테슬라 주식이 최근 한참 빠졌다.
작년까지만 해도 생산이 제대로 안 된다는게 계속 발목을 잡았는데 올해 들어와서는 주문량 감소와 financial 이슈가 폭락을 이끌고 있다.
주문량 감소는 2018년 4/4분기와 비교했을 때 2019년 1/4분기 주문량이 줄었다는 건데....
글쎄 내 생각엔 전기차에 대한 수요 욕구는 점점 더 증가할 것이라고 판단하고 있다. 그래서 이게 그렇게 주가 폭락의 근본 원인이 될 수 있나? 하는 의문이 든다.
오히려 주문은 느는데 테슬라가 밧데리 물량이 확보 안된다든지 해서 미처 생산을 제대로 못하고 있어서 주가에 악영향을 주고 있는 상황이 오면 더 이해할 수 있겠다.
그리고 financial 이슈는 자금 부족 문제는 있을 수 있지만 그렇다고 테슬라가 망하거나 하는 상황은 가지 않을 것이라고 생각한다.
그래서 이 악재도 이렇게 까지 주가가 폭락 할 충분한 이유는 아니라고 본다.
내가 생각하는 테슬라 혹은 전기차 시장의 악재는 미국의 세일가스 라고 본다.
미국이 사우디를 제치고 석유 생산 세계 1위를 하도록 만든게 세일가스이다.
미국은 앞으로 이 세일가스를 계속 팔아야 된다.
그러면 앞으로 상당기간 내연 기관 차량이 이를 소비하는 한 구성 요소로 존재하는게 더 좋다.
이 이유가 미국 정부가 전기차의 부흥을 도와주는 정책을 세우지 않도록 만들고 있다고 본다.
하지만 그렇더라도 전기차의 수요는 점차 늘어날 것이고 메이저 기업들의 전기차 생산 설비 확산은 점점 더 광범위하게 일어날 것이라고 본다.
메이저 차량 회사들이 기존 내연기관 관련 인력을 감축하고 있는 것도 그러한 이유에서 일 것이다.
하여간 길게 글을 쓸 필요는 없을 것 같고 내 생각에 지금 테슬라 주가의 폭락은 과하다고 본다.
악재라고 얘기하는 것들은 일시적인 사안들이라고 본다.
더군다나 그 악재로 이렇게까지 폭락할 정도도 아니고....
2분기 실적 발표를 기점으로 크고 긴 상승 국면으로 전환하지 않을까 예측해 본다. (솔직히 그렇게 기대해 본다)
이런 나의 기대에 조금 더 힘을 보태주는 기사가 있어서 번역해 봤다.
Tesla Stock in 2019 Looks a Lot Like Netflix Stock in 2011
By Eddie YoonJune 4, 2019 5:30 a.m. ET
Tesla stock continues to drop, and has now fallen to roughly half its peak of $385. This is bad, but it is nowhere as bad as Netflix ’s 80% stock decline in 2011. Netflix’s decline was followed by an eight-year stretch of growth. Will Tesla shareholders be similarly rewarded? The question is whether Netflix’s 2011 is a comparable proxy for Tesla’s 2019.
테슬라 주가는 계속 하락세를 보이고 있으며, 지금은 이전 최고치 인 $ 385의 절반 정도로 하락했다. 안 좋은 주가이다, 하지만 2011 년 Netflix의 주가가 80 % 폭락한 정도는 아니다. 이 Netflix의 폭락 이후 넷플릭스는 8년간의 지속적인 성장을 보인다. 테슬라 주주들도 마찬가지로 보상받을 것인가? 문제는 Netflix의 2011 년이 테슬라의 2019 년과 비슷한 상황인지 아닌지다.
Back in 2011, Netflix had announced a jarring price increase, and CEO Reed Hastings announced it was separating its streaming business from its DVD by mail business. In a single quarter, Netflix lost 800,000 subscribers—just over 3% of its subscribers, then sitting at 24 million.
2011 년으로 돌아가서, 당시 Netflix는 (약간 분위기에 안 맞게) 가격 인상을 발표했으며, CEO인 Reed Hastings는 스트리밍 사업을 우편을 통해 DVD 를 배달하는 사업과 분리한다고 발펴했다. 당시 1 분기만에 넷플릭스는 총 가입자 수의 3 %를 상회하는 80 만 명의 가입자를 잃어 총회원수가 2400 만명이 되었다.
At the core of those costly decisions was the company’s belief in their category. They believed that streaming was the future and had a significant upside. And Netflix was 100% right. Now they have 60 million households in the U.S. and 150 million worldwide. The stock price is 39 times higher than its low point in 2011.
당시 리스크가 많은 이 결정의 핵심은 회사의 카테고리에 대한 믿음이었습니다. 그들은 스트리밍이 미래라고 믿었고 실제로 그 결정이 상승의 기폭제가 되었다. Netflix의 예상과 결정이 100 % 들어 맞은 것이다. 넷플릭스는 현재 미국에 6000 만 가구, 전 세계에 1 억 5000 만 가구를 회원으로 두고 있다. 주가는 2011 년 저점보다 39 배 상승했다.
Similarly, Tesla is spot on in their belief that demand for electric vehicles will grow exponentially. In 2018, electric vehicles were 2% of total new cars sold in the U.S. but 20% of Americans want an electric vehicle (per a study by AAA). Electric vehicles already have roughly a 10% market share in California. Tesla accounts for more than 60% of the share of growth of electric cars. The idea that Tesla’s 30,000 dip in deliveries in Q1 2019 versus Q4 of 2018 highlights a fundamental demand problem with either electric vehicles (which could easily number in the millions in the near future) or Tesla itself (since their products are beloved by consumers) seems like a stretch.
이와 비슷하게, 테슬라는 전기 자동차에 대한 수요가 기하 급수적으로 늘어날 것이라는 믿음을 가지고 있다. 2018 년 전기 자동차는 미국에서 판매 된 총 신차의 2 %를 기록하고 있지만 미국인의 20 %는 전기 자동차를 원하는 것으로 알려져 있다. (AAA에 의한 연구 당). 전기 자동차는 이미 캘리포니아에서 약 10 %의 시장 점유율을 가지고 있습니다. 테슬라는 전기 자동차의 성장 점유율의 60 % 이상을 차지합니다. 2018년 4사분기와 비교했을 때 2019년 1사분기의 차량 판매량이 3만대 줄어든 것은 근본적인 수요 이슈를 부각 시켰습니다. 즉 가까운 미래에 수백만에 다다를 것으로 생각되는 전기차 사업 혹은 테슬라 그 자체이든 시장은 확대 될 것이라는 것입니다. (테슬라의 제품은 고객들로 부터 사랑을 받고 있습니다.)
Netflix also believed in their pricing power, especially if they continued to improve their product (e.g., better recommendations and more content, including original, award-winning content). Netflix was also correct about this, and has continued to raise prices successfully. Even though Netflix has surely lost some subscribers as they’ve raised prices, total revenue and profits have grown enough to offset those losses.
Netflix는 또한 pricing power를 믿었습니다. 특히 제품 개선을 지속하는 경우 (예 : 더 나은 추천 기능이나 좀 더 많은 - 오리지널 이거나 수상경력이 있는 - 콘텐츠 등) pricing power는 더욱 증가할 것이라고 믿었습니다. Netflix의 이 예측도 들어 맞았습니다. 그 결과 그들은 지속적으로 가격을 올리는데 성공했습니다. 가격 인상으로 일부 고객을 잃은 것은 사실이지만 그들은 가격을 인상함으로서 총 매출과 수익은 그 손실을 상쇄하기에 충분했습니다.
Tesla hasn’t increased its prices, but did see the $7,500 federal rebate for electric vehicles halved at the end of 2018—just at the same time their delivery volume dropped. Some analysts connected these two dots and see weakness in demand for Teslas. The more likely scenario is that this temporary price shock impacted quarterly sales by pulling some Q1 2019 sales earlier into Q4 2018 since the federal tax rebate phase-out was known for some time.
테슬라는 가격을 인상하지 않았지만 2018 년 말에 전기 자동차에 대한 7,500 달러의 연방 환급액이 절반으로 줄었습니다. 같은 기간 테슬라의 delivery 볼륨도 줄었습니다. 일부 분석가들은 이 둘을 근거로 Teslas에 대한 수요 약세로 보았습니다. 하지만 가장 그럴듯한 시나리오는 이러한 연방 세금 환급이 사라질 것이라고 알려져 그 이전인 2018년 1사분기의 수요를 증가시켰고 이는 2019년 1사분기 수요를 미리 끌어 당겼기 때문에 위와 같은 결과 - 2019년 1/4분기 매출이 3만대 감소- 가 나왔다는 겁니다.
The reality is that Tesla’s pricing power is strong. The best evidence of Tesla’s pricing power is that Tesla is attracting mainstream car owners as well as other luxury brand owners. Per CEO Elon Musk, the five most commonly traded in cars for a Tesla are Honda Accord, Honda Civic, Toyota Prius, Nissan Leaf, and BMW 3 series. It is no coincidence that from 2016 to 2018 Toyota Prius, Toyota Camry, Honda Accord, and Honda Civic all decreased a collective 15% in the US. This decline of nearly 190,000 cars is comparable to the over 180,000 Teslas sold in the US in 2018.
현실은 테슬라의 가격 결정권이 강하다는 것이다. 테슬라의 가격 결정력에 대한 가장 좋은 증거는 테슬라가 다른 럭셔리 브랜드 뿐만 아니라 주류 자동차 소비자를 끌어 들이고 있다는 것입니다. CEO 인 엘론 머스크 (Elon Musk)에 따르면 테슬라가 일반적으로 대체하는 5개의 차량은 혼다 어코드, 혼다 시빅, 토요타 프리우스, 닛산 리프, BMW 3 시리즈 등 입니다. 2016 년부터 2018 년까지 Toyota Prius, Toyota Camry, Honda Accord 및 Honda Civic의 판매량이 미국에서 15 % 감소했습니다. 차량 대수로는 약 19 만대의 감소한 것입니다. 이것은 2018 년에 미국에서 판매 된 180,000 대가 넘는 테슬라의 판매 대수와 비슷합니다.
Netflix and Tesla have also both struggled in some of the same ways, namely communication and execution.
Netflix와 Tesla는 communication and execution이라는 측면에서 비슷한 방식으로 어려움을 겪었습니다.
Even though Netflix was ultimately right to increase prices and focus on streaming, it was clumsy in how it communicated these changes to customers. The timing of some of these moves was also off: it could have allowed DVD by mail to slowly fade, and introduced its price hike when it launched House of Cards, its first major success in original content. These were unforced errors. Similarly, Tesla has had similar, self-inflicted struggles on communication and execution.
넷플 릭스가 궁극적으로 가격을 올리고 스트리밍에 집중하는 것이 옳았지 만 이러한 변화를 고객에게 어떻게 전달했는지는 서툴 렀다. 이러한 움직임의시기는 또한 벗어났습니다. 우편으로 DVD를 배달하는 서비스를 좀 더 천천히 사라지도록 할 수 있었고 원본 콘텐츠로 첫번째 메이저급 성공을 거둔 House of Cards의 상영이 시작됐을 때 가격 상승을 발표할 수도 있었다. 즉 발표 타이밍에서 서툴렀다는 것이다. 이것은 자체적인 오류라고 할 수 있다. 비슷하게, 테슬라는 communication and execution 에 있어 자초한 어려움을 비슷하게 겪고 있다.
The difference between the two firms is that since those earlier stumbles, Netflix’s execution has gotten smoother and their communication more empathetic. Netflix has continued to raise prices, using a good/better/best pricing strategy to give customers a feeling of control. Netflix has also recognized that it’s costly to try and be great at everything; this is why they’ve migrated to Amazon Web Services, even though Amazon Prime Video is a direct competitor. They’ve managed to focus on improving and expanding their content and geographies.
두 회사의 차이점은 넷플 릭스의 사태가 더 일찍 일어 났으므로 넷플 릭스의 execution이 좀 더 원활해졌고 communication은 좀 더 공감을 얻었다는 겁니다. Netflix는 고객에게 고객 자신이 가격을 컨트롤 하고 있다는 느낌을 주기 위해 good/better/best라는 가격 정책을 사용하면서 가격을 인상했습니다. Netflix는 또한 모든 것에서 최고가 되려고 하는 것이 너무 많은 비용을 초래한 다는 것을 깨달았습니다. 그렇기 때문에 Amazon Prime Video가 직접적인 경쟁자 임에도 불구하고 Amazon Web Services로 마이그레이션 한 이유입니다. 그들은 콘텐츠를 개선하고 서비스 지역을 확장하는데 초점을 맞춰서 사업을 진행했습니다.
Meanwhile, Tesla seems to be trying to do too many things at once, perhaps one reason they are struggling on deliveries. Musk continues to juggle roles across Tesla, Space X, and the Boring Company, and to occasionally issue SEC-incensing tweets.
그 사이에, Tesla는 한꺼번에 너무 많은 것을 시도하고있는 것처럼 보인다, 아마 납품에 어려움을 겪고 있는 것도 한 이유일 것이다. 머스크는 테슬라, 스페이스 X, the Boring Company에서 계속 자신의 역할을 수행하고 있다. 그리고 때때로 SEC를 건드리는 트윗도 하고 있다.
While Tesla is right about consumer demand and their pricing power, they should also remember that a successful company takes more than that. Being right isn’t always enough.
테슬라의 소비자 수요와 가격 결정력에 대해서는 옳다고 생각하지만 성공적인 기업은 그 이상을 필요로한다는 것을 기억해야합니다. 옳다는 것이 항상 충분한 것은 아닙니다.
Eddie Yoon is the founder of EddieWouldGrow, a think tank and advisory firm on growth strategy, and the author of the book Superconsumers and a monthly newsletter. Find him on Twitter and Instagram @eddiewouldgrow.
'IoT > AWS DeepRacer' 카테고리의 다른 글
| AWS DeepRacer League - New York을 다녀와서 (0) | 2019.07.24 |
|---|---|
| Using Jupyter Notebook for analysing DeepRacer's logs (0) | 2019.07.23 |
| AWS Deepracer Forum Q&A (1) | 2019.07.08 |
| AWS Deepracer Virtual Race 최초 참가 경험 정리 (0) | 2019.07.07 |
| MEGAZONE CLOUD AWS DeepRacer League in Korea (0) | 2019.06.25 |
| AWS DeepRacer League and 2nd Virtual Race open (1) | 2019.06.04 |
| AWS Deepracer - Oval and London loop track model 훈련 결과 (0) | 2019.06.03 |
| AWS Deepracer Model 훈련 및 평가 후 볼 수 있는 정보들 (0) | 2019.06.02 |
| AWS Deepracer 첫 모델 생성 및 결과 보기 (0) | 2019.06.02 |
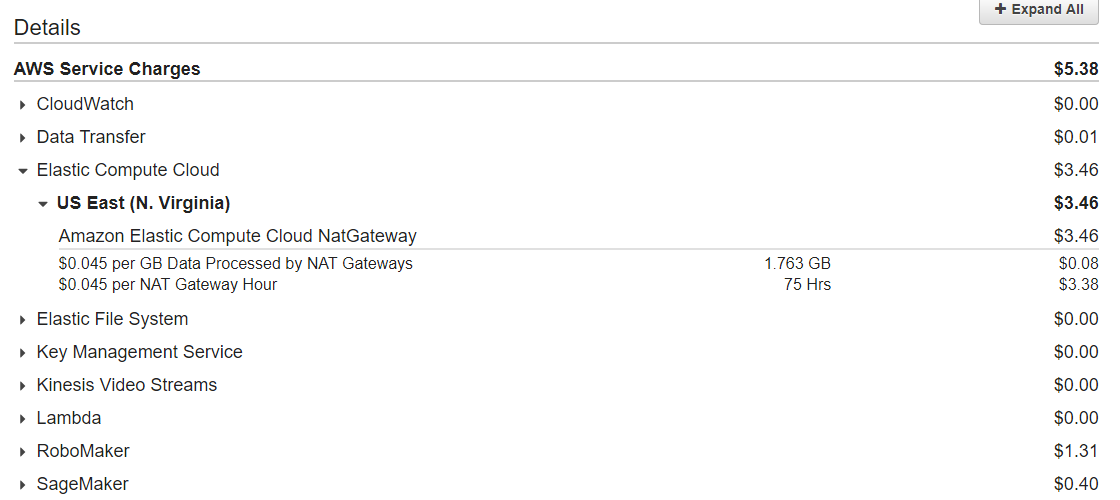
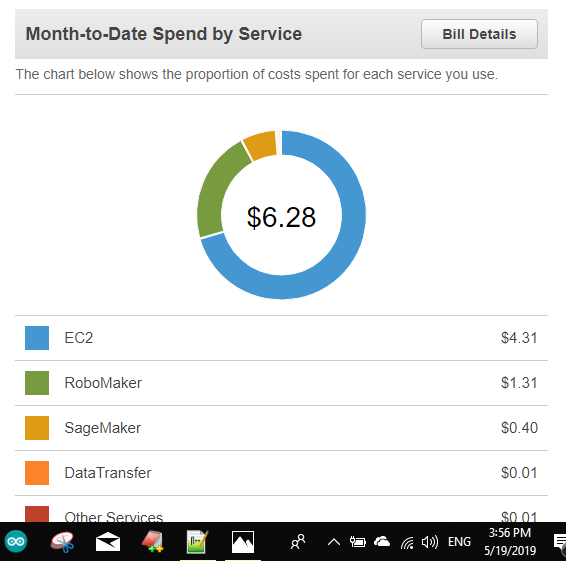
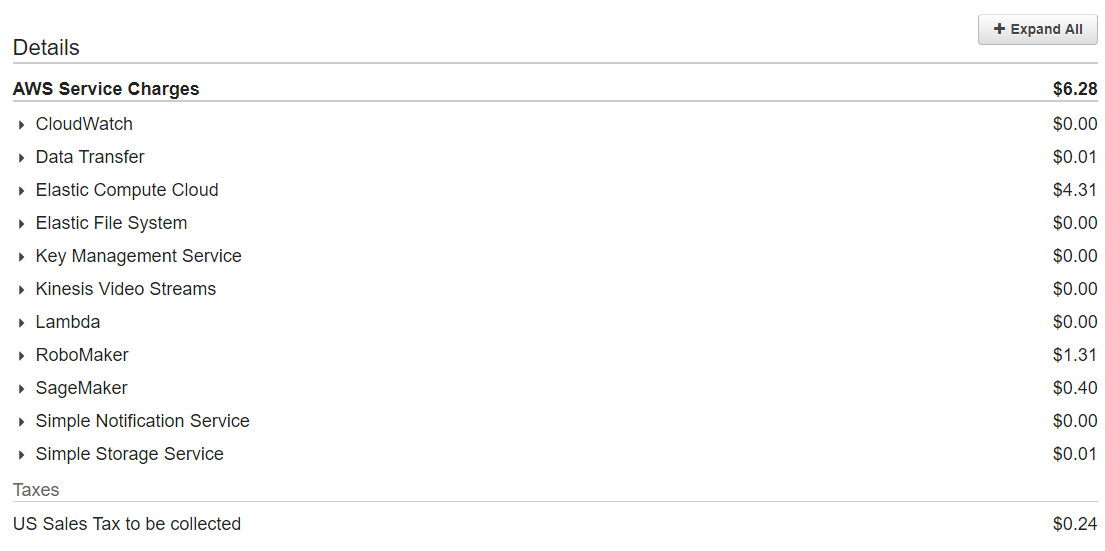
| AWS Deepracer를 시작하면 내야 하는 요금들... (0) | 2019.05.31 |