

오늘은 Openai Cookbook 에 있는 Fine Tuning 관련 글을 공부해 보겠습니다.
https://docs.google.com/document/d/1rqj7dkuvl7Byd5KQPUJRxc19BJt8wo0yHNwK84KfU3Q/edit
[PUBLIC] Best practices for fine-tuning GPT-3 to classify text
This document is a draft of a guide that will be added to the next revision of the OpenAI documentation. If you have any feedback, feel free to let us know. One note: this doc shares metrics for text-davinci-002, but that model is not yet available for fin
docs.google.com

This document is a draft of a guide that will be added to the next revision of the OpenAI documentation. If you have any feedback, feel free to let us know.
이 문서는 OpenAI 문서의 다음 개정판에 추가될 가이드의 초안입니다. 의견이 있으시면 언제든지 알려주십시오.
One note: this doc shares metrics for text-davinci-002, but that model is not yet available for fine-tuning.
참고: 이 문서는 text-davinci-002에 대한 메트릭을 공유하지만 해당 모델은 아직 미세 조정에 사용할 수 없습니다.
Best practices for fine-tuning GPT-3 to classify text
GPT-3’s understanding of language makes it excellent at text classification. Typically, the best way to classify text with GPT-3 is to fine-tune GPT-3 on training examples. Fine-tuned GPT-3 models can meet and exceed state-of-the-art records on text classification benchmarks.
GPT-3의 언어 이해력은 텍스트 분류에 탁월합니다. 일반적으로 GPT-3으로 텍스트를 분류하는 가장 좋은 방법은 training examples 로 GPT-3을 fine-tune하는 것입니다. Fine-tuned GPT-3 모델은 텍스트 분류 벤치마크에서 최신 기록을 충족하거나 능가할 수 있습니다.
This article shares best practices for fine-tuning GPT-3 to classify text.
이 문서에서는 GPT-3을 fine-tuning 하여 텍스트를 분류하는 모범 사례를 공유합니다.
Other resources:
Outline:
Best practices for fine-tuning GPT-3 to classify text
How to format your training data
How much training data do you need
How to evaluate your fine-tuned model
Example fine-tuning calls using the OpenAI CLI
Example metrics evolution over a training run, visualized with Weights & Biases
How to pick training hyperparameters
More detail on prompt_loss_weight
How to pick inference parameters
Common mistake #1: Insufficiently specified training data
Common mistake #2: Input data format that doesn’t match the training data format
How fine-tuning GPT-3 works
The OpenAI fine-tuning guide explains how to fine-tune your own custom version of GPT-3. You provide a list of training examples (each split into prompt and completion) and the model learns from those examples to predict the completion to a given prompt.
OpenAI fine-tuning guide는 사용자 지정 GPT-3 버전을 fine-tune하는 방법을 설명합니다. 교육 예제 목록(각각 prompt 와 completion로 분할)을 제공하면 모델이 해당 예제에서 학습하여 주어진 prompt에 대한 completion 를 예측합니다.
Example dataset:
| Prompt | Completion |
| “burger -->” | “ edible” |
| “paper towels -->” | “ inedible” |
| “vino -->” | “ edible” |
| “bananas -->” | “ edible” |
| “dog toy -->” | “ inedible” |
In JSONL format:
{"prompt": "burger -->", "completion": " edible"}
{"prompt": "paper towels -->", "completion": " inedible"}
{"prompt": "vino -->", "completion": " edible"}
{"prompt": "bananas -->", "completion": " edible"}
{"prompt": "dog toy -->", "completion": " inedible"}
During fine-tuning, the model reads the training examples and after each token of text, it predicts the next token. This predicted next token is compared with the actual next token, and the model’s internal weights are updated to make it more likely to predict correctly in the future. As training continues, the model learns to produce the patterns demonstrated in your training examples.
fine-tuning 중에 모델은 교육 예제를 읽고 텍스트의 각 토큰을 받아들여 그 다음 토큰이 무엇이 올 지 예측을 하게 됩니다. 이 예측된 다음 토큰은 실제 다음 토큰과 비교되고 모델의 내부 가중치가 업데이트되어 향후에 올바르게 예측할 가능성이 높아집니다. 학습이 계속됨에 따라 모델은 학습 예제에 표시된 패턴을 생성하는 방법을 배웁니다.
After your custom model is fine-tuned, you can call it via the API to classify new examples:
사용자 지정 모델이 fine-tuned된 후 API를 통해 호출하여 새 예제를 분류할 수 있습니다.
| Prompt | Completion |
| “toothpaste -->” | ??? |
Example API call to get the most likely token
가장 유사한 토큰을 얻는 API call 예제
api_response = openai.Completion.create(
    model="{fine-tuned model goes here, without brackets}",
    prompt="toothpaste -->",
    temperature=0,
    max_tokens=1
)
completion_text = api_response['choices'][0]['text']
if completion_text == ' edible':
    label = 'edible'
elif completion_text == ' in':
    label = 'inedible'
else:
    label = 'other'
As ‘ edible’ is 1 token and ‘ inedible’ is 3 tokens, in this example, we request just one completion token and count ‘ in’ as a match for ‘ inedible’.
'edible'은 토큰 1개이고 'inedible'은 토큰 3개이므로 이 예에서는 완료 토큰 하나만 요청하고 'inedible'에 대한 일치 항목으로 'in'을 계산합니다.
Example API call to get probabilities for the 5 most likely tokens
가장 유사한 토큰 5개에 대한 probabilities를 얻기 위한 API call 예제
api_response = openai.Completion.create(
    model="{fine-tuned model goes here, without brackets}",
    prompt="toothpaste -->",
    temperature=0,
    max_tokens=1,
    logprobs=5
)
dict_of_logprobs = api_response['choices'][0]['logprobs']['top_logprobs'][0].to_dict()
dict_of_probs = {k: 2.718**v for k, v in dict_of_logprobs.items()}
Training data
The most important determinant of success is training data.
Fine-tuning 성공의 가장 중요한 결정 요인은 학습 데이터입니다.
Your training data should be:
학습 데이터는 다음과 같아야 합니다.
- Large (ideally thousands or tens of thousands of examples)
- 대규모(이상적으로는 수천 또는 수만 개의 예)
- High-quality (consistently formatted and cleaned of incomplete or incorrect examples)
- 고품질(불완전하거나 잘못된 예를 일관되게 형식화하고 정리)
- Representative (training data should be similar to the data upon which you’ll use your model)
- 대표(학습 데이터는 모델을 사용할 데이터와 유사해야 함)
- Sufficiently specified (i.e., containing enough information in the input to generate what you want to see in the output)
- 충분히 특정화 되어야 함 (즉, 출력에서 보고 싶은 것을 생성하기 위해 입력에 충분한 정보 포함)
If you aren’t getting good results, the first place to look is your training data. Try following the tips below about data formatting, label selection, and quantity of training data needed. Also review our list of common mistakes.
좋은 결과를 얻지 못한 경우 가장 먼저 살펴봐야 할 곳은 훈련 데이터입니다. 데이터 형식, 레이블 선택 및 필요한 학습 데이터 양에 대한 아래 팁을 따르십시오. common mistakes 목록도 검토하십시오.
How to format your training data
Prompts for a fine-tuned model do not typically need instructions or examples, as the model can learn the task from the training examples. Including instructions shouldn’t hurt performance, but the extra text tokens will add cost to each API call.
모델이 교육 예제에서 작업을 학습할 수 있으므로 fine-tuned 모델에 대한 프롬프트에는 일반적으로 지침(instruction)이나 예제가 필요하지 않습니다. 지침(instruction)을 포함해도 성능이 저하되지는 않지만 추가 텍스트 토큰으로 인해 각 API 호출에 비용이 추가됩니다.
| Prompt | Tokens | Recommended |
| “burger -->" | 3 | ✅ |
| “Label the following item as either edible or inedible. Item: burger Label:” |
20 | ❌ |
| “Item: cake Category: edible Item: pan Category: inedible Item: burger Category:” |
26 | ❌ |
Instructions can still be useful when fine-tuning a single model to do multiple tasks. For example, if you train a model to classify multiple features from the same text string (e.g., whether an item is edible or whether it’s handheld), you’ll need some type of instruction to tell the model which feature you want labeled.
지침(instruction)은 여러 작업을 수행하기 위해 단일 모델을 fine-tuning할 때 여전히 유용할 수 있습니다. 예를 들어, 동일한 텍스트 문자열에서 여러 기능을 분류하도록 모델을 훈련하는 경우(예: 항목이 먹을 수 있는지 또는 휴대 가능한지 여부) 라벨을 지정하려는 기능을 모델에 알려주는 일종의 지침이 필요합니다.
Example training data:
| Prompt | Completion |
| “burger --> edible:” | “ yes” |
| “burger --> handheld:” | “ yes” |
| “car --> edible:” | “ no” |
| “car --> handheld:” | “ no” |
Example prompt for unseen example:
| Prompt | Completion |
| “cheese --> edible:” | ??? |
Note that for most models, the prompt + completion for each example must be less than 2048 tokens (roughly two pages of text). For text-davinci-002, the limit is 4000 tokens (roughly four pages of text).
대부분의 모델에서 각 예제에 대한 prompt + completion은 2048 토큰(약 2페이지의 텍스트) 미만이어야 합니다. text-davinci-002의 경우 한도는 4000개 토큰(약 4페이지의 텍스트)입니다.
Separator sequences
For classification, end your text prompts with a text sequence to tell the model that the input text is done and the classification should begin. Without such a signal, the model may append additional invented text before appending a class label, resulting in outputs like:
분류를 위해 입력 텍스트가 완료되고 분류가 시작되어야 함을 모델에 알리는 텍스트 시퀀스로 텍스트 프롬프트를 종료합니다. 이러한 신호가 없으면 모델은 클래스 레이블을 appending 하기 전에 추가 invented text 를 append 하여 다음과 같은 결과를 얻을 수 있습니다.
- burger edible (accurate)
- burger and fries edible (not quite was asked for)
- burger-patterned novelty tie inedible (inaccurate)
- burger burger burger burger (no label generated)
Examples of separator sequences
| Prompt | Recommended |
| “burger” | ❌ |
| “burger -->” | ✅ |
| “burger ### “ |
✅ |
| “burger >>>” | ✅ |
| “burger Label:” |
✅ |
Be sure that the sequence you choose is very unlikely to otherwise appear in your text (e.g., avoid ‘###’ or ‘->’ when classifying Python code). Otherwise, your choice of sequence usually doesn’t matter much.
선택한 sequence 가 텍스트에 다른 방법으로 사용되는 부호인지 확인하세요. (예: Python 코드를 분류할 때 '###' 또는 '->'를 피하십시오). 그러한 경우가 아니라면 시퀀스 선택은 일반적으로 그다지 중요하지 않습니다.
How to pick labels
One common question is what to use as class labels.
일반적인 질문 중 하나는 클래스 레이블로 무엇을 사용할 것인가입니다.
In general, fine-tuning can work with any label, whether the label has semantic meaning (e.g., “ edible”) or not (e.g., “1”). That said, in cases with little training data per label, it’s possible that semantic labels work better, so that the model can leverage its knowledge of the label’s meaning.
일반적으로 fine-tuning은 레이블에 semantic 의미(예: "식용")가 있든 없든(예: "1") 모든 레이블에서 작동할 수 있습니다. 즉, 레이블당 학습 데이터가 적은 경우 시맨틱 레이블이 더 잘 작동하여 모델이 레이블의 의미에 대한 지식을 활용할 수 있습니다.
When convenient, we recommend single-token labels. You can check the number of tokens in a string with the OpenAI tokenizer. Single-token labels have a few advantages:
가능하면 단일 토큰 레이블을 사용하는 것이 좋습니다. OpenAI 토크나이저를 사용하여 문자열의 토큰 수를 확인할 수 있습니다. 단일 토큰 레이블에는 다음과 같은 몇 가지 장점이 있습니다.
- Lowest cost . 적은 비용
- Easier to get their probabilities, which are useful for metrics confidence scores, precision, recall
- 메트릭 신뢰도 점수, 정밀도, recall에 유용한 확률을 쉽게 얻을 수 있습니다.
- No hassle from specifying stop sequences or post-processing completions in order to compare labels of different length
- 다른 길이의 레이블을 비교하기 위해 중지 시퀀스 또는 후처리 완료를 지정하는 번거로움이 없습니다.
Example labels
| Prompt | Label | Recommended |
| “burger -->” | “ edible” | ✅ |
| “burger -->” | “ 1” | ✅ |
| “burger -->” | “ yes” | ✅ |
| “burger -->” | “ A burger can be eaten” | ❌ (but still works) |
One useful fact: all numbers <500 are single tokens. 500 이하는 single token입니다.
If you do use multi-token labels, we recommend that each label begin with a different token. If multiple labels begin with the same token, an unsure model might end up biased toward those labels due to greedy sampling.
multi-token label을 사용하는 경우 각 레이블이 서로 다른 토큰으로 시작하는 것이 좋습니다. 여러 레이블이 동일한 토큰으로 시작하는 경우 greedy 샘플링으로 인해 불확실한 모델이 해당 레이블로 편향될 수 있습니다.
How much training data do you need
How much data you need depends on the task and desired performance.
필요한 데이터의 양은 작업과 원하는 성능에 따라 다릅니다.
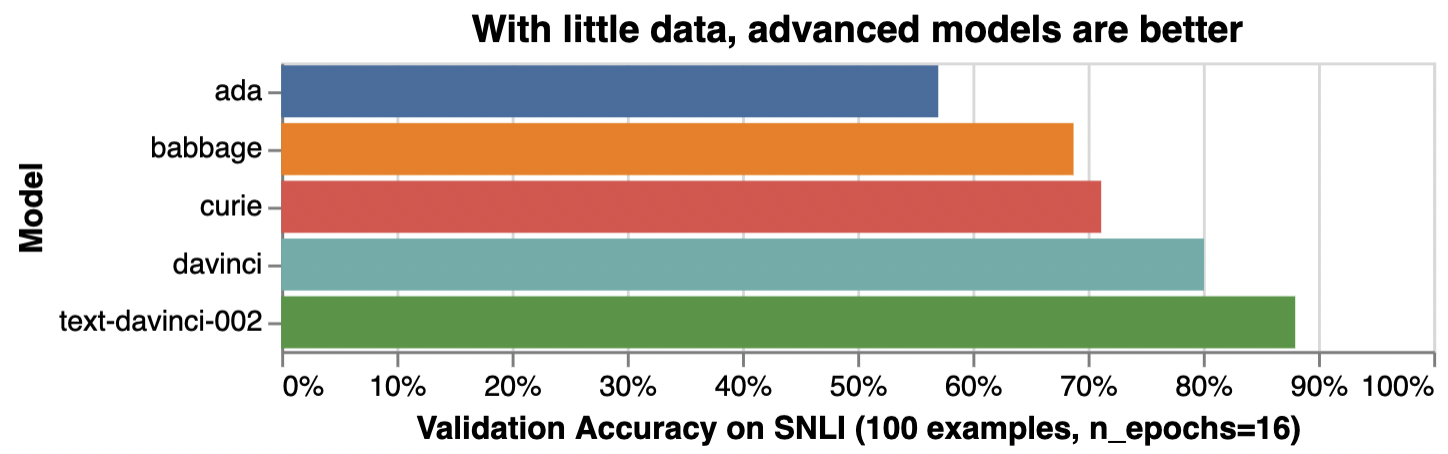
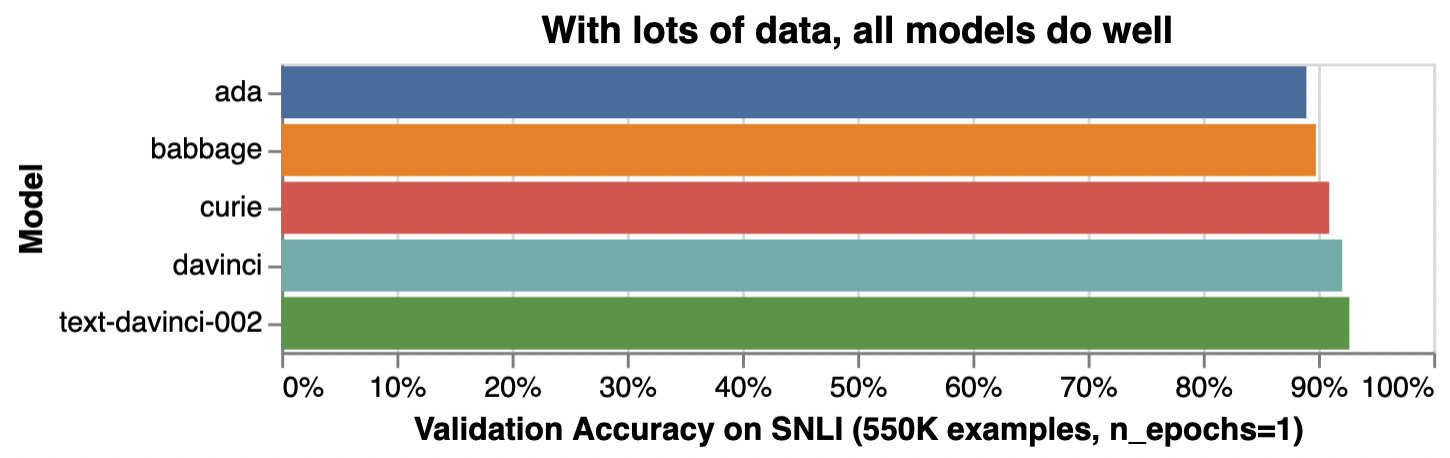
Below is an illustrative example of how adding training examples improves classification accuracy.
아래는 학습 예제를 추가하여 분류 정확도를 향상시키는 방법을 보여주는 예시입니다.

Illustrative examples of text classification performance on the Stanford Natural Language Inference (SNLI) Corpus, in which ordered pairs of sentences are classified by their logical relationship: either contradicted, entailed (implied), or neutral. Default fine-tuning parameters were used when not otherwise specified.
SNLI(Stanford Natural Language Inference) 코퍼스의 텍스트 분류 성능에 대한 예시로, 정렬된 문장 쌍이 논리적 관계(모순됨, 함축됨(암시됨) 또는 중립)에 따라 분류됩니다. 달리 지정되지 않은 경우 기본 fine-tuning 매개변수가 사용되었습니다.
Very roughly, we typically see that a few thousand examples are needed to get good performance:
아주 대략적으로 말해서 좋은 성능을 얻으려면 일반적으로 수천 개의 예제가 필요하다는 것을 알 수 있습니다.
| Examples per label | Performance (rough estimate) |
| Hundreds | Decent |
| Thousands | Good |
| Tens of thousands or more | Great |
To assess the value of getting more data, you can train models on subsets of your current dataset—e.g., 25%, 50%, 100%—and then see how performance scales with dataset size. If you plot accuracy versus number of training examples, the slope at 100% will indicate the improvement you can expect from getting more data. (Note that you cannot infer the value of additional data from the evolution of accuracy during a single training run, as a model half-trained on twice the data is not equivalent to a fully trained model.)
더 많은 데이터를 얻는 가치를 평가하기 위해 현재 데이터 세트의 하위 집합(예: 25%, 50%, 100%)에서 모델을 교육한 다음 데이터 세트 크기에 따라 성능이 어떻게 확장되는지 확인할 수 있습니다. 정확도 대 교육 예제 수를 플로팅하는 경우 100%의 기울기는 더 많은 데이터를 얻을 때 기대할 수 있는 개선을 나타냅니다. (두 배의 데이터로 절반만 훈련된 모델은 완전히 훈련된 모델과 동일하지 않기 때문에 단일 훈련 실행 동안 정확도의 진화에서 추가 데이터의 가치를 추론할 수 없습니다.)
How to evaluate your fine-tuned model
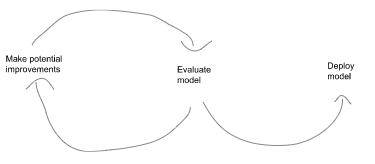
Evaluating your fine-tuned model is crucial to (a) improve your model and (b) tell when it’s good enough to be deployed.
fine-tuned 모델을 평가하는 것은 (a) 모델을 개선하고 (b) 언제 배포하기에 충분한 지를 알려주는 데 중요합니다.
Many metrics can be used to characterize the performance of a classifier
많은 메트릭을 사용하여 분류기의 성능을 특성화할 수 있습니다.
- Accuracy
- F1
- Precision / Positive Predicted Value / False Discovery Rate
- Recall / Sensitivity
- Specificity
- AUC / AUROC (area under the receiver operator characteristic curve)
- AUPRC (area under the precision recall curve)
- Cross entropy
Which metric to use depends on your specific application and how you weigh different types of mistakes. For example, if detecting something rare but consequential, where a false negative is costlier than a false positive, you might care about recall more than accuracy.
사용할 메트릭은 특정 응용 프로그램과 다양한 유형의 실수에 가중치를 두는 방법에 따라 다릅니다. 예를 들어 거짓 음성이 거짓 긍정보다 비용이 많이 드는 드물지만 결과적인 것을 감지하는 경우 정확도보다 리콜에 더 관심을 가질 수 있습니다.
The OpenAI API offers the option to calculate some of these classification metrics. If enabled, these metrics will be periodically calculated during fine-tuning as well as for your final model. You will see them as additional columns in your results file
OpenAI API는 이러한 분류 메트릭 중 일부를 계산하는 옵션을 제공합니다. 활성화된 경우 이러한 지표는 최종 모델뿐만 아니라 미세 조정 중에 주기적으로 계산됩니다. 결과 파일에 추가 열로 표시됩니다.
To enable classification metrics, you’ll need to:
분류 지표를 활성화하려면 다음을 수행해야 합니다.:
- use single-token class labels
- 단일 토큰 클래스 레이블 사용
- provide a validation file (same format as the training file)
- 유효성 검사 파일 제공(교육 파일과 동일한 형식)
- set the flag --compute_classification_metrics
- compute_classification_metrics 플래그 설정
- for multiclass classification: set the argument --classification_n_classes
- 다중 클래스 분류: --classification_n_classes 인수 설정
- for binary classification: set the argument --classification_positive_class
- 이진 분류: --classification_positive_class 인수 설정
Example fine-tuning calls using the OpenAI CLI
# For multiclass classification
openai api fine_tunes.create \
  -t <TRAIN_FILE_ID_OR_PATH> \
  -v <VALIDATION_FILE_OR_PATH> \
  -m <MODEL> \
  --compute_classification_metrics \
  --classification_n_classes <NUMBER_OF_CLASSES>
# For binary classification
openai api fine_tunes.create \
-t <TRAIN_FILE_ID_OR_PATH> \
-v <VALIDATION_FILE_OR_PATH> \
-m <MODEL> \
--compute_classification_metrics \
--classification_n_classes 2 \
--classification_positive_class <POSITIVE_CLASS_FROM_DATASET>
The following metrics will be displayed in your results file if you set --compute_classification_metrics:For multiclass classification
compute_classification_metrics 를 설정하면 결과 파일에 다음 지표가 표시됩니다.
- classification/accuracy: accuracy
- classification/weighted_f1_score: weighted F-1 score
For binary classification
The following metrics are based on a classification threshold of 0.5 (i.e. when the probability is > 0.5, an example is classified as belonging to the positive class.)
다음 메트릭은 0.5의 분류 임계값을 기반으로 합니다(즉, 확률이 > 0.5인 경우 예는 포지티브 클래스에 속하는 것으로 분류됨).
- classification/accuracy
- classification/precision
- classification/recall
- classification/f{beta}
- classification/auroc - AUROC
- classification/auprc - AUPRC
Note that these evaluations assume that you are using text labels for classes that tokenize down to a single token, as described above. If these conditions do not hold, the numbers you get will likely be wrong.
이러한 평가에서는 위에서 설명한 대로 단일 토큰으로 토큰화하는 클래스에 대해 텍스트 레이블을 사용하고 있다고 가정합니다. 이러한 조건이 충족되지 않으면 얻은 숫자가 잘못되었을 수 있습니다.
Example outputs
Example metrics evolution over a training run, visualized with Weights & Biases
Weights & Biases로 시각화된 교육 실행에 대한 메트릭 진화의 예

How to pick the right model
OpenAI offers fine-tuning for 5 models: OpenAI는 fine-tuning에 다음 5가지 모델을 사용할 것을 권장합니다.
- ada (cheapest and fastest)
- babbage
- curie
- davinci
- text-davinci-002 (highest quality)
Which model to use will depend on your use case and how you value quality versus price and speed.
사용할 모델은 사용 사례와 품질 대 가격 및 속도의 가치를 어떻게 평가하는지에 따라 달라집니다.
Generally, we see text classification use cases falling into two categories: simple and complex.
일반적으로 텍스트 분류 사용 사례는 단순과 복합의 두 가지 범주로 나뉩니다.
For tasks that are simple or straightforward, such as classifying sentiment, larger models offer diminishing benefit, as illustrated below:
감정 분류와 같이 간단하거나 직접적인 작업의 경우 더 큰 모델은 아래 그림과 같이 이점이 적습니다.
| Model | Illustrative accuracy* | Training cost** | Inference cost** |
| ada | 89% | $0.0004 / 1K tokens (~3,000 pages per dollar) | $0.0016 / 1K tokens (~800 pages per dollar) |
| babbage | 90% | $0.0006 / 1K tokens (~2,000 pages per dollar) | $0.0024 / 1K tokens (~500 pages per dollar) |
| curie | 91% | $0.003 / 1K tokens (~400 pages per dollar) | $0.012 / 1K tokens (~100 pages per dollar) |
| davinci | 92% | $0.03 / 1K tokens (~40 pages per dollar) | $0.12 / 1K tokens (~10 pages per dollar) |
| text-davinci-002 | 93% | unreleased | unreleased |
*Illustrative accuracy on the SNLI dataset, in which sentence pairs are classified as contradictions, implications, or neutral
*문장 쌍이 모순, 암시 또는 중립으로 분류되는 SNLI 데이터 세트에 대한 설명 정확도
**Pages per dollar figures assume ~800 tokens per page. OpenAI Pricing.
Illustrative examples of text classification performance on the Stanford Natural Language Inference (SNLI) Corpus, in which ordered pairs of sentences are classified by their logical relationship: either contradicted, entailed (implied), or neutral. Default fine-tuning parameters were used when not otherwise specified.
SNLI(Stanford Natural Language Inference) 코퍼스의 텍스트 분류 성능에 대한 예시로, 정렬된 문장 쌍이 논리적 관계(모순됨, 함축됨(암시됨) 또는 중립)에 따라 분류됩니다. 달리 지정되지 않은 경우 기본 미세 조정 매개변수가 사용되었습니다.
For complex tasks, requiring subtle interpretation or reasoning or prior knowledge or coding ability, the performance gaps between models can be larger, and better models like curie or text-davinci-002 could be the best fit.
미묘한 해석이나 추론 또는 사전 지식이나 코딩 능력이 필요한 복잡한 작업의 경우 모델 간의 성능 차이가 더 클 수 있으며 curie 또는 text-davinci-002와 같은 더 나은 모델이 가장 적합할 수 있습니다.
A single project might end up trying all models. One illustrative development path might look like this:
단일 프로젝트에서 모든 모델을 시도하게 될 수 있습니다. 예시적인 개발 경로는 다음과 같습니다.
- Test code using the cheapest & fastest model (ada)
- 가장 저렴하고 빠른 모델(ada)을 사용하여 테스트 코드
- Run a few early experiments to check whether your dataset works as expected with a middling model (curie)
- 중간 모델(curie)에서 데이터 세트가 예상대로 작동하는지 확인하기 위해 몇 가지 초기 실험을 실행합니다.
- Run a few more experiments with the best model to see how far you can push performance (text-davinci-002)
- 최상의 모델로 몇 가지 실험을 더 실행하여 성능을 얼마나 높일 수 있는지 확인하십시오(text-davinci-002).
- Once you have good results, do a training run with all models to map out the price-performance frontier and select the model that makes the most sense for your use case (ada, babbage, curie, davinci, text-davinci-002)
- 좋은 결과를 얻으면 모든 모델로 교육 실행을 수행하여 가격 대비 성능 한계를 파악하고 사용 사례에 가장 적합한 모델(ada, babbage, curie, davinci, text-davinci-002)을 선택합니다.
Another possible development path that uses multiple models could be:
여러 모델을 사용하는 또 다른 가능한 개발 경로는 다음과 같습니다.
- Starting with a small dataset, train the best possible model (text-davinci-002)
- 작은 데이터 세트로 시작하여 가능한 최상의 모델 훈련(text-davinci-002)
- Use this fine-tuned model to generate many more labels and expand your dataset by multiples
- 이 미세 조정된 모델을 사용하여 더 많은 레이블을 생성하고 데이터 세트를 배수로 확장하십시오.
- Use this new dataset to train a cheaper model (ada)
- 이 새로운 데이터 세트를 사용하여 더 저렴한 모델(ada) 훈련
How to pick training hyperparameters
Fine-tuning can be adjusted with various parameters. Typically, the default parameters work well and adjustments only result in small performance changes.
미세 조정은 다양한 매개변수로 조정할 수 있습니다. 일반적으로 기본 매개변수는 잘 작동하며 조정해도 성능이 약간만 변경됩니다.
| Parameter | Default | Recommendation |
| n_epochs controls how many times each example is trained on 각 예제가 훈련되는 횟수를 제어합니다. |
4 | For classification, we’ve seen good performance with numbers like 4 or 10. Small datasets may need more epochs and large datasets may need fewer epochs. 분류의 경우 4 또는 10과 같은 숫자로 좋은 성능을 보였습니다. 작은 데이터 세트에는 더 많은 에포크가 필요할 수 있고 큰 데이터 세트에는 더 적은 에포크가 필요할 수 있습니다. If you see low training accuracy, try increasing n_epochs. If you see high training accuracy but low validation accuracy (overfitting), try lowering n_epochs. 훈련 정확도가 낮은 경우 n_epochs를 늘려 보십시오. 훈련 정확도는 높지만 검증 정확도(과적합)가 낮은 경우 n_epochs를 낮추십시오. You can get training and validation accuracies by setting compute_classification_metrics to True and passing a validation file with labeled examples not in the training data. You can see graphs of these metrics evolving during fine-tuning with a Weights & Biases account. compute_classification_metrics를 True로 설정하고 교육 데이터에 없는 레이블이 지정된 예제가 있는 유효성 검사 파일을 전달하여 교육 및 유효성 검사 정확도를 얻을 수 있습니다. Weights & Biases 계정을 사용하여 미세 조정하는 동안 진화하는 이러한 지표의 그래프를 볼 수 있습니다. |
| batch_size controls the number of training examples used in a single training pass 단일 교육 패스에 사용되는 교육 예제의 수를 제어합니다. |
null (which dynamically adjusts to 0.2% of training set, capped at 256) (트레이닝 세트의 0.2%로 동적으로 조정되며 256으로 제한됨) |
We’ve seen good performance in the range of 0.01% to 2%, but worse performance at 5%+. In general, larger batch sizes tend to work better for larger datasets. 우리는 0.01%에서 2% 범위에서 좋은 성능을 보았지만 5% 이상에서는 더 나쁜 성능을 보였습니다. 일반적으로 더 큰 배치 크기는 더 큰 데이터 세트에서 더 잘 작동하는 경향이 있습니다. |
| learning_rate_multiplier controls rate at which the model weights are updated 모델 가중치가 업데이트되는 속도를 제어합니다. |
null (which dynamically adjusts to 0.05, 0.1, or 0.2 depending on batch size) (배치 크기에 따라 0.05, 0.1 또는 0.2로 동적으로 조정됨) |
We’ve seen good performance in the range of 0.02 to 0.5. Larger learning rates tend to perform better with larger batch sizes. 0.02~0.5 범위에서 좋은 성능을 보였습니다. 더 큰 학습 속도는 더 큰 배치 크기에서 더 잘 수행되는 경향이 있습니다. |
| prompt_loss_weight controls how much the model learns from prompt tokens vs completion tokens 모델이 프롬프트 토큰과 완료 토큰에서 학습하는 양을 제어합니다. |
0.1 | If prompts are very long relative to completions, it may make sense to reduce this weight to avoid over-prioritizing learning the prompt. In our tests, reducing this to 0 is sometimes slightly worse or sometimes about the same, depending on the dataset. 프롬프트가 완료에 비해 매우 긴 경우 프롬프트 학습에 과도한 우선순위를 두지 않도록 이 가중치를 줄이는 것이 좋습니다. 테스트에서 데이터 세트에 따라 이를 0으로 줄이는 것이 때때로 약간 더 나쁘거나 거의 동일합니다. |
More detail on prompt_loss_weight
When a model is fine-tuned, it learns to produce text it sees in both the prompt and the completion. In fact, from the point of view of the model being fine-tuned, the distinction between prompt and completion is mostly arbitrary. The only difference between prompt text and completion text is that the model learns less from each prompt token than it does from each completion token. This ratio is controlled by the prompt_loss_weight, which by default is 10%.
모델이 미세 조정되면 prompt and the completion 모두에 표시되는 텍스트를 생성하는 방법을 학습합니다. 실제로 미세 조정되는 모델의 관점에서 신속함과 완료의 구분은 대부분 임의적입니다. 프롬프트 텍스트와 완료 텍스트의 유일한 차이점은 모델이 각 완료 토큰에서 학습하는 것보다 각 프롬프트 토큰에서 학습하는 내용이 적다는 것입니다. 이 비율은 prompt_loss_weight에 의해 제어되며 기본적으로 10%입니다.
A prompt_loss_weight of 100% means that the model learns from prompt and completion tokens equally. In this scenario, you would get identical results with all training text in the prompt, all training text in the completion, or any split between them. For classification, we recommend against 100%.
100%의 prompt_loss_weight는 모델이 프롬프트 및 완료 토큰에서 동일하게 학습함을 의미합니다. 이 시나리오에서는 프롬프트의 모든 학습 텍스트, 완성의 모든 학습 텍스트 또는 이들 간의 분할에 대해 동일한 결과를 얻습니다. 분류의 경우 100% 대비를 권장합니다.
A prompt loss weight of 0% means that the model’s learning is focused entirely on the completion tokens. Note that even in this case, prompts are still necessary because they set the context for each completion. Sometimes we’ve seen a weight of 0% reduce classification performance slightly or make results slightly more sensitive to learning rate; one hypothesis is that a small amount of prompt learning helps preserve or enhance the model’s ability to understand inputs.
0%의 즉각적인 손실 가중치는 모델의 학습이 완료 토큰에 전적으로 집중되어 있음을 의미합니다. 이 경우에도 프롬프트는 각 완료에 대한 컨텍스트를 설정하기 때문에 여전히 필요합니다. 때때로 우리는 0%의 가중치가 분류 성능을 약간 감소시키거나 결과가 학습률에 약간 더 민감해지는 것을 보았습니다. 한 가지 가설은 소량의 즉각적인 학습이 입력을 이해하는 모델의 능력을 유지하거나 향상시키는 데 도움이 된다는 것입니다.
Example hyperparameter sweeps
n_epochs
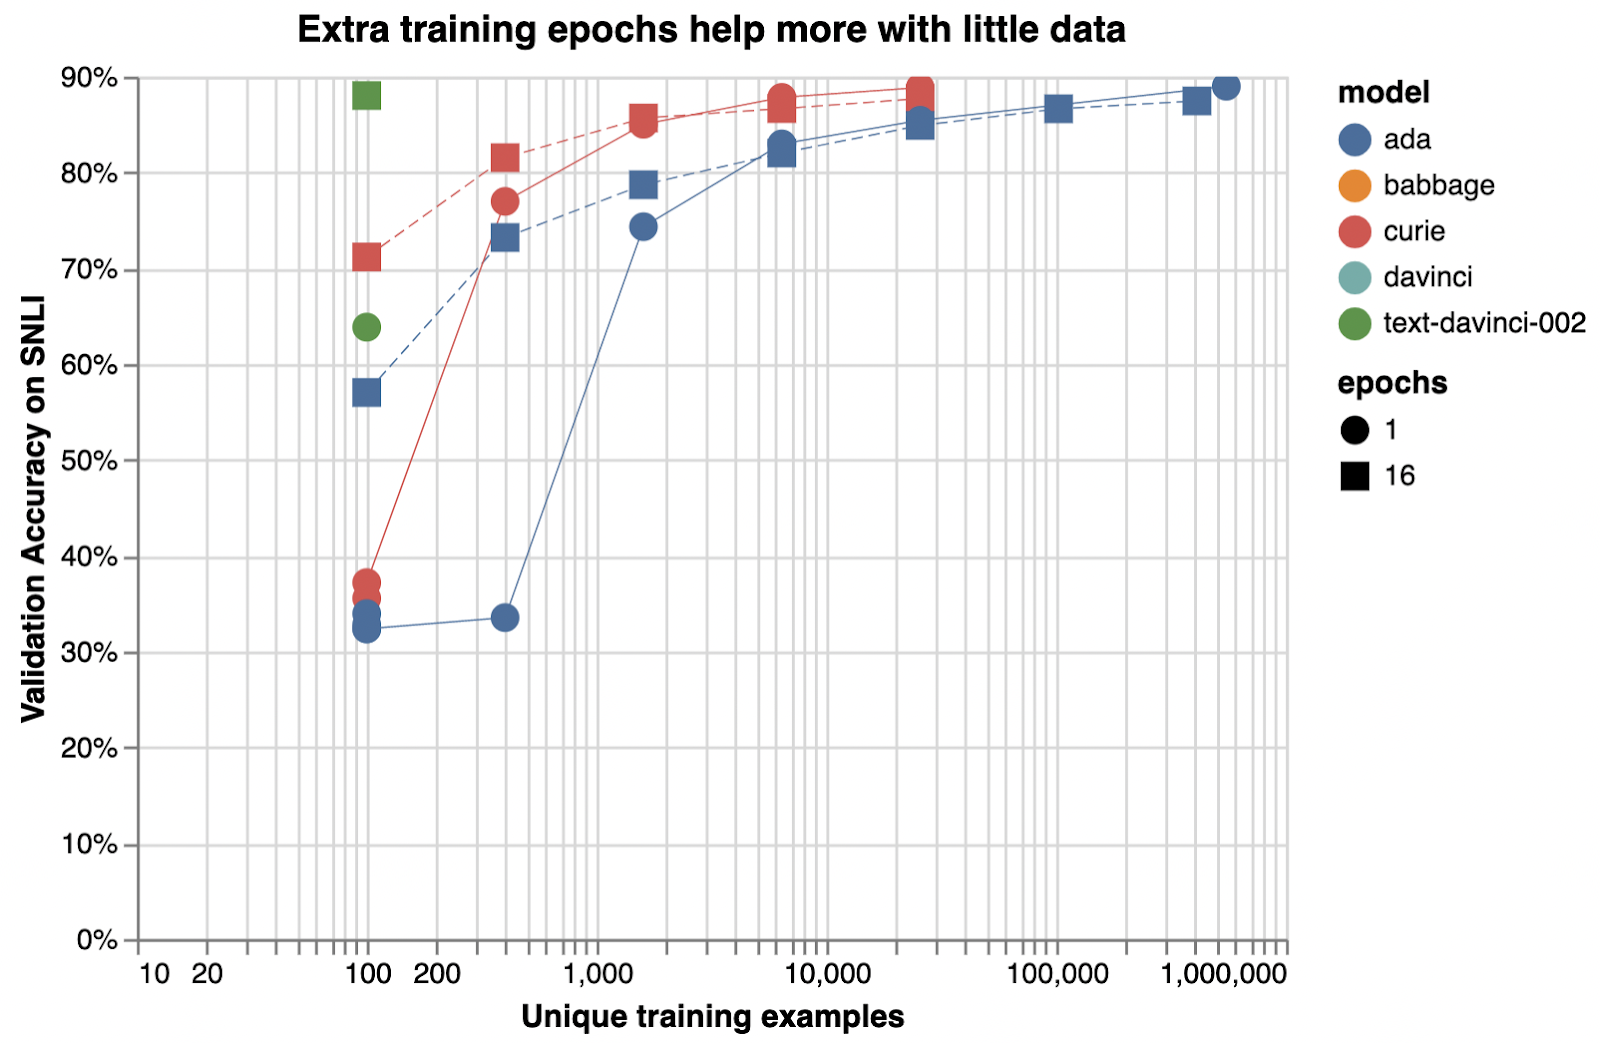
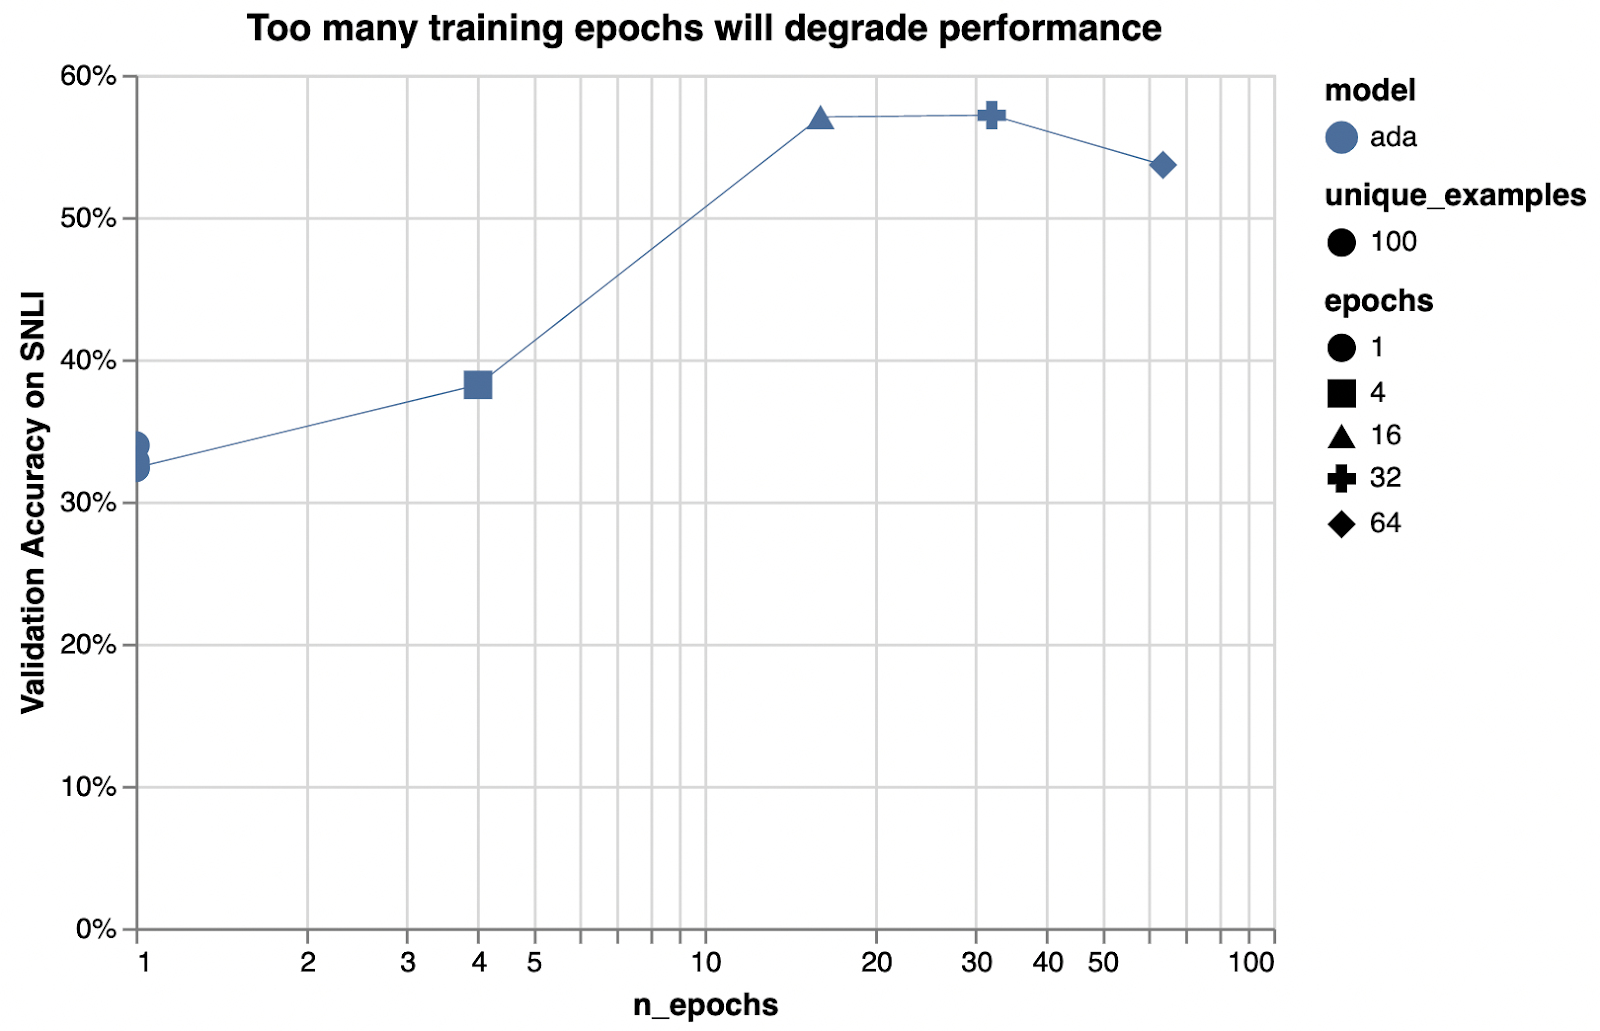
The impact of additional epochs is particularly high here, because only 100 training examples were used.
100개의 학습 예제만 사용되었기 때문에 추가 에포크의 영향이 여기에서 특히 높습니다.
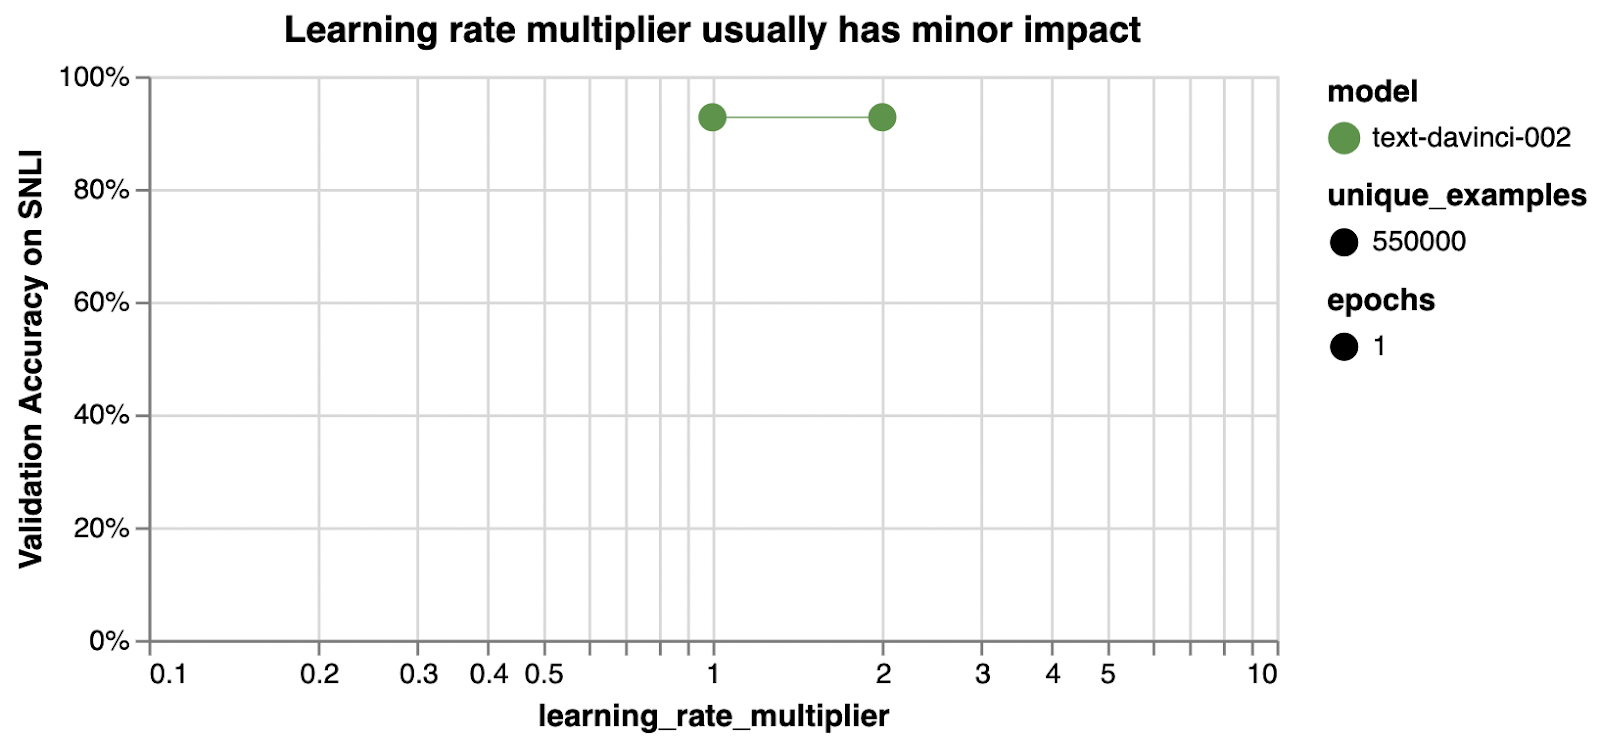
learning_rate_multiplier
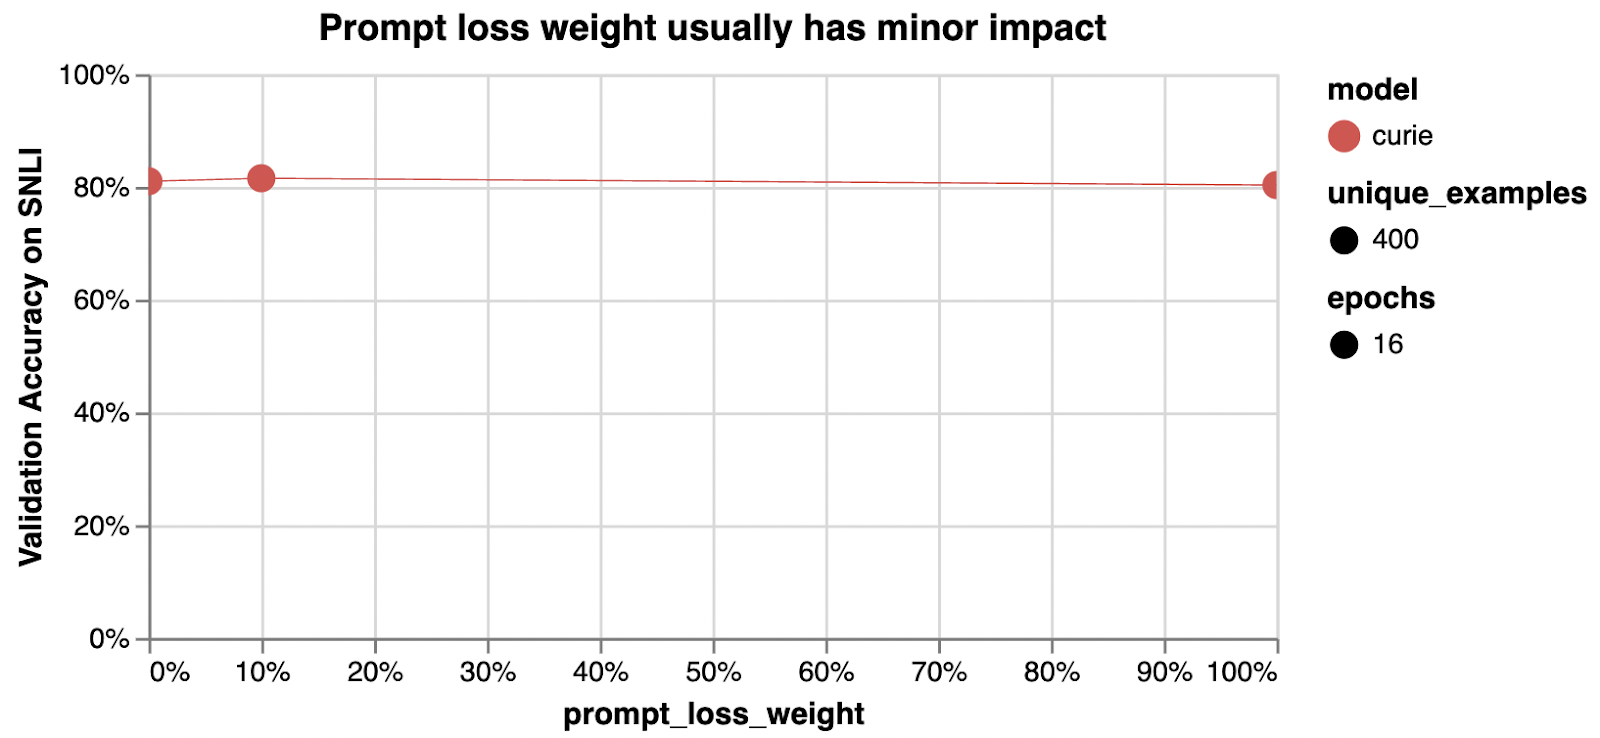
prompt_loss_weight
How to pick inference parameters
| Parameter | Recommendation |
| model | (discussed above) [add link] |
| temperature | Set temperature=0 for classification. Positive values add randomness to completions, which can be good for creative tasks but is bad for a short deterministic task like classification. 분류를 위해 온도=0으로 설정합니다. 양수 값은 완성에 임의성을 추가하므로 창의적인 작업에는 좋을 수 있지만 분류와 같은 짧은 결정론적 작업에는 좋지 않습니다. |
| max_tokens | If using single-token labels (or labels with unique first tokens), set max_tokens=1. If using longer labels, set to the length of your longest label. 단일 토큰 레이블(또는 고유한 첫 번째 토큰이 있는 레이블)을 사용하는 경우 max_tokens=1로 설정합니다. 더 긴 레이블을 사용하는 경우 가장 긴 레이블의 길이로 설정하십시오. |
| stop | If using labels of different length, you can optionally append a stop sequence like ‘ END’ to your training completions. Then, pass stop=‘ END’ in your inference call to prevent the model from generating excess text after appending short labels. (Otherwise, you can get completions like “burger -->” “ edible edible edible edible edible edible” as the model continues to generate output after the label is appended.) An alternative solution is to post-process the completions and look for prefixes that match any labels. 길이가 다른 레이블을 사용하는 경우 선택적으로 학습 완료에 ' END'와 같은 중지 시퀀스를 추가할 수 있습니다. 그런 다음 짧은 레이블을 추가한 후 모델이 과도한 텍스트를 생성하지 않도록 추론 호출에서 stop=' END'를 전달합니다. (그렇지 않으면 레이블이 추가된 후에도 모델이 계속 출력을 생성하므로 "burger -->" " edible edible edible edible edible"와 같은 완성을 얻을 수 있습니다.) 대체 솔루션은 완성을 후처리하고 접두사를 찾는 것입니다. 모든 레이블과 일치합니다. |
| logit_bias | If using single-token labels, set logit_bias={“label1”: 100, “label2”:100, …} with your labels in place of “label1” etc. For tasks with little data or complex labels, models can output tokens for invented classes never specified in your training set. logit_bias can fix this by upweighting your label tokens so that illegal label tokens are never produced. If using logit_bias in conjunction with multi-token labels, take extra care to check how your labels are being split into tokens, as logit_bias only operates on individual tokens, not sequences. 데이터가 적거나 레이블이 복잡한 작업의 경우 모델은 훈련 세트에 지정되지 않은 발명된 클래스에 대한 토큰을 출력할 수 있습니다. logit_bias는 불법 레이블 토큰이 생성되지 않도록 레이블 토큰의 가중치를 높여 이 문제를 해결할 수 있습니다. 다중 토큰 레이블과 함께 logit_bias를 사용하는 경우 logit_bias는 시퀀스가 아닌 개별 토큰에서만 작동하므로 레이블이 토큰으로 분할되는 방식을 특히 주의하십시오. Logit_bias can also be used to bias specific labels to appear more or less frequently. Logit_bias를 사용하여 특정 레이블이 더 자주 또는 덜 자주 표시되도록 바이어스할 수도 있습니다. |
| logprobs | Getting the probabilities of each label can be useful for computing confidence scores, precision-recall curves, calibrating debiasing using logit_bias, or general debugging. 각 레이블의 확률을 얻는 것은 신뢰도 점수 계산, 정밀도 재현 곡선, logit_bias를 사용한 편향성 보정 보정 또는 일반 디버깅에 유용할 수 있습니다. Setting logprobs=5 will return, for each token position of the completion, the top 5 most likely tokens and the natural logs of their probabilities. To convert logprobs into probabilities, raise e to the power of the logprob (probability = e^logprob). The probabilities returned are independent of temperature and represent what the probability would have been if the temperature had been set to 1. By default 5 is the maximum number of logprobs returned, but exceptions can be requested by emailing support@openai.com and describing your use case. logprobs=5로 설정하면 완료의 각 토큰 위치에 대해 가장 가능성이 높은 상위 5개 토큰과 해당 확률의 자연 로그가 반환됩니다. logprobs를 확률로 변환하려면 e를 logprob의 거듭제곱으로 올립니다(probability = e^logprob). 반환된 확률은 온도와 무관하며 온도가 1로 설정되었을 경우의 확률을 나타냅니다. 기본적으로 5는 반환되는 logprobs의 최대 수. 예외는 support@openai.com으로 이메일을 보내주세요 귀하의 사용 사례를 보내 주세요. Example API call to get probabilities for the 5 most likely tokens 가능성이 가장 높은 5개의 토큰에 대한 확률을 얻기 위한 API 호출 예 api_response = openai.Completion.create( model="{fine-tuned model goes here, without brackets}", prompt="toothpaste -->", temperature=0, max_tokens=1, logprobs=5 ) dict_of_logprobs = api_response['choices'][0]['logprobs']['top_logprobs'][0].to_dict() dict_of_probs = {k: 2.718**v for k, v in dict_of_logprobs.items()} |
| echo | In cases where you want the probability of a particular label that isn’t showing up in the list of logprobs, the echo parameter is useful. If echo is set to True and logprobs is set to a number, the API response will include logprobs for every token of the prompt as well as the completion. So, to get the logprob for any particular label, append that label to the prompt and make an API call with echo=True, logprobs=0, and max_tokens=0. logprobs 목록에 나타나지 않는 특정 레이블의 확률을 원하는 경우 echo 매개변수가 유용합니다. echo가 True로 설정되고 logprobs가 숫자로 설정되면 API 응답에는 완료뿐 아니라 프롬프트의 모든 토큰에 대한 logprobs가 포함됩니다. 따라서 특정 레이블에 대한 logprob를 가져오려면 해당 레이블을 프롬프트에 추가하고 echo=True, logprobs=0 및 max_tokens=0으로 API 호출을 수행합니다. Example API call to get the logprobs of prompt tokens 프롬프트 토큰의 logprobs를 가져오기 위한 API 호출 예 import openai response = openai.Completion.create( model="text-davinci-002", prompt="burger --> edible", temperature=0, max_tokens=0, logprobs=0, echo=True ) print(response['choices'][0]['logprobs']['token_logprobs']) === [None, -0.8182136, -7.7480173, -15.915648] |
Advanced techniques
Add reasoning steps
For complex tasks that require reasoning, one useful technique you can experiment with is inserting explanations before the final answer. Giving the model extra time and space to think ‘aloud’ can increase the odds it arrives at the correct final answer.
추론이 필요한 복잡한 작업의 경우 실험할 수 있는 유용한 기술 중 하나는 최종 답변 앞에 설명을 삽입하는 것입니다. 모델에게 '큰 소리로' 생각할 수 있는 추가 시간과 공간을 제공하면 올바른 최종 답변에 도달할 가능성이 높아질 수 있습니다.
Example (from Zelikman, Wu, et al.):
| Prompt | Completion | Completion with reasoning |
| “Q: Where do you put your grapes just before checking out? Answer Choices: (a) mouth (b) grocery cart (c) supermarket (d) fruit basket (e) fruit market A:” |
“(b)” | “The answer should be the place where grocery items are placed before checking out. Of the above choices, grocery cart makes the most sense for holding grocery items. Therefore, the answer is grocery cart (b).” “답은 체크아웃하기 전에 식료품을 두는 장소여야 합니다. 위의 선택 중에서 식료품 카트는 식료품을 보관하는 데 가장 적합합니다. 따라서 정답은 식료품 카트(b)입니다.” |
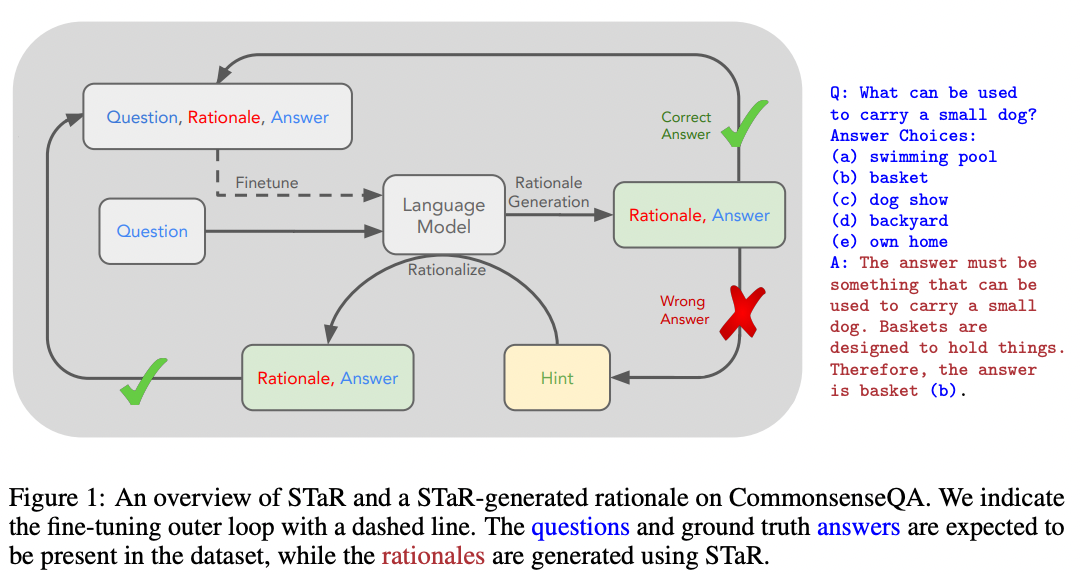
Although it can sound daunting to write many example explanations, it turns out you can use large language models to write the explanations. In 2022, Zelikman, Wu, et al. published a procedure called STaR (Self-Taught Reasoner) in which a few-shot prompt can be used to generate a set of {questions, rationales, answers} from just a set of {questions, answers}
많은 예제 설명을 작성하는 것이 어렵게 들릴 수 있지만 큰 언어 모델을 사용하여 설명을 작성할 수 있습니다. 2022년 Zelikman, Wu, et al. {질문, 답변} 세트에서 {질문, 근거, 답변} 세트를 생성하기 위해 몇 번의 프롬프트를 사용할 수 있는 STaR(Self-Taught Reasoner)라는 절차를 발표했습니다.
Sequential fine-tuning
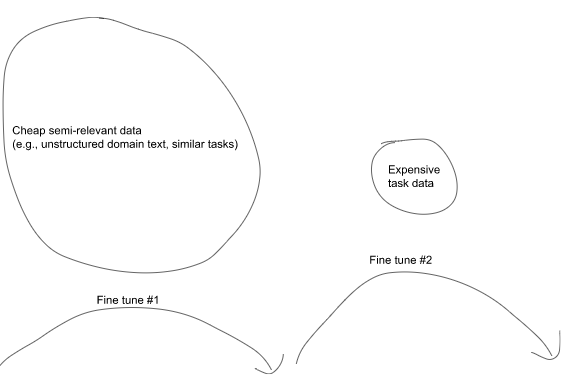
Models can be fine-tuned sequentially as many times as you like. One way you can use this is to pre-train your model on a large amount of relevant text, such as unstructured domain text or similar classification tasks, and then afterwards fine-tune on examples of the task you want the model to perform. An example procedure could look like:
모델은 원하는 만큼 순차적으로 미세 조정할 수 있습니다. 이를 사용할 수 있는 한 가지 방법은 구조화되지 않은 도메인 텍스트 또는 유사한 분류 작업과 같은 많은 양의 관련 텍스트에 대해 모델을 사전 훈련한 다음 나중에 모델이 수행할 작업의 예를 미세 조정하는 것입니다. 예제 절차는 다음과 같습니다.
- Step 1: Fine-tune on cheap, semi-relevant data
-
- E.g., unstructured domain text (such as legal or medical text)
- E.g., similar task data (such as another large classification set)
- Step 2: Fine-tune on expensive labeled examples
- E.g., text and classes (if training a classifier)
To fine-tune a previously fine-tuned model, pass in the fine-tuned model name when creating a new fine-tuning job (e.g. -m curie:ft-<org>-<date>). Other training parameters do not have to be changed, however if your new training data is much smaller than your previous training data, you may find it useful to reduce learning_rate_multiplier by a factor of 2 to 4.
이전에 미세 조정된 모델을 미세 조정하려면 새 미세 조정 작업을 생성할 때 미세 조정된 모델 이름을 전달합니다(예: -m curie:ft-<org>-<date>). 다른 훈련 매개변수는 변경할 필요가 없지만 새 훈련 데이터가 이전 훈련 데이터보다 훨씬 작은 경우 learning_rate_multiplier를 2~4배 줄이는 것이 유용할 수 있습니다.
Common mistakes
The most common mistakes when fine-tuning text classifiers are usually related to training data.
텍스트 분류기를 미세 조정할 때 가장 흔한 실수는 일반적으로 훈련 데이터와 관련이 있습니다.
Common mistake #1: Insufficiently specified training data
One thing to keep in mind is that training data is more than just a mapping of inputs to correct answers. Crucially, the inputs need to contain the information needed to derive an answer.
한 가지 명심해야 할 점은 교육 데이터가 정답에 대한 입력의 매핑 이상이라는 것입니다. 결정적으로 입력에는 답을 도출하는 데 필요한 정보가 포함되어야 합니다.
For example, consider fine-tuning a model to predict someone’s grades using the following dataset:
예를 들어 다음 데이터 세트를 사용하여 누군가의 성적을 예측하도록 모델을 미세 조정하는 것을 고려하십시오.
| Prompt | Completion |
| “Alice >>>” | “ A” |
| “Bob >>>” | “ B+” |
| “Coco >>>” | “ A-” |
| “Dominic >>>” | “ B” |
| Prompt | Completion |
| “Esmeralda >>>” | ??? |
Without knowing why these students got the grades they did, there is insufficient information for the model to learn from and no hope of making a good personalized prediction for Esmeralda.
이 학생들이 자신이 받은 성적을 받은 이유를 모르면 모델이 배울 수 있는 정보가 충분하지 않으며 Esmeralda에 대해 좋은 개인화된 예측을 할 수 있는 희망이 없습니다.
This can happen more subtly when some information is given but some is still missing. For example, if fine-tuning a classifier on whether a business expense is allowed or disallowed, and the business expense policy varies by date or by location or by employee type, make sure the input contains information on dates, locations, and employee type.
이것은 일부 정보가 제공되었지만 일부가 여전히 누락된 경우 더 미묘하게 발생할 수 있습니다. 예를 들어 비즈니스 비용이 허용되는지 여부에 대한 분류자를 미세 조정하고 비즈니스 비용 정책이 날짜, 위치 또는 직원 유형에 따라 달라지는 경우 입력에 날짜, 위치 및 직원 유형에 대한 정보가 포함되어 있는지 확인하십시오.
| Prompt | Completion |
| “Amount: $50 Item: Steak dinner ### ” |
“ allowed” |
| “Amount: $50 Item: Steak dinner ### ” |
“ disallowed” |
| Prompt | Completion |
| “Amount: $50 Item: Steak dinner ### ” |
??? |
Common mistake #2: Input data format that doesn’t match the training data format
Make sure that when you use your fine-tuned model, your submitted prompts match the format of your training data.
미세 조정된 모델을 사용할 때 제출된 프롬프트가 훈련 데이터의 형식과 일치하는지 확인하십시오.
| Training data format | API call | OK? |
| “dog toy -->” | “dog toy” | ❌Missing separator |
| “Amount: $50 Item: Steak dinner ### ” |
“Is a $50 steak dinner allowed? ### “ |
❌Different format |
| “Esmeralda >>>” | “Esmeralda >>> ” | ❌Extra space appended |
More examples
Below, we share more examples of training data for possible classifiers.
아래에서 가능한 분류기에 대한 훈련 데이터의 더 많은 예를 공유합니다.
Truthful consistency classifier
| Prompt | Completion |
| "Company: BHFF insurance Product: allround insurance Ad: One stop shop for all your insurance needs! Supported:" |
“ yes” |
| "Company: Loft conversion specialists Product: - Ad: Straight teeth in weeks! Supported:" |
“ no” |
Product review classifier (with multiple classes labeled in parallel)
| Prompt | Completion |
| "4/5 stars Camera seems fine. Not amazing, but perfectly decent. Biggest complaint is that the cable is only 5 feet long, which I didn't think to check. It's my fault, so I won't return it, but 5 feet is really short if you have multiple monitors and probably impossible if you have a desktop on the floor next to a standing desk. ### Positives:" |
“ fine, perfectly decent Negatives: not amazing, cable is only 5 feet long Overall sentiment: positive Possible improvements: longer cable Return risk: 1 Support priority: low Customer type: N/A” |
| "4/5 stars I bought this on sale for $70. I'm satisfied with it. (1) The instructions weren't that bad. (There was really only one ambiguous step, and it was easy to make an educated guess at the right way to go. Surprised by the ordering of one of the steps because some bars were hanging there for a while, but whatever.) (2) It definitely is labor intensive - the most painful step is screwing in 24 small wood screws to get the hooks attached. And it takes a bit of skill to get them all vertically parallel. Got a big blister from all the screwing. And the angles made it hard to use power tools - ended up screwing in by hand because it was easier to stay vertical next to the hook. (3) I weight 170 pounds and honestly the bench seems fine for supporting my weight. I was worried from the other reviews. But my trick was to leave things a little loose until the end and then really tighten everything once it was all together. I think really tightening at the end prevents any squeaky rocking. But only used it one day so far, so we'll see. Overall this is definitely cheap, but feels totally fine. It's cheap in a cheap way, not cheap in a junky knockoff way. Would buy again. Looks great. ### Positives:" |
“ instructions weren’t that bad, looks great Negatives: ambiguous step, labor intensive, got a big blister, cheap Overall sentiment: positive Possible improvements: less ambiguous instructions Return risk: 0 Support priority: low Customer type: N/A” |
| "5/5 stars I'm a fan. It's shiny and pure metal. Exactly what I wanted. ### Positives:” |
“ shiny, pure metal Negatives: N/A Overall sentiment: positive Possible improvements: N/A Return risk: 0 Support priority: low Customer type: N/A |
Sentiment analyzer
| Prompt | Completion |
| "Overjoyed with the new iPhone! ->" |
“ positive” |
| "@lakers disappoint for a third straight night https://t.co/38EFe43 ->" |
“ negative” |
Email prioritizer
| Prompt | Completion |
| "Subject: Update my address From: Joe Doe To: support@ourcompany.com Date: 2021-06-03 Content: Hi, I would like to update my billing address to match my delivery address. Please let me know once done. Thanks, Joe ### " |
“ 4” |
Legal claim detector
| Prompt | Completion |
| "When the IPV (injection) is used, 90% or more of individuals develop protective antibodies to all three serotypes of polio virus after two doses of inactivated polio vaccine (IPV), and at least 99% are immune to polio virus following three doses. -->" |
“ efficacy” |
| "Jonas Edward Salk (/sɔːlk/; born Jonas Salk; October 28, 1914 – June 23, 1995) was an American virologist and medical researcher who developed one of the first successful polio vaccines. He was born in New York City and attended the City College of New York and New York University School of Medicine. -->" |
“ not” |
News subject detector
| Prompt | Completion |
| "PC World - Upcoming chip set will include built-in security features for your PC. >>>" |
“ 4” (where 4 = Sci/Tech) |
| “Newspapers in Greece reflect a mixture of exhilaration that the Athens Olympics proved successful, and relief that they passed off without any major setback. >>>” |
“ 2” (where 2 = Sports) |
Logical relationship detector
| Prompt | Completion |
| "A land rover is being driven across a river. A vehicle is crossing a river. ### " |
“ implication” |
| "Violin soloists take the stage during the orchestra's opening show at the theater. People are playing the harmonica while standing on a roof. ### " |
“ contradiction” |
'Open AI > CookBook' 카테고리의 다른 글
| Openai cookbook : Azure OpenAI - How to get embeddings from Azure OpenAI (0) | 2023.03.19 |
|---|---|
| Openai cookbook : Azure OpenAI - How to get completions from Azure OpenAI (0) | 2023.03.18 |
| Azure OpenAI 를 사용하기 위한 사전 요구 사항들 - 사용 요청 거부 됨 (0) | 2023.03.18 |
| Openai cookbook : DALL-E - How to generate and edit images with DALL-E (1) | 2023.03.17 |
| Openai cookbook : Fine-tuning GPT-3 - Fine-tuned classification (0) | 2023.03.15 |
| Openai cookbook : ChatGPT , How to format inputs to ChatGPT models (2) | 2023.03.04 |
| Openai cookbook : GPT-3 , Code Editing examples (0) | 2023.03.04 |
| Openai cookbook : GPT-3 , Code explanation examples (0) | 2023.03.04 |
| Openai cookbook : GPT-3 , Code writing examples (0) | 2023.03.04 |
| Openai cookbook : GPT-3 , Text editing examples (0) | 2023.03.04 |