지난 글에서는 임베딩 값을 2D로 시각화 하는 예제를 분석해 봤습니다.
오늘은 임베딩 값을 3D로 시각화 하는 예제를 분석해 보겠습니다.
openai-cookbook/Visualizing_embeddings_in_3D.ipynb at main · openai/openai-cookbook · GitHub
GitHub - openai/openai-cookbook: Examples and guides for using the OpenAI API
Examples and guides for using the OpenAI API. Contribute to openai/openai-cookbook development by creating an account on GitHub.
github.com
Visualizing embeddings in 3D
지난 2D 예제에서는 1536 차원의 데이터를 2차원으로 만들어서 2D로 visualization을 했습니다.
오늘 예제에서는 이것을 3차원으로 만들어서 3D로 visualization을 하는 겁니다.
이것을 위해서 PCA를 사용합니다. (2D에서는 t-SJE를 이용했습니다.)
이 예제에서 사용하는 dbpedia_samples.jsonl은 이곳에서 구할 수 있습니다.
openai-cookbook/dbpedia_samples.jsonl at main · openai/openai-cookbook · GitHub
GitHub - openai/openai-cookbook: Examples and guides for using the OpenAI API
Examples and guides for using the OpenAI API. Contribute to openai/openai-cookbook development by creating an account on GitHub.
github.com
이 데이터의 첫 두줄은 아래와 같습니다. (총 200 줄이 있습니다.)
{"text": " Morada Limited is a textile company based in Altham Lancashire. Morada specializes in curtains.", "category": "Company"}
{"text": " The Armenian Mirror-Spectator is a newspaper published by the Baikar Association in Watertown Massachusetts.", "category": "WrittenWork"}
text 와 category 두 항목이 있습니다.
text는 한 문장이 있고 category에는 말 그대로 카테고리들이 있습니다.
어떤 카테고리들이 있고 각 카테고리는 몇개씩 있는지 알아 보겠습니다.
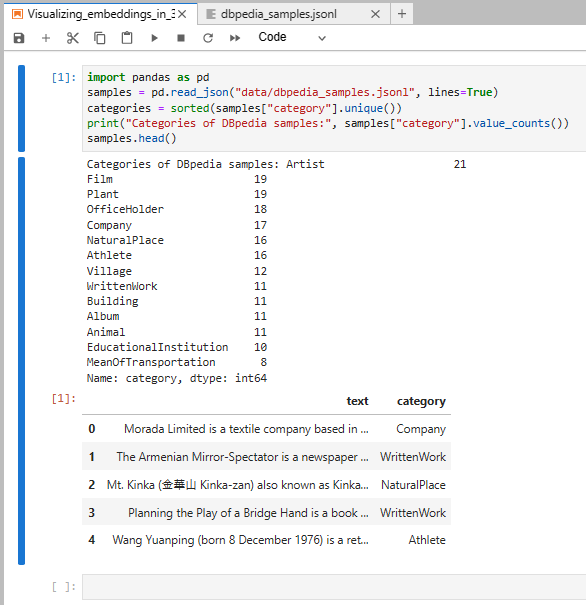
여기서는 pandas 모듈을 사용합니다.
read_json()을 사용해서 데이터세트를 읽어 옵니다. (samples)
그리고 이 데이터세트의 category를 수집해서 unique 한 리스트를 만든 후 정렬을 합니다. (categories)
print("Categories of DBpedia samples:", samples["category"].value_counts())이것을 위 방식으로 프린트를 하면 이런 결과를 얻습니다.

카테고리는 총 14개가 있고 그 중에 가장 많이 있는 카테고리는 Artist 로 21번 나옵니다.
그 외에 다른 카테고리들과 각 카테고리별 갯수를 표시합니다.
그리고 samples.head() 를 하면 아래 결과를 얻습니다.
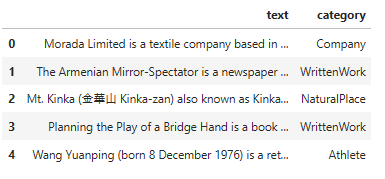
text와 category를 표 형식으로 보여 줍니다. head()를 사용하면 디폴트로 상위 5줄을 print 합니다.
그 다음은 openai api를 이용해서 각 text별로 임베딩 값을 받아 옵니다.
import openai
from openai.embeddings_utils import get_embeddings

def open_file(filepath):
    with open(filepath, 'r', encoding='utf-8') as infile:
        return infile.read()

openai.api_key = open_file('openaiapikey.txt')

# NOTE: The following code will send a query of batch size 200 to /embeddings
matrix = get_embeddings(samples["text"].to_list(), engine="text-embedding-ada-002")
embeddings_utils 의 get_embeddings를 사용해서 각 text 별로 openai로 부터 임베딩 값을 받아 옵니다.
Note : openai api는 유료입니다. 200개의 데이터에 대한 임베딩값을 받아오는데 대한 과금이 붙습니다.
저는 이 소스코드를 테스트 하는 과정에서 1센트가 과금이 되었습니다.
2. Reduce the embedding dimensionality
from sklearn.decomposition import PCA
pca = PCA(n_components=3)
vis_dims = pca.fit_transform(matrix)
samples["embed_vis"] = vis_dims.tolist()
이 부분에서 각 아이템별 임베딩을 PCA를 이용해서 3차원으로 만든다.
sklearn.decomposition.PCA — scikit-learn 1.2.1 documentation
sklearn.decomposition.PCA
Examples using sklearn.decomposition.PCA: A demo of K-Means clustering on the handwritten digits data A demo of K-Means clustering on the handwritten digits data Principal Component Regression vs P...
scikit-learn.org
PCA는 Principal Component Analysis (주성분 분석) 의 약자이다.
고차원의 데이터 (high-dimensional data)를 저차원으로 축소하여 새로운 데이터를 생성하는 방법이다.
PCA를 사용하면 N차원 데이터의 정보를 최대한 보존하면서 저차원의 데이터로 표현할 수 있다.
<PCA의 원리 요약>
1. 수학적인 방법으로 원래 데이터의 주성분(Principal Component)을 찾는다.
주성분은 원래 데이터의 차원의 수만큼 나온다.
2. 축소하려는 차원의 수만큼 주성분을 사용하여 새로운 데이터를 만든다.
PCA(주성분분석)의 원리와 응용 (tistory.com)
PCA(주성분분석)의 원리와 응용
1. PCA(Principal Component Analysis, 주성분분석)의 정의 PCA는 고차원의 데이터(high-dimensional data)를 저차원으로 축소(Reduction)하여 새로운 데이터를 생성하는 방법이다. PCA를 사용하면 N차원 데이터의 정
ds-dongjin.tistory.com
이 부분에서 PCA를 이용해 3차원으로 만든 데이터를 vis_dims에 담습니다.
여기까지 만든 데이터를 출력해 보면 아래와 같습니다.
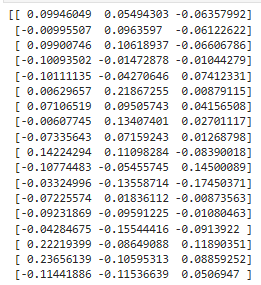
openai api로 부터 받은 임베딩 값 (1536 차원)을 3차원으로 축소 시킨 값입니다.
이 값들을 리스트 타입으로 만들어서 해당 데이터에 embed_vis 컬럼에 넣는 것이 그 다음 줄에서 하는 작업입니다.
이제 각 text들의 임베딩 값을 3차원으로 축소 했으니 3D 그래픽으로 표현 할 수 있습니다.
3. Plot the embeddings of lower dimensionality
여기서 제 경우에는 ipympl 모듈이 없다는 메세지가 나와서 이 모듈을 설치 해야 했습니다.
이 모듈은 jupyter Lab에서 matplotlib 모듈을 사용할 수 있도록 하는 모듈입니다.

ipympl — ipympl (matplotlib.org)
ipympl — ipympl
Toggle in-page Table of Contents
matplotlib.org
이제 matplotlib를 JupyterLab에서 사용할 수 있습니다.
이 matplotlib의 pyplot은 지난 예제에서도 산점도 그래프를 그릴때 사용했었습니다. (scatter)
%matplotlib widget
import matplotlib.pyplot as plt
import numpy as np

fig = plt.figure(figsize=(10, 5))
ax = fig.add_subplot(projection='3d')
cmap = plt.get_cmap("tab20")

# Plot each sample category individually such that we can set label name.
for i, cat in enumerate(categories):
    sub_matrix = np.array(samples[samples["category"] == cat]["embed_vis"].to_list())
    x=sub_matrix[:, 0]
    y=sub_matrix[:, 1]
    z=sub_matrix[:, 2]
    colors = [cmap(i/len(categories))] * len(sub_matrix)
    ax.scatter(x, y, zs=z, zdir='z', c=colors, label=cat)

ax.set_xlabel('x')
ax.set_ylabel('y')
ax.set_zlabel('z')
ax.legend(bbox_to_anchor=(1.1, 1))
pyplot의 figure() 함수는 이제 모양을 시작하겠다는 겁니다.
여기서는 figsize라는 파라미터를 사용했는데 Width, height 를 인치로 나타내는 겁니다.
그외 다른 파라미터들도 많은데 자세한 내용은 아래 페이지를 참조하세요.
matplotlib.pyplot.figure — Matplotlib 3.7.0 documentation
matplotlib.pyplot.figure — Matplotlib 3.7.0 documentation
The layout mechanism for positioning of plot elements to avoid overlapping Axes decorations (labels, ticks, etc). Note that layout managers can measurably slow down figure display. Defaults to None (but see the documentation of the Figure constructor regar
matplotlib.org
그 다음 나오는 add_subplot은 해당 figure에 Axes를 추가하는 것입니다.
matplotlib.figure — Matplotlib 3.7.0 documentation
[EDA Practice] Subplot 그리기 (tistory.com)
[EDA Practice] Subplot 그리기
이전 포스팅에서 matplotlib이나 seaborn을 통해서 그래프를 생성하면 자동으로 AxesSubplot 객체가 생성되었다. AxesSubplot은 Figure 객체에 포함된 객체이지만, 일반적으로는 하나밖에 생성이 안된다. 그
insighted-h.tistory.com
여기서는 projection 파라미터를 사용해서 3D 그래프로 그리도록 합니다.
그 다음 get_cmap()은 원하는 colormap의 타입을 정할 때 사용합니다. 여기서는 tab20 을 선택했습니다.
matplotlib.pyplot.get_cmap — Matplotlib 3.7.0 documentation
matplotlib.pyplot.get_cmap — Matplotlib 3.7.0 documentation
If a Colormap instance, it will be returned. Otherwise, the name of a colormap known to Matplotlib, which will be resampled by lut. The default, None, means rcParams["image.cmap"] (default: 'viridis').
matplotlib.org
이 예제에서 사용한 tab20은 아래와 같이 설명 돼 있습니다.
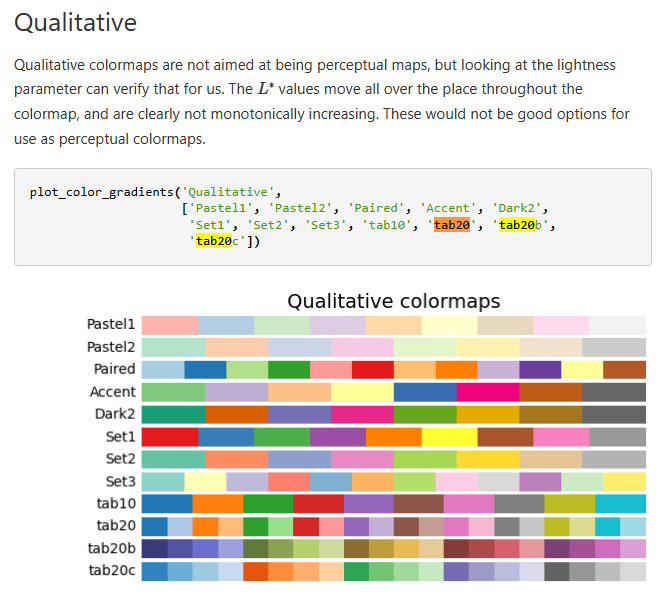
Choosing Colormaps in Matplotlib — Matplotlib 3.7.0 documentation
Choosing Colormaps in Matplotlib — Matplotlib 3.7.0 documentation
Note Click here to download the full example code Choosing Colormaps in Matplotlib Matplotlib has a number of built-in colormaps accessible via matplotlib.colormaps. There are also external libraries that have many extra colormaps, which can be viewed in t
matplotlib.org
다음에 나오는 for 문은 레이블 이름을 설정할 수 있도록 각 샘플 범주를 개별적으로 플로팅 합니다.
3차원을 위한 x,y,z에 해당 값과 color를 배정하고 scatter를 이용해서 3차원 좌표 안에 점을 찍습니다.
matplotlib.pyplot.legend — Matplotlib 3.7.0 documentation
legend() 함수는 정해진 legend를 어디에 위치할지 정하는 겁니다.
이 예제에서는 bbox_to_ancho,r 파라미터를 사용했는데 이 파라미터도 위 링크에 가시면 자세하기 볼 수 있습니다.
legend를 어디에 위치시키느냐를 결정하는 겁니다.
결과값은 아래와 같습니다.
참고로 legend는 오른쪽에 있는 범례 (Album, Animal ....) 입니다.

이 부분을 아래와 같이 고쳐 보겠습니다.
ax.legend(loc = 'lower right')

그러면 이 범례 부분의 위치가 바뀌었습니다.
이렇게 bbox_to_anchor는 그래프 밖에 범례를 위치시키고 싶을 때 사용합니다.
이 Openai api CookBook의 예제를 실행하면 아래와 같은 결과를 얻습니다.
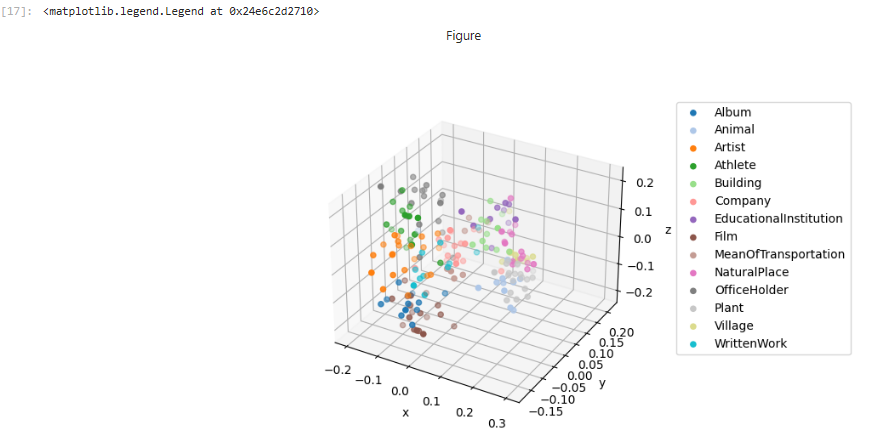
각 카테고리 별로 다른 색으로 표시된 점들이 3차원 그래프 안에 표시 돼 있습니다.
이러면 어떤 카테고리에 있는 데이터들이 어느 위치에 분포해 있는지 알 수 있게 됩니다.
오늘 예제는 openai api로 부터 받은 리스트의 아이템별 임베딩값(1536 dimention) 을 PCA를 이용해서 3 차원 (3 dimention)으로 바꾸는 작업을 1차로 했습니다.
그 다음 matplotlib.pyplot 모듈을 이용해서 이 3차원 데이터들을 3차원 그래픽으로 표현을 했습니다.
'Open AI > CookBook' 카테고리의 다른 글
| Openai cookbook : GPT - 3 , Guide How to work with large language models (0) | 2023.03.01 |
|---|---|
| Openai cookbook - API usage - How to stream completions (0) | 2023.03.01 |
| Openai cookbook - API usage - How to count tokens with tiktoken (0) | 2023.03.01 |
| Openai cookbook - API usage - How to handle rate limits (0) | 2023.02.28 |
| Openai cookbook - Embeddings - Embedding long inputs (1) | 2023.02.26 |
| Openai cookbook - Embeddings - Visualizing embeddings in 2D (1) | 2023.02.25 |
| Openai cookbook - Embeddings - Clustering embeddings (0) | 2023.02.24 |
| Openai cookbook - Embeddings - How to get embeddings (0) | 2023.02.24 |
| Openai cookbook - Embeddings - Text comparison examples - Customizing embeddings (0) | 2023.02.17 |
| Openai cookbook - Embeddings - Text comparison examples - Recommendation using embeddings (0) | 2023.02.16 |
