개발자로서 현장에서 일하면서 새로 접하는 기술들이나 알게된 정보 등을 정리하기 위한 블로그입니다. 운 좋게 미국에서 큰 회사들의 프로젝트에서 컬설턴트로 일하고 있어서 새로운 기술들을 접할 기회가 많이 있습니다. 미국의 IT 프로젝트에서 사용되는 툴들에 대해 많은 분들과 정보를 공유하고 싶습니다.
Let's look at adding in a retrieval step to a prompt and LLM, which adds up to a "retrieval-augmented generation" chain
"검색 증강 생성 retrieval-augmented generation " 체인에 추가되는 프롬프트 및 LLM에 검색 단계를 추가하는 방법을 살펴보겠습니다.
pip install langchain openai faiss-cpu tiktoken
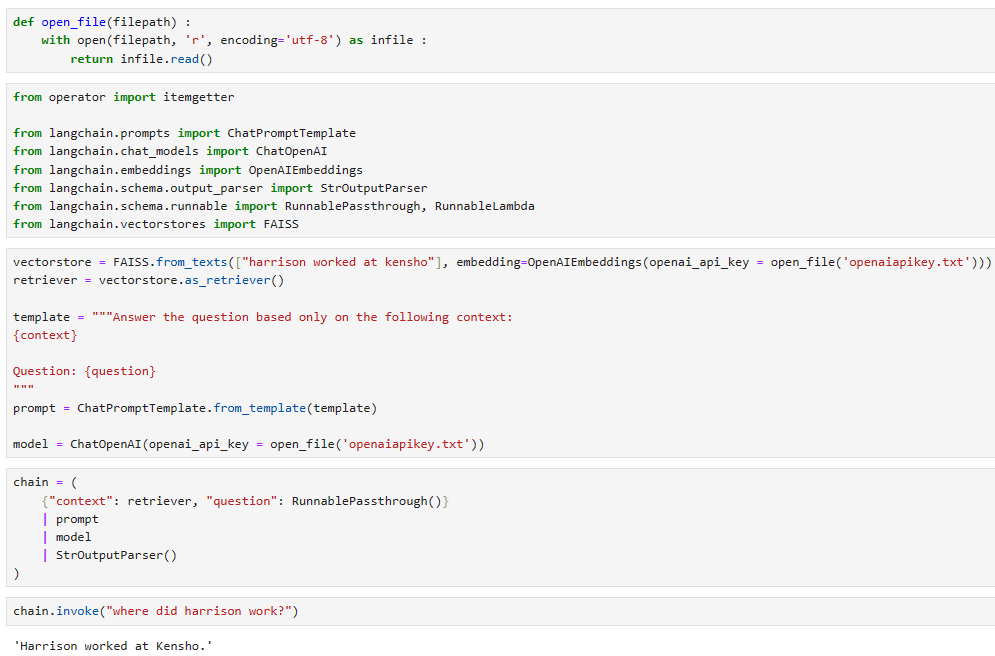
from operator import itemgetter

from langchain.prompts import ChatPromptTemplate
from langchain.chat_models import ChatOpenAI
from langchain.embeddings import OpenAIEmbeddings
from langchain.schema.output_parser import StrOutputParser
from langchain.schema.runnable import RunnablePassthrough, RunnableLambda
from langchain.vectorstores import FAISS
vectorstore = FAISS.from_texts(["harrison worked at kensho"], embedding=OpenAIEmbeddings())
retriever = vectorstore.as_retriever()

template = """Answer the question based only on the following context:
{context}

Question: {question}
"""
prompt = ChatPromptTemplate.from_template(template)

model = ChatOpenAI()
이 코드는 LangChain 라이브러리와 관련 패키지를 설치한 후, LangChain을 사용하여 간단한 정보 검색 대화 체인을 설정하고 호출하는 방법을 보여줍니다. 필요한 패키지 설치:
pip install langchain openai faiss-cpu tiktoken 명령어를 사용하여 LangChain 및 관련 패키지를 설치합니다.
LangChain 라이브러리 및 관련 패키지 가져오기:
from 문을 사용하여 필요한 라이브러리 및 패키지를 가져옵니다. 이 코드에서는 LangChain, OpenAI, FAISS, tiktoken 등을 가져옵니다.
정보 검색 대화 체인 설정:
FAISS를 사용하여 특정 텍스트("harrison worked at kensho")를 포함하는 벡터 스토어를 생성합니다.
이 벡터 스토어를 retriever로 설정합니다.
대화 체인의 템플릿을 설정합니다. 이 템플릿은 "context"와 "question"을 사용하여 대화를 생성하는 데 사용됩니다.
대화 모델(ChatOpenAI)을 설정합니다.
대화 체인을 설정합니다. 이 체인은 "context"와 "question" 데이터를 받아들이고, prompt를 통해 대화를 생성하며, 이 대화를 model을 사용하여 처리하고, 마지막으로 StrOutputParser()를 사용하여 출력을 파싱합니다.
대화 체인 호출:
chain.invoke("where did Harrison work?")를 통해 chain을 호출합니다. 이때 "where did Harrison work?"라는 질문이 대화 체인으로 전달되어, 해당 질문에 대한 정보 검색 대화가 생성되고 처리됩니다.
이 코드는 간단한 정보 검색 대화 체인을 설정하고 사용하는 방법을 보여주며, LangChain을 활용하여 다양한 대화 및 정보 처리 작업을 수행할 수 있습니다.
template = """Answer the question based only on the following context:
{context}

Question: {question}

Answer in the following language: {language}
"""
prompt = ChatPromptTemplate.from_template(template)

chain = {
    "context": itemgetter("question") | retriever,
    "question": itemgetter("question"),
    "language": itemgetter("language")
} | prompt | model | StrOutputParser()
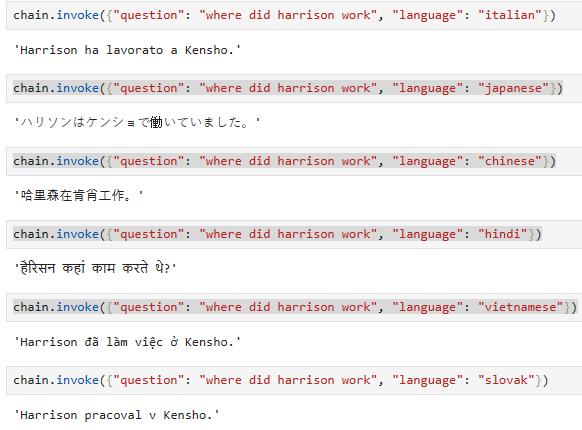
chain.invoke({"question": "where did harrison work", "language": "italian"})
'Harrison ha lavorato a Kensho.'
이 코드는 LangChain을 사용하여 정보 검색 대화 체인을 설정하고 호출하는 방법을 보여줍니다.
대화 체인 템플릿 설정:
"context," "question," 그리고 "language"을 사용하여 대화 템플릿을 설정합니다.
이 템플릿에는 "context," "question," "language"이라는 플레이스홀더가 포함되어 있으며, 대화 체인에서 이러한 값을 사용하여 대화를 생성하고 질문에 답변합니다.
대화 체인 설정:
itemgetter를 사용하여 "context," "question," 및 "language" 값을 추출합니다.
"context" 값은 "question"을 추출한 후, retriever를 사용하여 정보 검색을 위한 컨텍스트를 가져옵니다.
"question" 값은 "question"에서 직접 추출됩니다.
"language" 값은 "language"에서 직접 추출됩니다.
이러한 추출된 값들을 사용하여 대화 체인을 설정합니다.
대화 체인 호출:
chain.invoke({"question": "where did harrison work", "language": "Italian"})를 사용하여 대화 체인을 호출합니다.
"question"과 "language" 값을 대화 체인으로 전달합니다.
이로 인해 "where did harrison work"라는 질문과 "Italian"이라는 언어 설정이 포함된 대화가 생성되고 처리됩니다.
이 코드를 통해 특정 질문과 언어 설정을 기반으로 대화를 생성하고 답변을 얻을 수 있습니다.
==> 한국어의 경우 Kensho에서 일했다고 대답을 하지않고 질문을 그대로 번역을 했습니다.
그래서 일본어, 중국어, 힌디, 베트남어 그리고 슬로바키아어 등 여러 언어로 시도를 해 봤는데 힌디만 한국어와 같이 대답을 하지 않고 질문을 번역했더라구요. 일본어, 중국어, 베트남어, 슬로바키아어, 이탈리아어는 다 제대로 Kensho에서 일한다는 대답을 얻어 냈습니다. 한국어와 힌디어는 아직까지 좀 부족한 부분이 많은 것 같습니다.
Conversational Retrieval Chain
We can easily add in conversation history. This primarily means adding in chat_message_history
대화 기록을 쉽게 추가할 수 있습니다. 이는 주로 chat_message_history를 추가하는 것을 의미합니다.
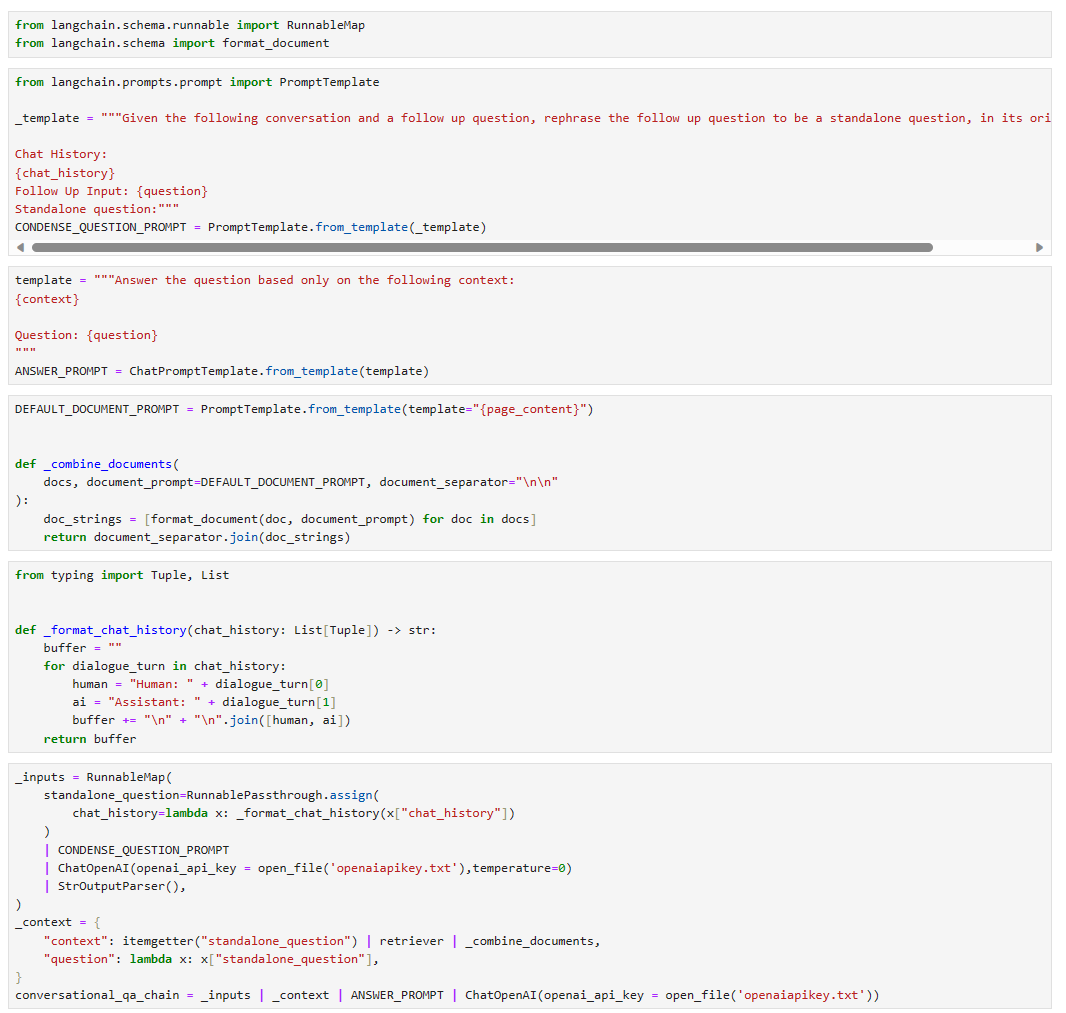
from langchain.schema.runnable import RunnableMap
from langchain.schema import format_document
from langchain.prompts.prompt import PromptTemplate

_template = """Given the following conversation and a follow up question, rephrase the follow up question to be a standalone question, in its original language.

Chat History:
{chat_history}
Follow Up Input: {question}
Standalone question:"""
CONDENSE_QUESTION_PROMPT = PromptTemplate.from_template(_template)
template = """Answer the question based only on the following context:
{context}

Question: {question}
"""
ANSWER_PROMPT = ChatPromptTemplate.from_template(template)
DEFAULT_DOCUMENT_PROMPT = PromptTemplate.from_template(template="{page_content}")


def _combine_documents(
    docs, document_prompt=DEFAULT_DOCUMENT_PROMPT, document_separator="\n\n"
):
    doc_strings = [format_document(doc, document_prompt) for doc in docs]
    return document_separator.join(doc_strings)
from typing import Tuple, List
def _format_chat_history(chat_history: List[Tuple]) -> str:
buffer = ""for dialogue_turn in chat_history:
human = "Human: " + dialogue_turn[0]
ai = "Assistant: " + dialogue_turn[1]
buffer += "\n" + "\n".join([human, ai])
return buffer
이 코드는 LangChain에서 다양한 처리 단계를 통해 대화 기록과 연결된 질문을 독립적인 질문으로 재구성하는 과정을 보여줍니다. 아래에서 각 부분을 자세히 설명하겠습니다.
_template 및 CONDENSE_QUESTION_PROMPT:
_template은 텍스트 템플릿으로, 대화 기록과 관련된 질문을 독립적인 질문으로 재구성하는 과정에 사용됩니다.
CONDENSE_QUESTION_PROMPT은 _template를 기반으로 하는 PromptTemplate 인스턴스로, 대화 기록과 관련된 템플릿 질문을 생성합니다.
template 및 ANSWER_PROMPT:
template은 다른 템플릿으로, 주어진 문맥과 질문을 기반으로 답변을 생성하는 과정에 사용됩니다.
ANSWER_PROMPT은 template를 기반으로 하는 ChatPromptTemplate 인스턴스로, 답변 생성에 사용됩니다.
DEFAULT_DOCUMENT_PROMPT:
DEFAULT_DOCUMENT_PROMPT는 문서 형식을 생성하는 데 사용되는 템플릿입니다.
_combine_documents 함수:
이 함수는 여러 문서를 결합하여 하나의 문서로 만드는 역할을 합니다. 주로 DEFAULT_DOCUMENT_PROMPT에서 사용됩니다.
_format_chat_history 함수:
이 함수는 대화 기록을 정리하고 형식화하는 역할을 합니다. 대화 기록을 읽어서 사람(Human)과 AI(Assistant)의 대화 내용을 구분하고 포맷합니다.
_inputs:
_inputs는 RunnableMap의 인스턴스로, standalone_question 키에 대한 처리 작업을 정의합니다.
RunnablePassthrough.assign() 함수를 사용하여 chat_history를 standalone_question에 할당하며, 이후 CONDENSE_QUESTION_PROMPT, ChatOpenAI 및 StrOutputParser를 통해 처리 작업을 수행합니다.
_context:
_context는 입력 및 문맥 관련 작업을 정의합니다. context 및 question 키를 정의하며, 이전 단계에서 처리된 standalone_question을 사용하여 문맥을 정리하고, 해당 문맥과 독립적인 질문을 추출합니다.
conversational_qa_chain:
conversational_qa_chain은 여러 단계로 구성된 LangChain 체인입니다. 이 체인은 _inputs, _context, ANSWER_PROMPT, ChatOpenAI를 순차적으로 연결하여 대화 기록 및 관련 질문을 처리하고 답변을 생성합니다.
이 코드는 LangChain에서 대화 데이터를 처리하고 관련 질문을 독립적인 질문으로 재구성하는 과정을 보여줍니다. 이를 통해 효율적으로 대화 데이터를 처리하고 답변을 생성할 수 있습니다.
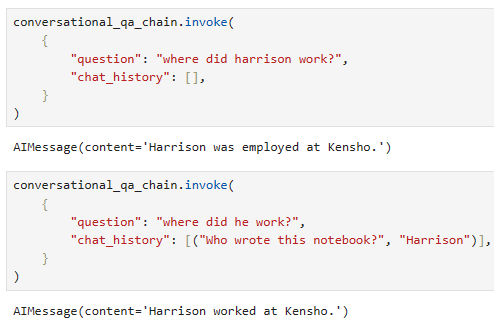
conversational_qa_chain.invoke(
    {
        "question": "where did harrison work?",
        "chat_history": [],
    }
)
AIMessage(content='Harrison was employed at Kensho.', additional_kwargs={}, example=False)
conversational_qa_chain.invoke(
    {
        "question": "where did he work?",
        "chat_history": [("Who wrote this notebook?", "Harrison")],
    }
)
AIMessage(content='Harrison worked at Kensho.', additional_kwargs={}, example=False)
conversational_qa_chain은 invoke 메서드를 사용하여 주어진 입력에 대한 처리를 수행하고 결과를 생성하는 것입니다. 아래는 두 가지 다른 입력에 대한 invoke 호출에 대한 설명입니다.
첫 번째 invoke 호출:
"question": "where did harrison work?"와 "chat_history": []와 같이 빈 대화 기록을 가지는 입력이 주어집니다.
첫 번째 호출에서는 대화 기록이 비어 있으므로 독립적인 질문이 이미 주어진 질문과 동일하게 설정됩니다.
이때, standalone_question이 "where did harrison work?"로 설정되고, 이 질문은 모델에 전달됩니다.
모델은 주어진 문맥 없이 질문을 이해하고 답변을 생성합니다.
두 번째 invoke 호출:
"question": "where did he work?"와 "chat_history": [("Who wrote this notebook?", "Harrison")]와 같이 대화 기록이 있는 입력이 주어집니다.
두 번째 호출에서는 대화 기록이 주어지며, 대화 기록의 마지막 대화는 "Harrison"로 끝나는 것을 고려합니다.
대화 기록에서 "Harrison"의 존재를 고려하여 새로운 독립적인 질문이 생성됩니다. 이 때 "who" 질문의 일부분인 "Harrison"을 고려하여 질문이 재구성됩니다.
standalone_question이 "where did he work?"로 설정되고, 이 질문은 모델에 전달됩니다.
모델은 이 새로운 질문과 대화 기록을 고려하여 답변을 생성합니다.
이러한 방식으로 대화 기록과 관련된 질문을 재구성하고 답변을 생성합니다.
With Memory and returning source documents
This shows how to use memory with the above. For memory, we need to manage that outside at the memory. For returning the retrieved documents, we just need to pass them through all the way.
위와 같이 메모리를 사용하는 방법을 보여줍니다. 메모리의 경우 메모리 외부에서 관리해야 합니다. 검색된 문서를 반환하려면 해당 문서를 끝까지 전달하기만 하면 됩니다.
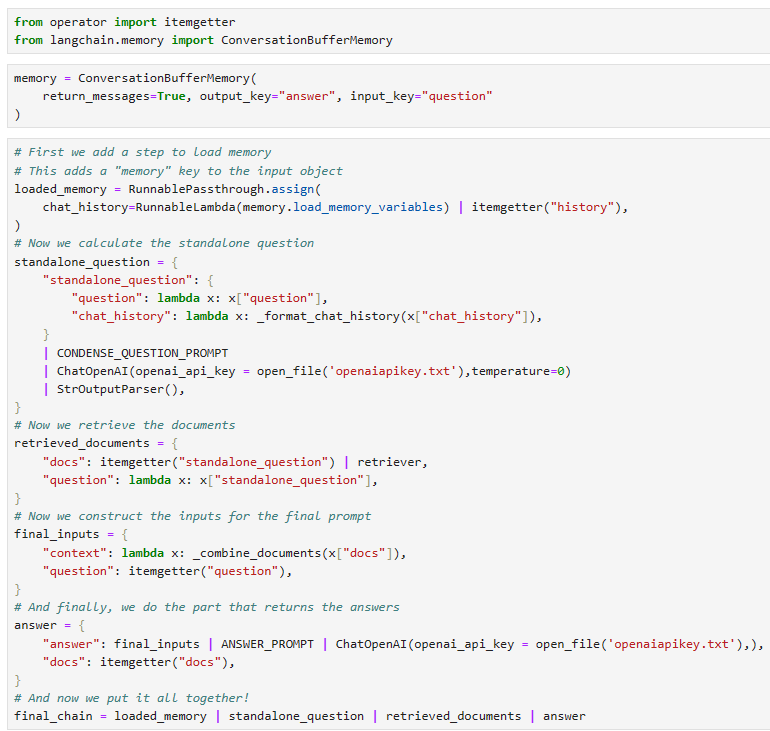
from operator import itemgetter
from langchain.memory import ConversationBufferMemory
# First we add a step to load memory# This adds a "memory" key to the input object
loaded_memory = RunnablePassthrough.assign(
chat_history=RunnableLambda(memory.load_memory_variables) | itemgetter("history"),
)
# Now we calculate the standalone question
standalone_question = {
"standalone_question": {
"question": lambda x: x["question"],
"chat_history": lambda x: _format_chat_history(x["chat_history"]),
}
| CONDENSE_QUESTION_PROMPT
| ChatOpenAI(temperature=0)
| StrOutputParser(),
}
# Now we retrieve the documents
retrieved_documents = {
"docs": itemgetter("standalone_question") | retriever,
"question": lambda x: x["standalone_question"],
}
# Now we construct the inputs for the final prompt
final_inputs = {
"context": lambda x: _combine_documents(x["docs"]),
"question": itemgetter("question"),
}
# And finally, we do the part that returns the answers
answer = {
"answer": final_inputs | ANSWER_PROMPT | ChatOpenAI(),
"docs": itemgetter("docs"),
}
# And now we put it all together!
final_chain = loaded_memory | standalone_question | retrieved_documents | answer
이 코드는 Langchain에서 대화 메모리를 사용하여 대화 기록을 기반으로 독립적인 질문을 재구성하고 답변을 생성하는 일련의 작업을 수행합니다. 다음은 주요 단계와 구성 요소의 설명입니다.
ConversationBufferMemory 초기화:
ConversationBufferMemory는 대화 기록을 저장하고 검색하는 메모리를 나타냅니다. 이 메모리에 저장된 대화 기록은 return_messages=True로 설정되어 메모리에서 반환될 것이고, output_key 및 input_key는 각각 출력과 입력과 관련된 키를 정의합니다.
loaded_memory 단계:
RunnablePassthrough.assign을 사용하여 메모리에서 대화 기록을 로드하고 chat_history로 저장합니다. 이로써 대화 기록을 메모리에서 가져올 수 있습니다.
standalone_question 단계:
standalone_question은 대화 기록에서 새로운 독립적인 질문을 생성하는 역할을 합니다.
입력으로부터 "question" 및 "chat_history"를 추출하여 CONDENSE_QUESTION_PROMPT와 ChatOpenAI를 사용하여 질문을 재구성하고, 결과를 StrOutputParser를 사용하여 텍스트로 파싱합니다.
retrieved_documents 단계:
retrieved_documents는 재구성된 질문을 기반으로 관련 문서를 검색합니다.
"question"을 질문으로, "standalone_question"을 기존의 독립적인 질문으로 사용하여 검색을 수행하고 검색 결과를 "docs"로 저장합니다.
final_inputs 단계:
final_inputs는 독립적인 질문과 검색된 문서를 조합하여 최종 입력을 준비합니다. "context"는 검색된 문서를 나타내며 "question"은 독립적인 질문을 나타냅니다.
answer 단계:
answer는 최종 입력을 기반으로 답변을 생성하는 역할을 합니다.
"answer"는 최종 질문 및 문서를 사용하여 ANSWER_PROMPT와 ChatOpenAI를 통해 답변을 생성하고 결과를 "answer"로 저장합니다.
final_chain 단계:
모든 단계를 합쳐서 최종 처리 체인을 생성합니다.
loaded_memory를 통해 대화 기록을 로드하고, standalone_question을 통해 독립적인 질문을 생성하며, retrieved_documents를 사용하여 문서를 검색하고, answer를 통해 답변을 생성합니다.
이렇게 구성된 final_chain은 주어진 입력을 처리하여 대화 기록, 독립적인 질문, 검색된 문서를 사용하여 답변을 생성합니다.
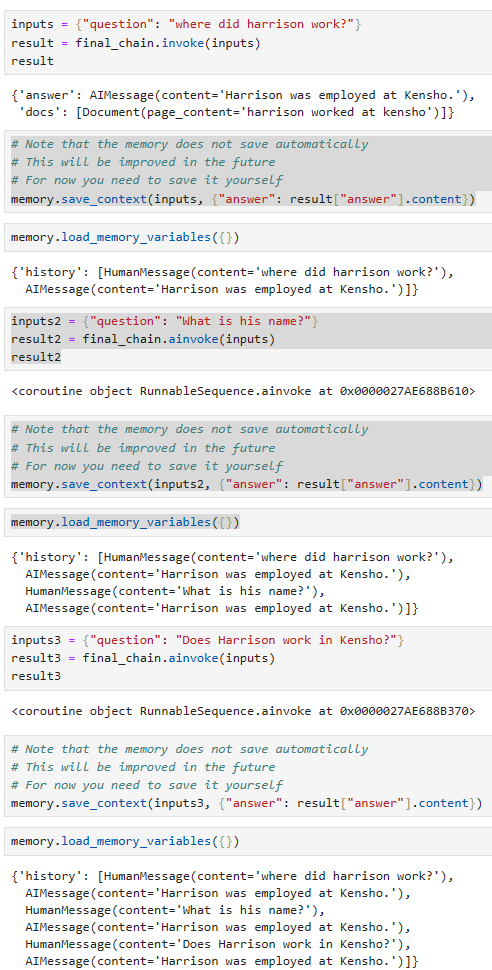
inputs = {"question": "where did harrison work?"}
result = final_chain.invoke(inputs)
result
    {'answer': AIMessage(content='Harrison was employed at Kensho.', additional_kwargs={}, example=False),
     'docs': [Document(page_content='harrison worked at kensho', metadata={})]}
# Note that the memory does not save automatically# This will be improved in the future# For now you need to save it yourself
memory.save_context(inputs, {"answer": result["answer"].content})
memory.load_memory_variables({})
    {'history': [HumanMessage(content='where did harrison work?', additional_kwargs={}, example=False),
      AIMessage(content='Harrison was employed at Kensho.', additional_kwargs={}, example=False)]}
이 코드는 앞서 정의한 final_chain을 사용하여 질문을 처리하고 결과를 반환하는 방법을 보여줍니다.
inputs 딕셔너리:
"question" 키를 사용하여 질문을 정의한 후, 이를 final_chain.invoke에 전달할 입력으로 사용합니다.
final_chain.invoke 호출:
final_chain을 사용하여 입력 데이터를 처리하고, 질문을 재구성하고 검색된 문서를 기반으로 답변을 생성합니다.
result 변수에 결과가 저장되며, 결과에는 "answer" 키가 있는데 이 키를 사용하여 답변을 얻을 수 있습니다.
메모리 관리:
주석으로 설명되어 있지만, 메모리가 자동으로 저장되지 않으며 사용자가 메모리를 수동으로 저장해야 합니다.
따라서 memory.save_context를 사용하여 현재의 문맥과 결과를 메모리에 저장합니다.
이렇게 저장한 데이터는 memory.load_memory_variables를 사용하여 다시 불러올 수 있습니다.
즉, 코드는 주어진 질문에 대한 답변을 생성하고, 필요한 경우 메모리에 결과를 저장하고 불러올 수 있도록 하는 데 사용됩니다.
교재에 있는 질문 Where did harrison work? 이외에 두개의 질문 What is his name? , Does Harrison work in Kensho? 를 추가 했습니다. invoke() 를 사용하면 에러가 나서 ainvoke()를 사용했는데 HumanMessage 즉 질문은 제대로 차곡차곡 저장이 되는데 대답은 해당 질문에 맞는 대답이 나오지 않고 첫번째 대답만 계속 나오네요. 해당 질문에 대한 대답을 얻으려면 좀 다른 방법으로 해야하나 봅니다. 나중에 따로 공부를 좀 해야 겠네요.
Example code for accomplishing common tasks with the LangChain Expression Language (LCEL). These examples show how to compose different Runnable (the core LCEL interface) components to achieve various tasks. If you're just getting acquainted with LCEL, thePrompt + LLMpage is a good place to start.
LCEL(LangChain Expression Language)을 사용하여 일반적인 작업을 수행하기 위한 예제 코드입니다. 이 예제에서는 다양한 작업을 수행하기 위해 다양한 Runnable(핵심 LCEL 인터페이스) 구성 요소를 구성하는 방법을 보여줍니다. LCEL에 대해 이제 막 익숙해졌다면 Prompt + LLM 페이지부터 시작하는 것이 좋습니다.
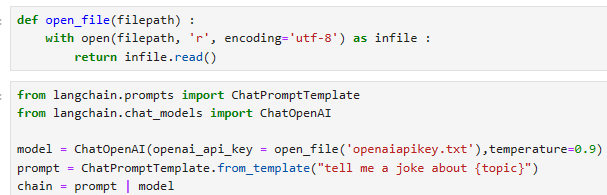
The simplest composition is just combing a prompt and model to create a chain that takes user input, adds it to a prompt, passes it to a model, and returns the raw model output.
가장 간단한 구성은 프롬프트와 모델을 결합하여 사용자 입력을 받아 프롬프트에 추가하고 모델에 전달하고 원시 모델 출력을 반환하는 체인을 만드는 것입니다.
Note, you can mix and match PromptTemplate/ChatPromptTemplates and LLMs/ChatModels as you like here.
여기에서는 PromptTemplate/ChatPromptTemplate과 LLM/ChatModel을 원하는 대로 혼합하고 일치시킬 수 있습니다.
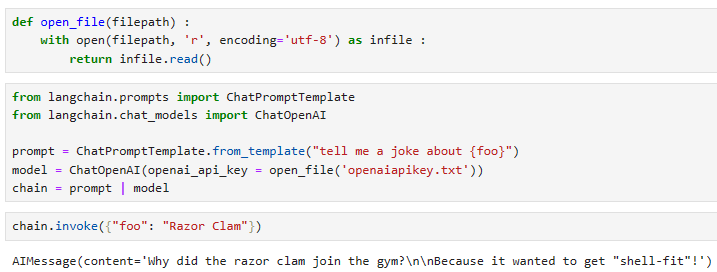
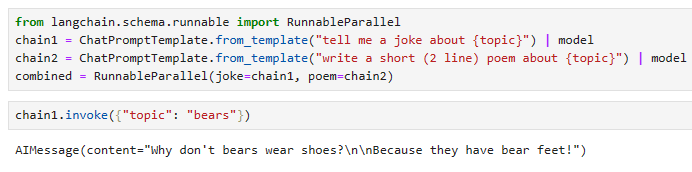
from langchain.prompts import ChatPromptTemplate
from langchain.chat_models import ChatOpenAI

prompt = ChatPromptTemplate.from_template("tell me a joke about {foo}")
model = ChatOpenAI()
chain = prompt | model
이 코드는 LangChain의 프롬프트 및 ChatOpenAI 모델을 사용하여 무언가에 대한 농담을 생성하는 방법을 보여줍니다. 코드를 한국어로 설명하면 다음과 같습니다:
ChatPromptTemplate 설정:
ChatPromptTemplate.from_template("tell me a joke about {foo}")를 사용하여 질문에 대한 템플릿을 설정합니다. 이 템플릿은 "{foo}" 부분에 대상 주제(또는 대상 단어)를 대신하여 사용자로부터 농담을 요청하는 용도로 사용됩니다.
ChatOpenAI 모델 설정:
ChatOpenAI()를 사용하여 ChatOpenAI 모델을 설정합니다. 이 모델은 주어진 텍스트 입력에 대해 자연스러운 대화를 생성하는 역할을 합니다.
대화 체인 설정:
prompt | model을 사용하여 prompt에서 생성한 템플릿과 ChatOpenAI 모델을 연결하여 대화 체인을 설정합니다. 이렇게 구성된 체인은 주어진 주제(대상)를 사용하여 농담을 생성할 수 있습니다.
대화 체인 호출:
chain.invoke({"foo": "elephants"})와 같이 chain을 호출하면, "{foo}" 부분에 "elephants"와 같은 대상이 삽입되어서 "elephants"에 관한 농담을 생성하게 됩니다.
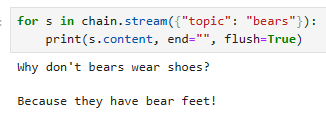
chain.invoke({"foo": "bears"})
이 코드는 사용자로부터 주제를 받아 해당 주제에 대한 농담을 생성하는 간단한 대화 체인을 설정하고 호출하는 방법을 보여줍니다.
AIMessage(content="Why don't bears wear shoes?\n\nBecause they have bear feet!", additional_kwargs={}, example=False)
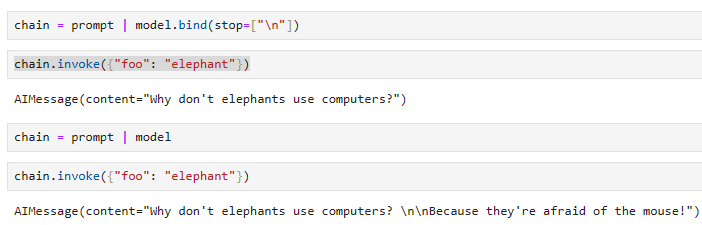
Often times we want to attach kwargs that'll be passed to each model call. Here are a few examples of that:
종종 우리는 각 모델 호출에 전달될 kwargs를 첨부하려고 합니다. 다음은 이에 대한 몇 가지 예입니다.
Attaching Stop Sequences
chain = prompt | model.bind(stop=["\n"])
chain.invoke({"foo": "bears"})
AIMessage(content='Why did the bear never wear shoes?', additional_kwargs={}, example=False)
이 코드는 주어진 대화 체인에 대한 변경 사항을 설명하고, "chain.invoke" 메소드를 통해 어떻게 호출하는지 설명하는 것입니다. 코드를 한국어로 설명하면 다음과 같습니다:
대화 체인 설정:
이전 코드와 마찬가지로 chain이라는 대화 체인을 설정합니다. 이 대화 체인은 특정 주제에 관한 농담을 생성하기 위해 prompt와 model을 연결한 것과 동일합니다.
model.bind 설정:
model.bind(stop=["\n"])를 사용하여 model에 대한 추가적인 설정을 지정합니다. 여기서 "stop" 파라미터는 모델이 대화 생성을 중지할 때 사용할 중지 토큰을 정의합니다. "\n"은 줄 바꿈 문자로, 모델은 이 문자를 만나면 대화 생성을 중지합니다.
대화 체인 호출:
chain.invoke({"foo": "bears"})를 통해 chain을 호출하면, "{foo}" 부분에 "bears"가 대입되어 해당 주제("bears"에 관한 농담)에 대한 대화를 생성합니다. 중지 토큰 설정이 적용되어 모델이 줄 바꿈 문자를 만나면 대화 생성을 중지합니다.
이 코드는 대화 체인에 대한 중지 토큰 설정을 추가하여 모델이 특정 지점에서 대화 생성을 중지하도록 하는 방법을 보여줍니다.
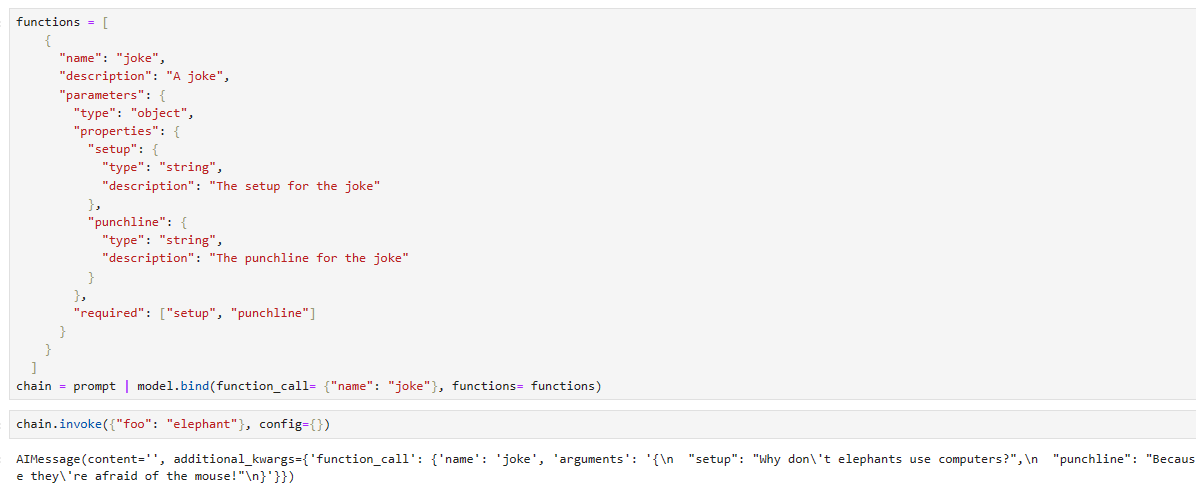
Attaching Function Call information
functions = [
    {
      "name": "joke",
      "description": "A joke",
      "parameters": {
        "type": "object",
        "properties": {
          "setup": {
            "type": "string",
            "description": "The setup for the joke"
          },
          "punchline": {
            "type": "string",
            "description": "The punchline for the joke"
          }
        },
        "required": ["setup", "punchline"]
      }
    }
  ]
chain = prompt | model.bind(function_call= {"name": "joke"}, functions= functions)
chain.invoke({"foo": "bears"}, config={})
AIMessage(content='', additional_kwargs={'function_call': {'name': 'joke', 'arguments': '{\n "setup": "Why don\'t bears wear shoes?",\n "punchline": "Because they have bear feet!"\n}'}}, example=False)
이 코드는 대화 체인과 함수 호출을 사용하여 농담을 생성하는 방법을 설명합니다.
함수 정의:
functions 리스트에 농담을 생성하는 함수를 정의합니다. 이 함수는 "setup"과 "punchline" 두 가지 매개변수를 받아서 농담을 생성합니다. "setup"은 농담의 시작 부분을, "punchline"은 농담의 결말 부분을 나타냅니다.
대화 체인 설정:
prompt와 model을 연결하여 대화 체인을 설정합니다. 이전과 마찬가지로 prompt는 대상 주제를 사용하여 농담을 생성하는 템플릿을 나타내고, model은 대화 생성에 사용됩니다.
model.bind(function_call={"name": "joke"}, functions=functions)를 사용하여 model에 대한 추가 설정을 지정합니다. 여기서 "function_call"은 호출할 함수의 이름을 "joke"로 지정하고, "functions"은 이 함수가 사용할 정의한 함수 리스트입니다.
대화 체인 호출:
chain.invoke({"foo": "bears"}, config={})를 통해 chain을 호출하면, "{foo}" 부분에 "bears"가 대입되어 해당 주제("bears"에 관한 농담)에 대한 대화를 생성합니다. 또한, "config" 파라미터는 추가적인 설정을 나타냅니다.
이 코드는 함수 호출과 대화 체인을 결합하여 주어진 주제에 대한 농담을 생성하는 방법을 보여줍니다. 설정된 함수가 사용자가 제공한 주제를 기반으로 농담을 생성합니다.
PromptTemplate + LLM + OutputParser
We can also add in an output parser to easily transform the raw LLM/ChatModel output into a more workable format
또한 출력 파서를 추가하여 원시 LLM/ChatModel 출력을 보다 실행 가능한 형식으로 쉽게 변환할 수 있습니다.
from langchain.schema.output_parser import StrOutputParser

chain = prompt | model | StrOutputParser()
Notice that this now returns a string - a much more workable format for downstream tasks
이제 이는 다운스트림 작업에 훨씬 더 실행 가능한 형식인 문자열을 반환합니다.
chain.invoke({"foo": "bears"})
"Why don't bears wear shoes?\n\nBecause they have bear feet!"
이 코드는 대화 체인에 대한 설명을 제공하고, "chain.invoke" 메소드를 사용하여 어떻게 호출하는지 설명하는 것입니다.
대화 체인 설정:
이전 코드와 마찬가지로 chain이라는 대화 체인을 설정합니다. 이 대화 체인은 특정 주제("foo"에 대한 값)에 관한 농담을 생성하기 위해 prompt와 model을 연결한 것과 동일합니다.
대화 체인 호출:
chain.invoke({"foo": "bears"})를 통해 chain을 호출하면, "{foo}" 부분에 "bears"가 대입되어 해당 주제("bears"에 관한 농담)에 대한 대화를 생성합니다.
출력 파싱:
StrOutputParser()를 사용하여 대화 체인의 출력을 문자열로 파싱하고 반환합니다.
이 코드는 대화 체인을 호출하여 특정 주제에 대한 농담을 생성하고, 생성된 결과를 문자열로 파싱하여 반환하는 예를 보여줍니다.
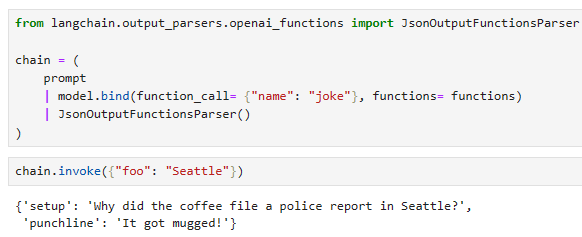
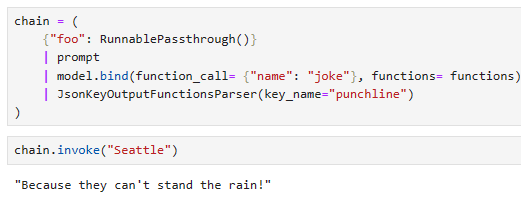
Functions Output Parser
When you specify the function to return, you may just want to parse that directly
    {'setup': "Why don't bears like fast food?",
     'punchline': "Because they can't catch it!"}
이 코드는 대화 체인의 출력을 JSON 형식으로 파싱하는 방법을 설명합니다.
대화 체인 설정:
chain을 설정하고, prompt와 model을 연결하여 대화 체인을 생성합니다.
model.bind(function_call={"name": "joke"}, functions=functions)를 사용하여 model에 대한 추가 설정을 지정합니다. 여기서 "function_call"은 호출할 함수의 이름을 "joke"로 지정하고, "functions"는 이 함수가 사용할 함수 리스트입니다.
출력 파싱 설정:
JsonOutputFunctionsParser()를 사용하여 대화 체인의 출력을 JSON 형식으로 파싱하도록 설정합니다.
대화 체인 호출:
chain.invoke({"foo": "bears"})를 통해 chain을 호출하면, "{foo}" 부분에 "bears"가 대입되어 해당 주제("bears"에 관한 농담)에 대한 대화를 생성합니다.
JSON 출력 파싱:
JsonOutputFunctionsParser()가 설정되어 있으므로, 대화 체인의 출력은 JSON 형식으로 파싱되며, 파싱된 JSON 객체를 반환합니다.
이 코드는 대화 체인의 출력을 JSON 형식으로 파싱하여 반환하는 방법을 보여줍니다. 이것은 출력 결과를 구조화된 데이터로 처리하거나 다른 목적에 활용할 때 유용합니다.
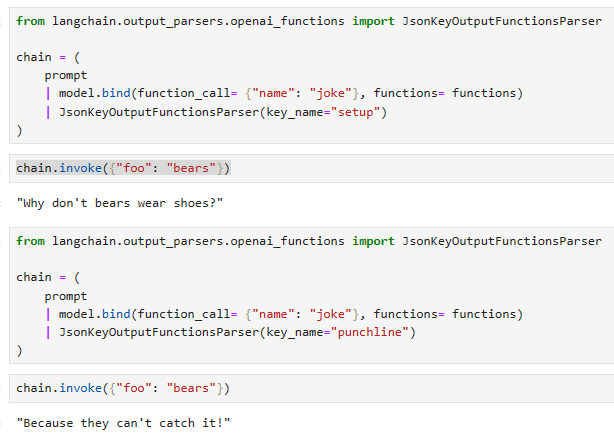
model.bind(function_call={"name": "joke"}, functions=functions)를 사용하여 model에 대한 추가 설정을 지정합니다. 여기서 "function_call"은 호출할 함수의 이름을 "joke"로 지정하고, "functions"는 이 함수가 사용할 함수 리스트입니다.
출력 파싱 설정:
JsonKeyOutputFunctionsParser(key_name="setup")를 사용하여 대화 체인의 출력에서 "setup"이라는 특정 키의 값을 추출하도록 설정합니다.
대화 체인 호출:
chain.invoke({"foo": "bears"})를 통해 chain을 호출하면, "{foo}" 부분에 "bears"가 대입되어 해당 주제("bears"에 관한 농담)에 대한 대화를 생성합니다.
JSON 출력 파싱:
JsonKeyOutputFunctionsParser(key_name="setup")가 설정되어 있으므로, 대화 체인의 출력에서 "setup"이라는 특정 키의 값을 추출하고, 이 값을 반환합니다.
이 코드는 대화 체인의 출력에서 특정 JSON 키를 추출하여 반환하는 방법을 보여줍니다. 이것은 대화 결과에서 원하는 정보를 추출하거나 가공할 때 유용합니다.
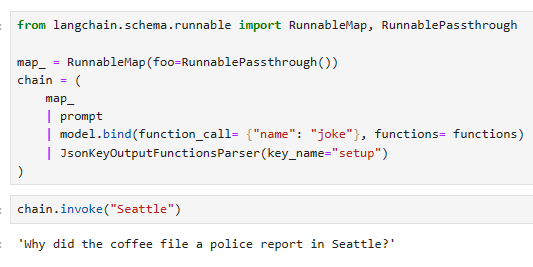
Simplifying input
To make invocation even simpler, we can add aRunnableMapto take care of creating the prompt input dict for us:
호출을 더욱 간단하게 만들기 위해 RunnableMap을 추가하여 프롬프트 입력 사전 생성을 처리할 수 있습니다.
이 코드는 대화 체인의 출력에서 특정 JSON 키를 추출하는 방법을 보여주며, 중간 단계에서 매핑을 사용하는 예제를 제공합니다.
매핑 설정:
RunnableMap(foo=RunnablePassthrough())를 사용하여 map_을 설정합니다. 이 매핑은 "foo"라는 키를 가진 데이터를 "RunnablePassthrough()"로 전달합니다.
대화 체인 설정:
chain을 설정하고, map_를 첫 번째 단계로 연결합니다.
그 다음으로 prompt와 model을 연결하여 대화 체인을 생성합니다.
model.bind(function_call={"name": "joke"}, functions=functions)를 사용하여 model에 대한 추가 설정을 지정합니다. 여기서 "function_call"은 호출할 함수의 이름을 "joke"로 지정하고, "functions"는 이 함수가 사용할 함수 리스트입니다.
JsonKeyOutputFunctionsParser(key_name="setup")를 사용하여 대화 체인의 출력에서 "setup"이라는 특정 키의 값을 추출하도록 설정합니다.
대화 체인 호출:
chain.invoke("bears")를 통해 chain을 호출하면, "bears"가 "foo" 키로 전달됩니다. 이 데이터가 대화 체인으로 전달되어 해당 주제("bears"에 관한 농담)에 대한 대화를 생성합니다.
JSON 출력 파싱:
JsonKeyOutputFunctionsParser(key_name="setup")가 설정되어 있으므로, 대화 체인의 출력에서 "setup"이라는 특정 키의 값을 추출하고, 이 값을 반환합니다.
이 코드는 데이터를 중간 단계에서 매핑하고, 그 후 대화 체인의 결과에서 특정 키를 추출하는 방법을 보여줍니다. 이것은 데이터 전달 및 처리를 효율적으로 관리할 때 유용합니다.
Since we're composing our map with another Runnable, we can even use some syntactic sugar and just use a dict:
다른 Runnable을 사용하여 맵을 구성하고 있으므로 syntactic sugar 을 사용하고 dict 만 사용할 수도 있습니다.
이 코드는 대화 체인을 설정하고 호출하는 방법을 보여주며, 중간 단계에서 데이터를 매핑합니다.
대화 체인 설정:
{"foo": RunnablePassthrough()}를 사용하여 데이터를 "foo" 키에 대한 "RunnablePassthrough()"로 설정합니다. 이 매핑은 "foo" 키를 가진 데이터를 "RunnablePassthrough()"로 전달합니다.
대화 체인 구성:
chain을 설정하고, 매핑된 데이터를 첫 번째 단계로 연결합니다. "foo" 키에 "bears" 데이터가 전달됩니다.
그 다음으로 prompt와 model을 연결하여 대화 체인을 생성합니다.
model.bind(function_call={"name": "joke"}, functions=functions)를 사용하여 model에 대한 추가 설정을 지정합니다. 여기서 "function_call"은 호출할 함수의 이름을 "joke"로 지정하고, "functions"는 이 함수가 사용할 함수 리스트입니다.
JsonKeyOutputFunctionsParser(key_name="setup")를 사용하여 대화 체인의 출력에서 "setup"이라는 특정 키의 값을 추출하도록 설정합니다.
대화 체인 호출:
chain.invoke("bears")를 통해 chain을 호출하면, "bears"가 "foo" 키로 전달됩니다. 이 데이터가 대화 체인으로 전달되어 해당 주제("bears"에 관한 농담)에 대한 대화를 생성합니다.
JSON 출력 파싱:
JsonKeyOutputFunctionsParser(key_name="setup")가 설정되어 있으므로, 대화 체인의 출력에서 "setup"이라는 특정 키의 값을 추출하고, 이 값을 반환합니다.
이 코드는 데이터를 중간 단계에서 매핑하고, 그 후 대화 체인의 결과에서 특정 키를 추출하는 방법을 보여줍니다. 이것은 데이터 전달 및 처리를 효율적으로 관리할 때 유용합니다.
This notebook covers how to do routing in the LangChain Expression Language.
이 노트는 LangChain Expression Language에서 라우팅을 수행하는 방법을 다룹니다.
Routing allows you to create non-deterministic chains where the output of a previous step defines the next step. Routing helps provide structure and consistency around interactions with LLMs.
라우팅을 사용하면 이전 단계의 출력이 다음 단계를 정의하는 비결정적 체인을 생성할 수 있습니다. 라우팅은 LLM과의 상호 작용에 대한 구조와 일관성을 제공하는 데 도움이 됩니다.
There are two ways to perform routing: 라우팅을 수행하는 방법에는 두 가지가 있습니다.
Using aRunnableBranch. RunnableBranch를 사용합니다.
Writing custom factory function that takes the input of a previous step and returns arunnable. Importantly, this should return arunnableand NOT actually execute. 이전 단계의 입력을 받아 실행 파일을 반환하는 사용자 정의 팩토리 함수를 작성합니다. 중요한 것은 실행 가능 파일을 반환해야 하며 실제로 실행되어서는 안 된다는 것입니다.
We'll illustrate both methods using a two step sequence where the first step classifies an input question as being aboutLangChain,Anthropic, orOther, then routes to a corresponding prompt chain.
첫 번째 단계에서는 입력 질문을 LangChain, Anthropic 또는 기타에 관한 것으로 분류한 다음 해당 프롬프트 체인으로 라우팅하는 2단계 시퀀스를 사용하여 두 방법을 모두 설명합니다.
Using a RunnableBranch
ARunnableBranchis initialized with a list of (condition, runnable) pairs and a default runnable. It selects which branch by passing each condition the input it's invoked with. It selects the first condition to evaluate to True, and runs the corresponding runnable to that condition with the input.
RunnableBranch는 ( condition, runnable ) 쌍 목록과 기본 실행 가능 항목으로 초기화됩니다. 호출된 입력에 각 조건을 전달하여 어떤 분기를 선택합니다. True로 평가할 첫 번째 조건을 선택하고 입력과 함께 해당 조건에 해당하는 실행 가능 항목을 실행합니다.
If no provided conditions match, it runs the default runnable.
제공된 조건이 일치하지 않으면 기본 실행 가능 파일을 실행합니다.
Here's an example of what it looks like in action:
실제 작동 모습의 예는 다음과 같습니다.
from langchain.prompts import PromptTemplate
from langchain.chat_models import ChatAnthropic
from langchain.schema.output_parser import StrOutputParser
First, let's create a chain that will identify incoming questions as being aboutLangChain,Anthropic, orOther:
먼저 들어오는 질문을 LangChain, Anthropic 또는 기타에 관한 것으로 식별하는 체인을 만들어 보겠습니다.
chain = PromptTemplate.from_template("""Given the user question below, classify it as either being about `LangChain`, `Anthropic`, or `Other`.

Do not respond with more than one word.

<question>
{question}
</question>

Classification:""") | ChatAnthropic() | StrOutputParser()
chain.invoke({"question": "how do I call Anthropic?"})
이 코드는 사용자 질문을 주어진 세 가지 범주 중 하나로 분류하는 작업을 수행하는 예시를 제공합니다.
PromptTemplate 설정:
PromptTemplate.from_template()를 사용하여 대화 템플릿을 설정합니다. 이 템플릿은 주어진 사용자 질문을 받아들이고 해당 질문을 "LangChain", "Anthropic", 또는 "Other" 중 하나로 분류합니다.
{question}은 템플릿 내에서 사용자의 질문을 나타내는 변수입니다.
ChatAnthropic 모델 설정:
ChatAnthropic()을 사용하여 ChatAnthropic 모델을 설정합니다. 이 모델을 사용하여 주어진 질문을 분류하고 분류 결과를 출력합니다.
StrOutputParser 설정:
StrOutputParser()는 출력을 문자열로 변환하기 위해 사용되는 파서입니다. 이 파서는 모델의 출력을 문자열 형식으로 변환합니다.
대화 체인 설정:
PromptTemplate을 통해 설정한 템플릿, ChatAnthropic 모델 및 StrOutputParser를 사용하여 대화 체인을 설정합니다. 이 대화 체인은 사용자의 질문을 받아들이고 해당 질문을 분류하는 역할을 수행합니다.
대화 체인 호출:
chain.invoke({"question": "how do I call Anthropic?"})는 "chain" 대화 체인을 호출하고 주어진 사용자 질문("how do I call Anthropic?")을 처리합니다.
이 코드는 사용자 질문을 분류하고 분류 결과를 출력하는 간단한 예시를 제공합니다. 결과는 "chain"을 통해 반환됩니다.
' Anthropic'
Now, let's create three sub chains:
이제 세 개의 하위 체인을 만들어 보겠습니다.
langchain_chain = PromptTemplate.from_template("""You are an expert in langchain. \
Always answer questions starting with "As Harrison Chase told me". \
Respond to the following question:

Question: {question}
Answer:""") | ChatAnthropic()
anthropic_chain = PromptTemplate.from_template("""You are an expert in anthropic. \
Always answer questions starting with "As Dario Amodei told me". \
Respond to the following question:

Question: {question}
Answer:""") | ChatAnthropic()
general_chain = PromptTemplate.from_template("""Respond to the following question:

Question: {question}
Answer:""") | ChatAnthropic()
full_chain.invoke({"question": "how do I use Anthropic?"})
이 코드는 주어진 질문에 대한 응답을 준비하기 위해 어떤 특정 전문 분야의 전문가 역할을 하는 예시를 제공합니다.
PromptTemplate 설정:
PromptTemplate.from_template()를 사용하여 대화 템플릿을 설정합니다. 각각 "LangChain", "Anthropic", 그리고 일반 질문에 대한 세 가지 다른 템플릿을 생성합니다.
각 템플릿은 주어진 질문을 받아들이고 해당 분야의 전문가 역할을 시뮬레이션하는 역할을 합니다.
ChatAnthropic 모델 설정:
ChatAnthropic()을 사용하여 ChatAnthropic 모델을 설정합니다. 이 모델은 주어진 질문에 대한 응답을 생성하는 역할을 합니다.
RunnableBranch 설정:
RunnableBranch는 각 질문을 어떤 분야의 전문가에게 보낼지 결정하는 조건과 해당 분야의 전문가 모델을 연결합니다.
예를 들어, "topic" 변수에 "anthropic"이 포함되어 있으면 anthropic_chain을 사용하고, "topic" 변수에 "langchain"이 포함되어 있으면 langchain_chain을 사용합니다. 그렇지 않으면 일반적인 질문에 대한 general_chain을 사용합니다.
대화 체인 설정:
full_chain은 주어진 질문과 해당 질문의 주제("topic")를 받아들이는 입력 변수를 정의합니다.
branch를 통해 어떤 전문 분야의 전문가 모델을 사용할지 결정하고 해당 모델에 질문을 전달합니다.
대화 체인 호출:
full_chain.invoke({"question": "how do I use Anthropic?"})는 "full_chain" 대화 체인을 호출하고 주어진 질문("how do I use Anthropic?")을 처리합니다. 이때, "topic" 변수는 "Anthropic"과 연관된 전문가 모델인 anthropic_chain으로 이어집니다.
이 코드는 주어진 질문에 따라 어떤 전문 분야의 전문가 모델을 사용하여 응답을 생성하는 방법을 보여줍니다. 결과는 "full_chain"을 통해 반환됩니다.
AIMessage(content=" As Dario Amodei told me, here are some ways to use Anthropic:\n\n- Sign up for an account on Anthropic's website to access tools like Claude, Constitutional AI, and Writer. \n\n- Use Claude for tasks like email generation, customer service chat, and QA. Claude can understand natural language prompts and provide helpful responses.\n\n- Use Constitutional AI if you need an AI assistant that is harmless, honest, and helpful. It is designed to be safe and aligned with human values.\n\n- Use Writer to generate natural language content for things like marketing copy, stories, reports, and more. Give it a topic and prompt and it will create high-quality written content.\n\n- Check out Anthropic's documentation and blog for tips, tutorials, examples, and announcements about new capabilities as they continue to develop their AI technology.\n\n- Follow Anthropic on social media or subscribe to their newsletter to stay up to date on new features and releases.\n\n- For most people, the easiest way to leverage Anthropic's technology is through their website - just create an account to get started!", additional_kwargs={}, example=False)
full_chain.invoke({"question": "how do I use LangChain?"})
AIMessage(content=' As Harrison Chase told me, here is how you use LangChain:\n\nLangChain is an AI assistant that can have conversations, answer questions, and generate text. To use LangChain, you simply type or speak your input and LangChain will respond. \n\nYou can ask LangChain questions, have discussions, get summaries or explanations about topics, and request it to generate text on a subject. Some examples of interactions:\n\n- Ask general knowledge questions and LangChain will try to answer factually. For example "What is the capital of France?"\n\n- Have conversations on topics by taking turns speaking. You can prompt the start of a conversation by saying something like "Let\'s discuss machine learning"\n\n- Ask for summaries or high-level explanations on subjects. For example "Can you summarize the main themes in Shakespeare\'s Hamlet?" \n\n- Give creative writing prompts or requests to have LangChain generate text in different styles. For example "Write a short children\'s story about a mouse" or "Generate a poem in the style of Robert Frost about nature"\n\n- Correct LangChain if it makes an inaccurate statement and provide the right information. This helps train it.\n\nThe key is interacting naturally and giving it clear prompts and requests', additional_kwargs={}, example=False)
full_chain.invoke({"question": "how do I use Anthroipc?"})
이 코드는 주어진 질문에 따라 적절한 전문 분야의 전문가 모델을 선택하여 응답을 생성하는 예시를 제공합니다.
route 함수:
route(info) 함수는 주어진 info 딕셔너리에 있는 "topic" 키의 값을 기반으로 전문 분야를 선택합니다.
만약 "topic"에 "anthropic"이 포함되어 있으면 anthropic_chain을 반환하고, "langchain"이 포함되어 있으면 langchain_chain을 반환합니다. 그렇지 않으면 general_chain을 반환합니다.
RunnableLambda 설정:
RunnableLambda는 함수를 실행할 수 있는 실행 가능한 객체로 설정됩니다. 이 경우, route 함수가 입력을 받아서 해당 질문을 처리할 적절한 전문 분야의 전문가 모델을 반환합니다.
대화 체인 설정:
full_chain은 주어진 질문("question")과 해당 질문의 주제("topic")를 받아들이는 입력 변수를 정의합니다.
RunnableLambda(route)를 통해 어떤 전문 분야의 전문가 모델을 사용할지 결정하고 해당 모델에 질문을 전달합니다.
대화 체인 호출:
full_chain.invoke({"question": "how do I use Anthropic?"})는 "full_chain" 대화 체인을 호출하고 주어진 질문("how do I use Anthropic?")을 처리합니다. 이때, "topic" 변수에 따라 anthropic_chain이 선택되어 해당 전문 분야에 대한 응답을 생성합니다.
이 코드는 주어진 질문의 주제에 따라 적절한 전문 분야의 전문가 모델을 선택하여 응답을 생성하는 방법을 보여줍니다. 결과는 "full_chain"을 통해 반환됩니다.
AIMessage(content=' As Dario Amodei told me, to use Anthropic IPC you first need to import it:\n\n```python\nfrom anthroipc import ic\n```\n\nThen you can create a client and connect to the server:\n\n```python \nclient = ic.connect()\n```\n\nAfter that, you can call methods on the client and get responses:\n\n```python\nresponse = client.ask("What is the meaning of life?")\nprint(response)\n```\n\nYou can also register callbacks to handle events: \n\n```python\ndef on_poke(event):\n print("Got poked!")\n\nclient.on(\'poke\', on_poke)\n```\n\nAnd that\'s the basics of using the Anthropic IPC client library for Python! Let me know if you have any other questions!', additional_kwargs={}, example=False)
full_chain.invoke({"question": "how do I use LangChain?"})
AIMessage(content=' As Harrison Chase told me, to use LangChain you first need to sign up for an API key at platform.langchain.com. Once you have your API key, you can install the Python library and write a simple Python script to call the LangChain API. Here is some sample code to get started:\n\n```python\nimport langchain\n\napi_key = "YOUR_API_KEY"\n\nlangchain.set_key(api_key)\n\nresponse = langchain.ask("What is the capital of France?")\n\nprint(response.response)\n```\n\nThis will send the question "What is the capital of France?" to the LangChain API and print the response. You can customize the request by providing parameters like max_tokens, temperature, etc. The LangChain Python library documentation has more details on the available options. The key things are getting an API key and calling langchain.ask() with your question text. Let me know if you have any other questions!', additional_kwargs={}, example=False)
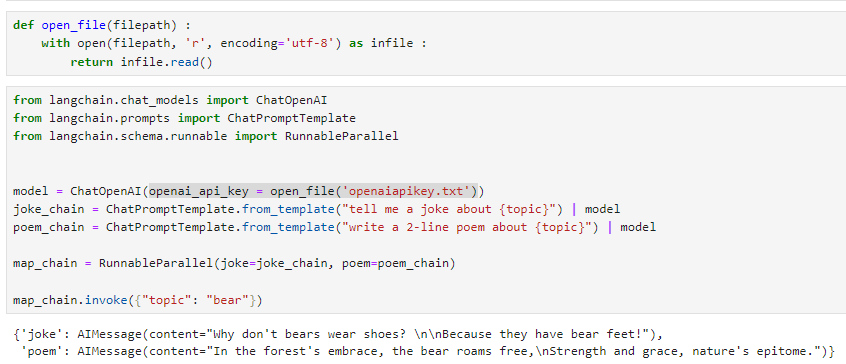
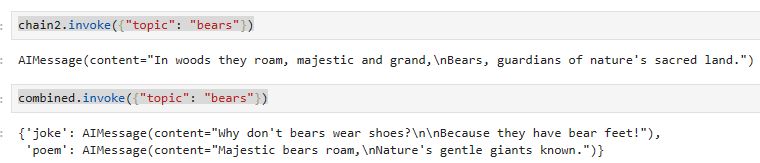
RunnableParallel (aka. RunnableMap) makes it easy to execute multiple Runnables in parallel, and to return the output of these Runnables as a map.
RunnableParallel(일명 RunnableMap)을 사용하면 여러 Runnable을 병렬로 쉽게 실행하고 이러한 Runnable의 출력을 맵으로 반환할 수 있습니다.
from langchain.chat_models import ChatOpenAI
from langchain.prompts import ChatPromptTemplate
from langchain.schema.runnable import RunnableParallel


model = ChatOpenAI()
joke_chain = ChatPromptTemplate.from_template("tell me a joke about {topic}") | model
poem_chain = ChatPromptTemplate.from_template("write a 2-line poem about {topic}") | model

map_chain = RunnableParallel(joke=joke_chain, poem=poem_chain)

map_chain.invoke({"topic": "bear"})
이 코드는 ChatOpenAI 모델을 사용하여 주제에 관한 농담 및 시를 생성하는 예시를 제공합니다.
ChatOpenAI 모델 설정:
ChatOpenAI()를 사용하여 ChatOpenAI 모델을 설정합니다. 이 모델을 사용하여 텍스트 생성 작업을 수행할 것입니다.
joke_chain 및 poem_chain 설정:
joke_chain은 "tell me a joke about {topic}"이라는 대화 템플릿을 사용하여 농담을 생성하는 대화 체인을 설정합니다.
poem_chain은 "write a 2-line poem about {topic}"이라는 대화 템플릿을 사용하여 시를 생성하는 대화 체인을 설정합니다.
RunnableParallel 설정:
RunnableParallel은 여러 개의 Runnable을 병렬로 실행하고 결과를 모으는 데 사용됩니다. 이 경우 "joke" 및 "poem" 두 개의 Runnable을 설정하여 두 가지 다른 종류의 내용을 생성합니다.
map_chain 호출:
map_chain.invoke({"topic": "bear"})는 "map_chain" 대화 체인을 호출하고 "{topic}" 변수를 "bear"로 설정하여 주제가 "bear"에 관한 농담 및 시를 생성합니다.
이 코드는 ChatOpenAI 모델을 사용하여 주제별로 농담과 시를 생성하는 방법을 보여줍니다. 결과는 "map_chain"을 통해 출력됩니다.
    {'joke': AIMessage(content="Why don't bears wear shoes? \n\nBecause they have bear feet!", additional_kwargs={}, example=False),
     'poem': AIMessage(content="In woodland depths, bear prowls with might,\nSilent strength, nature's sovereign, day and night.", additional_kwargs={}, example=False)}
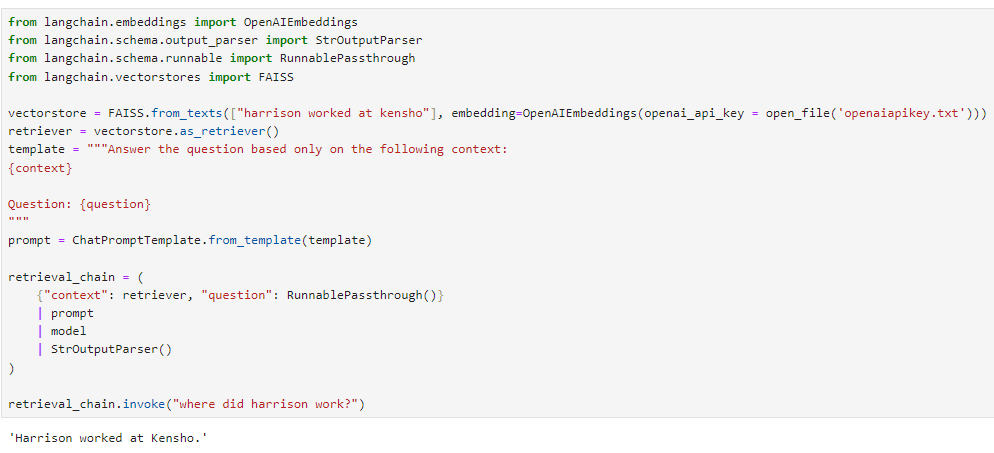
Manipulating outputs/inputs
Maps can be useful for manipulating the output of one Runnable to match the input format of the next Runnable in a sequence.
맵은 시퀀스에서 다음 Runnable의 입력 형식과 일치하도록 하나의 Runnable의 출력을 조작하는 데 유용할 수 있습니다.
from langchain.embeddings import OpenAIEmbeddings
from langchain.schema.output_parser import StrOutputParser
from langchain.schema.runnable import RunnablePassthrough
from langchain.vectorstores import FAISS
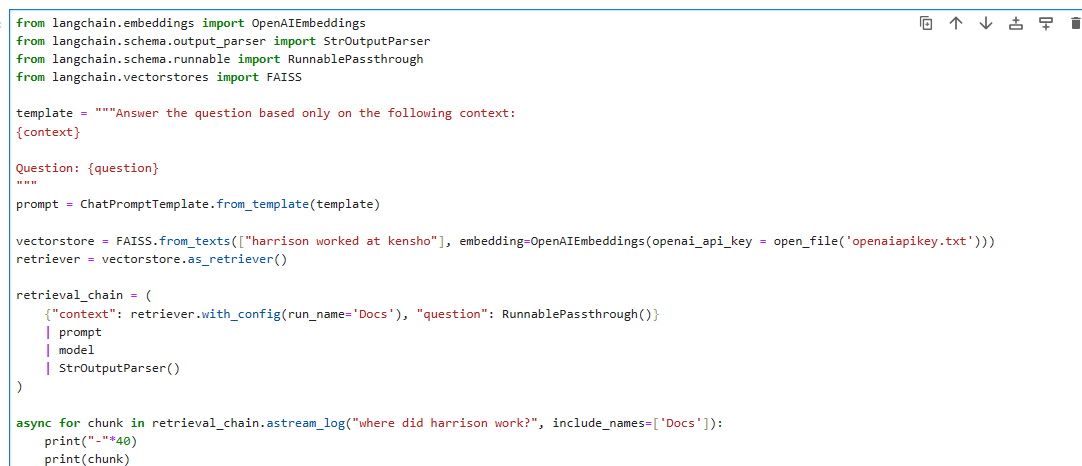
vectorstore = FAISS.from_texts(["harrison worked at kensho"], embedding=OpenAIEmbeddings())
retriever = vectorstore.as_retriever()
template = """Answer the question based only on the following context:
{context}
Question: {question}
"""
prompt = ChatPromptTemplate.from_template(template)
retrieval_chain = (
{"context": retriever, "question": RunnablePassthrough()}
| prompt
| model
| StrOutputParser()
)
retrieval_chain.invoke("where did harrison work?")
이 코드는 특정 문맥에서 주어진 질문에 답변하기 위해 FAISS 벡터 저장소(FAISS.from_texts)를 사용하는 예시를 제공합니다.
OpenAIEmbeddings 및 FAISS 벡터 저장소 설정:
OpenAIEmbeddings()를 사용하여 OpenAI의 임베딩을 설정합니다.
FAISS.from_texts()를 사용하여 "harrison worked at kensho"라는 텍스트를 포함하는 FAISS 벡터 저장소를 설정합니다. 이 벡터 저장소는 주어진 텍스트의 임베딩을 저장합니다.
대화 템플릿 설정:
template는 대화 템플릿을 정의하는 문자열로, "context" 및 "question" 변수를 포함합니다. 이 템플릿을 사용하여 문맥과 질문을 결합하는데 사용됩니다.
Retrieval Chain 설정:
retriever는 FAISS 벡터 저장소를 검색하는 데 사용되는 검색자(retriever)입니다.
{"context": retriever, "question": RunnablePassthrough()}는 문맥과 질문을 정의하는 변수를 설정합니다. "context" 변수에는 FAISS 벡터 저장소를 지정하고 "question" 변수는 원본 질문을 전달합니다.
prompt | model | StrOutputParser()는 이전에 설정한 템플릿을 사용하여 모델을 호출하고 출력을 문자열로 변환하는 대화 체인을 설정합니다.
Retrieval Chain 호출:
retrieval_chain.invoke("where did harrison work?")는 "retrieval_chain" 대화 체인을 호출하고 "where did harrison work?"라는 질문을 수행합니다.
이 코드는 FAISS 벡터 저장소를 사용하여 주어진 문맥에서 주어진 질문에 대한 답변을 검색하고 반환하는 방법을 보여줍니다. 결과는 "retrieval_chain"을 통해 출력됩니다.
'Harrison worked at Kensho.'
Here the input to prompt is expected to be a map with keys "context" and "question". The user input is just the question. So we need to get the context using our retriever and passthrough the user input under the "question" key.
여기서 프롬프트에 대한 입력은 "컨텍스트" 및 "질문" 키가 있는 맵일 것으로 예상됩니다. 사용자 입력은 단지 질문일 뿐입니다. 따라서 검색기를 사용하여 컨텍스트를 가져와야 하며 "질문" 키 아래에 있는 사용자 입력을 통과해야 합니다.
Note that when composing a RunnableMap when another Runnable we don't even need to wrap our dictionary in the RunnableMap class — the type conversion is handled for us.
다른 Runnable이 있을 때 RunnableMap을 구성할 때 사전을 RunnableMap 클래스로 래핑할 필요조차 없습니다. 유형 변환이 자동으로 처리됩니다.
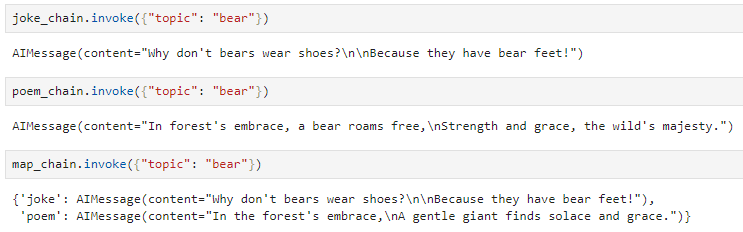
Parallelism
RunnableMaps are also useful for running independent processes in parallel, since each Runnable in the map is executed in parallel. For example, we can see our earlierjoke_chain,poem_chainandmap_chainall have about the same runtime, even thoughmap_chainexecutes both of the other two.
RunnableMaps는 맵의 각 Runnable이 병렬로 실행되므로 독립적인 프로세스를 병렬로 실행하는 데에도 유용합니다. 예를 들어 이전 joke_chain, poem_chain 및 map_chain은 map_chain이 다른 두 가지를 모두 실행하더라도 거의 동일한 런타임을 갖고 있음을 알 수 있습니다.
joke_chain.invoke({"topic": "bear"})
958 ms ± 402 ms per loop (mean ± std. dev. of 7 runs, 1 loop each)
poem_chain.invoke({"topic": "bear"})
1.22 s ± 508 ms per loop (mean ± std. dev. of 7 runs, 1 loop each)
map_chain.invoke({"topic": "bear"})
1.15 s ± 119 ms per loop (mean ± std. dev. of 7 runs, 1 loop each)
You can use generator functions (ie. functions that use theyieldkeyword, and behave like iterators) in a LCEL pipeline.
LCEL 파이프라인에서 생성기 함수(즉, Yield 키워드를 사용하고 반복자처럼 동작하는 함수)를 사용할 수 있습니다.
The signature of these generators should beIterator[Input] -> Iterator[Output]. Or for async generators:AsyncIterator[Input] -> AsyncIterator[Output].
이러한 생성기의 signature 은 Iterator[Input] -> Iterator[Output]이어야 합니다. 또는 비동기 생성기의 경우: AsyncIterator[Input] -> AsyncIterator[Output].
These are useful for: 이는 다음과 같은 경우에 유용합니다.
implementing a custom output parser
사용자 정의 출력 파서 구현
modifying the output of a previous step, while preserving streaming capabilities
스트리밍 기능을 유지하면서 이전 단계의 출력 수정
Let's implement a custom output parser for comma-separated lists.
쉼표로 구분된 목록에 대한 사용자 정의 출력 구문 분석기를 구현해 보겠습니다.
from typing import Iterator, List
from langchain.chat_models import ChatOpenAI
from langchain.prompts.chat import ChatPromptTemplate
from langchain.schema.output_parser import StrOutputParser
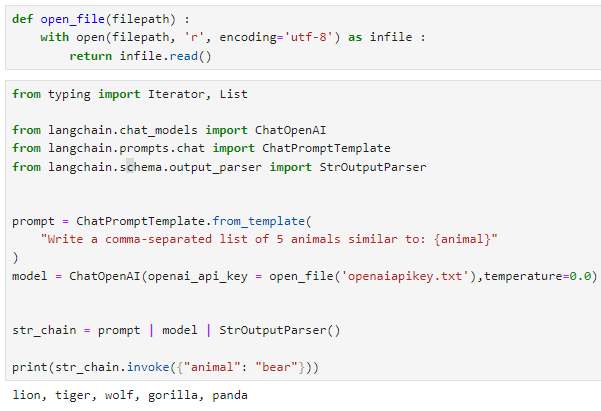
prompt = ChatPromptTemplate.from_template(
"Write a comma-separated list of 5 animals similar to: {animal}"
)
model = ChatOpenAI(temperature=0.0)
str_chain = prompt | model | StrOutputParser()
print(str_chain.invoke({"animal": "bear"}))
이 코드는 ChatPromptTemplate, ChatOpenAI 모델 및 StrOutputParser를 사용하여 유사한 동물 5마리를 포함한 쉼표로 구분된 목록을 생성하는 예시를 제공합니다.
ChatPromptTemplate 및 ChatOpenAI 모델 설정:
ChatPromptTemplate.from_template()를 사용하여 대화 템플릿을 생성합니다.
이 템플릿은 사용자에게 "{animal}" 변수를 포함한 예시 동물 이름을 기반으로 유사한 동물 5마리를 나열하라는 지시를 포함합니다.
ChatOpenAI(temperature=0.0)를 사용하여 ChatOpenAI 모델을 설정합니다. 온도(temperature)를 0.0으로 설정하여 모델의 출력을 더 일관된 형태로 만듭니다.
StrOutputParser를 사용한 대화 체인 설정:
prompt | model | StrOutputParser()는 대화 템플릿, 모델 및 StrOutputParser를 연결하여 문자열을 처리하는 대화 체인을 설정합니다.
대화 체인 호출:
str_chain.invoke({"animal": "bear"})는 "str_chain" 대화 체인을 호출하고 "{animal}" 변수를 "bear"로 설정하여 질문을 수행합니다.
출력 결과:
"print(str_chain.invoke({"animal": "bear"}))"는 대화 체인의 결과를 출력합니다.
이 코드는 ChatPromptTemplate, ChatOpenAI 모델 및 StrOutputParser를 사용하여 유사한 동물 목록을 생성하고 출력 결과를 확인하는 예시를 제공합니다.
lion, tiger, wolf, gorilla, panda
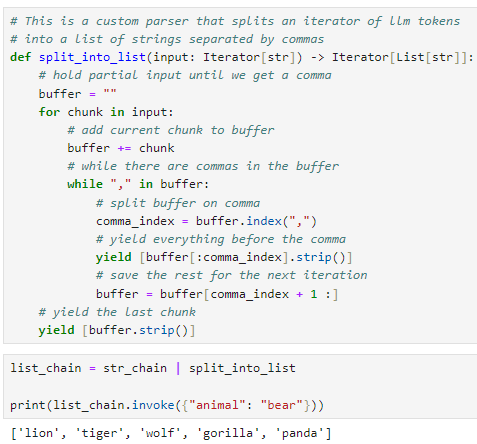
# This is a custom parser that splits an iterator of llm tokens# into a list of strings separated by commas
def split_into_list(input: Iterator[str]) -> Iterator[List[str]]:
# hold partial input until we get a comma
buffer = ""for chunk in input:
# add current chunk to buffer
buffer += chunk
# while there are commas in the bufferwhile","in buffer:
# split buffer on comma
comma_index = buffer.index(",")
# yield everything before the comma
yield [buffer[:comma_index].strip()]
# save the rest for the next iteration
buffer = buffer[comma_index + 1 :]
# yield the last chunk
yield [buffer.strip()]
Note that all inputs to these functions need to be a SINGLE argument. If you have a function that accepts multiple arguments, you should write a wrapper that accepts a single input and unpacks it into multiple argument.
이러한 함수에 대한 모든 입력은 SINGLE 인수여야 합니다. 여러 인수를 허용하는 함수가 있는 경우 단일 입력을 허용하고 이를 여러 인수로 압축 해제하는 래퍼를 작성해야 합니다.
from langchain.schema.runnable import RunnableLambda
from langchain.prompts import ChatPromptTemplate
from langchain.chat_models import ChatOpenAI
from operator import itemgetter
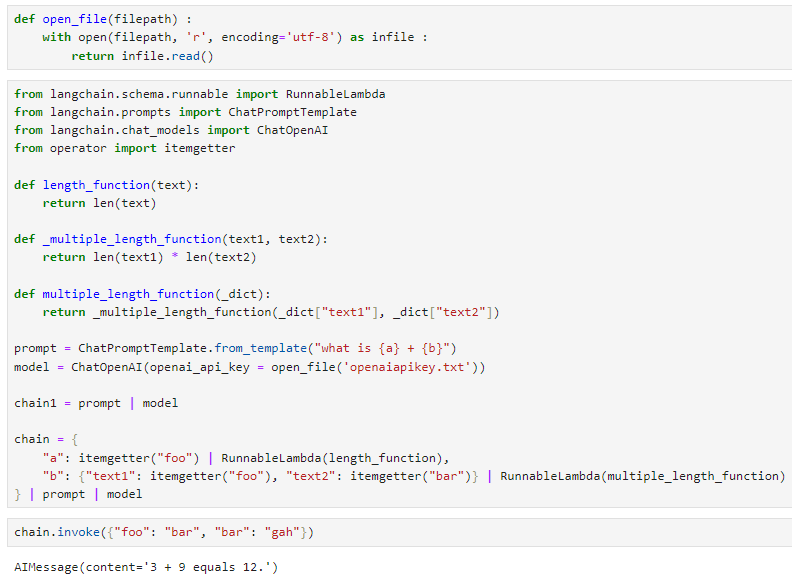
def length_function(text):
return len(text)
def _multiple_length_function(text1, text2):
return len(text1) * len(text2)
def multiple_length_function(_dict):
return _multiple_length_function(_dict["text1"], _dict["text2"])
prompt = ChatPromptTemplate.from_template("what is {a} + {b}")
model = ChatOpenAI()
chain1 = prompt | model
chain = {
"a": itemgetter("foo") | RunnableLambda(length_function),
"b": {"text1": itemgetter("foo"), "text2": itemgetter("bar")} | RunnableLambda(multiple_length_function)
} | prompt | model
chain.invoke({"foo": "bar", "bar": "gah"})
이 코드는 다양한 RunnableLambda 함수와 대화 체인을 사용하여 계산 및 대화 모델을 조합하는 예시를 제공합니다.
RunnableLambda 함수 정의:
length_function(text) 함수는 입력 문자열의 길이를 반환합니다.
_multiple_length_function(text1, text2) 함수는 두 개의 입력 문자열 길이를 곱한 값을 반환합니다.
multiple_length_function(_dict) 함수는 두 개의 입력 문자열 길이를 곱한 값을 반환하기 위해 _multiple_length_function 함수를 호출합니다.
대화 템플릿 및 모델 설정:
ChatPromptTemplate.from_template("what is {a} + {b}")를 사용하여 두 변수 "a"와 "b"를 사용하는 대화 템플릿을 설정합니다.
ChatOpenAI()를 사용하여 ChatOpenAI 모델을 설정합니다.
"chain1"은 "prompt" 템플릿과 "model" 모델을 연결한 대화 체인을 설정합니다.
RunnableLambda 함수 및 변수를 사용하여 체인 설정:
"chain"은 변수 "a"와 "b"를 설정하는 대화 체인을 생성합니다.
"a" 변수는 "foo" 변수에서 문자열을 추출하여 길이를 계산하는 RunnableLambda 함수를 사용하여 설정됩니다.
"b" 변수는 "text1"과 "text2" 변수에서 문자열을 추출하여 두 문자열의 길이를 곱한 값을 계산하기 위해 RunnableLambda 함수를 사용하여 설정됩니다.
대화 체인 호출:
chain.invoke({"foo": "bar", "bar": "gah"})는 "foo"와 "bar" 변수에 각각 "bar"와 "gah" 문자열을 할당하고, 대화 체인을 호출하여 "a"와 "b" 변수를 설정하고 결과를 반환합니다.
이 코드는 RunnableLambda 함수와 대화 체인을 사용하여 변수 및 함수를 효과적으로 조합하는 방법을 보여줍니다. 설정된 함수 및 변수를 활용하여 대화 체인에서 계산을 수행하고 결과를 얻을 수 있습니다.
Runnable lambdas can optionally accept aRunnableConfig, which they can use to pass callbacks, tags, and other configuration information to nested runs.
실행 가능한 람다는 콜백, 태그 및 기타 구성 정보를 중첩 실행에 전달하는 데 사용할 수 있는 RunnableConfig를 선택적으로 허용할 수 있습니다.
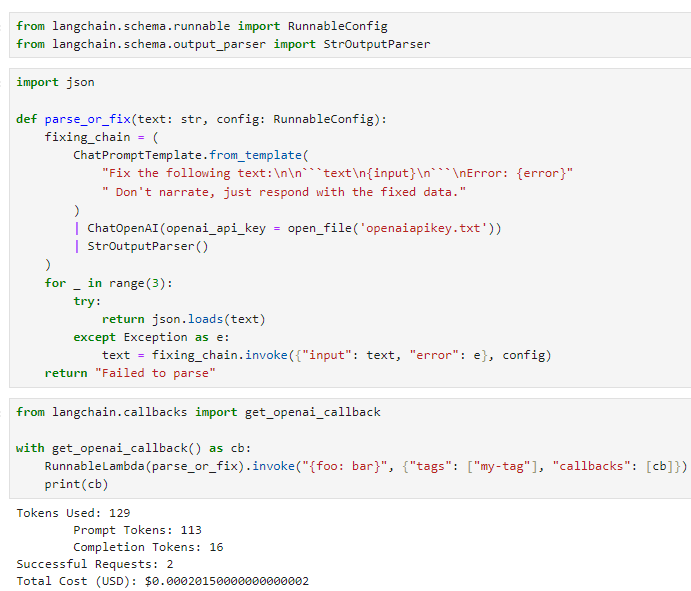
from langchain.schema.runnable import RunnableConfig
from langchain.schema.output_parser import StrOutputParser
import json
def parse_or_fix(text: str, config: RunnableConfig):
fixing_chain = (
ChatPromptTemplate.from_template(
"Fix the following text:\n\n```text\n{input}\n```\nError: {error}"" Don't narrate, just respond with the fixed data."
)
| ChatOpenAI()
| StrOutputParser()
)
for _ in range(3):
try:
return json.loads(text)
except Exception as e:
text = fixing_chain.invoke({"input": text, "error": e}, config)
return"Failed to parse"
from langchain.callbacks import get_openai_callback

with get_openai_callback() as cb:
    RunnableLambda(parse_or_fix).invoke("{foo: bar}", {"tags": ["my-tag"], "callbacks": [cb]})
    print(cb)
이 코드는 RunnableConfig 및 StrOutputParser를 사용하여 문자열을 구문 분석하거나 수정하는 함수를 정의하고 OpenAI 콜백을 사용하여 함수를 호출하는 예시를 제공합니다.
parse_or_fix 함수 정의:
parse_or_fix 함수는 두 개의 매개변수 text (문자열)와 config (RunnableConfig)를 가집니다.
fixing_chain은 text를 수정하기 위한 대화 체인을 정의합니다. 이 체인은 입력 문자열과 오류 메시지를 받아 수정된 데이터를 반환합니다.
"Fix the following text"이라는 시스템 메시지와 입력 문자열 및 오류 메시지를 포함하는 사용자 메시지로 구성된 대화 템플릿을 생성합니다. 그런 다음 ChatOpenAI 모델과 StrOutputParser를 사용하여 오류를 수정하는 체인을 설정합니다.
try-except 루프를 사용하여 입력 문자열을 JSON으로 파싱하려고 시도하고 예외가 발생한 경우 수정 체인을 사용하여 3 번 시도합니다. JSON 파싱이 성공하면 파싱된 결과를 반환하고, 세 번의 시도 후에도 성공하지 못하면 "Failed to parse"를 반환합니다.
OpenAI 콜백 사용:
from langchain.callbacks import get_openai_callback을 사용하여 OpenAI 콜백을 가져옵니다.
with get_openai_callback() as cb:를 사용하여 OpenAI 콜백을 설정하고 cb 변수에 할당합니다.
RunnableLambda(parse_or_fix).invoke("{foo: bar}", {"tags": ["my-tag"], "callbacks": [cb]})은 "parse_or_fix" 함수를 호출하고 입력 문자열과 구성 옵션을 전달합니다. 또한 "callbacks" 매개변수에 OpenAI 콜백을 추가하여 결과를 OpenAI에 보고합니다.
print(cb)는 OpenAI 콜백 객체를 출력하여 OpenAI에서 실행한 작업 및 결과를 확인합니다.
이 코드는 RunnableConfig 및 OpenAI 콜백을 활용하여 문자열을 구문 분석하거나 수정하는 함수를 구현하고, 이를 OpenAI에 보고하는 방법을 보여줍니다.
There are many possible points of failure in an LLM application, whether that be issues with LLM API's, poor model outputs, issues with other integrations, etc. Fallbacks help you gracefully handle and isolate these issues.
LLM API 문제, 잘못된 모델 출력, 기타 통합 문제 등 LLM 애플리케이션에는 실패할 수 있는 지점이 많이 있습니다. 폴백은 이러한 문제를 적절하게 처리하고 격리하는 데 도움이 됩니다.
Crucially, fallbacks can be applied not only on the LLM level but on the whole runnable level.
결정적으로 폴백은 LLM 수준뿐만 아니라 전체 실행 가능 수준에 적용될 수 있습니다.
Handling LLM API Errors
This is maybe the most common use case for fallbacks. A request to an LLM API can fail for a variety of reasons - the API could be down, you could have hit rate limits, any number of things. Therefore, using fallbacks can help protect against these types of things.
이는 아마도 폴백의 가장 일반적인 사용 사례일 것입니다. LLM API에 대한 요청은 다양한 이유로 실패할 수 있습니다. API가 다운되거나 속도 제한에 도달하는 등 여러 가지 이유로 실패할 수 있습니다. 따라서 fallbacks를 사용하면 이러한 유형의 문제로부터 보호하는 데 도움이 될 수 있습니다.
IMPORTANT: By default, a lot of the LLM wrappers catch errors and retry. You will most likely want to turn those off when working with fallbacks. Otherwise the first wrapper will keep on retrying and not failing.
중요: 기본적으로 많은 LLM wrappers 가 오류를 포착하고 다시 시도합니다. 폴백 작업을 할 때는 이 기능을 끄고 싶을 가능성이 높습니다. 그렇지 않으면 첫 번째 래퍼가 계속 재시도하고 실패하지 않습니다.
from langchain.chat_models import ChatOpenAI, ChatAnthropic
First, let's mock out what happens if we hit a RateLimitError from OpenAI
먼저 OpenAI에서 RateLimitError가 발생하면 어떤 일이 발생하는지 모의해 보겠습니다.
from unittest.mock import patch
from openai.error import RateLimitError
# Note that we set max_retries = 0 to avoid retrying on RateLimits, etc
openai_llm = ChatOpenAI(max_retries=0)
anthropic_llm = ChatAnthropic()
llm = openai_llm.with_fallbacks([anthropic_llm])
# Let's use just the OpenAI LLm first, to show that we run into an error
with patch('openai.ChatCompletion.create', side_effect=RateLimitError()):
    try:
         print(openai_llm.invoke("Why did the chicken cross the road?"))
    except:
        print("Hit error")
이 코드는 ChatOpenAI와 ChatAnthropic 대화 모델을 설정하고, RateLimitError가 발생하도록 모의 실험을 수행하는 예시를 제공합니다.
필수 모듈 및 클래스 가져오기:
langchain.chat_models 모듈에서 ChatOpenAI 및 ChatAnthropic 클래스를 가져옵니다. 이 클래스들은 대화 모델을 설정하고 사용하는 데 도움을 줍니다.
unittest.mock 모듈에서 patch 클래스를 가져옵니다. 이 클래스를 사용하여 함수 호출을 모의로 변경합니다.
openai.error 모듈에서 RateLimitError 클래스를 가져옵니다. 이 클래스는 OpenAI API 요청 제한(Rate Limit) 오류를 나타냅니다.
대화 모델 설정:
ChatOpenAI(max_retries=0)는 "ChatOpenAI" 대화 모델을 설정하며, max_retries를 0으로 설정하여 요청 제한(Rate Limit) 오류 시 재시도(retry)를 피합니다.
ChatAnthropic()는 "ChatAnthropic" 대화 모델을 설정합니다.
openai_llm.with_fallbacks([anthropic_llm])는 "openai_llm" 대화 모델을 설정하며, "ChatAnthropic" 대화 모델을 대체 옵션으로 사용합니다.
RateLimitError 모의 실험:
with patch('openai.ChatCompletion.create', side_effect=RateLimitError()):는 openai.ChatCompletion.create 함수 호출을 모의로 변경하여 RateLimitError를 발생하도록 설정합니다.
try: 블록은 RateLimitError가 발생할 가능성이 있는 코드를 포함합니다.
openai_llm.invoke("Why did the chicken cross the road?")는 "openai_llm" 대화 모델을 사용하여 질문을 호출합니다.
except: 블록은 RateLimitError가 발생한 경우 실행되며, "Hit error"를 출력합니다.
이 코드는 RateLimitError를 처리하는 방법을 모의 실험을 통해 보여줍니다. RateLimitError는 OpenAI API의 요청 제한을 초과한 경우 발생하는 오류입니다.
Hit error
# Now let's try with fallbacks to Anthropic
with patch('openai.ChatCompletion.create', side_effect=RateLimitError()):
    try:
         print(llm.invoke("Why did the chicken cross the road?"))
    except:
        print("Hit error")
이 코드는 ChatOpenAI와 ChatAnthropic 대화 모델을 설정하고, RateLimitError가 발생하도록 모의 실험을 수행합니다. 이번에는 "llm" 대화 모델이 대체 옵션으로 "ChatAnthropic" 대화 모델을 사용하여 실험합니다.
RateLimitError 모의 실험:
with patch('openai.ChatCompletion.create', side_effect=RateLimitError()):는 openai.ChatCompletion.create 함수 호출을 모의로 변경하여 RateLimitError를 발생하도록 설정합니다.
try: 블록은 RateLimitError가 발생할 가능성이 있는 코드를 포함합니다.
llm.invoke("Why did the chicken cross the road?")는 "llm" 대화 모델을 사용하여 질문을 호출합니다.
except: 블록은 RateLimitError가 발생한 경우 실행되며, "Hit error"를 출력합니다.
이 코드는 "llm" 대화 모델이 RateLimitError가 발생하는 상황에서 "ChatAnthropic" 대화 모델로 대체되어 정상적으로 처리하는 방법을 모의 실험을 통해 보여줍니다. RateLimitError가 발생하면 "ChatAnthropic" 대화 모델이 대신 사용되어 오류를 처리합니다.
content=' I don\'t actually know why the chicken crossed the road, but here are some possible humorous answers:\n\n- To get to the other side!\n\n- It was too chicken to just stand there. \n\n- It wanted a change of scenery.\n\n- It wanted to show the possum it could be done.\n\n- It was on its way to a poultry farmers\' convention.\n\nThe joke plays on the double meaning of "the other side" - literally crossing the road to the other side, or the "other side" meaning the afterlife. So it\'s an anti-joke, with a silly or unexpected pun as the answer.' additional_kwargs={} example=False
We can use our "LLM with Fallbacks" as we would a normal LLM.
일반 LLM처럼 "폴백이 포함된 LLM"을 사용할 수 있습니다.
from langchain.prompts import ChatPromptTemplate

prompt = ChatPromptTemplate.from_messages(
    [
        ("system", "You're a nice assistant who always includes a compliment in your response"),
        ("human", "Why did the {animal} cross the road"),
    ]
)
chain = prompt | llm
with patch('openai.ChatCompletion.create', side_effect=RateLimitError()):
    try:
         print(chain.invoke({"animal": "kangaroo"}))
    except:
        print("Hit error")
이 코드는 ChatPromptTemplate을 사용하여 대화 템플릿을 설정하고, RateLimitError가 발생하도록 모의 실험을 수행합니다. 이 템플릿은 사용자와 시스템 간의 대화에서 "compliment"를 항상 포함하는 섬사적인(Assistant) 응답을 생성하는 목적으로 설계되었습니다.
ChatPromptTemplate 설정:
ChatPromptTemplate.from_messages()를 사용하여 대화 템플릿을 생성합니다.
템플릿에는 시스템과 사용자 간의 대화 메시지가 정의되어 있습니다.
시스템 메시지는 "You're a nice assistant who always includes a compliment in your response"로 설정되어 있으며, Assistant가 항상 칭찬을 포함하는 좋은 Assistant임을 나타냅니다.
사용자 메시지는 "Why did the {animal} cross the road"로 설정되어 있으며, "{animal}" 부분은 나중에 사용자가 지정할 수 있는 변수로 사용됩니다.
대화 체인 설정:
chain = prompt | llm는 설정한 대화 템플릿과 "llm" 대화 모델을 연결하여 실행 체인을 설정합니다.
RateLimitError 모의 실험:
with patch('openai.ChatCompletion.create', side_effect=RateLimitError()):는 openai.ChatCompletion.create 함수 호출을 모의로 변경하여 RateLimitError를 발생하도록 설정합니다.
try: 블록은 RateLimitError가 발생할 가능성이 있는 코드를 포함합니다.
chain.invoke({"animal": "kangaroo"})는 "chain" 대화 체인을 사용하여 "{animal}" 변수를 "kangaroo"로 설정하여 질문을 호출합니다.
except: 블록은 RateLimitError가 발생한 경우 실행되며, "Hit error"를 출력합니다.
이 코드는 섬사적인(Assistant) 대화 템플릿과 "llm" 대화 모델을 사용하여 RateLimitError가 발생하는 상황에서 어떻게 오류를 처리하는지를 모의 실험을 통해 보여줍니다. RateLimitError가 발생하면 오류를 처리하는 방법을 확인할 수 있습니다.
content=" I don't actually know why the kangaroo crossed the road, but I'm happy to take a guess! Maybe the kangaroo was trying to get to the other side to find some tasty grass to eat. Or maybe it was trying to get away from a predator or other danger. Kangaroos do need to cross roads and other open areas sometimes as part of their normal activities. Whatever the reason, I'm sure the kangaroo looked both ways before hopping across!" additional_kwargs={} example=False
Specifying errors to handle
We can also specify the errors to handle if we want to be more specific about when the fallback is invoked:
fallback이 호출되는 시기에 대해 더 구체적으로 알고 싶다면 처리할 오류를 지정할 수도 있습니다.
이 코드는 설정한 ChatOpenAI 및 ChatAnthropic 대화 모델을 사용하여 RateLimitError가 발생하도록 모의 실험을 수행하고, 이 때 특정 예외(KeyboardInterrupt)를 처리하는 방법을 보여줍니다.
RateLimitError 모의 실험:
with patch('openai.ChatCompletion.create', side_effect=RateLimitError()):는 openai.ChatCompletion.create 함수 호출을 모의로 변경하여 RateLimitError를 발생하도록 설정합니다.
try: 블록은 RateLimitError가 발생할 가능성이 있는 코드를 포함합니다.
chain.invoke({"animal": "kangaroo"})는 "chain" 대화 체인을 사용하여 "{animal}" 변수를 "kangaroo"로 설정하여 질문을 호출합니다.
except: 블록은 RateLimitError가 발생한 경우 실행되며, "Hit error"를 출력합니다.
대화 모델 및 RateLimitError 처리:
openai_llm.with_fallbacks([anthropic_llm], exceptions_to_handle=(KeyboardInterrupt,))는 "openai_llm" 대화 모델에 대체 옵션으로 "anthropic_llm" 대화 모델을 추가하며, RateLimitError 외에도 KeyboardInterrupt 예외를 처리하기 위해 exceptions_to_handle를 설정합니다.
이렇게 설정한 "llm" 대화 모델을 사용하여 대화 체인을 생성합니다.
이 코드는 RateLimitError가 발생하거나 KeyboardInterrupt 예외가 발생하는 경우, 대체 옵션으로 "anthropic_llm" 대화 모델로 전환하여 오류를 처리하는 방법을 보여줍니다. KeyboardInterrupt 예외는 사용자가 프로그램을 중지할 때 발생하는 예외이며, 이러한 예외가 발생하는 경우 대체 모델로 전환하여 안전하게 처리할 수 있습니다.
Hit error
Fallbacks for Sequences
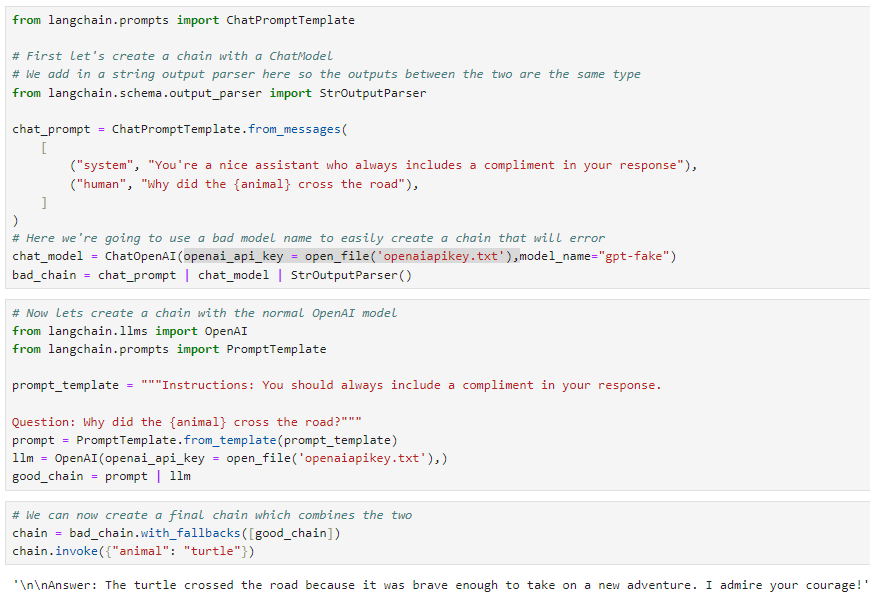
We can also create fallbacks for sequences, that are sequences themselves. Here we do that with two different models: ChatOpenAI and then normal OpenAI (which does not use a chat model). Because OpenAI is NOT a chat model, you likely want a different prompt.
시퀀스 자체인 시퀀스에 대한 대체를 만들 수도 있습니다. 여기서는 ChatOpenAI와 일반 OpenAI(채팅 모델을 사용하지 않음)라는 두 가지 모델을 사용하여 이를 수행합니다. OpenAI는 채팅 모델이 아니기 때문에 다른 프롬프트를 원할 가능성이 높습니다.
# First let's create a chain with a ChatModel# We add in a string output parser here so the outputs between the two are the same type
from langchain.schema.output_parser import StrOutputParser
chat_prompt = ChatPromptTemplate.from_messages(
[
("system", "You're a nice assistant who always includes a compliment in your response"),
("human", "Why did the {animal} cross the road"),
]
)
# Here we're going to use a bad model name to easily create a chain that will error
chat_model = ChatOpenAI(model_name="gpt-fake")
bad_chain = chat_prompt | chat_model | StrOutputParser()
# Now lets create a chain with the normal OpenAI model
from langchain.llms import OpenAI
from langchain.prompts import PromptTemplate

prompt_template = """Instructions: You should always include a compliment in your response.

Question: Why did the {animal} cross the road?"""
prompt = PromptTemplate.from_template(prompt_template)
llm = OpenAI()
good_chain = prompt | llm
# We can now create a final chain which combines the two
chain = bad_chain.with_fallbacks([good_chain])
chain.invoke({"animal": "turtle"})
이 코드는 먼저 ChatModel과 String Output Parser를 사용하여 대화 체인을 생성하고, 그런 다음 정상적인 OpenAI 모델과 연결하여 오류 처리를 수행하는 방법을 보여줍니다.
첫 번째 대화 체인 생성:
ChatPromptTemplate.from_messages()를 사용하여 대화 템플릿을 생성합니다. 이 템플릿은 시스템이 항상 칭찬을 포함하도록 지시하고 사용자로부터 "{animal}" 변수를 받는 대화를 설정합니다.
ChatOpenAI(model_name="gpt-fake")는 "gpt-fake"와 같은 잘못된 모델 이름을 사용하여 오류가 발생하는 "bad_chain" 대화 모델을 설정합니다.
chat_prompt | chat_model | StrOutputParser()는 "chat_prompt" 템플릿과 "chat_model" 대화 모델을 연결하고, 출력 형식을 일치시키기 위해 String Output Parser를 추가합니다.
정상적인 대화 체인 생성:
PromptTemplate.from_template(prompt_template)를 사용하여 대화 템플릿을 생성합니다. 이 템플릿은 Assistant가 항상 칭찬을 포함해야 함을 지시하고 "{animal}" 변수를 받는 대화를 설정합니다.
OpenAI()를 사용하여 정상적인 "llm" 대화 모델을 설정합니다.
prompt | llm는 "prompt" 템플릿과 "llm" 대화 모델을 연결하여 정상적인 대화 체인인 "good_chain"을 설정합니다.
대체 옵션을 포함하는 최종 대화 체인 생성:
bad_chain.with_fallbacks([good_chain])는 "bad_chain" 대화 체인을 "good_chain" 대화 체인으로 대체 옵션을 추가하여 최종 대화 체인 "chain"을 생성합니다.
대화 체인 호출:
chain.invoke({"animal": "turtle"})는 "chain" 대화 체인을 사용하여 "{animal}" 변수를 "turtle"로 설정하여 질문을 호출합니다.
이 코드는 대화 체인에서 모델 오류 처리 및 대체 모델 사용의 예시를 제공합니다. "bad_chain"에서 오류가 발생하면 "good_chain"으로 대체하여 정상적으로 처리됩니다.
Oftentimes you may want to experiment with, or even expose to the end user, multiple different ways of doing things. In order to make this experience as easy as possible, we have defined two methods.
종종 작업을 수행하는 여러 가지 다른 방법을 실험하거나 최종 사용자에게 노출시키고 싶을 수도 있습니다. 이 경험을 가능한 한 쉽게 만들기 위해 두 가지 방법을 정의했습니다.
First, aconfigurable_fieldsmethod. This lets you configure particular fields of a runnable.
첫째, configurable_fields 메소드입니다. 이를 통해 실행 가능 항목의 특정 필드를 구성할 수 있습니다.
Second, aconfigurable_alternativesmethod. With this method, you can list out alternatives for any particular runnable that can be set during runtime.
둘째, configurable_alternatives 방법입니다. 이 방법을 사용하면 런타임 중에 설정할 수 있는 특정 실행 가능 항목에 대한 대안을 나열할 수 있습니다.
With LLMs we can configure things like temperature
LLM을 사용하면 온도와 같은 항목을 구성할 수 있습니다.
from langchain.chat_models import ChatOpenAI
from langchain.prompts import PromptTemplate

model = ChatOpenAI(temperature=0).configurable_fields(
    temperature=ConfigurableField(
        id="llm_temperature",
        name="LLM Temperature",
        description="The temperature of the LLM",
    )
)
이 코드는 "langchain" 라이브러리를 사용하여 LLM (Language Model)에 대한 설정을 구성하고 온라인으로 제어할 수 있는 옵션을 추가하는 예시를 제공합니다.
모듈 및 클래스 가져오기:
langchain.chat_models 모듈에서 ChatOpenAI 클래스를 가져옵니다. 이 클래스는 OpenAI의 대화 모델을 사용하기 위한 도구를 제공합니다.
langchain.prompts 모듈에서 PromptTemplate 클래스를 가져옵니다. 이 클래스는 템플릿을 만들기 위한 도구를 제공합니다.
모델 설정:
"model" 변수에는 "ChatOpenAI(temperature=0)"를 사용하여 대화 모델을 생성합니다. "temperature=0"은 모델의 출력을 보다 결정적으로 만듭니다.
.configurable_fields()를 사용하여 모델에 구성 가능한 필드를 추가하고 설정합니다. 이러한 필드는 모델의 동작을 온라인으로 변경할 수 있는 옵션을 제공합니다.
구성 가능한 필드로 "temperature"을 추가합니다.
id="llm_temperature": 필드의 고유 식별자로 "llm_temperature"를 설정합니다.
name="LLM Temperature": 필드의 이름으로 "LLM Temperature"를 설정합니다.
description="The temperature of the LLM": 필드의 설명으로 "The temperature of the LLM"을 설정합니다.
이 코드는 "Langchain" 라이브러리를 사용하여 대화 모델의 설정을 구성 가능한 필드를 통해 정의하고, 이를 온라인으로 변경할 수 있는 옵션으로 제공하는 예시를 나타냅니다. "temperature"은 모델의 동작을 조절하는 중요한 매개변수 중 하나입니다.
model.invoke("pick a random number")
이 코드는 "model"을 사용하여 "pick a random number"라는 메시지를 모델에 전달하여 실행하는 부분을 설명하고 있습니다.
"model.invoke("pick a random number")":
이 부분은 "model"을 사용하여 "pick a random number"라는 메시지를 모델에 전달하여 실행하는 부분입니다.
모델은 이 메시지를 처리하고 결과를 생성합니다.
이 코드는 모델을 사용하여 특정 메시지를 모델에 전달하고, 모델이 해당 메시지를 처리한 후에 결과를 얻는 방법을 보여줍니다. "pick a random number" 메시지에 대한 모델의 응답은 다양할 수 있으며, 해당 메시지에 따라 모델이 적절한 응답을 생성할 것입니다.
AIMessage(content='7')
model.with_config(configurable={"llm_temperature": .9}).invoke("pick a random number")
이 코드는 모델 설정을 변경하고, 변경된 설정을 사용하여 "pick a random number" 메시지를 모델에 전달하여 실행하는 부분을 설명하고 있습니다.
configurable={"llm_temperature": .9}는 "llm_temperature"라는 설정 옵션을 변경하며, 온라인에서 모델의 온도(temperature)를 0.9로 설정합니다.
.invoke("pick a random number"):
이 부분은 변경된 설정을 가진 모델을 사용하여 "pick a random number"라는 메시지를 모델에 전달하여 실행하는 부분입니다.
모델은 이 메시지를 변경된 설정에 따라 처리하고 결과를 생성합니다.
이 코드는 모델의 설정을 변경하여 모델이 다른 동작을 하도록 만들고, 변경된 설정을 사용하여 "pick a random number" 메시지를 모델에 전달하여 실행하는 방법을 보여줍니다. 변경된 설정은 모델의 동작을 조절하며, 이 경우에는 온도(temperature)를 조정하는 예시입니다.
AIMessage(content='34')
We can also do this when its used as part of a chain
체인의 일부로 사용될 때도 이 작업을 수행할 수 있습니다.
prompt = PromptTemplate.from_template("Pick a random number above {x}")
chain = prompt | model
이 코드는 대화 체인을 설정하고 사용자에게 특정 명령을 전달하기 위한 템플릿을 생성하는 예제를 보여줍니다.
PromptTemplate.from_template("Pick a random number above {x}"):
이 부분은 "PromptTemplate.from_template()"을 사용하여 대화 템플릿을 생성합니다. 이 템플릿은 사용자에게 "Pick a random number above {x}"라는 명령을 전달하고, "{x}" 부분은 나중에 사용자가 지정할 수 있는 매개변수 또는 변수를 나타냅니다.
chain = prompt | model:
이 부분은 "chain"이라는 실행 체인을 설정합니다. 이 체인은 "prompt" (대화 템플릿)과 모델을 연결합니다.
사용자에게 명령을 전달하기 위한 템플릿은 "prompt"로 지정되며, 모델은 이 템플릿에 따라 작동합니다.
이 코드는 사용자에게 "Pick a random number above {x}"라는 명령을 전달하기 위한 템플릿을 생성하고, 이 명령을 모델과 연결하여 모델이 해당 명령을 처리하고 응답을 생성할 수 있도록 하는 예시를 보여줍니다. 이때, "{x}" 부분은 나중에 사용자가 지정할 수 있는 값입니다.
ChatPromptValue(messages=[HumanMessage(content="You are an assistant for question-answering tasks. Use the following pieces of retrieved context to answer the question. If you don't know the answer, just say that you don't know. Use three sentences maximum and keep the answer concise.\nQuestion: foo \nContext: bar \nAnswer:")])
ChatPromptValue(messages=[HumanMessage(content="[INST]<<SYS>> You are an assistant for question-answering tasks. Use the following pieces of retrieved context to answer the question. If you don't know the answer, just say that you don't know. Use three sentences maximum and keep the answer concise.<</SYS>> \nQuestion: foo \nContext: bar \nAnswer: [/INST]")])
이 코드는 HubRunnable을 사용하여 Hub에서 가져온 리포지토리 커밋(commit)을 설정하고, 설정된 커밋을 기반으로 특정 질문과 컨텍스트를 처리하고 실행하는 예시를 나타냅니다.
HubRunnable 및 설정:
HubRunnable("rlm/rag-prompt")는 "HubRunnable"을 생성하고, 이 HubRunnable은 "rlm/rag-prompt" 리포지토리에서 컨텐츠를 가져오도록 구성되어 있습니다.
.configurable_fields()를 사용하여 설정 가능한 필드를 추가하고 설정합니다. 이 경우 "owner_repo_commit"이라는 설정 옵션을 추가하며, "hub_commit"이라는 식별자와 설명이 포함되어 있습니다.
첫 번째 실행:
prompt.invoke({"question": "foo", "context": "bar"})는 "prompt"를 사용하여 "question"과 "context" 값을 갖는 JSON 객체를 HubRunnable에 전달하고 실행합니다.
설정 변경 및 두 번째 실행:
prompt.with_config(configurable={"hub_commit": "rlm/rag-prompt-llama"})는 "hub_commit" 설정 값을 "rlm/rag-prompt-llama"로 변경하는 부분입니다.
.invoke({"question": "foo", "context": "bar"})는 변경된 설정을 가진 "prompt"를 사용하여 두 번째 실행을 수행합니다.
이 코드는 HubRunnable을 사용하여 특정 Hub 리포지토리에서 커밋을 설정하고, 설정된 커밋을 기반으로 특정 질문과 컨텍스트를 처리하고 실행하는 예시를 제공합니다. 설정을 변경함으로써 다른 커밋에서 실행을 수행할 수 있습니다.
from langchain.chat_models import ChatOpenAI, ChatAnthropic
from langchain.schema.runnable import ConfigurableField
from langchain.prompts import PromptTemplate
llm = ChatAnthropic(temperature=0).configurable_alternatives(
# This gives this field an id# When configuring the end runnable, we can then use this id to configure this field
ConfigurableField(id="llm"),
# This sets a default_key.# If we specify this key, the default LLM (ChatAnthropic initialized above) will be used
default_key="anthropic",
# This adds a new option, with name `openai` that is equal to `ChatOpenAI()`
openai=ChatOpenAI(),
# This adds a new option, with name `gpt4` that is equal to `ChatOpenAI(model="gpt-4")`
gpt4=ChatOpenAI(model="gpt-4"),
# You can add more configuration options here
)
prompt = PromptTemplate.from_template("Tell me a joke about {topic}")
chain = prompt | llm
# By default it will call Anthropic
chain.invoke({"topic": "bears"})
AIMessage(content=" Here's a silly joke about bears:\n\nWhat do you call a bear with no teeth?\nA gummy bear!")
# We can use `.with_config(configurable={"llm": "openai"})` to specify an llm to use
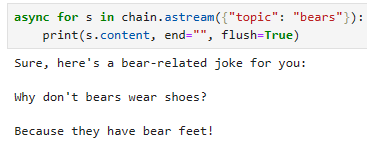
chain.with_config(configurable={"llm": "openai"}).invoke({"topic": "bears"})
AIMessage(content="Sure, here's a bear joke for you:\n\nWhy don't bears wear shoes?\n\nBecause they already have bear feet!")
# If we use the `default_key` then it uses the default
chain.with_config(configurable={"llm": "anthropic"}).invoke({"topic": "bears"})
AIMessage(content=" Here's a silly joke about bears:\n\nWhat do you call a bear with no teeth?\nA gummy bear!")
이 코드는 ChatAnthropic 및 다른 대화 모델(ChatOpenAI 및 모델 구성)을 사용하여 설정 가능한 대화 모델 체인을 설정하고, 설정을 변경하여 특정 대화 모델을 사용하여 특정 주제에 관한 농담을 생성하는 예시를 제공합니다.
모듈 및 클래스 가져오기:
langchain.chat_models 모듈에서 ChatOpenAI 및 ChatAnthropic 클래스를 가져옵니다. 이 클래스들은 대화 모델을 설정하고 사용하는 데 도움을 줍니다.
langchain.schema.runnable 모듈에서 ConfigurableField 클래스를 가져옵니다. 이 클래스는 설정 가능한 필드를 정의하는 데 사용됩니다.
langchain.prompts 모듈에서 PromptTemplate 클래스를 가져옵니다. 이 클래스는 대화 템플릿을 생성하는 데 사용됩니다.
대화 모델 및 설정 가능한 대화 모델 체인 설정:
ChatAnthropic(temperature=0)는 "ChatAnthropic" 대화 모델을 설정합니다. 이 모델은 온도(temperature)를 0으로 설정합니다.
.configurable_alternatives()를 사용하여 설정 가능한 대화 모델 옵션을 정의합니다.
"ConfigurableField"를 사용하여 "llm"이라는 설정 옵션을 추가하고 식별자를 지정합니다.
"default_key"를 사용하여 기본 LLM(ChatAnthropic 초기화)을 설정합니다.
다른 대화 모델 옵션을 추가합니다. "openai" 및 "gpt4"라는 이름의 옵션을 추가하고, 각각 "ChatOpenAI()" 및 "ChatOpenAI(model="gpt-4")"와 연결합니다.
이외에 필요한 설정 옵션을 추가할 수 있습니다.
대화 체인 설정:
"PromptTemplate.from_template()"를 사용하여 대화 템플릿을 생성합니다. 이 템플릿은 "{topic}" 부분을 나중에 사용자가 지정할 수 있는 변수로 사용하며, "Tell me a joke about {topic}"라는 메시지를 생성합니다.
chain = prompt | llm는 템플릿과 설정 가능한 대화 모델을 연결하여 실행 체인을 설정합니다.
대화 모델 및 설정 변경 및 실행:
"chain.invoke({"topic": "bears"})"는 설정 가능한 대화 모델 체인을 사용하여 주제가 "bears"인 농담을 생성합니다.
"chain.with_config(configurable={"llm": "openai"})"는 "llm" 설정 옵션을 "openai"로 변경하여 "ChatOpenAI" 대화 모델을 사용하여 동일한 주제에 관한 농담을 생성합니다.
"chain.with_config(configurable={"llm": "anthropic"})"는 "llm" 설정 옵션을 "anthropic" (기본 설정)으로 변경하여 "ChatAnthropic" 대화 모델을 사용하여 동일한 주제에 관한 농담을 생성합니다.
이 코드는 다양한 대화 모델 옵션을 설정하고 설정을 변경하여 다른 모델을 사용하여 특정 주제에 관한 농담을 생성하는 방법을 나타냅니다.
With Prompts
We can do a similar thing, but alternate between prompts
비슷한 작업을 수행할 수 있지만 프롬프트를 번갈아 가며 수행할 수 있습니다.
llm = ChatAnthropic(temperature=0)
prompt = PromptTemplate.from_template("Tell me a joke about {topic}").configurable_alternatives(
# This gives this field an id# When configuring the end runnable, we can then use this id to configure this field
ConfigurableField(id="prompt"),
# This sets a default_key.# If we specify this key, the default LLM (ChatAnthropic initialized above) will be used
default_key="joke",
# This adds a new option, with name `poem`
poem=PromptTemplate.from_template("Write a short poem about {topic}"),
# You can add more configuration options here
)
chain = prompt | llm
# By default it will write a joke
chain.invoke({"topic": "bears"})
AIMessage(content=" Here's a silly joke about bears:\n\nWhat do you call a bear with no teeth?\nA gummy bear!")
# We can configure it write a poem
chain.with_config(configurable={"prompt": "poem"}).invoke({"topic": "bears"})
AIMessage(content=' Here is a short poem about bears:\n\nThe bears awaken from their sleep\nAnd lumber out into the deep\nForests filled with trees so tall\nForaging for food before nightfall \nTheir furry coats and claws so sharp\nSniffing for berries and fish to nab\nLumbering about without a care\nThe mighty grizzly and black bear\nProud creatures, wild and free\nRuling their domain majestically\nWandering the woods they call their own\nBefore returning to their dens alone')
이 코드는 ChatAnthropic 대화 모델을 사용하여 설정 가능한 대화 템플릿 체인을 설정하고, 설정을 변경하여 농담 또는 시를 작성하는 예시를 제공합니다.
대화 모델 및 설정 가능한 대화 템플릿 설정:
ChatAnthropic(temperature=0)는 "ChatAnthropic" 대화 모델을 설정합니다. 이 모델은 온도(temperature)를 0으로 설정합니다.
PromptTemplate.from_template("Tell me a joke about {topic}")는 대화 템플릿을 생성하고, "{topic}" 부분은 나중에 사용자가 지정할 수 있는 변수로 사용됩니다.
.configurable_alternatives()를 사용하여 설정 가능한 대화 템플릿 옵션을 정의합니다.
"ConfigurableField"를 사용하여 "prompt"이라는 설정 옵션을 추가하고 식별자를 지정합니다.
"default_key"를 사용하여 기본 설정을 "joke"로 설정합니다. 이는 초기에 농담을 작성할 것을 의미합니다.
다른 대화 템플릿 옵션을 추가할 수 있습니다. "poem"이라는 이름의 옵션을 추가하고, 시를 작성하는 템플릿을 연결합니다.
대화 체인 설정:
chain = prompt | llm는 템플릿과 설정 가능한 대화 모델을 연결하여 실행 체인을 설정합니다.
농담 또는 시 작성:
"chain.invoke({"topic": "bears"})"는 설정 가능한 대화 템플릿 체인을 사용하여 주제가 "bears"인 농담을 생성합니다.
"chain.with_config(configurable={"prompt": "poem"})"는 "prompt" 설정 옵션을 "poem"으로 변경하여 동일한 주제에 대한 시를 생성합니다.
이 코드는 설정 가능한 대화 템플릿과 대화 모델을 사용하여 사용자가 설정을 변경함으로써 농담 또는 시를 작성하는 방법을 나타냅니다. "joke" 및 "poem" 설정을 변경하여 원하는 유형의 대화를 생성할 수 있습니다.
With Prompts and LLMs
We can also have multiple things configurable! Here's an example doing that with both prompts and LLMs.
여러 가지를 구성할 수도 있습니다! 프롬프트와 LLM을 모두 사용하여 이를 수행하는 예는 다음과 같습니다.
llm = ChatAnthropic(temperature=0).configurable_alternatives(
# This gives this field an id# When configuring the end runnable, we can then use this id to configure this field
ConfigurableField(id="llm"),
# This sets a default_key.# If we specify this key, the default LLM (ChatAnthropic initialized above) will be used
default_key="anthropic",
# This adds a new option, with name `openai` that is equal to `ChatOpenAI()`
openai=ChatOpenAI(),
# This adds a new option, with name `gpt4` that is equal to `ChatOpenAI(model="gpt-4")`
gpt4=ChatOpenAI(model="gpt-4"),
# You can add more configuration options here
)
prompt = PromptTemplate.from_template("Tell me a joke about {topic}").configurable_alternatives(
# This gives this field an id# When configuring the end runnable, we can then use this id to configure this field
ConfigurableField(id="prompt"),
# This sets a default_key.# If we specify this key, the default LLM (ChatAnthropic initialized above) will be used
default_key="joke",
# This adds a new option, with name `poem`
poem=PromptTemplate.from_template("Write a short poem about {topic}"),
# You can add more configuration options here
)
chain = prompt | llm
# We can configure it write a poem with OpenAI
chain.with_config(configurable={"prompt": "poem", "llm": "openai"}).invoke({"topic": "bears"})
AIMessage(content="In the forest, where tall trees sway,\nA creature roams, both fierce and gray.\nWith mighty paws and piercing eyes,\nThe bear, a symbol of strength, defies.\n\nThrough snow-kissed mountains, it does roam,\nA guardian of its woodland home.\nWith fur so thick, a shield of might,\nIt braves the coldest winter night.\n\nA gentle giant, yet wild and free,\nThe bear commands respect, you see.\nWith every step, it leaves a trace,\nOf untamed power and ancient grace.\n\nFrom honeyed feast to salmon's leap,\nIt takes its place, in nature's keep.\nA symbol of untamed delight,\nThe bear, a wonder, day and night.\n\nSo let us honor this noble beast,\nIn forests where its soul finds peace.\nFor in its presence, we come to know,\nThe untamed spirit that in us also flows.")
# We can always just configure only one if we want
chain.with_config(configurable={"llm": "openai"}).invoke({"topic": "bears"})
AIMessage(content="Sure, here's a bear joke for you:\n\nWhy don't bears wear shoes?\n\nBecause they have bear feet!")
이 코드는 ChatAnthropic 및 ChatOpenAI 대화 모델을 설정 가능한 대화 모델 체인으로 결합하고, 설정을 변경하여 다양한 대화 모델 및 대화 템플릿 옵션을 사용할 수 있는 예시를 제공합니다.
Saving configurations
We can also easily save configured chains as their own objects
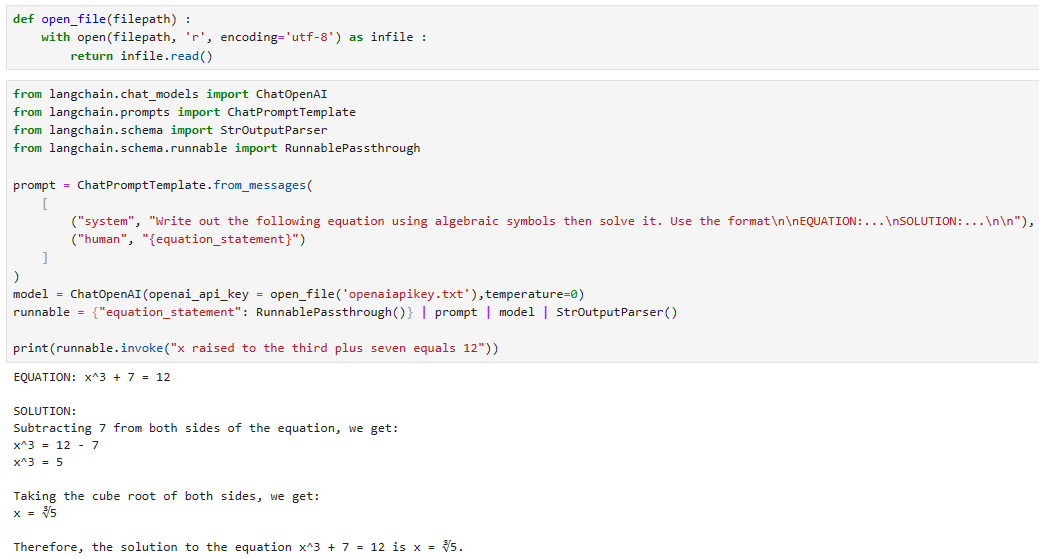
Sometimes we want to invoke a Runnable within a Runnable sequence with constant arguments that are not part of the output of the preceding Runnable in the sequence, and which are not part of the user input. We can useRunnable.bind()to easily pass these arguments in.
때때로 우리는 시퀀스의 이전 Runnable 출력의 일부가 아니고 사용자 입력의 일부도 아닌 상수 인수를 사용하여 Runnable 시퀀스 내에서 Runnable을 호출하려고 합니다. Runnable.bind()를 사용하여 이러한 인수를 쉽게 전달할 수 있습니다.
Suppose we have a simple prompt + model sequence:
간단한 프롬프트 + 모델 시퀀스가 있다고 가정해 보겠습니다.
from langchain.chat_models import ChatOpenAI
from langchain.prompts import ChatPromptTemplate
from langchain.schema import StrOutputParser
from langchain.schema.runnable import RunnablePassthrough

prompt = ChatPromptTemplate.from_messages(
    [
        ("system", "Write out the following equation using algebraic symbols then solve it. Use the format\n\nEQUATION:...\nSOLUTION:...\n\n"),
        ("human", "{equation_statement}")
    ]
)
model = ChatOpenAI(temperature=0)
runnable = {"equation_statement": RunnablePassthrough()} | prompt | model | StrOutputParser()

print(runnable.invoke("x raised to the third plus seven equals 12"))
이 코드는 "langchain" 라이브러리를 사용하여 주어진 방정식을 해결하기 위한 대화 모델을 설정하고 실행하는 예시를 보여줍니다.
모듈 및 클래스 가져오기:
langchain.chat_models 모듈에서 ChatOpenAI 클래스를 가져옵니다. 이 클래스는 OpenAI의 대화 모델을 사용하기 위한 도구를 제공합니다.
langchain.prompts 모듈에서 ChatPromptTemplate 클래스를 가져옵니다. 이 클래스는 대화 형식의 템플릿을 만들기 위한 도구를 제공합니다.
langchain.schema 모듈에서 StrOutputParser 클래스를 가져옵니다. 이 클래스는 출력을 파싱하기 위한 도구를 제공합니다.
langchain.schema.runnable 모듈에서 RunnablePassthrough 클래스를 가져옵니다. 이 클래스는 실행 가능한 객체를 나타내는 클래스입니다.
대화 템플릿 설정:
"prompt" 변수에는 "ChatPromptTemplate.from_messages()"를 사용하여 대화 템플릿을 생성합니다. 이 템플릿은 시스템 메시지와 사용자 메시지를 포함합니다. 사용자는 방정식을 입력하고 시스템은 방정식과 그 해를 출력할 것을 요청합니다.
모델 및 실행 가능한 체인 설정:
"model" 변수에는 "ChatOpenAI(temperature=0)"를 사용하여 대화 모델을 생성합니다. "temperature=0"은 모델의 출력을 보다 결정적으로 만듭니다.
"runnable" 변수에는 실행 가능한 체인을 설정합니다. 이 체인은 다음과 같이 구성됩니다:
"equation_statement" 변수를 "RunnablePassthrough()"와 조합하여 방정식 문장을 처리합니다.
"prompt" 템플릿을 추가합니다.
대화 모델(model)을 추가합니다.
출력 파서(StrOutputParser)를 추가합니다.
실행 및 결과 출력:
"runnable.invoke("x raised to the third plus seven equals 12")"를 사용하여 주어진 방정식을 실행합니다.
결과를 출력합니다.
이 코드는 주어진 방정식을 해결하기 위한 대화 모델을 설정하고 실행하여 결과를 출력하는 예시를 나타냅니다.
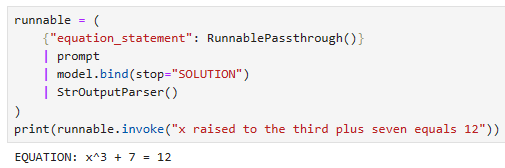
and want to call the model with certainstopwords:
특정 중지 단어로 모델을 호출하고 싶습니다.
runnable = (
    {"equation_statement": RunnablePassthrough()}
    | prompt
    | model.bind(stop="SOLUTION")
    | StrOutputParser()
)
print(runnable.invoke("x raised to the third plus seven equals 12"))
이 코드는 방정식을 처리하고 해결하기 위한 실행 체인을 설정하고, 주어진 방정식을 실행하여 결과를 출력하는 예시를 보여줍니다.
실행 체인 설정:
"runnable" 변수에는 실행 체인을 설정합니다.
이 체인은 다음과 같이 구성됩니다:
{"equation_statement": RunnablePassthrough()}: "equation_statement" 변수를 "RunnablePassthrough()"와 조합하여 방정식 문장을 처리합니다. 이 부분은 사용자가 입력한 방정식 문장을 체인으로 전달합니다.
"prompt": 이전 설명에서 정의된 "prompt" 템플릿을 추가합니다. 이 템플릿은 시스템 메시지와 사용자 메시지를 포함하며 방정식을 입력하는 역할을 합니다.
"model.bind(stop="SOLUTION")": 모델(model)에 "SOLUTION"이라는 종료 토큰을 지정하여, 모델이 "SOLUTION"이라는 토큰을 만날 때까지 출력을 생성하도록 설정합니다.
"StrOutputParser()": 출력 파서(StrOutputParser())를 추가합니다. 이 파서는 모델 출력을 파싱하고 처리합니다.
실행 및 결과 출력:
"runnable.invoke("x raised to the third plus seven equals 12")"를 사용하여 주어진 방정식을 실행합니다.
실행 결과를 출력합니다.
이 코드는 주어진 방정식을 처리하고 해결하기 위한 실행 체인을 설정하고, 결과를 출력하는 예시를 나타냅니다. 결과는 방정식의 해결책을 포함합니다.
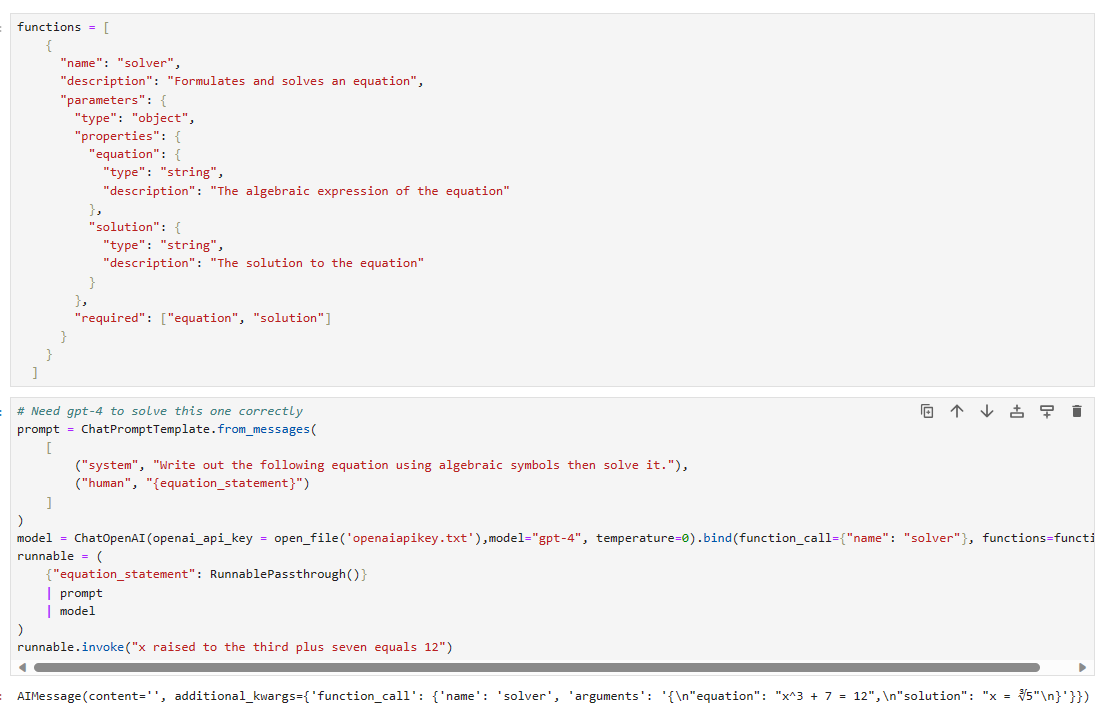
Attaching OpenAI functions
One particularly useful application of binding is to attach OpenAI functions to a compatible OpenAI model:
바인딩의 특히 유용한 응용 프로그램 중 하나는 OpenAI 기능을 호환되는 OpenAI 모델에 연결하는 것입니다.
functions = [
    {
      "name": "solver",
      "description": "Formulates and solves an equation",
      "parameters": {
        "type": "object",
        "properties": {
          "equation": {
            "type": "string",
            "description": "The algebraic expression of the equation"
          },
          "solution": {
            "type": "string",
            "description": "The solution to the equation"
          }
        },
        "required": ["equation", "solution"]
      }
    }
  ]
이 코드는 "functions"라는 변수에 대한 목록을 설정하며, 이 목록은 함수에 대한 정보를 포함합니다. 이 함수 정보는 JSON 형식으로 표현되며, 주어진 함수에 대한 이름, 설명, 그리고 함수의 매개변수에 대한 정보를 제공합니다.
functions 변수는 함수 정보를 담고 있는 리스트입니다.
name: 함수의 이름을 나타냅니다. 이 경우, 함수의 이름은 "solver"입니다.
description: 함수의 설명을 나타냅니다. 이 경우, "solver" 함수는 "방정식을 구성하고 풉니다"라는 설명을 갖습니다.
parameters: 함수의 매개변수에 대한 정보를 나타냅니다.
type: 매개변수의 형식을 지정합니다. 이 경우, "object"로 설정되어 있으므로, 객체 형태의 매개변수를 가집니다.
properties: 객체 형태의 매개변수에 포함된 속성들을 정의합니다.
"equation": 방정식의 대수적 표현에 대한 정보를 정의합니다. 이 매개변수는 문자열 형식을 갖고 있으며, "description"은 "방정식의 대수적 표현"입니다.
"solution": 방정식의 해결책에 대한 정보를 정의합니다. 이 매개변수 역시 문자열 형식을 갖고 있으며, "description"은 "방정식의 해결책"입니다.
required: 필수적으로 제공되어야 하는 매개변수를 정의합니다. "equation"과 "solution"은 반드시 제공되어야 하는 매개변수입니다.
이 코드는 "solver"라는 함수에 대한 정보를 정의하고, 해당 함수가 어떤 매개변수를 필요로 하며 어떤 역할을 하는지 설명합니다. 이러한 정보는 API 또는 서비스의 사용자에게 함수의 사용 방법을 설명하는 데 사용될 수 있습니다.
# Need gpt-4 to solve this one correctly
prompt = ChatPromptTemplate.from_messages(
    [
        ("system", "Write out the following equation using algebraic symbols then solve it."),
        ("human", "{equation_statement}")
    ]
)
model = ChatOpenAI(model="gpt-4", temperature=0).bind(function_call={"name": "solver"}, functions=functions)
runnable = (
    {"equation_statement": RunnablePassthrough()}
    | prompt
    | model
)
runnable.invoke("x raised to the third plus seven equals 12")
이 코드는 GPT-4 모델을 사용하여 방정식을 구성하고 풀기 위한 프로세스를 설정하고 실행하는 예시를 제공합니다.
실행 체인 설정:
"prompt" 변수에는 "ChatPromptTemplate.from_messages()"를 사용하여 대화 템플릿을 생성합니다. 이 템플릿은 시스템 메시지와 사용자 메시지를 포함합니다. 시스템 메시지에서는 사용자에게 방정식을 구성하고 풀어달라는 지시가 포함되어 있고, 사용자는 "equation_statement" 변수를 사용하여 방정식을 제공합니다.
모델 및 함수 설정:
"model" 변수에는 "ChatOpenAI(model="gpt-4", temperature=0)"를 사용하여 GPT-4 모델을 생성합니다. "temperature=0"은 모델의 출력을 보다 결정적으로 만듭니다.
"model.bind(function_call={"name": "solver"}, functions=functions)"를 사용하여 모델에 함수 호출을 바인딩합니다. "function_call"은 호출할 함수의 이름을 지정하고, "functions"는 함수의 정의를 포함하는 목록입니다. 이 경우, "solver" 함수가 호출될 것입니다.
실행 가능한 체인 설정:
"runnable" 변수에는 실행 가능한 체인을 설정합니다.
이 체인은 다음과 같이 구성됩니다:
{"equation_statement": RunnablePassthrough()}: "equation_statement" 변수를 "RunnablePassthrough()"와 조합하여 방정식 문장을 처리합니다.
"prompt" 템플릿을 추가합니다.
GPT-4 모델(model)을 추가합니다.
실행 및 결과 출력:
"runnable.invoke("x raised to the third plus seven equals 12")"를 사용하여 주어진 방정식을 실행합니다. 이 방정식은 "x raised to the third plus seven equals 12"로 주어집니다.
이 코드는 GPT-4 모델을 사용하여 방정식을 구성하고 풀기 위한 프로세스를 설정하고, 결과를 출력하는 예시를 나타냅니다. GPT-4 모델은 더 복잡한 방정식을 다루기 위해 사용됩니다.
In an effort to make it as easy as possible to create custom chains, we've implemented a"Runnable"protocol that most components implement. This is a standard interface with a few different methods, which makes it easy to define custom chains as well as making it possible to invoke them in a standard way. The standard interface exposed includes:
사용자 정의 체인을 최대한 쉽게 생성하기 위한 노력의 일환으로 우리는 대부분의 구성 요소가 구현하는 "실행 가능" 프로토콜을 구현했습니다. 이는 몇 가지 다른 메소드가 포함된 표준 인터페이스로, 사용자 정의 체인을 쉽게 정의할 수 있을 뿐만 아니라 표준 방식으로 호출할 수도 있습니다. 노출된 표준 인터페이스에는 다음이 포함됩니다.
stream: stream back chunks of the response 응답의 청크를 다시 스트리밍합니다.
invoke: call the chain on an input 입력에서 체인을 호출합니다.
batch: call the chain on a list of inputs 입력 목록에서 체인을 호출합니다.
These also have corresponding async methods: 여기에는 해당하는 비동기 메서드도 있습니다.
astream: stream back chunks of the response async 응답 비동기 청크를 다시 스트리밍합니다.
ainvoke: call the chain on an input async 입력 비동기에서 체인 호출
abatch: call the chain on a list of inputs async 비동기 입력 목록에서 체인을 호출합니다.
astream_log: stream back intermediate steps as they happen, in addition to the final response 최종 응답 외에도 중간 단계가 발생하면 다시 스트리밍합니다.
The type of the input varies by component:
입력 유형은 구성 요소에 따라 다릅니다.
The output type also varies by component:
출력 유형도 구성요소에 따라 다릅니다.
All runnables expose properties to inspect the input and output types:
모든 실행 가능 항목은 입력 및 출력 유형을 검사하기 위한 속성을 노출합니다.
input_schema: an input Pydantic model auto-generated from the structure of the Runnable
input_schema: Runnable의 구조에서 자동 생성된 입력 Pydantic 모델
output_schema: an output Pydantic model auto-generated from the structure of the Runnable
output_schema: Runnable의 구조에서 자동 생성된 출력 Pydantic 모델
Let's take a look at these methods! To do so, we'll create a super simple PromptTemplate + ChatModel chain.
이러한 방법들을 살펴보겠습니다! 이를 위해 매우 간단한 PromptTemplate + ChatModel 체인을 생성하겠습니다.
from langchain.prompts import ChatPromptTemplate
from langchain.chat_models import ChatOpenAI

model = ChatOpenAI()
prompt = ChatPromptTemplate.from_template("tell me a joke about {topic}")
chain = prompt | model
이 코드는 "langchain" 라이브러리를 사용하여 OpenAI의 언어 모델을 활용하는 예시를 제공합니다.
ChatPromptTemplate 클래스는 대화 생성에 사용되는 템플릿을 만들고 활용하는 데 도움을 주는 클래스입니다.
from langchain.chat_models import ChatOpenAI:
"langchain" 라이브러리에서 ChatOpenAI 클래스를 가져오는 명령입니다.
ChatOpenAI 클래스는 OpenAI의 언어 모델을 활용하는 데 사용되는 클래스입니다.
model = ChatOpenAI(openai_api_key = open_file('openaiapikey.txt'), temperature=0.9):
ChatOpenAI 클래스의 인스턴스를 생성합니다.
openai_api_key 매개변수에 OpenAI API 키를 파일로부터 읽어온 값을 전달합니다.
temperature 매개변수는 모델의 창의성을 조절하는 요소로, 0.9로 설정되어 있으며 높을수록 더 다양한 출력이 생성됩니다.
prompt = ChatPromptTemplate.from_template("tell me a joke about {topic}"):
ChatPromptTemplate 클래스의 from_template 메서드를 사용하여 템플릿을 생성합니다.
템플릿 문자열 "tell me a joke about {topic}"은 {topic} 부분이 나중에 대체될 변수를 나타냅니다.
chain = prompt | model:
prompt와 model을 결합하여 대화 체인을 생성합니다.
이러한 체인을 사용하면 템플릿을 모델과 함께 사용하여 모델에게 대화 형식으로 질문을 하고 응답을 받을 수 있습니다.
이 코드는 주어진 주제에 대한 재미있는 농담을 생성하기 위해 OpenAI 모델을 사용하는 예시를 나타내고 있습니다. 모델은 주어진 API 키 및 설정과 함께 템플릿을 사용하여 대화를 생성하고 대화의 연장으로 대화를 계속할 수 있습니다.
Input Schema
A description of the inputs accepted by a Runnable. This is a Pydantic model dynamically generated from the structure of any Runnable. You can call.schema()on it to obtain a JSONSchema representation.
Runnable이 허용하는 입력에 대한 설명입니다. 이는 Runnable의 구조에서 동적으로 생성된 Pydantic 모델입니다. .schema()를 호출하여 JSONSchema 표현을 얻을 수 있습니다.
# The input schema of the chain is the input schema of its first part, the prompt.
chain.input_schema.schema()
이 코드는 "chain"이라는 객체의 입력 스키마(input schema)를 설명하고 있습니다. "chain"은 여러 부분으로 구성된 대화 체인이며, 이 코드는 체인의 입력 스키마를 확인하는 부분에 대한 설명입니다.
# 체인의 입력 스키마는 체인의 첫 번째 부분인 prompt의 입력 스키마와 동일합니다.
chain.input_schema.schema()
"chain"은 여러 부분으로 이루어진 대화 체인을 나타내는 객체입니다. 이 대화 체인은 대화를 구성하고 관리하는 데 사용됩니다.
chain.input_schema.schema()은 체인의 입력 스키마를 확인하는 코드입니다. 입력 스키마는 데이터나 정보의 구조와 형식을 정의하는데 사용됩니다.
주석(#)은 코드에 설명을 추가하는 데 사용되며, 이 경우에는 주석으로 코드의 목적을 설명하고 있습니다.
이 코드에서 "chain"의 입력 스키마는 "prompt"라는 첫 번째 부분의 입력 스키마와 동일하다고 설명하고 있습니다. 즉, 체인의 입력 스키마는 체인의 첫 번째 부분인 "prompt"에서 정의한 입력 스키마와 일치합니다.
입력 스키마의 역할은 데이터의 형식, 구조, 및 유효성 검사에 관련됩니다. 이 코드는 입력 스키마를 확인하는 용도로 사용되며, 체인의 구조와 입력 데이터에 대한 정보를 얻을 수 있습니다.
이 코드는 체인의 입력 스키마를 확인하고 첫 번째 부분 "prompt"의 입력 스키마와 일치한다는 점을 강조하는 목적으로 사용됩니다.
prompt.input_schema.schema()
model.input_schema.schema()
return 값
{'title': 'ChatOpenAIInput',
 'anyOf': [{'type': 'string'},
  {'$ref': '#/definitions/StringPromptValue'},
  {'$ref': '#/definitions/ChatPromptValueConcrete'},
  {'type': 'array',
   'items': {'anyOf': [{'$ref': '#/definitions/AIMessage'},
     {'$ref': '#/definitions/HumanMessage'},
     {'$ref': '#/definitions/ChatMessage'},
     {'$ref': '#/definitions/SystemMessage'},
     {'$ref': '#/definitions/FunctionMessage'}]}}],
 'definitions': {'StringPromptValue': {'title': 'StringPromptValue',
   'description': 'String prompt value.',
   'type': 'object',
   'properties': {'text': {'title': 'Text', 'type': 'string'},
    'type': {'title': 'Type',
     'default': 'StringPromptValue',
     'enum': ['StringPromptValue'],
     'type': 'string'}},
   'required': ['text']},
  'AIMessage': {'title': 'AIMessage',
   'description': 'A Message from an AI.',
   'type': 'object',
   'properties': {'content': {'title': 'Content', 'type': 'string'},
    'additional_kwargs': {'title': 'Additional Kwargs', 'type': 'object'},
    'type': {'title': 'Type',
     'default': 'ai',
     'enum': ['ai'],
     'type': 'string'},
    'example': {'title': 'Example', 'default': False, 'type': 'boolean'}},
   'required': ['content']},
  'HumanMessage': {'title': 'HumanMessage',
   'description': 'A Message from a human.',
   'type': 'object',
   'properties': {'content': {'title': 'Content', 'type': 'string'},
    'additional_kwargs': {'title': 'Additional Kwargs', 'type': 'object'},
    'type': {'title': 'Type',
     'default': 'human',
     'enum': ['human'],
     'type': 'string'},
    'example': {'title': 'Example', 'default': False, 'type': 'boolean'}},
   'required': ['content']},
  'ChatMessage': {'title': 'ChatMessage',
   'description': 'A Message that can be assigned an arbitrary speaker (i.e. role).',
   'type': 'object',
   'properties': {'content': {'title': 'Content', 'type': 'string'},
    'additional_kwargs': {'title': 'Additional Kwargs', 'type': 'object'},
    'type': {'title': 'Type',
     'default': 'chat',
     'enum': ['chat'],
     'type': 'string'},
    'role': {'title': 'Role', 'type': 'string'}},
   'required': ['content', 'role']},
  'SystemMessage': {'title': 'SystemMessage',
   'description': 'A Message for priming AI behavior, usually passed in as the first of a sequence\nof input messages.',
   'type': 'object',
   'properties': {'content': {'title': 'Content', 'type': 'string'},
    'additional_kwargs': {'title': 'Additional Kwargs', 'type': 'object'},
    'type': {'title': 'Type',
     'default': 'system',
     'enum': ['system'],
     'type': 'string'}},
   'required': ['content']},
  'FunctionMessage': {'title': 'FunctionMessage',
   'description': 'A Message for passing the result of executing a function back to a model.',
   'type': 'object',
   'properties': {'content': {'title': 'Content', 'type': 'string'},
    'additional_kwargs': {'title': 'Additional Kwargs', 'type': 'object'},
    'type': {'title': 'Type',
     'default': 'function',
     'enum': ['function'],
     'type': 'string'},
    'name': {'title': 'Name', 'type': 'string'}},
   'required': ['content', 'name']},
  'ChatPromptValueConcrete': {'title': 'ChatPromptValueConcrete',
   'description': 'Chat prompt value which explicitly lists out the message types it accepts.\nFor use in external schemas.',
   'type': 'object',
   'properties': {'messages': {'title': 'Messages',
     'type': 'array',
     'items': {'anyOf': [{'$ref': '#/definitions/AIMessage'},
       {'$ref': '#/definitions/HumanMessage'},
       {'$ref': '#/definitions/ChatMessage'},
       {'$ref': '#/definitions/SystemMessage'},
       {'$ref': '#/definitions/FunctionMessage'}]}},
    'type': {'title': 'Type',
     'default': 'ChatPromptValueConcrete',
     'enum': ['ChatPromptValueConcrete'],
     'type': 'string'}},
   'required': ['messages']}}}
Output Schema
A description of the outputs produced by a Runnable. This is a Pydantic model dynamically generated from the structure of any Runnable. You can call.schema()on it to obtain a JSONSchema representation.
Runnable이 생성한 출력에 대한 설명입니다. 이는 Runnable의 구조에서 동적으로 생성된 Pydantic 모델입니다. .schema()를 호출하여 JSONSchema 표현을 얻을 수 있습니다.
# The output schema of the chain is the output schema of its last part, in this case a ChatModel, which outputs a ChatMessage
chain.output_schema.schema()
이 코드는 "chain" 객체의 출력 스키마를 설명하고 있습니다. "chain"은 여러 부분으로 구성된 대화 체인이며, 이 코드는 체인의 출력 스키마를 확인하는 부분에 대한 설명입니다.
# 체인의 출력 스키마는 마지막 부분인 ChatModel의 출력 스키마와 동일합니다. 이 경우에는 ChatMessage가 출력됩니다.
chain.output_schema.schema()
"chain"은 여러 부분으로 이루어진 대화 체인을 나타내는 객체입니다. 이 대화 체인은 대화의 구조와 출력을 관리하는 데 사용됩니다.
chain.output_schema.schema()은 체인의 출력 스키마를 확인하는 코드입니다. 출력 스키마는 데이터나 정보의 구조와 형식을 정의하는데 사용됩니다.
주석(#)은 코드에 설명을 추가하는 데 사용되며, 이 경우에는 주석으로 코드의 목적을 설명하고 있습니다.
이 코드에서 "chain"의 출력 스키마는 이 체인의 마지막 부분인 "ChatModel"에서 정의한 출력 스키마와 일치한다고 설명하고 있습니다. 마지막 부분인 "ChatModel"이 "ChatMessage"를 출력하므로, 체인의 출력 스키마도 "ChatMessage"와 일치합니다.
출력 스키마의 역할은 데이터의 형식, 구조, 및 유효성 검사에 관련됩니다. 이 코드는 출력 스키마를 확인하는 용도로 사용되며, 체인의 구조와 출력 데이터에 대한 정보를 얻을 수 있습니다.
이 코드는 체인의 출력 스키마를 확인하고 마지막 부분 "ChatModel"의 출력 스키마와 일치한다는 점을 강조하는 목적으로 사용됩니다.
return 값
{'title': 'ChatOpenAIOutput',
 'anyOf': [{'$ref': '#/definitions/AIMessage'},
  {'$ref': '#/definitions/HumanMessage'},
  {'$ref': '#/definitions/ChatMessage'},
  {'$ref': '#/definitions/SystemMessage'},
  {'$ref': '#/definitions/FunctionMessage'}],
 'definitions': {'AIMessage': {'title': 'AIMessage',
   'description': 'A Message from an AI.',
   'type': 'object',
   'properties': {'content': {'title': 'Content', 'type': 'string'},
    'additional_kwargs': {'title': 'Additional Kwargs', 'type': 'object'},
    'type': {'title': 'Type',
     'default': 'ai',
     'enum': ['ai'],
     'type': 'string'},
    'example': {'title': 'Example', 'default': False, 'type': 'boolean'}},
   'required': ['content']},
  'HumanMessage': {'title': 'HumanMessage',
   'description': 'A Message from a human.',
   'type': 'object',
   'properties': {'content': {'title': 'Content', 'type': 'string'},
    'additional_kwargs': {'title': 'Additional Kwargs', 'type': 'object'},
    'type': {'title': 'Type',
     'default': 'human',
     'enum': ['human'],
     'type': 'string'},
    'example': {'title': 'Example', 'default': False, 'type': 'boolean'}},
   'required': ['content']},
  'ChatMessage': {'title': 'ChatMessage',
   'description': 'A Message that can be assigned an arbitrary speaker (i.e. role).',
   'type': 'object',
   'properties': {'content': {'title': 'Content', 'type': 'string'},
    'additional_kwargs': {'title': 'Additional Kwargs', 'type': 'object'},
    'type': {'title': 'Type',
     'default': 'chat',
     'enum': ['chat'],
     'type': 'string'},
    'role': {'title': 'Role', 'type': 'string'}},
   'required': ['content', 'role']},
  'SystemMessage': {'title': 'SystemMessage',
   'description': 'A Message for priming AI behavior, usually passed in as the first of a sequence\nof input messages.',
   'type': 'object',
   'properties': {'content': {'title': 'Content', 'type': 'string'},
    'additional_kwargs': {'title': 'Additional Kwargs', 'type': 'object'},
    'type': {'title': 'Type',
     'default': 'system',
     'enum': ['system'],
     'type': 'string'}},
   'required': ['content']},
  'FunctionMessage': {'title': 'FunctionMessage',
   'description': 'A Message for passing the result of executing a function back to a model.',
   'type': 'object',
   'properties': {'content': {'title': 'Content', 'type': 'string'},
    'additional_kwargs': {'title': 'Additional Kwargs', 'type': 'object'},
    'type': {'title': 'Type',
     'default': 'function',
     'enum': ['function'],
     'type': 'string'},
    'name': {'title': 'Name', 'type': 'string'}},
   'required': ['content', 'name']}}}
Stream
for s in chain.stream({"topic": "bears"}):
    print(s.content, end="", flush=True)
이 코드는 "chain" 객체를 사용하여 대화를 생성하고 출력하는 부분을 설명하고 있습니다.
for s in chain.stream({"topic": "bears"})::
이 부분은 "chain" 객체를 사용하여 대화를 생성하는 반복문입니다.
"chain.stream({"topic": "bears"})"은 주어진 입력 매개변수인 {"topic": "bears"}를 사용하여 대화를 시작하고 그 결과를 반복적으로 처리합니다.
print(s.content, end="", flush=True):
"s"는 반복문에서 가져온 대화의 한 부분을 나타냅니다.
"s.content"는 대화의 내용을 나타내며, 이 부분은 출력됩니다.
"end=""`"는 "print" 함수가 줄 바꿈 문자를 출력하지 않도록 합니다. 따라서 출력이 연이어 나타납니다.
"flush=True"는 출력을 즉시 표시하도록 하는 옵션으로, 출력이 즉시 화면에 나타납니다.
이 코드는 "chain"을 사용하여 주제가 "bears"인 대화를 생성하고 해당 대화를 반복적으로 처리하여 출력합니다. 출력은 줄 바꿈 없이 연이어 표시되며, flush=True 옵션을 사용하여 즉시 표시됩니다.
Invoke
chain.invoke({"topic": "bears"})
이 코드는 "chain" 객체를 사용하여 대화를 생성하고 실행하는 부분을 설명하고 있습니다.
chain.invoke({"topic": "bears"}):
이 부분은 "chain" 객체를 사용하여 대화를 생성하고 실행하는 명령입니다.
{"topic": "bears"}는 입력 매개변수로 주어진 딕셔너리를 나타냅니다. 여기서 "topic"은 대화 주제를 설정하는데 사용되는 키이며, "bears"는 주제로 설정됩니다.
이 코드는 "chain"을 사용하여 주제가 "bears"인 대화를 생성하고 실행합니다. 이로써 대화 모델은 "bears" 주제에 관한 대화를 생성하고 결과를 반환합니다.
{"topic": "bears"}와 {"topic": "cats"}는 입력 매개변수로 주어진 딕셔너리의 목록을 나타냅니다. 각 딕셔너리에는 "topic" 키와 대화 주제를 설정하는 값이 포함되어 있습니다.
이 코드는 "chain"을 사용하여 "bears" 주제와 "cats" 주제에 관한 여러 대화를 생성하고 처리합니다. 이로써 대화 모델은 주어진 주제에 따라 대화를 생성하고 결과를 반환합니다.
Async Stream
async for s in chain.astream({"topic": "bears"}):
    print(s.content, end="", flush=True)
이 코드는 비동기로 "chain" 객체를 사용하여 대화를 생성하고 출력하는 부분을 설명하고 있습니다.
async for s in chain.astream({"topic": "bears"})::
이 부분은 비동기 반복문으로, "chain" 객체를 사용하여 대화를 생성하고 결과를 처리합니다.
chain.astream({"topic": "bears"})은 주어진 입력 매개변수인 {"topic": "bears"}를 사용하여 대화를 시작하고 비동기 스트림을 통해 결과를 받아옵니다.
print(s.content, end="", flush=True):
"s"는 스트림에서 가져온 대화의 한 부분을 나타냅니다.
"s.content"는 대화의 내용을 나타내며, 이 부분은 출력됩니다.
"end=""`"는 "print" 함수가 줄 바꿈 문자를 출력하지 않도록 합니다. 따라서 출력이 연이어 나타납니다.
"flush=True"는 출력을 즉시 표시하도록 하는 옵션으로, 출력이 즉시 화면에 나타납니다.
이 코드는 "chain"을 사용하여 주제가 "bears"인 대화를 생성하고 비동기 스트림을 통해 결과를 받아오며, 결과를 출력합니다. 출력은 줄 바꿈 없이 연이어 표시되며, flush=True 옵션을 사용하여 즉시 표시됩니다.
Async Invoke
await chain.ainvoke({"topic": "bears"})
이 코드는 "chain" 객체를 사용하여 대화를 생성하고 실행하는 비동기 방식을 설명하고 있습니다.
await chain.ainvoke({"topic": "bears"}):
이 부분은 "chain" 객체를 사용하여 비동기로 대화를 생성하고 실행하는 명령입니다.
{"topic": "bears"}는 입력 매개변수로 주어진 딕셔너리를 나타냅니다. 여기서 "topic"은 대화 주제를 설정하는데 사용되는 키이며, "bears"는 주제로 설정됩니다.
이 코드는 "chain"을 사용하여 "bears" 주제에 관한 대화를 생성하고 실행합니다. await 키워드는 비동기 작업이 완료될 때까지 대기하도록 하며, 대화의 실행이 완료되면 결과를 반환합니다.
Async Batch
await chain.abatch([{"topic": "bears"}])
이 코드는 "chain" 객체를 사용하여 대화를 생성하고 실행하는 비동기 일괄 처리 방법을 설명하고 있습니다.
await chain.abatch([{"topic": "bears"}]):
이 부분은 "chain" 객체를 사용하여 비동기로 대화를 생성하고 실행하는 명령입니다.
{"topic": "bears"}는 입력 매개변수로 주어진 딕셔너리의 목록을 나타냅니다. 각 딕셔너리에는 "topic" 키와 대화 주제를 설정하는 값이 포함되어 있습니다.
이 코드는 "chain"을 사용하여 "bears" 주제에 관한 대화를 생성하고 실행합니다. await 키워드는 비동기 작업이 완료될 때까지 대기하도록 하며, 대화의 실행이 완료되면 결과를 반환합니다.
Async Stream Intermediate Steps
All runnables also have a method.astream_log()which is used to stream (as they happen) all or part of the intermediate steps of your chain/sequence.
모든 runnables는 체인/시퀀스의 중간 단계 전체 또는 일부를 스트리밍하는 데 사용되는 .astream_log() 메서드도 있습니다.
This is useful to show progress to the user, to use intermediate results, or to debug your chain.
이는 사용자에게 진행 상황을 표시하거나, 중간 결과를 사용하거나, 체인을 디버깅하는 데 유용합니다.
You can stream all steps (default) or include/exclude steps by name, tags or metadata.
모든 단계를 스트리밍(기본값)하거나 이름, 태그 또는 메타데이터별로 단계를 포함/제외할 수 있습니다.
This method yieldsJSONPatchops that when applied in the same order as received build up the RunState.
이 메서드는 수신된 순서와 동일한 순서로 적용될 때 RunState를 구축하는 JSONPatch 작업을 생성합니다.
class LogEntry(TypedDict):
id: str
"""ID of the sub-run."""
name: str
"""Name of the object being run."""type: str
"""Type of the object being run, eg. prompt, chain, llm, etc."""
tags: List[str]
"""List of tags for the run."""
metadata: Dict[str, Any]
"""Key-value pairs of metadata for the run."""
start_time: str
"""ISO-8601 timestamp of when the run started."""
streamed_output_str: List[str]
"""List of LLM tokens streamed by this run, if applicable."""
final_output: Optional[Any]
"""Final output of this run.
Only available after the run has finished successfully."""
end_time: Optional[str]
"""ISO-8601 timestamp of when the run ended.
Only available after the run has finished."""
class RunState(TypedDict):
id: str
"""ID of the run."""
streamed_output: List[Any]
"""List of output chunks streamed by Runnable.stream()"""
final_output: Optional[Any]
"""Final output of the run, usually the result of aggregating (`+`) streamed_output.
Only available after the run has finished successfully."""
logs: Dict[str, LogEntry]
"""Map of run names to sub-runs. If filters were supplied, this list will
contain only the runs that matched the filters."""
위의 코드는 Python 3.8 이상에서 사용 가능한 TypedDict를 사용하여 두 개의 타입 딕셔너리(LogEntry 및 RunState)를 정의하고 있습니다. 이 타입 딕셔너리는 특정 키와 그에 상응하는 데이터 형식을 명시적으로 정의함으로써 딕셔너리의 구조를 제한하고 코드의 가독성과 안정성을 향상시킵니다.
LogEntry 타입 딕셔너리:
id: str: 서브런의 ID를 나타내는 문자열.
name: str: 실행 중인 객체의 이름을 나타내는 문자열.
type: str: 실행 중인 객체의 유형(예: 프롬프트, 체인, llm 등)을 나타내는 문자열.
tags: List[str]: 실행에 대한 태그 목록을 나타내는 문자열 리스트.
metadata: Dict[str, Any]: 실행에 대한 메타데이터를 나타내는 키-값 쌍의 딕셔너리.
start_time: str: 실행이 시작된 ISO-8601 타임스탬프를 나타내는 문자열.
streamed_output_str: List[str]: 이 실행에 의해 스트리밍된 LLM 토큰의 목록(적용 가능한 경우).
final_output: Optional[Any]: 이 실행의 최종 출력. 실행이 성공적으로 완료된 후에만 사용 가능한 옵셔널 타입 데이터.
end_time: Optional[str]: 실행이 종료된 ISO-8601 타임스탬프. 실행이 성공적으로 완료된 후에만 사용 가능한 옵셔널 타입 데이터.
RunState 타입 딕셔너리:
id: str: 실행의 ID를 나타내는 문자열.
streamed_output: List[Any]: Runnable.stream()에 의해 스트리밍된 출력 청크 목록을 나타내는 리스트.
final_output: Optional[Any]: 실행의 최종 출력. 일반적으로 streamed_output을 집계한 결과입니다. 실행이 성공적으로 완료된 후에만 사용 가능한 옵셔널 타입 데이터.
logs: Dict[str, LogEntry]: 실행의 이름과 서브런(로그 엔트리) 간의 매핑. 필터가 제공된 경우 해당 필터와 일치하는 실행만 포함합니다.
이러한 타입 딕셔너리는 데이터 구조와 형식을 명확히 정의하며, 이러한 정보를 사용하는 코드에서 유용한 형식 검증과 가독성을 제공합니다.
Streaming JSONPatch chunks
This is useful eg. to stream theJSONPatchin an HTTP server, and then apply the ops on the client to rebuild the run state there. SeeLangServefor tooling to make it easier to build a webserver from any Runnable.
이는 유용합니다. HTTP 서버에서 JSONPatch를 스트리밍한 다음 클라이언트에 작업을 적용하여 실행 상태를 다시 빌드합니다. Runnable에서 웹 서버를 더 쉽게 구축할 수 있는 도구는 LangServe를 참조하세요.
from langchain.embeddings import OpenAIEmbeddings
from langchain.schema.output_parser import StrOutputParser
from langchain.schema.runnable import RunnablePassthrough
from langchain.vectorstores import FAISS

template = """Answer the question based only on the following context:
{context}

Question: {question}
"""
prompt = ChatPromptTemplate.from_template(template)

vectorstore = FAISS.from_texts(["harrison worked at kensho"], embedding=OpenAIEmbeddings())
retriever = vectorstore.as_retriever()

retrieval_chain = (
    {"context": retriever.with_config(run_name='Docs'), "question": RunnablePassthrough()}
    | prompt
    | model
    | StrOutputParser()
)

async for chunk in retrieval_chain.astream_log("where did harrison work?", include_names=['Docs']):
    print("-"*40)
    print(chunk)
이 코드는 "langchain" 라이브러리를 사용하여 OpenAI 모델을 활용하여 질문 응답 시스템을 구축하는 예시를 제공합니다.
모듈 및 클래스 가져오기:
langchain.embeddings 모듈에서 OpenAIEmbeddings 클래스를 가져옵니다. 이 클래스는 OpenAI의 임베딩을 사용하기 위한 도구를 제공합니다.
langchain.schema.output_parser 모듈에서 StrOutputParser 클래스를 가져옵니다. 이 클래스는 출력을 파싱하는 데 사용됩니다.
langchain.schema.runnable 모듈에서 RunnablePassthrough 클래스를 가져옵니다. 이 클래스는 실행 가능한 객체를 나타내는 클래스입니다.
langchain.vectorstores 모듈에서 FAISS 클래스를 가져옵니다. 이 클래스는 FAISS 벡터 저장소를 만들고 관리하는 도구를 제공합니다.
템플릿 정의:
"template" 변수에는 질문에 대한 컨텍스트와 질문 자체를 템플릿으로 정의합니다.
질문 응답 시스템 구성:
"prompt" 변수에는 "ChatPromptTemplate.from_template(template)"을 사용하여 템플릿을 기반으로한 대화 템플릿을 생성합니다.
"vectorstore" 변수에는 "FAISS.from_texts"를 사용하여 벡터 저장소를 생성합니다. 이 벡터 저장소는 "harrison worked at kensho"와 같은 텍스트로 초기화되며, OpenAI 임베딩을 사용하여 벡터를 생성합니다.
"retriever" 변수에는 "vectorstore.as_retriever()"를 사용하여 정보 검색(retrieval)을 위한 객체를 생성합니다.
실행 체인 설정:
"retrieval_chain" 변수에는 실행 체인을 설정합니다. 이 체인은 다음과 같이 구성됩니다:
"context"와 "question" 매개변수를 사용하여 "retriever.with_config(run_name='Docs')"와 "RunnablePassthrough()"를 결합합니다.
"prompt" 템플릿을 추가합니다.
모델(model)을 추가합니다.
출력 파서(StrOutputParser)를 추가합니다.
결과 검색 및 출력:
비동기 반복문(async for)을 사용하여 질문을 실행하고 결과를 검색합니다.
retrieval_chain.astream_log("where did harrison work?", include_names=['Docs'])를 사용하여 "where did harrison work?"라는 질문을 실행하고, 실행 결과를 가져옵니다.
실행 결과를 출력합니다.
이 코드는 OpenAI 모델을 사용하여 컨텍스트와 질문을 기반으로 질문 응답 시스템을 구현하고, 결과를 출력하는 과정을 나타냅니다.
나는 OpenAI key를 외부 파일에서 읽어 오도록 아래와 같이 코딩 했음
return 값
Streaming the incremental RunState
You can simply passdiff=Falseto get incremental values ofRunState. You get more verbose output with more repetitive parts.
간단히 diff=False를 전달하여 RunState의 증분 값을 얻을 수 있습니다. 반복되는 부분이 많아지면 더 자세한 출력을 얻을 수 있습니다.
async for chunk in retrieval_chain.astream_log("where did harrison work?", include_names=['Docs'], diff=False):
    print("-"*70)
    print(chunk)
이 코드는 질문 응답 시스템을 통해 질문을 실행하고 결과를 비동기적으로 가져오는 부분을 설명하고 있습니다.
async for chunk in retrieval_chain.astream_log("where did harrison work?", include_names=['Docs'], diff=False)::
이 부분은 비동기 반복문으로, "retrieval_chain" 객체를 사용하여 질문을 실행하고 결과를 비동기적으로 처리합니다.
retrieval_chain.astream_log("where did harrison work?", include_names=['Docs'], diff=False)는 "where did harrison work?"라는 질문을 실행하고 결과를 가져오는 코드입니다.
include_names=['Docs']는 결과에 대한 필터로, "Docs"라는 이름을 가진 실행에 대한 결과만 포함합니다.
diff=False는 결과를 비교(diff)하지 않도록 설정합니다.
print("-"*70):
이 부분은 구분선을 출력합니다. 출력 결과를 시각적으로 구분하기 위해 사용됩니다.
print(chunk):
"chunk"는 질문 실행의 결과를 나타냅니다.
이 부분은 실행 결과를 출력합니다.
이 코드는 "retrieval_chain"을 사용하여 "where did harrison work?"라는 질문을 실행하고 결과를 가져오며, 결과를 출력합니다. 결과는 "Docs"라는 이름을 가진 실행에 대한 것만 포함되며, diff를 비활성화하고 결과를 출력합니다.
Let's take a look at how LangChain Expression Language supports parallel requests. For example, when using aRunnableParallel(often written as a dictionary) it executes each element in parallel.
LangChain Expression Language가 어떻게 병렬 요청을 지원하는지 살펴보겠습니다. 예를 들어 RunnableParallel(종종 사전으로 작성됨)을 사용하면 각 요소가 병렬로 실행됩니다.
from langchain.schema.runnable import RunnableParallel
chain1 = ChatPromptTemplate.from_template("tell me a joke about {topic}") | model
chain2 = ChatPromptTemplate.from_template("write a short (2 line) poem about {topic}") | model
combined = RunnableParallel(joke=chain1, poem=chain2)
chain1.invoke({"topic": "bears"})
이 코드는 "langchain" 라이브러리를 사용하여 두 개의 병렬 실행 체인을 생성하고, 이 두 체인을 조합하여 단일 실행 객체를 만들고, 그 중 하나인 "chain1"을 사용하여 특정 주제에 대한 실행을 시작하는 예시를 보여줍니다
모듈 및 클래스 가져오기:
langchain.schema.runnable 모듈에서 RunnableParallel 클래스를 가져옵니다. 이 클래스는 병렬 실행을 관리하고 조합하는 데 사용됩니다.
실행 체인 생성:
"chain1"은 "ChatPromptTemplate.from_template("tell me a joke about {topic}") | model"를 사용하여 생성됩니다. 이 체인은 주어진 주제에 관한 농담을 생성하기 위해 대화 템플릿과 모델을 조합합니다.
"chain2"는 "ChatPromptTemplate.from_template("write a short (2 line) poem about {topic}") | model"를 사용하여 생성됩니다. 이 체인은 주어진 주제에 관한 짧은 시를 생성하기 위해 대화 템플릿과 모델을 조합합니다.
병렬 실행 조합:
"combined"는 "RunnableParallel(joke=chain1, poem=chain2)"를 사용하여 생성됩니다. 이 객체는 "joke" 및 "poem"이라는 이름으로 "chain1"과 "chain2"를 조합한 것입니다. 이를 통해 "joke" 및 "poem" 실행을 병렬로 시작하고 결과를 처리할 수 있습니다.
실행 시작:
"chain1.invoke({"topic": "bears"})"을 사용하여 "chain1"을 실행합니다. 이 부분은 "bears" 주제에 관한 농담을 생성하는 실행을 시작합니다.
이 코드는 두 개의 병렬 실행 체인을 생성하고 실행하기 위한 방법을 보여주며, "chain1"을 사용하여 "bears" 주제에 관한 실행을 시작합니다.
chain2.invoke({"topic": "bears"})
combined.invoke({"topic": "bears"})
이 코드는 "chain2"와 "combined" 두 실행 체인을 사용하여 "bears" 주제에 관한 실행을 시작하는 부분을 설명하고 있습니다.
"chain2.invoke({"topic": "bears"})":
이 부분은 "chain2"를 사용하여 "bears" 주제에 관한 실행을 시작합니다. "chain2"는 주어진 주제에 관한 짧은 시를 생성하기 위한 실행을 나타냅니다.
"combined.invoke({"topic": "bears"})":
이 부분은 "combined"를 사용하여 "bears" 주제에 관한 실행을 시작합니다. "combined"는 "joke" 및 "poem"이라는 이름으로 두 개의 실행 체인을 병렬로 조합한 것입니다.
이 코드는 "chain2"와 "combined" 두 실행 체인을 사용하여 "bears" 주제에 관한 실행을 시작하며, 각 실행은 주어진 주제에 따라 농담 또는 시를 생성하는 목적을 갖고 있습니다.
Parallelism on batches
Parallelism can be combined with other runnables. Let's try to use parallelism with batches.