개발자로서 현장에서 일하면서 새로 접하는 기술들이나 알게된 정보 등을 정리하기 위한 블로그입니다. 운 좋게 미국에서 큰 회사들의 프로젝트에서 컬설턴트로 일하고 있어서 새로운 기술들을 접할 기회가 많이 있습니다. 미국의 IT 프로젝트에서 사용되는 툴들에 대해 많은 분들과 정보를 공유하고 싶습니다.
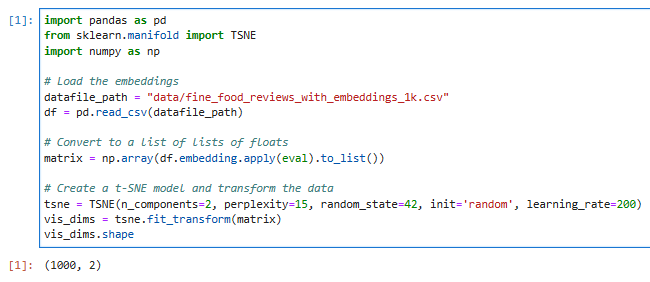
t-SNE decomposition (분해)를 사용해서 dimensionality를 2차원으로 줄입니다.
import pandas as pd
from sklearn.manifold import TSNE
import numpy as np
# Load the embeddings
datafile_path = "data/fine_food_reviews_with_embeddings_1k.csv"
df = pd.read_csv(datafile_path)
# Convert to a list of lists of floats
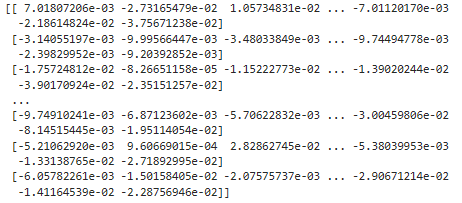
matrix = np.array(df.embedding.apply(eval).to_list())
# Create a t-SNE model and transform the data
tsne = TSNE(n_components=2, perplexity=15, random_state=42, init='random', learning_rate=200)
vis_dims = tsne.fit_transform(matrix)
vis_dims.shape
모듈은 pandas, numpy 그리고 sklearn.manifold의 TSNE를 사용합니다.
모두 이전 글에서 배운 모듈들 입니다.
판다스의 read_csv() 함수를 사용해서 csv 데이터 파일을 읽습니다.
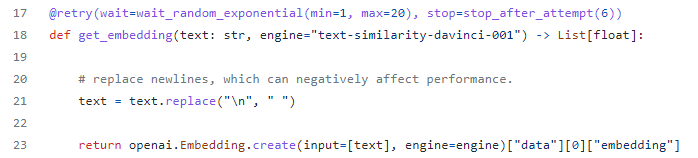
그 다음 numpy 의 array()를 사용해서 csv 파일의 embedding 컬럼에 있는 값들을 리스트 형식으로 변환합니다.
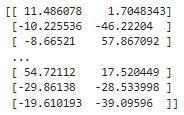
이 값을 shape을 이용해서 리스트의 크기와 차원을 표시하면 위에 처럼 1000,2 라고 나옵니다.
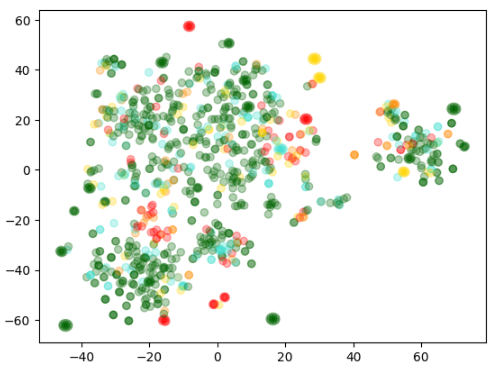
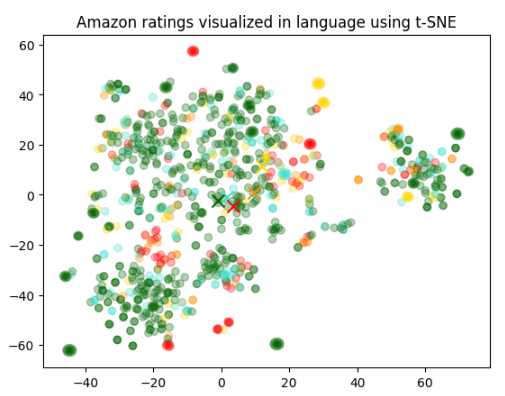
2. Plotting the embeddings
위에서 처럼 2차원으로 데이터를 정리하면 2D 산점도 분포도를 그릴 수 있다고 했습니다.
아래에서는 그것을 그리기 전에 알아보기 쉽도록 각 review에 대한 색을 지정해서 알아보기 쉽도록 합니다.
이 색은 별점 점수와 ranging 데이터를 기반으로 빨간색에서 녹색에 걸쳐 표현됩니다.
import matplotlib.pyplot as plt
import matplotlib
import numpy as np
colors = ["red", "darkorange", "gold", "turquoise", "darkgreen"]
x = [x for x,y in vis_dims]
y = [y for x,y in vis_dims]
color_indices = df.Score.values - 1
colormap = matplotlib.colors.ListedColormap(colors)
plt.scatter(x, y, c=color_indices, cmap=colormap, alpha=0.3)
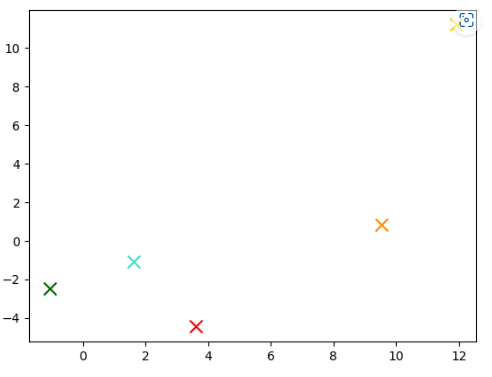
for score in [0,1,2,3,4]:
avg_x = np.array(x)[df.Score-1==score].mean()
avg_y = np.array(y)[df.Score-1==score].mean()
color = colors[score]
plt.scatter(avg_x, avg_y, marker='x', color=color, s=100)
plt.title("Amazon ratings visualized in language using t-SNE")
데이터 구조를 byte stream으로 변환하면 저장하거나 네트워크로 전송할 수 있습니다.
이런 것을 marshalling 이라고 하고 그 반대를 unmarshalling 이라고 합니다.
이런 작업을 할 수 있는 모듈은 아래 세가지가 있습니다.
marshal은 셋 중 가장 오래된 모듈이다. 이것은 주로 컴파일된 바이트코드 또는 인터프리터가 파이썬 모듈을 가져올 떄 얻는 .pyc 파일을 읽고 쓰기 위해 존재한다. 때문에 marshal로 객체를 직렬화할 수 있더라도, 이를 추천하지는 않는다.
json모듈은 셋 중 가장 최신의 모듈이다. 이를 통해 표준 JSON 파일로 작업을 할 수 있다. json 모듈을 통해 다양한 표준 파이썬 타입(bool, dict, int, float, list, string, tuple, None)을 직렬화, 역직렬화할 수 있다. json은 사람이 읽을 수 있고, 언어에 의존적이지 않다는 장점이 있다.
pickle모듈은 파이썬에서 객체를 직렬화 또는 역직렬화하는 또 다른 방식이다. json 모듈과는 다르게 객체를바이너리 포맷으로 직렬화한다. 이는 결과를 사람이 읽을 수 없다는 것을 의미한다. 그러나더 빠르고, 사용자 커스텀 객체 등더 다양한 파이썬 타입으로 동작할 수 있음을 의미한다.
bz2 를 csv 로 convert 시키는 온라인 툴에서 변환을 시도 했는데 너무 크기가 커서 실패 했습니다.
그래서 데이터소스가 없어서 이번 예제는 실행은 못 해 보고 소스만 분석하겠습니다.
위의 소스 코드는 데이터를 pandas의 read_csv() 로 읽어서 첫번째 5개만 df에 담는 역할을 합니다.
이런 결과를 얻을 수 있습니다.
# print the title, description, and label of each example
for idx, row in df.head(n_examples).iterrows():
print("")
print(f"Title: {row['title']}")
print(f"Description: {row['description']}")
print(f"Label: {row['label']}")
그 다음은 Title, Description, Lable 을 print 하는 부분 입니다.
여기까지 만들고 실행하면 아래 결과를 얻을 수 있습니다.
Title: World Briefings
Description: BRITAIN: BLAIR WARNS OF CLIMATE THREAT Prime Minister Tony Blair urged the international community to consider global warming a dire threat and agree on a plan of action to curb the quot;alarming quot; growth of greenhouse gases.
Label: World
Title: Nvidia Puts a Firewall on a Motherboard (PC World)
Description: PC World - Upcoming chip set will include built-in security features for your PC.
Label: Sci/Tech
Title: Olympic joy in Greek, Chinese press
Description: Newspapers in Greece reflect a mixture of exhilaration that the Athens Olympics proved successful, and relief that they passed off without any major setback.
Label: Sports
Title: U2 Can iPod with Pictures
Description: SAN JOSE, Calif. -- Apple Computer (Quote, Chart) unveiled a batch of new iPods, iTunes software and promos designed to keep it atop the heap of digital music players.
Label: Sci/Tech
Title: The Dream Factory
Description: Any product, any shape, any size -- manufactured on your desktop! The future is the fabricator. By Bruce Sterling from Wired magazine.
Label: Sci/Tech
여기까지 진행하면 아래와 같은 소스코드를 얻을 수 있을 겁니다.
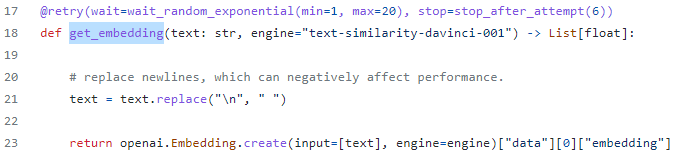
# imports
import pandas as pd
import pickle
import openai
from openai.embeddings_utils import (
get_embedding,
distances_from_embeddings,
tsne_components_from_embeddings,
chart_from_components,
indices_of_nearest_neighbors_from_distances,
)
# constants
EMBEDDING_MODEL = "text-embedding-ada-002"
def open_file(filepath):
with open(filepath, 'r', encoding='utf-8') as infile:
return infile.read()
openai.api_key = open_file('openaiapikey.txt')
# load data (full dataset available at http://groups.di.unipi.it/~gulli/AG_corpus_of_news_articles.html)
dataset_path = "data/AG_news_samples.csv"
df = pd.read_csv(dataset_path)

# print dataframe
n_examples = 5
df.head(n_examples)
# print the title, description, and label of each example
for idx, row in df.head(n_examples).iterrows():
    print("")
    print(f"Title: {row['title']}")
    print(f"Description: {row['description']}")
    print(f"Label: {row['label']}")
3. Build cache to save embeddings
이 기사들에 대해 임베딩 값을 얻기 전에 임베딩을 값을 저장할 캐시를 세팅해 보겠습니다.
이렇게 얻은 임베딩을 저장해서 재 사용하면 이 값을 얻기 위해 openai api를 call 하지 않아도 되기 때문에 비용을 절감할 수 있습니다.
이 캐시는 dictionary로 (text, model) 의 tuples로 매핑되 있습니다.
이 캐시는 Python pickle 파일로 저장 될 것입니다.
# establish a cache of embeddings to avoid recomputing
# cache is a dict of tuples (text, model) -> embedding, saved as a pickle file
# set path to embedding cache
embedding_cache_path = "data/recommendations_embeddings_cache.pkl"
# load the cache if it exists, and save a copy to disk
try:
embedding_cache = pd.read_pickle(embedding_cache_path)
except FileNotFoundError:
embedding_cache = {}
with open(embedding_cache_path, "wb") as embedding_cache_file:
pickle.dump(embedding_cache, embedding_cache_file)
# define a function to retrieve embeddings from the cache if present, and otherwise request via the API
def embedding_from_string(
string: str,
model: str = EMBEDDING_MODEL,
embedding_cache=embedding_cache
) -> list:
"""Return embedding of given string, using a cache to avoid recomputing."""
if (string, model) not in embedding_cache.keys():
embedding_cache[(string, model)] = get_embedding(string, model)
with open(embedding_cache_path, "wb") as embedding_cache_file:
pickle.dump(embedding_cache, embedding_cache_file)
return embedding_cache[(string, model)]
처음에 저장될 위치와 pkl 파일 이름을 embedding_cache_path 변수에 담습니다.
다음은 이 cache가 있으면 카피를 저장하는 보분입니다.
pandas의 read_pickle() 함수를 통해 읽습니다. (embedding_cache에 담음)
이 파일을 오픈할 때 사용한 wb 는 파일을 binary format으로 오픈하고 쓰기 기능이 있다는 의미 입니다.
그 다음은 embedding_from_string() 함수 입니다.
입력값으로는 string과 openai의 모델명 그리고 embedding_cache를 받습니다.
출력은 리스트 형식입니다.
다음 if 문은 sriing과 model 이 embedding_cache.keys() 에 없다면 get_embedding()을 통해서 임베딩 값을 얻는 일을 합니다. 여기서도 파일은 바이너리 형태로 열고 쓰기 기능이 허락돼 있습니다.
pickle.dump()는 해당 내용을 파일에 저장할 때사용하는 pickle 모듈의 api 함수 입니다.
# as an example, take the first description from the dataset
example_string = df["description"].values[0]
print(f"\nExample string: {example_string}")
# print the first 10 dimensions of the embedding
example_embedding = embedding_from_string(example_string)
print(f"\nExample embedding: {example_embedding[:10]}...")
이 부분은 위에 작성한 스크립트가 잘 작동하는지 print 해 보는 겁니다.
여기까지 작성 한 것을 실행 하면 아래 출력을 얻을 수 있습니다.
4. Recommend similar articles based on embeddings
비슷한 기사를 찾기 위해서는 아래 3단계를 거쳐야 합니다.
1. 모든 기사의 description들에 대해 similarity 임베딩 값을 얻는다.
2. 소스 타이틀과 다른 모든 기사들간의 distance를 계산한다.
3. source title에 다른 기사들의 closest를 프린트 한다.
def print_recommendations_from_strings(
strings: list[str],
index_of_source_string: int,
k_nearest_neighbors: int = 1,
model=EMBEDDING_MODEL,
) -> list[int]:
"""Print out the k nearest neighbors of a given string."""
# get embeddings for all strings
embeddings = [embedding_from_string(string, model=model) for string in strings]
# get the embedding of the source string
query_embedding = embeddings[index_of_source_string]
# get distances between the source embedding and other embeddings (function from embeddings_utils.py)
distances = distances_from_embeddings(query_embedding, embeddings, distance_metric="cosine")
# get indices of nearest neighbors (function from embeddings_utils.py)
indices_of_nearest_neighbors = indices_of_nearest_neighbors_from_distances(distances)
# print out source string
query_string = strings[index_of_source_string]
print(f"Source string: {query_string}")
# print out its k nearest neighbors
k_counter = 0
for i in indices_of_nearest_neighbors:
# skip any strings that are identical matches to the starting string
if query_string == strings[i]:
continue
# stop after printing out k articles
if k_counter >= k_nearest_neighbors:
break
k_counter += 1
# print out the similar strings and their distances
print(
f"""
--- Recommendation #{k_counter} (nearest neighbor {k_counter} of {k_nearest_neighbors}) ---
String: {strings[i]}
Distance: {distances[i]:0.3f}"""
)
return indices_of_nearest_neighbors
이 소스 코드가 그 일을 합니다.
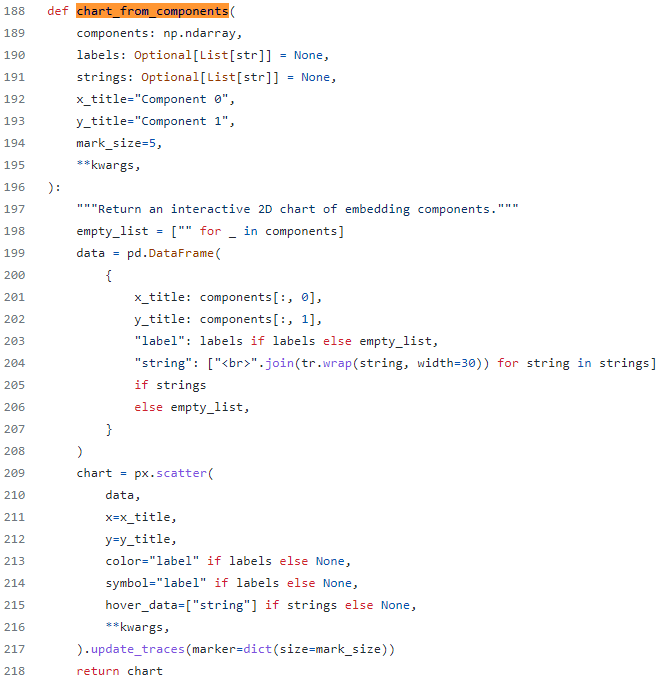
모든 string들에 대한 임베딩 값들을 받아서 distance를 구합니다. (distances_from_embeddings())
그리고 나서 가장 가까운 neighbor들을 구합니다. (indices_of_nearest_neighbors_from_distances())
그리고 query string을 print 합니다.
그리고 indices_of_nearest_neighbors 에 있는 요소들 만큼 for 루프를 돌리면서 Recommendation을 String, Distance 정보와 함께 print 합니다.
최종적으로 indices_of_nearest_neighbors를 return 합니다.
5. Example recommendations
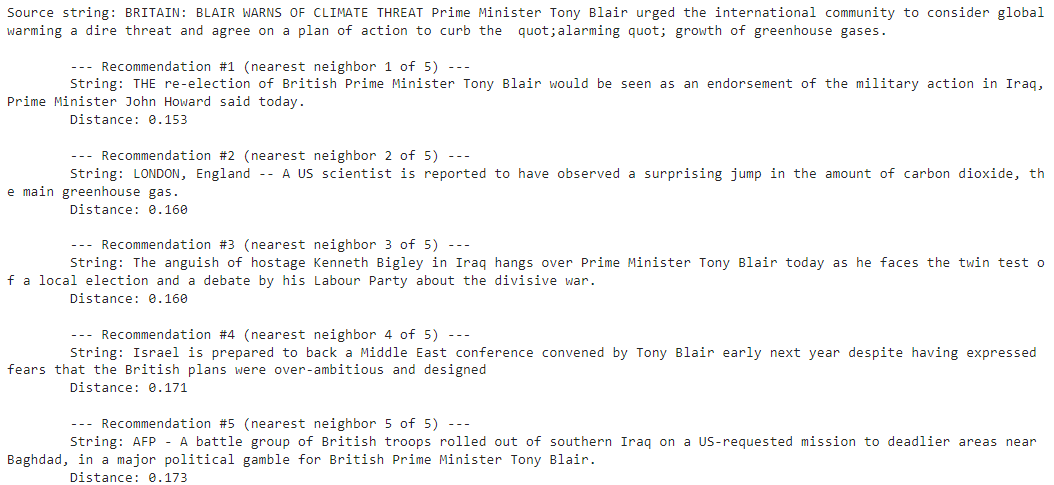
우선 Tony Blair에 대한 유사한 아티클들을 먼저 보죠.
article_descriptions = df["description"].tolist()
tony_blair_articles = print_recommendations_from_strings(
strings=article_descriptions, # let's base similarity off of the article description
index_of_source_string=0, # let's look at articles similar to the first one about Tony Blair
k_nearest_neighbors=5, # let's look at the 5 most similar articles
)
이렇게 하면 다음과 같은 정보를 얻을 수 있습니다.
첫 4개 기사에 토니 블레어가 언급 돼 있고 다섯번째에는 런던발 기후 변화에 대한 내용이 있습니다. 이것도 토니 블레어와 연관이 있다고 얘기할 수 있겠네요.
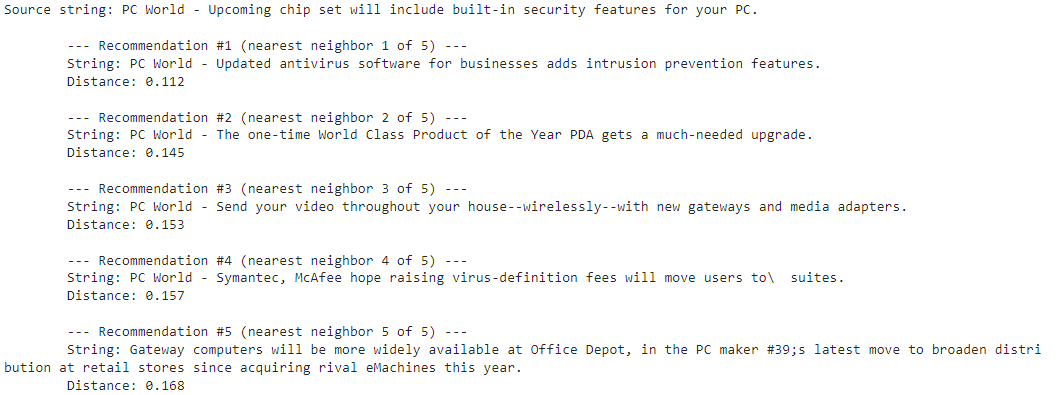
그러면 두번째 주제인 NVIDIA에 대한 결과물을 보겠습니다.
chipset_security_articles = print_recommendations_from_strings(
strings=article_descriptions, # let's base similarity off of the article description
index_of_source_string=1, # let's look at articles similar to the second one about a more secure chipset
k_nearest_neighbors=5, # let's look at the 5 most similar articles
)
결과를 보면 #1이 다른 결과물들 보다 가장 유사성이 큰 것을 볼 수 있습니다. (거리가 가깝다)
그 내용도 주어진 주제와 가장 가깝습니다.
Appendix: Using embeddings in more sophisticated recommenders
이 추천 시스템을 빌드하기 위한 좀 더 정교한 방법은 항목의 인기도, 사용자 클릭 데이터 같은 수많은 signal들을 가지고 machine learning 모델을 훈련 시키는 것입니다.
추천 시스템에서도 임베딩은 아주 유용하게 이용될 수 있습니다.
아직 기존의 유저 데이터가 없는 신제품에 대한 정보 같은 것들에 대해서 특히 이 임베딩은 잘 사용될 수 있습니다.
Appendix: Using embeddings to visualize similar articles
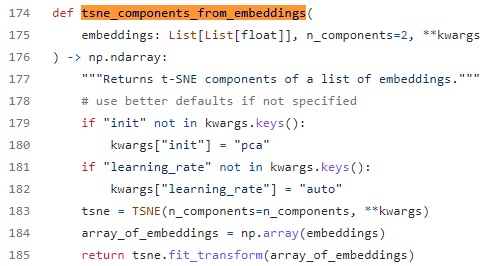
이 임베딩을 시각화 할 수도 있습니다. t-SNE 혹은 PCA와 같은 기술을 이용해서 임베딩을 2차원 또는 3차원 챠트로 만들 수 있습니다.
여기서는 t-SNE를 사용해서 모든 기사 설명을 시각화 해 봅니다.
(이와 관련된 결과물은 실행 때마다 조금씩 달라질 수 있습니다.)
# get embeddings for all article descriptions
embeddings = [embedding_from_string(string) for string in article_descriptions]
# compress the 2048-dimensional embeddings into 2 dimensions using t-SNE
tsne_components = tsne_components_from_embeddings(embeddings)
# get the article labels for coloring the chart
labels = df["label"].tolist()
chart_from_components(
components=tsne_components,
labels=labels,
strings=article_descriptions,
width=600,
height=500,
title="t-SNE components of article descriptions",
)
다음은 source article, nearest neighbors 혹은 그 외 다른 것인지에 따라 다른 색으로 나타내 보는 코드 입니다.
# create labels for the recommended articles
def nearest_neighbor_labels(
list_of_indices: list[int],
k_nearest_neighbors: int = 5
) -> list[str]:
"""Return a list of labels to color the k nearest neighbors."""
labels = ["Other" for _ in list_of_indices]
source_index = list_of_indices[0]
labels[source_index] = "Source"
for i in range(k_nearest_neighbors):
nearest_neighbor_index = list_of_indices[i + 1]
labels[nearest_neighbor_index] = f"Nearest neighbor (top {k_nearest_neighbors})"
return labels
tony_blair_labels = nearest_neighbor_labels(tony_blair_articles, k_nearest_neighbors=5)
chipset_security_labels = nearest_neighbor_labels(chipset_security_articles, k_nearest_neighbors=5
)
# a 2D chart of nearest neighbors of the Tony Blair article
chart_from_components(
components=tsne_components,
labels=tony_blair_labels,
strings=article_descriptions,
width=600,
height=500,
title="Nearest neighbors of the Tony Blair article",
category_orders={"label": ["Other", "Nearest neighbor (top 5)", "Source"]},
)
# a 2D chart of nearest neighbors of the chipset security article
chart_from_components(
components=tsne_components,
labels=chipset_security_labels,
strings=article_descriptions,
width=600,
height=500,
title="Nearest neighbors of the chipset security article",
category_orders={"label": ["Other", "Nearest neighbor (top 5)", "Source"]},
)
이런 과정을 통해 결과를 시각화 하면 좀 더 다양한 정보들을 얻을 수 있습니다.
이번 예제는 여기서 사용된 소스 데이터를 구하지 못해서 직접 실행은 못해 봤네요.
다음에 소스데이터를 구할 기회가 생기면 한번 직접 실행 해 봐야 겠습니다.
이 예제를 전부 완성하면 아래와 같은 소스 코드가 될 것입니다.
# imports
import pandas as pd
import pickle
import openai

from openai.embeddings_utils import (
    get_embedding,
    distances_from_embeddings,
    tsne_components_from_embeddings,
    chart_from_components,
    indices_of_nearest_neighbors_from_distances,
)

# constants
EMBEDDING_MODEL = "text-embedding-ada-002"

def open_file(filepath):
    with open(filepath, 'r', encoding='utf-8') as infile:
        return infile.read()

openai.api_key = open_file('openaiapikey.txt')

# load data (full dataset available at http://groups.di.unipi.it/~gulli/AG_corpus_of_news_articles.html)
dataset_path = "data/AG_news_samples.csv"
df = pd.read_csv(dataset_path)

# print dataframe
n_examples = 5
df.head(n_examples)

# print the title, description, and label of each example
for idx, row in df.head(n_examples).iterrows():
    print("")
    print(f"Title: {row['title']}")
    print(f"Description: {row['description']}")
    print(f"Label: {row['label']}")
# establish a cache of embeddings to avoid recomputing
# cache is a dict of tuples (text, model) -> embedding, saved as a pickle file

# set path to embedding cache
embedding_cache_path = "data/recommendations_embeddings_cache.pkl"

# load the cache if it exists, and save a copy to disk
try:
    embedding_cache = pd.read_pickle(embedding_cache_path)
except FileNotFoundError:
    embedding_cache = {}
with open(embedding_cache_path, "wb") as embedding_cache_file:
    pickle.dump(embedding_cache, embedding_cache_file)

# define a function to retrieve embeddings from the cache if present, and otherwise request via the API
def embedding_from_string(
    string: str,
    model: str = EMBEDDING_MODEL,
    embedding_cache=embedding_cache
) -> list:
    """Return embedding of given string, using a cache to avoid recomputing."""
    if (string, model) not in embedding_cache.keys():
        embedding_cache[(string, model)] = get_embedding(string, model)
        with open(embedding_cache_path, "wb") as embedding_cache_file:
            pickle.dump(embedding_cache, embedding_cache_file)
    return embedding_cache[(string, model)]
# as an example, take the first description from the dataset
example_string = df["description"].values[0]
print(f"\nExample string: {example_string}")

# print the first 10 dimensions of the embedding
example_embedding = embedding_from_string(example_string)
print(f"\nExample embedding: {example_embedding[:10]}...")
def print_recommendations_from_strings(
    strings: list[str],
    index_of_source_string: int,
    k_nearest_neighbors: int = 1,
    model=EMBEDDING_MODEL,
) -> list[int]:
    """Print out the k nearest neighbors of a given string."""
    # get embeddings for all strings
    embeddings = [embedding_from_string(string, model=model) for string in strings]
    # get the embedding of the source string
    query_embedding = embeddings[index_of_source_string]
    # get distances between the source embedding and other embeddings (function from embeddings_utils.py)
    distances = distances_from_embeddings(query_embedding, embeddings, distance_metric="cosine")
    # get indices of nearest neighbors (function from embeddings_utils.py)
    indices_of_nearest_neighbors = indices_of_nearest_neighbors_from_distances(distances)

    # print out source string
    query_string = strings[index_of_source_string]
    print(f"Source string: {query_string}")
    # print out its k nearest neighbors
    k_counter = 0
    for i in indices_of_nearest_neighbors:
        # skip any strings that are identical matches to the starting string
        if query_string == strings[i]:
            continue
        # stop after printing out k articles
        if k_counter >= k_nearest_neighbors:
            break
        k_counter += 1

        # print out the similar strings and their distances
        print(
            f"""
        --- Recommendation #{k_counter} (nearest neighbor {k_counter} of {k_nearest_neighbors}) ---
        String: {strings[i]}
        Distance: {distances[i]:0.3f}"""
        )

    return indices_of_nearest_neighbors
article_descriptions = df["description"].tolist()

tony_blair_articles = print_recommendations_from_strings(
    strings=article_descriptions,  # let's base similarity off of the article description
    index_of_source_string=0,  # let's look at articles similar to the first one about Tony Blair
    k_nearest_neighbors=5,  # let's look at the 5 most similar articles
)
chipset_security_articles = print_recommendations_from_strings(
    strings=article_descriptions,  # let's base similarity off of the article description
    index_of_source_string=1,  # let's look at articles similar to the second one about a more secure chipset
    k_nearest_neighbors=5,  # let's look at the 5 most similar articles
)
# get embeddings for all article descriptions
embeddings = [embedding_from_string(string) for string in article_descriptions]
# compress the 2048-dimensional embeddings into 2 dimensions using t-SNE
tsne_components = tsne_components_from_embeddings(embeddings)
# get the article labels for coloring the chart
labels = df["label"].tolist()

chart_from_components(
    components=tsne_components,
    labels=labels,
    strings=article_descriptions,
    width=600,
    height=500,
    title="t-SNE components of article descriptions",
)
# create labels for the recommended articles
def nearest_neighbor_labels(
    list_of_indices: list[int],
    k_nearest_neighbors: int = 5
) -> list[str]:
    """Return a list of labels to color the k nearest neighbors."""
    labels = ["Other" for _ in list_of_indices]
    source_index = list_of_indices[0]
    labels[source_index] = "Source"
    for i in range(k_nearest_neighbors):
        nearest_neighbor_index = list_of_indices[i + 1]
        labels[nearest_neighbor_index] = f"Nearest neighbor (top {k_nearest_neighbors})"
    return labels


tony_blair_labels = nearest_neighbor_labels(tony_blair_articles, k_nearest_neighbors=5)
chipset_security_labels = nearest_neighbor_labels(chipset_security_articles, k_nearest_neighbors=5
)
# a 2D chart of nearest neighbors of the Tony Blair article
chart_from_components(
    components=tsne_components,
    labels=tony_blair_labels,
    strings=article_descriptions,
    width=600,
    height=500,
    title="Nearest neighbors of the Tony Blair article",
    category_orders={"label": ["Other", "Nearest neighbor (top 5)", "Source"]},
)
# a 2D chart of nearest neighbors of the chipset security article
chart_from_components(
    components=tsne_components,
    labels=chipset_security_labels,
    strings=article_descriptions,
    width=600,
    height=500,
    title="Nearest neighbors of the chipset security article",
    category_orders={"label": ["Other", "Nearest neighbor (top 5)", "Source"]},
)