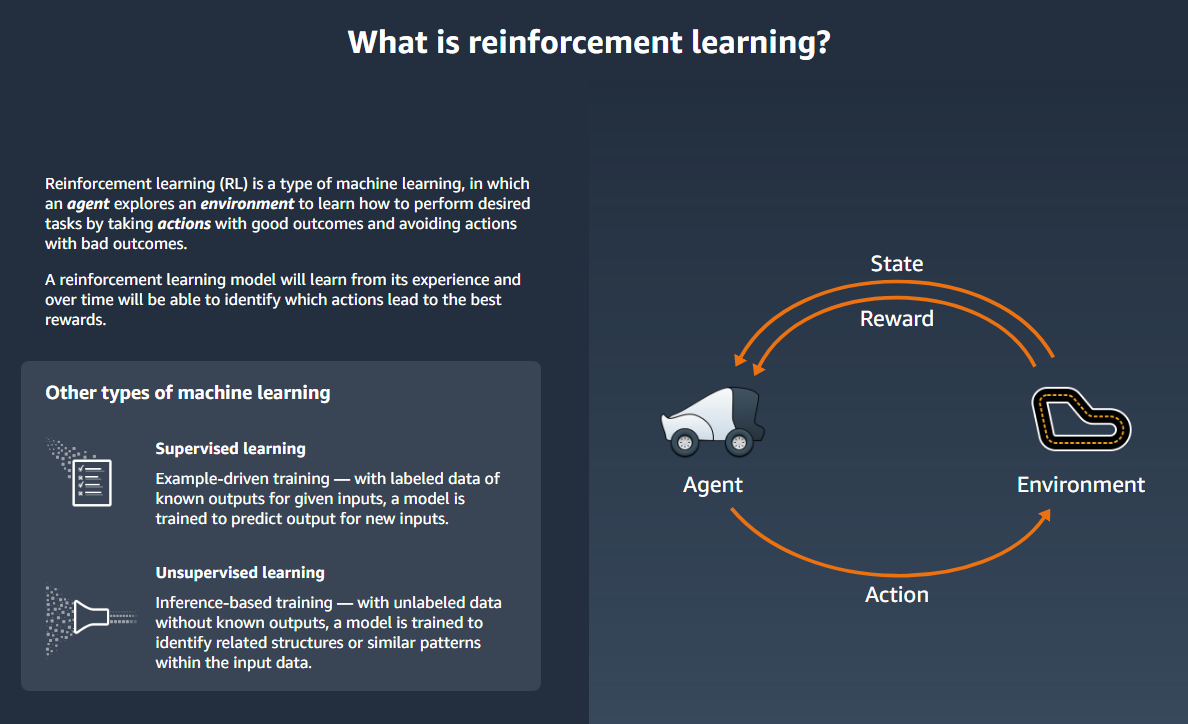
In general, to train your reinforcement learning model, you describe all of the environment, including states, actions and reward to ensure it captures the problem you are trying to solve. The AWS DeepRacer service have defined the states and actions for you and gives you the option of defining the reward so that you can focus on learning about reinforcement learning.
일반적으로 reinforcement learning 모델을 훈련하려면 해결하려는 문제를 파악할 수 있도록 상태, actions 및 reward를 포함한 모든 환경을 묘사해야 합니다. AWS DeepRacer 서비스는 상태와 행동을 정의해 주고 여러분이 reinforcement learning에 대한 학습에 집중할 수 있도록 보상을 정의 할 수있는 옵션을 제공합니다.
For example, in autonomous racing, the agent can be a vehicle with sensors. A well-marked driving track can be the environment. A positive reward would be when the vehicle stays on the track and a negative reward would be when it's off the track.
예를 들어, 자율주행(경주)에서 에이전트는 센서가있는 차량이 될 수 있습니다. 잘 표시된 주행 경로가 환경이 될 수 있습니다. 긍정적 인 보상은 차량이 궤도에 머물러있을 때가되고 부정적인 보상은 궤도를 벗어 났을 때입니다.
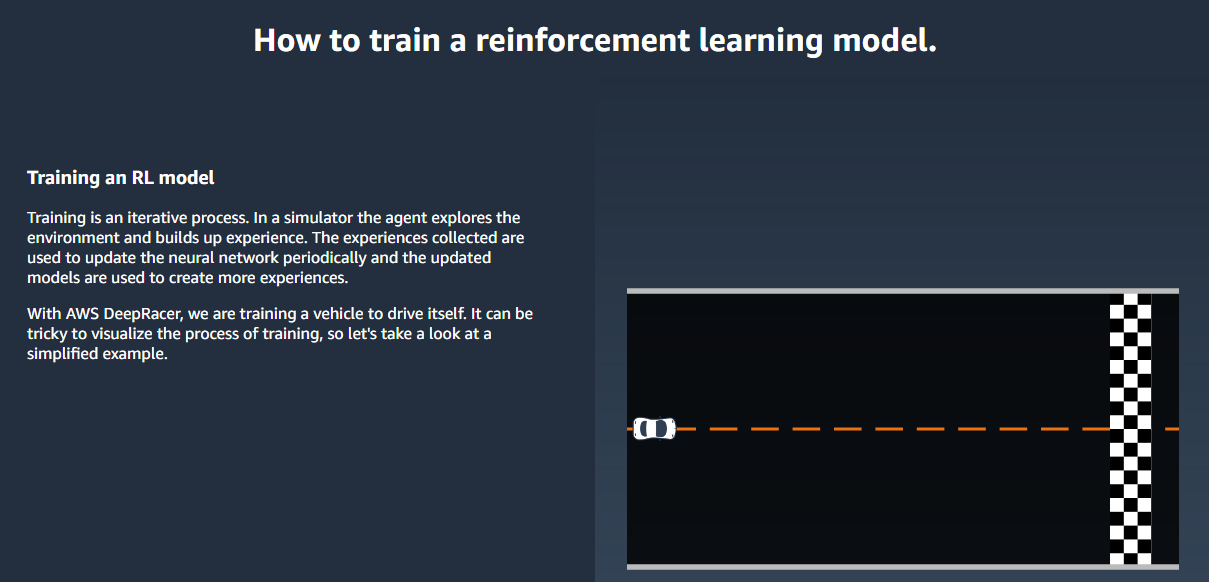
Let's say that you're interested in having the vehicle drive without getting off a straight track. The reward function takes images as input from the sensors and produces a score after sorting out the current position. Speed and the position of any obstacles nearby might also be involved. A simple form of the reward function could be that the score is zero if the vehicle is on the track, -1 if it's off the track, and +1 if reaches the finish line. With this reward function, the vehicle gets penalized for going off the track and rewarded for reaching the destination.
직선 트랙에서 벗어나지 않는 차량 주행에 관심이 있다고 가정 해 봅시다. 보상 기능은 이미지를 센서에서 입력 받아 현재 위치를 파악 한 후 점수를 생성합니다. 주변 장애물의 위치와 속도가 관련 될 수 있습니다. 보상 기능의 간단한 형태는 차량이 트랙에 있으면 점수가 0이고, 트랙에서 벗어난 경우에는 -1이며, 결승선에 도달하면 +1이 될 수 있습니다. 이 보상 기능으로 차량은 트랙에서 벗어나면 패널티를 받고 목적지에 도착하면 보상을 받게됩니다.
Training the vehicle involves repeated episodes along the track from start to finish. In an episode the agent interacts with the track to take the optimal course of actions by maximizing the expected future reward. At the end, the training produces a reinforcement learning model. After the training, the agent can follow the model to infer the optimal choice of actions in any given state, when the model is evaluated or deployed to run on a physical agent, such as an AWS DeepRacer scale vehicle.
차량을 훈련시키는 것은 처음부터 끝까지 트랙을 따라 반복되는 에피소드를 포함합니다. 에피소드에서 에이전트는 트랙과 상호 작용하여 예상되는 미래 보상을 최대화하여 최적의 행동 과정을 취합니다. 결국 교육은 보강 학습 (reinforcement learning) 모델을 생성합니다. 교육을 마친 후에 에이전트는 AWS DeepRacer scale vehicle과 같은 물리적 에이전트에서 실행되도록 모델을 평가하거나 배치 할 때 주어진 상태에서 최적의 동작 선택을 추론하도록 모델을 추적 할 수 있습니다.
To train a reinforcement learning model in practice, you must choose a learning algorithm. For autonomous driving, the proximal policy optimization (PPO) algorithm is a suitable choice. You can then choose a deep-learning framework supporting the chosen algorithm, unless you want to write one from scratch. AWS DeepRacer integrates with Amazon SageMaker to make some popular deep-learning frameworks, such as TensorFlow, readily available in the AWS DeepRacer console. Using a framework simplifies configuring and executing training jobs and lets you focus on building and enhancing reward functions specific to your problems.
실제로 보강 학습 (reinforcement learning) 모델을 훈련 시키려면 학습 알고리즘을 선택해야합니다. 자율 주행의 경우 proximal policy optimization (PPO) 알고리즘이 적합한 선택입니다. 그런 다음 (scratch를 바탕으로 직접 코드를 작성하고 싶지 않으면) 선택된 알고리즘을 지원하기 위해 딥러닝 프레임워크를 선택할 수 있습니다. AWS DeepRacer는 AWS DeepRacer 콘솔에서 쉽게 사용할 수있는 TensorFlow와 같은 인기있는 deep-learning frameworks,를 만들기 위해 Amazon SageMaker와 통합됩니다. 프레임 워크를 사용하면 교육 작업 구성 및 실행이 간단 해지고 문제에 특화된 보상 기능을 구축하고 강화할 수 있습니다.
Training a reinforcement learning model is an iterative process. First, it can be a challenge to define a reward function to cover all important behaviors of an agent in an environment all at once. Second, hyperparameters are often tuned to ensure satisfactory training performance. Both require experimentation. A prudent approach is to start with a simple reward function and then progressively enhance it. AWS DeepRacer facilitates this iterative process by enabling you to clone a trained model and then use it to jump-start the next round training. At each iteration you can introduce one or a few more sophisticated treatments to the reward function to handle previous ignored variables or you can systematically adjust hyperparameters until the result converges.
reinforcement learning 모델을 훈련하는 것은 반복적 인 과정입니다. 첫째, 한 번에 모든 환경에서 에이전트의 모든 중요한 동작을 다루는 보상 기능을 정의하는 것이 어려울 수 있습니다. 둘째, hyperparameters는 종종 만족스러운 교육 수행을 보장하기 위해 조정됩니다. 둘 다 실험이 필요합니다. 신중한 접근법은 간단한 보상 기능으로 시작한 다음 점진적으로 향상시키는 것입니다. AWS DeepRacer는 숙련 된 모델을 복제하여 다음 라운드 교육을 시작하기 위해 이 반복 프로세스를 용이하게합니다. 반복 할 때마다 보상 함수에 하나 이상의 정교한 처리 방법을 사용하여 이전의 무시 된 변수를 처리하거나 결과가 수렴 될 때까지 체계적으로 hyperparameters를 조정할 수 있습니다.
As with general practice in machine learning, you must evaluate a trained reinforcement learning model to ascertain its efficacy before deploying it to a physical agent for running inference in a real-world situation. For autonomous racing, the evaluation can be based on how often a vehicle stays on a given track from start to finish or how fast it can finish the course without getting off the track. The AWS DeepRacer simulation runs in the AWS RoboMaker simulator and lets you run the evaluation and post the performance metrics.
machine learning의 general practic 처럼 실제 상황에서 추론을 실행하기 위해 실제 에이전트에 적용하기 전에 훈련 된 reinforcement learning모델을 평가하여 효과를 확인해야합니다. 자율 경주(주행)의 경우, 평가는 차량이 처음부터 끝까지 주어진 트랙에 얼마나 자주 머물러 있는지 또는 트랙에서 벗어나지 않고 얼마나 빨리 코스를 마칠 수 있는지에 따라 결정됩니다. AWS DeepRacer 시뮬레이션은 AWS RoboMaker 시뮬레이터에서 실행되며 평가를 실행하고 성능 메트릭을 게시 할 수 있습니다.
The following sections discuss these topics in details.
Using a machine learning framework to train any machine learning model is useful. It allows you to focus on things specific to your system while leveraging tested general-purpose implementations of underlying algorithms. You should use one whenever possible.
machine learning 프레임 워크를 사용하여 어떤 machine learning 모델을 훈련하는 것은 아주 유용합니다. 그것은 당신이 당신의 시스템에 특정한 것에 초점을 맞추고 테스트 된 범용 알고리즘의 구현을 활용할 수있게합니다. 사용 가능하면 그 기능을 사용해야 합니다.
To train your reinforcement learning model for AWS DeepRacer, you can choose one of the following currently supported deep-learning frameworks and algorithms for you to train a reinforcement learning model for AWS DeepRacer.
AWS DeepRacer에 reinforcement learning 모델을 훈련하려면 AWS DeepRacer에 대한 reinforcement learning 모델을 교육하기 위해 현재 지원되는 deep-learning 프레임 워크들 및 알고리즘들 중 하나를 선택할 수 있습니다.
Reinforcement learning frameworks and algorithms supported by AWS DeepRacer vehicles
AWS DeepRacer 차량이 지원하는 보강 학습 프레임 워크 및 알고리즘
| Frameworks | Algorithm | Comment |
|---|
| TensorFlow | PPO | The proximal policy optimization (PPO) algorithm achieves policy gradient convergence by introducing a penalty to the
objective function to represent the constraint on the policy gradient.
proximal policy optimization (PPO) 알고리즘은
목적 함수에 페널티를 도입하는 것으로 policy gradient convergence를
달성합니다. 이로써 policy gradient에 대한 제약조건을 나타냅니다.
|
This section explains how to train and evaluate a AWS DeepRacer model using the AWS DeepRacer console calling Amazon SageMaker and AWS RoboMaker behind the scenes.
이 섹션에서는 AWS DeepRacer 콘솔을 사용하여 Amazon SageMaker 및 AWS RoboMaker를 현장에서 호출하여 AWS DeepRacer 모델을 교육하고 평가하는 방법에 대해 설명합니다.
To start training a reinforcement learning model, you can use the AWS DeepRacer console to create a training job, choose a supported framework and an available algorithm, add a reward function, and configure training settings, including hyperparameters, and then watch training to proceed in the simulator. You can find the step-by-step instructions in Train Your First AWS DeepRacer Model for Autonomous Racing . Here, we focus on how to create the reward function, start from a simple one for autonomous racing in a straight track.
reinforcement learning 모델을 시작하려면 AWS DeepRacer 콘솔을 사용하여 훈련 작업을 만들고, 지원되는 프레임 워크 및 사용 가능한 알고리즘을 선택하고, 보상 기능을 추가하고, hyperparameters를 포함한 훈련 설정을 구성한 다음 시뮬레이터에서 진행되는 훈련 과정을 지켜봅니다. Autonomous Racing을 위한 첫 번째 AWS DeepRacer 모델 훈련에서 단계별 지침을 찾을 수 있습니다. 여기서는 보상 기능을 만드는 방법에 초점을 맞춥니다. 직선 트랙에서 자율적인 경주를 위한 간단한 기능부터 시작합니다.
For a reinforcement learning model, the reward function prescribes an immediate reward or penalty when the agent takes an action in a given state. Its purpose is to encourage the agent to do more to help accomplishing the agent's goals and, in the meantime, to do less (or none) to prevent the agent from accomplishing its goals. It amounts to the environment's providing feedback to agent actions, affecting the agent behavior and has impacts on the training performance. When using the AWS DeepRacer console to train model with a supported framework, the reward function is the only application-specific part and depends on your input.
reinforcement learning 모델의 경우, 보상 기능은 agent가 주어진 상태에서 조치를 취할 때 즉각적인 보상 또는 벌금을 규정합니다. 그 목적은 에이전트가 목표를 달성하는 쪽으로 일을 하는 것을을 돕고, 에이전트가 목표를 달성하지 못하는 쪽으로 일을 하는 것을 방지하는 데 도움을 줍니다. 이는 환경이 에이전트 작업에 피드백을 제공하고 에이전트 동작에 영향을 미치며 훈련 퍼포먼스에 영향을 미칩니다. AWS DeepRacer 콘솔을 사용하여 지원되는 프레임 워크로 모델을 교육 할 때 보상 기능은 응용 프로그램 관련 부분 중 하나이며 사용자의 입력에 따라 다릅니다.
Constructing a reward function is like creating an incentive plan. If not carefully considered, it can lead to unintended consequences of opposite effect. This is possible because the reward function is local in time, but the final tasks depend on expected rewards from future. Real-world behaviors are rarely representable by linear functions and short-term incentives are not guaranteed to lead to long-term rewards. A good practice to create a reward a function is to start with a simple one that covers basic scenarios. And then iteratively enhance it to handle more actions, until all the behaviors are considered.
보상 기능을 구축하는 것은 인센티브 플랜을 만드는 것과 같습니다. 신중하게 고려하지 않으면 반대 효과의 의도하지 않은 결과를 초래할 수 있습니다. 이는 보상 기능이 시간상 현지에 있기 때문에 가능하지만 최종 작업은 미래의 예상 보상에 달려 있습니다. 실세계 행동은 linear 기능으로는 거의 표현할 수 없으며 단기 인센티브는 장기 보상으로 이어지지 않을 수도 있습니다. 함수에 보상을 생성하는 좋은 방법은 기본 시나리오를 다루는 간단한 것으로 시작하는 것입니다. 그런 다음 모든 동작을 고려할 때까지 더 많은 동작을 처리하도록 반복적으로 향상시킵니다.
For example, to train an AWS DeepRacer agent to drive autonomously on a well-marked track, we create the reward function with the following signature:
예를 들어 잘 표시된 트랙에서 자율적으로 작동하도록 AWS DeepRacer 에이전트를 훈련 시키려면 다음 서명을 사용하여 보상 기능을 만듭니다.
def reward_function(self, on_track, x, y, distance_from_center,
car_orientation, progress, steps, throttle, streering,
track_width, waypoints, closest_waypoint):
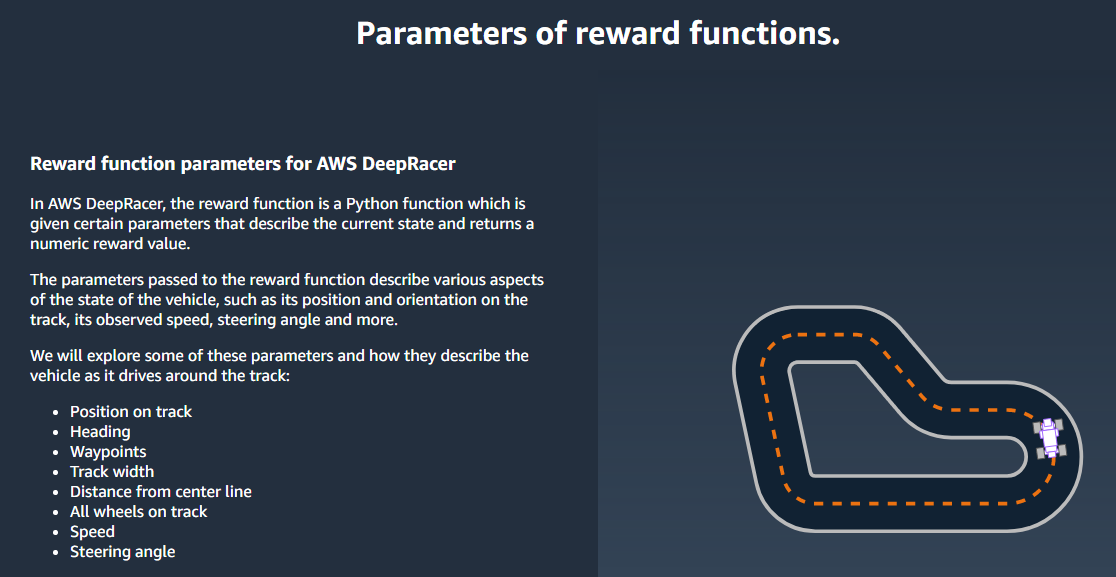
where the input parameters, as described in the following table, represent the state in which an action is to be taken and the output is a real value in the range of [-100000.0, 100000.0].
다음 표에서 설명하는 입력 매개 변수는 조치를 취할 상태를 나타내고 출력은 [-100000.0, 100000.0] 범위의 실제 값입니다.
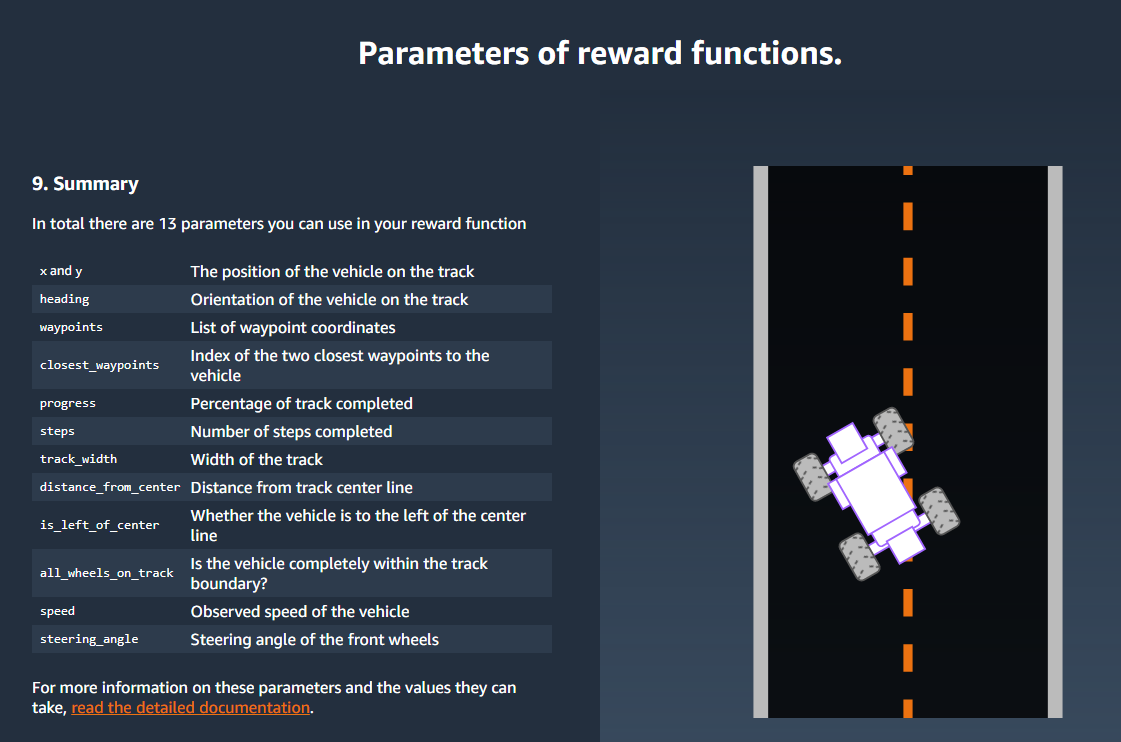
Input Parameters of AWS DeepRacer Reward Functions
| Parameter | Type | Range | Description |
|---|
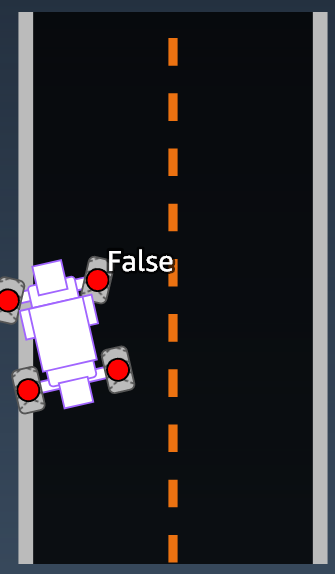
on_track | boolean | True|False | The vehicle is off track (False) if the front of the vehicle is outside of the white lines, otherwise, it's on track (True). |
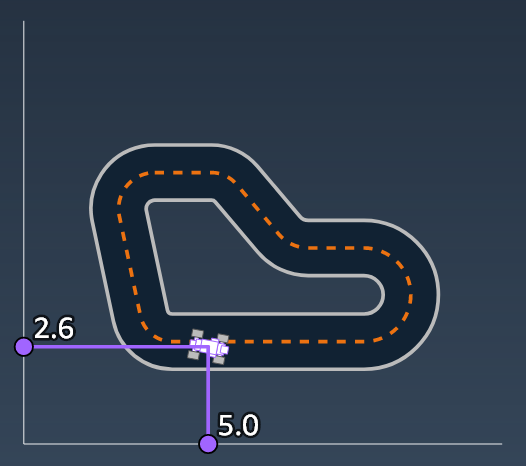
x | float | [0,inf] | Location of the vehicle along the x-axis, starting from 0. |
y | float | [0,inf] | Location of the vehicle along the y-axis, starting from 0. |
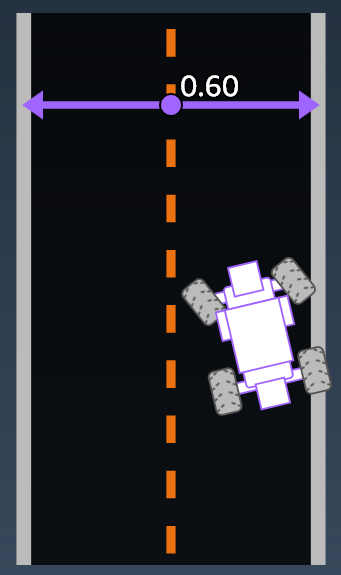
distance_from_center | float | [0,track_width/2] | Displacement from the center line of the track as defined bywaypoints. |
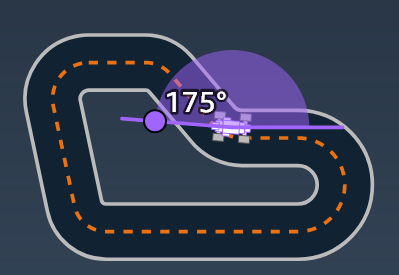
car_orientation | float | [-π, π] | Orientation of the vehicle around its z-axis as measured against the x-axis in radians. If the vehicle starts in the direction of the x-axis of the track, the car_orientation is 0 at the starting point. |
progress | float | [0,1] | Percentage of track completed. |
steps | int | [0,n] | Number of steps completed. |
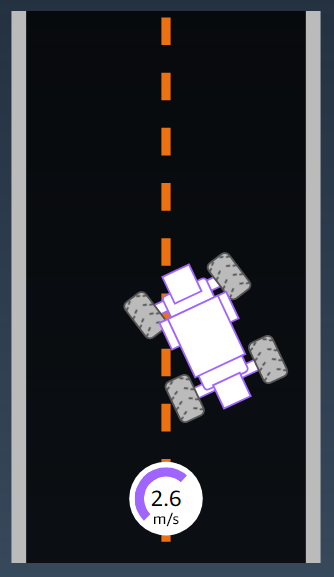
throttle | float | [0,1] | Vehicle's speed. 0 indicates stopped and 1 means at the maximum speed. |
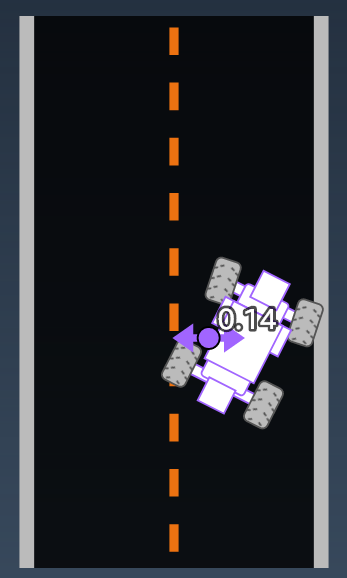
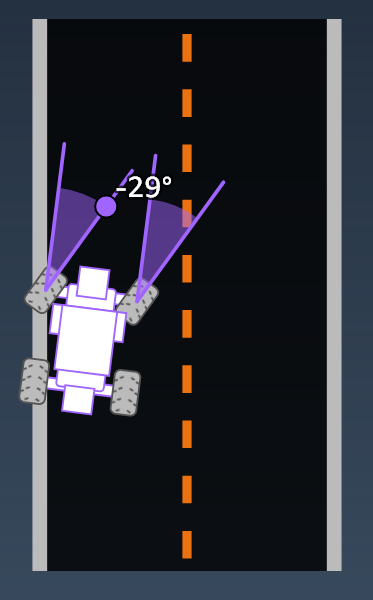
steering | float | [-1,1] | Steering position. -1 means right and 1 means left. |
track_width | float | [0,inf] | Track width. |
waypoint | (float,float) | (x,y) | A coorindate of (x, y) defining a point on the track. |
waypoints | list | [(x,y), …] | An ordered list of waypoints. |
closest_waypoint | int | [0, number of waypoints -1] | The zero-based index of the closest waypoint given the vehicle's x and y positions as measured by the Euclidean distance. It can be in front of the vehicle or behind it. |
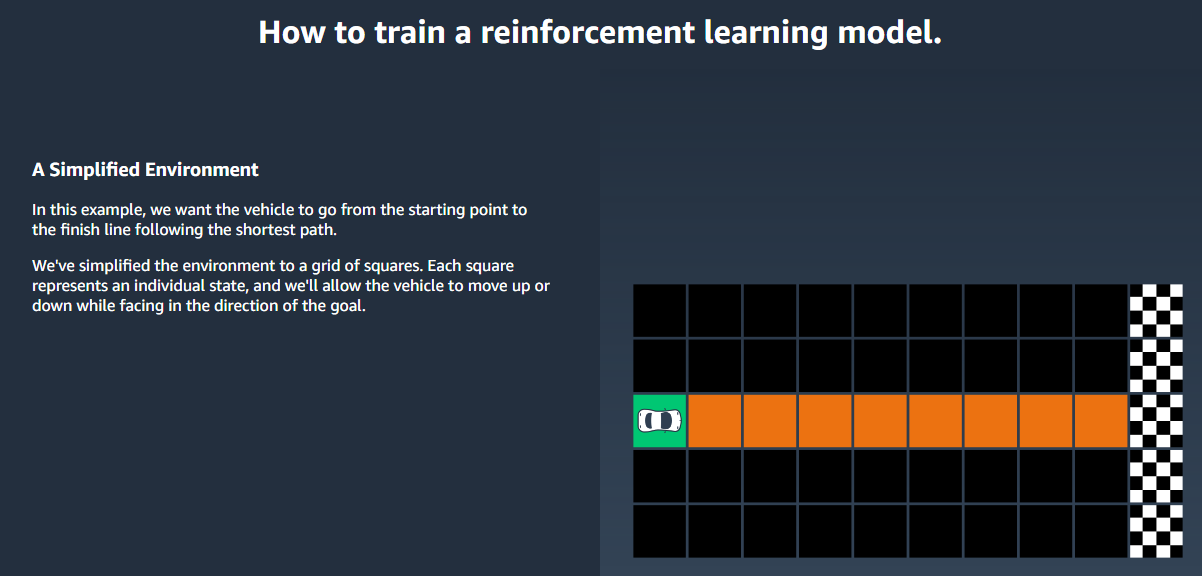
We can start building the reward function by first considering the most basic situation, namely, driving on a straight track from start to finish without getting off the track. In this scenario, the reward function logic depends only on_track and progress. As a trial, you could start with the following logic:
가장 기본적인 상황 즉, 트랙에서 내리지 않고 곧바로 직선으로 주행함으로써 보상 기능을 구축 할 수 있습니다. 이 시나리오에서 보상 기능 로직은 on_track 및 진행에만 의존합니다. trial로 다음과 같은 논리로 시작할 수 있습니다.
def reward_function(self, on_track, x, y, distance_from_center, car_orientation, progress,
steps, throttle, streering, track_width, waypoints, closest_waypoint):
if not on_track:
reward = -1
else if progress == 1 :
reward = 10
return reward
This logic penalizes the agent when it drives itself off the track while rewards the agent when it drives to the finishing line. It's reasonable for achieving the stated goal. However, the agent will roam freely between the starting point and the finishing line, including driving backwards on the track. This means that not only the training could take a long time to complete, but also the trained model would lead to a less efficient driving when deployed to a running vehicle.
이 로직은 agent가 트랙에서 벗어나면 agent에게 불이익을 주고 final 라인으로 이동할 때 보상을줍니다. 명시된 목표를 달성하는 것이 합리적입니다. 에이전트는 트랙에서 뒤로 운전하는 것을 포함하여 시작 지점과 마무리 지점 사이를 자유롭게 돌아 다닙니다. 이것은 훈련이 완료되는 데 오랜 시간이 걸릴뿐만 아니라 훈련 된 모델이 운전중인 차량에 배치 될 때 덜 효율적인 운전으로 이어질 수 있음을 의미합니다.
In practice, an agent learns more effectively if it can do so bit by bit throughout the course of training. This implies that a reward function should give out smaller rewards step by step along the track. For the agent to drive on the straight track, we can improve the reward function as follows:
실제로 에이전트는 훈련 과정에서 조금씩 조금씩 진전시키면서 더 효과적으로 훈련합니다. 이것은 보상 기능이 트랙을 따라 단계적으로 조금씩 조금씩 제공해야 함을 의미합니다. 에이전트가 직선으로 주행하기 위해서는 다음과 같이 보상 기능을 향상시킬 수 있습니다.
def reward_function(self, on_track, x, y, distance_from_center, car_orientation, progress,
steps, throttle, streering, track_width, waypoints, closest_waypoint):
if not on_track:
reward = -1
else:
reward = progress
return reward
With this function, the agent gets more reward the closer it reaches the finishing line. This should reduce or eliminate unproductive trials of driving backwards. In general, we want the reward function to distribute the reward more evenly over the action space. Creating an effective reward function can be a challenging undertaking. You should start with a simple one and progressively enhance or improve the function, with systematic experimentation, to become more robust and efficient.
이 기능을 사용하면 agent가 마무리 라인에 가까울수록 좀 더 많은 보상을 얻습니다. 이것은 자율 운전 중 비생산적인 시도를 줄이거 나 없애도록 합니다. 일반적으로 보상 기능을 통해 보상을 행동 공간에 균등하게 분배해야합니다. 효과적인 보상 기능을 만드는 것은 어려운 일이 될 수 있습니다. 단순한 것으로 시작하여 체계적인 실험을 통해 점진적으로 기능을 향상 시켜보다 강력하고 효율적으로 만들어야합니다.
After you have successfully trained your AWS DeepRacer model for the simple straight track, you can verify that your AWS DeepRacer vehicle (virtual or physical) can drive itself without going off the track. If you let the vehicle run on a looped track, it won't stay on the track. The reward function has ignored the actions to make turns to follow the track.
간단한 직선 트랙에 대한 AWS DeepRacer 모델을 성공적으로 훈련 한 후에 AWS DeepRacer 차량 (가상 또는 물리적)이 트랙에서 벗어나지 않고 스스로 운전할 수 있는지 확인할 수 있습니다. 루프 된 트랙에서 차량을 주행 시키면 트랙을 벗어날 겁니다. 위의 보상 기능은 트랙을 따라가는 동작은 고려하지 않았기 때문입니다.
To make your vehicle handle those actions, you must enhance the reward function to give out a reward when the agent makes a permissible turn and produce a penalty if the agent makes an illegal turn. Then, you're ready to start another round of training. To take advantage of the prior trainings, you can start the new training by cloning the previous trained model, passing along the previously learned knowledge. You can follow this pattern to progressively add more features to the reward function to train your AWS DeepRacer vehicle to drive in increasingly more complex environments.
차량이 그러한 행동을 처리하게하려면, agent가 허용 된 회전 이내의 행동에 보상을 제공하고 그 허용된 회전 밖으로 이탈 할 경우 벌점을 주는 보상 기능을 강화해야합니다. 그럼 이제 다시 한 번 훈련을 시작할 준비가되었습니다. 이전 훈련을 활용하려면 이전에 학습 한 지식을 전달하면서 이전에 훈련 된 모델을 복제하여 새 교육을 시작할 수 있습니다. 이 패턴을 따라 보상 기능에 점차적으로 기능을 추가하여 점점 더 복잡한 환경에서 운전할 수 있도록 AWS DeepRacer 차량을 교육 할 수 있습니다.
You can also apply this iterative process to improve the training performance by systematically tuning the hyperparameters used in training. Hyperparameters, such as learning rate, future reward discount, batch size included to compute gradient descent, number of episodes in a training session, and number of steps in an episode, are empirical factors affecting how fast and how stable the total average expected reward converges to the global maximum. Optimal values require systematic experimentation until proven effective. Cloning a previously trained model as the starting point of a new round of training with modified hyperparameters leverages already learned knowledge and could help improving the overall training efficiency.
또한 이 반복 프로세스를 적용하여 훈련에 사용되는 hyperparameters를 체계적으로 조정하여 교육 성능을 향상시킬 수 있습니다. learning rate, future reward discount, 훈련 세션에서 gradient descent와 에피소드 횟수를 계산하는 것을 포함한 일괄 처리 크기 및 에피소드에서의 스텝 수와 같은 hyperparameters는 얼마나 빠르고 얼마나 안정적으로 효과를 극대화하기 위해 평균적인 기대 보상을 커버하느냐에 영향을 주는 경험적 요인입니다. 최적의 값은 입증 된 효과가있을 때까지 체계적인 실험이 필요합니다. 이전에 숙련 된 모델을 수정 된 hyperparameters를 사용하여 새로운 교육 라운드의 시작점으로 복제하면 이미 학습 한 지식을 활용하고 전반적인 교육 효율성을 향상시킬 수 있습니다.
In this section, you learn how to clone a trained model with an enhanced reward function or a modified set of hyperparameters. Before walking through the steps to clone a model for continued training, we illustrate how to update the reward function to handle new situations. We also explain the range and meaning of hyperparameter values used in the supported reinforcement learning algorithms.
이 절에서는 향상된 보상 기능 또는 수정 된 hyperparameters 세트를 사용하여 훈련 된 모델을 복제하는 방법을 학습합니다. 지속적인 교육을 위해 모델을 복제하는 단계를 거치기 전에 새로운 상황을 처리하기 위해 보상 기능을 업데이트하는 방법을 설명합니다. 지원되는 강화 학습 알고리즘에 사용 된 hyperparameters 값의 범위와 의미에 대해서도 설명합니다.
This section shows how to iteratively enhance and improve a reward function with a series of example functions that take the input parameters as described elsewhere:
이 섹션에서는 다른 곳에서 설명한대로 입력 매개 변수를 사용하는 일련의 예제 함수를 사용하여 보상 함수를 반복적으로 향상시키는 방법을 보여줍니다.
Example 1: Follow the Track Center
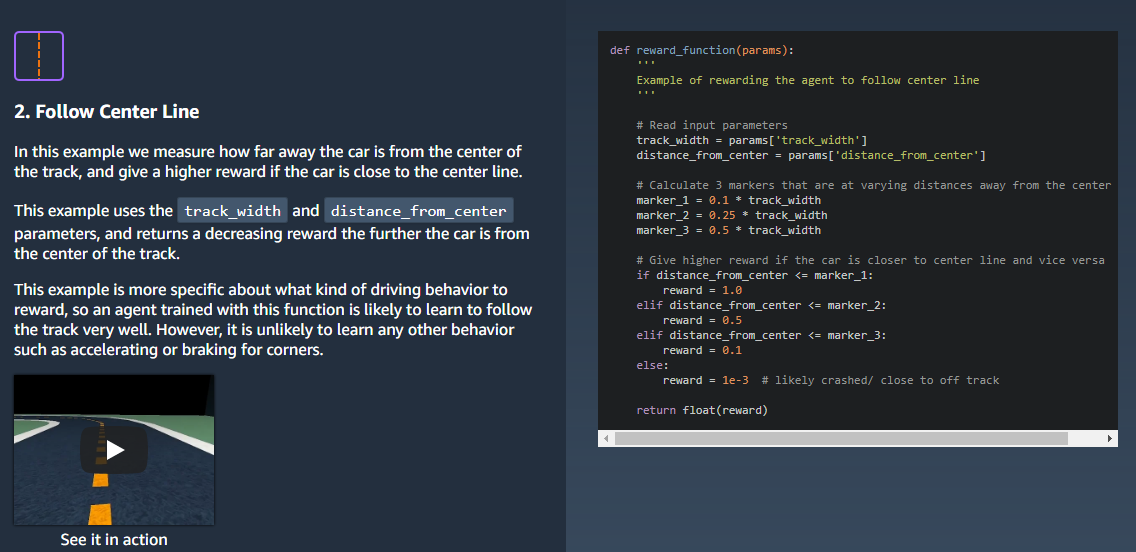
In this example, we start with a reward function to keep the vehicle driving close to the center of a track.
이 예에서는 차량의 주행을 트랙의 중심에 가깝게 유지하는 보상 기능으로 시작합니다.
The following reward function returns more reward when the vehicle is closer to the center of a track. The logic goes as follows:
다음 보상 기능은 차량이 트랙의 중심에 가까울 때 더 많은 보상을 반환합니다. 논리는 다음과 같습니다.
If the vehicle's distance from the track center is less than 20% of the track width, the output reward is 10.
- 트랙 센터에서 차량까지의 거리가 트랙 너비의 20 %보다 작 으면 출력 보상은 10입니다.
If the distance is greater than 20% and less than 50% of the track width, the reward is 3.
- 트랙 센터에서 차량까지의 거리가 트랙 폭의 20 %보다 크고 50 %보다 작 으면 보상은 3입니다.
If the distance is greater than 50% and less than 80% of the track width, the reward is 1.
- 트랙 센터에서 차량까지의 거리가 트랙 폭의 50 %보다 크고 80 %보다 작 으면 보상은 1입니다.
If the distance is greater than 80% of the track width, which is assumed to be crashed or off the track, the reward is 0.01.
- 트랙 센터에서 차량까지의 거리가 트랙 폭의 80 %보다 커 트랙을 벗어나거나 충돌 됐다고 간주되는 경우 보상은 0.01입니다.
In AWS DeepRacer, we can implement this function as follows:
AWS DeepRacer에서 이 기능을 아래와 같이 구현할 수 있습니다.
def reward_function(on_track, x, y, distance_from_center, car_orientation, progress, steps,
throttle, streering, track_width, waypoints, closest_waypoint):
import math
marker_1 = 0.2 * track_width
marker_2 = 0.5 * track_width
marker_3 = 0.8 * track_width
if distance_from_center >= 0.0 and distance_from_center <= marker_1:
reward = 10
elif distance_from_center <= marker_2:
reward = 3
elif distance_from_center <= marker_3:
reward = 1
else:
reward = 1e-2 # likely crashed/ close to off track
return float(reward)
The effect of this reward function is to keep the vehicle to drive as close to the track center as possible.
이 보상 기능의 효과는 차량을 가능한 한 트랙 중심에 가깝게 운전하는 것입니다.
In addition to the discrete version, you could also employ a continuous one to return the reward of the following form:
discrete version 외에도 다음 양식의 보상을 받기 위해 연속 버전을 사용할 수도 있습니다.
reward = exp(-a * distance_from_center)
Here a is a constant and distance_from_center is between 0 and 1.
상수와 distance_from_center는 0과 1 사이 입니다.
Example 2: Follow Center Line without Excessive Turns
In the following example function, we add rewards or penalties to steering to prevent the vehicle from turning away from the center line of the track.
다음 예제 기능에서는 차량이 트랙의 중심선에서 벗어나는 것을 방지하기 위해 조향에 보상이나 페널티를 추가합니다.
def reward_function2(on_track, x, y, distance_from_center, car_orientation, progress, steps,
throttle, streering, track_width, waypoints, closest_waypoint):
import math
marker_1 = 0.2 * track_width
marker_2 = 0.5 * track_width
marker_3 = 0.8 * track_width
if distance_from_center >= 0.0 and distance_from_center <= marker_1:
reward = 10
elif distance_from_center <= marker_2:
reward = 3
elif distance_from_center <= marker_3:
reward = 1
else:
reward = 1e-2 # likely crashed/ close to off track
# penalize reward if the vehicle is steering way too much
ABS_STEERING_THRESHOLD = 0.3
if math.abs(steering) > ABS_STEERING_THRESHOLD:
reward -= 0.5 * math.abs(steering)
reward = max([0.0, reward])
return float(reward)
Example 3: Follow Center Line with Straight Orientation
In this example, we add rewards or penalties to vehicle's orientations to keep the vehicle's body straight while it drives along the track center.
이 예에서는 트랙 센터를 따라 운전하는 동안 차량의 몸체를 똑바로 유지하기 위해 차량의 방향에 보상 또는 벌금을 추가합니다.
def reward_function3(on_track, x, y, distance_from_center, car_orientation, progress, steps,
throttle, streering, track_width, waypoints, closest_waypoint):
import math
marker_1 = 0.2 * track_width
marker_2 = 0.5 * track_width
marker_3 = 0.8 * track_width
if distance_from_center >= 0.0 and distance_from_center <= marker_1:
reward = 10
elif distance_from_center <= marker_2:
reward = 3
elif distance_from_center <= marker_3:
reward = 1
else:
reward = 1e-2 # likely crashed/ close to off track
waypoint_yaw = waypoints[closest_waypoint][-1]
# penalize reward if orientation of the vehicle deviates way too much when compared to ideal orientation
if math.abs(car_orientation - waypoint_yaw) >= math.radians(5):
reward *= 0.5
return float(reward)
If you use an orientation to detect if a vehicle is to make turns, this reward function should help other vehicles recognize the intention more clearly when a vehicle in the front makes turns.
차량이 회전해야 하는 경우를 감지하기 orientation 사용한다면 이 보상 기능은 앞 차량이 회전할 때 그 의도를 보다 분명히 감지하도록 도울 수 있어야 합니다.
The following table shows the hyperparameters that can be adjusted to tune the performance of training using a supported algorithm:
다음 표는 지원되는 알고리즘을 사용하여 학습 성능을 조정할 수있는 hyperparameters를 보여줍니다.
Algorithm-specific hyperparameters and their effects
| Algorithm | Hyperparameters | Description |
|---|
| PPO | Batch size | The number of images used for each gradient descent update.
A larger Batch size value leads to more stable updates, but slower training. - Required
Yes - Valid values
Positive integer of (32, 64, 128, 256, 512) - Default value
32
|
| PPO | Number of epochs | The number of passes through the experience buffer during gradient descent. A smaller num_epoch value promotes more stable updates, but slower training. A larger Number of epochsvalue is acceptable when the bath size is large. - Required
No - Valid values
Positive integer between [3 - 10] - Default value
3
|
| PPO | Learning rate | Controls how much each gradient descent contributes to an update.
A larger value can increase the training speed, but may cause the expected rewards not to convergence if it's too large. - Required
No - Valid values
Real number between [10-5- 10-3] - Default value
0.001
|
| PPO | Exploration | A type of exploration used in training reinforcement learning models . Use the categorical exploration (CategoricalParameters)
for a discrete action space and use the epsilon exploration
(EpsilonGreedy) for a continuous action space: The categorical exploration takes action according to the probability
distribution of the action space of the policy network. The epsilon exploration takes action at random with an epsilon
distribution. The initial value is 1 and then linearly decreased to
0.1 over X steps, where X is typically between10,000 and 100,000.
- Required
No - Valid values
String literal of CategoricalParameters orEpsilonGreedy - Default value
EpsilonGreedy
|
| PPO | Entropy | A degree of the randomness the agent takes action with. The larger the entropy, the more random actions the agent will take for exploration. - Required
No - Valid values
Real number between [10-4- 10-2] - Default value
0.5
|
| PPO | Discount factor | A factor specifies how much of the future reward contributes to the expected rewards. The larger the Discount factor value is, the farther out contributions the agent considers to take an action. If it is 0, only the immediate reward is considered. If it is 1, the full-range future rewards are included. As a simplified example, if the agent takes order of 100 steps to take a turn, then discount factor of 0.99 is a good value, if it takes 1000 steps, then 0.999 is a good value. - Required
No - Valid values
Real number between [0- 1] - Default value
0.999
|
| PPO | Loss type | Type of the objective function for optimization. A good training algorithm should make incremental changes to the agent's strategy so that it gradually transitions from taking random actions to taking strategic actions to increase reward. But if it makes too big a change then the training becomes unstable and the agent ends up not learning. The Huber loss and Mean squared error loss types behave similarly for small updates. But as the updates become larger, Huber loss takes smaller increments compared to Mean squared error loss. When you have convergence problems, use the Huber loss type. When convergence is good and you want to train faster, use the Mean squared error loss type. - Required
No - Valid values
(Huber loss, Mean squared error loss) - Default value
Huber loss
|
| PPO | Number of episodes between each training | This parameter tells the agent how frequently it should train it's neural networks. If this value is low, the agent gets a small amount of experience between updates. For problems that are easy to solve, a small number suffices and learning is fast. For more complex problems, it is better to gather more experience so that the agent observes variations of the effect of its actions. Learning will be slower in this case but more stable. Recommended values are (10, 20, 40). - Required
No - Valid values
[1 - 1000] - Default value
20
|
In this section, you learn how to clone a trained model using the AWS DeepRacer console.
이 섹션에서는 AWS DeepRacer 콘솔을 사용하여 훈련 된 모델을 복제하는 방법을 학습합니다.
To iterate training the reinforcement learning model using the AWS DeepRacer console
AWS DeepRacer 콘솔을 사용하여 강화 학습 모델을 반복 학습하려면
Sign in to the AWS DeepRacer console, if you're not already signed in.
아직 로그인하지 않은 경우 AWS DeepRacer 콘솔에 로그인하십시오.
On the Models page, choose a trained model and then choose Clone from the Action drop-down menu list.
모델 페이지에서 숙련 된 모델을 선택한 다음 작업 드롭 다운 메뉴 목록에서 복제를 선택하십시오.
For Model details, do the following:
모델 세부 정보를 보려면 다음을 수행하십시오.
Type RL_model_1 in Model name, if you don't want a name to be generated for the cloned model.
복제 된 모델에 대해 이름을 생성하지 않으려면 모델 이름에 RL_model_1을 입력하십시오.
Optionally, give a description for the to-be-cloned model in Model description - optional.
선택적으로, 모델 설명 - 선택 사항에서 복제 할 모델에 대한 설명을 제공하십시오.
For Environment simulation, choose another track option.
환경 시뮬레이션의 경우 다른 트랙 옵션을 선택하십시오.
For Reward function, choose Advanced. Modify the reward function, e.g., to consider steering.
보상 기능의 경우 고급을 선택하십시오. 예를 들어 조정을 고려하여 보상 기능을 수정하십시오.
Expand Algorithm settings and try different options, e.g., changing Batch size value from 32 to 64 or increasing the Learning rate to speed up the training.
알고리즘 설정을 확장하고 배치 옵션 값을 32에서 64로 변경하거나 학습 속도를 높여 교육 속도를 높이는 등 다양한 옵션을 시도해보십시오.
Experiment with difference choices of the Stop conditions. And then choose Start trainingto begin new round of training.
Stop 조건의 차이점을 실험 해보십시오. 그런 다음 교육 시작을 선택하여 새로운 교육 과정을 시작하십시오.
As with training a robust machine learning model in general, it is important that you conduct systematic experimentation to come up with the best solution.
일반적으로 머신러닝 모델을 좀 더 견고하고 강력하게 훈련하는 것과 마찬가지로 체계적인 실험을 수행하여 최상의 솔루션을 찾는 것이 중요합니다.
To evaluate a model is to test the performance of a trained model. In AWS DeepRacer, the standard performance metric is the average time of finishing three consecutive laps. Evaluating an AWS DeepRacer model involves the following tasks:
모델을 평가하는 것은 훈련 된 모델의 성능을 테스트하는 것입니다. AWS DeepRacer에서 표준 성능 메트릭은 연속 3 랩을 완료하는 평균 시간입니다. AWS DeepRacer 모델 평가에는 다음 작업이 포함됩니다.
Configure and start an evaluation job.
평가 작업을 구성하고 시작하십시오.
Observe the evaluation in progress while the job is running. This can be done in the AWS DeepRacer simulator.
작업이 진행되는 동안 진행중인 평가를 관찰하십시오. 이 작업은 AWS DeepRacer 시뮬레이터에서 수행 할 수 있습니다.
Inspect the evaluation summary after the evaluation job is done. You can terminate an evaluation job in progress at any time.
평가 작업이 완료되면 평가 요약을 검토하십시오. 진행중인 평가 작업을 언제든지 종료 할 수 있습니다.
You can test a model in multiple evaluation jobs, but you must run them one after another. AWS DeepRacer only keeps the latest evaluation job status and the result.
여러 평가 작업에서 모델을 테스트 할 수 있지만 하나씩 실행해야합니다. AWS DeepRacer는 최신 평가 작업 상태 및 결과 만 유지합니다.
You can evaluate an AWS DeepRacer model using the AWS DeepRacer simulator as a virtual environment.
AWS DeepRacer 시뮬레이터를 가상 환경으로 사용하여 AWS DeepRacer 모델을 평가할 수 있습니다.
For step-by-step instructions to run an AWS DeepRacer evaluation job in simulation, see Evaluate Your AWS DeepRacer Models in Simulation.
시뮬레이션에서 AWS DeepRacer 평가 작업을 실행하기위한 단계별 지침은 시뮬레이션에서 AWS DeepRacer 모델 평가를 참조하십시오.
For more information about how to run an AWS DeepRacer evaluation job with an AWS DeepRacer vehicle in a physical environment, see Drive Your AWS DeepRacer Vehicle .
실제 환경에서 AWS DeepRacer 차량으로 AWS DeepRacer 평가 작업을 실행하는 방법에 대한 자세한 내용은 AWS DeepRacer 차량 운전을 참조하십시오.
The AWS DeepRacer console provides you with an integrated experience to train and evaluate your AWS DeepRacer models. It's integrated because AWS DeepRacer uses Amazon SageMaker and AWS RoboMaker behind the scenes. The integration includes detailed reinforcement learning tasks and makes training more readily accessible to beginners.
AWS DeepRacer 콘솔은 AWS DeepRacer 모델을 교육하고 평가할 수있는 통합 된 경험을 제공합니다. AWS DeepRacer는 밑의 레이어에서 Amazon SageMaker와 AWS RoboMaker를 사용함으로서 그러한 것들을 통합하고 있습니다.. 통합에는 자세한 보강 학습 과제가 포함되어있어 초보자가보다 쉽게 학습 할 수 있습니다.
If you're an experienced user of Amazon SageMaker or if you're determined to learn how to use Amazon SageMaker and AWS RoboMaker to train and evaluate your AWS DeepRacer models, then you can manually create an Amazon SageMaker notebook. You can then clone a reinforcement learning sample notebook instance and use it as a template to perform the predefined tasks that train and evaluate an AWS DeepRacer model.
Amazon SageMaker를 사용하는 숙련 된 사용자이거나 Amazon SageMaker 및 AWS RoboMaker를 사용하여 AWS DeepRacer 모델을 교육하고 평가하는 방법을 배우고자 한다면 Amazon SageMaker notebook을 수동으로 만들 수 있습니다. 그런 다음 reinforcement learning 예제 notebook 인스턴스를 복제하고 이를 템플릿으로 사용하여 AWS DeepRacer 모델을 학습하고 평가하는 미리 정의 된 작업을 수행 할 수 있습니다.
After the training, you can copy the trained model artifacts to your AWS DeepRacer vehicle for test runs in a physical environment.
교육을 마친 후 훈련 된 모델 아티팩트를 AWS DeepRacer 차량에 복사하여 실제 환경에서 테스트를 실행할 수 있습니다.
The tutorial presents step-by-step instructions to walk you through these tasks.
이 자습서에서는 이러한 작업을 단계별로 안내합니다.
To train an AWS DeepRacer model directly on Amazon SageMaker, follow the steps below and create an Amazon SageMaker notebook instance.
Amazon SageMaker에서 직접 AWS DeepRacer 모델을 교육하려면 다음 단계를 수행하고 Amazon SageMaker 노트북 인스턴스를 만드십시오.
To create an Amazon SageMaker notebook instance to train and evaluate your AWS DeepRacer models
AWS DeepRacer 모델을 교육하고 평가할 Amazon SageMaker 노트북 인스턴스를 생성하려면
Sign in to the Amazon SageMaker console at https://console.aws.amazon.com/sagemaker. Choose one of the supported regions.
https://console.aws.amazon.com/sagemaker에서 Amazon SageMaker 콘솔에 로그인하십시오. 지원되는 지역 중 하나를 선택하십시오.
From the navigation pane, choose Notebook instances and then choose Create notebook instance.
탐색 창에서 Notebook instances를 선택한 다음 Create notebook instance를 선택하십시오.
On the Create notebook instance page, do the following:
노트북 인스턴스 작성 페이지에서 다음을 수행하십시오.
Type a name. For example, my-deepracer-model) for the Notebook instance name.
이름을 입력하십시오. 노트북 인스턴스 이름에 대한 my-deepracer-model).
If the IAM role drop-down menu is not populated with an existing IAM role, choose Create a new role, Enter a custom IAM role ARN, or Use existing role and then follow the instructions.
IAM 역할 드롭 다운 메뉴가 기존 IAM 역할로 채워지지 않은 경우 새 역할 만들기, 사용자 지정 IAM 역할 ARN 입력 또는 기존 역할 사용을 선택하고 지침을 따릅니다.
Leave the default choices for all other options and then choose Create notebook instance.
다른 모든 옵션의 기본 선택 항목을 그대로두고 노트북 인스턴스 작성을 선택하십시오.
For more information, see creating an Amazon SageMaker notebook instance.
자세한 내용은 Amazon SageMaker 노트북 인스턴스 만들기를 참조하십시오.
Wait for the notebook instance's Status to change from Pending to InService. Then choose Open Jupyter.
노트북 인스턴스의 Status가 Pending에서 InService로 변경 될 때까지 기다립니다. 그 다음 Open Jupyter를 선택하십시오.
On the Jupyter page (which is the home page of the newly created notebook), do the following:
Jupyter 페이지 (새로 만든 전자 필기장의 홈 페이지)에서 다음을 수행하십시오.
Choose the SageMaker Examples tab.
SageMaker 예제 탭을 선택하십시오.
Expand the Reinforcement Learning entry from the example list.
예제 목록에서 강화 학습 항목을 확장하십시오.
For this exercise, choose Use next to the rl_deepracer_coach_robomaker.ipynb item.
이 연습에서는 rl_deepracer_coach_robomaker.ipynb 항목 옆에있는 Use를 선택하십시오.
On the Create a copy in your home directory dialog, choose Create copy.
홈 디렉토리의 사본 작성 대화 상자에서 사본 작성을 선택하십시오.
At this point, the notebook instance is running and you can begin to train the model.
이 시점에서 노트북 인스턴스가 실행 중이며 모델을 학습 할 수 있습니다.
You are charged for a running instance according to the selected instance type. To avoid being charged for a running instance when you're not ready to use it, shut down the instance.
선택한 인스턴스 유형에 따라 실행중인 인스턴스에 대해 요금이 부과됩니다. 실행중인 인스턴스를 사용할 준비가되지 않았을 때 실행중인 인스턴스에 대해 요금이 부과되지 않도록하려면 인스턴스를 종료하십시오.
To use an Amazon SageMaker notebook instance to train your AWS DeepRacer model, first properly initialize the instance for the required job. The initialization includes the following.
AWS DeepRacer 모델을 교육하기 위해 Amazon SageMaker 노트북 인스턴스를 사용하려면 먼저 필요한 작업에 대해 인스턴스를 올바르게 초기화하십시오. 초기화에는 다음이 포함됩니다.
Import required libraries. 필수 라이브러리 가져 오기.
Set up training output storage. 훈련용 출력 저장 장치 설정
Grant access permissions for Amazon SageMaker and AWS RoboMaker.
Amazon SageMaker 및 AWS RoboMaker에 대한 액세스 권한을 부여하십시오.
Configure VPC for Amazon SageMaker and AWS RoboMaker to interact with each other.
Amazon SageMaker와 AWS RoboMaker가 서로 상호 작용할 수 있도록 VPC를 구성합니다.
Follow the steps below for detailed instructions to initialize a notebook instance.
노트북 인스턴스를 초기화하는 자세한 방법은 아래 단계를 따르십시오.
To initialize an Amazon SageMaker notebook instance
To import the required library to do training, choose the notebook instance's first code block. For example, choose the one under the Imports heading. Next, choose Run from the notebook's menu bar to execute the code block. You can use the Shift-Enter key-command shortcuts to start running the code block.
교육을 수행하는 데 필요한 라이브러리를 가져 오려면 노트북 인스턴스의 첫 번째 코드 블록을 선택하십시오. 예를 들어, Imports 제목 아래에있는 것을 선택하십시오. 그런 다음, 노트북의 메뉴 막대에서 실행을 선택하여 코드 블록을 실행하십시오. Shift-Enter 키 명령 단축키를 사용하여 코드 블록 실행을 시작할 수 있습니다.

Before the code execution starts, the code block status shows In [ ]. When the execution is under way, the status becomes In [*]. After the code execution is complete, the status becomes In [n], where nn=1. If you run the command again after the first run, the status becomes In [2].
코드 실행이 시작되기 전에 코드 블록 상태가 In []을 표시합니다. 실행이 진행 중일 때 상태는 In [*]이됩니다. 코드 실행이 완료되면 상태가 In [n]이되며, 여기서 n은 호출 순서와 일치합니다. 가져 오기 코드 셀이 첫 번째이므로 n = 1입니다. 처음 실행 한 후 명령을 다시 실행하면 상태가 [2]가됩니다.
For asynchronous execution, the code cell returns immediately to show the completed status. For synchronous executions, subsequent calls are blocked until the current code cell execution is completed when the status turns from In [*] to In [n].
비동기 실행의 경우 코드 셀은 즉시 반환되어 완료 상태를 표시합니다. 동기 실행의 경우 상태가 In [*]에서 In [n]으로 바뀔 때 현재 코드 셀 실행이 완료 될 때까지 후속 호출이 차단됩니다.
2. To set up the training output storage, choose the code block under Setup S3 bucket, and then choose Run from the notebook instance menu or press the Shift+Enter keys.
training output storage를 설정하려면 Setup S3 bucket에서 코드 블록을 선택한 다음 노트북 인스턴스 메뉴에서 Run을 선택하거나 Shift + Enter 키를 누릅니다.

When the execution completes, you can verify this bucket in Amazon S3 console.
실행이 완료되면 Amazon S3 콘솔에서이 버킷을 확인할 수 있습니다.
To view the s3_output_path variable value, append print(s3_output_path) to the above code cell and rerun the code.
s3_output_path 변수 값을 보려면 print (s3_output_path)를 위 코드 셀에 추가하고 코드를 다시 실행하십시오.
3. To define local variables to name the training job, to specify the training time, and to select an AWS availability region, run the code block under Define Variables.
교육 작업의 이름을 지정하고 교육 시간을 지정하고 AWS 가용성 영역을 선택하기 위해 지역 변수를 정의하려면 변수 정의 아래의 코드 블록을 실행하십시오.

The example notebook instance sets the job duration as 5 hours by default, which should be sufficient for this exercise. To speed up the end-to-end experience, you can change the job duration to 1 or 2 hours before running the code cell.
예제 노트북 인스턴스는 작업 기간을 기본적으로 5 시간으로 설정합니다. 이는이 연습에 충분해야합니다. 엔드 - 투 - 엔드 환경의 속도를 높이려면 코드 셀을 실행하기 전에 작업 기간을 1 ~ 2 시간으로 변경하십시오.
4. To permit this notebook instance to access the output storage from Amazon SageMaker, run the code cell under Create an IAM role.
이 노트북 인스턴스가 Amazon SageMaker의 출력 스토리지에 액세스 할 수있게하려면 IAM 역할 생성에서 코드 셀을 실행하십시오.
try:
role = sagemaker.get_execution_role()
except:
role = get_execution_role('sagemaker')
print("Using IAM role arn: {}".format(role))
When executed, this code block creates a new IAM role containing the following IAM policy.
이 코드 블록을 실행하면 다음 IAM 정책을 포함하는 새 IAM 역할이 만들어집니다.
{
"Version": "2012-10-17",
"Statement": [
{
"Effect": "Allow",
"Action": [
"s3:GetObject",
"s3:PutObject",
"s3:DeleteObject",
"s3:ListBucket"
],
"Resource": [
"arn:aws:s3:::*"
]
}
]
}
The created IAM role has Amazon SageMaker as its trusted entity.
생성 된 IAM 역할은 Amazon SageMaker를 신뢰할 수있는 엔터티로 사용합니다.
5. Because AWS RoboMaker is involved to render the training process, it also needs the permissions to access the same output storage. To do so, you must makerobomaker.amazonaws.com as another trusted entity of the role. For the specific instructions, run the code cell under Permission setup for invoking AWS RoboMaker from this notebook.
AWS RoboMaker는 교육 프로세스를 렌더링하는 데 관련되어 있으므로 동일한 출력 저장소에 액세스 할 수있는 권한도 필요합니다. 이렇게하려면 robomaker.amazonaws.com을 역할의 신뢰할 수있는 다른 엔터티로 만들어야합니다. 특정 지침을 보려면이 노트에서 AWS RoboMaker를 호출하기위한 권한 설정에서 코드 셀을 실행하십시오.
display(Markdown(generate_help_for_robomaker_trust_relationship(role)))
6. To enable VPC mode for Amazon SageMaker and AWS RoboMaker to communicate with each other over network, run the two code cells below Configure VPC. By default, the notebook instance uses your default VPC, security group, and subnets to configure the VPC mode. If you don't want open VPC for other traffic, make sure to set the Inbound Rules and Outbound Rules for the specified security group to allow incoming traffic from itself only.
Amazon SageMaker 및 AWS RoboMaker에서 VPC 모드를 활성화하여 네트워크를 통해 서로 통신하려면 VPC 구성 아래의 두 코드 셀을 실행하십시오. 기본적으로 노트북 인스턴스는 기본 VPC, 보안 그룹 및 서브넷을 사용하여 VPC 모드를 구성합니다. 다른 트래픽에 대해 열린 VPC를 사용하지 않으려면 수신 트래픽 자체 만 허용하도록 지정된 보안 그룹에 대한 인바운드 규칙 및 아웃 바운드 규칙을 설정해야합니다.

At this point, you're done with initializing the training and are ready to move on to set up the training environment.
이 시점에서 교육을 초기화하고 교육 환경을 설정하기 위해 준비를 마쳤습니다.
The environment for training your AWS DeepRacer model in this notebook instance is defined in the src/robomaker/environments/deepracer_env.py file. This environment file contains definitions of the track, states, actions, and the reward function used for the training. You can modify these definitions when setting up your training environment.
이 노트북 인스턴스에서 AWS DeepRacer 모델을 교육하는 환경은 src / robomaker / environments / deepracer_env.py 파일에 정의되어 있습니다. 이 환경 파일에는 트랙, 상태, 조치 및 학습에 사용 된 보상 기능에 대한 정의가 들어 있습니다. 교육 환경을 설정할 때 이러한 정의를 수정할 수 있습니다.
Given a track, states, and actions, the reward function makes your AWS DeepRacer model unique from others. Thus, the most important part of environment setup involves editing the reward function definition (def reward_function(…)) in the deepracer_env.py file. To edit thedeepracer_env.py file to customize the reward function, follow the steps below:
트랙, 주 및 액션이 주어지면 보상 기능을 통해 AWS DeepRacer 모델이 다른 모델과 차별화됩니다. 따라서 환경 설정에서 가장 중요한 부분은 deepracer_env.py 파일에서 보상 기능 정의 (def reward_function (...))를 편집하는 것입니다. deepracer_env.py 파일을 편집하여 보상 기능을 사용자 정의하려면 다음 단계를 따르십시오.
To modify the reward function in the deepracer_env.py file:
deepracer_env.py 파일에서 보상 기능을 수정하려면 다음을 수행하십시오.
Go back to the Amazon SageMaker notebook window on the Amazon SageMaker console and choose the Files tab.
Amazon SageMaker 콘솔의 Amazon SageMaker 노트북 창으로 돌아가서 파일 탭을 선택하십시오.
Navigate to the src/robomaker/environments folder and choose deepracer_env.py to open the environment file in the Amazon SageMaker code editor.
src / robomaker / environments 폴더로 이동하고 deepracer_env.py를 선택하여 Amazon SageMaker 코드 편집기에서 환경 파일을 엽니 다.
3. In the Python code editor, scroll down to the def reward_function definition block. The default reward_function, as shown as follows, is focused to keep the vehicle driving along the track center by decreasing the reward as the vehicle deviates further away from the center.
파이썬 코드 편집기에서 def reward_function 정의 블록까지 아래로 스크롤하십시오. 다음과 같이 기본 reward_function은 차량이 센터에서 더 멀리 벗어날 때 보상을 줄임으로써 트랙 센터를 따라 차량을 계속 주행시키는 데 중점을 둡니다.

Replace the above default reward_function definition with the following definition:
위의 기본 reward_function 정의를 다음 정의로 바꿉니다.
def reward_function(self, on_track, x, y, distance_from_center, car_orientation, progress, steps,
throttle, steering, track_width, waypoints, closest_waypoints):
reward = 1e-3
if distance_from_center >= 0.0 and distance_from_center <= 0.03:
reward = 1.0
# add steering penalty
if abs(steering) > 0.5:
reward *= 0.80
# add throttle penalty
if throttle < 0.5:
reward *= 0.80
return reward
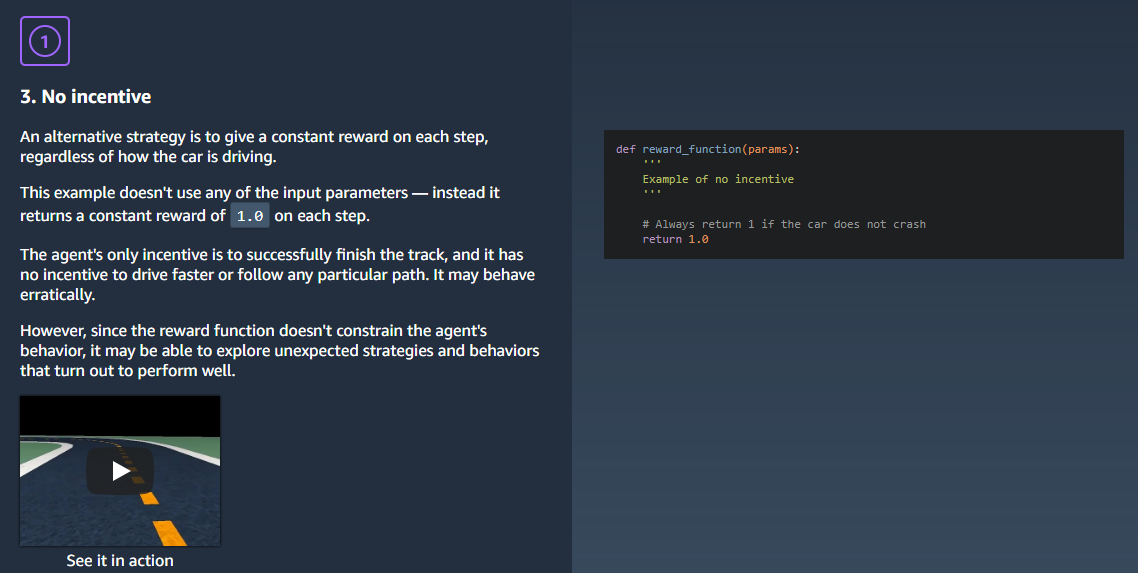
This reward function returns a reward of 1.0 when the vehicle is no more than 3 percent away from the track center. This contributes to keeping the vehicle along the track center. In addition, it reduces the reward by 20 percent if the vehicle steers left or right by more than 50 percent of the maximum allowed turns. This contributes to discouraging the vehicle to make too drastic turns. It also reduces the reward by 20 percent if the vehicle travels at less than 50 percent of maximum allowed throttle. This contributes to preventing the vehicle to move too slow, which is important for time trials. In all other cases, the reward function returns a small reward of 0.003. This has the effect of keeping the vehicle to do whatever it does.
이 보상 기능은 차량이 트랙 센터에서 3 % 이상 떨어지지 않은 경우 1.0의 보상을 반환합니다. 이것은 트랙 센터를 따라 차량을 유지하는 데 기여합니다. 또한, 차량이 최대 허용 회전 수의 50 % 이상 왼쪽이나 오른쪽으로 조종 할 경우 보상을 20 % 줄입니다. 이것은 차량이 너무 급하게 회전하는 것을 방해하는 데 기여합니다. 또한 차량이 최대 허용 스로틀의 50 % 미만으로 주행하면 보상을 20 % 줄입니다. 이것은 차량이 너무 천천히 움직이는 것을 방지하는데 기여하는데, 이것은 시련을 위해 중요합니다. 다른 모든 경우에 보상 함수는 0.003의 작은 보상을 반환합니다. 이것은 차량이 무엇을 하든지 유지하도록하는 효과가 있습니다.
The expected behavior, as dictated by this updated reward function, is to make the vehicle drive sufficiently fast along the middle of the track without making excessive turns.
이 업데이트 된 보상 기능에 의해 지시되는 예상되는 동작은 과도한 회전을하지 않고 트랙의 중간을 따라 차량 구동을 충분히 빠르게하는 것입니다.
4. Choose File → Save to save the change of the reward function.
Notice that the environment file is shared by both Amazon SageMaker and AWS RoboMaker, also known as nodes. When it's used by Amazon SageMaker, the node_type isSAGEMAKER_TRAINING_WORKER. When it's used by AWS RoboMaker, the node_type is SIMULATION_WORKER.
환경 파일은 Amazon SageMaker와 AWS RoboMaker (노드라고도 함)에서 공유됩니다. Amazon SageMaker에서 사용하는 경우 node_type은 SAGEMAKER_TRAINING_WORKER입니다. AWS RoboMaker에서 사용하는 경우 node_type은 SIMULATION_WORKER입니다.
As part of the environment setup, you can optionally modify the hyperparameters used in training. The hyperparameters are defined in the deepracer.py file under the src/robomaker/presetsdirectory. The instruction to edit the hyperparameters values is similar to those described above. For this exercise, use the default hyperparameter values.
환경 설정의 일부로 선택적으로 교육에 사용되는 하이퍼 매개 변수를 수정할 수 있습니다. 하이퍼 매개 변수는 deepracer.py 파일의 src / robomaker / presets 디렉토리에 정의되어 있습니다. 하이퍼 파라미터 값을 편집하는 명령은 위에서 설명한 것과 비슷합니다. 이 연습에서는 기본 하이퍼 매개 변수 값을 사용하십시오.
Train Your AWS DeepRacer Model
Training your model with Amazon SageMaker and AWS RoboMaker amounts to executing the code in the training_worker.py file under the notebook's src directory. The training_worker.py file is designated as the entry point of your training job.
Amazon SageMaker 및 AWS RoboMaker를 사용하여 모델을 교육하면 노트북 src 디렉토리의 training_worker.py 파일에서 코드가 실행됩니다. training_worker.py 파일은 교육 작업의 시작점으로 지정됩니다.
The training process involves using AWS RoboMaker to emulate driving experiences in the environment, relaying the experiences at fixed intervals to Amazon SageMaker as input to train the deep neural network, and updating the network weights to an S3 location.
교육 과정에는 AWS RoboMaker를 사용하여 환경에서 운전 경험을 에뮬레이션하고 일정한 간격으로 경험을 Amazon SageMaker에 입력으로 전달하여 심 신경 네트워크를 교육하고 네트워크 가중치를 S3 위치로 업데이트합니다.
While the training is in progress, you can have specified training metrics logged to Amazon CloudWatch Logs or displayed to the AWS RoboMaker terminal.
교육이 진행되는 동안 Amazon CloudWatch Log에 기록되거나 AWS RoboMaker 단말기에 표시되는 교육 메트릭을 지정할 수 있습니다.
To train your AWS DeepRacer model
If you would like to view the training_worker.py code, you can uncomment the code cell under Training Entrypoint and then choose Run.
training_worker.py 코드를 보려면 교육 Entrypoint에서 코드 셀의 주석 처리를 제거한 다음 실행을 선택하십시오.

Alternatively, you can open the src/training_worker.py file directly from the notebook's home directory accessible through the Files tab.
또는 파일 탭을 통해 액세스 할 수있는 노트북의 홈 디렉토리에서 src / training_worker.py 파일을 직접 열 수도 있습니다.
2. To start an Amazon SageMaker job to train your AWS DeepRacer model, do the following:
Amazon SageMaker 작업을 시작하여 AWS DeepRacer 모델을 교육하려면 다음을 수행하십시오.
a. To prepare for running AWS RoboMaker, run the first code cell under Train the RL model using the Python SDK Script mode.
AWS RoboMaker를 실행할 준비를하려면 Python SDK Script 모드를 사용하여 RL 모델 교육에서 첫 번째 코드 셀을 실행하십시오.

This uploads the preset and environment to the S3 location for AWS RoboMaker to read.
그러면 프리셋 및 환경이 AWS RoboMaker가 읽을 수있는 S3 위치로 업로드됩니다.
b. To define training metrics to watch in either CloudWatch Logs or in an AWS RoboMaker console window, run the second code cell under Train the RL model using the Python SDK Script mode.
CloudWatch 로그 또는 AWS RoboMaker 콘솔 창에서 볼 수있는 교육 메트릭을 정의하려면 Python SDK 스크립트 모드를 사용하여 RL 모델 교육에서 두 번째 코드 셀을 실행하십시오.

You can watch the specified metrics to monitor the training and to find out the effectiveness of your chosen reward function in CloudWatch Logs or using an AWS RoboMaker terminal.
지정된 측정 항목을보고 교육을 모니터링하고 CloudWatch 로그에서 선택한 보상 기능의 효과를 확인하거나 AWS RoboMaker 터미널을 사용하여 확인할 수 있습니다.
c. To start a Amazon SageMaker training job for your AWS DeepRacer model, run the third code cell under Train the RL model using the Python SDK Script mode.
AWS DeepRacer 모델에 대한 Amazon SageMaker 교육 작업을 시작하려면 Python SDK 스크립트 모드를 사용하여 RL 모델 교육에서 세 번째 코드 셀을 실행하십시오.

This Amazon SageMaker training job uses the TensorFlow framework and runs on a specified EC2 compute instance type. The output lists the job name. You can track the status of this training job in Amazon SageMaker.
이 Amazon SageMaker 교육 작업은 TensorFlow 프레임 워크를 사용하며 지정된 EC2 계산 인스턴스 유형에서 실행됩니다. 출력에는 작업 이름이 나열됩니다. Amazon SageMaker에서이 교육 작업의 상태를 추적 할 수 있습니다.

3. To start an environment emulation job in AWS RoboMaker, run the code cell under Start the Robomaker job .
AWS RoboMaker에서 환경 에뮬레이션 작업을 시작하려면 Robomaker 작업 시작 아래에서 코드 셀을 실행하십시오.
4. After the training and emulation jobs are created, to create an AWS RoboMaker simulation application to run the simulation, run the three code cells under Create Simulations Application, in the order of display.
교육 및 에뮬레이션 작업이 생성 된 후 시뮬레이션을 실행하는 AWS RoboMaker 시뮬레이션 응용 프로그램을 만들려면 시뮬레이션 순서 생성 응용 프로그램에서 세 개의 코드 셀을 표시 순서대로 실행하십시오.
5. To start the simulation on AWS RoboMaker and share the simulated data, run the code cell under Launch the Simulation job on RoboMaker.
AWS RoboMaker에서 시뮬레이션을 시작하고 시뮬레이션 된 데이터를 공유하려면 RoboMaker에서 시뮬레이션 작업 시작 아래의 코드 셀을 실행하십시오.

6. To watch the simulations in AWS RoboMaker, run the code cell under Visualizing the simulations in RoboMaker and then choose the Simulation 1 link from the output.
AWS RoboMaker에서 시뮬레이션을 보려면 RoboMaker에서 시뮬레이션 시각화에서 코드 셀을 실행 한 다음 출력에서 시뮬레이션 1 링크를 선택하십시오.

Alternatively, you can go to the AWS RoboMaker console directly to open the simulation job.
또는 AWS RoboMaker 콘솔로 직접 가서 시뮬레이션 작업을 열 수도 있습니다.
After the simulation job is initialized, the AWS RoboMaker console makes available the following visualization utilities:
시뮬레이션 작업이 초기화되면 AWS RoboMaker 콘솔에서 다음과 같은 시각화 유틸리티를 사용할 수 있습니다.
Gazebo: an emulation of 3D worlds for simulating autonomous vehicle in the chosen track.
선택한 트랙에서 자율 주행 차량을 시뮬레이션하기위한 3D 세계의 에뮬레이션입니다.
rqt: Qt-based framework and plugins for ROS GUI development.
ROS GUI 개발을위한 Qt 기반 프레임 워크 및 플러그인.
ivis: ROS visualizer for displaying the field of vision as captured by the vehicle's front-facing camera.
차량의 전면 카메라로 촬영 한 시야를 표시하는 ROS 시각화 장치.
Terminal: A terminal application to provide command line access on the simulation job host.
시뮬레이션 작업 호스트에서 명령 줄 액세스를 제공하는 터미널 응용 프로그램입니다.
a. To view your vehicle learning in the 3D simulation, double-click or tap Gazebo.
3D 시뮬레이션에서 차량 학습을 보려면 두 번 클릭하거나 Gazebo를 누릅니다.
You watch the simulated vehicle navigate along the track in repeated trials starting from the starting point and ending at going off-track or reaching the finishing line. In the beginning, the vehicle can stay on the track briefly. As time goes on, it learns to stay on the track longer.
시뮬레이트 된 차량이 출발점에서 출발하여 오프 트랙으로 이동하거나 피니시 라인에 도달하는 반복 된 시도에서 트랙을 따라 탐색하는 것을 보았습니다. 처음에는 차량이 트랙에 잠시 머무를 수 있습니다. 시간이 지남에 따라 트랙에 더 오래 머무르는 법을 배웁니다.
b. To access rqt utilities, double-click or tap rqt and choose a plugin.
rqt 유틸리티에 액세스하려면 두 번 클릭하거나 rqt를 누르고 플러그인을 선택하십시오.

For more information about the plugins, see AWS RoboMaker plugins.
플러그인에 대한 자세한 내용은 AWS RoboMaker 플러그인을 참조하십시오.
c. To view the front-facing vision of the vehicle, double-click or tap rvis. Choose Add to create a visualization. And then choose the By topic tab, scroll down to choose/camera/zed/rgb/image_rec_color/Image, choose OK.
차량의 앞을 향한 시야를 보려면 두 번 클릭하거나 rvis를 누릅니다. 추가를 선택하여 시각화를 만듭니다. 그런 다음 항목 별 탭을 선택하고 /cr/zed/rgb/ image_rec_color / Image를 선택하여 아래로 스크롤 한 다음 확인을 선택하십시오.
d. To use the terminal, double-click or tap Terminal to open a terminal window on the simulation job host and type appropriate shell command.
터미널을 사용하려면 더블 클릭하거나 터미널을 눌러 시뮬레이션 작업 호스트에서 터미널 창을 열고 적절한 쉘 명령을 입력하십시오.

With the simulation job host terminal opened, you can call Linux shell commands to view (more or tail) the logs or performing other operations.
시뮬레이션 작업 호스트 터미널이 열린 상태에서 Linux 셸 명령을 호출하여 로그를 보거나 (또는 더 많이) 로그를 보거나 다른 작업을 수행 할 수 있습니다.
To view the reward of the last 10 steps in the simulation logs, you can type the following shell command in the terminal:
시뮬레이션 로그에서 마지막 10 단계의 보상을 보려면 터미널에 다음과 같은 쉘 명령을 입력 할 수 있습니다.
tail tmp/simulation-logs/stdout_and_stderr
7. To visualize the training performance, run the two code cells under Plot metrics for training job. When all is done successfully, you see a plot of Training reward vs Episode # similar to the following.
교육 성능을 시각화하려면 교육 작업을위한 Plot 메트릭 아래의 두 코드 셀을 실행하십시오. 모든 것이 성공적으로 완료되면 교육 보상과 에피소드 #의 음모가 다음과 유사하게 나타납니다.

In this particular example, the training reward appears to start to plateau. Perhaps more data are needed to verify if it's true. If the training job is running, you can run the code cell under Plot metrics for training job again to include more recent data into the plot. If they persist, the onset of large fluctuations can indicate certain deficiency in the reward function. Thus, you might update the reward function definition. In any case, you need to collect more data with more training.
이 특별한 예에서 교육 보상은 고원에 서기 시작합니다. 아마도 사실인지 확인하기 위해 더 많은 데이터가 필요합니다. 교육 작업이 실행중인 경우 최신 데이터를 플롯에 포함 시키려면 교육용 작업 메트릭에서 코드 셀을 다시 실행할 수 있습니다. 그것이 지속된다면 큰 변동의 시작은 보상 기능의 특정 결함을 나타낼 수 있습니다. 따라서 보상 기능 정의를 갱신 할 수 있습니다. 어떤 경우 든 더 많은 교육을 통해 더 많은 데이터를 수집해야합니다.
After training has elapsed the specified amount of time, you can locate the trained model artifacts in the training job's S3 bucket, e.g., s3://<bucket>/<sagemaker-training-job-name>/output/model.tar.gz. Download the model artifacts file, copy it to a USB drive and then transfer the file to your AWS DeepRacer vehicle's compute module.
지정된 시간이 경과 한 후에는 교육 작업의 S3 버켓에서 훈련 된 모델 아티팩트 (예 : s3 : // <bucket> / <sagemaker-training-job-name> / output / models.tar)를 찾을 수 있습니다. gz. 모델 아티팩트 파일을 다운로드하여 USB 드라이브에 복사 한 다음 파일을 AWS DeepRacer 차량의 컴퓨팅 모듈로 전송하십시오.
To clean up when you're done with training and no longer need the AWS RoboMaker and Amazon SageMaker resources, run the two code cells under Clean Up.
교육을 마치고 더 이상 AWS RoboMaker 및 Amazon SageMaker 리소스가 필요 없으면 정리하려면 Clean Up 아래의 두 코드 셀을 실행하십시오.
To evaluate the model that has been trained thus far, run the code cell under Evaluation.
지금까지 교육을받은 모델을 평가하려면 평가에서 코드 셀을 실행하십시오.
If successful, a simulation job is created for the task in AWS RoboMaker. Make note of the job name in the output below the code cell. You may need it to open the simulation job in the AWS RoboMaker console. This simulation job is similar to the simulation job for training. It provides the same utilities for you view the evaluation in progress in the AWS RoboMaker console. In particular, you can watch the evaluation trials in Gazebo.
성공하면 AWS RoboMaker에서 해당 작업에 대한 시뮬레이션 작업이 생성됩니다. 코드 셀 아래의 출력에서 작업 이름을 기록하십시오. AWS RoboMaker 콘솔에서 시뮬레이션 작업을 열 때 필요할 수 있습니다. 이 시뮬레이션 작업은 교육을위한 시뮬레이션 작업과 유사합니다. AWS RoboMaker 콘솔에서 진행중인 평가를 볼 수있는 동일한 유틸리티를 제공합니다. 특히 Gazebo에서 평가판을 볼 수 있습니다.
When you're done with evaluating the model and want to terminate the simulation application, run the code cell under Clean Up Simulation Application Resource.
모델 평가를 마치고 시뮬레이션 애플리케이션을 종료하려면 시뮬레이션 시뮬레이션 애플리케이션 리소스 정리 아래에서 코드 셀을 실행하십시오.