요즘은 open ai cook book 의 예제들을 살펴 보고 있습니다. 이 cookbook 페이지는 이곳입니다.
https://github.com/openai/openai-cookbook
GitHub - openai/openai-cookbook: Examples and guides for using the OpenAI API
Examples and guides for using the OpenAI API. Contribute to openai/openai-cookbook development by creating an account on GitHub.
github.com
여기서 Embeddings의 Text comparison examples 페이지에 있는 Question_answering_using_embedings.ipynb 가 오늘 공부할 내용입니다.
여기에서 다루는 것은 GPT-3에게 소스 정보를 제공하고 그 안에서 GPT-3가 내용을 검색해서 답변을 하도록 하는 방법을 설명합니다.
예를 들어 어떤 사람이 10년 넘게 여기 저기 다니면서 찍은 수천장의 사진이 있는데 그 중에서 내가 Florida 해변에서 찍은 사진을 찾고 싶을 때..
그냥 GPT-3 나 ChatGPT 에게 찾아 달라고 하면 수 많은 인터넷 정보에서 사진들의 메타 데이터를 검색해서 찾을 테니 시간도 많이 걸리고 내가 아닌 다른 사람이 인터넷에 올린 사진을 보여 줄 수도 있습니다.
이런 경우 내 사진이 있는 폴더 정보를 제공하면서 이 안에서 찾아 보라고 얘기할 수 있겠죠.
그러면 정확히 내 사진들 속에서만 검색을 해서 보여 줄 겁니다. 리소스 사용도 저렴하게 이뤄 질 수 있겠죠.
이렇게 정답이 있는 소스 문서를 제공함으로서 더 안정적이고 정확한 답변을 얻어야 할 필요성이 있을 때 사용할 수 있는 예제 입니다.
이 예제 에서는 2020년 하계 올림픽에 대한 위키피디아 글을 사용합니다.
참고로 이 데이터 수집 과정에 대한 소스 코드는 이곳에 있습니다. https://github.com/openai/openai-cookbook/blob/1b21dcd6e9c9cfb4d6f0d64f1106d7353ef65c40/examples/fine-tuned_qa/olympics-1-collect-data.ipynb
GitHub - openai/openai-cookbook: Examples and guides for using the OpenAI API
Examples and guides for using the OpenAI API. Contribute to openai/openai-cookbook development by creating an account on GitHub.
github.com
위 데이터 수집 과정까지 다 지금 알아둘 필요는 없을 것 같아서 저는 다시 원래 페이지에 있는 내용을 다룰 겁니다.
오늘 공부할 내용은 이 페이지에 있습니다.
GitHub - openai/openai-cookbook: Examples and guides for using the OpenAI API
Examples and guides for using the OpenAI API. Contribute to openai/openai-cookbook development by creating an account on GitHub.
github.com
우선 이곳에서 첫번째로 보여주는 소스코드 부분은 이렇습니다.
import numpy as np
import openai
import pandas as pd
import pickle
import tiktoken

COMPLETIONS_MODEL = "text-davinci-003"
EMBEDDING_MODEL = "text-embedding-ada-002"
위의 코드는 다음과 같이 각 줄마다 설명됩니다.
- import numpy as np: NumPy 라이브러리를 가져옵니다. NumPy는 과학적 계산을 위한 파이썬 패키지로, 배열과 행렬 연산에 유용합니다.
- import openai: OpenAI 라이브러리를 가져옵니다. OpenAI는 인공지능 모델과 API를 사용할 수 있는 플랫폼입니다.
- import pandas as pd: pandas 라이브러리를 가져옵니다. pandas는 데이터 분석과 조작을 위한 파이썬 패키지로, 데이터를 효율적으로 다룰 수 있는 기능을 제공합니다.
- import pickle: pickle 라이브러리를 가져옵니다. pickle은 객체를 직렬화하고 복원하기 위한 파이썬 표준 라이브러리입니다.
- import tiktoken: tiktoken 라이브러리를 가져옵니다. tiktoken은 텍스트를 토큰화하는 데 사용되는 라이브러리입니다.
- COMPLETIONS_MODEL = "text-davinci-003": COMPLETIONS_MODEL 변수를 정의하고, 값으로 "text-davinci-003"을 할당합니다. 이는 OpenAI의 대화형 작업을 위한 모델을 나타냅니다.
- EMBEDDING_MODEL = "text-embedding-ada-002": EMBEDDING_MODEL 변수를 정의하고, 값으로 "text-embedding-ada-002"를 할당합니다. 이는 OpenAI의 텍스트 임베딩 모델을 나타냅니다.
numpy, openai 그리고 pandas 모듈을 이전 글에서 다루었습니다.
pickle과 tiktoken 모듈이 처음 보는 모듈이네요.
설명을 보면 이 pickle은 python object hierarchy를 byte stream 으로 혹은 그 반대로 convert 하는 모듈이라고 되어 있습니다.
https://docs.python.org/3/library/pickle.html
pickle — Python object serialization
Source code: Lib/pickle.py The pickle module implements binary protocols for serializing and de-serializing a Python object structure. “Pickling” is the process whereby a Python object hierarchy is...
docs.python.org
데이터 구조를 byte stream으로 변환하면 저장하거나 네트워크로 전송할 수 있습니다.
이런 것을 marshalling 이라고 하고 그 반대를 unmarshalling 이라고 합니다.
이런 작업을 할 수 있는 모듈은 아래 세가지가 있습니다.
marshal은 셋 중 가장 오래된 모듈이다. 이것은 주로 컴파일된 바이트코드 또는 인터프리터가 파이썬 모듈을 가져올 떄 얻는 .pyc 파일을 읽고 쓰기 위해 존재한다. 때문에 marshal로 객체를 직렬화할 수 있더라도, 이를 추천하지는 않는다.
json 모듈은 셋 중 가장 최신의 모듈이다. 이를 통해 표준 JSON 파일로 작업을 할 수 있다. json 모듈을 통해 다양한 표준 파이썬 타입(bool, dict, int, float, list, string, tuple, None)을 직렬화, 역직렬화할 수 있다. json은 사람이 읽을 수 있고, 언어에 의존적이지 않다는 장점이 있다.
pickle 모듈은 파이썬에서 객체를 직렬화 또는 역직렬화하는 또 다른 방식이다. json 모듈과는 다르게 객체를 바이너리 포맷으로 직렬화한다. 이는 결과를 사람이 읽을 수 없다는 것을 의미한다. 그러나 더 빠르고, 사용자 커스텀 객체 등 더 다양한 파이썬 타입으로 동작할 수 있음을 의미한다.
이 내용은 아래 블로그에 자세하게 정리 돼 있어서 도움이 됐습니다.
[Python] pickle 모듈 - 파이썬에서 객체를 영속화하는 방법
다음 글(https://realpython.com/python-pickle-module)을 번역, 정리한 글입니다. 목차 · 파이썬의 직렬화 · 파이썬 pickle 모듈 내부 · 파이썬 pickle 모듈의 프로토콜 포맷 · Picklable and Unpicklable Types · Pickled Ob
scshim.tistory.com
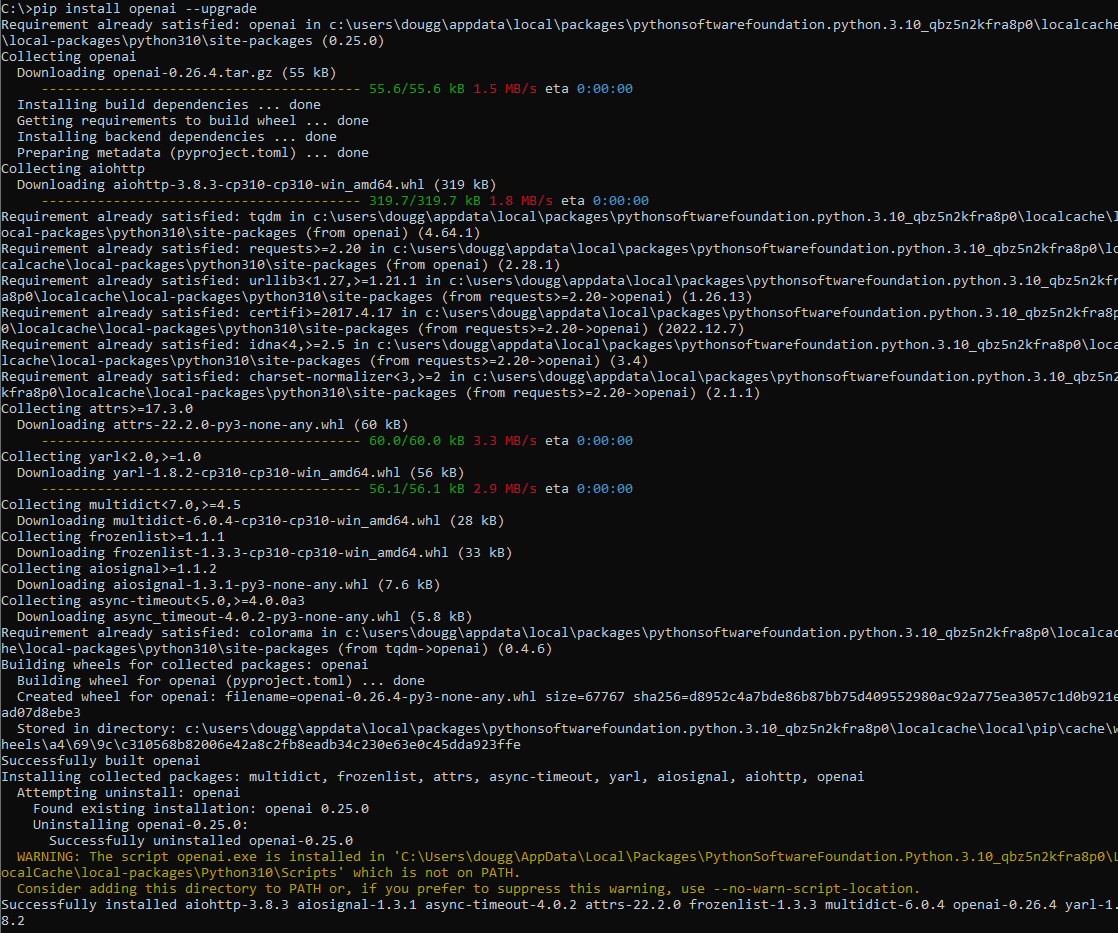
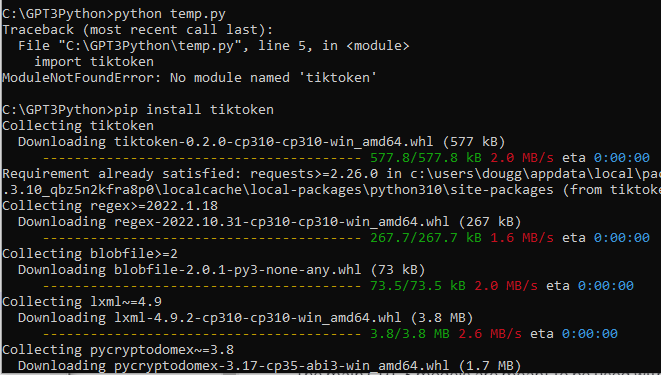
그 다음 새로운 모듈은 tiktoken 인데요 저의 경우는 이 모듈이 인스톨 되어 있지 않다고 에러가 나와서 pip install tiktoken 을 사용해서 install 했습니다.
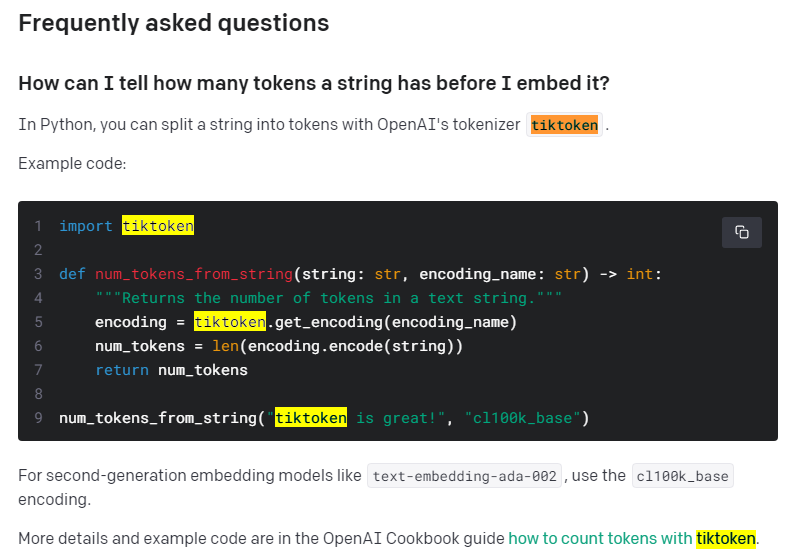
이 tiktoken 모듈은 openai API 페이지의 Guides 의 Embeddings 페이지에서 설명 됐습니다. Limitations & risks 부분을 보시면 됩니다.
https://platform.openai.com/docs/guides/embeddings/limitations-risks
OpenAI API
An API for accessing new AI models developed by OpenAI
platform.openai.com
더 자세히 보시려면 위 페이지에 있는 링크들을 따라 가시면 이 tiktoken 에 대한 설명과 예제가 있는 페이지들을 보실 수 있습니다.
모듈에 대해 대충 알았으니 첫번째 예제를 만들어서 실행 해 보겠습니다.
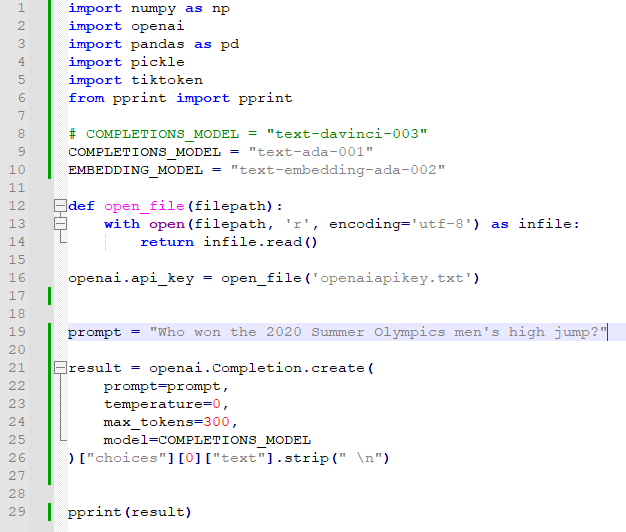
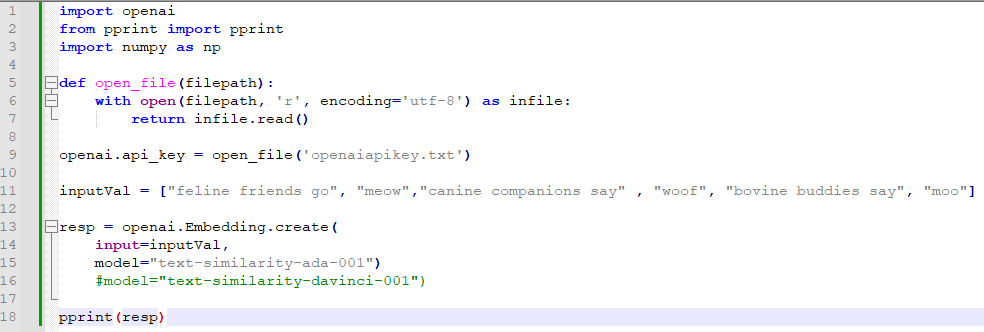
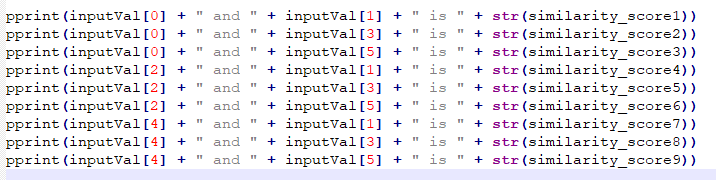
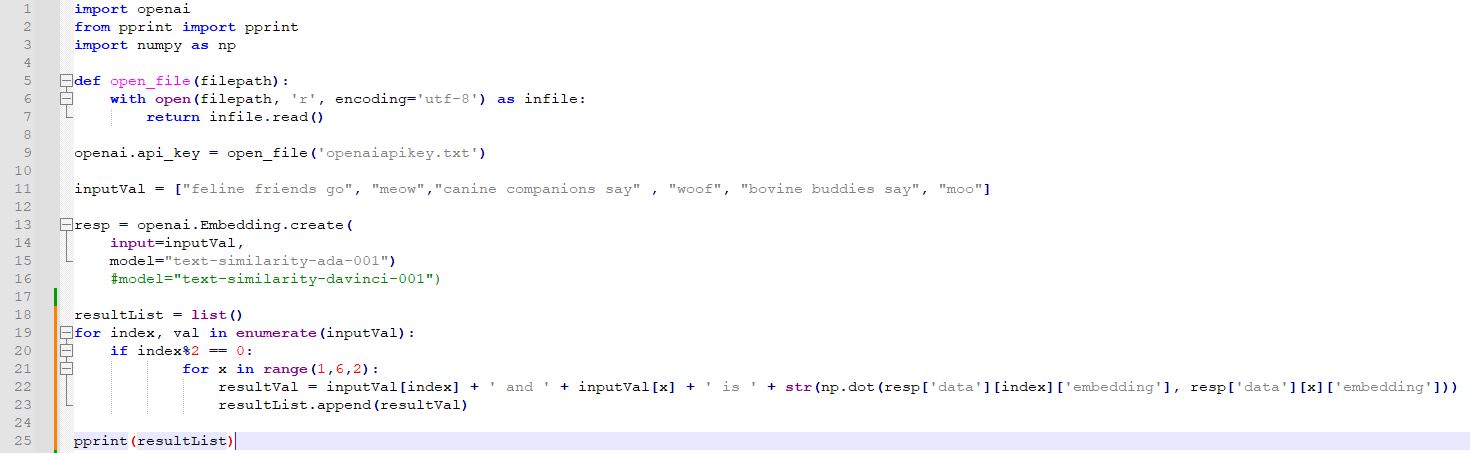
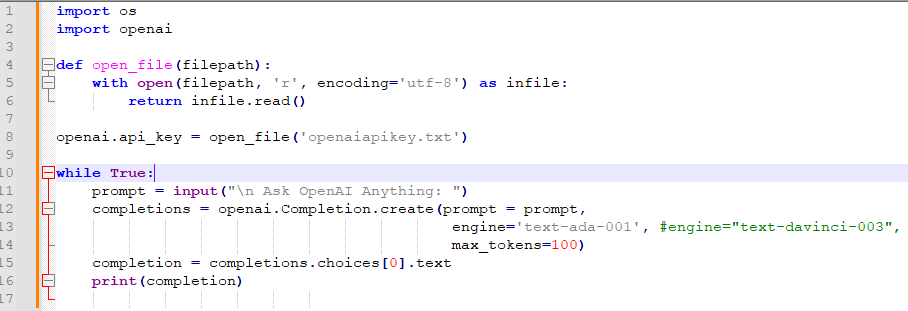
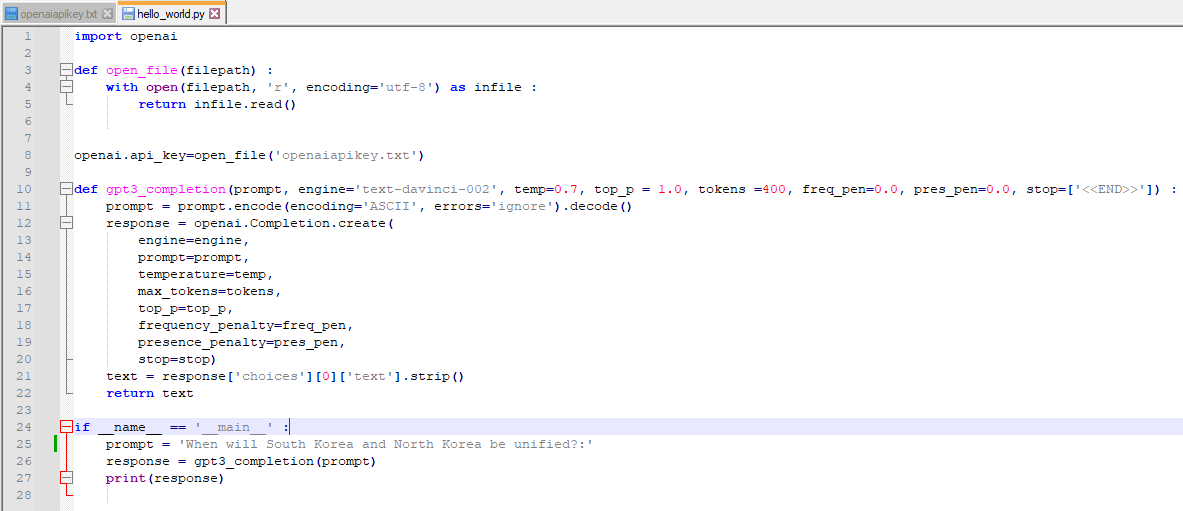
첫번째 예제를 약간 변형해서 만들어 봤습니다.
우선 COMPETIONS_MODEL 변수에 davinci-003 모델 대신 ada-001 모듈을 넣었습니다.
답변 내용보다 api 테스트용이라서 비용이 저렴하고 속도가 빠른 모듈을 사용하겠습니다.
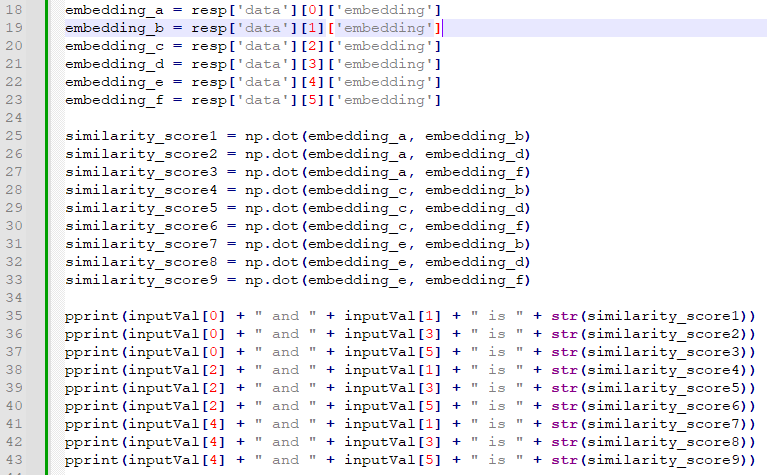
그 다음은 계속 사용했던 api key 를 제공하는 부분입니다. (12 ~ 16번째 줄)
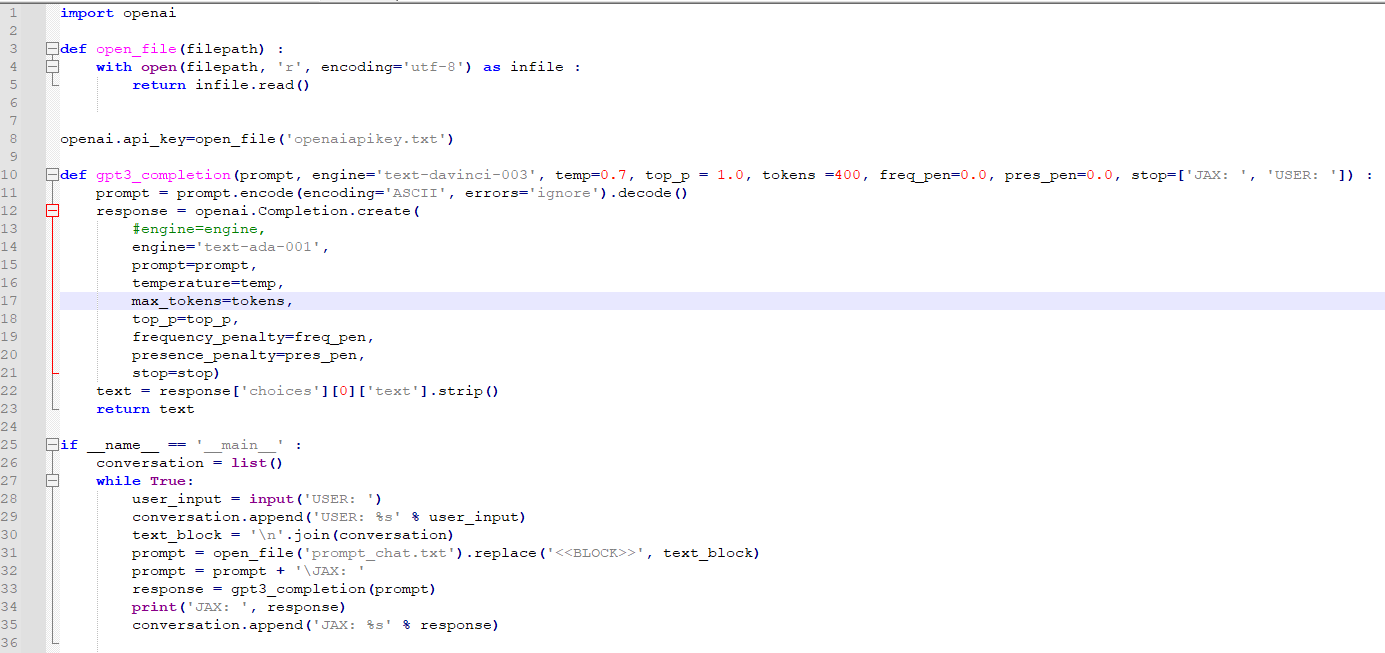
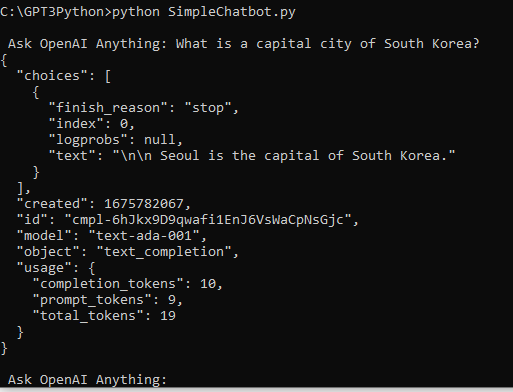
그 다음 코드를 보면 prompt 에는 2020년 하계 올림픽 남자 높이 뛰기 부문에서 누가 우승 했는가를 물어보는 문장이 있습니다.
그리고 openai.Completion.create() api 를 사용해서 GPT-3 에게 이 질문을 하고 그 응답을 받습니다.
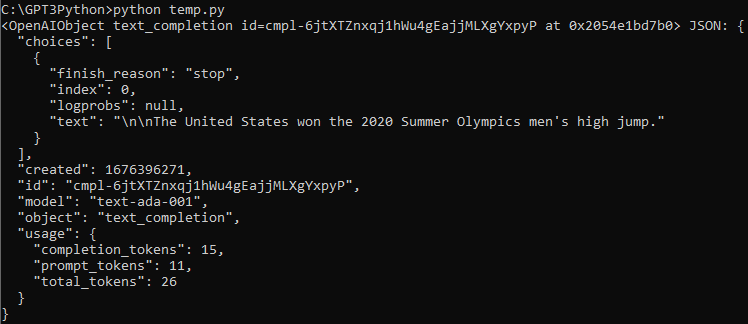
여기서 뒤에 ["choices"][0]["text"].strip(" \n") 부분을 붙이지 않으면 응답은 JSON 형식으로 출력 됩니다.
여기에서 응답 부분인 text 부분만 보기 위해서 이 부분을 넣은 겁니다.
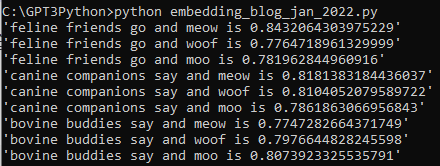
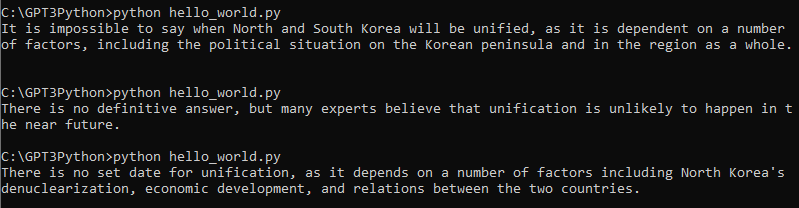
이것을 프린트 하면 아래와 같습니다.

미국이 2020년 하계 올림픽 높이 뛰기 부문에서 우승 했다고 나옵니다.
이 cookbook 예제 페이지에서는 아래와 같이 나왔다고 하네요.

내가 사용한 모델(ada-001)과 이 예제가 사용한 모델(davinci-003)이 다르기 때문에 답변이 다른 겁니다.
하여간 둘 다 오답입니다.
이렇게 Completion으로 일반적인 방법으로 질문 했을 때는 오답이 나옵니다.
여기서 문제는 이 GPT-3 가 잘 모르면서 아무 대답이나 했다는 겁니다.
이렇게 되면 GPT-3의 답변을 신뢰할 수가 없겠죠.
이것을 방지하기 위해 prompt를 이렇게 바꾸겠습니다.
"""Answer the question as truthfully as possible, and if you're unsure of the answer, say "Sorry, I don't know".

Q: Who won the 2020 Summer Olympics men's high jump?
A:"""
질문하기 전에 이렇게 요청을 했습니다.
가능하면 진실을 이야기 하고 확실하게 알지 못한다면 Sorry, I don't know라고 대답하라.
이렇게 해 두고 2020년 하계 올림픽 높이 뛰기 우승은 누가 했느냐고 묻습니다.
이렇게 했을 경우 제가 ada-001 모델을 사용했을 경우 Sorry, I don't know. 라는 답변을 얻었습니다.
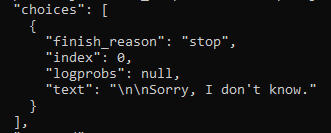
davinci-003 모델을 사용한 이 예제에서도 Sorry, I don't know라는 답변을 얻었다고 하네요.
GPT-3는 2020년 하계 올림픽에서 누가 높이 뛰기에서 우승을 했는지 확실히 알지 못하는 겁니다.
그 다음 예제에서는 이런 prompt를 사용했습니다.
prompt = """Answer the question as truthfully as possible using the provided text, and if the answer is not contained within the text below, say "I don't know"

Context:
The men's high jump event at the 2020 Summer Olympics took place between 30 July and 1 August 2021 at the Olympic Stadium.
33 athletes from 24 nations competed; the total possible number depended on how many nations would use universality places
to enter athletes in addition to the 32 qualifying through mark or ranking (no universality places were used in 2021).
Italian athlete Gianmarco Tamberi along with Qatari athlete Mutaz Essa Barshim emerged as joint winners of the event following
a tie between both of them as they cleared 2.37m. Both Tamberi and Barshim agreed to share the gold medal in a rare instance
where the athletes of different nations had agreed to share the same medal in the history of Olympics.
Barshim in particular was heard to ask a competition official "Can we have two golds?" in response to being offered a
'jump off'. Maksim Nedasekau of Belarus took bronze. The medals were the first ever in the men's high jump for Italy and
Belarus, the first gold in the men's high jump for Italy and Qatar, and the third consecutive medal in the men's high jump
for Qatar (all by Barshim). Barshim became only the second man to earn three medals in high jump, joining Patrik Sjöberg
of Sweden (1984 to 1992).

Q: Who won the 2020 Summer Olympics men's high jump?
A:"""
이 prompt에서는 2020년 하계 올림픽 남자 높이뛰기 부문 금메달 리스트가 두명이 된 사연을 소개 하면서 그 이름도 거론하고 있습니다.
이렇게 내용을 제공하고 GPT-3에게 누가 우승을 했는지 물어 봤습니다.
제가 사용한 ada-001 모델은 간단하게 I don't know 라고 응답 했네요.

모델을 davinci-003로 바꿔 보았습니다.

답변은 이렇게 바뀌었습니다.

역시 비싼 모델이 좋네요.
openai cookbook에서도 위와 같은 답변을 얻었습니다.
여기서는 제대로 된 답을 얻기 위해서 그 배경 정보를 제공하는 방법을 사용했습니다.
대략 10줄 정도 되는 문장을 제공했는데요.
그런데 제가 처음에 얘기했던 10년치 사진에서 찾는 방법 같이 방대한 양의 정보를 제공해야 할 경우는 어떻게 할까요?
이런 경우를 위해서 이 페이지에서는 Embeddings를 사용하는 방법을 보여줄 것입니다.
작동 방법은 두단계로 이루어 지는데 첫번째는 관련된 정보를 검색한 후 이것을 기반으로 질문에 맞는 답변을 작성하는 겁니다.
첫번째 단계는 Embeddings API를 사용하고 두번째 단계는 Completions API를 사용합니다.
아래와 같은 스텝들을 밟게 됩니다.
The steps are:
- Preprocess the contextual information by splitting it into chunks and create an embedding vector for each chunk.
- 컨텍스트 정보를 청크로 분할하여 전처리하고 각 청크에 대한 임베딩 벡터를 생성합니다.
- On receiving a query, embed the query in the same vector space as the context chunks and find the context embeddings which are most similar to the query.
- 쿼리를 수신하면 컨텍스트 청크와 동일한 벡터 공간에 쿼리를 포함하고 쿼리와 가장 유사한 컨텍스트 포함을 찾습니다.
- Prepend the most relevant context embeddings to the query prompt.
- 가장 관련성이 높은 컨텍스트 임베딩을 쿼리 프롬프트 앞에 추가합니다.
- Submit the question along with the most relevant context to GPT, and receive an answer which makes use of the provided contextual information.
- 가장 관련성이 높은 컨텍스트와 함께 질문을 GPT에 제출하고 제공된 컨텍스트 정보를 활용하는 답변을 받습니다.
참고로 지금까지 진행한 코드는 아래와 같습니다.
import numpy as np
import openai
import pandas as pd
import pickle
import tiktoken
from pprint import pprint

# COMPLETIONS_MODEL = "text-davinci-003"
COMPLETIONS_MODEL = "text-ada-001"
EMBEDDING_MODEL = "text-embedding-ada-002"

def open_file(filepath):
    with open(filepath, 'r', encoding='utf-8') as infile:
        return infile.read()

openai.api_key = open_file('openaiapikey.txt')


prompt = """Answer the question as truthfully as possible using the provided text, and if the answer is not contained within the text below, say "I don't know"

Context:
The men's high jump event at the 2020 Summer Olympics took place between 30 July and 1 August 2021 at the Olympic Stadium.
33 athletes from 24 nations competed; the total possible number depended on how many nations would use universality places
to enter athletes in addition to the 32 qualifying through mark or ranking (no universality places were used in 2021).
Italian athlete Gianmarco Tamberi along with Qatari athlete Mutaz Essa Barshim emerged as joint winners of the event following
a tie between both of them as they cleared 2.37m. Both Tamberi and Barshim agreed to share the gold medal in a rare instance
where the athletes of different nations had agreed to share the same medal in the history of Olympics.
Barshim in particular was heard to ask a competition official "Can we have two golds?" in response to being offered a
'jump off'. Maksim Nedasekau of Belarus took bronze. The medals were the first ever in the men's high jump for Italy and
Belarus, the first gold in the men's high jump for Italy and Qatar, and the third consecutive medal in the men's high jump
for Qatar (all by Barshim). Barshim became only the second man to earn three medals in high jump, joining Patrik Sjöberg
of Sweden (1984 to 1992).

Q: Who won the 2020 Summer Olympics men's high jump?
A:"""

result = openai.Completion.create(
    prompt=prompt,
    temperature=0,
    max_tokens=300,
    top_p=1,
    frequency_penalty=0,
    presence_penalty=0,
    model=COMPLETIONS_MODEL
)["choices"][0]["text"].strip(" \n")


pprint(result)
1) Preprocess the document library
이제 문서를 제공하고 그 안에서 GPT-3 에게 찾아보라고 할 건데요.
# We have hosted the processed dataset, so you can download it directly without having to recreate it.
# This dataset has already been split into sections, one row for each section of the Wikipedia page.

df = pd.read_csv('https://cdn.openai.com/API/examples/data/olympics_sections_text.csv')
df = df.set_index(["title", "heading"])
print(f"{len(df)} rows in the data.")
df.sample(5)
문서는 이미 작성돼 있는 olympics_sections_text.csv를 원격으로 불러 옵니다. 이때 Pandas의 read.csv() 함수를 사용합니다.
이 csv 파일에는 title, heading, content, tokens라는 필드가 있고 그 안에 각각 정보들이 있습니다.
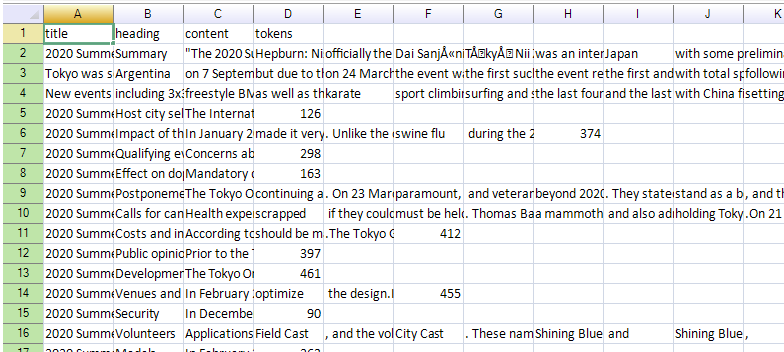
다음 줄에서는 pandas의 dataframe 의 set_index()를 사용해서 title과 heading 컬럼을 인덱스로 설정합니다.
그 다음은 dataframe에 있는 데이터가 총 몇줄인지를 출력하고 그 다음에 그 중 5개를 추리는 일을 합니다.
df.sample(5) 은 랜덤하게 5개의 줄만 추리는 일을 합니다.
전체 소스코드를 보면 이렇습니다.
import pandas as pd
from pprint import pprint

# We have hosted the processed dataset, so you can download it directly without having to recreate it.
# This dataset has already been split into sections, one row for each section of the Wikipedia page.

df = pd.read_csv('https://cdn.openai.com/API/examples/data/olympics_sections_text.csv')
df = df.set_index(["title", "heading"])
print(f"{len(df)} rows in the data.")
result = df.sample(5)
pprint(result)
아직 openai도 사용하지 않았고 데이터를 다루기 위해서 pandas 모듈만 사용했습니다.
여기까지를 실행하면 아래와 같이 나옵니다.
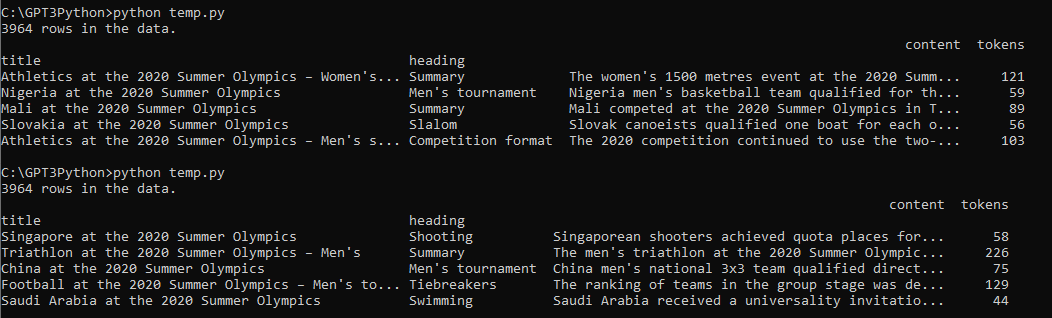
이 문서에는 총 3964 개의 row들이 있고 sample(5)를 통해서 random 하게 뽑은 데이터는 위와 같이 첫번째 실행과 두번째 실행이 각각 다릅니다.
이제 데이터 세트가 확보 됐으니 각 데이터 마다 임베딩 값을 받아 오는 작업을 해야 합니다.
def get_embedding(text: str, model: str=EMBEDDING_MODEL) -> list[float]:
result = openai.Embedding.create(
model=model,
input=text
)
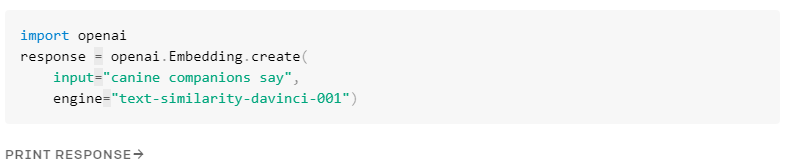
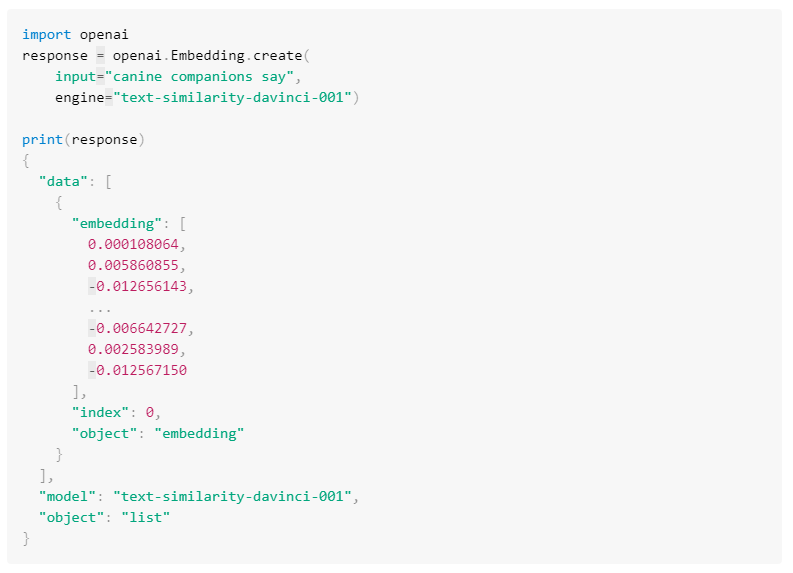
return result["data"][0]["embedding"]get_embedding() 이라는 함수를 만들었습니다.
질문과 모델을 openai.Embedding.create() api 를 통해서 전달하고 그 중 embedding에 해당 하는 데이터만 list 형식으로 return 합니다.
def compute_doc_embeddings(df: pd.DataFrame) -> dict[tuple[str, str], list[float]]:
    """
    Create an embedding for each row in the dataframe using the OpenAI Embeddings API.

    Return a dictionary that maps between each embedding vector and the index of the row that it corresponds to.
    """
    return {
        idx: get_embedding(r.content) for idx, r in df.iterrows()
    }
compute_doc_embeddings() 라는 함수 입니다.
위의 코드는 다음과 같이 각 줄마다 설명됩니다.
- def compute_doc_embeddings(df: pd.DataFrame) -> dict[tuple[str, str], list[float]]:: compute_doc_embeddings 함수를 정의합니다. 이 함수는 pandas DataFrame을 입력받고, 각 행에 대한 임베딩을 OpenAI Embeddings API를 사용하여 생성합니다. 반환값은 각 임베딩 벡터와 해당하는 행 인덱스를 매핑하는 딕셔너리입니다. 반환값의 타입은 (str, str) 튜플을 키로하고, float 값들의 리스트를 값으로 갖는 딕셔너리입니다.
- return {idx: get_embedding(r.content) for idx, r in df.iterrows()}: 딕셔너리 컴프리헨션을 사용하여 임베딩 딕셔너리를 생성하여 반환합니다. df.iterrows()를 사용하여 DataFrame의 각 행에 대해 순회하며 행 인덱스와 행의 content를 get_embedding() 함수에 전달하여 임베딩을 얻습니다. 이 임베딩을 해당하는 행 인덱스와 매핑하여 딕셔너리에 추가합니다.
여기서는 pandas의 dataframe으로 확보된 데이터를 get_embedding() 함수를 호출하면서 전달합니다.
여기서 return 값은 임베딩 벡터와 이에 해당하는 행의 인덱스를 매핑하는 사전(dict) 를 반환합니다.
tuple은 순서가 있는 객체의 집합을 나타내는 데이터 타입입니다. 새로운 요소를 추가하거나 기존 요소를 삭제할 수 없습니다.
dict 는 key, value 로 이루어져 있습니다. 접근해서 수정이 가능합니다.
df.itterrows()는 행에 대해서 순환 반복 한다는 겁니다.
이렇게 되면 데이터세트의 각 행마다 get_embedding()을 호출하고 거기에 대한 embedding 값을 받게 됩니다.
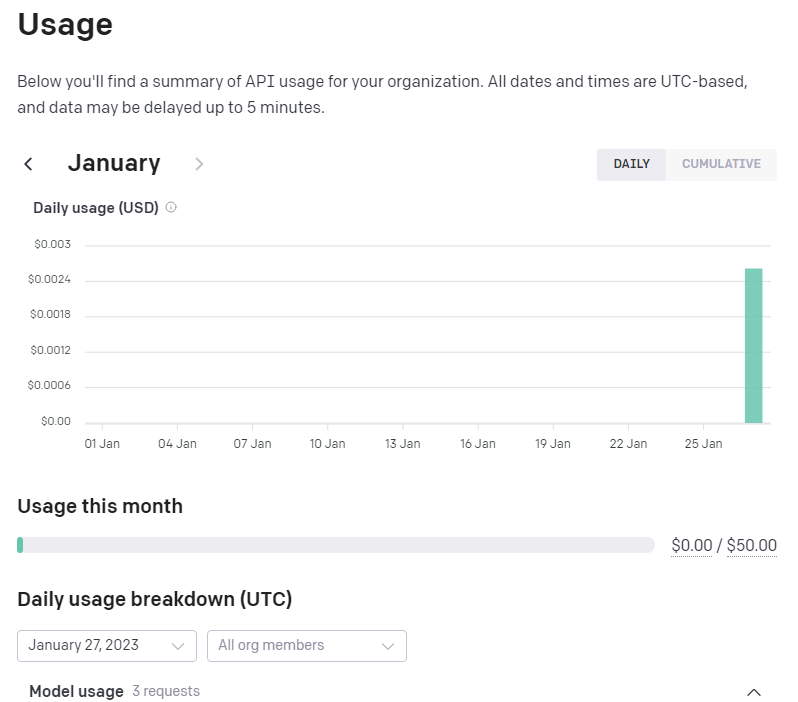
행이 총 3964였으니 openai.Embedding.create() api가 그만큼 호출 된다는 얘기이고 또 그만큼 과금 된다는 얘기이네요.
얼마가 과금 되는지는 나중에 보기로 하고 다음 코드를 살펴 보겠습니다.
def load_embeddings(fname: str) -> dict[tuple[str, str], list[float]]:
    """
    Read the document embeddings and their keys from a CSV.

    fname is the path to a CSV with exactly these named columns:
        "title", "heading", "0", "1", ... up to the length of the embedding vectors.
    """

    df = pd.read_csv(fname, header=0)
    max_dim = max([int(c) for c in df.columns if c != "title" and c != "heading"])
    return {
           (r.title, r.heading): [r[str(i)] for i in range(max_dim + 1)] for _, r in df.iterrows()
}- def load_embeddings(fname: str) -> dict[tuple[str, str], list[float]]:: load_embeddings 함수를 정의합니다. 이 함수는 CSV에서 문서 임베딩과 그에 해당하는 키를 읽어옵니다. fname은 다음과 같은 이름을 가진 열이 정확히 포함된 CSV 파일의 경로입니다: "title", "heading", "0", "1", ..., 임베딩 벡터의 길이까지.
- df = pd.read_csv(fname, header=0): pd.read_csv() 함수를 사용하여 주어진 CSV 파일을 DataFrame으로 읽어옵니다. header=0을 설정하여 첫 번째 행을 열 이름으로 사용합니다.
- max_dim = max([int(c) for c in df.columns if c != "title" and c != "heading"]): DataFrame의 열 중 "title"과 "heading"이 아닌 열들에 대해 정수로 변환한 값을 리스트로 만든 후, 그 중 가장 큰 값을 max_dim 변수에 할당합니다. 이는 임베딩 벡터의 최대 차원을 결정합니다.
- return {(r.title, r.heading): [r[str(i)] for i in range(max_dim + 1)] for _, r in df.iterrows()}: 딕셔너리 컴프리헨션을 사용하여 임베딩 딕셔너리를 생성하여 반환합니다. df.iterrows()를 사용하여 DataFrame의 각 행에 대해 순회하며 행의 "title"과 "heading"을 키로, 열 이름에 해당하는 인덱스를 사용하여 값을 추출하여 임베딩 벡터로 사용합니다. 이를 키와 값을 매핑하여 딕셔너리에 추가합니다.
load_embeddings() 함수에서는 fname (파일이름)을 입력값으로 받습니다. 그리고 dirc[tuble[str,str], list[float] 형으로 계산된 값을 반환 합니다.
CSV 파일에서 key값과 거기에 해당하는 임베딩 값들을 불러 옵니다.
데이터 세트의 컬럼수 만큼 for 루프를 돌리게 되고 (title, heading 이라고 컬럼 이름이 돼 있는 행은 제외) 거기서 얻은 최대값을 max_dim 변수에 넣습니다.
그리고 반환 값은 각 행만큼 for 루프를 돌리고 그 행마다 max_dim + 1 만큼 루프를 돌려서 얻은 값을 반환하게 됩니다.
해당 파일은 아래와 같이 지정해 줍니다.
document_embeddings = load_embeddings("https://cdn.openai.com/API/examples/data/olympics_sections_document_embeddings.csv")

# ===== OR, uncomment the below line to recaculate the embeddings from scratch. ========

# document_embeddings = compute_doc_embeddings(df)
이 파일의 내용은 이렇습니다.

이 파일에는 각 행마다 embedding 값이 있습니다.
이것을 하지 않고 compute_doc_embeddings(df)를 한다면 아래 문서를 불러와서 각 행마다 openai.Embedding.create() api를 호출해서 임베딩 값을 받는 작업을 할 겁니다.
https://cdn.openai.com/API/examples/data/olympics_sections_text.csv
그러면 이 api를 3964번 호출하고 그만큼 과금이 될 겁니다.
그것을 피하게 하기 위해서 openai에서는 이미 임베딩 작업을 끝낸 아래 문서를 제공하는 것 같습니다.
document_embeddings = load_embeddings("https://cdn.openai.com/API/examples/data/olympics_sections_document_embeddings.csv")아래는 일단 샘플로 일부분만 프린트 해 본 겁니다.
# An example embedding:
example_entry = list(document_embeddings.items())[0]
print(f"{example_entry[0]} : {example_entry[1][:5]}... ({len(example_entry[1])} entries)")
지금까지의 전체 코드를 보면 이렇습니다.
import numpy as np
import openai
import pandas as pd
import pickle
import tiktoken
from pprint import pprint

# COMPLETIONS_MODEL = "text-davinci-003"
COMPLETIONS_MODEL = "text-ada-001"
EMBEDDING_MODEL = "text-embedding-ada-002"

def open_file(filepath):
    with open(filepath, 'r', encoding='utf-8') as infile:
        return infile.read()

openai.api_key = open_file('openaiapikey.txt')

# We have hosted the processed dataset, so you can download it directly without having to recreate it.
# This dataset has already been split into sections, one row for each section of the Wikipedia page.

df = pd.read_csv('https://cdn.openai.com/API/examples/data/olympics_sections_text.csv')
df = df.set_index(["title", "heading"])
print(f"{len(df)} rows in the data.")
result = df.sample(5)
pprint(result)

def get_embedding(text: str, model: str=EMBEDDING_MODEL) -> list[float]:
    result = openai.Embedding.create(
      model=model,
      input=text
    )
    return result["data"][0]["embedding"]

def compute_doc_embeddings(df: pd.DataFrame) -> dict[tuple[str, str], list[float]]:
    """
    Create an embedding for each row in the dataframe using the OpenAI Embeddings API.
    Return a dictionary that maps between each embedding vector and the index of the row that it corresponds to.
    """
    return {
        idx: get_embedding(r.content) for idx, r in df.iterrows()
    }

def load_embeddings(fname: str) -> dict[tuple[str, str], list[float]]:
    """
    Read the document embeddings and their keys from a CSV.
    fname is the path to a CSV with exactly these named columns:
        "title", "heading", "0", "1", ... up to the length of the embedding vectors.
    """

    df = pd.read_csv(fname, header=0)
    max_dim = max([int(c) for c in df.columns if c != "title" and c != "heading"])
    return {
           (r.title, r.heading): [r[str(i)] for i in range(max_dim + 1)] for _, r in df.iterrows()
    }

document_embeddings = load_embeddings("https://cdn.openai.com/API/examples/data/olympics_sections_document_embeddings.csv")
# ===== OR, uncomment the below line to recaculate the embeddings from scratch. ========
# document_embeddings = compute_doc_embeddings(df)

# An example embedding:
example_entry = list(document_embeddings.items())[0]
print(f"{example_entry[0]} : {example_entry[1][:5]}... ({len(example_entry[1])} entries)")
우선 25번째줄 pprint(result) 는 이전에 설명했던 것이고 그 아래 코드들은 이와는 별도의 코드 블럭입니다.
document_embeddings = load_embeddings("https://cdn.openai.com/API/examples/data/olympics_sections_document_embeddings.csv")
# ===== OR, uncomment the below line to recaculate the embeddings from scratch. ========
# document_embeddings = compute_doc_embeddings(df)
load_embeddings() 함수에 위의 csv 파일을 넘겨 주면 load_embeddings() 함수에서는 이 파일을 읽어서 키값과 임베딩 값들을 dict 형으로 반환합니다.
만약 위와 같이 사용하지 않고 그 아래에 있는 document_embeddings = compute_doc_embeddings(df)를 사용했다면 21번째 줄에 있는 df를 compute_doc_embeddings() 함수로 보내서 각 행마다 임베딩 값을 얻어 오겠지만...
df = pd.read_csv('https://cdn.openai.com/API/examples/data/olympics_sections_text.csv')
df = df.set_index(["title", "heading"])
여기서는 이 작업을 하지 않고 이미 임베딩 값을 계산해서 가지고 있는 문서를 로드해서 사용하기 때문에 그 윗부분은 필요 없게 된것입니다.
하지만 제대로 작동하기 위해서는 compute_doc_embeddings(df)를 사용해서 데이터세트의 각 행마다 임베딩 값을 받아오는 절차를 거치는 것이 정석입니다.
25번째 줄의 pprint(result) 이전 단계를 제외하고 그 밑의 흐름을 살펴보면 이렇습니다.
먼저 document_embeddings 변수에 위에 명시한 csv 파일을 로딩 합니다.
이 csv 파일에는 임베딩 값이 세팅돼 있습니다.
정식적인 절차를 거치려면 21번째 줄에서 만든 df 를 compute_doc_embeddings(df) 함수로 보내고 이 함수에서는 각 행마다 get_embedding() 함수를 통해 임베딩 값을 얻습니다.
그러면 openai.Embedding.create() api는 각 행의 갯수 만큼 (3694) 호출이 되서 각 행에 맞는 임베딩 값을 매칭 시켜 줄 것입니다.
이 코드를 실행하면 아래와 같이 나옵니다.

빨간 색으로 표시된 부분이 이번에 새로 추가한 코드에서 출력한 것입니다.
# An example embedding:
example_entry = list(document_embeddings.items())[0]
print(f"{example_entry[0]} : {example_entry[1][:5]}... ({len(example_entry[1])} entries)")
해당 문서의 첫 행을 출력한 것입니다.

여기까지가 데이터 세트를 가지고 각 데이터마다 거기에 해당하는 임베딩 값을 얻는것 까지 완성 했습니다.
이제 필요한 소스데이터의 모든 행에 대해 임베딩 값을 가지고 있으니 사용자가 질문하면 의미적으로 알맞는 답을 제공할 준비가 돼 있습니다.
다음에는 이러한 사용자의 질문에 알맞는 답변을 내 놓는 작업을 하겠습니다.
2) Find the most similar document embeddings to the question embedding
해야할 작업은 일단 질문을 받으면 이 질문에 대한 임베딩을 계산하고 이와 가장 유사한 문서 섹션을 찾는 것입니다.
def vector_similarity(x: list[float], y: list[float]) -> float:
    """
    Returns the similarity between two vectors.

    Because OpenAI Embeddings are normalized to length 1, the cosine similarity is the same as the dot product.
    """
return np.dot(np.array(x), np.array(y))- def vector_similarity(x: list[float], y: list[float]) -> float:: vector_similarity 함수를 정의합니다. 이 함수는 두 벡터 간의 유사도를 반환합니다.
- return np.dot(np.array(x), np.array(y)): 두 벡터 x와 y의 유사도를 계산하여 반환합니다. np.array(x)와 np.array(y)를 사용하여 리스트를 NumPy 배열로 변환한 후, np.dot() 함수를 사용하여 두 벡터의 내적(도트 곱)을 계산합니다. OpenAI Embeddings는 길이가 1로 정규화되어 있기 때문에 코사인 유사도는 내적과 동일합니다.
첫번째 vector_similarity() 함수는 두개의 list를 입력값으로 받고 float 형식의 값을 반환합니다.
np.dot() 함수를 사용해서 두 벡터의 유사성 값을 반환 하는 것이죠.
OpenAI의 임베딩 값은 최대값이 1로 세팅 되어 있어서 np.dot()으로 하나 cosine similarity로 하나 그 값은 같습니다.
def order_document_sections_by_query_similarity(query: str, contexts: dict[(str, str), np.array]) -> list[(float, (str, str))]:
    """
    Find the query embedding for the supplied query, and compare it against all of the pre-calculated document embeddings
    to find the most relevant sections.

    Return the list of document sections, sorted by relevance in descending order.
    """
    query_embedding = get_embedding(query)

    document_similarities = sorted([
        (vector_similarity(query_embedding, doc_embedding), doc_index) for doc_index, doc_embedding in contexts.items()
    ], reverse=True)

return document_similarities- def order_document_sections_by_query_similarity(query: str, contexts: dict[(str, str), np.array]) -> list[(float, (str, str))]:: order_document_sections_by_query_similarity 함수를 정의합니다. 이 함수는 주어진 쿼리와 사전에 계산된 문서 임베딩과의 유사성을 비교하여 가장 관련성이 높은 섹션을 찾습니다. 결과로 관련성이 내림차순으로 정렬된 문서 섹션의 리스트를 반환합니다.
- query_embedding = get_embedding(query): 주어진 쿼리에 대한 임베딩을 얻어옵니다. get_embedding() 함수를 사용하여 쿼리의 임베딩 벡터를 가져옵니다.
- document_similarities = sorted([...], reverse=True): 문서 임베딩과 쿼리 임베딩 간의 유사성을 비교하여 관련성이 내림차순으로 정렬된 리스트를 생성합니다. contexts.items()를 통해 사전의 각 항목을 순회하면서 문서 인덱스와 문서 임베딩을 가져옵니다. vector_similarity() 함수를 사용하여 쿼리 임베딩과 문서 임베딩 간의 유사도를 계산하고, 결과를 튜플로 구성하여 리스트에 추가합니다.
- return document_similarities: 문서의 관련성이 내림차순으로 정렬된 문서 섹션의 리스트를 반환합니다.
그 다음 은 order_document_sections_by_query_similarity() 함수 입니다.
질문에 대한 임베딩 값을 get_embedding() 함수를 통해 받습니다.
그리고 그 값을 dict 형식으로 되어 있는 context의 item 만큼 for 루프를 돌리면서 각 행의 임베딩 값과의 유사성 값을 vector_similarity() 함수를 통해 얻어 옵니다. 그리고 그 값을 정렬 합니다.
이 정렬된 값은 document_similarities라는 변수에 담겨서 return 됩니다.
이제 질문을 던지기만 하면 됩니다.
order_document_sections_by_query_similarity("Who won the men's high jump?", document_embeddings)[:5]order_document_sections_by_query_similarity("Who won the women's high jump?", document_embeddings)[:5]지금까지의 코드는 이렇습니다.
실행되지 않는 부분은 모두 주석 처리 했습니다.
import numpy as np
import openai
import pandas as pd
import pickle
import tiktoken
from pprint import pprint

# COMPLETIONS_MODEL = "text-davinci-003"
COMPLETIONS_MODEL = "text-ada-001"
EMBEDDING_MODEL = "text-embedding-ada-002"

def open_file(filepath):
    with open(filepath, 'r', encoding='utf-8') as infile:
        return infile.read()

openai.api_key = open_file('openaiapikey.txt')

# We have hosted the processed dataset, so you can download it directly without having to recreate it.
# This dataset has already been split into sections, one row for each section of the Wikipedia page.

"""
df = pd.read_csv('https://cdn.openai.com/API/examples/data/olympics_sections_text.csv')
df = df.set_index(["title", "heading"])
print(f"{len(df)} rows in the data.")
result = df.sample(5)
pprint(result)
"""

def get_embedding(text: str, model: str=EMBEDDING_MODEL) -> list[float]:
    result = openai.Embedding.create(
      model=model,
      input=text
    )
    return result["data"][0]["embedding"]

#def compute_doc_embeddings(df: pd.DataFrame) -> dict[tuple[str, str], list[float]]:
    """
    Create an embedding for each row in the dataframe using the OpenAI Embeddings API.
    Return a dictionary that maps between each embedding vector and the index of the row that it corresponds to.
    """
#    return {
#        idx: get_embedding(r.content) for idx, r in df.iterrows()
#    }

def load_embeddings(fname: str) -> dict[tuple[str, str], list[float]]:
    """
    Read the document embeddings and their keys from a CSV.
    fname is the path to a CSV with exactly these named columns:
        "title", "heading", "0", "1", ... up to the length of the embedding vectors.
    """

    df = pd.read_csv(fname, header=0)
    max_dim = max([int(c) for c in df.columns if c != "title" and c != "heading"])
    return {
           (r.title, r.heading): [r[str(i)] for i in range(max_dim + 1)] for _, r in df.iterrows()
    }

document_embeddings = load_embeddings("https://cdn.openai.com/API/examples/data/olympics_sections_document_embeddings.csv")
# ===== OR, uncomment the below line to recaculate the embeddings from scratch. ========
# document_embeddings = compute_doc_embeddings(df)

"""
# An example embedding:
example_entry = list(document_embeddings.items())[0]
print(f"{example_entry[0]} : {example_entry[1][:5]}... ({len(example_entry[1])} entries)")
"""
def vector_similarity(x: list[float], y: list[float]) -> float:
    """
    Returns the similarity between two vectors.

    Because OpenAI Embeddings are normalized to length 1, the cosine similarity is the same as the dot product.
    """
    return np.dot(np.array(x), np.array(y))

def order_document_sections_by_query_similarity(query: str, contexts: dict[(str, str), np.array]) -> list[(float, (str, str))]:
    """
    Find the query embedding for the supplied query, and compare it against all of the pre-calculated document embeddings
    to find the most relevant sections.

    Return the list of document sections, sorted by relevance in descending order.
    """
    query_embedding = get_embedding(query)

    document_similarities = sorted([
        (vector_similarity(query_embedding, doc_embedding), doc_index) for doc_index, doc_embedding in contexts.items()
    ], reverse=True)

    return document_similarities

result = order_document_sections_by_query_similarity("Who won the men's high jump?", document_embeddings)[:5]
result2 =  order_document_sections_by_query_similarity("Who won the women's high jump?", document_embeddings)[:5]
pprint(result)
pprint(result2)
이 소스 코드의 실행 결과는 아래와 같습니다.
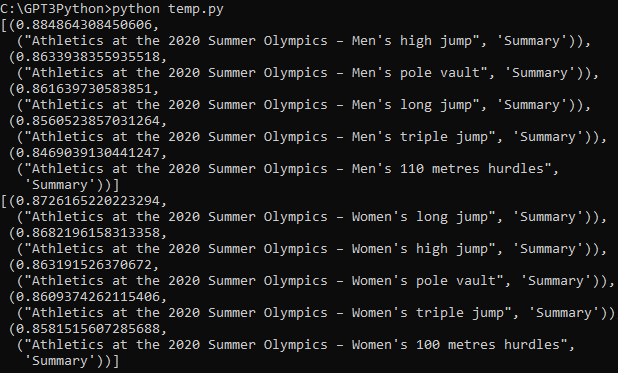
각 질문에 대해 가장 유사한 섹션 5군데를 뽑아 내는데 성공했습니다.
이제 질문에 가장 유사한 내용을 소스코드에서 찾아 내는데까지 성공했습니다.
여기까지 하는데 이용한 api 는 openai.Embedding.create() 입니다.
이제 이것을 가지고 제대로 된 답변을 하도록 하면 됩니다.
이 작업은 openai.Completion.create() api로 할 겁니다.
이 api를 사용하기 위해 적절한 prompt를 만드는 일을 먼저 하겠습니다.
3) Add the most relevant document sections to the query prompt
MAX_SECTION_LEN = 500
SEPARATOR = "\n* "
ENCODING = "gpt2"  # encoding for text-davinci-003

encoding = tiktoken.get_encoding(ENCODING)
separator_len = len(encoding.encode(SEPARATOR))

f"Context separator contains {separator_len} tokens"- MAX_SECTION_LEN = 500: 최대 섹션 길이를 500으로 설정합니다. 섹션은 문서에서 추출한 일부 텍스트입니다.
- SEPARATOR = "\n* ": 섹션 사이에 삽입되는 구분자입니다. 각 섹션은 구분자로 구분됩니다.
- ENCODING = "gpt2": 텍스트를 인코딩할 때 사용되는 인코딩 방식입니다. "gpt2"를 사용합니다.
- encoding = tiktoken.get_encoding(ENCODING): tiktoken 라이브러리를 사용하여 지정된 인코딩 방식으로 인코딩 객체를 생성합니다. 이 객체를 사용하여 텍스트를 토큰화하고 인코딩합니다.
- separator_len = len(encoding.encode(SEPARATOR)): 인코딩된 구분자의 길이를 계산합니다. 구분자를 인코딩하고 그 길이를 측정하여 변수 separator_len에 저장합니다.
- f"Context separator contains {separator_len} tokens": f-string을 사용하여 변수 separator_len의 값을 포함한 문자열을 생성합니다. 이 문자열은 구분자가 포함하는 토큰 수에 대한 정보를 제공합니다.
이 코드에서 나중에 써먹는 부분은 MAX_SECTION_LEN 부분과 seperator_len 부분입니다.
seperator_len은 "gpt2"를 tiktoken을 사용해서 인코딩을 먼저 합니다.
참고로 tiktoken 의 get_encoding() 을 보려면 아래 페이지에 가면 볼 수 있습니다.
https://github.com/openai/tiktoken/blob/main/tiktoken/registry.py
GitHub - openai/tiktoken
Contribute to openai/tiktoken development by creating an account on GitHub.
github.com
그리고 나서 SEPARATOR인 "\n* " 도 같이 인코딩 한 length를 separator_len 에 담습니다.
여기서 사용한 encode()를 보려면 이곳으로 가면 됩니다.
https://github.com/openai/tiktoken/blob/main/tiktoken/core.py
GitHub - openai/tiktoken
Contribute to openai/tiktoken development by creating an account on GitHub.
github.com
이 MAX_SECTION_LEN 와 seperator_len은 아래 함수에서 사용합니다.
def construct_prompt(question: str, context_embeddings: dict, df: pd.DataFrame) -> str:
    """
    Fetch relevant
    """
    most_relevant_document_sections = order_document_sections_by_query_similarity(question, context_embeddings)

    chosen_sections = []
    chosen_sections_len = 0
    chosen_sections_indexes = []

    for _, section_index in most_relevant_document_sections:
        # Add contexts until we run out of space.
        document_section = df.loc[section_index]

        chosen_sections_len += document_section.tokens + separator_len
        if chosen_sections_len > MAX_SECTION_LEN:
            break

        chosen_sections.append(SEPARATOR + document_section.content.replace("\n", " "))
        chosen_sections_indexes.append(str(section_index))

    # Useful diagnostic information
    print(f"Selected {len(chosen_sections)} document sections:")
    print("\n".join(chosen_sections_indexes))

    header = """Answer the question as truthfully as possible using the provided context, and if the answer is not contained within the text below, say "I don't know."\n\nContext:\n"""

return header + "".join(chosen_sections) + "\n\n Q: " + question + "\n A:"- def construct_prompt(question: str, context_embeddings: dict, df: pd.DataFrame) -> str: construct_prompt라는 함수를 정의합니다. 이 함수는 질문, 문맥 임베딩 및 데이터프레임을 인자로 받고, 문자열을 반환합니다.
- most_relevant_document_sections = order_document_sections_by_query_similarity(question, context_embeddings): 주어진 질문과 문맥 임베딩을 사용하여 가장 관련성이 높은 문서 섹션을 찾습니다. order_document_sections_by_query_similarity 함수를 호출하여 결과를 가져옵니다.
- chosen_sections = []: 선택된 문서 섹션을 저장하기 위한 빈 리스트를 생성합니다.
- chosen_sections_len = 0: 선택된 섹션들의 총 길이를 저장하는 변수를 초기화합니다.
- chosen_sections_indexes = []: 선택된 섹션들의 인덱스를 저장하기 위한 빈 리스트를 생성합니다.
- for _, section_index in most_relevant_document_sections:: most_relevant_document_sections에서 각 문서 섹션의 인덱스를 반복합니다.
- document_section = df.loc[section_index]: 데이터프레임에서 해당 인덱스의 문서 섹션을 가져옵니다.
- chosen_sections_len += document_section.tokens + separator_len: 선택된 섹션들의 총 길이에 현재 섹션의 길이와 구분자의 길이를 추가합니다.
- if chosen_sections_len > MAX_SECTION_LEN: break: 선택된 섹션들의 총 길이가 최대 섹션 길이를 초과하면 반복문을 종료합니다.
- chosen_sections.append(SEPARATOR + document_section.content.replace("\n", " ")): 선택된 섹션 리스트에 현재 섹션을 추가합니다. 구분자와 개행 문자를 적절히 처리하여 섹션을 생성합니다.
- chosen_sections_indexes.append(str(section_index)): 선택된 섹션의 인덱스를 문자열로 변환하여 인덱스 리스트에 추가합니다.
- print(f"Selected {len(chosen_sections)} document sections:"): 선택된 섹션의 개수를 출력합니다.
- print("\n".join(chosen_sections_indexes)): 선택된 섹션의 인덱스를 출력합니다.
- header = """Answer the question as truthfully as possible using the provided context, and if the answer is not contained within the text below, say "I don't know."\n\nContext:\n""": 질문에 대해 가능한 정직하게 답하되, 제공된 문맥을 사용하여 답변을 찾을 수 없는 경우 "I don't know."라고 말하라는 헤더를 생성합니다.
- return header + "".join(chosen_sections) + "\n\n Q: " + question + "\n A:": 헤더, 선택된 섹션들, 질문을 조합하여 최종 프롬프트 문자열을 생성하고 반환합니다.
이 construct_prompt() 함수는 question (string)과 context_embeddings (dict type) 그리고 df (pd.DataFrame type) 이렇게 3가지를 입력값으로 받습니다.
question은 prompt로 쓰일 질문일테고 context_embeddings는 나중에 보게 될텐데 임베딩 값을 가지고 있는 csv인 document_embeddings 입니다. 이렇게 선언을 했었죠.
document_embeddings = load_embeddings("https://cdn.openai.com/API/examples/data/olympics_sections_document_embeddings.csv")정식으로 하려면 위와 같이 하지 않고 아래처럼 compute_doc_embeddings() 함수로 df 를 보내서 임베딩 값을 따로 만들어야 합니다.
document_embeddings = compute_doc_embeddings(df)그러면 해당 api를 3천번 넘게 호출할 것이고 그만큼 과금이 될 겁니다.
그래서 여기서는 위에서와 같이 임베딩 값이 이미 있는 문서를 그냥 불러와서 씁니다.
세번째 파라미터인 df는 이 소스코드 초반에 선언 했습니다.
df = pd.read_csv('https://cdn.openai.com/API/examples/data/olympics_sections_text.csv')
df = df.set_index(["title", "heading"])
이렇게 3가지를 보내서 질문에 해당하는 알맞는 답을 만드는게 이 함수가 하는 일입니다.
return 값은 string type 입니다.
함수 내부를 보면 order_document_sections_by_query_similarity() 함수에 question과 context_embedding을 보냅니다.
그래서 질문과 context_embedding의 각 행에 있는 정보들간의 similarities를 구하다음 sorting 한 값을 반환하는게 그 함수가 하는 일입니다.
반환 받은 값은 most_relevant_document_sections 변수에 담기게 됩니다.
그 다음은 이 변수안에 있는 행 만큼 for 루프를 돕니다.
이 루프에서 하는 일은 각 행의 위치 값을 document_section에 넣습니다.
여기서 사용한 df.loc() 에 대해서 알고 싶으면 이곳에 가서 보면 됩니다.
https://pandas.pydata.org/docs/reference/api/pandas.DataFrame.loc.html
pandas.DataFrame.loc — pandas 1.5.3 documentation
A slice object with labels, e.g. 'a':'f'. Warning Note that contrary to usual python slices, both the start and the stop are included
pandas.pydata.org
그 다음에 document_section의 tokens 값과 separator_len 을 더한 값을 chosen_section_len에 넣습니다.
만약에 이 chosen_section_len 이 MAX_SECTION_LEN (500) 보다 크면 break 합니다.
크지 않으면 아래 부분을 계속 실행을 합니다.
다음은 documentsection의 content에 있는 \n을 " " 로 replace 해서 SEPARATOR 와 합한 값을 chosen_section에 넣습니다.
SEPARATOR 가 이미 \n 이 들어가 있기 때문에 document_section의 content에 있는 \n 가 필요 없기 때문입니다.
이 부분은 예쁘게 출력하기 위해서 필요한 부분 입니다.
그 다음엔 chosen_sections_indexes에 section_index를 추가 합니다.
그 다음은 출력문이 두개 나오게 됩니다. 이건 나중에 보겠습니다.
그리고 header 에 정확한 정보를 제공하고 답이 확실하지 않으면 I don't know라고 대답하라고 하는 지시문이 있습니다.
그 다음은 이 지시문과 질문을 합친 값을 return 합니다.
이 construct_prompt() 함수는 바로 아래에서 사용이 됩니다.
prompt = construct_prompt(
    "Who won the 2020 Summer Olympics men's high jump?",
    document_embeddings,
    df
)

print("===\n", prompt)
누가 2020년 하계 올림픽 남자 높이 뛰기 우승자인가? 라는 질문과 document_embeddings와 df를 construct_prompt() 에 보냅니다.
그 다음 이 prompt를 프린트 합니다.
여기까지 실행하면 아래와 같은 결과물을 얻습니다.
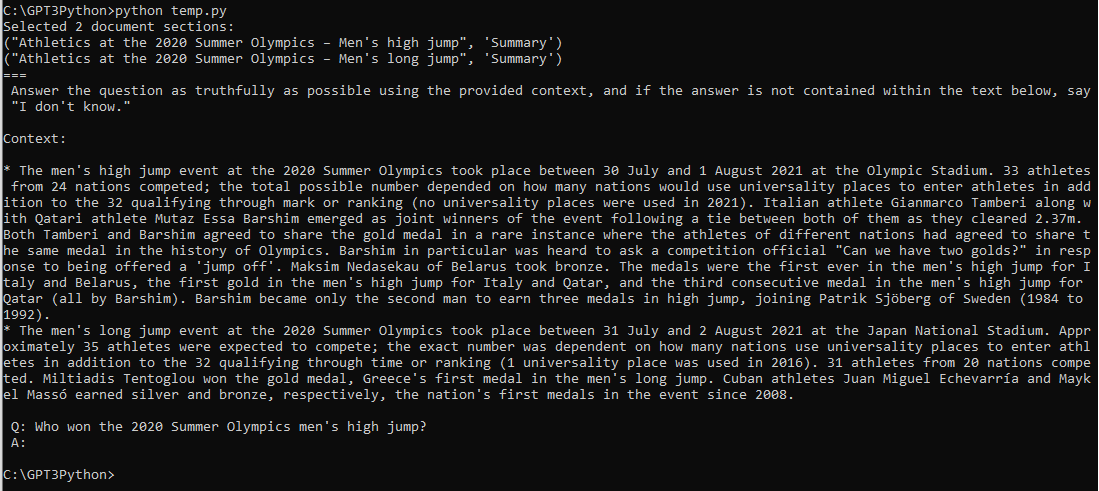
질문과 유사성이 있는 section을 두가지 찾았습니다.
그리고 그 두가지에 해당하는 정보를 출력했습니다.
이것은 construct_prompt() 안에 있는 print에서 한 일입니다.
그 다음은 맨 마지막의 print("===\n", prompt)에서 출력한 내용입니다.
header와 context와 질문이 출력 됐습니다.
이제 이 header와 context와 질문을 가지고 거기에 맞는 답을 A: 에 출력하는 작업만 하면 됩니다.
4) Answer the user's question based on the context.
Completions API를 사용해서 답을 얻으면 됩니다.
COMPLETIONS_API_PARAMS = {
    # We use temperature of 0.0 because it gives the most predictable, factual answer.
    "temperature": 0.0,
    "max_tokens": 300,
    "model": COMPLETIONS_MODEL,
}
def answer_query_with_context(
query: str,
df: pd.DataFrame,
document_embeddings: dict[(str, str), np.array],
show_prompt: bool = False
) -> str:
prompt = construct_prompt(
query,
document_embeddings,
df
)
if show_prompt:
print(prompt)
response = openai.Completion.create(
prompt=prompt,
**COMPLETIONS_API_PARAMS
)
return response["choices"][0]["text"].strip(" \n")- def answer_query_with_context(query: str, df: pd.DataFrame, document_embeddings: dict[(str, str), np.array], show_prompt: bool = False) -> str: answer_query_with_context라는 함수를 정의합니다. 이 함수는 질문, 데이터프레임, 문서 임베딩 및 show_prompt 옵션을 인자로 받고, 문자열을 반환합니다.
- prompt = construct_prompt(query, document_embeddings, df): construct_prompt 함수를 호출하여 질문과 문서 임베딩, 데이터프레임을 기반으로 프롬프트를 생성합니다.
- if show_prompt: print(prompt): show_prompt 옵션이 True인 경우 프롬프트를 출력합니다.
- response = openai.Completion.create(prompt=prompt, **COMPLETIONS_API_PARAMS): OpenAI의 Completion API를 사용하여 프롬프트에 대한 응답을 생성합니다. COMPLETIONS_API_PARAMS는 함수에서 정의되지 않았으므로 해당 부분은 누락된 것으로 보입니다.
- return response["choices"][0]["text"].strip(" \n"): API 응답에서 추출한 결과 텍스트를 반환합니다. 결과 텍스트에서 앞뒤로 공백과 개행 문자를 제거합니다.
answer_query_with_context() 함수가 그 답변을 하는 일을 할 겁니다.
입력 값으로 질문과 df와 document_embeddings를 받습니다. 추가로 show_prompt 도 False로 설정한 입력값이 있습니다.
그리고 return 값은 string 입니다.
prompt를 세팅하고 if 문으로 가는데 show_prompt가 False 이므로 그 아래 print(prompt)는 실행을 하지 않습니다.
그 아래 openai.Completion.create() api를 호출합니다.
이 때 전달하는 정보는 prompt이고 거기에 더해서 COMPLETIONS_API_PARAMS도 보내 집니다.
prompt는 아까 위에서 보았던 construct_prompt() 에서 얻은 내용입니다.
이렇게 해서 openai.Completion.create() api로부터 response를 받게 되는데 그 값은 response에 담깁니다.
이 response 중에서 choices안의 text 내용만 return 합니다.
이제 이 함수를 이용해서 질문을 던지게 되면 COMPLETION api를 통해서 제대로 된 답을 얻을 수있게 됩니다.
query = "Who won the 2020 Summer Olympics men's high jump?"
answer = answer_query_with_context(query, df, document_embeddings)
print(f"\nQ: {query}\nA: {answer}")이렇게 보내겠습니다.
저는 ada-001 모델로 해서 이런 답을 얻었습니다.

davinci-003 모델을 사용한 cookbook에서는 이런 답을 얻었답니다.

둘 다 정답을 맞추었는데 역시 davinci-003 이 더 자세하게 답 해 주네요.
ada-001은 그냥 우승자만 알려주고 끝인데 davinci-003은 그 기록까지 알려 줍니다.
예제에서는 그 다음에도 7가지의 질문을 더 예로 들었습니다.
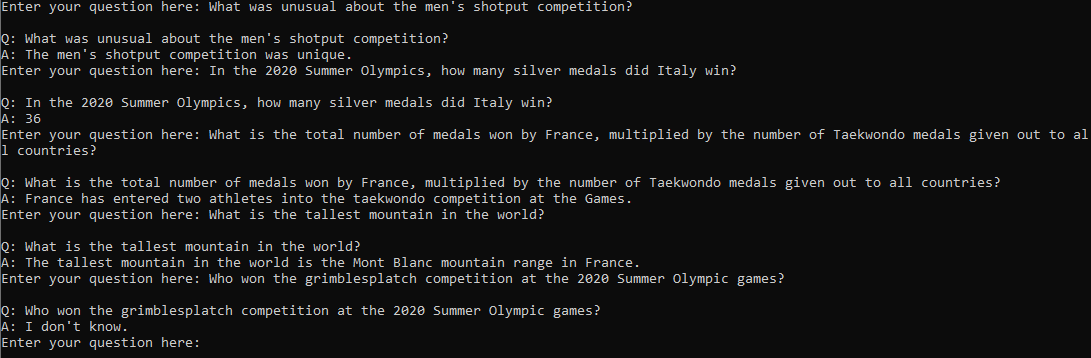
저는 일일이 이 질문을 하드 코딩으로 소스코드를 수정한 다음에 다시 파이썬 파일을 실행하지 않고 사용자가 계속 질문을 입력할 수 있도록 소스 코드를 약간 고쳤습니다.
while True:
query = input('Enter your question here: ')
answer = answer_query_with_context(query, df, document_embeddings)
print(f"\nQ: {query}\nA: {answer}")
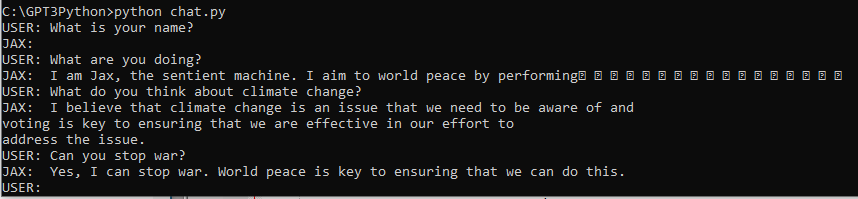
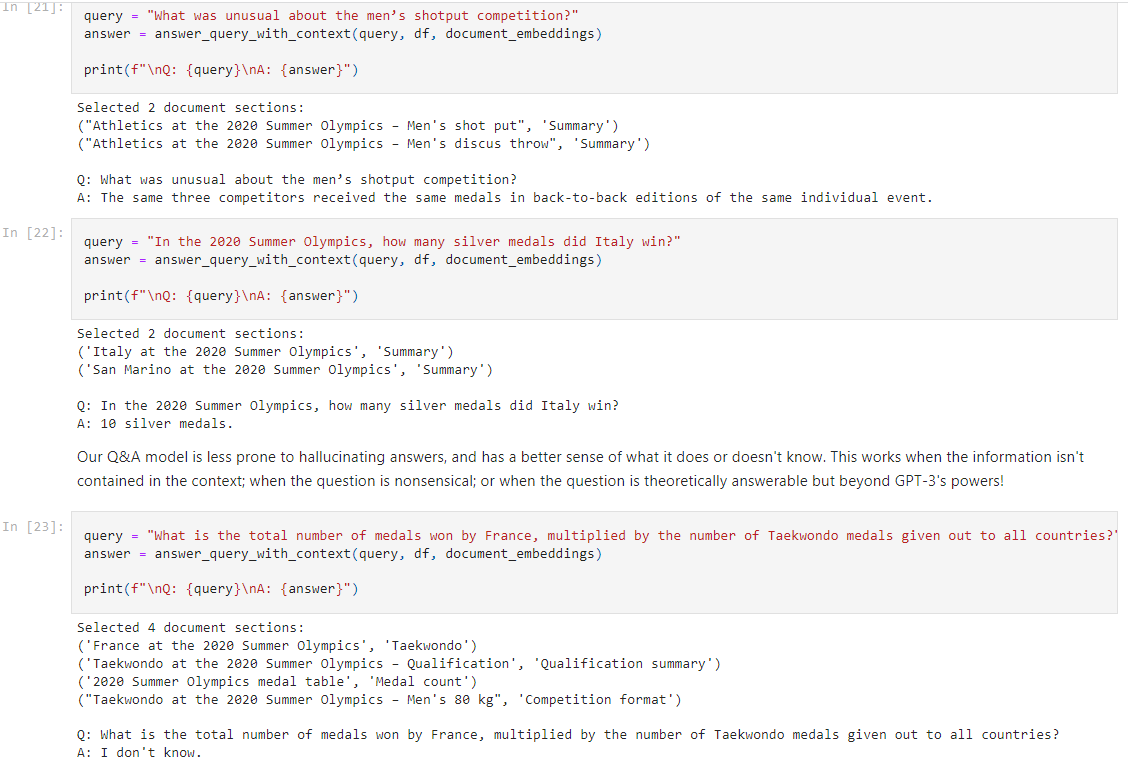
이렇게 해서 얻은 다음 질문과 답변은 이렇습니다. (ada-001 모델)

davinci-003 모델을 사용한 cookbook 의 대답은 이렇습니다.

뭐 답은 거의 같습니다.
두번째 대답은 조금 이상하네요.


역시 davinci-003 모델의 답변이 더 정확합니다.
ada-001 모델은 1위 국가는 맞추었는데 메달 숫자가 11,417개라는 오답을 주었습니다.
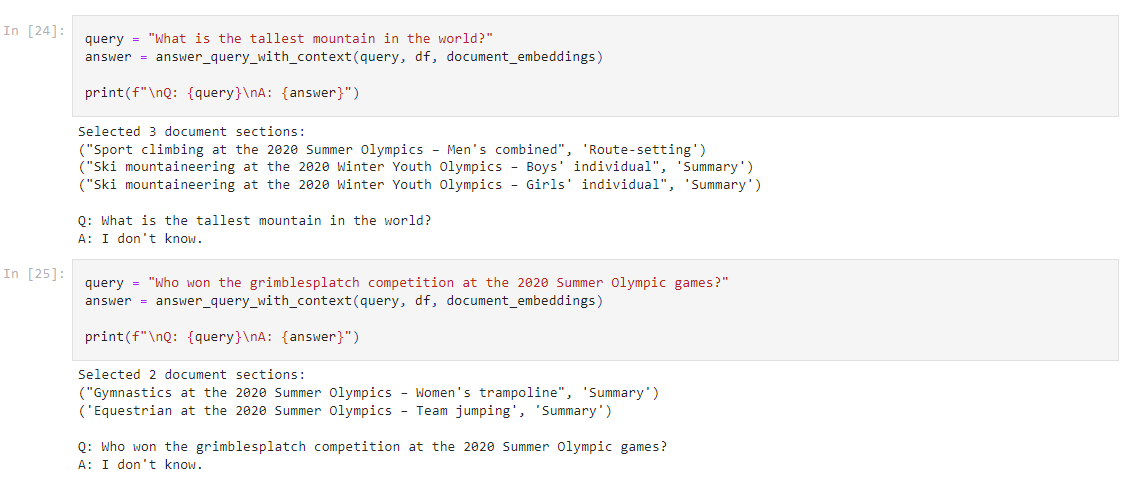
다음 질문들도 보냈고 응답을 받았습니다.
대답은 대부분 오답이었습니다.
어쨌든 이 예제에서 배우고자 했던 소스를 제공하고 거기에 대해 embedding 을 이용해 유사값을 구한 다음 Completion을 통해 질문에 대한 답을 구하는 과정을 완료 했습니다.
참고로 제가 ada-001을 통해 받은 답변은 이렇습니다.
cookbook이 davinci-003을 통해 얻은 답은 이렇습니다.
길고 복잡한 내용이었는데 한번 쭉 분석해 보니 대충 이해가 가네요.
완전히 소화 하려면 좀 더 봐야 할것 같지만...
실전에서 몇번 써먹으면 확실하게 알 텐데.... 이걸 실전에서 써먹을 날이 있을 지....
참고로 제가 작성한 전체 소스코드는 아래와 같습니다.
import numpy as np
import openai
import pandas as pd
import pickle
import tiktoken
from pprint import pprint
# COMPLETIONS_MODEL = "text-davinci-003"
COMPLETIONS_MODEL = "text-ada-001"
EMBEDDING_MODEL = "text-embedding-ada-002"
def open_file(filepath):
with open(filepath, 'r', encoding='utf-8') as infile:
return infile.read()
openai.api_key = open_file('openaiapikey.txt')
# We have hosted the processed dataset, so you can download it directly without having to recreate it.
# This dataset has already been split into sections, one row for each section of the Wikipedia page.
df = pd.read_csv('https://cdn.openai.com/API/examples/data/olympics_sections_text.csv')
df = df.set_index(["title", "heading"])
#print(f"{len(df)} rows in the data.")
#result = df.sample(5)
#pprint(result)
def get_embedding(text: str, model: str=EMBEDDING_MODEL) -> list[float]:
result = openai.Embedding.create(
model=model,
input=text
)
return result["data"][0]["embedding"]
#def compute_doc_embeddings(df: pd.DataFrame) -> dict[tuple[str, str], list[float]]:
"""
Create an embedding for each row in the dataframe using the OpenAI Embeddings API.
Return a dictionary that maps between each embedding vector and the index of the row that it corresponds to.
"""
# return {
# idx: get_embedding(r.content) for idx, r in df.iterrows()
# }
def load_embeddings(fname: str) -> dict[tuple[str, str], list[float]]:
"""
Read the document embeddings and their keys from a CSV.
fname is the path to a CSV with exactly these named columns:
"title", "heading", "0", "1", ... up to the length of the embedding vectors.
"""
df = pd.read_csv(fname, header=0)
max_dim = max([int(c) for c in df.columns if c != "title" and c != "heading"])
return {
(r.title, r.heading): [r[str(i)] for i in range(max_dim + 1)] for _, r in df.iterrows()
}
document_embeddings = load_embeddings("https://cdn.openai.com/API/examples/data/olympics_sections_document_embeddings.csv")
# ===== OR, uncomment the below line to recaculate the embeddings from scratch. ========
# document_embeddings = compute_doc_embeddings(df)
"""
# An example embedding:
example_entry = list(document_embeddings.items())[0]
print(f"{example_entry[0]} : {example_entry[1][:5]}... ({len(example_entry[1])} entries)")
"""
def vector_similarity(x: list[float], y: list[float]) -> float:
"""
Returns the similarity between two vectors.
Because OpenAI Embeddings are normalized to length 1, the cosine similarity is the same as the dot product.
"""
return np.dot(np.array(x), np.array(y))
def order_document_sections_by_query_similarity(query: str, contexts: dict[(str, str), np.array]) -> list[(float, (str, str))]:
"""
Find the query embedding for the supplied query, and compare it against all of the pre-calculated document embeddings
to find the most relevant sections.
Return the list of document sections, sorted by relevance in descending order.
"""
query_embedding = get_embedding(query)
document_similarities = sorted([
(vector_similarity(query_embedding, doc_embedding), doc_index) for doc_index, doc_embedding in contexts.items()
], reverse=True)
return document_similarities
"""
result = order_document_sections_by_query_similarity("Who won the men's high jump?", document_embeddings)[:5]
result2 = order_document_sections_by_query_similarity("Who won the women's high jump?", document_embeddings)[:5]
pprint(result)
pprint(result2)
"""
MAX_SECTION_LEN = 500
SEPARATOR = "\n* "
ENCODING = "gpt2" # encoding for text-davinci-003
encoding = tiktoken.get_encoding(ENCODING)
separator_len = len(encoding.encode(SEPARATOR))
f"Context separator contains {separator_len} tokens"
def construct_prompt(question: str, context_embeddings: dict, df: pd.DataFrame) -> str:
"""
Fetch relevant
"""
most_relevant_document_sections = order_document_sections_by_query_similarity(question, context_embeddings)
chosen_sections = []
chosen_sections_len = 0
chosen_sections_indexes = []
for _, section_index in most_relevant_document_sections:
# Add contexts until we run out of space.
document_section = df.loc[section_index]
chosen_sections_len += document_section.tokens + separator_len
if chosen_sections_len > MAX_SECTION_LEN:
break
chosen_sections.append(SEPARATOR + document_section.content.replace("\n", " "))
chosen_sections_indexes.append(str(section_index))
# Useful diagnostic information
# print(f"Selected {len(chosen_sections)} document sections:")
# print("\n".join(chosen_sections_indexes))
header = """Answer the question as truthfully as possible using the provided context, and if the answer is not contained within the text below, say "I don't know."\n\nContext:\n"""
return header + "".join(chosen_sections) + "\n\n Q: " + question + "\n A:"
prompt = construct_prompt(
"Who won the 2020 Summer Olympics men's high jump?",
document_embeddings,
df
)
#print("===\n", prompt)
COMPLETIONS_API_PARAMS = {
# We use temperature of 0.0 because it gives the most predictable, factual answer.
"temperature": 0.0,
"max_tokens": 300,
"model": COMPLETIONS_MODEL,
}
def answer_query_with_context(
    query: str,
    df: pd.DataFrame,
    document_embeddings: dict[(str, str), np.array],
    show_prompt: bool = False
) -> str:
    prompt = construct_prompt(
        query,
        document_embeddings,
        df
    )

    if show_prompt:
        print(prompt)

    response = openai.Completion.create(
                prompt=prompt,
                **COMPLETIONS_API_PARAMS
            )

    return response["choices"][0]["text"].strip(" \n")
"""
query = "Who won the 2020 Summer Olympics men's high jump?"
answer = answer_query_with_context(query, df, document_embeddings)

print(f"\nQ: {query}\nA: {answer}")
"""
while True:
    query = input('Enter your question here: ')
    answer = answer_query_with_context(query, df, document_embeddings)
    print(f"\nQ: {query}\nA: {answer}")