개발자로서 현장에서 일하면서 새로 접하는 기술들이나 알게된 정보 등을 정리하기 위한 블로그입니다. 운 좋게 미국에서 큰 회사들의 프로젝트에서 컬설턴트로 일하고 있어서 새로운 기술들을 접할 기회가 많이 있습니다. 미국의 IT 프로젝트에서 사용되는 툴들에 대해 많은 분들과 정보를 공유하고 싶습니다.
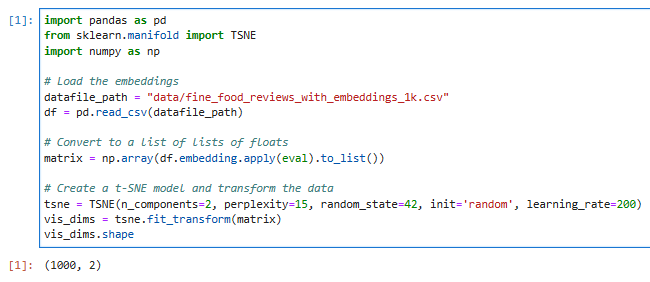
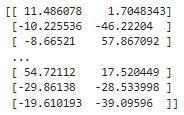
t-SNE decomposition (분해)를 사용해서 dimensionality를 2차원으로 줄입니다.
import pandas as pd
from sklearn.manifold import TSNE
import numpy as np
# Load the embeddings
datafile_path = "data/fine_food_reviews_with_embeddings_1k.csv"
df = pd.read_csv(datafile_path)
# Convert to a list of lists of floats
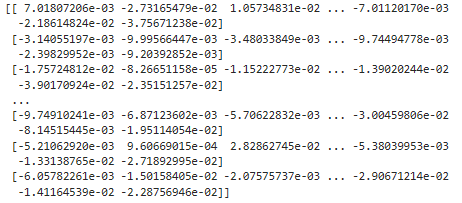
matrix = np.array(df.embedding.apply(eval).to_list())
# Create a t-SNE model and transform the data
tsne = TSNE(n_components=2, perplexity=15, random_state=42, init='random', learning_rate=200)
vis_dims = tsne.fit_transform(matrix)
vis_dims.shape
모듈은 pandas, numpy 그리고 sklearn.manifold의 TSNE를 사용합니다.
모두 이전 글에서 배운 모듈들 입니다.
판다스의 read_csv() 함수를 사용해서 csv 데이터 파일을 읽습니다.
그 다음 numpy 의 array()를 사용해서 csv 파일의 embedding 컬럼에 있는 값들을 리스트 형식으로 변환합니다.
이 값을 shape을 이용해서 리스트의 크기와 차원을 표시하면 위에 처럼 1000,2 라고 나옵니다.
2. Plotting the embeddings
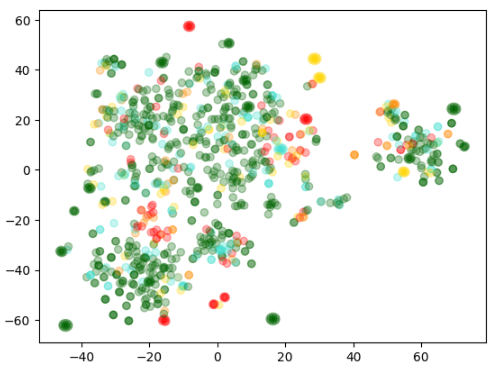
위에서 처럼 2차원으로 데이터를 정리하면 2D 산점도 분포도를 그릴 수 있다고 했습니다.
아래에서는 그것을 그리기 전에 알아보기 쉽도록 각 review에 대한 색을 지정해서 알아보기 쉽도록 합니다.
이 색은 별점 점수와 ranging 데이터를 기반으로 빨간색에서 녹색에 걸쳐 표현됩니다.
import matplotlib.pyplot as plt
import matplotlib
import numpy as np
colors = ["red", "darkorange", "gold", "turquoise", "darkgreen"]
x = [x for x,y in vis_dims]
y = [y for x,y in vis_dims]
color_indices = df.Score.values - 1
colormap = matplotlib.colors.ListedColormap(colors)
plt.scatter(x, y, c=color_indices, cmap=colormap, alpha=0.3)
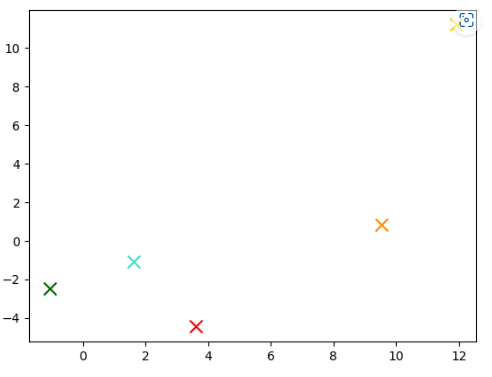
for score in [0,1,2,3,4]:
avg_x = np.array(x)[df.Score-1==score].mean()
avg_y = np.array(y)[df.Score-1==score].mean()
color = colors[score]
plt.scatter(avg_x, avg_y, marker='x', color=color, s=100)
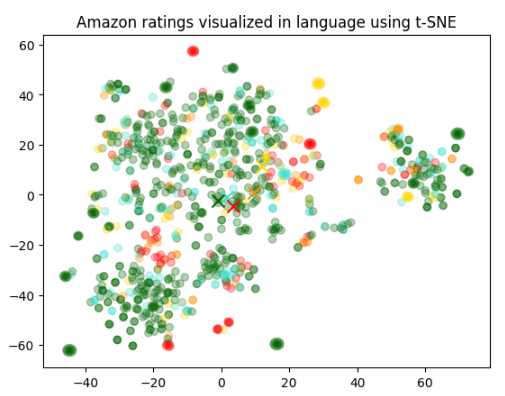
plt.title("Amazon ratings visualized in language using t-SNE")
The frequency and presence penalties found in theCompletions APIcan be used to reduce the likelihood of sampling repetitive sequences of tokens. They work by directly modifying the logits (un-normalized log-probabilities) with an additive contribution.
Completions API에 있는 빈도 및 존재 여부 패널티를 사용하여 반복적인 토큰 시퀀스를 샘플링할 가능성을 줄일 수 있습니다. 추가 기여로 로짓(정규화되지 않은 로그 확률)을 직접 수정하여 작동합니다.
c[j]is how often that token was sampled prior to the current position
c[j]는 현재 위치 이전에 해당 토큰이 샘플링된 빈도입니다.
float(c[j] > 0)is 1 ifc[j] > 0and 0 otherwise
float(c[j] > 0)은 c[j] > 0이면 1이고 그렇지 않으면 0입니다.
alpha_frequencyis the frequency penalty coefficient
alpha_frequency는 빈도 페널티 계수입니다.
alpha_presenceis the presence penalty coefficient
alpha_presence는 존재 페널티 계수입니다.
As we can see, the presence penalty is a one-off additive contribution that applies to all tokens that have been sampled at least once and the frequency penalty is a contribution that is proportional to how often a particular token has already been sampled.
보시다시피 존재 패널티는 적어도 한 번 샘플링된 모든 토큰에 적용되는 일회성 추가 기여이며 빈도 페널티는 특정 토큰이 이미 샘플링된 빈도에 비례하는 기여입니다.
Reasonable values for the penalty coefficients are around 0.1 to 1 if the aim is to just reduce repetitive samples somewhat. If the aim is to strongly suppress repetition, then one can increase the coefficients up to 2, but this can noticeably degrade the quality of samples. Negative values can be used to increase the likelihood of repetition.
페널티 계수의 합리적인 값은 반복적인 샘플을 어느 정도 줄이는 것이 목표인 경우 약 0.1에서 1 사이입니다. 반복을 강력하게 억제하는 것이 목적이라면 계수를 최대 2까지 높일 수 있지만 이렇게 하면 샘플의 품질이 눈에 띄게 저하될 수 있습니다. 음수 값을 사용하여 반복 가능성을 높일 수 있습니다.
Classifies if text violates OpenAI's Content Policy
텍스트가 OpenAI의 콘텐츠 정책을 위반하는지 분류합니다.
Request body
input
string or array
Required
The input text to classify
분류할 입력 텍스트
model
string
Optional
Defaults totext-moderation-latest
기본값은 text-moderation-latest입니다.
Two content moderations models are available:text-moderation-stableandtext-moderation-latest.
두 가지 콘텐츠 조정 모델(text-moderation-stable 및 text-moderation-latest)을 사용할 수 있습니다.
The default istext-moderation-latestwhich will be automatically upgraded over time. This ensures you are always using our most accurate model. If you usetext-moderation-stable, we will provide advanced notice before updating the model. Accuracy oftext-moderation-stablemay be slightly lower than fortext-moderation-latest.
기본값은 시간이 지남에 따라 자동으로 업그레이드되는 text-moderation-latest입니다. 이렇게 하면 항상 가장 정확한 모델을 사용할 수 있습니다. text-moderation-stable을 사용할 경우 모델 업데이트 전 사전 공지를 드립니다. text-moderation-stable의 정확도는 text-moderation-latest보다 약간 낮을 수 있습니다.
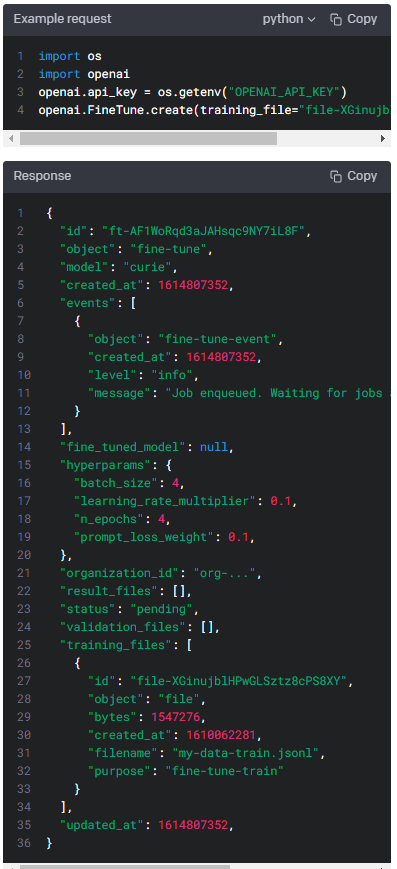
Your dataset must be formatted as a JSONL file, where each training example is a JSON object with the keys "prompt" and "completion". Additionally, you must upload your file with the purposefine-tune.
데이터 세트는 JSONL 파일로 형식화되어야 합니다. 여기서 각 교육 예제는 "prompt" 및 "completion" 키가 있는 JSON 개체입니다. 또한 미세 조정 목적으로 파일을 업로드해야 합니다.
The ID of an uploaded file that contains validation data.
유효성 검사 데이터가 포함된 업로드된 파일의 ID입니다.
If you provide this file, the data is used to generate validation metrics periodically during fine-tuning. These metrics can be viewed in thefine-tuning results file. Your train and validation data should be mutually exclusive.
이 파일을 제공하면 미세 조정 중에 정기적으로 유효성 검사 지표를 생성하는 데 데이터가 사용됩니다. 이러한 메트릭은 미세 조정 결과 파일에서 볼 수 있습니다. 학습 및 검증 데이터는 상호 배타적이어야 합니다.
Your dataset must be formatted as a JSONL file, where each validation example is a JSON object with the keys "prompt" and "completion". Additionally, you must upload your file with the purposefine-tune.
데이터 세트는 JSONL 파일로 형식화되어야 합니다. 여기서 각 검증 예제는 "prompt" 및 "completion" 키가 있는 JSON 개체입니다. 또한 미세 조정 목적으로 파일을 업로드해야 합니다.
The name of the base model to fine-tune. You can select one of "ada", "babbage", "curie", "davinci", or a fine-tuned model created after 2022-04-21. To learn more about these models, see theModelsdocumentation.
미세 조정할 기본 모델의 이름입니다. "ada", "babbage", "curie", "davinci" 또는 2022-04-21 이후 생성된 미세 조정된 모델 중 하나를 선택할 수 있습니다. 이러한 모델에 대한 자세한 내용은 모델 설명서를 참조하십시오.
n_epochs
integer
Optional
Defaults to4
The number of epochs to train the model for. An epoch refers to one full cycle through the training dataset.
모델을 훈련할 에포크 수입니다. 에포크는 교육 데이터 세트를 통한 하나의 전체 주기를 나타냅니다.
batch_size
integer
Optional
Defaults tonull
The batch size to use for training. The batch size is the number of training examples used to train a single forward and backward pass.
교육에 사용할 배치 크기입니다. 배치 크기는 단일 정방향 및 역방향 패스를 훈련하는 데 사용되는 훈련 예제의 수입니다.
By default, the batch size will be dynamically configured to be ~0.2% of the number of examples in the training set, capped at 256 - in general, we've found that larger batch sizes tend to work better for larger datasets.
기본적으로 배치 크기는 훈련 세트에 있는 예제 수의 ~0.2%로 동적으로 구성되며 최대 256개로 제한됩니다. 일반적으로 배치 크기가 클수록 데이터 세트가 더 잘 작동하는 경향이 있습니다.
learning_rate_multiplier
number
Optional
Defaults tonull
The learning rate multiplier to use for training. The fine-tuning learning rate is the original learning rate used for pretraining multiplied by this value.
훈련에 사용할 학습률 승수입니다. 미세 조정 학습률은 사전 훈련에 사용된 원래 학습률에 이 값을 곱한 것입니다.
By default, the learning rate multiplier is the 0.05, 0.1, or 0.2 depending on finalbatch_size(larger learning rates tend to perform better with larger batch sizes). We recommend experimenting with values in the range 0.02 to 0.2 to see what produces the best results.
기본적으로 학습률 승수는 최종 batch_size에 따라 0.05, 0.1 또는 0.2입니다(배치 크기가 클수록 학습률이 높을수록 더 잘 수행되는 경향이 있음). 0.02에서 0.2 범위의 값으로 실험하여 최상의 결과를 생성하는 것이 무엇인지 확인하는 것이 좋습니다.
prompt_loss_weight
number
Optional
Defaults to0.01
The weight to use for loss on the prompt tokens. This controls how much the model tries to learn to generate the prompt (as compared to the completion which always has a weight of 1.0), and can add a stabilizing effect to training when completions are short.
프롬프트 토큰에서 손실에 사용할 가중치입니다. 이것은 모델이 프롬프트를 생성하기 위해 학습을 시도하는 정도를 제어하고(항상 가중치가 1.0인 완료와 비교하여) 완료가 짧을 때 훈련에 안정화 효과를 추가할 수 있습니다.
If prompts are extremely long (relative to completions), it may make sense to reduce this weight so as to avoid over-prioritizing learning the prompt.
프롬프트가 매우 긴 경우(완료에 비해) 프롬프트 학습에 과도한 우선순위를 두지 않도록 이 가중치를 줄이는 것이 좋습니다.
compute_classification_metrics
boolean
Optional
Defaults tofalse
If set, we calculate classification-specific metrics such as accuracy and F-1 score using the validation set at the end of every epoch. These metrics can be viewed in theresults file.
설정된 경우 매 에포크가 끝날 때마다 검증 세트를 사용하여 정확도 및 F-1 점수와 같은 분류별 메트릭을 계산합니다. 이러한 메트릭은 결과 파일에서 볼 수 있습니다.
In order to compute classification metrics, you must provide avalidation_file. Additionally, you must specifyclassification_n_classesfor multiclass classification orclassification_positive_classfor binary classification.
분류 메트릭을 계산하려면 validation_file을 제공해야 합니다. 또한 다중 클래스 분류의 경우 classification_n_classes를 지정하고 이진 분류의 경우 classification_positive_class를 지정해야 합니다.
classification_n_classes
integer
Optional
Defaults tonull
The number of classes in a classification task.
분류 작업의 클래스 수입니다.
This parameter is required for multiclass classification.
이 매개변수는 다중 클래스 분류에 필요합니다.
classification_positive_class
string
Optional
Defaults tonull
The positive class in binary classification.
이진 분류의 포지티브 클래스입니다.
This parameter is needed to generate precision, recall, and F1 metrics when doing binary classification.
이 매개변수는 이진 분류를 수행할 때 정밀도, 재현율 및 F1 메트릭을 생성하는 데 필요합니다.
classification_betas
array
Optional
Defaults tonull
If this is provided, we calculate F-beta scores at the specified beta values. The F-beta score is a generalization of F-1 score. This is only used for binary classification.
이것이 제공되면 지정된 베타 값에서 F-베타 점수를 계산합니다. F-베타 점수는 F-1 점수를 일반화한 것입니다. 이진 분류에만 사용됩니다.
With a beta of 1 (i.e. the F-1 score), precision and recall are given the same weight. A larger beta score puts more weight on recall and less on precision. A smaller beta score puts more weight on precision and less on recall.
베타 1(즉, F-1 점수)에서는 정밀도와 재현율에 동일한 가중치가 부여됩니다. 베타 점수가 클수록 재현율에 더 많은 가중치를 부여하고 정밀도에는 덜 적용합니다. 베타 점수가 작을수록 정밀도에 더 많은 가중치를 부여하고 재현율에 더 적은 가중치를 둡니다.
suffix
string
Optional
Defaults tonull
A string of up to 40 characters that will be added to your fine-tuned model name.
미세 조정된 모델 이름에 추가될 최대 40자의 문자열입니다.
For example, asuffixof "custom-model-name" would produce a model name likeada:ft-your-org:custom-model-name-2022-02-15-04-21-04.
예를 들어 "custom-model-name" 접미사는 ada:ft-your-org:custom-model-name-2022-02-15-04-21-04와 같은 모델 이름을 생성합니다.
Get fine-grained status updates for a fine-tune job.
미세 조정 작업을 위해 세분화된 상태 업데이트를 받습니다.
Path parameters
fine_tune_id
string
Required
The ID of the fine-tune job to get events for.
이벤트를 가져올 미세 조정 작업의 ID입니다.
Query parameters
stream
boolean
Optional
Defaults tofalse
Whether to stream events for the fine-tune job. If set to true, events will be sent as data-onlyserver-sent eventsas they become available. The stream will terminate with adata: [DONE]message when the job is finished (succeeded, cancelled, or failed).
미세 조정 작업에 대한 이벤트를 스트리밍할지 여부입니다. true로 설정하면 이벤트가 사용 가능해지면 데이터 전용 서버 전송 이벤트로 전송됩니다. 스트림은 작업이 완료되면(성공, 취소 또는 실패) data: [DONE] 메시지와 함께 종료됩니다.
If set to false, only events generated so far will be returned.
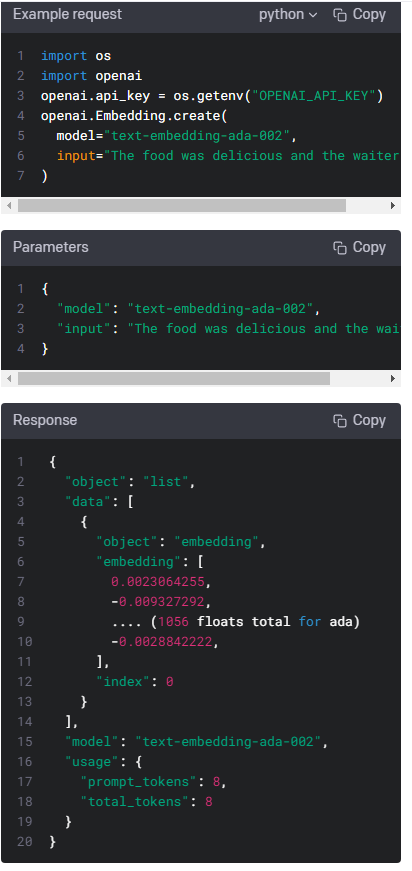
Creates an embedding vector representing the input text.
입력 텍스트를 표현하는 embedding 벡터를 만듭니다.
Request body
model
string
Required
ID of the model to use. You can use theList modelsAPI to see all of your available models, or see ourModel overviewfor descriptions of them.
사용할 모델의 ID입니다. 모델 목록 API를 사용하여 사용 가능한 모든 모델을 보거나 모델 개요에서 설명을 볼 수 있습니다.
input
string or array
Required
Input text to get embeddings for, encoded as a string or array of tokens. To get embeddings for multiple inputs in a single request, pass an array of strings or array of token arrays. Each input must not exceed 8192 tokens in length.
문자열 또는 토큰 배열로 인코딩된 임베딩을 가져올 입력 텍스트입니다. 단일 요청에서 여러 입력에 대한 임베딩을 가져오려면 문자열 배열 또는 토큰 배열 배열을 전달합니다. 각 입력은 길이가 8192 토큰을 초과할 수 없습니다.
user
string
Optional
A unique identifier representing your end-user, which can help OpenAI to monitor and detect abuse.Learn more.
OpenAI가 남용을 모니터링하고 탐지하는 데 도움이 될 수 있는 최종 사용자를 나타내는 고유 식별자입니다. 더 알아보기.
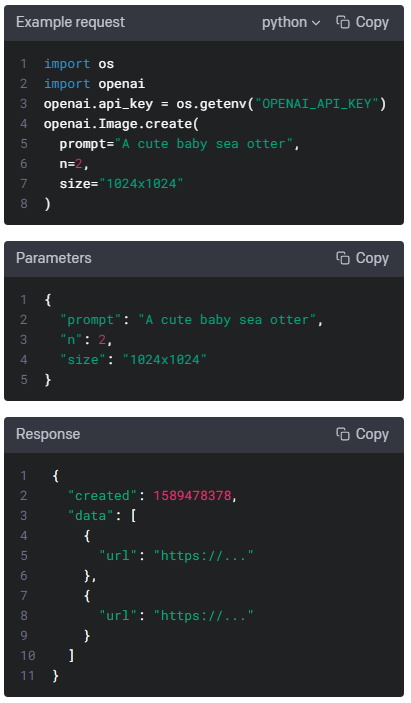
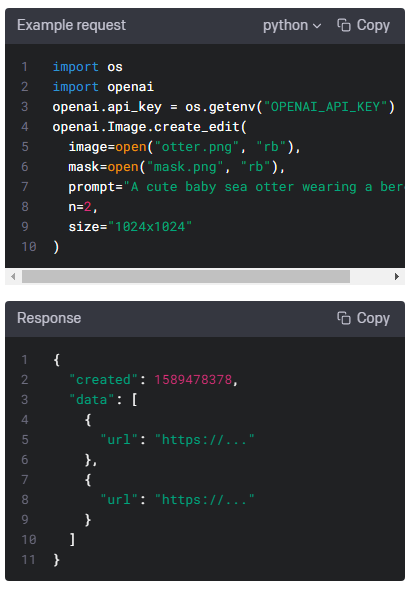
Creates an edited or extended image given an original image and a prompt.
원본 이미지와 프롬프트가 주어지면 편집되거나 확장된 이미지를 생성합니다.
Request body
image
string
Required
The image to edit. Must be a valid PNG file, less than 4MB, and square. If mask is not provided, image must have transparency, which will be used as the mask.
편집할 이미지입니다. 유효한 PNG 파일이어야 하며 4MB 미만의 정사각형이어야 합니다. 마스크를 제공하지 않으면 이미지에 투명도가 있어야 마스크로 사용됩니다.
mask
string
Optional
An additional image whose fully transparent areas (e.g. where alpha is zero) indicate whereimageshould be edited. Must be a valid PNG file, less than 4MB, and have the same dimensions asimage.
완전히 투명한 영역(예: 알파가 0인 경우)이 있는 추가 이미지는 이미지를 편집해야 하는 위치를 나타냅니다. 4MB 미만의 유효한 PNG 파일이어야 하며 이미지와 크기가 같아야 합니다.
prompt
string
Required
A text description of the desired image(s). The maximum length is 1000 characters.
원하는 이미지에 대한 텍스트 설명입니다. 최대 길이는 1000자입니다.
n
integer
Optional
Defaults to1
The number of images to generate. Must be between 1 and 10.
생성할 이미지 수입니다. 1에서 10 사이여야 합니다.
size
string
Optional
Defaults to1024x1024
The size of the generated images. Must be one of256x256,512x512, or1024x1024.
생성된 이미지의 크기입니다. 256x256, 512x512 또는 1024x1024 중 하나여야 합니다.
response_format
string
Optional
Defaults tourl
The format in which the generated images are returned. Must be one ofurlorb64_json.
생성된 이미지가 반환되는 형식입니다. url 또는 b64_json 중 하나여야 합니다.
user
string
Optional
A unique identifier representing your end-user, which can help OpenAI to monitor and detect abuse.Learn more.
OpenAI가 남용을 모니터링하고 탐지하는 데 도움이 될 수 있는 최종 사용자를 나타내는 고유 식별자입니다. 더 알아보기.
Note that <|endoftext|> is the document separator that the model sees during training, so if a prompt is not specified the model will generate as if from the beginning of a new document.
<|endoftext|>는 훈련 중에 모델이 보는 문서 구분 기호이므로 프롬프트가 지정되지 않으면 모델이 새 문서의 시작 부분에서 생성되는 것처럼 생성됩니다.
suffix
string
Optional
Defaults tonull
The suffix that comes after a completion of inserted text.
삽입된 텍스트가 완료된 뒤에 오는 접미사.
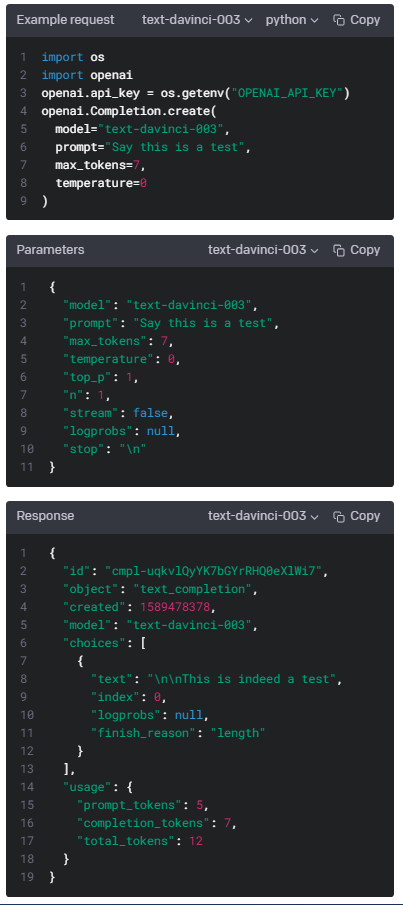
max_tokens
integer
Optional
Defaults to16
The maximum number oftokensto generate in the completion.
completion 에서 생성할 수 있는 최대 토큰 수입니다.
The token count of your prompt plusmax_tokenscannot exceed the model's context length. Most models have a context length of 2048 tokens (except for the newest models, which support 4096).
프롬프트의 토큰 수에 max_tokens를 더한 값은 모델의 컨텍스트 길이를 초과할 수 없습니다. 대부분의 모델은 컨텍스트 길이가 2048 토큰입니다(4096을 지원하는 최신 모델 제외).
temperature
number
Optional
Defaults to1
Whatsampling temperatureto use. Higher values means the model will take more risks. Try 0.9 for more creative applications, and 0 (argmax sampling) for ones with a well-defined answer.
사용할 샘플링 온도. 값이 높을수록 모델이 더 많은 위험을 감수하게 됩니다. 더 창의적인 응용 프로그램에는 0.9를, 잘 정의된 답이 있는 응용 프로그램에는 0(argmax 샘플링)을 사용해 보십시오.
We generally recommend altering this ortop_pbut not both.
일반적으로 temperature나 top_p를 변경하는 것이 좋지만 둘 다 변경하는 것은 권장하지 않습니다.
top_p
number
Optional
Defaults to1
An alternative to sampling with temperature, called nucleus sampling, where the model considers the results of the tokens with top_p probability mass. So 0.1 means only the tokens comprising the top 10% probability mass are considered.
모델이 top_p 확률 질량으로 토큰의 결과를 고려하는 핵 샘플링이라고 하는 온도(temperature)를 사용한 샘플링의 대안입니다. 따라서 0.1은 상위 10% 확률 질량을 구성하는 토큰만 고려됨을 의미합니다.
We generally recommend altering this ortemperaturebut not both.
일반적으로 top_p 또는 온도 (temperature) 를 변경하는 것이 좋지만 둘 다 변경하는 것은 권장하지 않습니다.
n
integer
Optional
Defaults to1
How many completions to generate for each prompt.
각 프롬프트에 대해 생성할 완료 수입니다.
Note:Because this parameter generates many completions, it can quickly consume your token quota. Use carefully and ensure that you have reasonable settings formax_tokensandstop.
참고: 이 매개변수는 많은 완료를 생성하기 때문에 토큰 할당량을 빠르게 소비할 수 있습니다. 신중하게 사용하고 max_tokens 및 중지에 대한 합리적인 설정이 있는지 확인하십시오.
stream
boolean
Optional
Defaults tofalse
Whether to stream back partial progress. If set, tokens will be sent as data-onlyserver-sent eventsas they become available, with the stream terminated by adata: [DONE]message.
부분 진행 상황을 스트리밍할지 여부입니다. 설정되면 토큰이 사용 가능해지면 데이터 전용 서버 전송 이벤트로 전송되며, 스트림은 data: [DONE] 메시지로 종료됩니다.
logprobs
integer
Optional
Defaults tonull
Include the log probabilities on thelogprobsmost likely tokens, as well the chosen tokens. For example, iflogprobsis 5, the API will return a list of the 5 most likely tokens. The API will always return thelogprobof the sampled token, so there may be up tologprobs+1elements in the response.
logprobs 가장 가능성이 높은 토큰과 선택한 토큰에 대한 로그 확률을 포함합니다. 예를 들어 logprobs가 5이면 API는 가능성이 가장 높은 5개의 토큰 목록을 반환합니다. API는 항상 샘플링된 토큰의 logprob를 반환하므로 응답에 최대 logprobs+1 요소가 있을 수 있습니다.
The maximum value forlogprobsis 5. If you need more than this, please contact us through ourHelp centerand describe your use case.
logprobs의 최대 값은 5입니다. 이보다 더 필요한 경우 고객 센터를 통해 문의하여 사용 사례를 설명하십시오.
echo
boolean
Optional
Defaults tofalse
Echo back the prompt in addition to the completion
완료(completion)에 더해서 프롬프트를 반환합니다.
stop
string or array
Optional
Defaults tonull
Up to 4 sequences where the API will stop generating further tokens. The returned text will not contain the stop sequence.
API가 추가 토큰 생성을 중지하는 최대 4개의 시퀀스. 반환된 텍스트에는 중지 시퀀스가 포함되지 않습니다.
presence_penalty
number
Optional
Defaults to0
Number between -2.0 and 2.0. Positive values penalize new tokens based on whether they appear in the text so far, increasing the model's likelihood to talk about new topics.
-2.0에서 2.0 사이의 숫자입니다. 양수 값은 지금까지 텍스트에 나타나는지 여부에 따라 새 토큰에 페널티를 주어 모델이 새 주제에 대해 이야기할 가능성을 높입니다.
Number between -2.0 and 2.0. Positive values penalize new tokens based on their existing frequency in the text so far, decreasing the model's likelihood to repeat the same line verbatim.
-2.0에서 2.0 사이의 숫자입니다. 양수 값은 지금까지 텍스트의 기존 빈도를 기반으로 새 토큰에 페널티를 주어 모델이 동일한 줄을 그대로 반복할 가능성을 줄입니다.
Generatesbest_ofcompletions server-side and returns the "best" (the one with the highest log probability per token). Results cannot be streamed.
서버측에서 best_of 완료를 생성하고 "최고"(토큰당 로그 확률이 가장 높은 항목)를 반환합니다. 결과를 스트리밍할 수 없습니다.
When used withn,best_ofcontrols the number of candidate completions andnspecifies how many to return –best_ofmust be greater thann.
n과 함께 사용하는 경우 best_of는 후보 완료 수를 제어하고 n은 반환할 수를 지정합니다. best_of는 n보다 커야 합니다.
Note:Because this parameter generates many completions, it can quickly consume your token quota. Use carefully and ensure that you have reasonable settings formax_tokensandstop.
참고: 이 매개변수는 많은 완료를 생성하기 때문에 토큰 할당량을 빠르게 소비할 수 있습니다. 신중하게 사용하고 max_tokens 및 중지에 대한 합리적인 설정이 있는지 확인하십시오.
logit_bias
map
Optional
Defaults tonull
Modify the likelihood of specified tokens appearing in the completion.
완료(completion)에 지정된 토큰이 나타날 가능성을 수정합니다.
Accepts a json object that maps tokens (specified by their token ID in the GPT tokenizer) to an associated bias value from -100 to 100. You can use thistokenizer tool(which works for both GPT-2 and GPT-3) to convert text to token IDs. Mathematically, the bias is added to the logits generated by the model prior to sampling. The exact effect will vary per model, but values between -1 and 1 should decrease or increase likelihood of selection; values like -100 or 100 should result in a ban or exclusive selection of the relevant token.
토큰(GPT 토크나이저의 토큰 ID로 지정됨)을 -100에서 100 사이의 관련 바이어스 값으로 매핑하는 json 개체를 허용합니다. 이 토크나이저 도구(GPT-2 및 GPT-3 모두에서 작동)를 사용하여 변환할 수 있습니다. 토큰 ID에 대한 텍스트. 수학적으로 바이어스는 샘플링 전에 모델에 의해 생성된 로짓에 추가됩니다. 정확한 효과는 모델마다 다르지만 -1과 1 사이의 값은 선택 가능성을 낮추거나 높여야 합니다. -100 또는 100과 같은 값은 관련 토큰을 금지하거나 배타적으로 선택해야 합니다.
As an example, you can pass{"50256": -100}to prevent the <|endoftext|> token from being generated.
예를 들어 {"50256": -100}을 전달하여 <|endoftext|> 토큰이 생성되지 않도록 할 수 있습니다.
user
string
Optional
A unique identifier representing your end-user, which can help OpenAI to monitor and detect abuse.Learn more.
OpenAI가 남용을 모니터링하고 탐지하는 데 도움이 될 수 있는 최종 사용자를 나타내는 고유 식별자입니다.
This guide provides a comprehensive set of best practices to help you transition from prototype to production. Whether you are a seasoned machine learning engineer or a recent enthusiast, this guide should provide you with the tools you need to successfully put the platform to work in a production setting: from securing access to our API to designing a robust architecture that can handle high traffic volumes. Use this guide to help develop a plan for deploying your application as smoothly and effectively as possible.
이 가이드는 프로토타입에서 프로덕션으로 전환하는 데 도움이 되는 포괄적인 모범 사례를 제공합니다. 노련한 기계 학습 엔지니어이든 최근에 열광하는 사람이든 관계 없이 이 가이드는 플랫폼을 생산 환경에서 성공적으로 작동시키는 데 필요한 도구를 제공합니다. API에 대한 액세스 보안에서 높은 수준을 처리할 수 있는 강력한 아키텍처 설계에 이르기까지 교통량을 핸들링 할 수 있는 아키텍쳐를 제공합니다. 이 가이드를 사용하면 애플리케이션을 최대한 원활하고 효과적으로 배포하기 위한 계획을 개발하는 데 도움이 됩니다.
Setting up your organization
Once youlog into your OpenAI account, you can find your organization name and ID in yourorganization settings. The organization name is the label for your organization, shown in user interfaces. The organization ID is the unique identifier for your organization which can be used in API requests.
OpenAI 계정에 로그인하면 조직 설정에서 조직 이름과 ID를 찾을 수 있습니다. 조직 이름은 사용자 인터페이스에 표시되는 조직의 레이블입니다. 조직 ID는 API 요청에 사용할 수 있는 조직의 고유 식별자입니다.
Users who belong to multiple organizations canpass a headerto specify which organization is used for an API request. Usage from these API requests will count against the specified organization's quota. If no header is provided, thedefault organizationwill be billed. You can change your default organization in youruser settings.
여러 조직에 속한 사용자는 헤더를 전달하여 API 요청에 사용되는 조직을 지정할 수 있습니다. 이러한 API 요청의 사용량은 지정된 조직의 할당량에 포함됩니다. 헤더가 제공되지 않으면 기본 조직에 요금이 청구됩니다. 사용자 설정에서 기본 조직을 변경할 수 있습니다.
You can invite new members to your organization from thememberssettings page. Members can bereadersorowners. Readers can make API requests and view basic organization information, while owners can modify billing information and manage members within an organization.
구성원 설정 페이지에서 조직에 새 구성원을 초대할 수 있습니다. 구성원은 독자 또는 소유자일 수 있습니다. 독자는 API 요청을 하고 기본 조직 정보를 볼 수 있으며 소유자는 청구 정보를 수정하고 조직 내 구성원을 관리할 수 있습니다.
Managing billing limits
New free trial users receive an initial credit of $18 that expires after three months. Once the credit has been used or expires, you can choose to enterbilling informationto continue your use of the API. If no billing information is entered, you will still have login access but will be unable to make any further API requests.
새로운 무료 평가판 사용자는 3개월 후에 만료되는 $18의 초기 크레딧을 받습니다. 크레딧이 사용되었거나 만료되면 결제 정보를 입력하여 API를 계속 사용할 수 있습니다. 결제 정보를 입력하지 않으면 로그인 액세스 권한은 계속 유지되지만 더 이상 API 요청을 할 수 없습니다.
Once you’ve entered your billing information, you will have an approved usage limit of $120 per month, which is set by OpenAI. To increase your quota beyond the $120 monthly billing limit, please submit aquota increase request.
청구 정보를 입력하면 OpenAI에서 설정한 월 $120의 사용 한도가 승인됩니다. $120 월 청구 한도 이상으로 할당량을 늘리려면 할당량 증가 요청을 제출하십시오.
If you’d like to be notified when your usage exceeds a certain amount, you can set a soft limit through theusage limitspage. When the soft limit is reached, the owners of the organization will receive an email notification. You can also set a hard limit so that, once the hard limit is reached, any subsequent API requests will be rejected. Note that these limits are best effort, and there may be 5 to 10 minutes of delay between the usage and the limits being enforced.
사용량이 일정량을 초과할 때 알림을 받으려면 사용량 한도 페이지를 통해 소프트 한도를 설정할 수 있습니다. 소프트 제한에 도달하면 조직 소유자는 이메일 알림을 받게 됩니다. 하드 제한에 도달하면 후속 API 요청이 거부되도록 하드 제한을 설정할 수도 있습니다. 이러한 제한은 최선의 노력이며 사용량과 적용되는 제한 사이에 5~10분의 지연이 있을 수 있습니다.
API keys
The OpenAI API uses API keys for authentication. Visit yourAPI keyspage to retrieve the API key you'll use in your requests.
OpenAI API는 인증을 위해 API 키를 사용합니다. 요청에 사용할 API 키를 검색하려면 API 키 페이지를 방문하세요.
This is a relatively straightforward way to control access, but you must be vigilant about securing these keys. Avoid exposing the API keys in your code or in public repositories; instead, store them in a secure location. You should expose your keys to your application using environment variables or secret management service, so that you don't need to hard-code them in your codebase. Read more in ourBest practices for API key safety.
이것은 액세스를 제어하는 비교적 간단한 방법이지만 이러한 키를 보호하는 데 주의를 기울여야 합니다. 코드 또는 공개 리포지토리에 API 키를 노출하지 마십시오. 대신 안전한 장소에 보관하십시오. 코드베이스에서 키를 하드 코딩할 필요가 없도록 환경 변수 또는 비밀 관리 서비스를 사용하여 키를 애플리케이션에 노출해야 합니다. API 키 안전을 위한 모범 사례에서 자세히 알아보세요.
Staging accounts
As you scale, you may want to create separate organizations for your staging and production environments. Please note that you can sign up using two separate email addresses likebob+prod@widgetcorp.comandbob+dev@widgetcorp.comto create two organizations. This will allow you to isolate your development and testing work so you don't accidentally disrupt your live application. You can also limit access to your production organization this way.
규모를 조정함에 따라 스테이징 및 프로덕션 환경에 대해 별도의 조직을 생성할 수 있습니다. bob+prod@widgetcorp.com 및 bob+dev@widgetcorp.com과 같은 두 개의 개별 이메일 주소를 사용하여 가입하여 두 개의 조직을 만들 수 있습니다. 이를 통해 개발 및 테스트 작업을 분리하여 실수로 라이브 애플리케이션을 중단하지 않도록 할 수 있습니다. 이러한 방식으로 프로덕션 조직에 대한 액세스를 제한할 수도 있습니다.
Building your prototype
If you haven’t gone through thequickstart guide, we recommend you start there before diving into the rest of this guide.
빠른 시작 가이드를 살펴보지 않은 경우 이 가이드의 나머지 부분을 시작하기 전에 여기에서 시작하는 것이 좋습니다.
For those new to the OpenAI API, ourplaygroundcan be a great resource for exploring its capabilities. Doing so will help you learn what's possible and where you may want to focus your efforts. You can also explore ourexample prompts.
OpenAI API를 처음 사용하는 사용자에게 Playground는 해당 기능을 탐색하는 데 유용한 리소스가 될 수 있습니다. 그렇게 하면 무엇이 가능한지, 어디에 노력을 집중해야 하는지 알 수 있습니다. 예제 프롬프트를 탐색할 수도 있습니다.
While the playground is a great place to prototype, it can also be used as an incubation area for larger projects. The playground also makes it easy to export code snippets for API requests and share prompts with collaborators, making it an integral part of your development process.
놀이터(playground)는 프로토타입을 만들기에 좋은 장소이지만 대규모 프로젝트를 위한 인큐베이션 영역으로도 사용할 수 있습니다. 또한 Playground를 사용하면 API 요청에 대한 코드 스니펫을 쉽게 내보내고 공동 작업자와 프롬프트를 공유하여 개발 프로세스의 필수적인 부분이 됩니다.
Additional tips
Start by determining the core functionalitiesyou want your application to have. Consider the types of data inputs, outputs, and processes you will need. Aim to keep the prototype as focused as possible, so that you can iterate quickly and efficiently.
애플리케이션에 원하는 핵심 기능을 결정하는 것부터 시작하십시오. 필요한 데이터 입력, 출력 및 프로세스 유형을 고려하십시오. 신속하고 효율적으로 반복할 수 있도록 가능한 한 프로토타입에 초점을 맞추는 것을 목표로 하십시오.
Choose the programming language and framework that you feel most comfortable withand that best aligns with your goals for the project. Some popular options include Python, Java, and Node.js. Seelibrary supportpage to learn more about the library bindings maintained both by our team and by the broader developer community.
가장 편안하고 프로젝트 목표에 가장 부합하는 프로그래밍 언어와 프레임워크를 선택하세요. 인기 있는 옵션으로는 Python, Java 및 Node.js가 있습니다. 우리 팀과 광범위한 개발자 커뮤니티에서 유지 관리하는 라이브러리 바인딩에 대해 자세히 알아보려면 라이브러리 지원 페이지를 참조하세요.
Development environment and support: Set up your development environment with the right tools and libraries and ensure you have the resources you need to train your model. Leverage our documentation,community forumand ourhelp centerto get help with troubleshooting. If you are developing using Python, take a look at thisstructuring your projectguide (repository structure is a crucial part of your project’s architecture). In order to connect with our support engineers, simply log in to your account and use the "Help" button to start a conversation.
개발 환경 및 지원: 올바른 도구와 라이브러리로 개발 환경을 설정하고 모델 교육에 필요한 리소스가 있는지 확인합니다. 설명서, 커뮤니티 포럼 및 도움말 센터를 활용하여 문제 해결에 대한 도움을 받으세요. Python을 사용하는 개발하인 경우 이 프로젝트 구조화 가이드를 살펴보세요(리포지토리 구조는 프로젝트 아키텍처의 중요한 부분입니다). 지원 엔지니어와 연결하려면 계정에 로그인하고 "도움말" 버튼을 사용하여 대화를 시작하십시오.
Techniques for improving reliability around prompts
Even with careful planning, it's important to be prepared for unexpected issues when using GPT-3 in your application. In some cases, the model may fail on a task, so it's helpful to consider what you can do to improve the reliability of your application.
신중하게 계획하더라도 응용 프로그램에서 GPT-3을 사용할 때 예기치 않은 문제에 대비하는 것이 중요합니다. 경우에 따라 모델이 작업에 실패할 수 있으므로 애플리케이션의 안정성을 개선하기 위해 수행할 수 있는 작업을 고려하는 것이 좋습니다.
If your task involves logical reasoning or complexity, you may need to take additional steps to build more reliable prompts. For some helpful suggestions, consult ourTechniques to improve reliabilityguide. Overall the recommendations revolve around:
작업에 논리적 추론이나 복잡성이 포함된 경우 보다 신뢰할 수 있는 프롬프트를 작성하기 위해 추가 단계를 수행해야 할 수 있습니다. 몇 가지 유용한 제안을 보려면 안정성 가이드를 개선하기 위한 기술을 참조하십시오. 전반적으로 권장 사항은 다음과 같습니다.
Decomposing unreliable operations into smaller, more reliable operations (e.g.,selection-inference prompting) 신뢰할 수 없는 작업을 더 작고 더 안정적인 작업으로 분해(예: 선택-추론 프롬프팅)
Using multiple steps or multiple relationships to make the system's reliability greater than any individual component (e.g.,maieutic prompting) 여러 단계 또는 여러 관계를 사용하여 시스템의 안정성을 개별 구성 요소보다 크게 만듭니다(예: 기계 프롬프트).
Evaluation and iteration
One of the most important aspects of developing a system for production is regular evaluation and iterative experimentation. This process allows you to measure performance, troubleshoot issues, and fine-tune your models to improve accuracy and efficiency. A key part of this process is creating an evaluation dataset for your functionality. Here are a few things to keep in mind:
생산 시스템 개발의 가장 중요한 측면 중 하나는 정기적인 평가와 반복 실험입니다. 이 프로세스를 통해 성능을 측정하고, 문제를 해결하고, 모델을 미세 조정하여 정확도와 효율성을 높일 수 있습니다. 이 프로세스의 핵심 부분은 기능에 대한 평가 데이터 세트를 만드는 것입니다. 다음은 염두에 두어야 할 몇 가지 사항입니다.
Make sure yourevaluation set is representativeof the data your model will be used on in the real world. This will allow you to assess your model's performance on data it hasn't seen before and help you understand how well it generalizes to new situations.
평가 세트가 실제 세계에서 모델이 사용될 데이터를 대표하는지 확인하십시오. 이를 통해 이전에 본 적이 없는 데이터에 대한 모델의 성능을 평가하고 새로운 상황에 얼마나 잘 일반화되는지 이해할 수 있습니다.
Regularly update your evaluation set to ensure that it stays relevantas your model evolves and as new data becomes available.
평가 세트를 정기적으로 업데이트하여 모델이 발전하고 새 데이터를 사용할 수 있을 때 관련성을 유지하도록 합니다.
다양한 메트릭을 사용하여 모델의 성능을 평가하십시오. 애플리케이션 및 비즈니스 결과에 따라 정확도, 정밀도, 재현율, F1 점수 또는 MAP(평균 평균 정밀도)가 포함될 수 있습니다. 또한 미세 조정을 Weights & Biases와 동기화하여 실험, 모델 및 데이터 세트를 추적할 수 있습니다.
Compare your model's performance against baseline. This will give you a better understanding of your model's strengths and weaknesses and can help guide your future development efforts.
모델의 성능을 기준과 비교하십시오. 이렇게 하면 모델의 강점과 약점을 더 잘 이해할 수 있고 향후 개발 노력을 안내하는 데 도움이 될 수 있습니다.
By conducting regular evaluation and iterative experimentation, you can ensure that your GPT-powered application or prototype continues to improve over time.
정기적인 평가와 반복적인 실험을 통해 GPT 기반 애플리케이션 또는 프로토타입이 시간이 지남에 따라 지속적으로 개선되도록 할 수 있습니다.
Evaluating language models
Language models can be difficult to evaluate because evaluating the quality of generated language is often subjective, and there are many different ways to communicate the same message correctly in language. For example, when evaluating a model on the ability to summarize a long passage of text, there are many correct summaries. That being said, designing good evaluations is critical to making progress in machine learning.
언어 모델은 생성된 언어의 품질을 평가하는 것이 주관적인 경우가 많고 동일한 메시지를 언어로 올바르게 전달하는 다양한 방법이 있기 때문에 평가하기 어려울 수 있습니다. 예를 들어, 긴 텍스트 구절을 요약하는 능력에 대한 모델을 평가할 때 정확한 요약이 많이 있습니다. 즉, 좋은 평가를 설계하는 것은 기계 학습을 발전시키는 데 중요합니다.
An eval suite needs to be comprehensive, easy to run, and reasonably fast (depending on model size). It also needs to be easy to continue to add to the suite as what is comprehensive one month will likely be out of date in another month. We should prioritize having a diversity of tasks and tasks that identify weaknesses in the models or capabilities that are not improving with scaling.
평가 도구 모음은 포괄적이고 실행하기 쉬우며 합리적으로 빨라야 합니다(모델 크기에 따라 다름). 또한 한 달 동안 포괄적인 내용이 다음 달에는 구식이 될 수 있으므로 제품군에 계속 추가하기 쉬워야 합니다. 모델의 약점이나 확장으로 개선되지 않는 기능을 식별하는 다양한 작업과 작업을 우선시해야 합니다.
The simplest way to evaluate your system is to manually inspect its outputs. Is it doing what you want? Are the outputs high quality? Are they consistent?
시스템을 평가하는 가장 간단한 방법은 출력을 수동으로 검사하는 것입니다. 당신이 원하는대로하고 있습니까? 출력물이 고품질입니까? 일관성이 있습니까?
Automated evaluations
The best way to test faster is to develop automated evaluations. However, this may not be possible in more subjective applications like summarization tasks.
더 빠르게 테스트하는 가장 좋은 방법은 자동화된 평가를 개발하는 것입니다. 그러나 이것은 요약 작업과 같은 보다 주관적인 응용 프로그램에서는 불가능할 수 있습니다.
Automated evaluations work best when it’s easy to grade a final output as correct or incorrect. For example, if you’re fine-tuning a classifier to classify text strings as class A or class B, it’s fairly simple: create a test set with example input and output pairs, run your system on the inputs, and then grade the system outputs versus the correct outputs (looking at metrics like accuracy, F1 score, cross-entropy, etc.).
자동화된 평가는 최종 결과물을 정확하거나 부정확한 것으로 쉽게 등급을 매길 때 가장 잘 작동합니다. 예를 들어 텍스트 문자열을 클래스 A 또는 클래스 B로 분류하기 위해 분류자를 미세 조정하는 경우 매우 간단합니다. 예를 들어 입력 및 출력 쌍으로 테스트 세트를 만들고 입력에서 시스템을 실행한 다음 시스템 등급을 지정합니다. 출력 대 올바른 출력(정확도, F1 점수, 교차 엔트로피 등과 같은 메트릭 보기).
If your outputs are semi open-ended, as they might be for a meeting notes summarizer, it can be trickier to define success: for example, what makes one summary better than another? Here, possible techniques include:
출력물이 회의록 요약기용일 수 있으므로 반 개방형인 경우 성공을 정의하기가 더 까다로울 수 있습니다. 예를 들어 어떤 요약이 다른 요약보다 더 나은가요? 같은... 여기서 사용 가능한 기술은 다음과 같습니다.
Writing a test with ‘gold standard’ answers and then measuring some sort of similarity score between each gold standard answer and the system output (we’ve seenembeddingswork decently well for this)
'골드 스탠다드' 답변으로 테스트를 작성한 다음 각 골드 스탠다드 답변과 시스템 출력 사이의 일종의 유사성 점수를 측정합니다(임베딩이 이에 대해 적절하게 작동하는 것을 확인했습니다).
Building a discriminator system to judge / rank outputs, and then giving that discriminator a set of outputs where one is generated by the system under test (this can even be GPT model that is asked whether the question is answered correctly by a given output)
출력을 판단하고 순위를 매기는 판별기 시스템을 구축한 다음 해당 판별기에 테스트 중인 시스템에서 생성된 출력 세트를 제공합니다(이는 주어진 출력에 의해 질문이 올바르게 대답되었는지 묻는 GPT 모델일 수도 있음)
Building an evaluation model that checks for the truth of components of the answer; e.g., detecting whether a quote actually appears in the piece of given text
답변 구성 요소의 진실성을 확인하는 평가 모델 구축 예를 들어 인용문이 주어진 텍스트에 실제로 나타나는지 여부를 감지합니다.
For very open-ended tasks, such as a creative story writer, automated evaluation is more difficult. Although it might be possible to develop quality metrics that look at spelling errors, word diversity, and readability scores, these metrics don’t really capture the creative quality of a piece of writing. In cases where no good automated metric can be found, human evaluations remain the best method.
창의적인 스토리 작가와 같이 제한이 없는 작업의 경우 자동화된 평가가 더 어렵습니다. 맞춤법 오류, 단어 다양성 및 가독성 점수를 살펴보는 품질 메트릭을 개발하는 것이 가능할 수 있지만 이러한 메트릭은 글의 창의적인 품질을 실제로 포착하지 못합니다. 좋은 자동 메트릭을 찾을 수 없는 경우 여전히 사람의 평가가 가장 좋은 방법입니다.
Example procedure for evaluating a GPT-3-based system
As an example, let’s consider the case of building a retrieval-based Q&A system.
예를 들어 검색 기반 Q&A 시스템을 구축하는 경우를 생각해 봅시다.
A retrieval-based Q&A system has two steps. First, a user’s query is used to rank potentially relevant documents in a knowledge base. Second, GPT-3 is given the top-ranking documents and asked to generate an answer to the query.
검색 기반 Q&A 시스템에는 두 단계가 있습니다. 첫째, 사용자의 쿼리는 지식 기반에서 잠재적으로 관련이 있는 문서의 순위를 매기는 데 사용됩니다. 둘째, GPT-3에게 최상위 문서를 제공하고 쿼리에 대한 답변을 생성하도록 요청합니다.
Evaluations can be made to measure the performance of each step.
평가는 각 단계의 성과를 측정하기 위해 이루어질 수 있습니다.
For the search step, one could:
검색 단계는 이렇게 진행 될 수 있습니다.
First, generate a test set with ~100 questions and a set of correct documents for each
먼저 ~100개의 질문과 각각에 대한 올바른 문서 세트로 테스트 세트를 생성합니다.
The questions can be sourced from user data if you have any; otherwise, you can invent a set of questions with diverse styles and difficulty.
질문이 있는 경우 사용자 데이터에서 질문을 가져올 수 있습니다. 그렇지 않으면 다양한 스타일과 난이도의 일련의 질문을 만들 수 있습니다.
For each question, have a person manually search through the knowledge base and record the set of documents that contain the answer.
각 질문에 대해 한 사람이 수동으로 기술 자료를 검색하고 답변이 포함된 문서 세트를 기록하도록 합니다.
Second, use the test set to grade the system’s performance 둘째, 테스트 세트를 사용하여 시스템의 성능 등급을 매깁니다.
For each question, use the system to rank the candidate documents (e.g., by cosine similarity of the document embeddings with the query embedding).
각 질문에 대해 시스템을 사용하여 후보 문서의 순위를 매깁니다(예: 쿼리 임베딩과 문서 임베딩의 코사인 유사성 기준).
You can score the results with a binary accuracy score of 1 if the candidate documents contain at least 1 relevant document from the answer key and 0 otherwise
후보 문서에 답변 키의 관련 문서가 1개 이상 포함되어 있으면 이진 정확도 점수 1로 결과를 채점하고 그렇지 않으면 0으로 점수를 매길 수 있습니다.
You can also use a continuous metric like Mean Reciprocal Rank which can help distinguish between answers that were close to being right or far from being right (e.g., a score of 1 if the correct document is rank 1, a score of ½ if rank 2, a score of ⅓ if rank 3, etc.)
또한 평균 역수 순위와 같은 연속 메트릭을 사용하여 정답에 가까운 답변과 그렇지 않은 답변을 구별할 수 있습니다(예: 올바른 문서가 순위 1인 경우 점수 1점, 순위 2인 경우 점수 ½) , 3순위인 경우 ⅓점 등)
For the question answering step, one could:
이 질문에 대한 답변의 단계는 이럴 수 있습니다.
First, generate a test set with ~100 sets of {question, relevant text, correct answer} 먼저 {질문, 관련 텍스트, 정답}의 ~100세트로 테스트 세트를 생성합니다.
For the questions and relevant texts, use the above data
질문 및 관련 텍스트는 위의 데이터를 사용하십시오.
For the correct answers, have a person write down ~100 examples of what a great answer looks like.
정답을 찾기 위해 한 사람에게 훌륭한 답변이 어떤 것인지에 대한 ~100개의 예를 적어보라고 합니다.
Second, use the test set to grade the system’s performance 둘째, 테스트 세트를 사용하여 시스템의 성능 등급을 매깁니다.
For each question & text pair, combine them into a prompt and submit the prompt to GPT-3
각 질문 및 텍스트 쌍에 대해 프롬프트로 결합하고 프롬프트를 GPT-3에 제출합니다.
Next, compare GPT-3’s answers to the gold-standard answer written by a human
다음으로 GPT-3의 답변을 인간이 작성한 표준 답변과 비교합니다.
This comparison can be manual, where humans look at them side by side and grade whether the GPT-3 answer is correct/high quality
이 비교는 사람이 나란히 보고 GPT-3 답변이 올바른지/높은 품질인지 등급을 매기는 수동 방식일 수 있습니다.
This comparison can also be automated, by using embedding similarity scores or another method (automated methods will likely be noisy, but noise is ok as long as it’s unbiased and equally noisy across different types of models that you’re testing against one another)
이 비교는 임베딩 유사성 점수 또는 다른 방법을 사용하여 자동화할 수도 있습니다. (자동화된 방법은 잡음이 많을 수 있지만 서로 테스트하는 여러 유형의 모델에서 편향되지 않고 잡음이 동일하다면 잡음은 괜찮습니다.)
Of course,N=100is just an example, and in early stages, you might start with a smaller set that’s easier to generate, and in later stages, you might invest in a larger set that’s more costly but more statistically reliable.
물론 N=100은 예일 뿐이며 초기 단계에서는 생성하기 쉬운 더 작은 세트로 시작할 수 있고, 이후 단계에서는 비용이 더 많이 들지만 통계적으로 더 신뢰할 수 있는 더 큰 세트에 투자할 수 있습니다.
Scaling your solution architecture
When designing your application or service for production that uses our API, it's important to consider how you will scale to meet traffic demands. There are a few key areas you will need to consider regardless of the cloud service provider of your choice:
API를 사용하는 프로덕션용 애플리케이션 또는 서비스를 설계할 때 트래픽 수요를 충족하기 위해 확장하는 방법을 고려하는 것이 중요합니다. 선택한 클라우드 서비스 공급자에 관계없이 고려해야 할 몇 가지 주요 영역이 있습니다.
Horizontal scaling: You may want to scale your application out horizontally to accommodate requests to your application that come from multiple sources. This could involve deploying additional servers or containers to distribute the load. If you opt for this type of scaling, make sure that your architecture is designed to handle multiple nodes and that you have mechanisms in place to balance the load between them.
수평 확장: 여러 소스에서 오는 애플리케이션에 대한 요청을 수용하기 위해 애플리케이션을 수평으로 확장할 수 있습니다. 여기에는 로드를 분산하기 위해 추가 서버 또는 컨테이너를 배포하는 작업이 포함될 수 있습니다. 이러한 유형의 확장을 선택하는 경우 아키텍처가 여러 노드를 처리하도록 설계되었고 노드 간에 로드 균형을 유지하는 메커니즘이 있는지 확인하십시오.
Vertical scaling: Another option is to scale your application up vertically, meaning you can beef up the resources available to a single node. This would involve upgrading your server's capabilities to handle the additional load. If you opt for this type of scaling, make sure your application is designed to take advantage of these additional resources.
수직 확장: 또 다른 옵션은 애플리케이션을 수직으로 확장하는 것입니다. 즉, 단일 노드에서 사용 가능한 리소스를 강화할 수 있습니다. 여기에는 추가 로드를 처리하기 위한 서버 기능 업그레이드가 포함됩니다. 이러한 유형의 확장을 선택하는 경우 애플리케이션이 이러한 추가 리소스를 활용하도록 설계되었는지 확인하십시오.
Caching: By storing frequently accessed data, you can improve response times without needing to make repeated calls to our API. Your application will need to be designed to use cached data whenever possible and invalidate the cache when new information is added. There are a few different ways you could do this. For example, you could store data in a database, filesystem, or in-memory cache, depending on what makes the most sense for your application.
캐싱: 자주 액세스하는 데이터를 저장하면 API를 반복적으로 호출하지 않고도 응답 시간을 개선할 수 있습니다. 애플리케이션은 가능할 때마다 캐시된 데이터를 사용하고 새 정보가 추가되면 캐시를 무효화하도록 설계해야 합니다. 이를 수행할 수 있는 몇 가지 방법이 있습니다. 예를 들어 애플리케이션에 가장 적합한 항목에 따라 데이터베이스, 파일 시스템 또는 메모리 내 캐시에 데이터를 저장할 수 있습니다.
Load balancing: Finally, consider load-balancing techniques to ensure requests are distributed evenly across your available servers. This could involve using a load balancer in front of your servers or using DNS round-robin. Balancing the load will help improve performance and reduce bottlenecks.
로드 밸런싱: 마지막으로 로드 밸런싱 기술을 고려하여 요청이 사용 가능한 서버에 고르게 분산되도록 합니다. 여기에는 서버 앞에서 로드 밸런서를 사용하거나 DNS 라운드 로빈을 사용하는 것이 포함될 수 있습니다. 로드 균형을 조정하면 성능을 개선하고 병목 현상을 줄이는 데 도움이 됩니다.
Managing rate limits and latency
When using our API, it's important to understand and plan forrate limits. Exceeding these limits will result in error messages and can disrupt your application's performance. Rate limits are in place for a variety of reasons, from preventing abuse to ensuring everyone has fair access to the API.
API를 사용할 때 속도 제한을 이해하고 계획하는 것이 중요합니다. 이러한 제한을 초과하면 오류 메시지가 표시되고 애플리케이션 성능이 저하될 수 있습니다. 속도 제한은 악용 방지에서 모든 사람이 API에 공정하게 액세스할 수 있도록 보장하는 등 다양한 이유로 적용됩니다.
To avoid running into them, keep these tips in mind:
이러한 문제가 발생하지 않도록 하려면 다음 팁을 염두에 두십시오.
Monitor your API usage to stay within your rate limit thresholds. Consider implementing exponential backoff and retry logic so your application can pause and retry requests if it hits a rate limit. (see example below).
API 사용량을 모니터링하여 속도 제한 임계값을 유지하세요. 애플리케이션이 속도 제한에 도달하면 요청을 일시 중지하고 다시 시도할 수 있도록 지수 백오프 및 재시도 로직을 구현하는 것을 고려하십시오. (아래 예 참조).
Use caching strategies to reduce the number of requests your application needs to make.
캐싱 전략을 사용하여 애플리케이션에 필요한 요청 수를 줄입니다.
If your application consistently runs into rate limits, you may need to adjust your architecture or strategies to use the API in a less demanding manner.
애플리케이션이 지속적으로 속도 제한에 도달하는 경우 덜 까다로운 방식으로 API를 사용하도록 아키텍처 또는 전략을 조정해야 할 수 있습니다.
To avoid hitting the rate limit, we generally recommend implementing exponential backoff to your request code. For additional tips and guidance, consult ourHow to handle rate limitsguide. In Python, an exponential backoff solution might look like this:
속도 제한에 도달하지 않으려면 일반적으로 요청 코드에 지수 백오프를 구현하는 것이 좋습니다. 추가 팁 및 지침은 속도 제한 처리 방법 가이드를 참조하세요. Python에서 지수 백오프 솔루션은 다음과 같습니다.
import backoff import openai from openai.error import RateLimitError
(Please note: The backoff library is a third-party tool. We encourage all our users to do their due diligence when it comes to validating any external code for their projects.)
(참고: 백오프 라이브러리는 타사 도구입니다. 우리는 모든 사용자가 자신의 프로젝트에 대한 외부 코드의 유효성을 검사할 때 실사를 수행할 것을 권장합니다.)
As noted in thecookbook, If you're processing real-time requests from users, backoff and retry is a great strategy to minimize latency while avoiding rate limit errors. However, if you're processing large volumes of batch data, where throughput matters more than latency, you can do a few other things in addition to backoff and retry, for example, proactively adding delay between requests and batching requests. Note that our API has separate limits for requests per minute and tokens per minute.
cookbook에서 언급했듯이 사용자의 실시간 요청을 처리하는 경우 백오프 및 재시도는 속도 제한 오류를 피하면서 대기 시간을 최소화하는 훌륭한 전략입니다. 그러나 대기 시간보다 처리량이 더 중요한 대량의 배치 데이터를 처리하는 경우 백오프 및 재시도 외에 몇 가지 다른 작업을 수행할 수 있습니다(예: 요청 및 배치 요청 사이에 사전에 지연 추가). API에는 분당 요청과 분당 토큰에 대한 별도의 제한이 있습니다.
Managing costs
To monitor your costs, you can set a soft limit in your account to receive an email alert once you pass a certain usage threshold. You can also set a hard limit. Please be mindful of the potential for a hard limit to cause disruptions to your application/users. Use theusage tracking dashboardto monitor your token usage during the current and past billing cycles.
비용을 모니터링하기 위해 특정 사용 임계값을 초과하면 이메일 알림을 받도록 계정에 소프트 한도를 설정할 수 있습니다. 하드 제한을 설정할 수도 있습니다. 엄격한 제한으로 인해 애플리케이션/사용자가 중단될 가능성이 있음을 염두에 두십시오. 사용량 추적 대시보드를 사용하여 현재 및 과거 청구 주기 동안 토큰 사용량을 모니터링하십시오.
Text generation
One of the challenges of moving your prototype into production is budgeting for the costs associated with running your application. OpenAI offers apay-as-you-go pricing model, with prices per 1,000 tokens (roughly equal to 750 words). To estimate your costs, you will need to project the token utilization. Consider factors such as traffic levels, the frequency with which users will interact with your application, and the amount of data you will be processing.
프로토타입을 프로덕션으로 옮기는 데 따르는 문제 중 하나는 애플리케이션 실행과 관련된 비용을 위한 예산을 책정하는 것입니다. OpenAI는 1,000개 토큰(대략 750단어에 해당)당 가격으로 종량제 가격 책정 모델을 제공합니다. 비용을 추정하려면 토큰 활용도를 예측해야 합니다. 트래픽 수준, 사용자가 애플리케이션과 상호 작용하는 빈도, 처리할 데이터 양과 같은 요소를 고려하십시오.
One useful framework for thinking about reducing costs is to consider costs as a function of the number of tokens and the cost per token.There are two potential avenues for reducing costs using this framework. First, you could work to reduce the cost per token by switching to smaller models for some tasks in order to reduce costs. Alternatively, you could try to reduce the number of tokens required. There are a few ways you could do this, such as by using shorter prompts,fine-tuningmodels, or caching common user queries so that they don't need to be processed repeatedly.
비용 절감에 대해 생각할 수 있는 유용한 프레임워크 중 하나는 토큰 수와 토큰당 비용의 함수로 비용을 고려하는 것입니다. 이 프레임워크를 사용하여 비용을 절감할 수 있는 두 가지 잠재적 방법이 있습니다. 첫째, 비용을 줄이기 위해 일부 작업에 대해 더 작은 모델로 전환하여 토큰당 비용을 줄이는 작업을 할 수 있습니다. 또는 필요한 토큰 수를 줄일 수 있습니다. 짧은 프롬프트를 사용하거나, 모델을 미세 조정하거나, 반복적으로 처리할 필요가 없도록 일반 사용자 쿼리를 캐싱하는 등의 몇 가지 방법이 있습니다.
You can experiment with our interactivetokenizer toolto help you estimate costs. The API and playground also returns token counts as part of the response. Once you’ve got things working with our most capable model, you can see if the other models can produce the same results with lower latency and costs. Learn more in ourtoken usage help article.
대화형 토크나이저 도구를 실험하여 비용을 추정할 수 있습니다. API와 놀이터는 또한 응답의 일부로 토큰 수를 반환합니다. 가장 유능한 모델로 작업을 수행하면 다른 모델이 더 낮은 대기 시간과 비용으로 동일한 결과를 생성할 수 있는지 확인할 수 있습니다. 토큰 사용 도움말 문서에서 자세히 알아보세요.
MLOps strategy
As you move your prototype into production, you may want to consider developing an MLOps strategy. MLOps (machine learning operations) refers to the process of managing the end-to-end life cycle of your machine learning models, including any models you may be fine-tuning using our API. There are a number of areas to consider when designing your MLOps strategy. These include
프로토타입을 프로덕션으로 옮길 때 MLOps 전략 개발을 고려할 수 있습니다. MLOps(기계 학습 작업)는 API를 사용하여 미세 조정할 수 있는 모든 모델을 포함하여 기계 학습 모델의 종단 간 수명 주기를 관리하는 프로세스를 나타냅니다. MLOps 전략을 설계할 때 고려해야 할 여러 영역이 있습니다. 여기에는 다음이 포함됩니다.
Data and model management: managing the data used to train or fine-tune your model and tracking versions and changes.
데이터 및 모델 관리: 모델 훈련 또는 미세 조정에 사용되는 데이터를 관리하고 버전 및 변경 사항을 추적합니다.
Model monitoring: tracking your model's performance over time and detecting any potential issues or degradation.
모델 모니터링: 시간이 지남에 따라 모델의 성능을 추적하고 잠재적인 문제 또는 성능 저하를 감지합니다.
Model retraining: ensuring your model stays up to date with changes in data or evolving requirements and retraining or fine-tuning it as needed.
모델 재훈련: 데이터의 변화나 진화하는 요구 사항에 따라 모델을 최신 상태로 유지하고 필요에 따라 모델을 재훈련하거나 미세 조정합니다.
Model deployment: automating the process of deploying your model and related artifacts into production.
모델 배포: 모델 및 관련 아티팩트를 프로덕션에 배포하는 프로세스를 자동화합니다.
Thinking through these aspects of your application will help ensure your model stays relevant and performs well over time.
응용 프로그램의 이러한 측면을 고려하면 모델이 관련성을 유지하고 시간이 지남에 따라 잘 수행되도록 하는 데 도움이 됩니다.
Security and compliance
As you move your prototype into production, you will need to assess and address any security and compliance requirements that may apply to your application. This will involve examining the data you are handling, understanding how our API processes data, and determining what regulations you must adhere to. For reference, here is ourPrivacy PolicyandTerms of Use.
프로토타입을 프로덕션으로 이동하면 애플리케이션에 적용될 수 있는 모든 보안 및 규정 준수 요구 사항을 평가하고 해결해야 합니다. 여기에는 귀하가 처리하는 데이터를 검토하고 API가 데이터를 처리하는 방법을 이해하고 준수해야 하는 규정을 결정하는 것이 포함됩니다. 참고로 개인 정보 보호 정책 및 이용 약관은 다음과 같습니다.
Some common areas you'll need to consider include data storage, data transmission, and data retention. You might also need to implement data privacy protections, such as encryption or anonymization where possible. In addition, you should follow best practices for secure coding, such as input sanitization and proper error handling.
고려해야 할 몇 가지 공통 영역에는 데이터 스토리지, 데이터 전송 및 데이터 보존이 포함됩니다. 가능한 경우 암호화 또는 익명화와 같은 데이터 개인 정보 보호를 구현해야 할 수도 있습니다. 또한 입력 삭제 및 적절한 오류 처리와 같은 안전한 코딩을 위한 모범 사례를 따라야 합니다.
Safety best practices
When creating your application with our API, consider oursafety best practicesto ensure your application is safe and successful. These recommendations highlight the importance of testing the product extensively, being proactive about addressing potential issues, and limiting opportunities for misuse.
API로 애플리케이션을 생성할 때 안전 모범 사례를 고려하여 애플리케이션이 안전하고 성공적인지 확인하세요. 이러한 권장 사항은 제품을 광범위하게 테스트하고 잠재적인 문제를 사전에 해결하며 오용 기회를 제한하는 것의 중요성을 강조합니다.
Themoderationendpoint is a tool you can use to check whether content complies with OpenAI'scontent policy. Developers can thus identify content that our content policy prohibits and take action, for instance by filtering it.
The models classifies the following categories:
조정 끝점(moderationendpoint )은 콘텐츠가 OpenAI의 콘텐츠 정책을 준수하는지 확인하는 데 사용할 수 있는 도구입니다. 따라서 개발자는 콘텐츠 정책에서 금지하는 콘텐츠를 식별하고 예를 들어 필터링을 통해 조치를 취할 수 있습니다.
모델은 다음과 같이 분류 됩니다.
CATEGORY DESCRIPTION
hate
Content that expresses, incites, or promotes hate based on race, gender, ethnicity, religion, nationality, sexual orientation, disability status, or caste. 인종, 성별, 민족, 종교, 국적, 성적 취향, 장애 상태 또는 계급에 따라 증오를 표현, 선동 또는 조장하는 콘텐츠.
hate/threatening
Hateful content that also includes violence or serious harm towards the targeted group. 대상 그룹에 대한 폭력 또는 심각한 피해를 포함하는 증오성 콘텐츠.
self-harm
Content that promotes, encourages, or depicts acts of self-harm, such as suicide, cutting, and eating disorders. 자살, 절단, 섭식 장애와 같은 자해 행위를 조장 또는 묘사하는 콘텐츠.
sexual
Content meant to arouse sexual excitement, such as the description of sexual activity, or that promotes sexual services (excluding sex education and wellness). 성행위 묘사 등 성적 흥분을 유발하거나 성행위를 조장하는 콘텐츠(성교육 및 웰빙 제외)
sexual/minors
Sexual content that includes an individual who is under 18 years old. 18세 미만의 개인이 포함된 성적 콘텐츠.
violence
Content that promotes or glorifies violence or celebrates the suffering or humiliation of others. 폭력을 조장 또는 미화하거나 다른 사람의 고통이나 굴욕을 기념하는 콘텐츠.
violence/graphic
Violent content that depicts death, violence, or serious physical injury in extreme graphic detail. 죽음, 폭력 또는 심각한 신체적 부상을 극도로 생생하게 묘사하는 폭력적인 콘텐츠입니다.
The moderation endpoint is free to use when monitoring the inputs and outputs of OpenAI APIs. We currently do not support monitoring of third-party traffic.
중재 엔드포인트(moderation endpoint)는 OpenAI API의 입력 및 출력을 모니터링할 때 무료로 사용할 수 있습니다. 현재 타사 트래픽 모니터링은 지원하지 않습니다.
We are continuously working to improve the accuracy of our classifier and are especially working to improve the classifications ofhate,self-harm, andviolence/graphiccontent. Our support for non-English languages is currently limited.
분류기(필터)의 정확성을 개선하기 위해 지속적으로 노력하고 있으며 특히 증오, 자해, 폭력/노골적인 콘텐츠의 분류를 개선하기 위해 노력하고 있습니다. 영어 이외의 언어에 대한 지원은 현재 제한되어 있습니다.
Quickstart
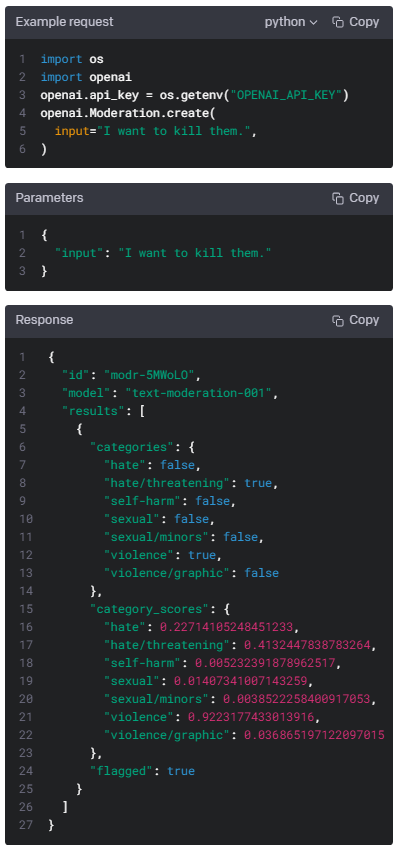
To obtain a classification for a piece of text, make a request to themoderation endpointas demonstrated in the following code snippets:
텍스트 조각에 대한 분류를 얻으려면 다음 코드 스니펫에 표시된 대로 조정 엔드포인트에 요청하십시오.
Below is an example output of the endpoint. It returns the following fields:
flagged: Set totrueif the model classifies the content as violating OpenAI's content policy,falseotherwise.
categories: Contains a dictionary of per-category binary content policy violation flags. For each category, the value istrueif the model flags the corresponding category as violated,falseotherwise.
category_scores: Contains a dictionary of per-category raw scores output by the model, denoting the model's confidence that the input violates the OpenAI's policy for the category. The value is between 0 and 1, where higher values denote higher confidence. The scores should not be interpreted as probabilities.
다음은 끝점(endpoint)의 출력 예입니다. 다음 필드를 반환합니다.
* flagged: 모델이 콘텐츠를 OpenAI의 콘텐츠 정책을 위반하는 것으로 분류하면 true로 설정하고 그렇지 않으면 false로 설정합니다. * 카테고리: 카테고리별 이진 콘텐츠 정책 위반 플래그의 사전을 포함합니다. 각 범주에 대해 모델이 해당 범주를 위반한 것으로 플래그를 지정하면 값은 true이고 그렇지 않으면 false입니다. * category_scores: 입력이 범주에 대한 OpenAI의 정책을 위반한다는 모델의 신뢰도를 나타내는 모델의 범주별 원시 점수 출력 사전을 포함합니다. 값은 0과 1 사이이며 값이 높을수록 신뢰도가 높습니다. 점수를 확률로 해석해서는 안 됩니다.
OpenAI will continuously upgrade the moderation endpoint's underlying model. Therefore, custom policies that rely oncategory_scoresmay need recalibration over time.
OpenAI는 조정 엔드포인트(moderation endpoint)의 기본 모델을 지속적으로 업그레이드합니다. 따라서 category_scores에 의존하는 사용자 정의 정책은 시간이 지남에 따라 재조정이 필요할 수 있습니다.