개발자로서 현장에서 일하면서 새로 접하는 기술들이나 알게된 정보 등을 정리하기 위한 블로그입니다. 운 좋게 미국에서 큰 회사들의 프로젝트에서 컬설턴트로 일하고 있어서 새로운 기술들을 접할 기회가 많이 있습니다. 미국의 IT 프로젝트에서 사용되는 툴들에 대해 많은 분들과 정보를 공유하고 싶습니다.
It’s been two months since we announced GPTs, and users have already created over 3 million custom versions of ChatGPT. Many builders have shared their GPTs for others to use. Today, we're starting to roll out the GPT Store to ChatGPT Plus, Team and Enterprise users so you can find useful and popular GPTs. Visit chat.openai.com/gpts to explore.
GPTs 를 발표한 지 두 달이 지났고 사용자는 이미 300만 개 이상의 ChatGPT 맞춤 버전을 만들었습니다. 많은 빌더가 다른 사람들이 사용할 수 있도록 GPTs 를 공유했습니다. 오늘 우리는 유용하고 인기 있는 GPTs 를 찾을 수 있도록 ChatGPT Plus, Team 및 Enterprise 사용자에게 GPT Store를 출시하기 시작했습니다. chat.openai.com/gpts를 방문하여 살펴보세요.
Discover what’s trending in the store
The store features a diverse range of GPTs developed by our partners and the community. Browse popular and trending GPTs on the community leaderboard, with categories like DALL·E, writing, research, programming, education, and lifestyle.
이 스토어에는 파트너와 커뮤니티가 개발한 다양한 GPT가 있습니다. 커뮤니티 리더보드에서 DALL·E, 글쓰기, 연구, 프로그래밍, 교육, 라이프스타일과 같은 카테고리를 포함하는 인기 있고 인기 있는 GPT를 찾아보세요.
New featured GPTs every week
We will also highlight useful and impactful GPTs. Some of our first featured GPTs include:
또한 유용하고 영향력 있는 GPT를 강조하겠습니다. 첫 번째 주요 GPT 중 일부는 다음과 같습니다.
Building your own GPT is simple and doesn't require any coding skills.
자신만의 GPT를 구축하는 것은 간단하며 코딩 기술이 필요하지 않습니다.
If you’d like to share a GPT in the store, you’ll need to:스토어에서 GPT를 공유하려면 다음을 수행해야 합니다.
Save your GPT forEveryone(Anyone with a linkwill not be shown in the store).
모든 사람을 위해 GPT를 저장하세요. 링크가 있는 사람은 누구나 스토어에 표시되지 않습니다.
Verify your Builder Profile (Settings→Builder profile→Enable your name or a verified website).
빌더 프로필을 확인하세요(설정 → 빌더 프로필 → 이름 또는 확인된 웹사이트 활성화).
Please review our latestusage policiesandGPT brand guidelinesto ensure your GPT is compliant. To help ensure GPTs adhere to our policies, we've established a new review system in addition to the existing safety measures we've built into our products. The review process includes both human and automated review. Users are alsoable to reportGPTs.
귀하의 GPT가 규정을 준수하는지 확인하려면 최신 사용 정책과 GPT 브랜드 가이드라인을 검토하세요. GPT가 Google 정책을 준수할 수 있도록 Google에서는 제품에 적용한 기존 안전 조치 외에 새로운 검토 시스템을 구축했습니다. 검토 프로세스에는 사람이 수행하는 검토와 자동 검토가 모두 포함됩니다. 사용자는 GPT를 보고할 수도 있습니다.
Builders can earn based on GPT usage
In Q1 we will launch a GPT builder revenue program. As a first step, US builders will be paid based on user engagement with their GPTs. We'll provide details on the criteria for payments as we get closer.
1분기에는 GPT 빌더 수익 프로그램을 시작할 예정입니다. 첫 번째 단계로 미국 builders 는 GPT에 대한 사용자 참여를 기반으로 비용을 지불받습니다. 결제 기준에 대한 자세한 내용은 추후 확정되는 대로 안내해 드리겠습니다.
Team and Enterprise customers can manage GPTs
Today, we announced our newChatGPT Teamplan for teams of all sizes. Team customers have access to a private section of the GPT Store which includes GPTs securely published to your workspace. The GPT Store will be available soon forChatGPT Enterprisecustomers and will include enhanced admin controls like choosing how internal-only GPTs are shared and which external GPTs may be used inside your business. Like all usage on ChatGPT Team and Enterprise, we do not use your conversations with GPTs to improve our models.
오늘 우리는 모든 규모의 팀을 위한 새로운 ChatGPT 팀 계획을 발표했습니다. 팀 고객은 작업공간에 안전하게 게시된 GPT가 포함된 GPT 스토어의 비공개 섹션에 액세스할 수 있습니다. GPT 스토어는 곧 ChatGPT Enterprise 고객에게 제공될 예정이며 내부 전용 GPT 공유 방법 및 비즈니스 내에서 사용할 수 있는 외부 GPT 선택과 같은 향상된 관리 제어 기능이 포함됩니다. ChatGPT Team 및 Enterprise의 모든 사용과 마찬가지로 우리는 모델을 개선하기 위해 GPT와의 대화를 사용하지 않습니다.
We support journalism, partner with news organizations, and believe The New York Times lawsuit is without merit.
Our goal is to develop AI tools thatempower peopleto solve problems that are otherwise out of reach. People worldwide are already using our technology toimprove their daily lives. Millions of developers and more than 92% of Fortune 500 are building on our products today.
우리의 목표는 사람들이 다른 방법으로는 접근할 수 없는 문제를 해결할 수 있도록 지원하는 AI 도구를 개발하는 것입니다. 전 세계 사람들은 이미 일상 생활을 개선하기 위해 우리의 기술을 사용하고 있습니다. 오늘날 수백만 명의 개발자와 Fortune 500대 기업 중 92% 이상이 우리 제품을 기반으로 개발하고 있습니다.
While we disagree with the claims in The New York Times lawsuit, we view it as an opportunity to clarify our business, our intent, and how we build our technology. Our position can be summed up in these four points, which we flesh out below:
우리는 New York Times 소송의 주장에 동의하지 않지만, 이를 우리의 비즈니스, 의도, 기술 구축 방법을 명확히 할 수 있는 기회로 봅니다. 우리의 입장은 다음 네 가지로 요약될 수 있으며, 아래에서 구체적으로 설명하겠습니다.
We collaborate with news organizations and are creating new opportunities
우리는 언론 기관과 협력하여 새로운 기회를 창출하고 있습니다.
Training is fair use, but we provide an opt-out because it’s the right thing to do
Training 은 공정한 사용이지 올바른 일이기 때문에 거부할 수 있는 옵션을 제공합니다.
“Regurgitation” is a rare bug that we are working to drive to zero
"Regurgitation 역류, 표"는 우리가 제로화하기 위해 노력하고 있는 희귀한 버그입니다.
The New York Times is not telling the full story
New York Times는 전체 내용을 말하지 않습니다.
1. We collaborate with news organizations and are creating new opportunities
1. 우리는 언론사와 협력하여 새로운 기회를 창출하고 있습니다.
We work hard in our technology design process to support news organizations. We’ve met with dozens, as well as leading industry organizations like the News/Media Alliance, to explore opportunities, discuss their concerns, and provide solutions. We aim to learn, educate, listen to feedback, and adapt.
우리는 언론사를 지원하기 위해 기술 설계 프로세스에 열심히 노력하고 있습니다. 우리는 기회를 탐색하고, 우려 사항을 논의하고, 솔루션을 제공하기 위해 뉴스/미디어 연합(News/Media Alliance)과 같은 선도적인 업계 조직뿐만 아니라 수십 곳을 만났습니다. 우리는 배우고, 교육하고, 피드백을 듣고, 적응하는 것을 목표로 합니다.
Our goals are to support a healthy news ecosystem, be a good partner, and create mutually beneficial opportunities. With this in mind, we have pursued partnerships with news organizations to achieve these objectives:
우리의 목표는 건강한 뉴스 생태계를 지원하고, 좋은 파트너가 되며, 상호 이익이 되는 기회를 창출하는 것입니다. 이를 염두에 두고 우리는 다음과 같은 목표를 달성하기 위해 언론 기관과 파트너십을 추구해 왔습니다.
Deploy our products to benefit and support reporters and editors, by assisting with time-consuming tasks like analyzing voluminous public records and translating stories.
방대한 공공 기록 분석 및 기사 번역과 같이 시간이 많이 걸리는 작업을 지원하여 기자와 편집자에게 혜택을 주고 지원하기 위해 제품을 배포합니다.
Teach our AI models about the world by training on additional historical, non-publicly available content.
추가로 비공개로 제공되는 역사적 콘텐츠를 훈련하여 AI 모델에 세상에 대해 가르칩니다.
Display real-time content with attribution in ChatGPT, providing new ways for news publishers to connect with readers.
ChatGPT에 속성이 포함된 실시간 콘텐츠를 표시하여 뉴스 게시자가 독자와 연결할 수 있는 새로운 방법을 제공합니다.
Associated Press, Axel Springer, American Journalism Project 및 NYU와의 초기 파트너십을 통해 우리의 접근 방식을 엿볼 수 있습니다.
2. Training is fair use, but we provide an opt-out because it’s the right thing to do
2. Training은 공정한 사용이지만 옳은 일이기 때문에 거부할 수 있는 옵션을 제공합니다.
Training AI models using publicly available internet materials is fair use, as supported by long-standing and widely accepted precedents. We view this principle as fair to creators, necessary for innovators, and critical for US competitiveness.
공개적으로 이용 가능한 인터넷 자료를 사용하여 AI 모델을 훈련시키는 것은 오랫동안 지속되고 널리 받아들여지는 선례에 의해 뒷받침되는 공정 사용입니다. 우리는 이 원칙이 창작자에게는 공정하고 혁신가에게는 필요하며 미국 경쟁력에 매우 중요하다고 생각합니다.
AI 모델 훈련이 공정한 사용으로 허용된다는 원칙은 최근 미국 저작권청에 의견을 제출한 다양한 학계, 도서관 협회, 시민 사회 단체, 스타트업, 미국 선도 기업, 창작자, 작가 및 기타 사람들에 의해 지지됩니다. 유럽 연합, 일본, 싱가포르, 이스라엘을 포함한 다른 지역 및 국가에도 저작권이 있는 콘텐츠에 대한 훈련 모델을 허용하는 법률이 있습니다. 이는 AI 혁신, 발전 및 투자에 유리합니다.
That being said, legal right is less important to us than being good citizens. We have led the AI industry in providing a simple opt-outprocessfor publishers (which The New York Times adopted in August 2023) to prevent our tools from accessing their sites.
즉, 법적 권리는 좋은 시민이 되는 것보다 우리에게 덜 중요합니다. Google은 Google 도구가 사이트에 액세스하지 못하도록 게시자에게 간단한 거부 프로세스(2023년 8월 New York Times 채택)를 제공함으로써 AI 업계를 주도해 왔습니다.
3. “Regurgitation” is a rare bug that we are working to drive to zero
3. “Regurgitation, 표절, 역류, 토해내”는 우리가 제로화하기 위해 노력하고 있는 희귀한 버그입니다.
Our models were designed and trained to learn concepts in order to apply them tonew problems.
우리의 모델은 개념을 새로운 문제에 적용하기 위해 학습하도록 설계되고 훈련되었습니다.
Memorization is a rare failure of the learning process that we are continually making progress on, but it’s more common when particular content appears more than once in training data, like if pieces of it appear on lots of different public websites. So we have measures in place to limit inadvertent memorization and prevent regurgitation in model outputs. We also expect our users to act responsibly; intentionally manipulating our models to regurgitate is not an appropriate use of our technology and is against our terms of use.
암기 Memorization 는 우리가 지속적으로 발전하고 있는 학습 과정에서 드문 실패이지만, 특정 콘텐츠가 여러 공개 웹사이트에 나타나는 것처럼 특정 콘텐츠가 훈련 데이터에 두 번 이상 나타날 때 더 일반적입니다. 따라서 우리는 의도하지 않은 암기 Memorization 를 제한하고 모델 출력의 역류 Regurgitation 를 방지하기 위한 조치를 취했습니다. 또한 우리는 사용자가 책임감 있게 행동할 것을 기대합니다. 의도적으로 모델을 조작하여 역류 Regurgitation 시키는 것은 당사 기술의 적절한 사용이 아니며 당사 이용 약관에 위배됩니다.
Just as humans obtain a broad education to learn how to solve new problems, we want our AI models to observe the range of the world’s information, including from every language, culture, and industry. Because models learn from the enormous aggregate of human knowledge, any one sector—including news—is a tiny slice of overall training data, and any single data source—including The New York Times—is not significant for the model’s intended learning.
인간이 새로운 문제를 해결하는 방법을 배우기 위해 광범위한 교육을 받는 것처럼 우리는 AI 모델이 모든 언어, 문화, 산업을 포함하여 전 세계의 다양한 정보를 관찰하기를 원합니다. 모델은 인간 지식의 막대한 집합체로부터 학습하기 때문에 뉴스를 포함한 모든 한 부문은 전체 교육 데이터의 작은 조각이며 New York Times를 포함한 단일 데이터 소스는 모델의 의도된 학습에 중요하지 않습니다.
4. The New York Times is not telling the full story
4. 뉴욕타임스는 전체 내용을 말하지 않습니다.
Our discussions with The New York Times had appeared to be progressing constructively through our last communication on December 19. The negotiations focused on a high-value partnership around real-time display with attribution in ChatGPT, in which The New York Times would gain a new way to connect with their existing and new readers, and our users would gain access to their reporting. We had explained to The New York Times that, like any single source, their content didn't meaningfully contribute to the training of our existing models and also wouldn't be sufficiently impactful for future training. Their lawsuit on December 27—which we learned about by reading The New York Times—came as a surprise and disappointment to us.
The New York Times와의 논의는 12월 19일 마지막 커뮤니케이션을 통해 건설적으로 진행되는 것으로 나타났습니다. 협상은 ChatGPT의 속성이 포함된 실시간 디스플레이를 중심으로 한 고부가가치 파트너십에 초점을 맞췄으며, 이로 인해 The New York Times는 새로운 이점을 얻게 됩니다. 기존 및 신규 독자와 연결하는 방법이며 사용자는 보고에 액세스할 수 있습니다. 우리는 다른 단일 소스와 마찬가지로 해당 콘텐츠가 기존 모델의 교육에 의미 있게 기여하지 않았으며 향후 교육에도 충분한 영향을 미치지 않을 것이라고 The New York Times에 설명했습니다. New York Times를 읽으면서 알게 된 12월 27일의 소송은 우리에게 놀라움과 실망으로 다가왔습니다.
Along the way, they had mentioned seeing some regurgitation of their content but repeatedly refused to share any examples, despite our commitment to investigate and fix any issues. We’ve demonstrated how seriously we treat this as a priority, such as in July when wetook down a ChatGPT featureimmediately after we learned it could reproduce real-time content in unintended ways.
그 과정에서 그들은 콘텐츠가 일부 역류 Regurgitation 되는 것을 언급했지만 문제를 조사하고 수정하겠다는 우리의 노력에도 불구하고 어떤 사례도 공유하기를 반복적으로 거부했습니다. 우리는 의도하지 않은 방식으로 실시간 콘텐츠를 재현할 수 있다는 사실을 알게 된 직후 ChatGPT 기능을 중단한 7월과 같이 이를 얼마나 진지하게 우선순위로 취급하는지 보여주었습니다.
Interestingly, the regurgitations The New York Times induced appear to be from years-old articles that have proliferated onmultiplethird-partywebsites. It seems they intentionally manipulated prompts, often including lengthy excerpts of articles, in order to get our model to regurgitate. Even when using such prompts, our models don’t typically behave the way The New York Times insinuates, which suggests they either instructed the model to regurgitate or cherry-picked their examples from many attempts.
흥미롭게도 New York Times가 유발한 역류 Regurgitation 는 여러 제3자 웹사이트에 확산된 오래된 기사에서 나온 것으로 보입니다. 우리 모델이 역류 Regurgitation 하도록 하기 위해 종종 긴 기사 발췌를 포함하여 프롬프트를 의도적으로 조작한 것 같습니다. 이러한 프롬프트를 사용할 때에도 우리 모델은 일반적으로 The New York Times가 암시하는 방식으로 동작하지 않습니다. 이는 모델이 모델에 역류 Regurgitation 하도록 지시했거나 여러 시도에서 사례를 선별했음을 의미합니다.
Despite their claims, this misuse is not typical or allowed user activity, and is not a substitute for The New York Times. Regardless, we are continually making our systems more resistant to adversarial attacks to regurgitate training data, and have already made much progress in our recent models.
그들의 주장에도 불구하고 이러한 오용은 일반적이지 않거나 허용되는 사용자 활동이 아니며 The New York Times를 대체할 수 없습니다. 그럼에도 불구하고 우리는 훈련 데이터를 역류 Regurgitation 시키는 적대적 공격에 대한 시스템 저항력을 높이기 위해 지속적으로 노력하고 있으며 이미 최근 모델에서 많은 진전을 이루었습니다.
We regard The New York Times’ lawsuit to be without merit. Still, we are hopeful for a constructive partnership with The New York Times and respect its long history, which includes reporting thefirst working neural networkover 60 years ago and championing First Amendment freedoms.
우리는 New York Times의 소송이 가치가 없다고 생각합니다. 그럼에도 불구하고 우리는 The New York Times와의 건설적인 파트너십을 희망하며 60년 전 최초로 작동하는 신경망을 보고하고 수정헌법 제1조의 자유를 옹호하는 등의 오랜 역사를 존중합니다.
We look forward to continued collaboration with news organizations, helping elevate their ability to produce quality journalism by realizing the transformative potential of AI.
우리는 AI의 혁신적인 잠재력을 실현하여 양질의 저널리즘을 생산하는 능력을 향상시키는 언론 기관과의 지속적인 협력을 기대합니다.
This is the end of the first part of the course! Part 2 will be released on November 15th with a big community event, see more informationhere.
이것으로 강좌의 첫 번째 부분이 끝났습니다! 파트 2는 대규모 커뮤니티 이벤트와 함께 11월 15일에 출시될 예정입니다. 자세한 내용은 여기에서 확인하세요.
You should now be able to fine-tune a pretrained model on a text classification problem (single or pairs of sentences) and upload the result to the Model Hub. To make sure you mastered this first section, you should do exactly that on a problem that interests you (and not necessarily in English if you speak another language)! You can find help in theHugging Face forumsand share your project inthis topiconce you’re finished.
이제 텍스트 분류 문제(단일 또는 쌍의 문장)에 대해 사전 학습된 모델을 미세 조정하고 결과를 모델 허브에 업로드할 수 있습니다. 이 첫 번째 섹션을 완전히 마스터하려면 관심 있는 문제에 대해 정확하게 해당 섹션을 완료해야 합니다(다른 언어를 사용하는 경우 반드시 영어로 할 필요는 없음)! Hugging Face 포럼에서 도움을 찾을 수 있으며 작업이 끝나면 이 주제에서 프로젝트를 공유할 수 있습니다.
We can’t wait to see what you will build with this!
The model card is a file which is arguably as important as the model and tokenizer files in a model repository. It is the central definition of the model, ensuring reusability by fellow community members and reproducibility of results, and providing a platform on which other members may build their artifacts.
모델 카드는 모델 저장소의 모델 및 토크나이저 파일만큼 중요한 파일입니다. 이는 모델의 핵심 정의로, 동료 커뮤니티 구성원의 재사용성과 결과 재현성을 보장하고 다른 구성원이 아티팩트를 구축할 수 있는 플랫폼을 제공합니다.
Documenting the training and evaluation process helps others understand what to expect of a model — and providing sufficient information regarding the data that was used and the preprocessing and postprocessing that were done ensures that the limitations, biases, and contexts in which the model is and is not useful can be identified and understood.
교육 및 평가 프로세스를 문서화하면 다른 사람들이 모델에 대해 기대하는 바를 이해하는 데 도움이 됩니다. 사용된 데이터와 수행된 전처리 및 후처리에 대한 충분한 정보를 제공하면 모델이 존재하는 한계, 편향 및 맥락을 보장할 수 있습니다. 유용하지 않은 것을 식별하고 이해할 수 있습니다.
Therefore, creating a model card that clearly defines your model is a very important step. Here, we provide some tips that will help you with this. Creating the model card is done through theREADME.mdfile you saw earlier, which is a Markdown file.
따라서 모델을 명확하게 정의하는 모델 카드를 만드는 것은 매우 중요한 단계입니다. 여기서는 이에 도움이 될 몇 가지 팁을 제공합니다. 모델 카드 생성은 앞서 본 Markdown 파일인 README.md 파일을 통해 이루어집니다.
The “model card” concept originates from a research direction from Google, first shared in the paper“Model Cards for Model Reporting”by Margaret Mitchell et al. A lot of information contained here is based on that paper, and we recommend you take a look at it to understand why model cards are so important in a world that values reproducibility, reusability, and fairness.
"모델 카드" 개념은 Margaret Mitchell 외 연구진이 "모델 보고를 위한 모델 카드" 논문에서 처음 공유한 Google의 연구 방향에서 비롯되었습니다. 여기에 포함된 많은 정보는 해당 논문을 기반으로 하며, 재현성, 재사용성 및 공정성을 중시하는 세계에서 모델 카드가 왜 그토록 중요한지 이해하기 위해 이 문서를 살펴보는 것이 좋습니다.
The model card usually starts with a very brief, high-level overview of what the model is for, followed by additional details in the following sections:
모델 카드는 일반적으로 모델의 용도에 대한 매우 간단하고 높은 수준의 개요로 시작하고 다음 섹션의 추가 세부정보가 이어집니다.
Model description. 모델 설명
Intended uses & limitations 용도 및 제한 사항
How to use 사용하는 방법
Limitations and bias 한계와 편견
Training data 훈련 데이터
Training procedure 훈련 절차
Evaluation results 평가 결과
Let’s take a look at what each of these sections should contain.
각 섹션에 어떤 내용이 포함되어야 하는지 살펴보겠습니다.
Model description
The model description provides basic details about the model. This includes the architecture, version, if it was introduced in a paper, if an original implementation is available, the author, and general information about the model. Any copyright should be attributed here. General information about training procedures, parameters, and important disclaimers can also be mentioned in this section.
모델 설명은 모델에 대한 기본 세부정보를 제공합니다. 여기에는 아키텍처, 버전, 논문에 소개된 경우, 원래 구현이 가능한 경우, 작성자 및 모델에 대한 일반 정보가 포함됩니다. 모든 저작권은 여기에 귀속되어야 합니다. 훈련 절차, 매개변수 및 중요한 면책 조항에 대한 일반 정보도 이 섹션에서 언급될 수 있습니다.
Intended uses & limitations
Here you describe the use cases the model is intended for, including the languages, fields, and domains where it can be applied. This section of the model card can also document areas that are known to be out of scope for the model, or where it is likely to perform suboptimally.
여기서는 모델이 적용될 수 있는 언어, 필드 및 도메인을 포함하여 모델의 사용 사례를 설명합니다. 모델 카드의 이 섹션은 모델의 범위를 벗어나는 것으로 알려진 영역이나 최적이 아닌 성능을 발휘할 가능성이 있는 영역을 문서화할 수도 있습니다.
How to use
This section should include some examples of how to use the model. This can showcase usage of thepipeline()function, usage of the model and tokenizer classes, and any other code you think might be helpful.
이 섹션에는 모델 사용 방법에 대한 몇 가지 예가 포함되어야 합니다. 이는 파이프라인() 함수의 사용법, 모델 및 토크나이저 클래스의 사용법, 도움이 될 수 있다고 생각되는 기타 코드를 보여줄 수 있습니다.
Training data
This part should indicate which dataset(s) the model was trained on. A brief description of the dataset(s) is also welcome.
이 부분은 모델이 훈련된 데이터세트를 나타내야 합니다. 데이터 세트에 대한 간략한 설명도 환영합니다.
Training procedure
In this section you should describe all the relevant aspects of training that are useful from a reproducibility perspective. This includes any preprocessing and postprocessing that were done on the data, as well as details such as the number of epochs the model was trained for, the batch size, the learning rate, and so on.
이 섹션에서는 재현성 관점에서 유용한 훈련의 모든 관련 측면을 설명해야 합니다. 여기에는 데이터에 대해 수행된 전처리 및 후처리뿐만 아니라 모델이 훈련된 시대 수, 배치 크기, 학습 속도 등과 같은 세부 정보도 포함됩니다.
Variable and metrics
Here you should describe the metrics you use for evaluation, and the different factors you are mesuring. Mentioning which metric(s) were used, on which dataset and which dataset split, makes it easy to compare you model’s performance compared to that of other models. These should be informed by the previous sections, such as the intended users and use cases.
여기에서는 평가에 사용하는 측정항목과 측정하는 다양한 요소를 설명해야 합니다. 어떤 측정항목이 사용되었는지, 어떤 데이터세트에 어떤 데이터세트가 분할되었는지 언급하면 모델의 성능을 다른 모델의 성능과 쉽게 비교할 수 있습니다. 이는 의도된 사용자 및 사용 사례와 같은 이전 섹션을 통해 알려야 합니다.
Evaluation results
Finally, provide an indication of how well the model performs on the evaluation dataset. If the model uses a decision threshold, either provide the decision threshold used in the evaluation, or provide details on evaluation at different thresholds for the intended uses.
마지막으로 모델이 평가 데이터 세트에서 얼마나 잘 수행되는지 표시합니다. 모델이 결정 임계값을 사용하는 경우 평가에 사용되는 결정 임계값을 제공하거나 의도된 용도에 대해 다양한 임계값에서의 평가에 대한 세부 정보를 제공합니다.
Example
Check out the following for a few examples of well-crafted model cards:
More examples from different organizations and companies are availablehere.
여기에서 다양한 조직 및 회사의 더 많은 사례를 확인할 수 있습니다.
Note
Model cards are not a requirement when publishing models, and you don’t need to include all of the sections described above when you make one. However, explicit documentation of the model can only benefit future users, so we recommend that you fill in as many of the sections as possible to the best of your knowledge and ability.
모델을 게시할 때 모델 카드는 필수 사항이 아니며, 모델을 만들 때 위에 설명된 모든 섹션을 포함할 필요는 없습니다. 그러나 모델에 대한 명시적인 문서화는 미래의 사용자에게만 도움이 될 수 있으므로 귀하의 지식과 능력을 최대한 활용하여 가능한 한 많은 섹션을 작성하는 것이 좋습니다.
Model card metadata
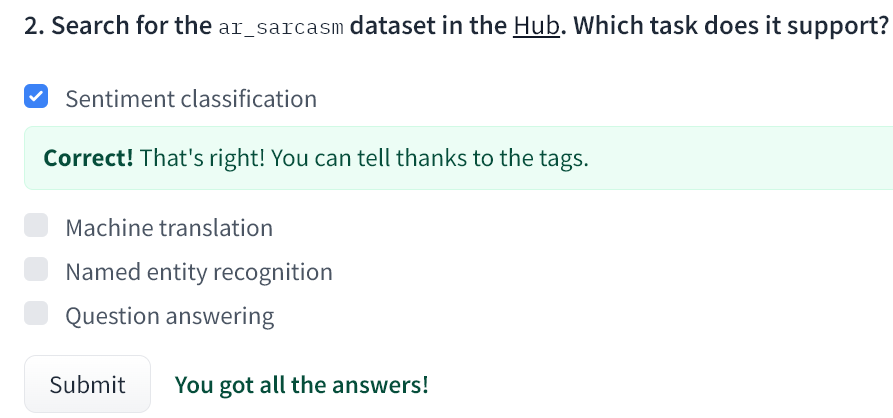
If you have done a little exploring of the Hugging Face Hub, you should have seen that some models belong to certain categories: you can filter them by tasks, languages, libraries, and more. The categories a model belongs to are identified according to the metadata you add in the model card header.
Hugging Face Hub를 조금 탐색했다면 일부 모델이 특정 범주에 속한다는 것을 알았을 것입니다. 작업, 언어, 라이브러리 등을 기준으로 필터링할 수 있습니다. 모델이 속한 카테고리는 모델 카드 헤더에 추가한 메타데이터에 따라 식별됩니다.
For example, if you take a look at thecamembert-basemodel card, you should see the following lines in the model card header:
---
language: fr
license: mit
datasets:
- oscar
---
This metadata is parsed by the Hugging Face Hub, which then identifies this model as being a French model, with an MIT license, trained on the Oscar dataset.
이 메타데이터는 Hugging Face Hub에 의해 구문 분석되며, 그런 다음 이 모델을 Oscar 데이터 세트에서 훈련된 MIT 라이선스를 갖춘 프랑스 모델로 식별합니다.
Thefull model card specificationallows specifying languages, licenses, tags, datasets, metrics, as well as the evaluation results the model obtained when training.
The full model card specification allows specifying languages, licenses, tags, datasets, metrics, as well as the evaluation results the model obtained when training.
In the steps below, we’ll take a look at the easiest ways to share pretrained models to the 🤗 Hub. There are tools and utilities available that make it simple to share and update models directly on the Hub, which we will explore below.
아래 단계에서는 사전 학습된 모델을 🤗 허브에 공유하는 가장 쉬운 방법을 살펴보겠습니다. 허브에서 직접 모델을 간단하게 공유하고 업데이트할 수 있는 도구와 유틸리티가 있습니다. 이에 대해서는 아래에서 살펴보겠습니다.
We encourage all users that train models to contribute by sharing them with the community — sharing models, even when trained on very specific datasets, will help others, saving them time and compute resources and providing access to useful trained artifacts. In turn, you can benefit from the work that others have done!
우리는 모델을 훈련하는 모든 사용자가 커뮤니티와 공유함으로써 기여하도록 권장합니다. 모델을 공유하면 매우 특정한 데이터 세트에 대해 훈련을 받은 경우에도 다른 사람에게 도움이 되고 시간을 절약하며 리소스를 계산하고 유용한 훈련된 아티팩트에 대한 액세스를 제공할 수 있습니다. 그러면 당신도 다른 사람들이 한 일로부터 유익을 얻을 수 있습니다!
There are three ways to go about creating new model repositories:
새 모델 리포지토리를 만드는 방법에는 세 가지가 있습니다.
Using thepush_to_hubAPI
push_to_hub API 사용
Using thehuggingface_hubPython library
Huggingface_hub Python 라이브러리 사용
Using the web interface
웹 인터페이스 사용
Once you’ve created a repository, you can upload files to it via git and git-lfs. We’ll walk you through creating model repositories and uploading files to them in the following sections.
저장소를 생성한 후에는 git 및 git-lfs를 통해 파일을 업로드할 수 있습니다. 다음 섹션에서는 모델 리포지토리를 생성하고 여기에 파일을 업로드하는 과정을 안내합니다.
The simplest way to upload files to the Hub is by leveraging thepush_to_hubAPI.
허브에 파일을 업로드하는 가장 간단한 방법은 push_to_hub API를 활용하는 것입니다.
Before going further, you’ll need to generate an authentication token so that thehuggingface_hubAPI knows who you are and what namespaces you have write access to. Make sure you are in an environment where you havetransformersinstalled (seeSetup). If you are in a notebook, you can use the following function to login:
더 진행하기 전에, Huggingface_hub API가 당신 누구인지, 어떤 네임스페이스에 쓰기 액세스 권한이 있는지 알 수 있도록 인증 토큰을 생성해야 합니다. 변압기가 설치된 환경에 있는지 확인하십시오(설정 참조). 노트북에 있는 경우 다음 기능을 사용하여 로그인할 수 있습니다.
from huggingface_hub import notebook_login

notebook_login()
In a terminal, you can run:
huggingface-cli login
In both cases, you should be prompted for your username and password, which are the same ones you use to log in to the Hub. If you do not have a Hub profile yet, you should create onehere.
두 경우 모두 허브에 로그인하는 데 사용하는 것과 동일한 사용자 이름과 비밀번호를 입력하라는 메시지가 표시됩니다. 아직 허브 프로필이 없다면 여기에서 생성해야 합니다.
Great! You now have your authentication token stored in your cache folder. Let’s create some repositories!
Great ! 이제 인증 토큰이 캐시 폴더에 저장되었습니다. 저장소를 만들어 봅시다!
If you have played around with theTrainerAPI to train a model, the easiest way to upload it to the Hub is to setpush_to_hub=Truewhen you define yourTrainingArguments:
모델을 훈련하기 위해 Trainer API를 사용해 본 경우 이를 허브에 업로드하는 가장 쉬운 방법은 TrainingArguments를 정의할 때 push_to_hub=True를 설정하는 것입니다.
When you calltrainer.train(), theTrainerwill then upload your model to the Hub each time it is saved (here every epoch) in a repository in your namespace. That repository will be named like the output directory you picked (herebert-finetuned-mrpc) but you can choose a different name withhub_model_id = "a_different_name".
Trainer.train()을 호출하면 Trainer는 모델이 네임스페이스의 저장소에 저장될 때마다(여기에서는 매 에포크마다) 모델을 허브에 업로드합니다. 해당 저장소의 이름은 선택한 출력 디렉터리(여기서는 bert-finetuned-mrpc)와 같이 지정되지만,hub_model_id = "a_ Different_name"을 사용하여 다른 이름을 선택할 수 있습니다.
To upload your model to an organization you are a member of, just pass it withhub_model_id = "my_organization/my_repo_name".
당신이 소속된 organization 에 모델을 업로드하려면, Hub_model_id = "my_organization/my_repo_name"으로 전달하세요.
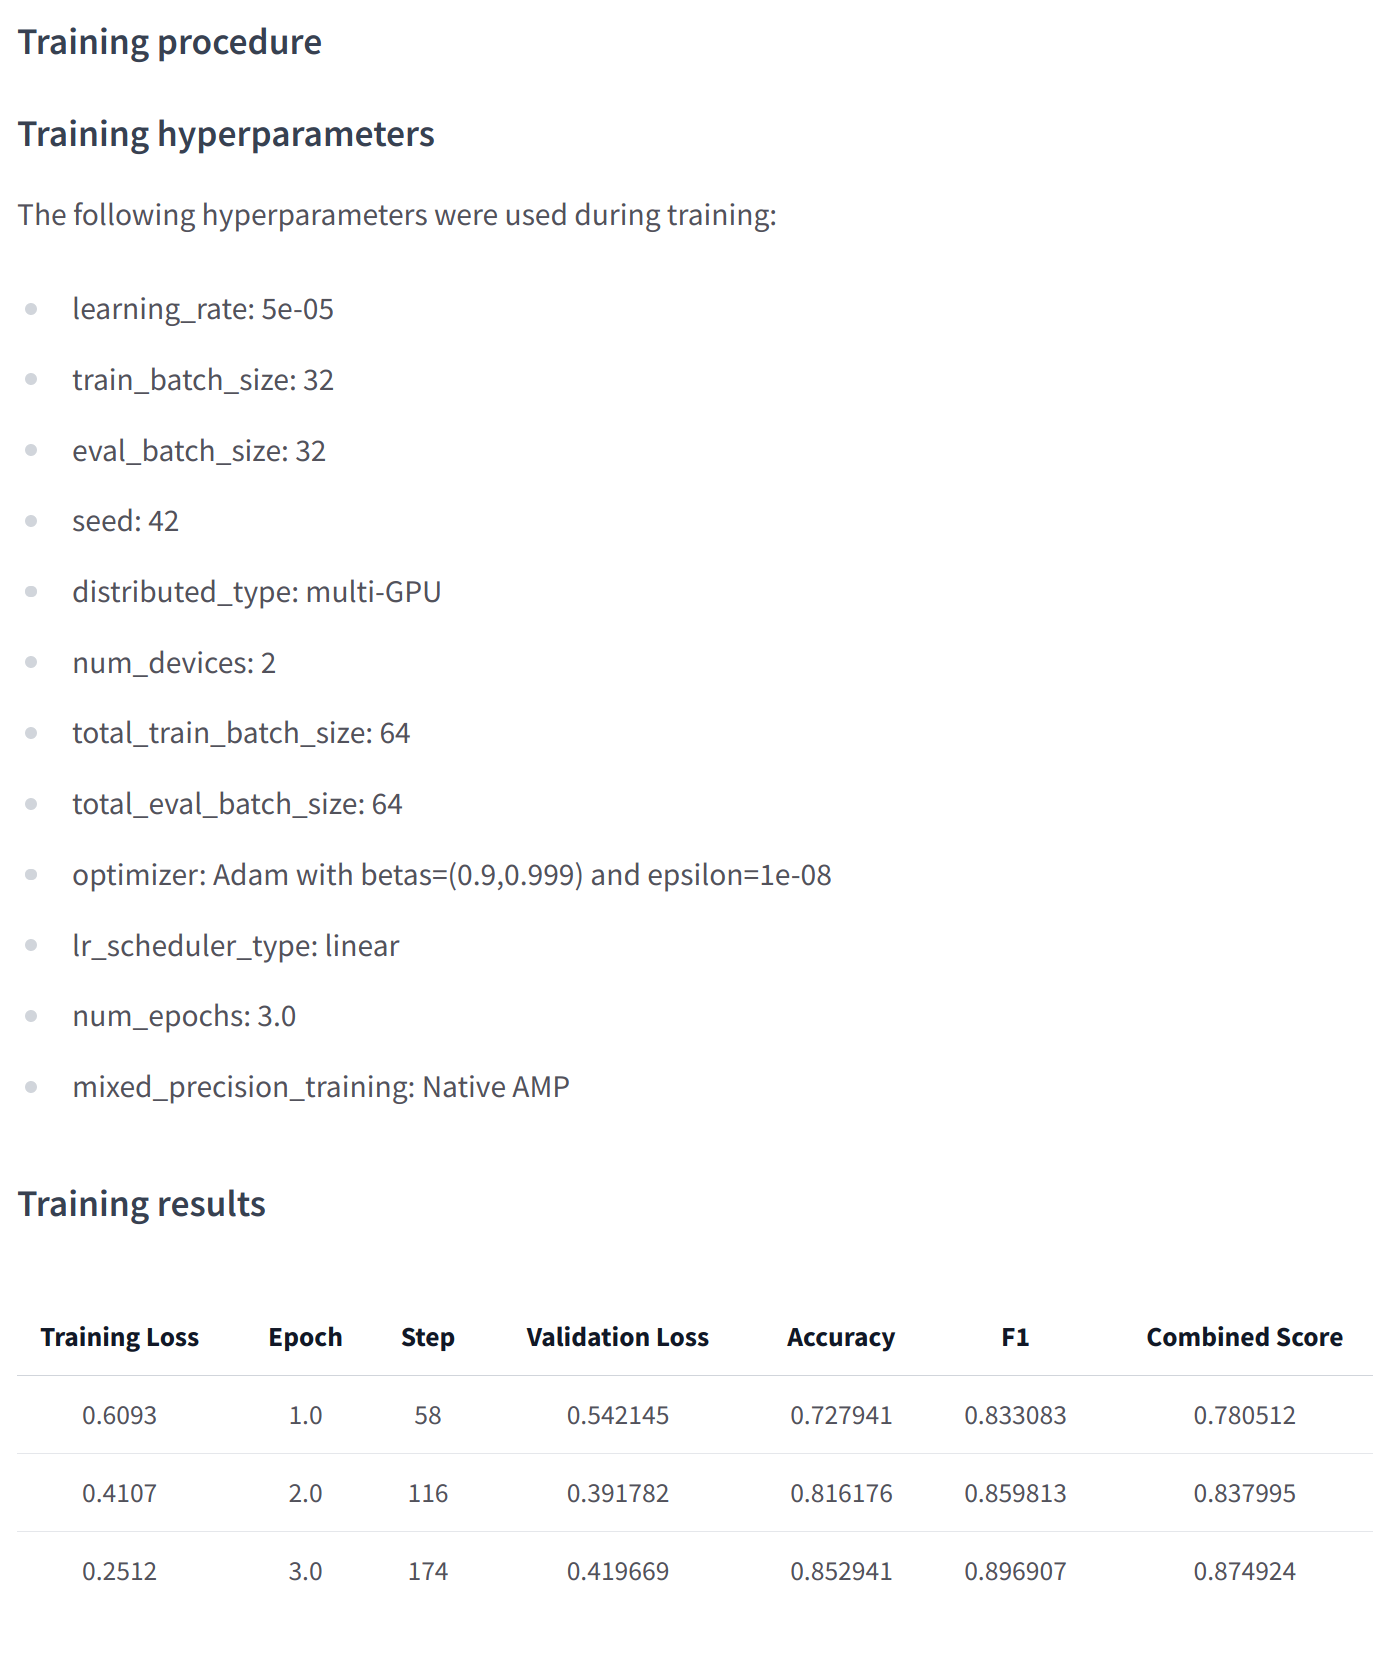
Once your training is finished, you should do a finaltrainer.push_to_hub()to upload the last version of your model. It will also generate a model card with all the relevant metadata, reporting the hyperparameters used and the evaluation results! Here is an example of the content you might find in a such a model card:
훈련이 완료되면 최종 training.push_to_hub()를 수행하여 모델의 마지막 버전을 업로드해야 합니다. 또한 사용된 하이퍼파라미터와 평가 결과를 보고하는 모든 관련 메타데이터가 포함된 모델 카드를 생성합니다! 다음은 이러한 모델 카드에서 찾을 수 있는 콘텐츠의 예입니다.
At a lower level, accessing the Model Hub can be done directly on models, tokenizers, and configuration objects via theirpush_to_hub()method. This method takes care of both the repository creation and pushing the model and tokenizer files directly to the repository. No manual handling is required, unlike with the API we’ll see below.
낮은 수준에서는 모델 허브에 대한 액세스가 push_to_hub() 메서드를 통해 모델, 토크나이저 및 구성 개체에서 직접 수행될 수 있습니다. 이 방법은 저장소 생성과 모델 및 토크나이저 파일을 저장소에 직접 푸시하는 작업을 모두 처리합니다. 아래에서 볼 API와 달리 수동 처리가 필요하지 않습니다.
To get an idea of how it works, let’s first initialize a model and a tokenizer:
작동 방식에 대한 아이디어를 얻으려면 먼저 모델과 토크나이저를 초기화해 보겠습니다.
from transformers import AutoModelForMaskedLM, AutoTokenizer

checkpoint = "camembert-base"

model = AutoModelForMaskedLM.from_pretrained(checkpoint)
tokenizer = AutoTokenizer.from_pretrained(checkpoint)
You’re free to do whatever you want with these — add tokens to the tokenizer, train the model, fine-tune it. Once you’re happy with the resulting model, weights, and tokenizer, you can leverage thepush_to_hub()method directly available on themodelobject:
토크나이저에 토큰을 추가하고, 모델을 훈련하고, 미세 조정하는 등 원하는 대로 무엇이든 자유롭게 할 수 있습니다. 결과 모델, 가중치 및 토크나이저에 만족하면 모델 객체에서 직접 사용할 수 있는 push_to_hub() 메서드를 활용할 수 있습니다.
model.push_to_hub("dummy-model")
This will create the new repositorydummy-modelin your profile, and populate it with your model files. Do the same with the tokenizer, so that all the files are now available in this repository:
그러면 프로필에 새 저장소 더미 모델이 생성되고 모델 파일이 채워집니다. 이제 토크나이저에서도 동일한 작업을 수행하여 이제 이 저장소에서 모든 파일을 사용할 수 있습니다.
tokenizer.push_to_hub("dummy-model")
If you belong to an organization, simply specify theorganizationargument to upload to that organization’s namespace:
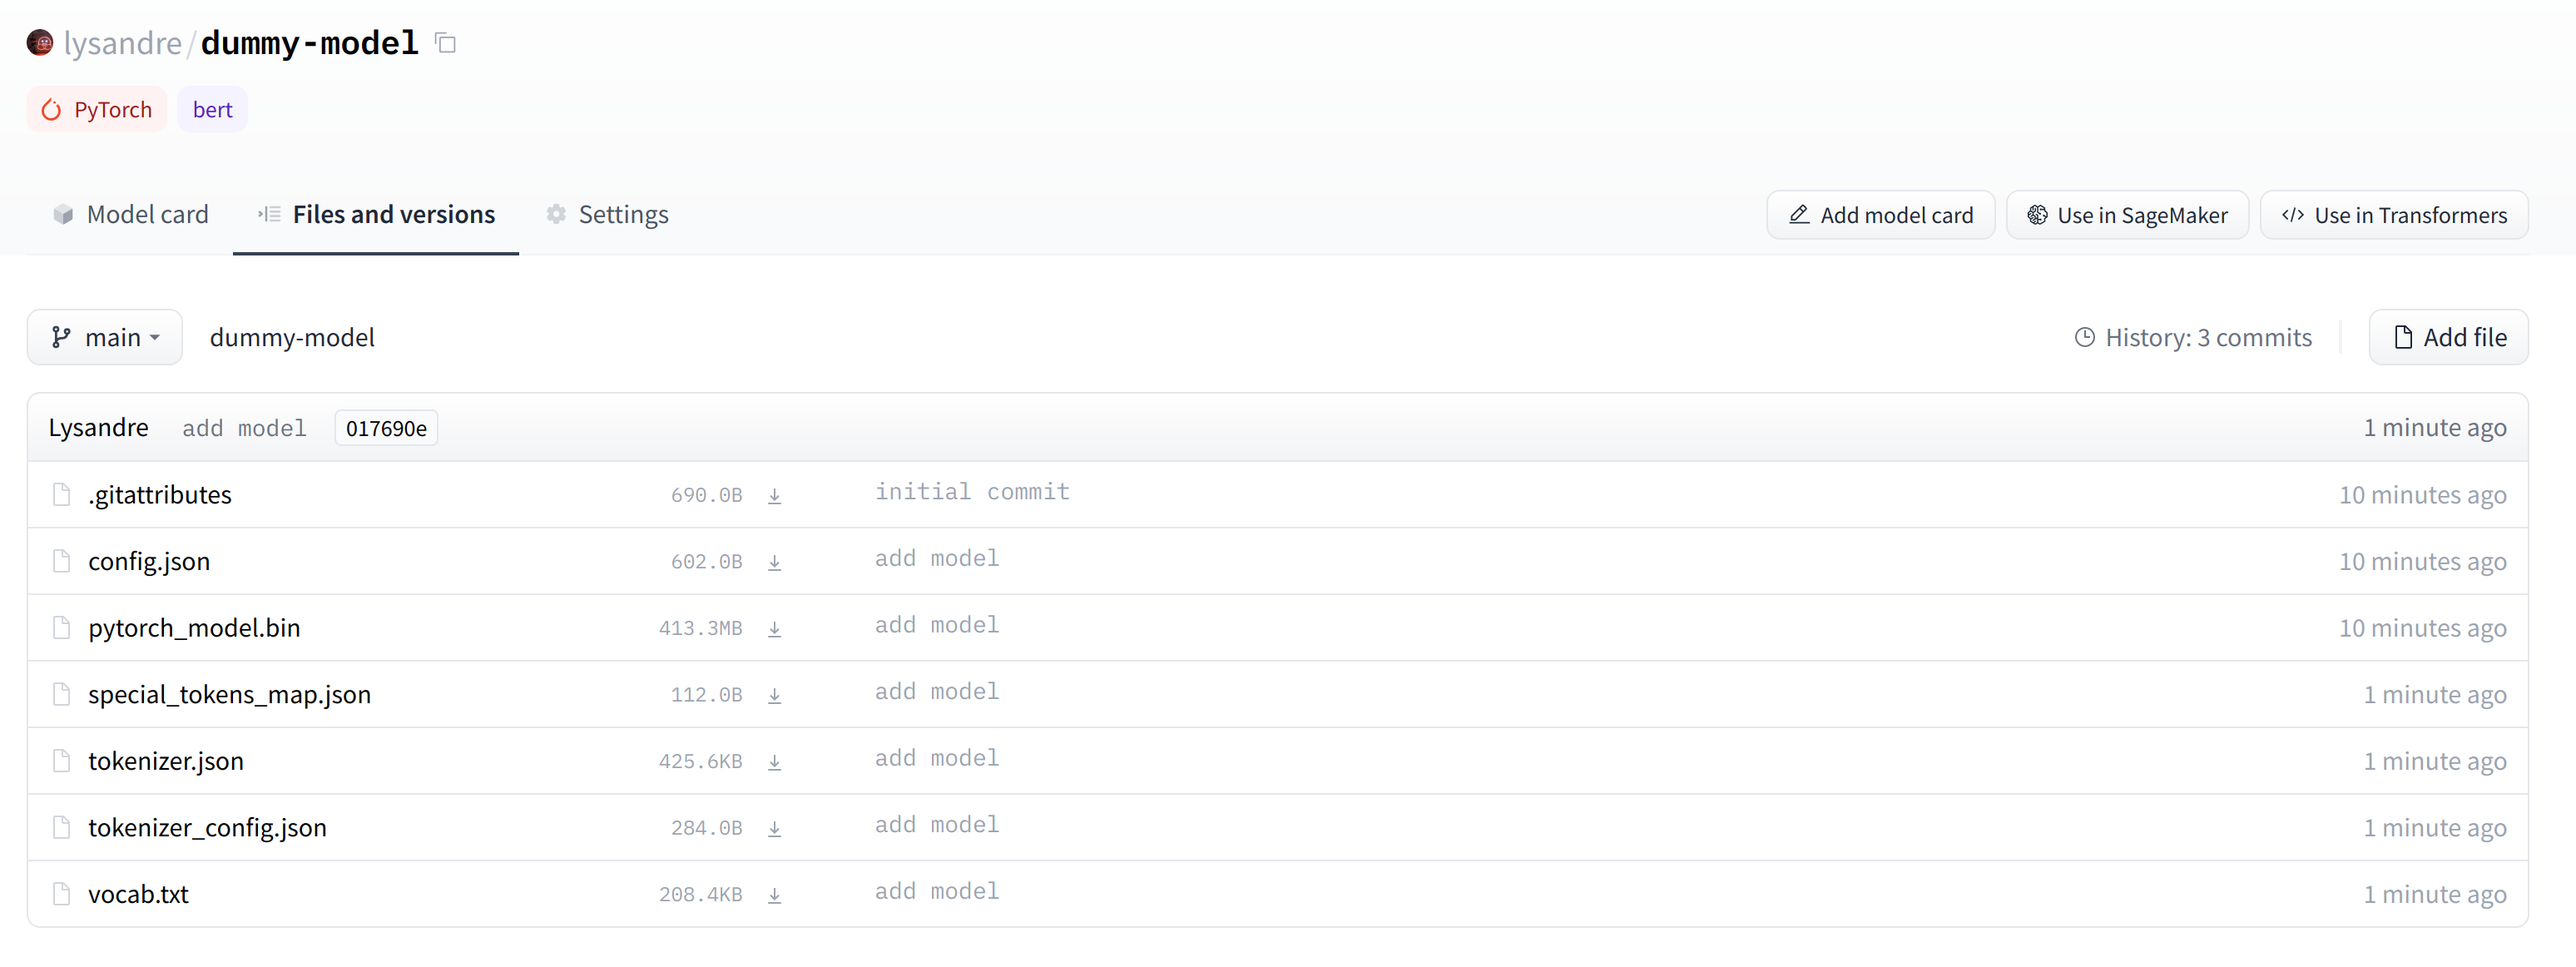
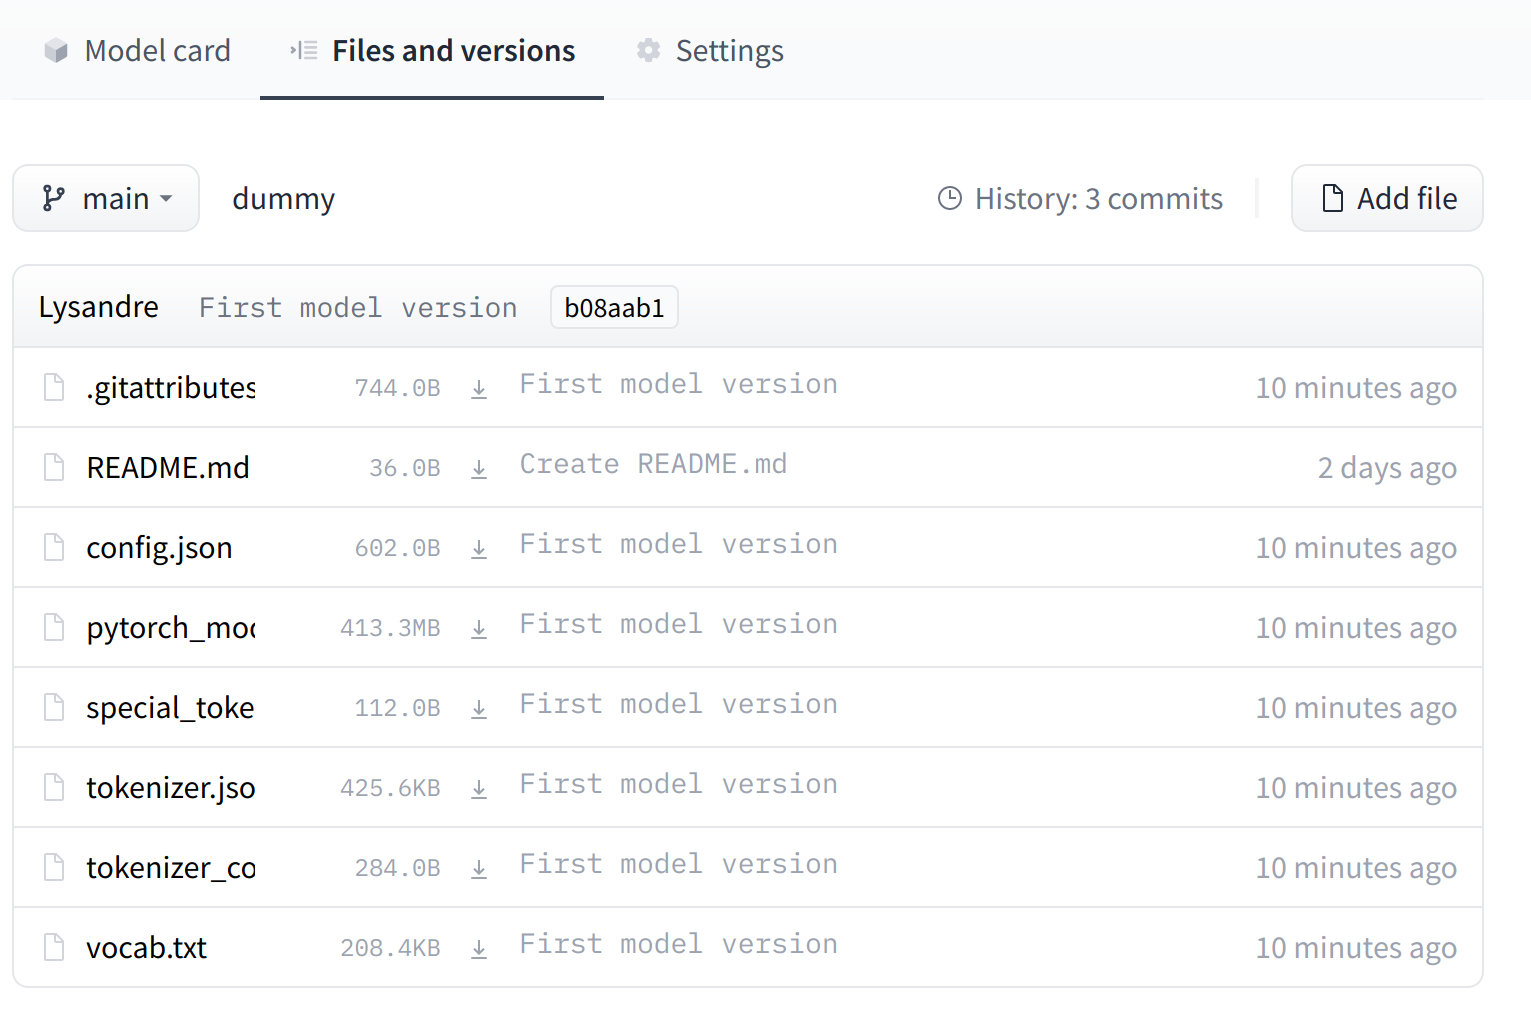
Click on the “Files and versions” tab, and you should see the files visible in the following screenshot:
"파일 및 버전" 탭을 클릭하면 다음 스크린샷에 표시된 파일을 볼 수 있습니다.
✏️Try it out!Take the model and tokenizer associated with thebert-base-casedcheckpoint and upload them to a repo in your namespace using thepush_to_hub()method. Double-check that the repo appears properly on your page before deleting it.
✏️ 한번 사용해 보세요! bert-base 케이스 체크포인트와 연관된 모델 및 토크나이저를 가져와서 push_to_hub() 메소드를 사용하여 네임스페이스의 저장소에 업로드하십시오. 저장소를 삭제하기 전에 페이지에 저장소가 제대로 나타나는지 다시 확인하세요.
As you’ve seen, thepush_to_hub()method accepts several arguments, making it possible to upload to a specific repository or organization namespace, or to use a different API token. We recommend you take a look at the method specification available directly in the🤗 Transformers documentationto get an idea of what is possible.
본 것처럼 push_to_hub() 메서드는 여러 인수를 허용하므로 특정 저장소나 조직 네임스페이스에 업로드하거나 다른 API 토큰을 사용할 수 있습니다. 무엇이 가능한지에 대한 아이디어를 얻으려면 🤗 Transformers 문서에서 직접 제공되는 메서드 사양을 살펴보는 것이 좋습니다.
Thepush_to_hub()method is backed by thehuggingface_hubPython package, which offers a direct API to the Hugging Face Hub. It’s integrated within 🤗 Transformers and several other machine learning libraries, likeallenlp. Although we focus on the 🤗 Transformers integration in this chapter, integrating it into your own code or library is simple.
push_to_hub() 메서드는 Hugging Face Hub에 직접 API를 제공하는 Huggingface_hub Python 패키지의 지원을 받습니다. 이는 🤗 Transformers 및 AllenLP와 같은 기타 여러 기계 학습 라이브러리 내에 통합되어 있습니다. 이 장에서는 🤗 Transformers 통합에 중점을 두지만 이를 자신의 코드나 라이브러리에 통합하는 것은 간단합니다.
Jump to the last section to see how to upload files to your newly created repository!
새로 생성된 저장소에 파일을 업로드하는 방법을 보려면 마지막 섹션으로 이동하세요!
Using thehuggingface_hubPython library
Thehuggingface_hubPython library is a package which offers a set of tools for the model and datasets hubs. It provides simple methods and classes for common tasks like getting information about repositories on the hub and managing them. It provides simple APIs that work on top of git to manage those repositories’ content and to integrate the Hub in your projects and libraries.
Huggingface_hub Python 라이브러리는 모델 및 데이터 세트 허브를 위한 도구 세트를 제공하는 패키지입니다. 허브의 리포지토리에 대한 정보 가져오기 및 관리와 같은 일반적인 작업을 위한 간단한 메서드와 클래스를 제공합니다. git 위에서 작동하여 해당 리포지토리의 콘텐츠를 관리하고 프로젝트 및 라이브러리에 허브를 통합하는 간단한 API를 제공합니다.
Similarly to using thepush_to_hubAPI, this will require you to have your API token saved in your cache. In order to do this, you will need to use thelogincommand from the CLI, as mentioned in the previous section (again, make sure to prepend these commands with the!character if running in Google Colab):
push_to_hub API를 사용하는 것과 마찬가지로 API 토큰을 캐시에 저장해야 합니다. 이렇게 하려면 이전 섹션에서 언급한 대로 CLI에서 로그인 명령을 사용해야 합니다(Google Colab에서 실행하는 경우 이 명령 앞에 ! 문자를 추가해야 합니다).
huggingface-cli login
Thehuggingface_hubpackage offers several methods and classes which are useful for our purpose. Firstly, there are a few methods to manage repository creation, deletion, and others:
Huggingface_hub 패키지는 우리의 목적에 유용한 여러 메서드와 클래스를 제공합니다. 첫째, 저장소 생성, 삭제 등을 관리하는 몇 가지 방법이 있습니다.
from huggingface_hub import (
    # User management
    login,
    logout,
    whoami,

    # Repository creation and management
    create_repo,
    delete_repo,
    update_repo_visibility,

    # And some methods to retrieve/change information about the content
    list_models,
    list_datasets,
    list_metrics,
    list_repo_files,
    upload_file,
    delete_file,
)
Additionally, it offers the very powerfulRepositoryclass to manage a local repository. We will explore these methods and that class in the next few section to understand how to leverage them.
또한 로컬 저장소를 관리할 수 있는 매우 강력한 Repository 클래스를 제공합니다. 다음 몇 섹션에서 이러한 메서드와 해당 클래스를 살펴보고 이를 활용하는 방법을 이해할 것입니다.
Thecreate_repomethod can be used to create a new repository on the hub:
create_repo 메소드를 사용하여 허브에 새 저장소를 생성할 수 있습니다.
from huggingface_hub import create_repo

create_repo("dummy-model")
This will create the repositorydummy-modelin your namespace. If you like, you can specify which organization the repository should belong to using theorganizationargument:
그러면 네임스페이스에 저장소 더미 모델이 생성됩니다. 원하는 경우 조직 인수를 사용하여 저장소가 속해야 하는 조직을 지정할 수 있습니다.
from huggingface_hub import create_repo

create_repo("dummy-model", organization="huggingface")
This will create thedummy-modelrepository in thehuggingfacenamespace, assuming you belong to that organization. Other arguments which may be useful are:
그러면 귀하가 해당 조직에 속해 있다는 가정 하에 Huggingface 네임스페이스에 더미 모델 저장소가 생성됩니다. 유용할 수 있는 다른 인수는 다음과 같습니다.
private, in order to specify if the repository should be visible from others or not.
비공개, 저장소가 다른 사람에게 표시되어야 하는지 여부를 지정합니다.
token, if you would like to override the token stored in your cache by a given token.
토큰: 특정 토큰으로 캐시에 저장된 토큰을 재정의하려는 경우.
repo_type, if you would like to create adatasetor aspaceinstead of a model. Accepted values are"dataset"and"space".
repo_type, 모델 대신 데이터 세트나 공간을 생성하려는 경우. 허용되는 값은 "dataset" 및 "space"입니다.
Once the repository is created, we should add files to it! Jump to the next section to see the three ways this can be handled.
저장소가 생성되면 여기에 파일을 추가해야 합니다! 이 문제를 처리할 수 있는 세 가지 방법을 보려면 다음 섹션으로 이동하세요.
Using the web interface
The web interface offers tools to manage repositories directly in the Hub. Using the interface, you can easily create repositories, add files (even large ones!), explore models, visualize diffs, and much more.
웹 인터페이스는 허브에서 직접 저장소를 관리할 수 있는 도구를 제공합니다. 인터페이스를 사용하면 저장소 생성, 파일 추가(큰 파일도 포함), 모델 탐색, 차이점 시각화 등을 쉽게 수행할 수 있습니다.
새 저장소를 만들려면 Huggingface.co/new를 방문하세요.
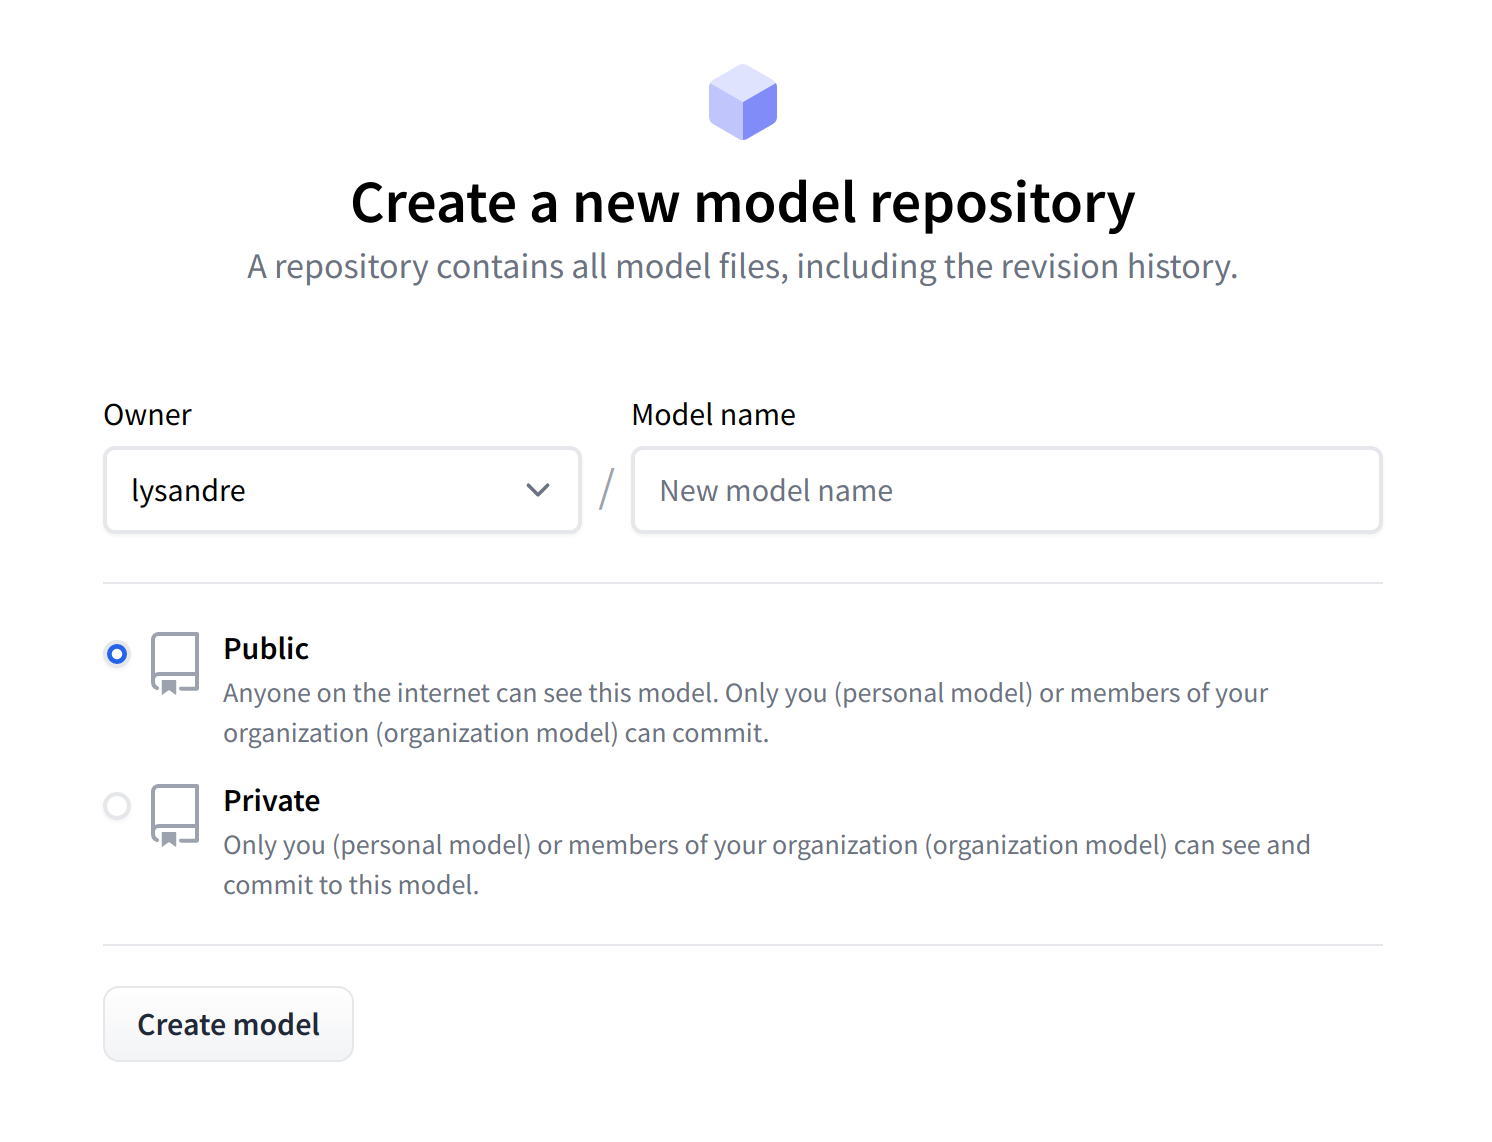
First, specify the owner of the repository: this can be either you or any of the organizations you’re affiliated with. If you choose an organization, the model will be featured on the organization’s page and every member of the organization will have the ability to contribute to the repository.
먼저 저장소의 소유자를 지정하십시오. 이는 귀하 또는 귀하가 소속된 조직일 수 있습니다. 조직을 선택하면 해당 모델이 해당 조직의 페이지에 표시되며 조직의 모든 구성원은 저장소에 기여할 수 있습니다.
Next, enter your model’s name. This will also be the name of the repository. Finally, you can specify whether you want your model to be public or private. Private models are hidden from public view.
다음으로 모델 이름을 입력하세요. 이는 저장소의 이름이기도 합니다. 마지막으로 모델을 공개할지 비공개할지 지정할 수 있습니다. 비공개 모델은 공개적으로 표시되지 않습니다.
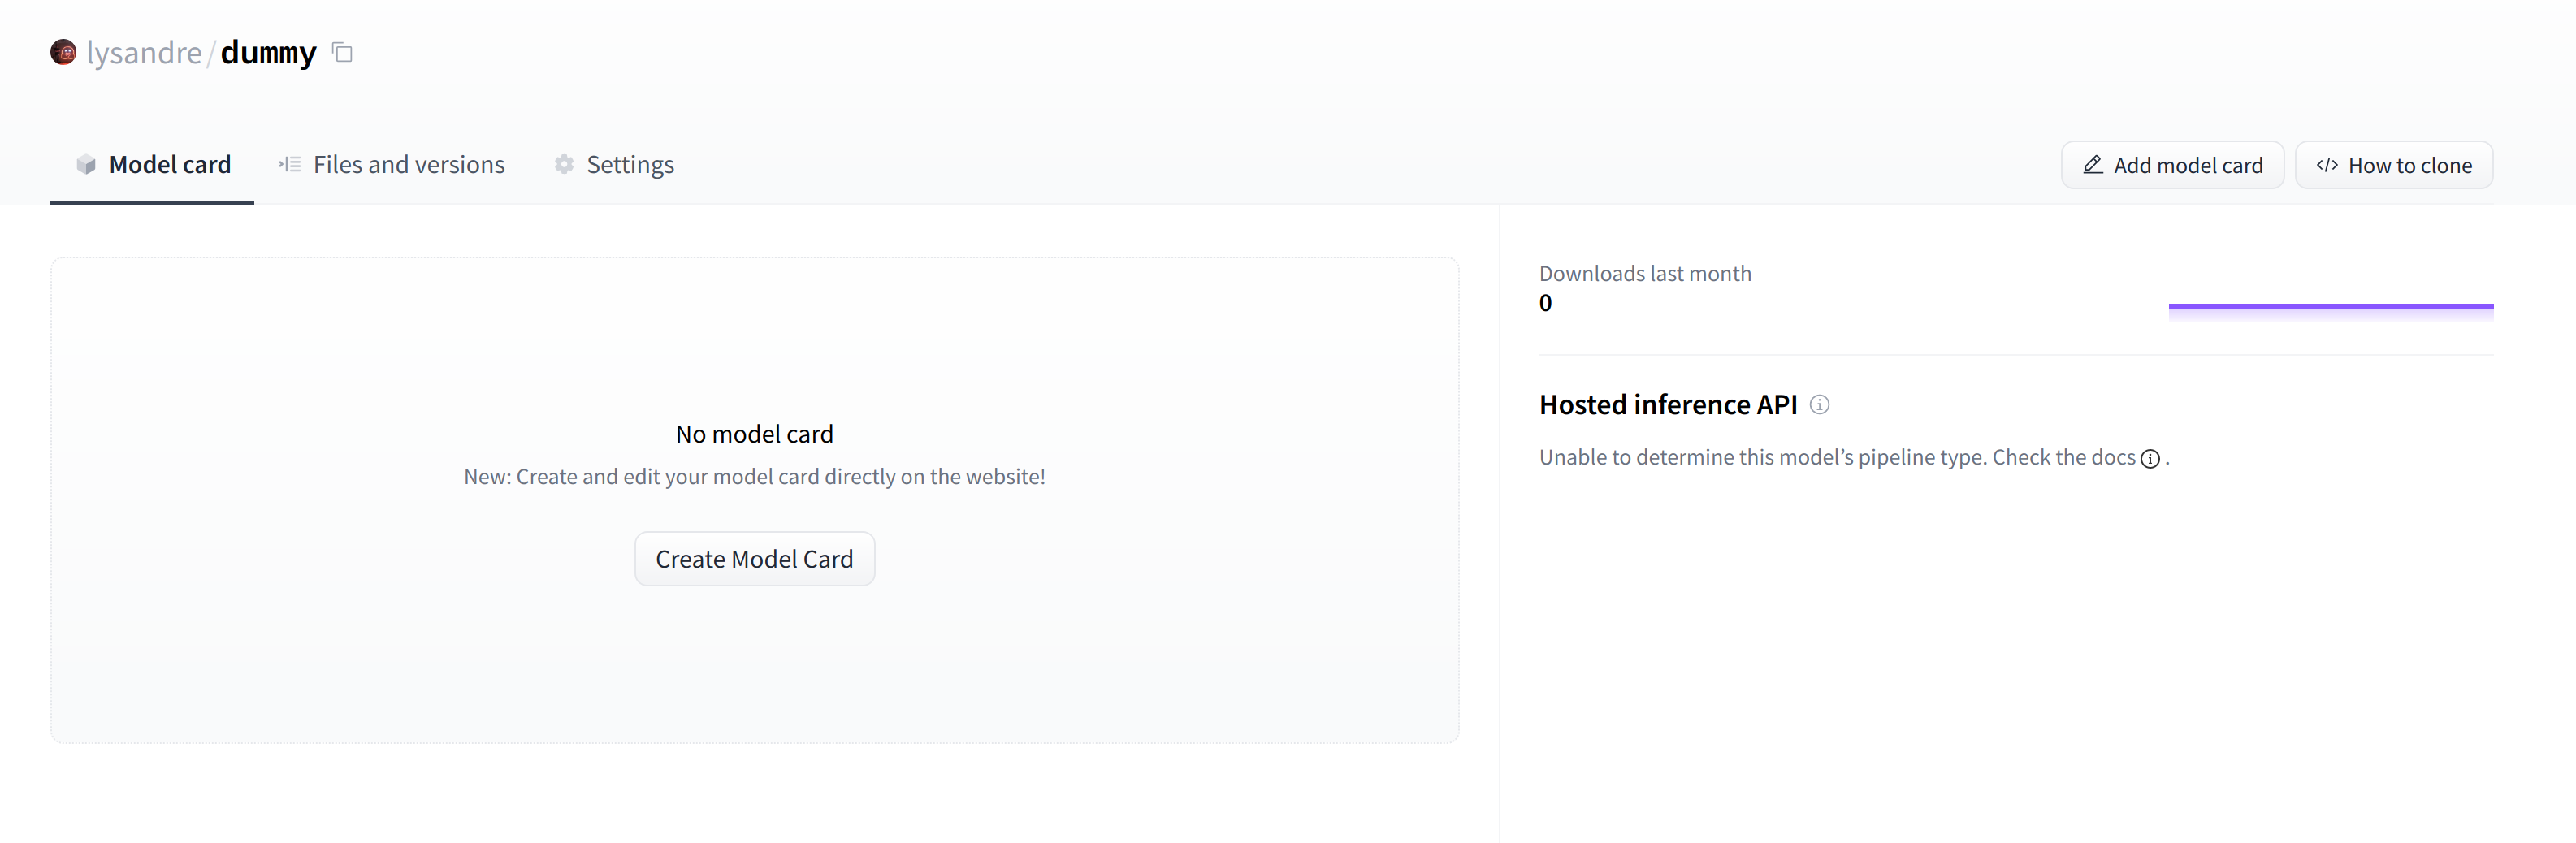
After creating your model repository, you should see a page like this:
모델 리포지토리를 생성하면 다음과 같은 페이지가 표시됩니다.
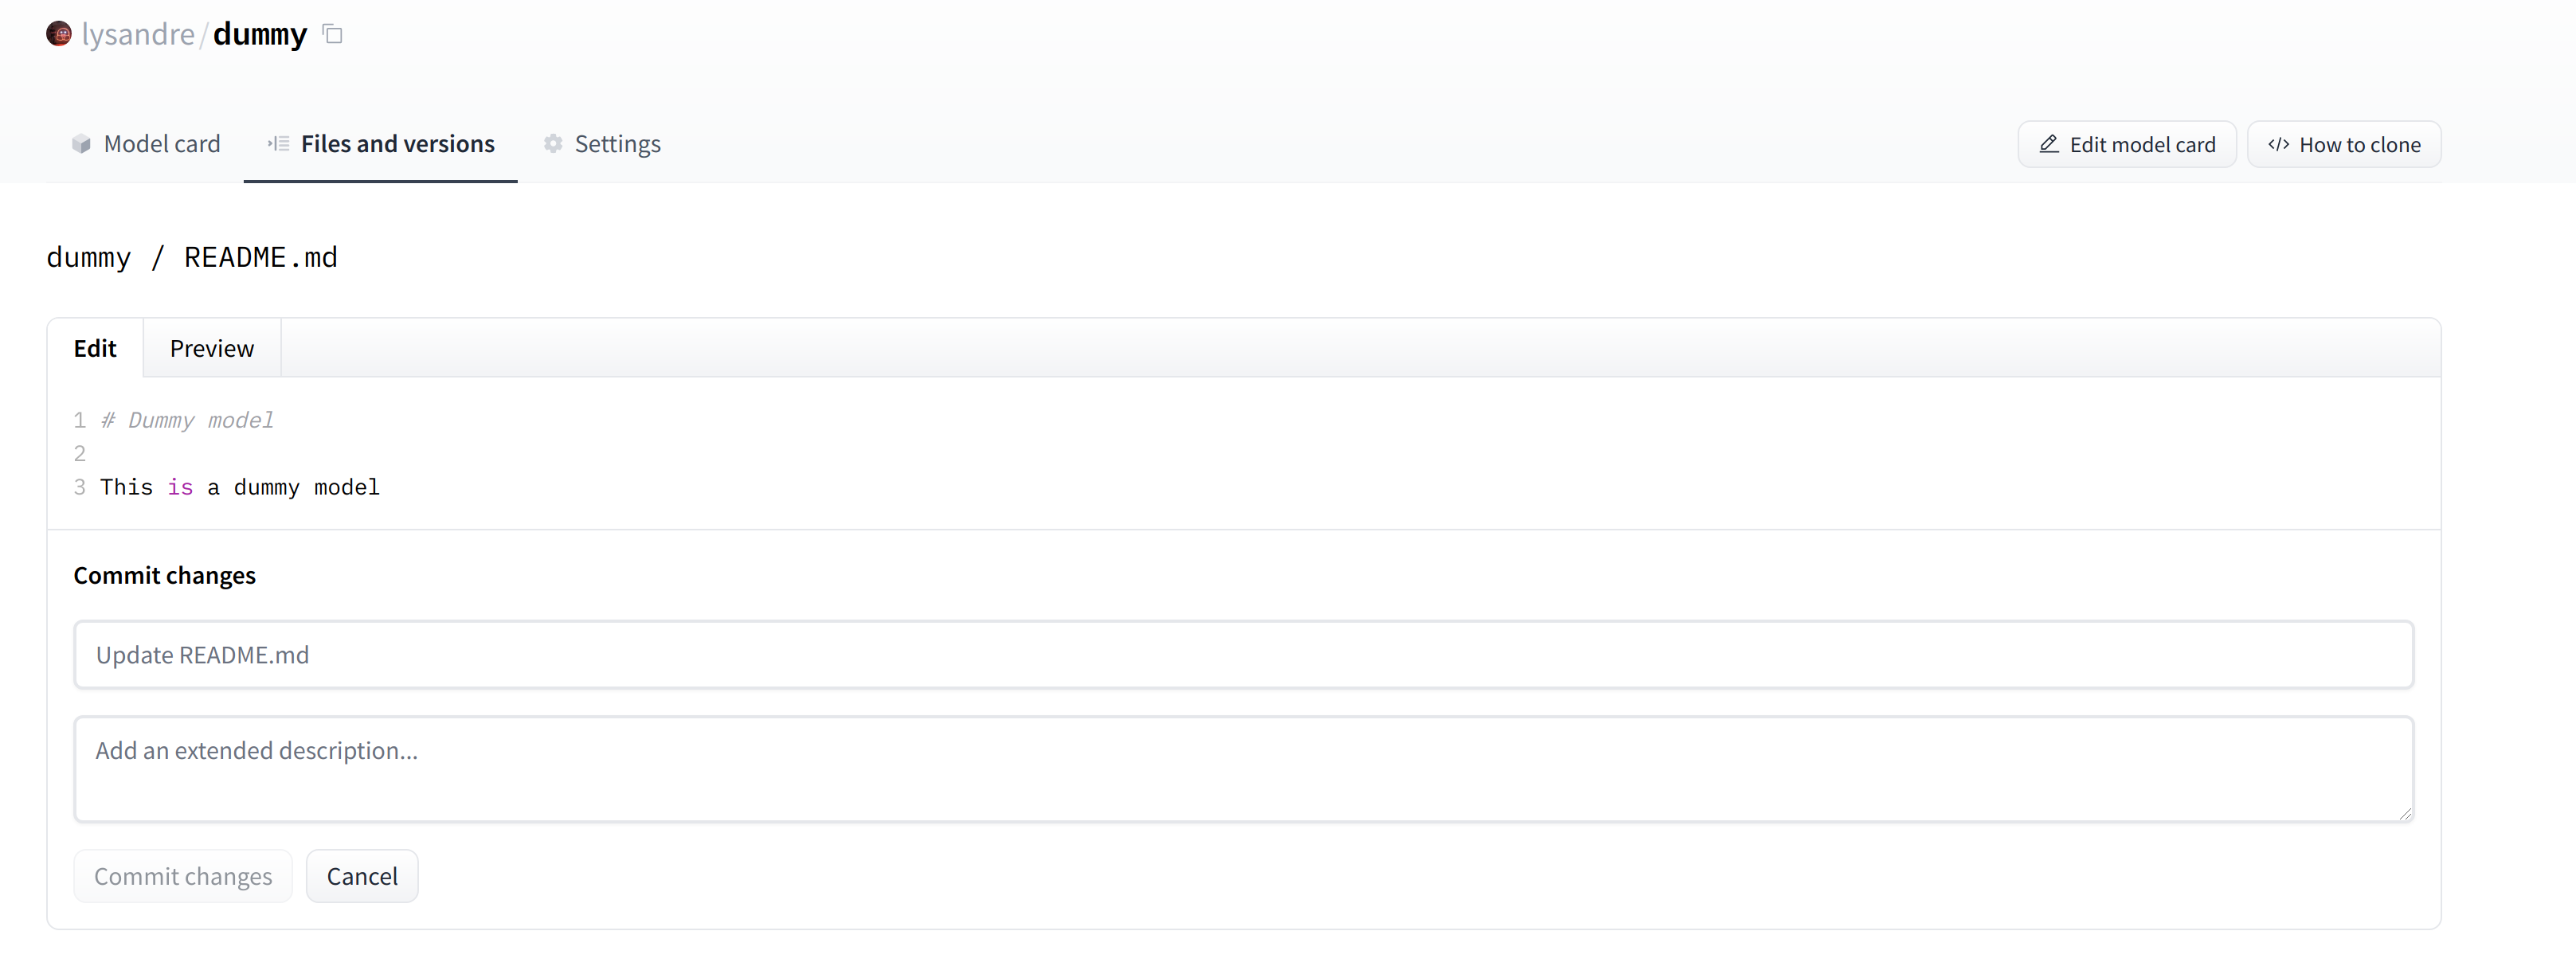
This is where your model will be hosted. To start populating it, you can add a README file directly from the web interface.
이곳이 귀하의 모델이 호스팅되는 곳입니다. 채우기를 시작하려면 웹 인터페이스에서 직접 README 파일을 추가하면 됩니다.
The README file is in Markdown — feel free to go wild with it! The third part of this chapter is dedicated to building a model card. These are of prime importance in bringing value to your model, as they’re where you tell others what it can do.
README 파일은 Markdown에 있습니다. 마음껏 사용해 보세요! 이 장의 세 번째 부분은 모델 카드를 만드는 데 전념합니다. 이는 모델이 무엇을 할 수 있는지 다른 사람에게 알려주기 때문에 모델에 가치를 부여하는 데 가장 중요합니다.
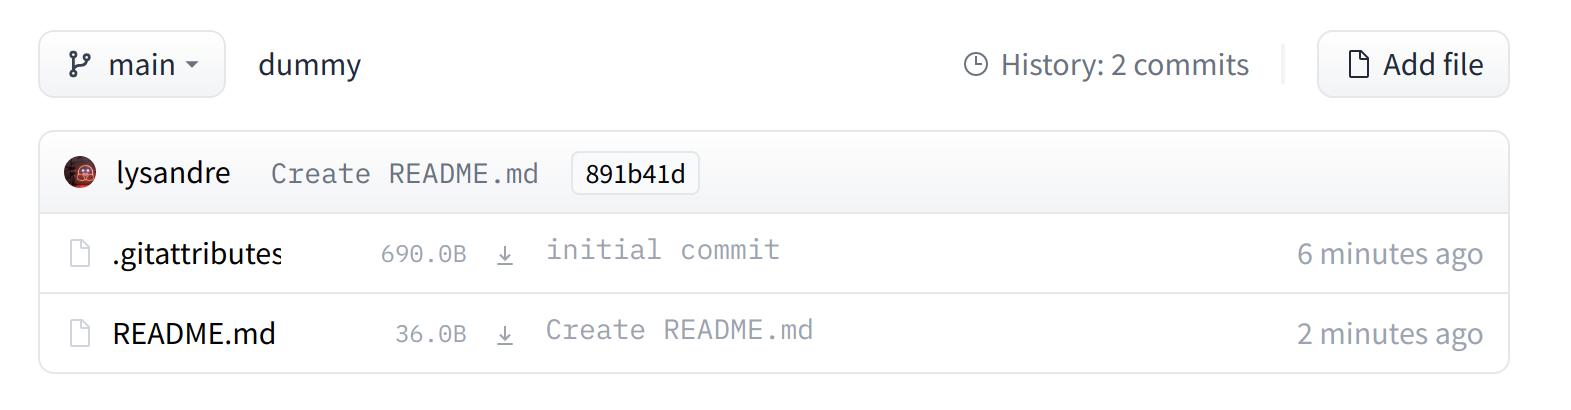
If you look at the “Files and versions” tab, you’ll see that there aren’t many files there yet — just theREADME.mdyou just created and the.gitattributesfile that keeps track of large files.
"파일 및 버전" 탭을 보면 아직 파일이 많지 않다는 것을 알 수 있습니다. 방금 생성한 README.md와 대용량 파일을 추적하는 .gitattributes 파일만 있습니다.
We’ll take a look at how to add some new files next.
다음에는 새 파일을 추가하는 방법을 살펴보겠습니다.
Uploading the model files
The system to manage files on the Hugging Face Hub is based on git for regular files, and git-lfs (which stands forGit Large File Storage) for larger files.
Hugging Face Hub의 파일 관리 시스템은 일반 파일은 git, 대용량 파일은 git-lfs(Git Large File Storage의 약자)를 기반으로 합니다.
In the next section, we go over three different ways of uploading files to the Hub: throughhuggingface_huband through git commands.
다음 섹션에서는 Huggingface_hub 및 git 명령을 통해 허브에 파일을 업로드하는 세 가지 방법을 살펴보겠습니다.
Theupload_fileapproach
Usingupload_filedoes not require git and git-lfs to be installed on your system. It pushes files directly to the 🤗 Hub using HTTP POST requests. A limitation of this approach is that it doesn’t handle files that are larger than 5GB in size. If your files are larger than 5GB, please follow the two other methods detailed below.
upload_file을 사용하면 시스템에 git 및 git-lfs를 설치할 필요가 없습니다. HTTP POST 요청을 사용하여 파일을 🤗 허브에 직접 푸시합니다. 이 접근 방식의 한계는 크기가 5GB보다 큰 파일을 처리하지 못한다는 것입니다. 파일이 5GB보다 큰 경우 아래에 설명된 두 가지 다른 방법을 따르세요.
The API may be used as follows:
API는 다음과 같이 사용될 수 있습니다:
from huggingface_hub import upload_file

upload_file(
    "<path_to_file>/config.json",
    path_in_repo="config.json",
    repo_id="<namespace>/dummy-model",
)
This will upload the fileconfig.jsonavailable at<path_to_file>to the root of the repository asconfig.json, to thedummy-modelrepository. Other arguments which may be useful are:
그러면 <path_to_file>에서 사용 가능한 config.json 파일이 저장소 루트에 config.json으로 더미 모델 저장소에 업로드됩니다. 유용할 수 있는 다른 인수는 다음과 같습니다.
token, if you would like to override the token stored in your cache by a given token.
토큰: 특정 토큰으로 캐시에 저장된 토큰을 재정의하려는 경우.
repo_type, if you would like to upload to adatasetor aspaceinstead of a model. Accepted values are"dataset"and"space".
repo_type, 모델 대신 데이터세트나 공간에 업로드하려는 경우. 허용되는 값은 "dataset" 및 "space"입니다.
TheRepositoryclass
TheRepositoryclass manages a local repository in a git-like manner. It abstracts most of the pain points one may have with git to provide all features that we require.
Repository 클래스는 Git과 같은 방식으로 로컬 저장소를 관리합니다. 이는 필요한 모든 기능을 제공하기 위해 git에서 발생할 수 있는 대부분의 문제점을 추상화합니다.
Using this class requires having git and git-lfs installed, so make sure you have git-lfs installed (seeherefor installation instructions) and set up before you begin.
이 클래스를 사용하려면 git 및 git-lfs가 설치되어 있어야 하므로 시작하기 전에 git-lfs가 설치되어 있는지 확인하고(설치 지침은 여기 참조) 설정하세요.
In order to start playing around with the repository we have just created, we can start by initialising it into a local folder by cloning the remote repository:
방금 생성한 저장소를 가지고 놀기 위해 원격 저장소를 복제하여 로컬 폴더로 초기화하는 것부터 시작할 수 있습니다.
from huggingface_hub import Repository

repo = Repository("<path_to_dummy_folder>", clone_from="<namespace>/dummy-model")
This created the folder<path_to_dummy_folder>in our working directory. This folder only contains the.gitattributesfile as that’s the only file created when instantiating the repository throughcreate_repo.
그러면 작업 디렉터리에 <path_to_dummy_folder> 폴더가 생성되었습니다. 이 폴더에는 create_repo를 통해 저장소를 인스턴스화할 때 생성되는 유일한 파일인 .gitattributes 파일만 포함됩니다.
From this point on, we may leverage several of the traditional git methods:
And others! We recommend taking a look at theRepositorydocumentation availableherefor an overview of all available methods.
다른 사람! 사용 가능한 모든 방법에 대한 개요를 보려면 여기에서 제공되는 리포지토리 문서를 살펴보는 것이 좋습니다.
At present, we have a model and a tokenizer that we would like to push to the hub. We have successfully cloned the repository, we can therefore save the files within that repository.
현재 우리는 허브에 푸시하려는 모델과 토크나이저를 보유하고 있습니다. 저장소를 성공적으로 복제했으므로 해당 저장소 내에 파일을 저장할 수 있습니다.
We first make sure that our local clone is up to date by pulling the latest changes:
먼저 최신 변경 사항을 가져와서 로컬 클론이 최신 상태인지 확인합니다.
repo.git_pull()
Once that is done, we save the model and tokenizer files:
The<path_to_dummy_folder>now contains all the model and tokenizer files. We follow the usual git workflow by adding files to the staging area, committing them and pushing them to the hub:
이제 <path_to_dummy_folder>에는 모든 모델 및 토크나이저 파일이 포함됩니다. 우리는 스테이징 영역에 파일을 추가하고 커밋한 후 허브에 푸시하는 방식으로 일반적인 git 워크플로를 따릅니다.
repo.git_add()
repo.git_commit("Add model and tokenizer files")
repo.git_push()
Congratulations! You just pushed your first files on the hub.
축하해요! 방금 첫 번째 파일을 허브에 푸시했습니다.
The git-based approach
This is the very barebones approach to uploading files: we’ll do so with git and git-lfs directly. Most of the difficulty is abstracted away by previous approaches, but there are a few caveats with the following method so we’ll follow a more complex use-case.
이것은 파일 업로드에 대한 매우 기본적인 접근 방식입니다. git 및 git-lfs를 직접 사용하여 수행합니다. 대부분의 어려움은 이전 접근 방식으로 추상화되지만 다음 방법에는 몇 가지 주의 사항이 있으므로 보다 복잡한 사용 사례를 따르겠습니다.
Using this class requires having git and git-lfs installed, so make sure you havegit-lfsinstalled (see here for installation instructions) and set up before you begin.
이 클래스를 사용하려면 git 및 git-lfs가 설치되어 있어야 하므로 시작하기 전에 git-lfs가 설치되어 있는지 확인하고(설치 지침은 여기 참조) 설정하세요.
First start by initializing git-lfs: 먼저 git-lfs를 초기화하여 시작하세요:
git lfs install
Updated git hooks.
Git LFS initialized.
Once that’s done, the first step is to clone your model repository:
My username islysandreand I’ve used the model namedummy, so for me the command ends up looking like the following:
내 사용자 이름은 lysandre이고 모델 이름은 dummy를 사용했기 때문에 명령은 다음과 같이 표시됩니다.
git clone https://huggingface.co/lysandre/dummy
I now have a folder nameddummyin my working directory. I cancdinto the folder and have a look at the contents:
이제 작업 디렉터리에 dummy라는 폴더가 생겼습니다. 폴더에 CD를 넣고 내용을 볼 수 있습니다.
cd dummy && ls
README.md
If you just created your repository using Hugging Face Hub’screate_repomethod, this folder should only contain a hidden.gitattributesfile. If you followed the instructions in the previous section to create a repository using the web interface, the folder should contain a singleREADME.mdfile alongside the hidden.gitattributesfile, as shown here.
Hugging Face Hub의 create_repo 메소드를 사용하여 저장소를 방금 생성한 경우 이 폴더에는 숨겨진 .gitattributes 파일만 포함되어야 합니다. 이전 섹션의 지침에 따라 웹 인터페이스를 사용하여 저장소를 만든 경우 폴더에는 여기에 표시된 것처럼 숨겨진 .gitattributes 파일과 함께 단일 README.md 파일이 포함되어야 합니다.
Adding a regular-sized file, such as a configuration file, a vocabulary file, or basically any file under a few megabytes, is done exactly as one would do it in any git-based system. However, bigger files must be registered through git-lfs in order to push them tohuggingface.co.
구성 파일, 어휘 파일 또는 기본적으로 몇 메가바이트 미만의 파일과 같은 일반 크기의 파일을 추가하는 것은 모든 git 기반 시스템에서 수행하는 것과 똑같이 수행됩니다. 그러나 더 큰 파일을 Huggingface.co로 푸시하려면 git-lfs를 통해 등록해야 합니다.
Let’s go back to Python for a bit to generate a model and tokenizer that we’d like to commit to our dummy repository:
Python으로 돌아가서 더미 저장소에 커밋할 모델과 토크나이저를 생성해 보겠습니다.
from transformers import AutoModelForMaskedLM, AutoTokenizer
checkpoint = "camembert-base"
model = AutoModelForMaskedLM.from_pretrained(checkpoint)
tokenizer = AutoTokenizer.from_pretrained(checkpoint)
# Do whatever with the model, train it, fine-tune it...
model.save_pretrained("<path_to_dummy_folder>")
tokenizer.save_pretrained("<path_to_dummy_folder>")
Now that we’ve saved some model and tokenizer artifacts, let’s take another look at thedummyfolder:
If you look at the file sizes (for example, withls -lh), you should see that the model state dict file (pytorch_model.bin) is the only outlier, at more than 400 MB.
파일 크기(예: ls -lh 사용)를 살펴보면 모델 상태 dict 파일(pytorch_model.bin)이 400MB를 초과하는 유일한 이상값임을 알 수 있습니다.
✏️ When creating the repository from the web interface, the *.gitattributes* file is automatically set up to consider files with certain extensions, such as *.bin* and *.h5*, as large files, and git-lfs will track them with no necessary setup on your side.
✏️ 웹 인터페이스에서 저장소를 생성할 때 *.gitattributes* 파일은 *.bin* 및 *.h5*와 같은 특정 확장자를 가진 파일을 대용량 파일로 간주하도록 자동으로 설정되며 git-lfs는 이를 추적합니다. 귀하 측에서 필요한 설정이 필요하지 않습니다.
We can now go ahead and proceed like we would usually do with traditional Git repositories. We can add all the files to Git’s staging environment using thegit addcommand:
이제 기존 Git 리포지토리에서 일반적으로 하던 것처럼 진행할 수 있습니다. git add 명령을 사용하여 Git의 스테이징 환경에 모든 파일을 추가할 수 있습니다.
git add .
We can then have a look at the files that are currently staged:
그런 다음 현재 준비된 파일을 살펴볼 수 있습니다.
git status
On branch main
Your branch is up to date with 'origin/main'.

Changes to be committed:
  (use "git restore --staged <file>..." to unstage)
  modified:   .gitattributes
	new file:   config.json
	new file:   pytorch_model.bin
	new file:   sentencepiece.bpe.model
	new file:   special_tokens_map.json
	new file:   tokenizer.json
	new file:   tokenizer_config.json
Similarly, we can make sure that git-lfs is tracking the correct files by using itsstatuscommand:
마찬가지로, status 명령을 사용하여 git-lfs가 올바른 파일을 추적하고 있는지 확인할 수 있습니다.
git lfs status
On branch main
Objects to be pushed to origin/main:


Objects to be committed:

	config.json (Git: bc20ff2)
	pytorch_model.bin (LFS: 35686c2)
	sentencepiece.bpe.model (LFS: 988bc5a)
	special_tokens_map.json (Git: cb23931)
	tokenizer.json (Git: 851ff3e)
	tokenizer_config.json (Git: f0f7783)

Objects not staged for commit:
We can see that all files haveGitas a handler, exceptpytorch_model.binandsentencepiece.bpe.model, which haveLFS. Great!
LFS가 있는 pytorch_model.bin 및 문장 조각.bpe.model을 제외하고 모든 파일에는 핸들러로 Git이 있는 것을 볼 수 있습니다. Great !
Let’s proceed to the final steps, committing and pushing to thehuggingface.coremote repository:
Huggingface.co 원격 저장소에 커밋하고 푸시하는 마지막 단계를 진행해 보겠습니다.
The Model Hub makes selecting the appropriate model simple, so that using it in any downstream library can be done in a few lines of code. Let’s take a look at how to actually use one of these models, and how to contribute back to the community.
모델 허브를 사용하면 적절한 모델을 간단하게 선택할 수 있으므로 다운스트림 라이브러리에서 몇 줄의 코드만으로 모델을 사용할 수 있습니다. 이러한 모델 중 하나를 실제로 사용하는 방법과 커뮤니티에 다시 기여하는 방법을 살펴보겠습니다.
Let’s say we’re looking for a French-based model that can perform mask filling.
마스크 채우기를 수행할 수 있는 프랑스 기반 모델을 찾고 있다고 가정해 보겠습니다.
We select thecamembert-basecheckpoint to try it out. The identifiercamembert-baseis all we need to start using it! As you’ve seen in previous chapters, we can instantiate it using thepipeline()function:
이를 시험해 보기 위해 카망베르 기반 체크포인트를 선택합니다. 식별자 camembert-base만 사용하면 됩니다! 이전 장에서 본 것처럼 파이프라인() 함수를 사용하여 인스턴스화할 수 있습니다.
from transformers import pipeline
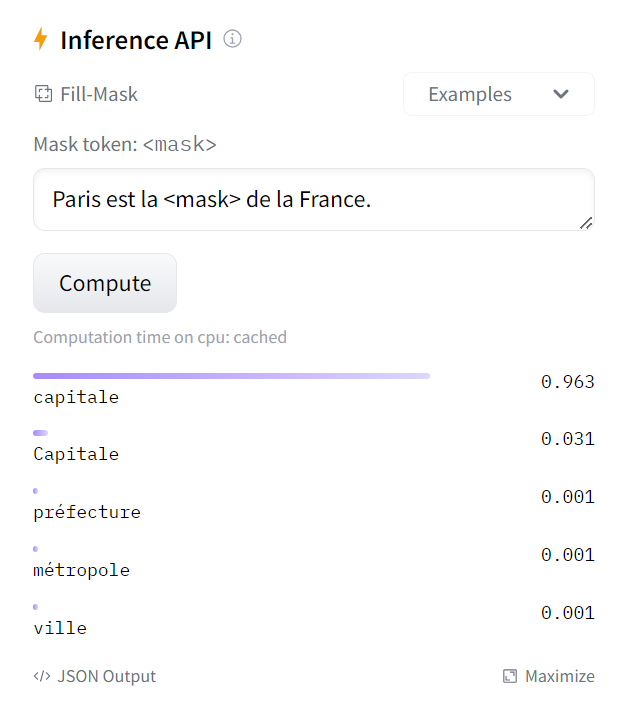
camembert_fill_mask = pipeline("fill-mask", model="camembert-base")
results = camembert_fill_mask("Le camembert est <mask> :)")
해당 코드는 Hugging Face의 Transformers 라이브러리를 사용하여 CamemBERT 모델을 활용하여 문장 내의 마스킹된 단어를 예측하는 코드입니다. 간단히 설명하면, 주어진 문장에서 <mask>로 표시된 부분을 모델이 예측하도록 하는 파이프라인을 설정하고, 그 결과를 확인하는 코드입니다.
"fill-mask" 태스크를 수행하는 파이프라인을 설정합니다. 여기서는 CamemBERT 모델을 사용하고 있습니다.
문장의 마스킹된 부분 예측:
results = camembert_fill_mask("Le camembert est <mask> :)")
설정한 파이프라인을 사용하여 주어진 문장에서 <mask>로 표시된 부분을 모델이 예측하고, 결과를 results 변수에 저장합니다.
위 코드에서는 "Le camembert est <mask> :)"라는 문장에서 <mask> 부분을 모델이 예측한 결과를 확인할 수 있습니다. 결과는 results 변수에 저장되어 있습니다.
참고: 코드는 CamemBERT 모델의 미세 조정 및 특정한 데이터셋에 따라 결과가 달라질 수 있습니다.
Some weights of the model checkpoint at camembert-base were not used when initializing CamembertForMaskedLM: ['roberta.pooler.dense.bias', 'roberta.pooler.dense.weight']
- This IS expected if you are initializing CamembertForMaskedLM from the checkpoint of a model trained on another task or with another architecture (e.g. initializing a BertForSequenceClassification model from a BertForPreTraining model).
- This IS NOT expected if you are initializing CamembertForMaskedLM from the checkpoint of a model that you expect to be exactly identical (initializing a BertForSequenceClassification model from a BertForSequenceClassification model).
[{'score': 0.9632076025009155, 'token': 2117, 'token_str': 'capitale', 'sequence': 'Paris est la capitale de la France.'}, {'score': 0.031002620235085487, 'token': 22013, 'token_str': 'Capitale', 'sequence': 'Paris est la Capitale de la France.'}, {'score': 0.0011895311763510108, 'token': 10431, 'token_str': 'préfecture', 'sequence': 'Paris est la préfecture de la France.'}, {'score': 0.0006761185941286385, 'token': 8529, 'token_str': 'métropole', 'sequence': 'Paris est la métropole de la France.'}, {'score': 0.0005724380607716739, 'token': 285, 'token_str': 'ville', 'sequence': 'Paris est la ville de la France.'}]
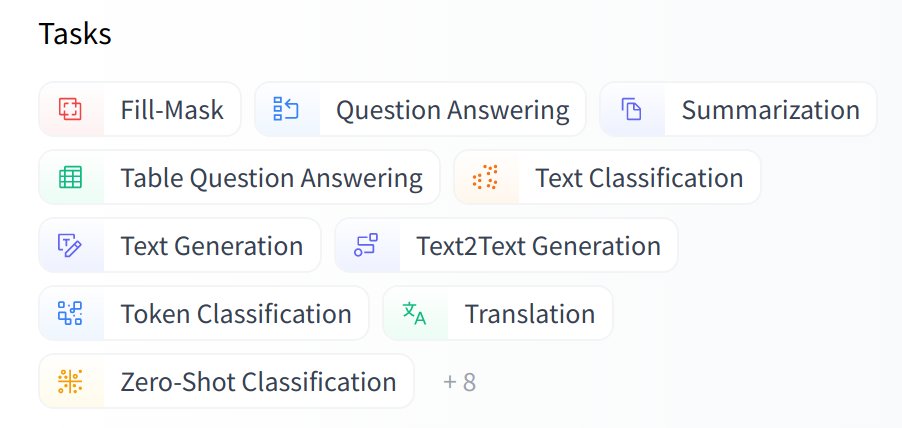
As you can see, loading a model within a pipeline is extremely simple. The only thing you need to watch out for is that the chosen checkpoint is suitable for the task it’s going to be used for. For example, here we are loading thecamembert-basecheckpoint in thefill-maskpipeline, which is completely fine. But if we were to load this checkpoint in thetext-classificationpipeline, the results would not make any sense because the head ofcamembert-baseis not suitable for this task! We recommend using the task selector in the Hugging Face Hub interface in order to select the appropriate checkpoints:
보시다시피 파이프라인 내에서 모델을 로드하는 것은 매우 간단합니다. 주의해야 할 유일한 점은 선택한 체크포인트가 사용할 작업에 적합한지 여부입니다. 예를 들어, 여기서는 채우기 마스크 파이프라인에 카망베르 기반 체크포인트를 로드하고 있는데, 이는 전혀 문제가 없습니다. 하지만 텍스트 분류 파이프라인에 이 체크포인트를 로드하면 Camembert-base의 헤드가 이 작업에 적합하지 않기 때문에 결과가 의미가 없습니다! 적절한 체크포인트를 선택하려면 Hugging Face Hub 인터페이스의 task selector 를 사용하는 것이 좋습니다.
You can also instantiate the checkpoint using the model architecture directly:
모델 아키텍처를 직접 사용하여 체크포인트를 인스턴스화할 수도 있습니다.
from transformers import CamembertTokenizer, CamembertForMaskedLM

tokenizer = CamembertTokenizer.from_pretrained("camembert-base")
model = CamembertForMaskedLM.from_pretrained("camembert-base")
해당 코드는 Hugging Face의 Transformers 라이브러리를 사용하여 CamemBERT 모델의 토크나이저와 마스킹 언어 모델을 불러와 초기화하는 코드입니다. 간단히 설명하면, CamemBERT 모델의 토크나이저와 마스킹 언어 모델을 설정하여 활용할 수 있도록 하는 과정입니다.
라이브러리 임포트:
from transformers import CamembertTokenizer, CamembertForMaskedLM
Transformers 라이브러리에서 CamemBERT 모델의 토크나이저와 마스킹 언어 모델을 사용하기 위해 필요한 모듈을 임포트합니다.
토크나이저 및 마스킹 언어 모델 초기화:
tokenizer = CamembertTokenizer.from_pretrained("camembert-base")
model = CamembertForMaskedLM.from_pretrained("camembert-base")
from_pretrained 메서드를 사용하여 "camembert-base"라는 사전 학습된 모델을 불러오고, 이를 초기화하여 tokenizer와 model 변수에 할당합니다. CamembertTokenizer는 문장을 토큰으로 분할하는 역할을 하며, CamembertForMaskedLM은 마스킹 언어 모델의 인스턴스를 생성합니다.
이제 위의 코드를 사용하여 CamemBERT 모델의 토크나이저와 마스킹 언어 모델을 활용할 수 있습니다. 예를 들어, 문장을 토큰화하거나 마스킹된 부분을 예측하는 작업 등을 수행할 수 있습니다.
However, we recommend using theAuto*classesinstead, as these are by design architecture-agnostic. While the previous code sample limits users to checkpoints loadable in the CamemBERT architecture, using theAuto*classes makes switching checkpoints simple:
그러나 Auto* 클래스는 설계상 아키텍처에 구애받지 않으므로 대신 사용하는 것이 좋습니다. 이전 코드 샘플에서는 사용자가 CamemBERT 아키텍처에서 로드할 수 있는 체크포인트로 제한했지만 Auto* 클래스를 사용하면 체크포인트 전환이 간단해졌습니다.
from transformers import AutoTokenizer, AutoModelForMaskedLM

tokenizer = AutoTokenizer.from_pretrained("camembert-base")
model = AutoModelForMaskedLM.from_pretrained("camembert-base")
해당 코드는 Hugging Face의 Transformers 라이브러리를 사용하여 CamemBERT 모델의 토크나이저와 마스킹 언어 모델을 불러와 초기화하는 코드입니다. AutoTokenizer와 AutoModelForMaskedLM 클래스를 사용하면 모델의 종류를 명시적으로 지정하지 않고 자동으로 적절한 모델을 불러올 수 있습니다.
라이브러리 임포트:
from transformers import AutoTokenizer, AutoModelForMaskedLM
tokenizer = AutoTokenizer.from_pretrained("camembert-base")
model = AutoModelForMaskedLM.from_pretrained("camembert-base")
from_pretrained 메서드를 사용하여 "camembert-base"라는 사전 학습된 모델을 불러오고, 이를 초기화하여 tokenizer와 model 변수에 할당합니다. AutoTokenizer는 문장을 토큰으로 분할하는 역할을 하며, AutoModelForMaskedLM은 마스킹 언어 모델의 인스턴스를 생성합니다.
이 코드는 특정 모델의 이름을 명시하지 않고도 자동으로 적절한 모델을 불러오기 때문에 편리하게 사용할 수 있습니다. 위의 코드를 사용하면 CamemBERT 모델의 토크나이저와 마스킹 언어 모델을 초기화할 수 있습니다.
When using a pretrained model, make sure to check how it was trained, on which datasets, its limits, and its biases. All of this information should be indicated on its model card.
사전 학습된 모델을 사용할 때는 모델이 어떻게 학습되었는지, 어떤 데이터세트에 대해, 한계, 편향이 있는지 확인하세요. 이 모든 정보는 모델 카드에 표시되어야 합니다.
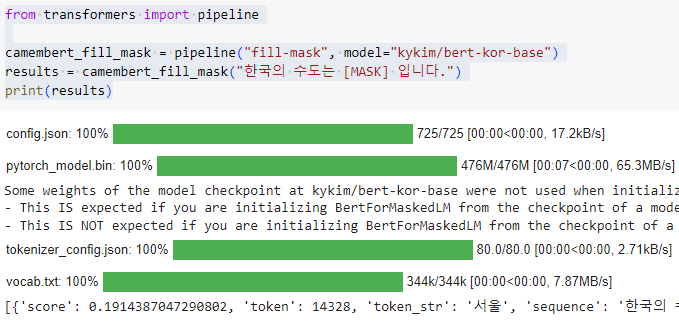
Korean example.
from transformers import pipeline

camembert_fill_mask = pipeline("fill-mask", model="kykim/bert-kor-base")
results = camembert_fill_mask("한국의 수도는 [MASK] 입니다.")
print(results)
[{'score': 0.1914387047290802, 'token': 14328, 'token_str': '서울', 'sequence': '한국의 수도는 서울 입니다.'},
{'score': 0.10752367973327637, 'token': 14147, 'token_str': '한국', 'sequence': '한국의 수도는 한국 입니다.'},
{'score': 0.07457706332206726, 'token': 21793, 'token_str': '로마', 'sequence': '한국의 수도는 로마 입니다.'},
{'score': 0.07277032732963562, 'token': 16809, 'token_str': '대한민국', 'sequence': '한국의 수도는 대한민국 입니다.'},
{'score': 0.022880734875798225, 'token': 25738, 'token_str': '필리핀', 'sequence': '한국의 수도는 필리핀 입니다.'}]
TheHugging Face Hub–- our main website –- is a central platform that enables anyone to discover, use, and contribute new state-of-the-art models and datasets. It hosts a wide variety of models, with more than 10,000 publicly available. We’ll focus on the models in this chapter, and take a look at the datasets in Chapter 5.
당사의 메인 웹사이트인 Hugging Face Hub는 누구나 새로운 최첨단 모델과 데이터 세트를 발견, 사용 및 기여할 수 있는 중앙 플랫폼입니다. 공개적으로 사용 가능한 모델이 10,000개 이상인 다양한 모델을 호스팅합니다. 이번 장에서는 모델에 중점을 두고, 5장에서는 데이터세트를 살펴보겠습니다.
The models in the Hub are not limited to 🤗 Transformers or even NLP. There are models fromFlairandAllenNLPfor NLP,Asteroidandpyannotefor speech, andtimmfor vision, to name a few.
허브의 모델은 🤗 Transformers나 NLP에만 국한되지 않습니다. NLP를 위한 Flair 및 AllenNLP 모델, 음성을 위한 Asteroid 및 pyannote, 비전을 위한 timm 등의 모델이 있습니다.
Each of these models is hosted as a Git repository, which allows versioning and reproducibility. Sharing a model on the Hub means opening it up to the community and making it accessible to anyone looking to easily use it, in turn eliminating their need to train a model on their own and simplifying sharing and usage.
이러한 각 모델은 버전 관리 및 재현성을 허용하는 Git 저장소로 호스팅됩니다. 허브에서 모델을 공유한다는 것은 해당 모델을 커뮤니티에 공개하고 쉽게 사용하려는 모든 사람이 액세스할 수 있게 함으로써 스스로 모델을 교육할 필요가 없어지고 공유 및 사용이 단순화된다는 의미입니다.
Additionally, sharing a model on the Hub automatically deploys a hosted Inference API for that model. Anyone in the community is free to test it out directly on the model’s page, with custom inputs and appropriate widgets.
또한 허브에서 모델을 공유하면 해당 모델에 대해 호스팅된 추론 API가 자동으로 배포됩니다. 커뮤니티의 누구든지 사용자 정의 입력 및 적절한 위젯을 사용하여 모델 페이지에서 직접 자유롭게 테스트할 수 있습니다.
The best part is that sharing and using any public model on the Hub is completely free!Paid plansalso exist if you wish to share models privately.
가장 좋은 점은 허브에서 공개 모델을 공유하고 사용하는 것이 완전히 무료라는 것입니다! 모델을 개인적으로 공유하려는 경우 유료 플랜도 있습니다.
Having a huggingface.co account is required to follow along this part, as we’ll be creating and managing repositories on the Hugging Face Hub:create an account
Hugging Face Hub에서 리포지토리를 생성하고 관리할 것이므로 이 부분을 수행하려면 Huggingface.co 계정이 필요합니다. 계정을 만드세요.
That was fun! In the first two chapters you learned about models and tokenizers, and now you know how to fine-tune them for your own data. To recap, in this chapter you:
재미있었어요! 처음 두 장에서는 모델과 토크나이저에 대해 배웠고 이제 자신의 데이터에 맞게 미세 조정하는 방법을 알게 되었습니다. 요약하면 이 장에서는 다음을 수행합니다.