
https://huggingface.co/learn/nlp-course/chapter2/2?fw=pt
Behind the pipeline - Hugging Face NLP Course
This is the first section where the content is slightly different depending on whether you use PyTorch or TensorFlow. Toggle the switch on top of the title to select the platform you prefer! Let’s start with a complete example, taking a look at what happ
huggingface.co
Behind the pipeline
This is the first section where the content is slightly different depending on whether you use PyTorch or TensorFlow. Toggle the switch on top of the title to select the platform you prefer!
PyTorch를 사용하는지, TensorFlow를 사용하는지에 따라 내용이 조금씩 달라지는 첫 번째 섹션입니다. 제목 상단의 스위치를 전환하여 원하는 플랫폼을 선택하세요!
https://youtu.be/1pedAIvTWXk?si=qXNz-TvLKCLZEIsZ
Let’s start with a complete example, taking a look at what happened behind the scenes when we executed the following code in Chapter 1:
완전한 예제부터 시작해 1장에서 다음 코드를 실행했을 때 뒤에서 무슨 일이 일어났는지 살펴보겠습니다.
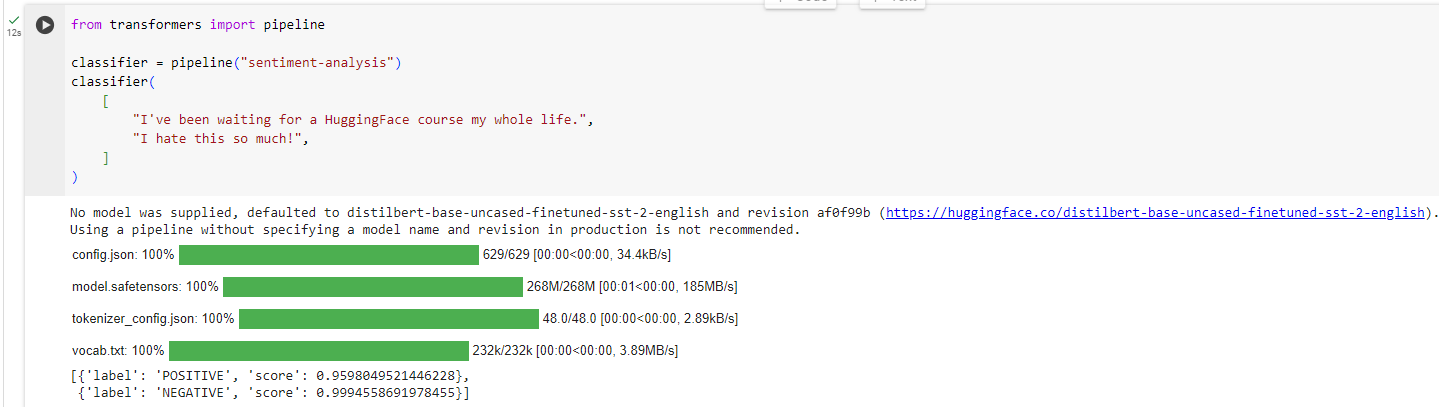
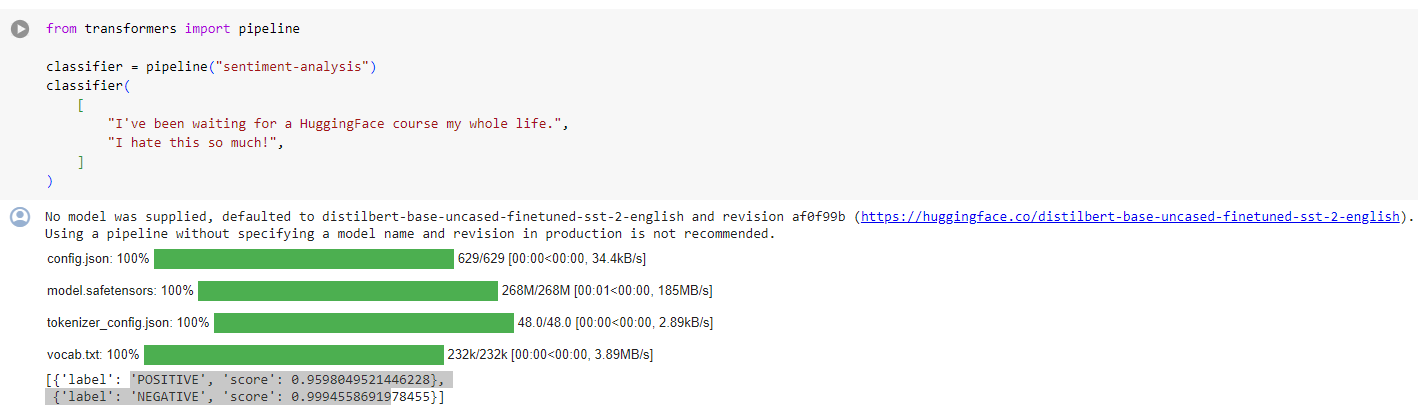
from transformers import pipeline

classifier = pipeline("sentiment-analysis")
classifier(
    [
        "I've been waiting for a HuggingFace course my whole life.",
        "I hate this so much!",
    ]
)
이 코드는 Hugging Face Transformers 라이브러리를 사용하여 감정 분석(sentiment analysis)을 수행하는 예제입니다.
이 코드는 두 개의 문장에 대해 감정 분석을 수행합니다. 생성된 'sentiment-analysis' 파이프라인은 입력된 각 문장의 감정을 판별하고, 결과를 리스트로 반환합니다. 출력된 결과는 입력된 각 문장에 대한 감정에 대한 정보를 담고 있습니다.
주의: 결과는 확률값으로 나타나며, 주어진 문장이 긍정적인 감정, 부정적인 감정, 혹은 중립적인 감정을 나타낼 확률을 표시합니다. 결과의 형식은 리스트 안에 딕셔너리 형태로 주어집니다.
and obtained: 그리고 얻은 것 :
[{'label': 'POSITIVE', 'score': 0.9598047137260437},
 {'label': 'NEGATIVE', 'score': 0.9994558095932007}]
CoLab 실행 결과
* sentiment-analysis 파이프라인의 디폴트 모델은 distilbert-base-uncased-finetuned-sst-2-english 임 위 링크를 클릭하면 해당 모델을 설명하는 페이지로 이동 할 수 있음.
https://huggingface.co/distilbert-base-uncased-finetuned-sst-2-english
distilbert-base-uncased-finetuned-sst-2-english · Hugging Face
🔥 ANDRYHA/FakeNewsClassifier 📚 CK42/sentiment-model-comparison ⌨️ EnzoBustos/IC-2022-Classificacao-de-Dados-Financeiros 📚 abrar-adnan/speech-analyzer 🏆 CodyJiang/Finetuning-Sentiment-Analysis-App 🛡️ anonymous8/Rapid-Textual-Adversarial
huggingface.co
As we saw in Chapter 1, this pipeline groups together three steps: preprocessing, passing the inputs through the model, and postprocessing:
1장에서 본 것처럼 이 파이프라인은 전처리, 모델을 통해 입력 전달, 후처리의 세 단계로 그룹화됩니다.

Let’s quickly go over each of these.
각 항목을 빠르게 살펴보겠습니다.
Preprocessing with a tokenizer
Like other neural networks, Transformer models can’t process raw text directly, so the first step of our pipeline is to convert the text inputs into numbers that the model can make sense of. To do this we use a tokenizer, which will be responsible for:
다른 신경망과 마찬가지로 Transformer 모델은 원시 텍스트를 직접 처리할 수 없으므로 파이프라인의 첫 번째 단계는 텍스트 입력을 모델이 이해할 수 있는 숫자로 변환하는 것입니다. 이를 위해 우리는 다음을 담당하는 토크나이저를 사용합니다.
- Splitting the input into words, subwords, or symbols (like punctuation) that are called tokens
- 입력을 토큰이라고 하는 단어, 하위 단어 또는 기호(구두점 등)로 분할
- Mapping each token to an integer
- 각 토큰을 정수로 매핑
- Adding additional inputs that may be useful to the model
- 모델에 유용할 수 있는 추가 입력 추가
All this preprocessing needs to be done in exactly the same way as when the model was pretrained, so we first need to download that information from the Model Hub. To do this, we use the AutoTokenizer class and its from_pretrained() method. Using the checkpoint name of our model, it will automatically fetch the data associated with the model’s tokenizer and cache it (so it’s only downloaded the first time you run the code below).
이 모든 전처리는 모델이 사전 훈련되었을 때와 정확히 동일한 방식으로 수행되어야 하므로 먼저 모델 허브에서 해당 정보를 다운로드해야 합니다. 이를 위해 AutoTokenizer 클래스와 해당 from_pretrained() 메서드를 사용합니다. 모델의 체크포인트 이름을 사용하면 모델의 토크나이저와 관련된 데이터를 자동으로 가져와 캐시합니다(따라서 아래 코드를 처음 실행할 때만 다운로드됩니다).
Since the default checkpoint of the sentiment-analysis pipeline is distilbert-base-uncased-finetuned-sst-2-english (you can see its model card here), we run the following:
감정 분석 파이프라인의 기본 체크포인트는 distilbert-base-uncased-finetuned-sst-2-english(여기서 해당 모델 카드를 볼 수 있음)이므로 다음을 실행합니다.
from transformers import AutoTokenizer

checkpoint = "distilbert-base-uncased-finetuned-sst-2-english"
tokenizer = AutoTokenizer.from_pretrained(checkpoint)
이 코드는 Hugging Face Transformers 라이브러리를 사용하여 사전 훈련된 모델의 토크나이저를 로드하는 예제입니다.
이 코드에서 사용된 AutoTokenizer.from_pretrained 함수는 주어진 모델 체크포인트에 대응하는 토크나이저를 로드합니다. 여기서 사용된 체크포인트 "distilbert-base-uncased-finetuned-sst-2-english"는 감정 분석 작업에 대해 미세 조정된 DistilBERT 모델입니다.
로드된 토크나이저는 입력 텍스트를 토큰으로 분할하고, 각 토큰을 모델이 이해할 수 있는 형식으로 변환하는 데 사용됩니다. 이 토크나이저를 사용하여 모델에 입력 데이터를 전처리할 수 있습니다.
Once we have the tokenizer, we can directly pass our sentences to it and we’ll get back a dictionary that’s ready to feed to our model! The only thing left to do is to convert the list of input IDs to tensors.
토크나이저가 있으면 문장을 직접 전달할 수 있고 모델에 제공할 준비가 된 사전을 다시 얻을 수 있습니다! 이제 남은 일은 입력 ID 목록을 텐서로 변환하는 것뿐입니다.
You can use 🤗 Transformers without having to worry about which ML framework is used as a backend; it might be PyTorch or TensorFlow, or Flax for some models. However, Transformer models only accept tensors as input. If this is your first time hearing about tensors, you can think of them as NumPy arrays instead. A NumPy array can be a scalar (0D), a vector (1D), a matrix (2D), or have more dimensions. It’s effectively a tensor; other ML frameworks’ tensors behave similarly, and are usually as simple to instantiate as NumPy arrays.
어떤 ML 프레임워크가 백엔드로 사용되는지 걱정할 필요 없이 🤗 Transformers를 사용할 수 있습니다. 일부 모델의 경우 PyTorch, TensorFlow 또는 Flax일 수 있습니다. 그러나 Transformer 모델은 텐서만 입력으로 허용합니다. 텐서에 대해 처음 듣는 경우 대신 NumPy 배열로 생각할 수 있습니다. NumPy 배열은 스칼라(0D), 벡터(1D), 행렬(2D)이거나 더 많은 차원을 가질 수 있습니다. 사실상 텐서입니다. 다른 ML 프레임워크의 텐서는 비슷하게 동작하며 일반적으로 NumPy 배열만큼 인스턴스화하기가 간단합니다.
To specify the type of tensors we want to get back (PyTorch, TensorFlow, or plain NumPy), we use the return_tensors argument:
반환하려는 텐서 유형(PyTorch, TensorFlow 또는 일반 NumPy)을 지정하려면 return_tensors 인수를 사용합니다.
raw_inputs = [
    "I've been waiting for a HuggingFace course my whole life.",
    "I hate this so much!",
]
inputs = tokenizer(raw_inputs, padding=True, truncation=True, return_tensors="pt")
print(inputs)
이 코드는 Hugging Face Transformers 라이브러리를 사용하여 텍스트 데이터를 전처리하는 예제입니다. 코드의 주요 부분은 tokenizer의 사용입니다.
- raw_inputs: 원시 입력 텍스트의 리스트로, 각각의 텍스트는 모델에 입력될 문장을 나타냅니다.
- tokenizer: AutoTokenizer.from_pretrained로 로드한 토크나이저를 사용하여 입력 데이터를 전처리합니다. 여기서는 padding, truncation, return_tensors 등의 인자를 사용하여 입력 데이터를 모델에 맞는 형식으로 변환합니다.
- padding=True: 입력 시퀀스의 길이를 맞추기 위해 패딩을 추가합니다.
- truncation=True: 입력 시퀀스가 모델의 최대 길이를 초과할 경우 자르기(truncate)를 수행합니다.
- return_tensors="pt": PyTorch 텐서 형식으로 결과를 반환합니다.
- inputs: 전처리가 완료된 입력 데이터를 나타내는 딕셔너리입니다. 딕셔너리는 input_ids, attention_mask, 등의 필드를 포함합니다.
- print(inputs): 최종적으로 전처리된 입력 데이터를 출력합니다.
이 코드를 통해 텍스트 데이터를 모델이 이해할 수 있는 형식으로 변환하고, 필요에 따라 패딩 및 자르기를 수행하여 모델에 입력할 수 있습니다.
Don’t worry about padding and truncation just yet; we’ll explain those later. The main things to remember here are that you can pass one sentence or a list of sentences, as well as specifying the type of tensors you want to get back (if no type is passed, you will get a list of lists as a result).
아직은 패딩과 잘림에 대해 걱정하지 마세요. 나중에 설명하겠습니다. 여기서 기억해야 할 주요 사항은 한 문장 또는 문장 목록을 전달할 수 있을 뿐만 아니라 반환하려는 텐서 유형을 지정할 수 있다는 것입니다(유형이 전달되지 않으면 결과적으로 list of lists 을 얻게 됩니다). .
Here’s what the results look like as PyTorch tensors:
PyTorch 텐서의 결과는 다음과 같습니다.
{
    'input_ids': tensor([
        [  101,  1045,  1005,  2310,  2042,  3403,  2005,  1037, 17662, 12172, 2607,  2026,  2878,  2166,  1012,   102],
        [  101,  1045,  5223,  2023,  2061,  2172,   999,   102,     0,     0,     0,     0,     0,     0,     0,     0]
    ]),
    'attention_mask': tensor([
        [1, 1, 1, 1, 1, 1, 1, 1, 1, 1, 1, 1, 1, 1, 1, 1],
        [1, 1, 1, 1, 1, 1, 1, 1, 0, 0, 0, 0, 0, 0, 0, 0]
    ])
}
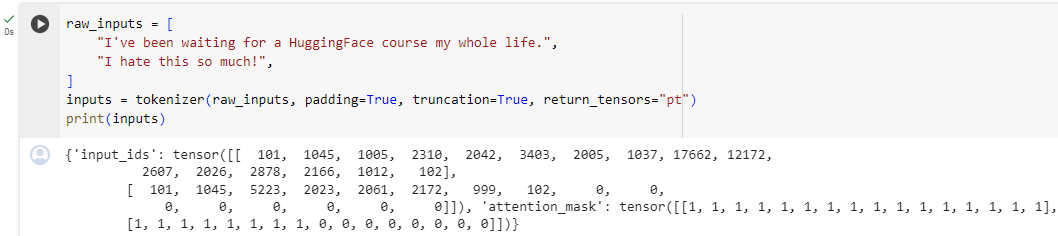
The output itself is a dictionary containing two keys, input_ids and attention_mask. input_ids contains two rows of integers (one for each sentence) that are the unique identifiers of the tokens in each sentence. We’ll explain what the attention_mask is later in this chapter.
출력 자체는 input_ids 및 attention_mask라는 두 개의 키를 포함하는 사전입니다. input_ids에는 각 문장에 있는 토큰의 고유 식별자인 두 행의 정수(각 문장당 하나씩)가 포함되어 있습니다. attention_mask가 무엇인지는 이 장의 뒷부분에서 설명하겠습니다.
Going through the model
We can download our pretrained model the same way we did with our tokenizer. 🤗 Transformers provides an AutoModel class which also has a from_pretrained() method:
토크나이저에서와 동일한 방식으로 사전 훈련된 모델을 다운로드할 수 있습니다. 🤗 Transformers는 from_pretrained() 메소드도 포함하는 AutoModel 클래스를 제공합니다.
from transformers import AutoModel

checkpoint = "distilbert-base-uncased-finetuned-sst-2-english"
model = AutoModel.from_pretrained(checkpoint)
이 코드는 Hugging Face Transformers 라이브러리를 사용하여 사전 훈련된 모델을 로드하는 예제입니다.
여기서 사용된 AutoModel.from_pretrained 함수는 주어진 모델 체크포인트에 해당하는 사전 훈련된 모델을 로드합니다. 이 예제에서 사용된 체크포인트 "distilbert-base-uncased-finetuned-sst-2-english"는 감정 분석 작업에 대해 미세 조정된 DistilBERT 모델입니다.
로드된 모델은 해당 언어 모델의 가중치와 아키텍처를 포함하고 있습니다. 이 모델은 주어진 문제나 작업에 대해 특정한 특성을 학습했으며, 이를 활용하여 다양한 NLP 작업을 수행할 수 있습니다.
로드된 모델은 주로 추론이나 특정 작업에 활용되며, 입력 데이터에 대한 예측이나 특성 추출을 수행할 수 있습니다.
In this code snippet, we have downloaded the same checkpoint we used in our pipeline before (it should actually have been cached already) and instantiated a model with it.
이 코드 조각에서는 이전에 파이프라인에서 사용한 것과 동일한 체크포인트를 다운로드하고(실제로는 이미 캐시되었어야 함) 이를 사용하여 모델을 인스턴스화했습니다.
This architecture contains only the base Transformer module: given some inputs, it outputs what we’ll call hidden states, also known as features. For each model input, we’ll retrieve a high-dimensional vector representing the contextual understanding of that input by the Transformer model.
이 아키텍처에는 기본 Transformer 모듈만 포함되어 있습니다. 일부 입력이 주어지면 hidden states ( features 이라고도 함)를 출력합니다. 각 모델 입력에 대해 Transformer 모델의 해당 입력에 대한 맥락적 이해를 나타내는 고차원 벡터를 검색합니다.
If this doesn’t make sense, don’t worry about it. We’ll explain it all later.
이해가 되지 않더라도 걱정하지 마세요. 나중에 모두 설명하겠습니다.
While these hidden states can be useful on their own, they’re usually inputs to another part of the model, known as the head. In Chapter 1, the different tasks could have been performed with the same architecture, but each of these tasks will have a different head associated with it.
이러한 hidden states 는 그 자체로 유용할 수 있지만 일반적으로 head 라고 하는 모델의 다른 부분에 대한 입력입니다. 1장에서는 동일한 아키텍처로 다양한 작업을 수행할 수 있었지만 이러한 각 작업에는 이와 관련된 각각 다른 head 가 있습니다.
A high-dimensional vector?
The vector output by the Transformer module is usually large. It generally has three dimensions:
Transformer 모듈의 벡터 출력은 일반적으로 큽니다. 일반적으로 다음과 같은 세 가지 차원을 갖습니다.
- Batch size: The number of sequences processed at a time (2 in our example).
- 배치 크기: 한 번에 처리되는 시퀀스 수(예제에서는 2)입니다.
- Sequence length: The length of the numerical representation of the sequence (16 in our example).
- 시퀀스 길이: 시퀀스의 숫자 표현 길이입니다(이 예에서는 16).
- Hidden size: The vector dimension of each model input.
- 숨겨진 크기: 각 모델 입력의 벡터 차원입니다.
It is said to be “high dimensional” because of the last value. The hidden size can be very large (768 is common for smaller models, and in larger models this can reach 3072 or more).
마지막 값 때문에 "고차원"이라고 합니다. 숨겨진 크기는 매우 클 수 있습니다(소형 모델에서는 768이 일반적이고 대형 모델에서는 3072 이상에 도달할 수 있음).
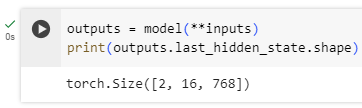
We can see this if we feed the inputs we preprocessed to our model:
전처리한 입력을 모델에 공급하면 이를 확인할 수 있습니다.
outputs = model(**inputs)
print(outputs.last_hidden_state.shape)
torch.Size([2, 16, 768])
이 코드는 Hugging Face Transformers 라이브러리를 사용하여 모델에 입력 데이터를 전달하고 모델의 출력을 확인하는 예제입니다.
- outputs = model(**inputs): 모델에 입력 데이터를 전달합니다. inputs는 이전 코드에서 전처리된 텍스트 데이터를 모델이 이해할 수 있는 형식으로 변환한 결과입니다. model은 이전에 로드한 사전 훈련된 모델입니다.
- print(outputs.last_hidden_state.shape): 모델의 출력 중에서 last_hidden_state의 모양(shape)을 출력합니다. last_hidden_state는 모델의 마지막 숨겨진 상태를 나타내며, 이는 주어진 입력 시퀀스에 대한 모델의 표현을 담고 있습니다.
예를 들어, 출력된 모양이 (batch_size, sequence_length, hidden_size)라면, 각 차원의 의미는 다음과 같습니다:
- batch_size: 현재 배치의 샘플 수
- sequence_length: 입력 시퀀스의 토큰 수
- hidden_size: 모델의 각 토큰에 대한 표현 차원의 크기
따라서 outputs.last_hidden_state.shape을 통해 모델이 입력에 대해 어떤 형태의 표현을 생성했는지 확인할 수 있습니다. 이는 모델의 내부 표현을 이해하고 다음 단계로의 전처리나 작업을 계획하는 데 도움이 됩니다.
Note that the outputs of 🤗 Transformers models behave like namedtuples or dictionaries. You can access the elements by attributes (like we did) or by key (outputs["last_hidden_state"]), or even by index if you know exactly where the thing you are looking for is (outputs[0]).
🤗 Transformers 모델의 출력은 명명된 튜플이나 사전처럼 동작합니다. 속성(우리가 했던 것처럼)이나 키(outputs["last_hidden_state"]) 또는 찾고 있는 항목이 어디에 있는지 정확히 아는 경우(outputs[0]) 인덱스를 통해 요소에 액세스할 수 있습니다.
Model heads: Making sense out of numbers
The model heads take the high-dimensional vector of hidden states as input and project them onto a different dimension. They are usually composed of one or a few linear layers:
model heads 는 hidden states 의 고차원 벡터를 입력으로 사용하여 이를 다른 차원에 투영합니다. 일반적으로 하나 또는 몇 개의 선형 레이어로 구성됩니다.

The output of the Transformer model is sent directly to the model head to be processed.
Transformer 모델의 출력은 처리를 위해 모델 헤드로 직접 전송됩니다.
In this diagram, the model is represented by its embeddings layer and the subsequent layers. The embeddings layer converts each input ID in the tokenized input into a vector that represents the associated token. The subsequent layers manipulate those vectors using the attention mechanism to produce the final representation of the sentences.
이 다이어그램에서 모델은 임베딩 레이어와 subsequent 레이어로 표현됩니다. 임베딩 레이어는 토큰화된 입력의 각 입력 ID를 연결된 토큰을 나타내는 벡터로 변환합니다. subsequent 레이어에서는 Attention 메커니즘을 사용하여 해당 벡터를 조작하여 문장의 최종 표현을 생성합니다.
There are many different architectures available in 🤗 Transformers, with each one designed around tackling a specific task. Here is a non-exhaustive list:
🤗 Transformers에는 다양한 아키텍처가 있으며, 각 아키텍처는 특정 작업을 처리하도록 설계되었습니다. 다음은 전체 목록이 아닙니다.
- *Model (retrieve the hidden states)
- *ForCausalLM
- *ForMaskedLM
- *ForMultipleChoice
- *ForQuestionAnswering
- *ForSequenceClassification
- *ForTokenClassification
- and others 🤗
For our example, we will need a model with a sequence classification head (to be able to classify the sentences as positive or negative). So, we won’t actually use the AutoModel class, but AutoModelForSequenceClassification:
이 예에서는 문장을 긍정 또는 부정으로 분류할 수 있도록 sequence classification head 가 있는 모델이 필요합니다. 따라서 실제로 AutoModel 클래스를 사용하지 않고 AutoModelForSequenceClassification을 사용합니다.
from transformers import AutoModelForSequenceClassification

checkpoint = "distilbert-base-uncased-finetuned-sst-2-english"
model = AutoModelForSequenceClassification.from_pretrained(checkpoint)
outputs = model(**inputs)
이 코드는 Hugging Face Transformers 라이브러리를 사용하여 사전 훈련된 시퀀스 분류 모델을 로드하고, 해당 모델에 입력 데이터를 전달하는 예제입니다.
- AutoModelForSequenceClassification.from_pretrained(checkpoint): 주어진 체크포인트에 해당하는 사전 훈련된 시퀀스 분류 모델을 로드합니다. 이 모델은 주로 텍스트 분류와 같은 작업을 위해 사전에 훈련되었습니다.
- outputs = model(**inputs): 로드한 모델에 전처리된 입력 데이터인 inputs를 전달하여 모델의 출력을 얻습니다. 여기서 inputs는 이전에 전처리된 텍스트 데이터에 대한 모델의 입력 형식입니다. 모델은 입력에 대해 예측값을 생성하거나 특정 작업에 필요한 표현을 출력할 것입니다.
이 코드를 통해 텍스트 분류 모델이 주어진 입력 데이터에 대해 어떻게 예측을 수행하는지를 확인할 수 있습니다. 이 모델은 주어진 문장의 클래스(긍정, 부정 등)를 예측하는 데 사용될 수 있습니다.
Now if we look at the shape of our outputs, the dimensionality will be much lower: the model head takes as input the high-dimensional vectors we saw before, and outputs vectors containing two values (one per label):
이제 출력의 모양을 살펴보면 차원이 훨씬 낮아집니다. 모델 헤드는 이전에 본 고차원 벡터를 입력으로 사용하고 두 값(레이블당 하나씩)을 포함하는 벡터를 출력합니다.
print(outputs.logits.shape)
이 코드는 Hugging Face Transformers 라이브러리를 사용하여 모델의 출력인 로짓(logits)의 모양(shape)을 출력하는 예제입니다.
- outputs.logits: 모델의 출력 중에서 예측된 클래스에 대한 로짓 값을 나타냅니다. 로짓은 주로 소프트맥스 함수를 통과하기 전의 확률에 해당합니다.
- outputs.logits.shape: 로짓의 모양을 출력합니다. 이는 PyTorch 텐서의 모양으로, (batch_size, num_labels)와 같은 형태일 것입니다.
- batch_size: 현재 배치의 샘플 수
- num_labels: 모델이 분류하려는 클래스 또는 레이블의 수
예를 들어, 출력된 모양이 (2, 2)라면, 이는 현재 배치에 두 개의 샘플이 있고 각 샘플에 대해 두 개의 클래스(레이블)에 대한 로짓 값을 가지고 있다는 것을 나타냅니다.
이 코드를 통해 모델이 입력 데이터에 대해 어떤 형태의 로짓을 출력하는지 확인할 수 있으며, 이를 통해 모델의 예측 결과를 이해할 수 있습니다.
torch.Size([2, 2])
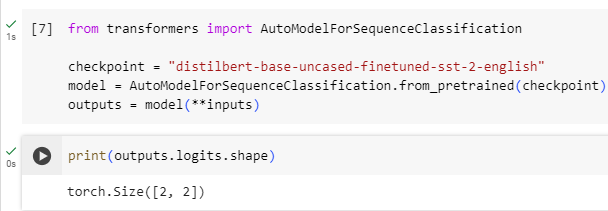
Since we have just two sentences and two labels, the result we get from our model is of shape 2 x 2.
두 개의 문장과 두 개의 레이블만 있으므로 모델에서 얻은 결과는 2 x 2 모양입니다.
Postprocessing the output
The values we get as output from our model don’t necessarily make sense by themselves. Let’s take a look:
모델의 출력으로 얻은 값이 반드시 그 자체로 의미가 있는 것은 아닙니다. 한 번 보자:
print(outputs.logits)tensor([[-1.5607, 1.6123],
[ 4.1692, -3.3464]], grad_fn=<AddmmBackward>)
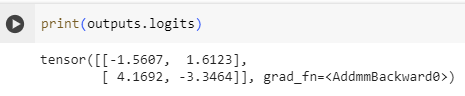
해석:
- 첫 번째 행은 첫 번째 입력에 대한 로짓 값을 나타냅니다. 이 경우, 두 개의 클래스에 대한 로짓이 각각 -1.5607와 1.6123입니다.
- 두 번째 행은 두 번째 입력에 대한 로짓 값을 나타냅니다. 여기서는 두 개의 클래스에 대한 로짓이 각각 4.1692와 -3.3464입니다.
로짓 값은 주로 소프트맥스 함수를 통과하여 확률 값으로 변환됩니다. 소프트맥스를 통과한 후, 각 클래스에 대한 확률이 얻어지게 됩니다. 일반적으로 확률이 가장 높은 클래스가 모델의 예측 클래스가 됩니다.
이를 통해 모델의 예측 결과를 확인하고, 어떤 클래스에 모델이 더 강한 확신을 갖고 있는지를 알 수 있습니다.
Our model predicted [-1.5607, 1.6123] for the first sentence and [ 4.1692, -3.3464] for the second one. Those are not probabilities but logits, the raw, unnormalized scores outputted by the last layer of the model. To be converted to probabilities, they need to go through a SoftMax layer (all 🤗 Transformers models output the logits, as the loss function for training will generally fuse the last activation function, such as SoftMax, with the actual loss function, such as cross entropy):
우리 모델은 첫 번째 문장에 대해 [-1.5607, 1.6123]을 예측하고 두 번째 문장에 대해 [4.1692, -3.3464]를 예측했습니다. 이는 확률이 아니라 모델의 마지막 계층에서 출력되는 정규화되지 않은 원시 점수인 로짓입니다. 확률로 변환하려면 SoftMax 레이어를 통과해야 합니다(모든 🤗 Transformers 모델은 로짓을 출력합니다. 훈련용 손실 함수는 일반적으로 교차 엔트로피와 같은 실제 손실 함수와 마지막 활성화 함수(SoftMax같은 함)를 융합하기 때문입니다).
import torch

predictions = torch.nn.functional.softmax(outputs.logits, dim=-1)
print(predictions)
tensor([[4.0195e-02, 9.5980e-01],
        [9.9946e-01, 5.4418e-04]], grad_fn=<SoftmaxBackward>)
이 코드는 PyTorch를 사용하여 모델의 로짓(logits) 값을 소프트맥스(softmax) 함수를 통과시켜 확률로 변환하는 작업을 수행하고, 변환된 확률 값을 출력하는 예제입니다.
- torch.nn.functional.softmax(outputs.logits, dim=-1): outputs.logits 텐서에 대해 소프트맥스 함수를 적용합니다. 소프트맥스 함수는 각 원소를 [0, 1] 범위로 변환하여 전체 합이 1이 되도록 만듭니다. 이를 통해 로짓 값이 클래스에 대한 확률 값으로 변환됩니다. dim=-1은 마지막 차원(여기서는 클래스 차원)을 기준으로 소프트맥스를 계산한다는 것을 의미합니다.
- print(predictions): 소프트맥스 함수를 통과한 결과인 변환된 확률 값을 출력합니다.
출력된 값은 확률로, 각 클래스에 대한 확률 값이 표시됩니다. 이러한 확률 값은 각 클래스에 속할 확률을 의미하며, 일반적으로 가장 높은 확률 값을 가진 클래스가 모델의 최종 예측 클래스가 됩니다.
이를 통해 모델이 예측한 클래스에 대한 확률 값을 확인할 수 있습니다.
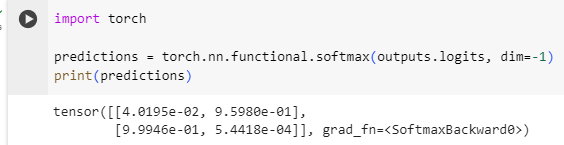
Now we can see that the model predicted [0.0402, 0.9598] for the first sentence and [0.9995, 0.0005] for the second one. These are recognizable probability scores.
이제 모델이 첫 번째 문장에 대해 [0.0402, 0.9598]을 예측하고 두 번째 문장에 대해 [0.9995, 0.0005]를 예측한 것을 볼 수 있습니다. 이는 인식 가능한 확률 점수입니다.
To get the labels corresponding to each position, we can inspect the id2label attribute of the model config (more on this in the next section):
각 위치에 해당하는 라벨을 얻으려면 모델 구성의 id2label 속성을 검사하면 됩니다(자세한 내용은 다음 섹션에서 확인하세요).
model.config.id2label{0: 'NEGATIVE', 1: 'POSITIVE'}
이 코드는 Hugging Face Transformers 라이브러리의 모델 설정(configuration)에서 클래스 레이블을 숫자에서 레이블 문자열로 매핑하는 딕셔너리를 반환합니다. 구체적으로는 id2label 속성을 사용하고 있습니다.
해석:
- model.config: 모델의 설정(configuration)을 나타내는 객체에 접근합니다.
- id2label: 클래스의 숫자 식별자(ID)를 해당 클래스의 레이블 문자열로 매핑하는 딕셔너리입니다.
이 딕셔너리는 주로 다중 클래스 분류 작업에서 모델이 각 클래스에 대해 할당한 숫자 ID를 해당 클래스의 레이블로 매핑하는 데 사용됩니다. 이 매핑은 모델의 출력에서 어떤 클래스가 예측되었는지를 이해하고 해석하는 데 도움이 됩니다.
예를 들어, 딕셔너리가 다음과 같다면:
{0: 'negative', 1: 'positive'}
이는 모델이 0을 부정(negative) 클래스로, 1을 긍정(positive) 클래스로 예측한다는 것을 의미합니다. 이러한 딕셔너리를 통해 모델의 예측 결과를 해석할 수 있습니다.

Now we can conclude that the model predicted the following:
이제 모델이 다음을 예측했다는 결론을 내릴 수 있습니다.
- First sentence: NEGATIVE: 0.0402, POSITIVE: 0.9598
- 첫 번째 문장: 부정: 0.0402, 긍정: 0.9598
- Second sentence: NEGATIVE: 0.9995, POSITIVE: 0.0005
- 두 번째 문장: 부정: 0.9995, 긍정: 0.0005
We have successfully reproduced the three steps of the pipeline: preprocessing with tokenizers, passing the inputs through the model, and postprocessing! Now let’s take some time to dive deeper into each of those steps.
우리는 파이프라인의 세 단계, 즉 토크나이저를 사용한 전처리, 모델을 통해 입력 전달, 후처리를 성공적으로 재현했습니다! 이제 각 단계에 대해 자세히 알아보는 시간을 갖도록 하겠습니다.
✏️ Try it out! Choose two (or more) texts of your own and run them through the sentiment-analysis pipeline. Then replicate the steps you saw here yourself and check that you obtain the same results!
✏️ 한번 사용해 보세요! 두 개 이상의 텍스트를 선택하고 감정 분석 파이프라인을 통해 실행하세요. 그런 다음 여기에서 본 단계를 직접 재현하고 동일한 결과를 얻는지 확인하세요!
Summary
이 단원은 아래와 같은 코드를 실행하면 backend 단위에서 어떤 일이 일어나는지 알아볼 수 있는 메소드들을 소개 하고 있음
sentiment-analysis를 사용해서 입력 문장에 대한 긍정과 부정 여부를 출력으로 얻었는데 이 결과를 얻기 위해 내부적으로는 아래와 같은 단계를 가짐.
1. 입력값들을 기계가 알 수 있도록 토큰화 한다. AutoTokenizer를 사용하면 입력값에 대한 토큰 값을 얻을 수 있음
2. 토큰 값을 사전 훈련된 모델에 통과 시켜 hidden_state 값을 얻는다. AutoModel을 사용하면 해당 hidden_state 값에 대한 정보를 알 수 있음
긍정 부정을 구별하려면 AutoModel 대신 AutoModelForSequenceClassification 모델을 사용해서 logit 값을 얻을 수 있음
이 에제 에서는 AutoModel 대신 AutoModelForSequenceClassification 모델을 사용했음
3. logit 값을 softmax에 통과 시켜 확률 값으로 변환한다. torch.nn.functional.softmax() 함수를 사용함
이러한 과정을 거쳐 위와 같은 결과를 얻게 된 것임.
'Hugging Face > NLP Course' 카테고리의 다른 글
| HF-NLP-USING 🤗 TRANSFORMERS : Basic usage completed! (0) | 2023.12.25 |
|---|---|
| HF-NLP-USING 🤗 TRANSFORMERS : Putting it all together (0) | 2023.12.25 |
| HF-NLP-USING 🤗 TRANSFORMERS : Handling multiple sequences (0) | 2023.12.25 |
| HF-NLP-USING 🤗 TRANSFORMERS : Tokenizers (1) | 2023.12.25 |
| HF-NLP-USING 🤗 TRANSFORMERS : Models (1) | 2023.12.25 |
| HF-NLP-USING 🤗 TRANSFORMERS : Introduction (0) | 2023.12.24 |
| HF-NLP-Transformer models : End-of-chapter quiz (1) | 2023.12.24 |
| HF-NLP-Transformer models : Summary (0) | 2023.12.24 |
| HF-NLP-Transformer models : Bias and limitations (1) | 2023.12.24 |
| HF-NLP-Transformer models : Sequence-to-sequence models[sequence-to-sequence-models] (1) | 2023.12.24 |