

https://huggingface.co/learn/nlp-course/chapter2/3?fw=pt
Models - Hugging Face NLP Course
2. Using 🤗 Transformers 3. Fine-tuning a pretrained model 4. Sharing models and tokenizers 5. The 🤗 Datasets library 6. The 🤗 Tokenizers library 9. Building and sharing demos new
huggingface.co
Models
https://youtu.be/AhChOFRegn4?si=KjVrNIfDzk7o7NKr
In this section we’ll take a closer look at creating and using a model. We’ll use the AutoModel class, which is handy when you want to instantiate any model from a checkpoint.
이번 섹션에서는 모델을 생성하고 사용하는 방법을 자세히 살펴보겠습니다. 체크포인트에서 모델을 인스턴스화하려는 경우 편리한 AutoModel 클래스를 사용하겠습니다.
The AutoModel class and all of its relatives are actually simple wrappers over the wide variety of models available in the library. It’s a clever wrapper as it can automatically guess the appropriate model architecture for your checkpoint, and then instantiates a model with this architecture.
AutoModel 클래스와 모든 관련 클래스는 실제로 라이브러리에서 사용할 수 있는 다양한 모델에 대한 간단한 래퍼입니다. 체크포인트에 적합한 모델 아키텍처를 자동으로 추측한 다음 이 아키텍처로 모델을 인스턴스화할 수 있으므로 영리한 래퍼입니다.
However, if you know the type of model you want to use, you can use the class that defines its architecture directly. Let’s take a look at how this works with a BERT model.
그러나 사용하려는 모델 유형을 알고 있는 경우 해당 아키텍처를 직접 정의하는 클래스를 사용할 수 있습니다. 이것이 BERT 모델에서 어떻게 작동하는지 살펴보겠습니다.
Creating a Transformer
The first thing we’ll need to do to initialize a BERT model is load a configuration object:
BERT 모델을 초기화하기 위해 가장 먼저 해야 할 일은 구성 객체를 로드하는 것입니다.
from transformers import BertConfig, BertModel

# Building the config
config = BertConfig()

# Building the model from the config
model = BertModel(config)
이 코드는 Hugging Face Transformers 라이브러리를 사용하여 BERT(Bidirectional Encoder Representations from Transformers) 모델을 구성하고 초기화하는 예제입니다. 주로 모델의 설정(configuration)과 모델 인스턴스를 생성하는 과정을 보여줍니다.
설명:
- BertConfig(): BERT 모델의 설정을 생성합니다. 이 설정은 모델의 아키텍처, 하이퍼파라미터 등을 조절하는 데 사용됩니다. 여기서는 기본 설정을 사용하고 있습니다. 필요에 따라 다양한 설정을 조절하여 모델을 사용자 정의할 수 있습니다.
- BertModel(config): 이전에 생성한 설정을 사용하여 BERT 모델을 빌드합니다. 이 모델은 주어진 설정에 따라 BERT의 아키텍처를 가진 인스턴스로 초기화됩니다.
이 코드는 모델 구성과 초기화의 간단한 예제를 보여주고 있습니다. 실제로는 더 많은 설정을 튜닝하고, 특정 작업에 맞게 사전 훈련된 가중치를 로드하여 모델을 사용합니다.
The configuration contains many attributes that are used to build the model:
구성에는 모델을 빌드하는 데 사용되는 많은 속성이 포함되어 있습니다.
print(config)BertConfig {
[...]
"hidden_size": 768,
"intermediate_size": 3072,
"max_position_embeddings": 512,
"num_attention_heads": 12,
"num_hidden_layers": 12,
[...]
}

해석:
- attention_probs_dropout_prob: 어텐션 계층의 드롭아웃 확률
- classifier_dropout: 분류기 계층의 드롭아웃 확률 (현재는 null로 설정되어 있음)
- hidden_act: 은닉 계층에서 사용되는 활성화 함수 (여기서는 GELU)
- hidden_dropout_prob: 은닉 계층의 드롭아웃 확률
- hidden_size: 은닉 계층의 차원 크기
- initializer_range: 가중치 초기화 범위
- intermediate_size: Transformer 모델의 중간(인터미디에이트) 계층 크기
- layer_norm_eps: 레이어 정규화의 epsilon 값
- max_position_embeddings: 최대 위치 임베딩의 길이
- model_type: 모델의 유형 (여기서는 "bert")
- num_attention_heads: 어텐션 헤드의 수
- num_hidden_layers: 은닉 계층의 총 수
- pad_token_id: 패딩 토큰의 식별자
- position_embedding_type: 위치 임베딩의 유형 (여기서는 "absolute")
- transformers_version: Transformers 라이브러리의 버전
- type_vocab_size: 타입(예: 문장 A와 문장 B)의 수
- use_cache: 결과를 캐시에 저장하여 재사용할지 여부
- vocab_size: 어휘 크기
이러한 설정은 모델의 아키텍처와 학습 가능한 매개변수들에 대한 중요한 정보를 담고 있습니다.
While you haven’t seen what all of these attributes do yet, you should recognize some of them: the hidden_size attribute defines the size of the hidden_states vector, and num_hidden_layers defines the number of layers the Transformer model has.
아직 이러한 모든 속성의 기능을 보지는 못했지만 일부 속성은 인식해야 합니다. Hidden_size 속성은 Hidden_states 벡터의 크기를 정의하고 num_hidden_layers는 Transformer 모델의 레이어 수를 정의합니다.
Different loading methods
Creating a model from the default configuration initializes it with random values:
기본 구성에서 모델을 생성하면 임의의 값으로 초기화됩니다.
from transformers import BertConfig, BertModel

config = BertConfig()
model = BertModel(config)

# Model is randomly initialized!
이 코드는 Hugging Face Transformers 라이브러리를 사용하여 BERT(Bidirectional Encoder Representations from Transformers) 모델을 랜덤으로 초기화하는 예제입니다.
설명:
- BertConfig(): BERT 모델의 설정을 생성합니다. 여기서는 기본 설정을 사용하고 있습니다.
- BertModel(config): 이전에 생성한 설정을 사용하여 BERT 모델을 랜덤으로 초기화합니다. 이 모델은 주어진 설정에 따라 BERT의 아키텍처를 가진 인스턴스로 초기화됩니다.
- # 모델은 랜덤으로 초기화됐습니다!: 주석을 통해 모델이 랜덤으로 초기화되었음을 나타냅니다. 초기화된 모델은 사전 훈련된 가중치를 가지고 있지 않으며, 훈련되지 않은 상태에서 시작됩니다.
이 코드는 가중치가 랜덤으로 초기화된 BERT 모델을 생성하는 간단한 예제입니다. 일반적으로는 랜덤으로 초기화된 모델을 사용하기보다는 사전 훈련된 모델을 로드하여 특정 작업에 맞게 조정하는 것이 더 흔합니다.
The model can be used in this state, but it will output gibberish; it needs to be trained first. We could train the model from scratch on the task at hand, but as you saw in Chapter 1, this would require a long time and a lot of data, and it would have a non-negligible environmental impact. To avoid unnecessary and duplicated effort, it’s imperative to be able to share and reuse models that have already been trained.
이 상태에서 모델을 사용할 수 있지만 횡설수설이 출력됩니다. 먼저 훈련을 받아야 합니다. 당면한 작업에 대해 처음부터 모델을 훈련할 수 있지만 1장에서 본 것처럼 이 작업에는 오랜 시간과 많은 데이터가 필요하며 환경에 미치는 영향도 무시할 수 없습니다. 불필요하고 중복된 노력을 피하려면 이미 훈련된 모델을 공유하고 재사용할 수 있는 것이 필수적입니다.
Loading a Transformer model that is already trained is simple — we can do this using the from_pretrained() method:
이미 학습된 Transformer 모델을 로드하는 것은 간단합니다. from_pretrained() 메서드를 사용하면 됩니다.
from transformers import BertModel

model = BertModel.from_pretrained("bert-base-cased")
이 코드는 Hugging Face Transformers 라이브러리를 사용하여 사전 훈련된 BERT(Bidirectional Encoder Representations from Transformers) 모델을 로드하는 예제입니다.
설명:
- from transformers import BertModel: BERT 모델을 사용하기 위해 BertModel 클래스를 가져옵니다.
- BertModel.from_pretrained("bert-base-cased"): "bert-base-cased"라는 사전 훈련된 BERT 모델을 로드합니다. 이 모델은 대/소문자 구분을 유지한 상태로 사전에 학습되었습니다.
로드된 모델은 이미 사전 훈련된 가중치를 가지고 있으며, 텍스트 데이터에 대한 다양한 NLP 작업에서 사용할 수 있습니다. 이 모델은 주어진 입력에 대한 표현(representation)을 추출하거나 특정 작업에 맞게 미세 조정될 수 있습니다.
사전 훈련된 모델을 사용하면 높은 수준의 언어 이해 능력을 가진 모델을 간단하게 적용할 수 있습니다.

Note :
Hugging Face Transformers 라이브러리를 사용하여 사전 훈련된 트랜스포머 모델을 from_pretrained 메서드를 통해 로드할 때, 주로 두 가지 주요 구성 요소가 관련됩니다.
- config.json: 이 파일은 모델의 구성 설정을 포함합니다. 모델 아키텍처, 하이퍼파라미터 및 모델 동작을 정의하는 기타 설정과 관련된 정보를 포함합니다. 구성 파일은 모델을 사전 훈련할 때 사용된 설정과 동일한 설정으로 모델을 올바르게 초기화하는 데 필수적입니다. JSON 파일이며 쉽게 검사하거나 수정할 수 있습니다. 이 구성은 주로 BertConfig와 같은 클래스를 사용하여 로드됩니다.
- model.pth 또는 model.tf (또는 유사한 이름): 이 파일은 모델의 사전 훈련된 가중치를 포함합니다. 정확한 형식 및 확장자는 프레임워크(PyTorch, TensorFlow) 및 특정 모델 아키텍처에 따라 다를 수 있습니다. 가중치 파일에는 모델이 대량의 텍스트 데이터에서 사전 훈련 중에 미세 조정된 학습 매개변수가 포함되어 있습니다. 이 파일은 모델이 사전 훈련 중에 학습한 지식과 표현을 포착하는 부분입니다.
위의 경우 model.safetensors를 로드했지만, 일반적으로 가중치가 포함된 .bin, .h5 또는 .tf와 같은 확장자를 가진 파일을 볼 수 있습니다. 파일 확장자는 프레임워크 및 모델에 따라 달라질 수 있습니다.
from_pretrained 메서드는 config 및 사전 훈련된 가중치를 모델에 로드합니다. 모델을 로드한 후 model을 출력하면 모델 아키텍처 및 구성에 관한 정보가 표시될 수 있습니다.
만약 config.json 및 model.safetensors와 같은 특정 파일이 있다면 이러한 파일의 내용을 확인하여 실제 구조와 내용을 확인하는 것이 좋습니다.
pretrained model의 config

As you saw earlier, we could replace BertModel with the equivalent AutoModel class. We’ll do this from now on as this produces checkpoint-agnostic code; if your code works for one checkpoint, it should work seamlessly with another. This applies even if the architecture is different, as long as the checkpoint was trained for a similar task (for example, a sentiment analysis task).
앞에서 본 것처럼 BertModel을 동등한 AutoModel 클래스로 대체할 수 있습니다. 체크포인트에 구애받지 않는 코드가 생성되므로 지금부터 이 작업을 수행하겠습니다. 코드가 하나의 체크포인트에서 작동한다면 다른 체크포인트에서도 원활하게 작동해야 합니다. 이는 체크포인트가 유사한 작업(예: 감정 분석 작업)에 대해 훈련된 한 아키텍처가 다르더라도 적용됩니다.
In the code sample above we didn’t use BertConfig, and instead loaded a pretrained model via the bert-base-cased identifier. This is a model checkpoint that was trained by the authors of BERT themselves; you can find more details about it in its model card.
위의 코드 샘플에서는 BertConfig를 사용하지 않고 대신 bert-base-cased 식별자를 통해 사전 훈련된 모델을 로드했습니다. 이는 BERT 작성자가 직접 교육한 모델 체크포인트입니다. 모델 카드에서 자세한 내용을 확인할 수 있습니다.
This model is now initialized with all the weights of the checkpoint. It can be used directly for inference on the tasks it was trained on, and it can also be fine-tuned on a new task. By training with pretrained weights rather than from scratch, we can quickly achieve good results.
이제 이 모델은 체크포인트의 모든 가중치로 초기화됩니다. 훈련된 작업에 대한 추론을 위해 직접 사용할 수 있으며, 새로운 작업에 대해 미세 조정할 수도 있습니다. 처음부터 훈련하는 것이 아니라 미리 훈련된 가중치로 훈련하면 빠르게 좋은 결과를 얻을 수 있습니다.
The weights have been downloaded and cached (so future calls to the from_pretrained() method won’t re-download them) in the cache folder, which defaults to ~/.cache/huggingface/transformers. You can customize your cache folder by setting the HF_HOME environment variable.
가중치는 ~/.cache/huggingface/transformers의 기본값인 캐시 폴더에 다운로드 및 캐시되었습니다(향후 from_pretrained() 메서드에 대한 호출이 다시 다운로드되지 않음). HF_HOME 환경 변수를 설정하여 캐시 폴더를 사용자 정의할 수 있습니다.
The identifier used to load the model can be the identifier of any model on the Model Hub, as long as it is compatible with the BERT architecture. The entire list of available BERT checkpoints can be found here.
모델을 로드하는 데 사용되는 식별자는 BERT 아키텍처와 호환되는 한 모델 허브에 있는 모든 모델의 식별자가 될 수 있습니다. 사용 가능한 BERT 체크포인트의 전체 목록은 여기에서 확인할 수 있습니다.
Saving methods
Saving a model is as easy as loading one — we use the save_pretrained() method, which is analogous to the from_pretrained() method:
모델을 저장하는 것은 모델을 로드하는 것만큼 쉽습니다. 우리는 from_pretrained() 메서드와 유사한 save_pretrained() 메서드를 사용합니다.
model.save_pretrained("directory_on_my_computer")
이 코드는 Hugging Face Transformers 라이브러리를 사용하여 모델을 지정된 디렉토리에 저장하는 예제입니다. 코드를 간단히 설명하겠습니다.
설명:
- model: 저장하려는 모델 인스턴스입니다.
- save_pretrained("directory_on_my_computer"): 모델을 지정된 디렉토리에 저장합니다. 여기서 "directory_on_my_computer"는 모델이 저장될 로컬 디렉토리의 경로를 나타냅니다.
이 코드를 실행하면 모델의 가중치 및 구성 설정이 지정된 디렉토리에 저장됩니다. 이렇게 저장된 모델은 나중에 from_pretrained 메서드를 사용하여 다시 로드할 수 있습니다. 이는 모델을 학습한 후 향후 사용이나 배포를 위해 모델 상태를 저장하는 일반적인 방법 중 하나입니다.
This saves two files to your disk:
이렇게 하면 디스크에 두 개의 파일이 저장됩니다.
ls directory_on_my_computer

config.json pytorch_model.bin
If you take a look at the config.json file, you’ll recognize the attributes necessary to build the model architecture. This file also contains some metadata, such as where the checkpoint originated and what 🤗 Transformers version you were using when you last saved the checkpoint.
config.json 파일을 살펴보면 모델 아키텍처를 구축하는 데 필요한 속성을 인식할 수 있습니다. 이 파일에는 체크포인트가 어디서 생성되었는지, 체크포인트를 마지막으로 저장했을 때 사용한 🤗 Transformers 버전과 같은 일부 메타데이터도 포함되어 있습니다.
The pytorch_model.bin file is known as the state dictionary; it contains all your model’s weights. The two files go hand in hand; the configuration is necessary to know your model’s architecture, while the model weights are your model’s parameters.
pytorch_model.bin 파일은 상태 사전으로 알려져 있습니다. 여기에는 모델의 모든 가중치가 포함됩니다. 두 파일은 서로 밀접하게 연관되어 있습니다. 모델의 아키텍처를 알기 위해서는 구성이 필요하며, 모델 가중치는 모델의 매개변수입니다.
Note: 두 파일의 내용을 보면 아래와 같습니다.
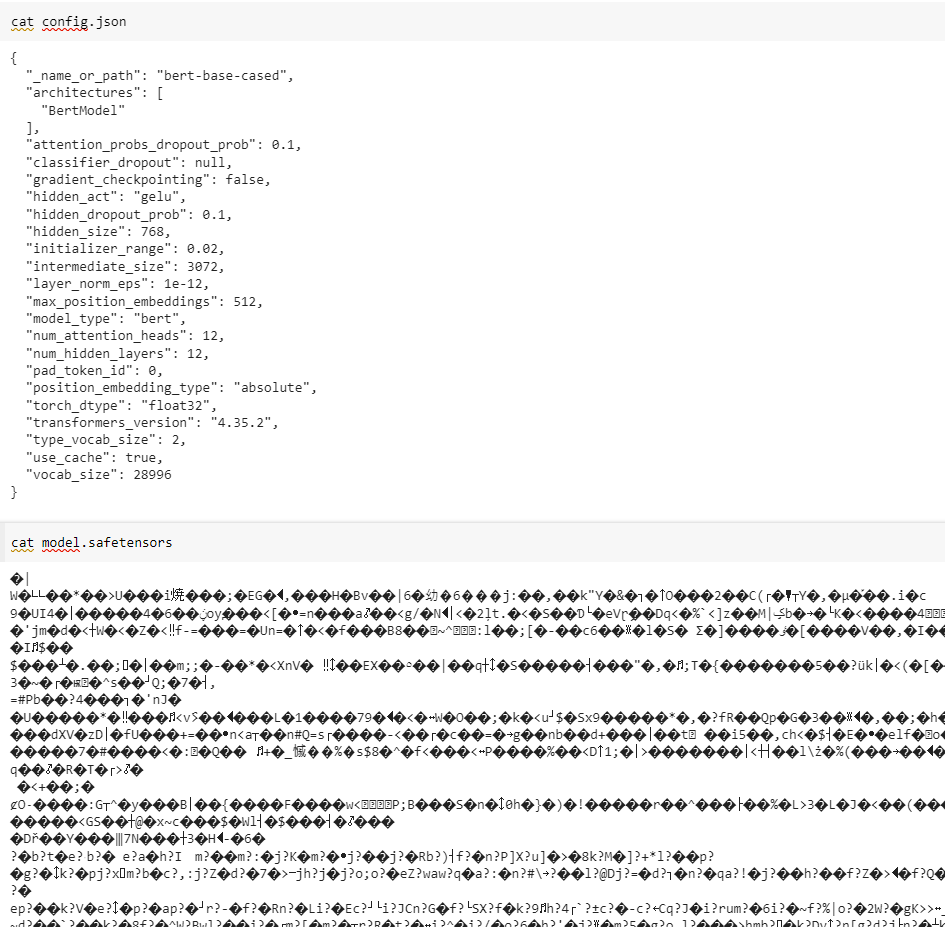
이 파일들의 사이즈를 보면 이렇습니다.

config 파일은 간단한 json 포맷으로 된 텍스트 파일이기 때문에 656 바이트 밖에 안 됩니다.
그런데 가중치값이 들어 있는 model.safetensors 파일은 413 메가 바이트 정도 됩니다.
이 정도 되면 어플리케이션만 잘 만들면 onDevice 에서 돌릴 수 있지 않을까요?
지금은 입력값으로 이 가중치 값들을 가지고 결과를 만들어 내는 연산이 너무 무거워서 안되는 건가?
Using a Transformer model for inference
Now that you know how to load and save a model, let’s try using it to make some predictions. Transformer models can only process numbers — numbers that the tokenizer generates. But before we discuss tokenizers, let’s explore what inputs the model accepts.
이제 모델을 로드하고 저장하는 방법을 알았으니 이를 사용하여 몇 가지 예측을 해보겠습니다. Transformer 모델은 토크나이저가 생성하는 숫자만 처리할 수 있습니다. 하지만 토크나이저에 대해 논의하기 전에 모델이 어떤 입력을 받아들이는지 살펴보겠습니다.
Tokenizers can take care of casting the inputs to the appropriate framework’s tensors, but to help you understand what’s going on, we’ll take a quick look at what must be done before sending the inputs to the model.
토크나이저는 입력을 적절한 프레임워크의 텐서에 캐스팅하는 작업을 처리할 수 있지만, 무슨 일이 일어나고 있는지 이해하는 데 도움이 되도록 입력을 모델에 보내기 전에 수행해야 할 작업을 간략하게 살펴보겠습니다.
Let’s say we have a couple of sequences:
몇 가지 시퀀스가 있다고 가정해 보겠습니다.
sequences = ["Hello!", "Cool.", "Nice!"]
The tokenizer converts these to vocabulary indices which are typically called input IDs. Each sequence is now a list of numbers! The resulting output is:
토크나이저는 이를 일반적으로 입력 ID라고 하는 어휘 색인으로 변환합니다. 이제 각 시퀀스는 숫자 목록입니다! 결과 출력은 다음과 같습니다.
encoded_sequences = [
    [101, 7592, 999, 102],
    [101, 4658, 1012, 102],
    [101, 3835, 999, 102],
]
This is a list of encoded sequences: a list of lists. Tensors only accept rectangular shapes (think matrices). This “array” is already of rectangular shape, so converting it to a tensor is easy:
이것은 인코딩된 시퀀스 목록입니다. a list of lists . Tensor는 직사각형 모양(행렬을 생각해 보세요)만 허용합니다. 이 "배열"은 이미 직사각형 모양이므로 텐서로 변환하는 것은 쉽습니다.
import torch

model_inputs = torch.tensor(encoded_sequences)
Using the tensors as inputs to the model
Making use of the tensors with the model is extremely simple — we just call the model with the inputs:
모델과 함께 텐서를 사용하는 것은 매우 간단합니다. 입력을 사용하여 모델을 호출하기만 하면 됩니다.
output = model(model_inputs)
While the model accepts a lot of different arguments, only the input IDs are necessary. We’ll explain what the other arguments do and when they are required later, but first we need to take a closer look at the tokenizers that build the inputs that a Transformer model can understand.
모델은 다양한 인수를 허용하지만 입력 ID만 필요합니다. 다른 인수의 기능과 필요한 시기는 나중에 설명하겠지만 먼저 Transformer 모델이 이해할 수 있는 입력을 작성하는 토크나이저를 자세히 살펴봐야 합니다.
Summary
AutoModel이나 BertModel() 등을 사용하면 랜덤한 가중치 값이 초기화 됨
pretrained model을 사용해서 train 된 가중치를 사용하려면 from_pretrained() 메소드를 사용.
그러면 config 파일과 가중치 파일을 가져온다. save_pretrained()를 사용하면 이 두 파일을 로컬에 저장할 수 있음
'Hugging Face > NLP Course' 카테고리의 다른 글
| HF-NLP-USING 🤗 TRANSFORMERS : End-of-chapter quiz (0) | 2023.12.25 |
|---|---|
| HF-NLP-USING 🤗 TRANSFORMERS : Basic usage completed! (0) | 2023.12.25 |
| HF-NLP-USING 🤗 TRANSFORMERS : Putting it all together (0) | 2023.12.25 |
| HF-NLP-USING 🤗 TRANSFORMERS : Handling multiple sequences (0) | 2023.12.25 |
| HF-NLP-USING 🤗 TRANSFORMERS : Tokenizers (1) | 2023.12.25 |
| HF-NLP-USING 🤗 TRANSFORMERS : Behind the pipeline (0) | 2023.12.24 |
| HF-NLP-USING 🤗 TRANSFORMERS : Introduction (0) | 2023.12.24 |
| HF-NLP-Transformer models : End-of-chapter quiz (1) | 2023.12.24 |
| HF-NLP-Transformer models : Summary (0) | 2023.12.24 |
| HF-NLP-Transformer models : Bias and limitations (1) | 2023.12.24 |