

HF-NLP-USING 🤗 TRANSFORMERS : Handling multiple sequences
2023. 12. 25. 12:05 |
https://huggingface.co/learn/nlp-course/chapter2/5?fw=pt
Handling multiple sequences - Hugging Face NLP Course
In the previous section, we explored the simplest of use cases: doing inference on a single sequence of a small length. However, some questions emerge already: Let’s see what kinds of problems these questions pose, and how we can solve them using the
huggingface.co
Handling multiple sequences
https://youtu.be/M6adb1j2jPI?si=YqCspD4kwBnCat-7
In the previous section, we explored the simplest of use cases: doing inference on a single sequence of a small length. However, some questions emerge already:
이전 섹션에서는 가장 간단한 사용 사례인 짧은 길이의 단일 시퀀스에 대해 추론을 수행하는 방법을 살펴보았습니다. 그러나 몇 가지 질문이 이미 나타났습니다.
- How do we handle multiple sequences? 여러 시퀀스를 어떻게 처리합니까?
- How do we handle multiple sequences of different lengths? 길이가 다른 여러 시퀀스를 어떻게 처리합니까?
- Are vocabulary indices the only inputs that allow a model to work well? 모델이 잘 작동하도록 하는 유일한 입력은 vocabulary indices 입니까?
- Is there such a thing as too long a sequence? 너무 긴 시퀀스 같은 것이 있나요?
Let’s see what kinds of problems these questions pose, and how we can solve them using the 🤗 Transformers API.
이러한 질문이 어떤 종류의 문제를 야기하는지, 그리고 🤗 Transformers API를 사용하여 이러한 문제를 어떻게 해결할 수 있는지 살펴보겠습니다.
Models expect a batch of inputs
In the previous exercise you saw how sequences get translated into lists of numbers. Let’s convert this list of numbers to a tensor and send it to the model:
이전 연습에서는 시퀀스가 숫자 목록으로 변환되는 방법을 살펴보았습니다. 이 숫자 목록을 텐서로 변환하여 모델에 보내겠습니다.
import torch
from transformers import AutoTokenizer, AutoModelForSequenceClassification

checkpoint = "distilbert-base-uncased-finetuned-sst-2-english"
tokenizer = AutoTokenizer.from_pretrained(checkpoint)
model = AutoModelForSequenceClassification.from_pretrained(checkpoint)

sequence = "I've been waiting for a HuggingFace course my whole life."

tokens = tokenizer.tokenize(sequence)
ids = tokenizer.convert_tokens_to_ids(tokens)
input_ids = torch.tensor(ids)
# This line will fail.
model(input_ids)
IndexError: Dimension out of range (expected to be in range of [-1, 0], but got 1)
이 코드는 Hugging Face Transformers 라이브러리를 사용하여 사전 훈련된 감성 분류 모델을 로드하고, 주어진 텍스트 시퀀스를 토큰화하여 모델에 전달하는 예제입니다. 코드를 이해해보겠습니다.
해석:
- checkpoint: 사용할 모델 및 토크나이저의 이름 또는 경로를 나타냅니다. 여기서는 감성 분류 모델 "distilbert-base-uncased-finetuned-sst-2-english"를 사용합니다.
- AutoTokenizer.from_pretrained(checkpoint): 주어진 모델의 토크나이저를 로드합니다.
- AutoModelForSequenceClassification.from_pretrained(checkpoint): 주어진 모델을 시퀀스 분류를 위한 모델로 로드합니다.
- sequence: 분류를 위한 입력 텍스트 시퀀스를 정의합니다.
- tokenizer.tokenize(sequence): 입력 텍스트를 토큰화합니다.
- tokenizer.convert_tokens_to_ids(tokens): 토큰들을 모델의 입력으로 사용할 수 있는 정수 ID로 변환합니다.
- torch.tensor(ids): PyTorch 텐서로 변환합니다.
- model(input_ids): 여기서 주의해야 할 부분입니다. 이 코드는 모델에 입력을 전달하는데, 일반적으로는 토큰화된 시퀀스가 아니라 정수 ID로 이루어진 텐서를 전달해야 합니다. 그러나 현재 코드에서는 토큰화된 결과를 그대로 전달하고 있습니다. 따라서 이 줄에서 에러가 발생할 것입니다.
이 코드를 수정하여 model에 올바른 입력 형식을 제공하면 모델이 텍스트를 분류하는 결과를 얻을 수 있습니다.

Oh no! Why did this fail? “We followed the steps from the pipeline in section 2.
이! 왜 이것이 실패했는가? “우리는 섹션 2의 파이프라인 단계를 따랐습니다.
The problem is that we sent a single sequence to the model, whereas 🤗 Transformers models expect multiple sentences by default. Here we tried to do everything the tokenizer did behind the scenes when we applied it to a sequence. But if you look closely, you’ll see that the tokenizer didn’t just convert the list of input IDs into a tensor, it added a dimension on top of it:
문제는 우리가 모델에 단일 시퀀스를 보낸 반면 🤗 Transformers 모델은 기본적으로 여러 문장을 기대한다는 것입니다. 여기서 우리는 토크나이저를 시퀀스에 적용할 때 뒤에서 토크나이저가 수행하는 모든 작업을 수행하려고 했습니다. 그러나 자세히 살펴보면 토크나이저가 입력 ID 목록을 텐서로 변환한 것이 아니라 그 위에 차원을 추가했다는 것을 알 수 있습니다.
tokenized_inputs = tokenizer(sequence, return_tensors="pt")
print(tokenized_inputs["input_ids"])
tensor([[  101,  1045,  1005,  2310,  2042,  3403,  2005,  1037, 17662, 12172,
          2607,  2026,  2878,  2166,  1012,   102]])
이 코드는 Hugging Face Transformers 라이브러리의 토크나이저를 사용하여 주어진 텍스트 시퀀스를 토큰화하고, 그 결과를 PyTorch 텐서로 반환하는 예제입니다. 코드를 이해해보겠습니다.
해석:
- tokenizer: 사전 훈련된 모델의 토크나이저를 나타냅니다. 코드에서는 이미 로드된 토크나이저를 사용하고 있다고 가정합니다.
- sequence: 토큰화할 텍스트 시퀀스입니다. 코드에서는 "I've been waiting for a HuggingFace course my whole life."라는 텍스트를 사용하고 있습니다.
- tokenizer(sequence, return_tensors="pt"): 주어진 텍스트 시퀀스를 토큰화하고, 결과를 PyTorch 텐서로 반환합니다. return_tensors="pt" 인자는 결과를 PyTorch 텐서로 반환하도록 지정하는 부분입니다.
- tokenized_inputs["input_ids"]: 토큰화된 결과 중에서 "input_ids" 키에 해당하는 값, 즉 정수로 이루어진 텐서를 출력합니다.
따라서 print(tokenized_inputs["input_ids"])는 주어진 텍스트 시퀀스를 토큰화하여 얻은 토큰 ID들을 PyTorch 텐서로 출력합니다. 이렇게 토큰화된 입력은 주로 모델에 입력으로 제공될 때 사용되며, 모델이 텍스트를 이해할 수 있는 형식으로 변환됩니다.

Let’s try again and add a new dimension: 다시 시도하고 새로운 측정기준을 추가해 보겠습니다.
import torch
from transformers import AutoTokenizer, AutoModelForSequenceClassification

checkpoint = "distilbert-base-uncased-finetuned-sst-2-english"
tokenizer = AutoTokenizer.from_pretrained(checkpoint)
model = AutoModelForSequenceClassification.from_pretrained(checkpoint)

sequence = "I've been waiting for a HuggingFace course my whole life."

tokens = tokenizer.tokenize(sequence)
ids = tokenizer.convert_tokens_to_ids(tokens)

input_ids = torch.tensor([ids])
print("Input IDs:", input_ids)

output = model(input_ids)
print("Logits:", output.logits)
We print the input IDs as well as the resulting logits — here’s the output:
입력 ID와 결과 로짓을 인쇄합니다. 출력은 다음과 같습니다.
Input IDs: [[ 1045,  1005,  2310,  2042,  3403,  2005,  1037, 17662, 12172,  2607, 2026,  2878,  2166,  1012]]
Logits: [[-2.7276,  2.8789]]
이 코드는 Hugging Face Transformers 라이브러리를 사용하여 감성 분류 모델을 로드하고, 주어진 텍스트 시퀀스를 토큰화하여 모델에 전달하며, 모델의 출력을 확인하는 예제입니다. 코드를 이해해보겠습니다.
해석:
- checkpoint: 사용할 모델 및 토크나이저의 이름 또는 경로를 나타냅니다. 여기서는 감성 분류 모델 "distilbert-base-uncased-finetuned-sst-2-english"를 사용합니다.
- AutoTokenizer.from_pretrained(checkpoint): 주어진 모델의 토크나이저를 로드합니다.
- AutoModelForSequenceClassification.from_pretrained(checkpoint): 주어진 모델을 감성 분류를 위한 모델로 로드합니다.
- sequence: 감성 분류를 위한 입력 텍스트 시퀀스를 정의합니다.
- tokenizer.tokenize(sequence): 입력 텍스트를 토큰화합니다.
- tokenizer.convert_tokens_to_ids(tokens): 토큰들을 모델의 입력으로 사용할 수 있는 정수 ID로 변환합니다.
- torch.tensor([ids]): PyTorch 텐서로 변환합니다. 여기서는 2D 텐서를 만들기 위해 입력을 리스트로 묶었습니다.
- model(input_ids): 모델에 입력을 전달하여 출력을 얻습니다.
- output.logits: 모델의 출력 중 로짓(logits) 값을 확인합니다. 이 값은 감성 분류 모델이 각 클래스에 할당한 점수를 나타냅니다.
따라서 코드는 주어진 텍스트를 감성 분류 모델에 입력으로 전달하고, 모델이 예측한 클래스에 대한 로짓을 출력합니다.

Batching is the act of sending multiple sentences through the model, all at once. If you only have one sentence, you can just build a batch with a single sequence:
일괄 처리는 모델을 통해 여러 문장을 한 번에 보내는 행위입니다. 문장이 하나뿐인 경우 단일 시퀀스로 배치를 만들 수 있습니다.
batched_ids = [ids, ids]
This is a batch of two identical sequences! 이것은 두 개의 동일한 시퀀스로 구성된 배치입니다!
✏️ Try it out! Convert this batched_ids list into a tensor and pass it through your model. Check that you obtain the same logits as before (but twice)!
✏️ 한번 사용해 보세요! 이 bated_ids 목록을 텐서로 변환하고 모델을 통해 전달하세요. 이전과 동일한 로지트(단, 두 번)를 얻었는지 확인하세요!
Batching allows the model to work when you feed it multiple sentences. Using multiple sequences is just as simple as building a batch with a single sequence. There’s a second issue, though. When you’re trying to batch together two (or more) sentences, they might be of different lengths. If you’ve ever worked with tensors before, you know that they need to be of rectangular shape, so you won’t be able to convert the list of input IDs into a tensor directly. To work around this problem, we usually pad the inputs.
일괄 처리를 사용하면 모델에 여러 문장을 제공할 때 모델이 작동할 수 있습니다. 여러 시퀀스를 사용하는 것은 단일 시퀀스로 배치를 구축하는 것만큼 간단합니다. 하지만 두 번째 문제가 있습니다. 두 개 이상의 문장을 일괄 처리하려고 하면 길이가 다를 수 있습니다. 이전에 텐서를 사용해 본 적이 있다면 직사각형 모양이어야 하므로 입력 ID 목록을 텐서로 직접 변환할 수 없다는 것을 알고 있을 것입니다. 이 문제를 해결하기 위해 일반적으로 입력을 채웁니다.
Padding the inputs
The following list of lists cannot be converted to a tensor:
다음 list of lists 은 텐서로 변환할 수 없습니다.
batched_ids = [
    [200, 200, 200],
    [200, 200]
]
In order to work around this, we’ll use padding to make our tensors have a rectangular shape. Padding makes sure all our sentences have the same length by adding a special word called the padding token to the sentences with fewer values. For example, if you have 10 sentences with 10 words and 1 sentence with 20 words, padding will ensure all the sentences have 20 words. In our example, the resulting tensor looks like this:
이 문제를 해결하기 위해 패딩을 사용하여 텐서를 직사각형 모양으로 만듭니다. 패딩은 더 적은 값을 가진 문장에 패딩 토큰이라는 특수 단어를 추가하여 모든 문장의 길이를 동일하게 만듭니다. 예를 들어, 10개 단어로 구성된 10개의 문장과 20개 단어로 구성된 1개의 문장이 있는 경우 패딩을 사용하면 모든 문장이 20개 단어로 구성됩니다. 이 예에서 결과 텐서는 다음과 같습니다.
padding_id = 100

batched_ids = [
    [200, 200, 200],
    [200, 200, padding_id],
]
The padding token ID can be found in tokenizer.pad_token_id. Let’s use it and send our two sentences through the model individually and batched together:
패딩 토큰 ID는 tokenizer.pad_token_id에서 찾을 수 있습니다. 이를 사용하여 모델을 통해 두 문장을 개별적으로 일괄 전송해 보겠습니다.
model = AutoModelForSequenceClassification.from_pretrained(checkpoint)

sequence1_ids = [[200, 200, 200]]
sequence2_ids = [[200, 200]]
batched_ids = [
    [200, 200, 200],
    [200, 200, tokenizer.pad_token_id],
]

print(model(torch.tensor(sequence1_ids)).logits)
print(model(torch.tensor(sequence2_ids)).logits)
print(model(torch.tensor(batched_ids)).logits)
tensor([[ 1.5694, -1.3895]], grad_fn=<AddmmBackward>)
tensor([[ 0.5803, -0.4125]], grad_fn=<AddmmBackward>)
tensor([[ 1.5694, -1.3895],
[ 1.3373, -1.2163]], grad_fn=<AddmmBackward>)
이 코드는 Hugging Face Transformers 라이브러리를 사용하여 감성 분류 모델을 로드하고, 서로 다른 길이의 시퀀스에 대한 예측을 수행하는 예제입니다. 코드를 이해해보겠습니다.
해석:
- AutoModelForSequenceClassification.from_pretrained(checkpoint): 주어진 모델을 감성 분류를 위한 모델로 로드합니다.
- sequence1_ids, sequence2_ids, batched_ids: 서로 다른 길이의 시퀀스를 정의합니다. sequence1_ids는 길이가 3인 시퀀스, sequence2_ids는 길이가 2인 시퀀스, batched_ids는 길이가 3 또는 2인 두 개의 시퀀스로 구성된 배치입니다. 두 번째 시퀀스의 끝 부분은 패딩 토큰으로 채워져 있습니다.
- model(torch.tensor(sequence1_ids)).logits: 모델에 첫 번째 시퀀스를 입력으로 전달하고, 감성 분류 모델이 예측한 클래스에 대한 로짓(logits)을 출력합니다.
- model(torch.tensor(sequence2_ids)).logits: 모델에 두 번째 시퀀스를 입력으로 전달하고, 마찬가지로 예측한 클래스에 대한 로짓을 출력합니다.
- model(torch.tensor(batched_ids)).logits: 모델에 배치로 묶인 시퀀스를 입력으로 전달하고, 예측한 클래스에 대한 로짓을 출력합니다. 이때, 패딩된 부분은 모델에 영향을 미치지 않습니다.
따라서 코드는 서로 다른 길이의 시퀀스를 모델에 입력으로 전달하여 예측을 수행하고, 각 시퀀스에 대한 예측 클래스에 대한 로짓을 출력하는 예제입니다.

There’s something wrong with the logits in our batched predictions: the second row should be the same as the logits for the second sentence, but we’ve got completely different values!
일괄 예측의 로짓에 문제가 있습니다. 두 번째 행은 두 번째 문장의 로짓과 동일해야 하지만 값이 완전히 다릅니다!
This is because the key feature of Transformer models is attention layers that contextualize each token. These will take into account the padding tokens since they attend to all of the tokens of a sequence. To get the same result when passing individual sentences of different lengths through the model or when passing a batch with the same sentences and padding applied, we need to tell those attention layers to ignore the padding tokens. This is done by using an attention mask.
이는 Transformer 모델의 주요 기능이 각 토큰을 맥락화하는 attention layers 이기 때문입니다. 이는 시퀀스의 모든 토큰에 참여하므로 패딩 토큰을 고려합니다. 모델을 통해 길이가 다른 개별 문장을 전달할 때 또는 동일한 문장과 패딩이 적용된 배치를 전달할 때 동일한 결과를 얻으려면 해당 Attention 레이어에 패딩 토큰을 무시하도록 지시해야 합니다. 이는 attention mask 를 사용하여 수행됩니다.
Attention masks
Attention masks are tensors with the exact same shape as the input IDs tensor, filled with 0s and 1s: 1s indicate the corresponding tokens should be attended to, and 0s indicate the corresponding tokens should not be attended to (i.e., they should be ignored by the attention layers of the model).
어텐션 마스크는 입력 ID 텐서와 정확히 동일한 모양의 텐서이며 0과 1로 채워집니다. 1은 해당 토큰에 주의해야 함을 나타내고 0은 해당 토큰에 주의하지 않아야 함을 나타냅니다(즉, 무시해야 함). 모델의 attention layer ).
Let’s complete the previous example with an attention mask:
attention mask 를 사용하여 이전 예를 완성해 보겠습니다.
batched_ids = [
[200, 200, 200],
[200, 200, tokenizer.pad_token_id],
]
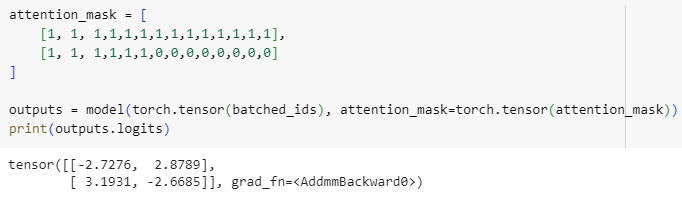
attention_mask = [
[1, 1, 1],
[1, 1, 0],
]
outputs = model(torch.tensor(batched_ids), attention_mask=torch.tensor(attention_mask))
print(outputs.logits)tensor([[ 1.5694, -1.3895],
[ 0.5803, -0.4125]], grad_fn=<AddmmBackward>)
이 코드는 Hugging Face Transformers 라이브러리를 사용하여 감성 분류 모델에 대해 패딩된 시퀀스를 입력으로 전달하고, attention mask를 사용하여 패딩 부분에 모델이 주의를 기울이지 않도록 하는 예제입니다. 코드를 이해해보겠습니다.
해석:
- batched_ids: 두 개의 시퀀스를 담은 배치를 정의합니다. 첫 번째 시퀀스는 길이가 3이고 모든 토큰이 실제 입력에 속해 있는 것으로 가정합니다. 두 번째 시퀀스는 길이가 3이지만, 세 번째 토큰이 패딩 토큰으로 채워져 있습니다.
- attention_mask: 각 시퀀스에 대한 어텐션 마스크를 정의합니다. 첫 번째 시퀀스는 모든 토큰에 대해 어텐션을 기울이기를 원하므로 1로 설정합니다. 두 번째 시퀀스는 마지막 토큰이 패딩되었으므로, 이를 나타내기 위해 마지막 위치에 0으로 설정합니다.
- model(torch.tensor(batched_ids), attention_mask=torch.tensor(attention_mask)): 모델에 패딩된 시퀀스와 attention mask를 입력으로 전달합니다. attention mask는 패딩 토큰에 대한 어텐션을 조절하는 데 사용됩니다.
- outputs.logits: 모델의 출력 중 로짓(logits) 값을 확인합니다. 이 값은 감성 분류 모델이 각 클래스에 할당한 점수를 나타냅니다.
따라서 코드는 패딩된 시퀀스를 모델에 입력으로 전달하고, attention mask를 사용하여 패딩 부분에 대한 어텐션을 제어하여 예측을 수행하고, 각 시퀀스에 대한 예측 클래스에 대한 로짓을 출력하는 예제입니다.

Now we get the same logits for the second sentence in the batch.
이제 배치의 두 번째 문장에 대해 동일한 로짓을 얻습니다.
Notice how the last value of the second sequence is a padding ID, which is a 0 value in the attention mask.
두 번째 시퀀스의 마지막 값이 어텐션 마스크의 0 값인 패딩 ID라는 점에 유의하세요.
✏️ Try it out! Apply the tokenization manually on the two sentences used in section 2 (“I’ve been waiting for a HuggingFace course my whole life.” and “I hate this so much!”). Pass them through the model and check that you get the same logits as in section 2. Now batch them together using the padding token, then create the proper attention mask. Check that you obtain the same results when going through the model!
✏️ 한번 사용해 보세요! 섹션 2에서 사용된 두 문장(“ I’ve been waiting for a HuggingFace course my whole life.” and “I hate this so much! ”)에 토큰화를 수동으로 적용합니다. 모델을 통해 이를 전달하고 섹션 2와 동일한 로짓을 얻는지 확인합니다. 이제 패딩 토큰을 사용하여 일괄 처리한 다음 적절한 주의 마스크를 만듭니다. 모델을 진행할 때 동일한 결과를 얻는지 확인하십시오!
실행 결과


attention_mask를 사용하지 않았을 경우 두번째 문장이 다르게 나옴
attention_mask를 사용하면 batched_ids를 사용해도 두 문장 모두 logit이 같게 나옴.
Longer sequences
With Transformer models, there is a limit to the lengths of the sequences we can pass the models. Most models handle sequences of up to 512 or 1024 tokens, and will crash when asked to process longer sequences. There are two solutions to this problem:
Transformer 모델의 경우 모델을 전달할 수 있는 시퀀스의 길이에 제한이 있습니다. 대부분의 모델은 최대 512개 또는 1024개 토큰의 시퀀스를 처리하며 더 긴 시퀀스를 처리하라는 요청을 받으면 충돌이 발생합니다. 이 문제에 대한 두 가지 해결책이 있습니다.
- Use a model with a longer supported sequence length.
- 지원되는 시퀀스 길이가 더 긴 모델을 사용하세요.
- Truncate your sequences.
- 시퀀스를 자릅니다.
Models have different supported sequence lengths, and some specialize in handling very long sequences. Longformer is one example, and another is LED. If you’re working on a task that requires very long sequences, we recommend you take a look at those models.
모델마다 지원되는 시퀀스 길이가 다르며 일부 모델은 매우 긴 시퀀스를 전문적으로 처리합니다. Longformer가 한 예이고 다른 하나는 LED입니다. 매우 긴 시퀀스가 필요한 작업을 수행하는 경우 해당 모델을 살펴보는 것이 좋습니다.
Otherwise, we recommend you truncate your sequences by specifying the max_sequence_length parameter:
그렇지 않은 경우 max_sequence_length 매개변수를 지정하여 시퀀스를 자르는 것이 좋습니다.
sequence = sequence[:max_sequence_length]
Summary
여러 문장의 입력값을 받을 경우 각 tensor의 길이는 모두 같아야 한다.
이럴 경우 짧은 문장의 경우 긴 문장과 길이기 같도록 하기 위해 padding을 더해 준다.
이 때 짧은 문장에 더해진 padding이 attention 연산을 할 때 같이 계산되기 때문에 결과값 (logit)이 실제 문장과는 다르게 나온다. attention연산에서 padding 부분이 제외 되도록 하기 위해 atention_mask를 사용해야 한다.
'Hugging Face > NLP Course' 카테고리의 다른 글
| HF-NLP-FINE-TUNING A PRETRAINED MODEL-Processing the data (1) | 2023.12.26 |
|---|---|
| HF-NLP-FINE-TUNING A PRETRAINED MODEL-Introduction (0) | 2023.12.26 |
| HF-NLP-USING 🤗 TRANSFORMERS : End-of-chapter quiz (0) | 2023.12.25 |
| HF-NLP-USING 🤗 TRANSFORMERS : Basic usage completed! (0) | 2023.12.25 |
| HF-NLP-USING 🤗 TRANSFORMERS : Putting it all together (0) | 2023.12.25 |
| HF-NLP-USING 🤗 TRANSFORMERS : Tokenizers (1) | 2023.12.25 |
| HF-NLP-USING 🤗 TRANSFORMERS : Models (1) | 2023.12.25 |
| HF-NLP-USING 🤗 TRANSFORMERS : Behind the pipeline (0) | 2023.12.24 |
| HF-NLP-USING 🤗 TRANSFORMERS : Introduction (0) | 2023.12.24 |
| HF-NLP-Transformer models : End-of-chapter quiz (1) | 2023.12.24 |