

https://huggingface.co/learn/nlp-course/chapter2/4?fw=pt
Tokenizers - Hugging Face NLP Course
Tokenizers are one of the core components of the NLP pipeline. They serve one purpose: to translate text into data that can be processed by the model. Models can only process numbers, so tokenizers need to convert our text inputs to numerical data. In this
huggingface.co
https://youtu.be/VFp38yj8h3A?si=zeIrCE2nhR7jk2r8
Tokenizers are one of the core components of the NLP pipeline. They serve one purpose: to translate text into data that can be processed by the model. Models can only process numbers, so tokenizers need to convert our text inputs to numerical data. In this section, we’ll explore exactly what happens in the tokenization pipeline.
토크나이저는 NLP 파이프라인의 핵심 구성 요소 중 하나입니다. 이는 한 가지 목적, 즉 텍스트를 모델에서 처리할 수 있는 데이터로 변환하는 데 사용됩니다. 모델은 숫자만 처리할 수 있으므로 토크나이저는 텍스트 입력을 숫자 데이터로 변환해야 합니다. 이 섹션에서는 토큰화 파이프라인에서 정확히 무슨 일이 일어나는지 살펴보겠습니다.
In NLP tasks, the data that is generally processed is raw text. Here’s an example of such text:
NLP 작업에서 일반적으로 처리되는 데이터는 원시 텍스트입니다. 다음은 그러한 텍스트의 예입니다.
Jim Henson was a puppeteer
However, models can only process numbers, so we need to find a way to convert the raw text to numbers. That’s what the tokenizers do, and there are a lot of ways to go about this. The goal is to find the most meaningful representation — that is, the one that makes the most sense to the model — and, if possible, the smallest representation.
그러나 모델은 숫자만 처리할 수 있으므로 원시 텍스트를 숫자로 변환하는 방법을 찾아야 합니다. 이것이 바로 토크나이저가 하는 일이며, 이를 해결하는 방법은 많습니다. 목표는 가장 의미 있는 표현, 즉 모델에 가장 적합한 표현과 가능하다면 가장 작은 표현을 찾는 것입니다.
Let’s take a look at some examples of tokenization algorithms, and try to answer some of the questions you may have about tokenization.
토큰화 알고리즘의 몇 가지 예를 살펴보고 토큰화에 관해 가질 수 있는 몇 가지 질문에 답해 보겠습니다.
Word-based
https://youtu.be/nhJxYji1aho?si=aBJsxx9XrFSCPYEp
The first type of tokenizer that comes to mind is word-based. It’s generally very easy to set up and use with only a few rules, and it often yields decent results. For example, in the image below, the goal is to split the raw text into words and find a numerical representation for each of them:
가장 먼저 떠오르는 토크나이저 유형은 단어 기반입니다. 일반적으로 몇 가지 규칙만 있으면 설정하고 사용하기가 매우 쉽고, 종종 괜찮은 결과를 얻을 수 있습니다. 예를 들어, 아래 이미지에서 목표는 원시 텍스트를 단어로 분할하고 각 단어에 대한 숫자 표현을 찾는 것입니다.

There are different ways to split the text. For example, we could use whitespace to tokenize the text into words by applying Python’s split() function:
텍스트를 분할하는 방법에는 여러 가지가 있습니다. 예를 들어, Python의 Split() 함수를 적용하여 공백을 사용하여 텍스트를 단어로 토큰화할 수 있습니다.
tokenized_text = "Jim Henson was a puppeteer".split()
print(tokenized_text)
['Jim', 'Henson', 'was', 'a', 'puppeteer']
There are also variations of word tokenizers that have extra rules for punctuation. With this kind of tokenizer, we can end up with some pretty large “vocabularies,” where a vocabulary is defined by the total number of independent tokens that we have in our corpus.
구두점에 대한 추가 규칙이 있는 다양한 단어 토크나이저도 있습니다. 이런 종류의 토크나이저를 사용하면 꽤 큰 "어휘 vocabularies "를 얻을 수 있습니다. 여기서 어휘는 코퍼스에 있는 총 독립 토큰 수로 정의됩니다.
Each word gets assigned an ID, starting from 0 and going up to the size of the vocabulary. The model uses these IDs to identify each word.
각 단어에는 0부터 시작하여 어휘 크기까지 ID가 할당됩니다. 모델은 이러한 ID를 사용하여 각 단어를 식별합니다.
If we want to completely cover a language with a word-based tokenizer, we’ll need to have an identifier for each word in the language, which will generate a huge amount of tokens. For example, there are over 500,000 words in the English language, so to build a map from each word to an input ID we’d need to keep track of that many IDs. Furthermore, words like “dog” are represented differently from words like “dogs”, and the model will initially have no way of knowing that “dog” and “dogs” are similar: it will identify the two words as unrelated. The same applies to other similar words, like “run” and “running”, which the model will not see as being similar initially.
단어 기반 토크나이저로 언어를 완전히 다루려면 언어의 각 단어에 대한 식별자가 있어야 하며, 이로 인해 엄청난 양의 토큰이 생성됩니다. 예를 들어, 영어에는 500,000개 이상의 단어가 있으므로 각 단어에서 입력 ID까지의 맵을 작성하려면 많은 ID를 추적해야 합니다. 또한, " dog "와 같은 단어는 " dogs "와 같은 단어와 다르게 표현되며, 모델은 처음에는 " dog "와 " dogs "가 유사하다는 것을 알 수 없습니다. 즉, 두 단어를 관련 없는 것으로 식별합니다. "run" 및 "running"과 같은 다른 유사한 단어에도 동일하게 적용됩니다. 모델에서는 처음에는 유사한 것으로 간주하지 않습니다.
Finally, we need a custom token to represent words that are not in our vocabulary. This is known as the “unknown” token, often represented as ”[UNK]” or ””. It’s generally a bad sign if you see that the tokenizer is producing a lot of these tokens, as it wasn’t able to retrieve a sensible representation of a word and you’re losing information along the way. The goal when crafting the vocabulary is to do it in such a way that the tokenizer tokenizes as few words as possible into the unknown token.
마지막으로, 우리 vocabulary 에 없는 단어를 나타내기 위해서는 사용자 정의 토큰이 필요합니다. 이는 " unknown " 토큰으로 알려져 있으며 종종 "[UNK]" 또는 ""로 표시됩니다. 토크나이저가 이러한 토큰을 많이 생성하는 것을 보면 일반적으로 나쁜 징조입니다. 단어에 대한 합리적인 표현을 검색할 수 없고 그 과정에서 정보가 손실되기 때문입니다. 어휘를 만들 때 목표는 토크나이저가 가능한 한 적은 단어를 unknown 토큰으로 토큰화하는 방식으로 이를 수행하는 것입니다.
One way to reduce the amount of unknown tokens is to go one level deeper, using a character-based tokenizer.
알려지지 않은 토큰의 양을 줄이는 한 가지 방법은 문자 기반 토크나이저를 사용하여 한 단계 더 깊이 들어가는 것입니다.
Character-based
https://youtu.be/ssLq_EK2jLE?si=qpUoKBKDZyMzqICB
Character-based tokenizers split the text into characters, rather than words. This has two primary benefits:
문자 기반 토크나이저는 텍스트를 단어가 아닌 문자로 분할합니다. 여기에는 두 가지 주요 이점이 있습니다.
- The vocabulary is much smaller. 어휘가 훨씬 작습니다.
- There are much fewer out-of-vocabulary (unknown) tokens, since every word can be built from characters.
- 모든 단어가 문자로 구성될 수 있으므로 어휘에서 벗어난(알 수 없는) 토큰이 훨씬 적습니다.
But here too some questions arise concerning spaces and punctuation:
그러나 여기서도 공백과 구두점에 관해 몇 가지 질문이 제기됩니다.

This approach isn’t perfect either. Since the representation is now based on characters rather than words, one could argue that, intuitively, it’s less meaningful: each character doesn’t mean a lot on its own, whereas that is the case with words. However, this again differs according to the language; in Chinese, for example, each character carries more information than a character in a Latin language.
이 접근 방식도 완벽하지는 않습니다. 이제 표현은 단어가 아닌 문자를 기반으로 하기 때문에 직관적으로 의미가 덜하다고 주장할 수 있습니다. 각 문자는 그 자체로는 큰 의미가 없지만 단어의 경우에는 그렇습니다. 그러나 이것도 언어에 따라 다릅니다. 예를 들어 중국어의 경우 각 문자는 라틴어의 문자보다 더 많은 정보를 전달합니다.
Another thing to consider is that we’ll end up with a very large amount of tokens to be processed by our model: whereas a word would only be a single token with a word-based tokenizer, it can easily turn into 10 or more tokens when converted into characters.
고려해야 할 또 다른 사항은 모델에서 처리할 토큰의 양이 매우 많아진다는 것입니다. 단어 기반 토크나이저에서는 단어가 단일 토큰일 뿐이지만, 캐릭터로 변환하면 쉽게 10개 이상의 토큰으로 바뀔 수 있습니다.
To get the best of both worlds, we can use a third technique that combines the two approaches: subword tokenization.
두 가지 장점을 모두 활용하기 위해 두 가지 접근 방식을 결합한 세 번째 기술인 하위 단어 토큰화를 사용할 수 있습니다.
Subword tokenization
https://youtu.be/zHvTiHr506c?si=ffMfRyqPLLUyQXuN
Subword tokenization algorithms rely on the principle that frequently used words should not be split into smaller subwords, but rare words should be decomposed into meaningful subwords.
하위 단어 토큰화 알고리즘은 자주 사용되는 단어를 더 작은 하위 단어로 분할해서는 안 되고, 희귀한 단어는 의미 있는 하위 단어로 분해해야 한다는 원칙에 의존합니다.
For instance, “annoyingly” might be considered a rare word and could be decomposed into “annoying” and “ly”. These are both likely to appear more frequently as standalone subwords, while at the same time the meaning of “annoyingly” is kept by the composite meaning of “annoying” and “ly”.
예를 들어, " annoyingly "는 드문 단어로 간주될 수 있으며 " annoying "과 "ly"로 분해될 수 있습니다. 이들 둘 다 독립형 하위 단어로 더 자주 나타날 가능성이 높으며, 동시에 " annoyingly "의 의미는 " annoying "과 "ly"의 복합 의미로 유지됩니다.
Here is an example showing how a subword tokenization algorithm would tokenize the sequence “Let’s do tokenization!“:
다음은 하위 단어 토큰화 알고리즘이 "Let's do tokenization!" 시퀀스를 토큰화하는 방법을 보여주는 예입니다.

These subwords end up providing a lot of semantic meaning: for instance, in the example above “tokenization” was split into “token” and “ization”, two tokens that have a semantic meaning while being space-efficient (only two tokens are needed to represent a long word). This allows us to have relatively good coverage with small vocabularies, and close to no unknown tokens.
이러한 하위 단어는 결국 많은 semantic meaning 를 제공하게 됩니다. 예를 들어 위의 예에서 " tokenization "는 " token "과 " ization "로 분할되었으며 space-efficient 이면서 semantic meaning 를 갖는 두 개의 토큰입니다( 긴 단어를 표현하기 위해 두 개의 토큰만 필요함). 이를 통해 우리는 작은 어휘로 상대적으로 좋은 적용 범위를 가질 수 있으며 unknown 토큰이 거의 없습니다.
This approach is especially useful in agglutinative languages such as Turkish, where you can form (almost) arbitrarily long complex words by stringing together subwords.
이 접근 방식은 하위 단어를 함께 묶어 (거의) 임의로 긴 복잡한 단어를 형성할 수 있는 터키어와 같은 교착어에서 특히 유용합니다.
And more!
Unsurprisingly, there are many more techniques out there. To name a few:
놀랍게도 이 외에도 더 많은 기술이 있습니다. 몇 가지 예를 들면 다음과 같습니다.
- Byte-level BPE, as used in GPT-2. GPT-2에서 사용되는 바이트 수준 BPE
- WordPiece, as used in BERT. BERT에서 사용되는 WordPiece
- SentencePiece or Unigram, as used in several multilingual models. 여러 다국어 모델에 사용되는 SentencePiece 또는 Unigram
You should now have sufficient knowledge of how tokenizers work to get started with the API.
이제 API를 시작하려면 토크나이저가 어떻게 작동하는지에 대한 충분한 지식이 있어야 합니다.
Loading and saving
Loading and saving tokenizers is as simple as it is with models. Actually, it’s based on the same two methods: from_pretrained() and save_pretrained(). These methods will load or save the algorithm used by the tokenizer (a bit like the architecture of the model) as well as its vocabulary (a bit like the weights of the model).
토크나이저를 로드하고 저장하는 것은 모델과 마찬가지로 간단합니다. 실제로는 from_pretrained()와 save_pretrained()라는 동일한 두 가지 메서드를 기반으로 합니다. 이러한 방법은 토크나이저에서 사용하는 알고리즘(모델의 아키텍처와 약간 유사)과 해당 어휘(모델의 가중치와 약간 유사)를 로드하거나 저장합니다.
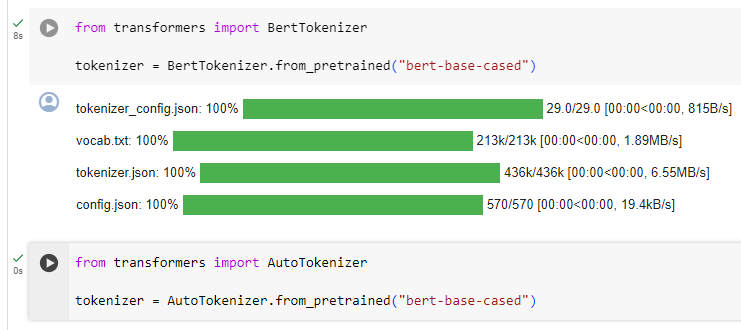
Loading the BERT tokenizer trained with the same checkpoint as BERT is done the same way as loading the model, except we use the BertTokenizer class:
BERT와 동일한 체크포인트로 훈련된 BERT 토크나이저를 로드하는 것은 BertTokenizer 클래스를 사용한다는 점을 제외하면 모델 로드와 동일한 방식으로 수행됩니다.
from transformers import BertTokenizer

tokenizer = BertTokenizer.from_pretrained("bert-base-cased")
Similar to AutoModel, the AutoTokenizer class will grab the proper tokenizer class in the library based on the checkpoint name, and can be used directly with any checkpoint:
AutoModel과 마찬가지로 AutoTokenizer 클래스는 체크포인트 이름을 기반으로 라이브러리에서 적절한 토크나이저 클래스를 가져오고 모든 체크포인트와 함께 직접 사용할 수 있습니다.
from transformers import AutoTokenizer

tokenizer = AutoTokenizer.from_pretrained("bert-base-cased")
We can now use the tokenizer as shown in the previous section:
이제 이전 섹션에 표시된 대로 토크나이저를 사용할 수 있습니다.
tokenizer("Using a Transformer network is simple")
{'input_ids': [101, 7993, 170, 11303, 1200, 2443, 1110, 3014, 102],
 'token_type_ids': [0, 0, 0, 0, 0, 0, 0, 0, 0],
 'attention_mask': [1, 1, 1, 1, 1, 1, 1, 1, 1]}
해석:
- input_ids: 텍스트를 BERT 모델이 이해할 수 있는 숫자 시퀀스로 변환한 결과입니다. 여기서는 각 토큰에 해당하는 정수 ID들의 리스트입니다.
- token_type_ids: 문장 유형을 나타내는 부분입니다. BERT 모델이 여러 문장을 입력으로 받을 수 있기 때문에, 각 토큰이 어느 문장에 속하는지를 구분합니다. 여기서는 단일 문장이므로 모두 0으로 설정되어 있습니다.
- attention_mask: 어텐션 마스크는 입력 토큰 중 어떤 것이 실제로 모델에 의해 주의를 기울여야 하는지를 나타냅니다. 여기서는 모든 토큰이 실제 입력에 포함되므로 모두 1로 설정되어 있습니다.
이 결과를 통해 원본 텍스트가 토큰화되어 모델의 입력 형식으로 변환된 것을 확인할 수 있습니다.

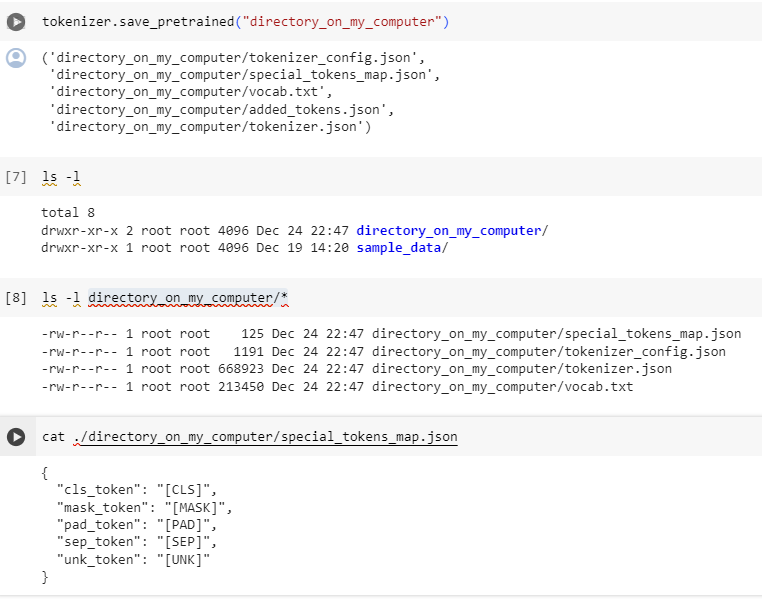
Saving a tokenizer is identical to saving a model:
토크나이저를 저장하는 것은 모델을 저장하는 것과 동일합니다.
tokenizer.save_pretrained("directory_on_my_computer")
We’ll talk more about token_type_ids in Chapter 3, and we’ll explain the attention_mask key a little later. First, let’s see how the input_ids are generated. To do this, we’ll need to look at the intermediate methods of the tokenizer.
token_type_ids에 대해서는 3장에서 더 자세히 설명하고 attention_mask 키에 대해서는 잠시 후에 설명하겠습니다. 먼저 input_ids가 어떻게 생성되는지 살펴보겠습니다. 이를 위해서는 토크나이저의 중간 메소드를 살펴봐야 합니다.
다운 받은 파일들 내용을 살펴 보겠습니다.


tokenizer.json하고 vocab.txt 는 뭔지 잘 모르겠네요.. 왜 한문이 나오는지... ;;
Encoding
https://youtu.be/Yffk5aydLzg?si=-pDGz1WdrfhtchwK
Translating text to numbers is known as encoding. Encoding is done in a two-step process: the tokenization, followed by the conversion to input IDs.
텍스트를 숫자로 변환하는 것을 인코딩이라고 합니다. 인코딩은 토큰화와 입력 ID로의 변환이라는 2단계 프로세스로 수행됩니다.
As we’ve seen, the first step is to split the text into words (or parts of words, punctuation symbols, etc.), usually called tokens. There are multiple rules that can govern that process, which is why we need to instantiate the tokenizer using the name of the model, to make sure we use the same rules that were used when the model was pretrained.
앞서 살펴본 것처럼 첫 번째 단계는 텍스트를 일반적으로 토큰이라고 하는 단어(또는 단어의 일부, 구두점 기호 등)로 분할하는 것입니다. 해당 프로세스를 제어할 수 있는 여러 규칙이 있으므로 모델 이름을 사용하여 토크나이저를 인스턴스화하여 모델이 사전 훈련될 때 사용된 것과 동일한 규칙을 사용하는지 확인해야 합니다.
The second step is to convert those tokens into numbers, so we can build a tensor out of them and feed them to the model. To do this, the tokenizer has a vocabulary, which is the part we download when we instantiate it with the from_pretrained() method. Again, we need to use the same vocabulary used when the model was pretrained.
두 번째 단계는 해당 토큰을 숫자로 변환하는 것입니다. 이를 통해 토큰으로 텐서를 구축하고 모델에 제공할 수 있습니다. 이를 위해 토크나이저에는 from_pretrained() 메서드를 사용하여 인스턴스화할 때 다운로드하는 부분인 어휘가 있습니다. 다시 말하지만, 모델이 사전 훈련될 때 사용된 것과 동일한 어휘를 사용해야 합니다.
To get a better understanding of the two steps, we’ll explore them separately. Note that we will use some methods that perform parts of the tokenization pipeline separately to show you the intermediate results of those steps, but in practice, you should call the tokenizer directly on your inputs (as shown in the section 2).
두 단계를 더 잘 이해하기 위해 두 단계를 별도로 살펴보겠습니다. 토큰화 파이프라인의 일부를 개별적으로 수행하여 해당 단계의 중간 결과를 표시하는 일부 메서드를 사용하지만 실제로는 입력에서 직접 토크나이저를 호출해야 합니다(섹션 2 참조).
Tokenization
The tokenization process is done by the tokenize() method of the tokenizer:
토큰화 프로세스는 토크나이저의 tokenize() 메소드에 의해 수행됩니다.
from transformers import AutoTokenizer

tokenizer = AutoTokenizer.from_pretrained("bert-base-cased")

sequence = "Using a Transformer network is simple"
tokens = tokenizer.tokenize(sequence)

print(tokens)
The output of this method is a list of strings, or tokens:
이 메소드의 출력은 문자열 또는 토큰 목록입니다.
['Using', 'a', 'transform', '##er', 'network', 'is', 'simple']

This tokenizer is a subword tokenizer: it splits the words until it obtains tokens that can be represented by its vocabulary. That’s the case here with transformer, which is split into two tokens: transform and ##er.
이 토크나이저는 하위 단어 토크나이저입니다. 즉, 어휘로 표현될 수 있는 토큰을 얻을 때까지 단어를 분할합니다. 이는 Transform과 ##er라는 두 개의 토큰으로 분할된 Transformer의 경우입니다.
From tokens to input IDs
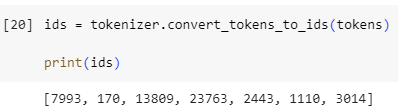
The conversion to input IDs is handled by the convert_tokens_to_ids() tokenizer method:
입력 ID로의 변환은 Convert_tokens_to_ids() 토크나이저 메서드에 의해 처리됩니다.
ids = tokenizer.convert_tokens_to_ids(tokens)

print(ids)
[7993, 170, 11303, 1200, 2443, 1110, 3014]
These outputs, once converted to the appropriate framework tensor, can then be used as inputs to a model as seen earlier in this chapter.
이러한 출력은 일단 적절한 프레임워크 텐서로 변환되면 이 장의 앞부분에서 본 것처럼 모델에 대한 입력으로 사용될 수 있습니다.
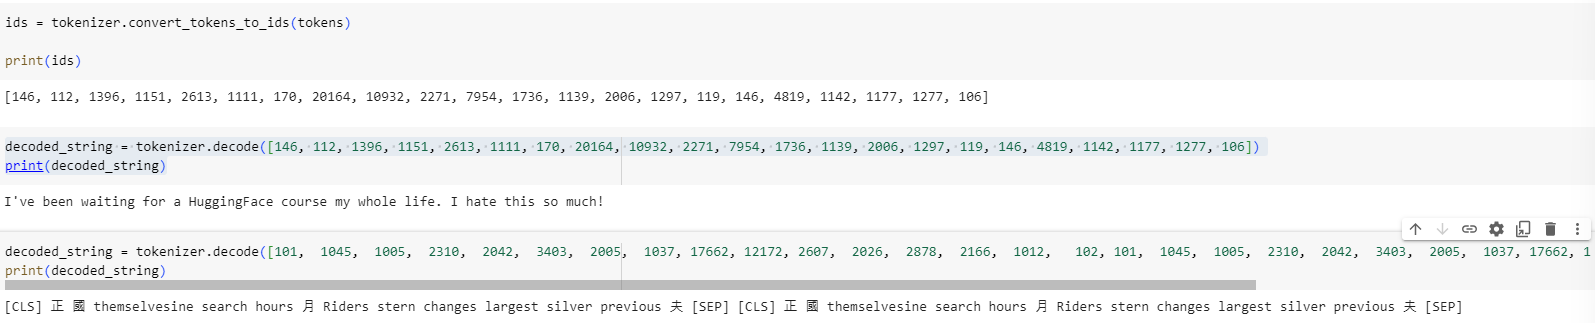
✏️ Try it out! Replicate the two last steps (tokenization and conversion to input IDs) on the input sentences we used in section 2 (“I’ve been waiting for a HuggingFace course my whole life.” and “I hate this so much!”). Check that you get the same input IDs we got earlier!
✏️ 한번 사용해 보세요! 섹션 2에서 사용한 입력 문장에 마지막 두 단계(토큰화 및 입력 ID로 변환)를 복제합니다( “I’ve been waiting for a HuggingFace course my whole life.” and “I hate this so much!” ). 이전에 얻은 것과 동일한 입력 ID를 얻었는지 확인하세요!
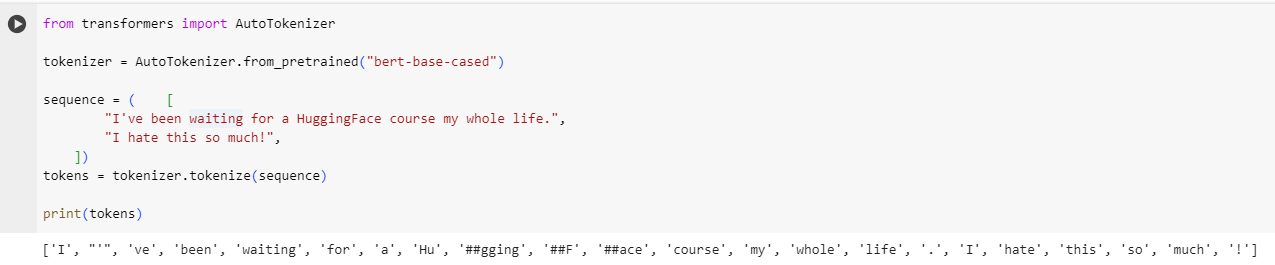

Section 2에서 같은 문장으로 얻은 input_ids

두개의 ID가 다름. 이유는 섹션 2에서는 distilbert-base-uncased-finetuned-sst-2-english 모델을 사용했고 이번 장에서는
Decoding
Decoding is going the other way around: from vocabulary indices, we want to get a string. This can be done with the decode() method as follows:
디코딩은 반대 방향으로 진행됩니다. 즉, 어휘 색인에서 문자열을 얻으려고 합니다. 이는 다음과 같이 decode() 메소드를 사용하여 수행할 수 있습니다.
decoded_string = tokenizer.decode([7993, 170, 11303, 1200, 2443, 1110, 3014])
print(decoded_string)
'Using a Transformer network is simple'

Note that the decode method not only converts the indices back to tokens, but also groups together the tokens that were part of the same words to produce a readable sentence. This behavior will be extremely useful when we use models that predict new text (either text generated from a prompt, or for sequence-to-sequence problems like translation or summarization).
decode 메소드는 인덱스를 다시 토큰으로 변환할 뿐만 아니라 동일한 단어의 일부인 토큰을 함께 그룹화하여 읽을 수 있는 문장을 생성합니다. 이 동작은 새 텍스트(프롬프트에서 생성된 텍스트 또는 번역이나 요약과 같은 시퀀스 간 문제)를 예측하는 모델을 사용할 때 매우 유용합니다.
By now you should understand the atomic operations a tokenizer can handle: tokenization, conversion to IDs, and converting IDs back to a string. However, we’ve just scraped the tip of the iceberg. In the following section, we’ll take our approach to its limits and take a look at how to overcome them.
이제 토큰화, ID로 변환, ID를 다시 문자열로 변환 등 토크나이저가 처리할 수 있는 원자성 작업을 이해해야 합니다. 그러나 우리는 빙산의 일각만을 긁어낸 것에 불과합니다. 다음 섹션에서는 한계에 대한 접근 방식을 살펴보고 이를 극복하는 방법을 살펴보겠습니다.
Summary
입력값은 텍스트이고 이는 모델이 알아볼 수 있도록 숫자로 바꾸어야 한다. 입력값은 token 으로 나뉘게 되고 각 토큰마다 ID 라고 하는 숫자로 매핑된다. 이 때 ID 화 하고 또 ID를 vocablary 화 하는 것은 모델이 사용했을 때와 같은 방법으로 해야 한다.
관련된 클래스는 AutoTokenizer, BertTokenizer 등이 있다.
tokenizer.save_pretrained()로 해당 정보를 저장할 수 있다.
tokenizer.convert_tokens_to_ids(), tokenizer.decode() 등의 메소드가 있다.
'Hugging Face > NLP Course' 카테고리의 다른 글
| HF-NLP-FINE-TUNING A PRETRAINED MODEL-Introduction (0) | 2023.12.26 |
|---|---|
| HF-NLP-USING 🤗 TRANSFORMERS : End-of-chapter quiz (0) | 2023.12.25 |
| HF-NLP-USING 🤗 TRANSFORMERS : Basic usage completed! (0) | 2023.12.25 |
| HF-NLP-USING 🤗 TRANSFORMERS : Putting it all together (0) | 2023.12.25 |
| HF-NLP-USING 🤗 TRANSFORMERS : Handling multiple sequences (0) | 2023.12.25 |
| HF-NLP-USING 🤗 TRANSFORMERS : Models (1) | 2023.12.25 |
| HF-NLP-USING 🤗 TRANSFORMERS : Behind the pipeline (0) | 2023.12.24 |
| HF-NLP-USING 🤗 TRANSFORMERS : Introduction (0) | 2023.12.24 |
| HF-NLP-Transformer models : End-of-chapter quiz (1) | 2023.12.24 |
| HF-NLP-Transformer models : Summary (0) | 2023.12.24 |