
HF-NLP-FINE-TUNING A PRETRAINED MODEL-Processing the data
2023. 12. 26. 11:12 |
https://huggingface.co/learn/nlp-course/chapter3/2?fw=pt
Processing the data - Hugging Face NLP Course
Continuing with the example from the previous chapter, here is how we would train a sequence classifier on one batch in PyTorch: Of course, just training the model on two sentences is not going to yield very good results. To get better results, you will ne
huggingface.co
Processing the data
Continuing with the example from the previous chapter, here is how we would train a sequence classifier on one batch in PyTorch:
이전 장의 예를 계속해서 PyTorch의 한 배치에 대해 시퀀스 분류기를 훈련하는 방법은 다음과 같습니다.
import torch
from transformers import AdamW, AutoTokenizer, AutoModelForSequenceClassification

# Same as before
checkpoint = "bert-base-uncased"
tokenizer = AutoTokenizer.from_pretrained(checkpoint)
model = AutoModelForSequenceClassification.from_pretrained(checkpoint)
sequences = [
    "I've been waiting for a HuggingFace course my whole life.",
    "This course is amazing!",
]
batch = tokenizer(sequences, padding=True, truncation=True, return_tensors="pt")

# This is new
batch["labels"] = torch.tensor([1, 1])

optimizer = AdamW(model.parameters())
loss = model(**batch).loss
loss.backward()
optimizer.step()
이 코드는 Hugging Face Transformers 라이브러리를 사용하여 감성 분류 모델을 훈련하는 예제입니다. 코드를 단계별로 설명하겠습니다.
해석:
- 모델 및 토크나이저 초기화: BERT(Bidirectional Encoder Representations from Transformers) 모델과 토크나이저를 불러오고, 훈련에 사용할 텍스트 시퀀스를 정의합니다.
- 입력 배치 생성: 토크나이저를 사용하여 텍스트 시퀀스를 토큰화하고, 패딩 및 자르기를 수행하여 모델에 입력으로 전달할 수 있는 형태의 배치를 생성합니다.
- 라벨 추가: 훈련 데이터의 감성 분류 라벨을 나타내는 "labels" 키를 추가합니다. 이 예제에서는 각 시퀀스에 대해 1로 라벨이 지정되어 있다고 가정합니다.
- 옵티마이저 초기화: AdamW 옵티마이저를 초기화합니다. 이는 모델의 가중치를 업데이트할 때 사용됩니다.
- 손실 계산 및 역전파: 모델에 입력을 전달하여 손실을 계산하고, 역전파를 수행하여 그래디언트를 계산합니다.
- 모델 업데이트: 옵티마이저를 사용하여 모델의 가중치를 업데이트합니다. 이는 모델의 훈련 과정에서 경사 하강법을 이용하여 가중치를 조절하는 부분입니다.
이 코드는 BERT 모델을 사용하여 감성 분류 모델을 훈련하는 기본적인 예제를 보여줍니다.

Of course, just training the model on two sentences is not going to yield very good results. To get better results, you will need to prepare a bigger dataset.
물론 두 문장으로 모델을 훈련시키는 것만으로는 좋은 결과를 얻을 수 없습니다. 더 나은 결과를 얻으려면 더 큰 데이터 세트를 준비해야 합니다.
In this section we will use as an example the MRPC (Microsoft Research Paraphrase Corpus) dataset, introduced in a paper by William B. Dolan and Chris Brockett. The dataset consists of 5,801 pairs of sentences, with a label indicating if they are paraphrases or not (i.e., if both sentences mean the same thing). We’ve selected it for this chapter because it’s a small dataset, so it’s easy to experiment with training on it.
이 섹션에서는 William B. Dolan과 Chris Brockett의 논문에서 소개된 MRPC(Microsoft Research Paraphrase Corpus) 데이터 세트를 예로 사용합니다. 데이터세트는 5,801개의 문장 쌍으로 구성되어 있으며, 해당 문장이 의역인지 아닌지(즉, 두 문장이 모두 같은 것을 의미하는지)를 나타내는 레이블이 있습니다. 이 장에서는 데이터세트가 작기 때문에 이를 선택했습니다. 따라서 훈련을 통해 실험하기가 쉽습니다.
Loading a dataset from the Hub
https://youtu.be/_BZearw7f0w?si=DrJDFkTtQwNT0L5X
The Hub doesn’t just contain models; it also has multiple datasets in lots of different languages. You can browse the datasets here, and we recommend you try to load and process a new dataset once you have gone through this section (see the general documentation here). But for now, let’s focus on the MRPC dataset! This is one of the 10 datasets composing the GLUE benchmark, which is an academic benchmark that is used to measure the performance of ML models across 10 different text classification tasks.
허브에는 모델만 포함되는 것이 아닙니다. 또한 다양한 언어로 된 여러 데이터 세트가 있습니다. 여기에서 데이터세트를 찾아볼 수 있으며, 이 섹션을 완료한 후 새 데이터세트를 로드하고 처리해 보는 것이 좋습니다(여기에서 일반 문서 참조). 하지만 지금은 MRPC 데이터 세트에 집중하겠습니다! 이는 10개의 다양한 텍스트 분류 작업에 걸쳐 ML 모델의 성능을 측정하는 데 사용되는 학문적 벤치마크인 GLUE 벤치마크를 구성하는 10개의 데이터세트 중 하나입니다.
The 🤗 Datasets library provides a very simple command to download and cache a dataset on the Hub. We can download the MRPC dataset like this:
🤗 데이터 세트 라이브러리는 허브에서 데이터 세트를 다운로드하고 캐시하는 매우 간단한 명령을 제공합니다. 다음과 같이 MRPC 데이터세트를 다운로드할 수 있습니다.
from datasets import load_dataset

raw_datasets = load_dataset("glue", "mrpc")
raw_datasets
DatasetDict({
    train: Dataset({
        features: ['sentence1', 'sentence2', 'label', 'idx'],
        num_rows: 3668
    })
    validation: Dataset({
        features: ['sentence1', 'sentence2', 'label', 'idx'],
        num_rows: 408
    })
    test: Dataset({
        features: ['sentence1', 'sentence2', 'label', 'idx'],
        num_rows: 1725
    })
})
이 코드는 Hugging Face의 datasets 라이브러리를 사용하여 MRPC(Microsoft Research Paraphrase Corpus) 데이터셋을 로드하는 예제입니다. 코드를 단계별로 설명하겠습니다.
해석:
- load_dataset("glue", "mrpc"): Hugging Face의 datasets 라이브러리를 사용하여 GLUE(General Language Understanding Evaluation) 벤치마크의 MRPC 부분을 로드합니다. 이 부분은 두 문장이 서로 의미론적으로 동일한지 여부를 나타내는 이진 분류 데이터셋입니다.
- raw_datasets: 로드된 데이터셋 객체를 변수에 저장합니다. 이 데이터셋 객체에는 훈련(train), 검증(validation), 테스트(test) 등의 세트로 구분된 원시(raw) 데이터가 포함되어 있습니다.
이 코드를 실행하면 raw_datasets에 MRPC 데이터셋이 로드되어 있고, 해당 데이터셋의 구조와 예시를 확인할 수 있습니다. datasets 라이브러리는 데이터셋을 효율적으로 다루기 위한 다양한 기능을 제공하며, 이를 사용하여 데이터를 로드하고 전처리하는 과정을 단순화할 수 있습니다.
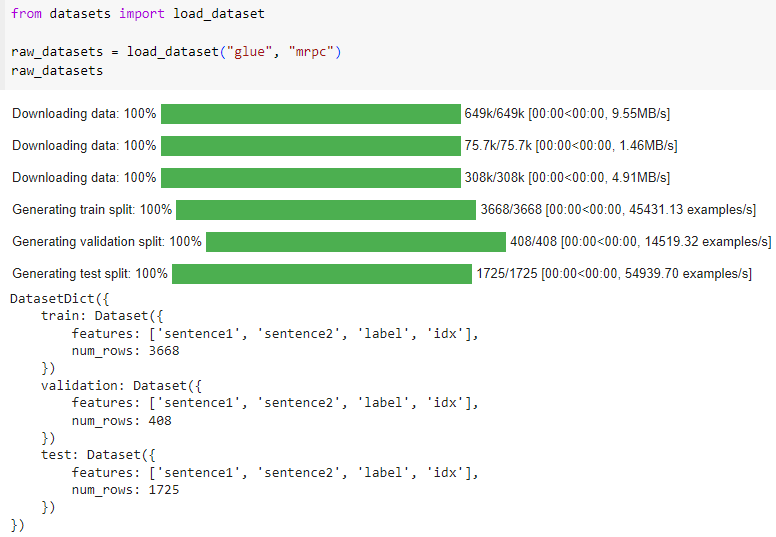
As you can see, we get a DatasetDict object which contains the training set, the validation set, and the test set. Each of those contains several columns (sentence1, sentence2, label, and idx) and a variable number of rows, which are the number of elements in each set (so, there are 3,668 pairs of sentences in the training set, 408 in the validation set, and 1,725 in the test set).
보시다시피 훈련 세트, 검증 세트 및 테스트 세트가 포함된 DatasetDict 객체를 얻습니다. 각 항목에는 여러 열(sentence1, 문장2, label 및 idx)과 각 세트의 요소 수인 가변 개수의 행이 포함되어 있습니다(따라서 훈련 세트에는 3,668개의 문장 쌍이 있고 검증 세트에서는 408, 테스트 세트에서는 1,725이 있습니다.).
This command downloads and caches the dataset, by default in ~/.cache/huggingface/datasets. Recall from Chapter 2 that you can customize your cache folder by setting the HF_HOME environment variable.
이 명령은 기본적으로 ~/.cache/huggingface/datasets에 데이터 세트를 다운로드하고 캐시합니다. HF_HOME 환경 변수를 설정하여 캐시 폴더를 사용자 정의할 수 있다는 것을 2장에서 상기하십시오.
We can access each pair of sentences in our raw_datasets object by indexing, like with a dictionary:
사전처럼 색인을 생성하여 raw_datasets 객체의 각 문장 쌍에 액세스할 수 있습니다.
raw_train_dataset = raw_datasets["train"]
raw_train_dataset[0]
{'idx': 0,
 'label': 1,
 'sentence1': 'Amrozi accused his brother , whom he called " the witness " , of deliberately distorting his evidence .',
 'sentence2': 'Referring to him as only " the witness " , Amrozi accused his brother of deliberately distorting his evidence .'}
이 코드는 MRPC(Microsoft Research Paraphrase Corpus) 데이터셋에서 훈련 세트(train set)를 추출하고, 해당 훈련 세트의 첫 번째 예시를 확인하는 예제입니다. 코드를 단계별로 설명하겠습니다.
해석:
- raw_datasets["train"]: MRPC 데이터셋에서 "train" 부분을 추출합니다. 이는 훈련 세트를 나타냅니다.
- raw_train_dataset: 추출된 훈련 세트를 변수에 저장합니다. 이 변수에는 훈련 세트의 원시(raw) 데이터가 들어 있습니다.
- raw_train_dataset[0]: 훈련 세트의 첫 번째 예시를 가져옵니다. 이는 두 문장과 해당 문장이 서로 의미론적으로 동일한지 여부를 나타내는 이진 레이블로 구성된 데이터 포인트입니다.
따라서 코드를 실행하면 MRPC 데이터셋의 훈련 세트에서 첫 번째 데이터 포인트를 확인할 수 있습니다. 이 데이터셋은 주로 문장의 의미론적 동일성을 평가하는 이진 분류 작업을 위해 사용됩니다.

We can see the labels are already integers, so we won’t have to do any preprocessing there. To know which integer corresponds to which label, we can inspect the features of our raw_train_dataset. This will tell us the type of each column:
레이블이 이미 정수라는 것을 알 수 있으므로 거기서 전처리를 수행할 필요가 없습니다. 어떤 정수가 어떤 라벨에 해당하는지 알기 위해 raw_train_dataset의 기능을 검사할 수 있습니다. 이는 각 열의 유형을 알려줍니다.
raw_train_dataset.features{'sentence1': Value(dtype='string', id=None),
'sentence2': Value(dtype='string', id=None),
'label': ClassLabel(num_classes=2, names=['not_equivalent', 'equivalent'], names_file=None, id=None),
'idx': Value(dtype='int32', id=None)}
raw_train_dataset.features는 MRPC(Microsoft Research Paraphrase Corpus) 데이터셋의 훈련 세트에 대한 특성(features)을 나타내는 부분입니다. 이것은 데이터셋의 구조와 각 데이터 포인트에 어떤 정보가 포함되어 있는지에 대한 정보를 제공합니다.
해석:
- raw_train_dataset: MRPC 데이터셋에서 추출한 훈련 세트를 나타냅니다.
- .features: 데이터셋의 각 데이터 포인트의 특성을 나타내는 속성입니다. 이는 데이터셋이 어떤 속성들을 가지고 있는지에 대한 정보를 담고 있습니다.
결과로 출력되는 정보는 데이터셋의 특성을 설명하는데 사용되는 데이터셋의 메타 정보입니다. 이 정보에는 데이터의 타입, 크기, 필드 등이 포함될 수 있습니다. 이를 통해 데이터셋의 구조를 이해하고, 필요한 정보에 쉽게 접근할 수 있게 됩니다.

Behind the scenes, label is of type ClassLabel, and the mapping of integers to label name is stored in the names folder. 0 corresponds to not_equivalent, and 1 corresponds to equivalent.
뒤에서 레이블은 ClassLabel 유형이며 레이블 이름에 대한 정수 매핑은 이름 폴더에 저장됩니다. 0은 not_equival에 해당하고 1은 동등에 해당합니다.
✏️ Try it out! Look at element 15 of the training set and element 87 of the validation set. What are their labels?
✏️ 한번 사용해 보세요! 훈련 세트의 요소 15와 검증 세트의 요소 87을 살펴보세요. 그들의 라벨은 무엇입니까?


Preprocessing a dataset
https://youtu.be/0u3ioSwev3s?si=rry0Ov_jZduQLOes
To preprocess the dataset, we need to convert the text to numbers the model can make sense of. As you saw in the previous chapter, this is done with a tokenizer. We can feed the tokenizer one sentence or a list of sentences, so we can directly tokenize all the first sentences and all the second sentences of each pair like this:
데이터세트를 전처리하려면 텍스트를 모델이 이해할 수 있는 숫자로 변환해야 합니다. 이전 장에서 본 것처럼 이는 토크나이저를 사용하여 수행됩니다. 토크나이저에 한 문장 또는 문장 목록을 제공할 수 있으므로 다음과 같이 각 쌍의 모든 첫 번째 문장과 모든 두 번째 문장을 직접 토큰화할 수 있습니다.
from transformers import AutoTokenizer

checkpoint = "bert-base-uncased"
tokenizer = AutoTokenizer.from_pretrained(checkpoint)
tokenized_sentences_1 = tokenizer(raw_datasets["train"]["sentence1"])
tokenized_sentences_2 = tokenizer(raw_datasets["train"]["sentence2"])
이 코드는 Hugging Face Transformers 라이브러리를 사용하여 BERT 모델의 토크나이저를 초기화하고, MRPC(Microsoft Research Paraphrase Corpus) 데이터셋의 훈련 세트에서 각 문장을 토큰화하는 예제입니다. 코드를 단계별로 설명하겠습니다.
해석:
- AutoTokenizer.from_pretrained(checkpoint): BERT 모델의 체크포인트를 로드하여 해당 모델에 대한 토크나이저를 초기화합니다.
- raw_datasets["train"]["sentence1"] 및 raw_datasets["train"]["sentence2"]: MRPC 데이터셋의 훈련 세트에서 각 데이터 포인트의 "sentence1" 및 "sentence2" 필드에서 문장 데이터를 추출합니다.
- tokenizer(raw_datasets["train"]["sentence1"]) 및 tokenizer(raw_datasets["train"]["sentence2"]): 각 문장을 토큰화하여 모델에 입력으로 사용할 수 있는 형태로 만듭니다. 각 문장은 토큰 ID, 어텐션 마스크, 토큰 유형 ID 등으로 이루어진 토큰화된 입력으로 변환됩니다.
따라서 코드를 실행하면 BERT 모델의 토크나이저를 사용하여 MRPC 데이터셋의 훈련 세트의 문장들이 토큰화되어 tokenized_sentences_1 및 tokenized_sentences_2 변수에 저장됩니다. 이 토큰화된 입력은 이후 모델에 입력으로 전달되어 감성 분류나 문장 유사도 등의 작업을 수행하는 데 사용될 수 있습니다.
However, we can’t just pass two sequences to the model and get a prediction of whether the two sentences are paraphrases or not. We need to handle the two sequences as a pair, and apply the appropriate preprocessing. Fortunately, the tokenizer can also take a pair of sequences and prepare it the way our BERT model expects:
그러나 단순히 두 개의 시퀀스를 모델에 전달하고 두 문장이 paraphrases 인지 아닌지에 대한 예측을 얻을 수는 없습니다. 두 시퀀스를 한 쌍으로 처리하고 적절한 전처리를 적용해야 합니다. 다행스럽게도 토크나이저는 한 쌍의 시퀀스를 가져와 BERT 모델이 예상하는 방식으로 준비할 수도 있습니다.
inputs = tokenizer("This is the first sentence.", "This is the second one.")
inputs
{
  'input_ids': [101, 2023, 2003, 1996, 2034, 6251, 1012, 102, 2023, 2003, 1996, 2117, 2028, 1012, 102],
  'token_type_ids': [0, 0, 0, 0, 0, 0, 0, 0, 1, 1, 1, 1, 1, 1, 1],
  'attention_mask': [1, 1, 1, 1, 1, 1, 1, 1, 1, 1, 1, 1, 1, 1, 1]
}
이 코드는 Hugging Face Transformers 라이브러리를 사용하여 텍스트를 토큰화하는 예제입니다. 두 개의 문장이 주어지고, 해당 문장들이 토큰화된 입력 형식으로 변환됩니다. 코드를 단계별로 설명하겠습니다.
해석:
- tokenizer: BERT 모델이나 다른 특정 모델에 해당하는 토크나이저를 초기화합니다.
- "This is the first sentence.", "This is the second one.": 두 개의 문장이 함수에 입력됩니다.
- inputs: 두 문장이 토크나이저에 의해 처리되어 모델에 입력으로 전달할 수 있는 형태로 변환됩니다. 결과는 딕셔너리 형태로 반환되며, 토큰 ID, 어텐션 마스크, 토큰 유형 ID 등으로 이루어진 정보를 담고 있습니다.
실제로 코드를 실행하면 inputs 변수에는 토큰화된 입력이 저장되어 있습니다. 이 토큰화된 입력은 모델에 입력으로 전달되어 문장 간의 관계를 분류하거나 다른 NLP 작업을 수행하는 데 사용될 수 있습니다.

We discussed the input_ids and attention_mask keys in Chapter 2, but we put off talking about token_type_ids. In this example, this is what tells the model which part of the input is the first sentence and which is the second sentence.
2장에서 input_ids 및 attention_mask 키에 대해 논의했지만 token_type_ids에 대한 논의는 미루었습니다. 이 예에서는 입력의 어느 부분이 첫 번째 문장이고 어느 부분이 두 번째 문장인지 모델에 알려줍니다.
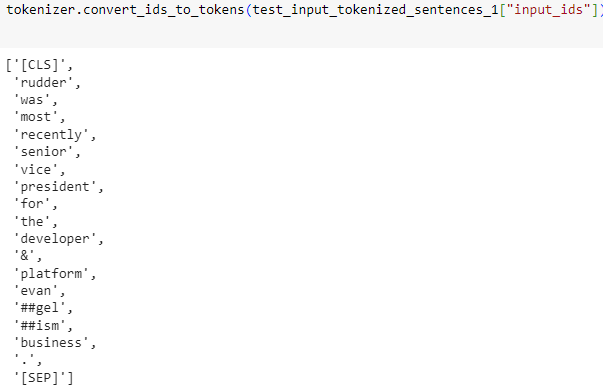
✏️ Try it out! Take element 15 of the training set and tokenize the two sentences separately and as a pair. What’s the difference between the two results?
✏️ 한번 사용해 보세요! 훈련 세트의 요소 15를 가져와 두 문장을 개별적으로 그리고 한 쌍으로 토큰화합니다. 두 결과의 차이점은 무엇입니까?

두 문장을 따로 토큰화 하면 아래와 같이 됨
{'input_ids': [101, 24049, 2001, 2087, 3728, 3026, 3580, 2343, 2005, 1996, 9722, 1004, 4132, 9340, 12439, 2964, 2449, 1012, 102], 'token_type_ids': [0, 0, 0, 0, 0, 0, 0, 0, 0, 0, 0, 0, 0, 0, 0, 0, 0, 0, 0], 'attention_mask': [1, 1, 1, 1, 1, 1, 1, 1, 1, 1, 1, 1, 1, 1, 1, 1, 1, 1, 1]}
{'input_ids': [101, 3026, 3580, 2343, 4388, 24049, 1010, 3839, 2132, 1997, 1996, 9722, 1998, 4132, 9340, 12439, 2964, 3131, 1010, 2097, 2599, 1996, 2047, 9178, 1012, 102], 'token_type_ids': [0, 0, 0, 0, 0, 0, 0, 0, 0, 0, 0, 0, 0, 0, 0, 0, 0, 0, 0, 0, 0, 0, 0, 0, 0, 0], 'attention_mask': [1, 1, 1, 1, 1, 1, 1, 1, 1, 1, 1, 1, 1, 1, 1, 1, 1, 1, 1, 1, 1, 1, 1, 1, 1, 1]}
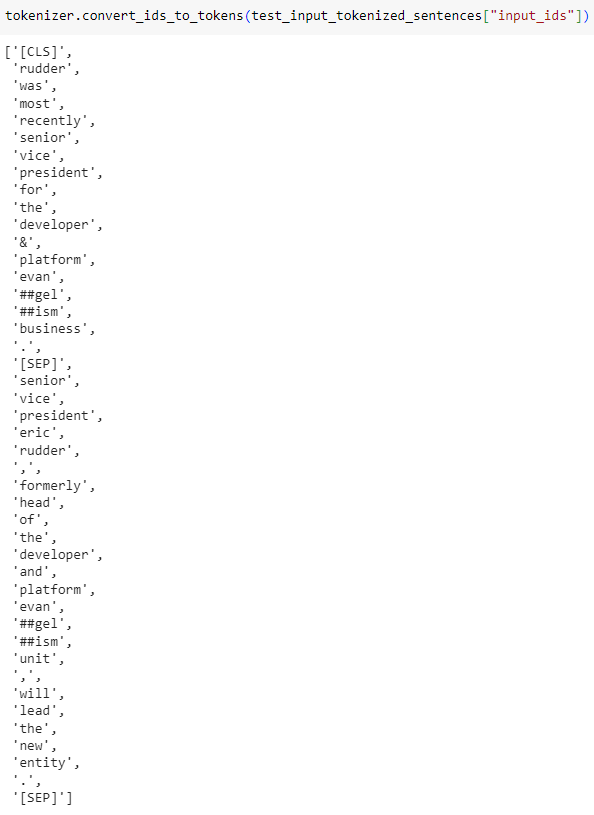
그리고 한 쌍으로 토큰화 하면 이렇게 됨.
{'input_ids': [101, 24049, 2001, 2087, 3728, 3026, 3580, 2343, 2005, 1996, 9722, 1004, 4132, 9340, 12439, 2964, 2449, 1012, 102, 3026, 3580, 2343, 4388, 24049, 1010, 3839, 2132, 1997, 1996, 9722, 1998, 4132, 9340, 12439, 2964, 3131, 1010, 2097, 2599, 1996, 2047, 9178, 1012, 102], 'token_type_ids': [0, 0, 0, 0, 0, 0, 0, 0, 0, 0, 0, 0, 0, 0, 0, 0, 0, 0, 0, 1, 1, 1, 1, 1, 1, 1, 1, 1, 1, 1, 1, 1, 1, 1, 1, 1, 1, 1, 1, 1, 1, 1, 1, 1], 'attention_mask': [1, 1, 1, 1, 1, 1, 1, 1, 1, 1, 1, 1, 1, 1, 1, 1, 1, 1, 1, 1, 1, 1, 1, 1, 1, 1, 1, 1, 1, 1, 1, 1, 1, 1, 1, 1, 1, 1, 1, 1, 1, 1, 1, 1]}
전자는 101 이 각 문장 시작할 때 오고 후자는 101이 한번만 있음. 그리고 token_type_ids 가 전자는 모두 0인데 비해 후자는 첫번째 문장은 0이고 두번째 문장은 1 임.
If we decode the IDs inside input_ids back to words:
input_ids 내부의 ID를 다시 단어로 디코딩하면 다음과 같습니다.
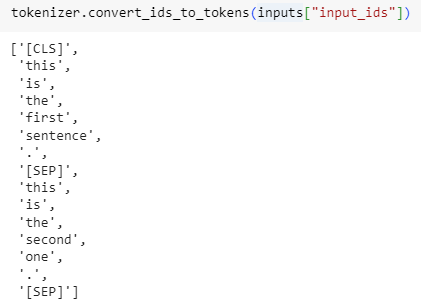
tokenizer.convert_ids_to_tokens(inputs["input_ids"])
이 코드는 Hugging Face Transformers 라이브러리를 사용하여 모델 입력으로 사용되는 토큰 ID를 해당하는 토큰으로 변환하는 예제입니다. 코드를 단계별로 설명하겠습니다.
해석:
- tokenizer: 이전에 초기화한 BERT 모델이나 특정 모델에 해당하는 토크나이저를 사용합니다.
- inputs["input_ids"]: 이전 코드에서 생성한 inputs 딕셔너리에서 "input_ids" 키를 사용하여 모델에 입력으로 전달된 토큰 ID를 가져옵니다.
- tokenizer.convert_ids_to_tokens(...): 토크나이저의 convert_ids_to_tokens 메서드를 사용하여 토큰 ID를 실제 토큰으로 변환합니다.
실제로 코드를 실행하면 inputs["input_ids"]에 해당하는 토큰 ID들이 토크나이저에 의해 실제 토큰으로 변환되어 출력됩니다. 이는 모델의 입력이 텍스트로 어떻게 표현되었는지를 확인할 수 있는 유용한 작업입니다.
we will get: 아래와 같이 결과가 나옵니다.
['[CLS]', 'this', 'is', 'the', 'first', 'sentence', '.', '[SEP]', 'this', 'is', 'the', 'second', 'one', '.', '[SEP]']
element 15에 대해 작업했던 것들을 decode 하면 아래와 같습니다.

So we see the model expects the inputs to be of the form [CLS] sentence1 [SEP] sentence2 [SEP] when there are two sentences. Aligning this with the token_type_ids gives us:
따라서 모델은 두 개의 문장이 있는 경우 입력이 [CLS] 문장1 [SEP] 문장2 [SEP] 형식이 될 것으로 예상합니다. 이것을 token_type_ids와 일치시키면 다음이 제공됩니다.
['[CLS]', 'this', 'is', 'the', 'first', 'sentence', '.', '[SEP]', 'this', 'is', 'the', 'second', 'one', '.', '[SEP]']
[      0,      0,    0,     0,       0,          0,   0,       0,      1,    1,     1,        1,     1,   1,       1]
As you can see, the parts of the input corresponding to [CLS] sentence1 [SEP] all have a token type ID of 0, while the other parts, corresponding to sentence2 [SEP], all have a token type ID of 1.
보시다시피, [CLS] 문장1 [SEP]에 해당하는 입력 부분은 모두 토큰 유형 ID가 0이고 문장2 [SEP]에 해당하는 다른 부분은 모두 토큰 유형 ID가 1입니다.
Note that if you select a different checkpoint, you won’t necessarily have the token_type_ids in your tokenized inputs (for instance, they’re not returned if you use a DistilBERT model). They are only returned when the model will know what to do with them, because it has seen them during its pretraining.
다른 체크포인트를 선택하는 경우 토큰화된 입력에 token_type_ids가 반드시 있을 필요는 없습니다(예를 들어 DistilBERT 모델을 사용하는 경우 반환되지 않습니다). 모델이 사전 학습 중에 이를 확인했기 때문에 모델이 이를 어떻게 해야 할지 알 때만 반환됩니다.
Here, BERT is pretrained with token type IDs, and on top of the masked language modeling objective we talked about in Chapter 1, it has an additional objective called next sentence prediction. The goal with this task is to model the relationship between pairs of sentences.
여기서 BERT는 토큰 유형 ID로 사전 학습되었으며, 1장에서 설명한 마스크된 언어 모델링 목표 외에 다음 문장 예측이라는 추가 목표가 있습니다. 이 작업의 목표는 문장 쌍 간의 관계를 모델링하는 것입니다.
With next sentence prediction, the model is provided pairs of sentences (with randomly masked tokens) and asked to predict whether the second sentence follows the first. To make the task non-trivial, half of the time the sentences follow each other in the original document they were extracted from, and the other half of the time the two sentences come from two different documents.
다음 문장 예측을 통해 모델에는 문장 쌍(무작위로 마스킹된 토큰 포함)이 제공되고 두 번째 문장이 첫 번째 문장 다음에 오는지 여부를 예측하도록 요청됩니다. 작업을 간단하게 만들기 위해 절반의 시간 동안 문장은 추출된 원본 문서에서 서로 따르고 나머지 절반의 시간은 두 문장이 두 개의 다른 문서에서 나옵니다.
In general, you don’t need to worry about whether or not there are token_type_ids in your tokenized inputs: as long as you use the same checkpoint for the tokenizer and the model, everything will be fine as the tokenizer knows what to provide to its model.
일반적으로 토큰화된 입력에 token_type_ids가 있는지 여부에 대해 걱정할 필요가 없습니다. 토크나이저와 모델에 동일한 체크포인트를 사용하는 한, 토크나이저는 모델에 무엇을 제공할지 알고 있으므로 모든 것이 잘 될 것입니다.
Now that we have seen how our tokenizer can deal with one pair of sentences, we can use it to tokenize our whole dataset: like in the previous chapter, we can feed the tokenizer a list of pairs of sentences by giving it the list of first sentences, then the list of second sentences. This is also compatible with the padding and truncation options we saw in Chapter 2. So, one way to preprocess the training dataset is:
이제 토크나이저가 한 쌍의 문장을 처리하는 방법을 살펴보았으므로 이를 사용하여 전체 데이터세트를 토큰화할 수 있습니다. 이전 장에서와 마찬가지로 토크나이저에 첫 번째 문장 목록을 제공하여 문장 쌍 목록을 제공할 수 있습니다. 그런 다음 두 번째 문장의 목록입니다. 이는 2장에서 본 패딩 및 자르기 옵션과도 호환됩니다. 따라서 교육 데이터 세트를 전처리하는 한 가지 방법은 다음과 같습니다.
tokenized_dataset = tokenizer(
    raw_datasets["train"]["sentence1"],
    raw_datasets["train"]["sentence2"],
    padding=True,
    truncation=True,
)
이 코드는 Hugging Face Transformers 라이브러리를 사용하여 MRPC(Microsoft Research Paraphrase Corpus) 데이터셋의 훈련 세트의 문장들을 토크나이저를 이용하여 일괄적으로 토큰화하는 예제입니다. 코드를 단계별로 설명하겠습니다.
해석:
- tokenizer: 이전에 초기화한 BERT 모델이나 특정 모델에 해당하는 토크나이저를 사용합니다.
- raw_datasets["train"]["sentence1"] 및 raw_datasets["train"]["sentence2"]: MRPC 데이터셋의 훈련 세트에서 각 데이터 포인트의 "sentence1" 및 "sentence2" 필드에서 문장 데이터를 추출합니다.
- tokenizer(...): 토크나이저를 사용하여 여러 문장을 일괄적으로 토큰화합니다. padding=True 및 truncation=True는 토큰화된 입력에 대해 패딩 및 자르기를 수행하도록 지시합니다.
결과로 생성된 tokenized_dataset에는 토큰화된 입력이 저장되어 있습니다. 이 토큰화된 데이터는 모델에 입력으로 전달되어 훈련이나 추론과 같은 NLP 작업에 사용될 수 있습니다. 일반적으로 토큰화된 데이터는 토큰 ID, 어텐션 마스크, 토큰 유형 ID 등의 정보를 담고 있습니다.
This works well, but it has the disadvantage of returning a dictionary (with our keys, input_ids, attention_mask, and token_type_ids, and values that are lists of lists). It will also only work if you have enough RAM to store your whole dataset during the tokenization (whereas the datasets from the 🤗 Datasets library are Apache Arrow files stored on the disk, so you only keep the samples you ask for loaded in memory).
이는 잘 작동하지만 사전(키, input_ids, attention_mask, token_type_ids 및 목록 목록인 값 포함)을 반환해야 한다는 단점이 있습니다. 또한 토큰화 중에 전체 데이터세트를 저장할 수 있을 만큼 충분한 RAM이 있는 경우에만 작동합니다(반면 🤗 데이터세트 라이브러리의 데이터세트는 디스크에 저장된 Apache Arrow 파일이므로 요청한 샘플만 메모리에 로드하도록 유지합니다).
To keep the data as a dataset, we will use the Dataset.map() method. This also allows us some extra flexibility, if we need more preprocessing done than just tokenization. The map() method works by applying a function on each element of the dataset, so let’s define a function that tokenizes our inputs:
데이터를 데이터세트로 유지하기 위해 Dataset.map() 메서드를 사용합니다. 이는 또한 토큰화보다 더 많은 전처리가 필요한 경우 추가적인 유연성을 제공합니다. map() 메소드는 데이터 세트의 각 요소에 함수를 적용하여 작동하므로 입력을 토큰화하는 함수를 정의해 보겠습니다.
def tokenize_function(example):
    return tokenizer(example["sentence1"], example["sentence2"], truncation=True)
이 코드는 Hugging Face Transformers 라이브러리를 사용하여 MRPC(Microsoft Research Paraphrase Corpus) 데이터셋의 각 예시에 대한 사용자 정의 토크나이즈 함수를 정의하는 예제입니다. 코드를 단계별로 설명하겠습니다.
해석:
- tokenize_function: 사용자가 정의한 토크나이즈 함수입니다. 이 함수는 각 데이터 포인트에 대한 토큰화를 수행합니다.
- example: 함수의 인자로 받는 입력 예시(데이터 포인트)입니다.
- example["sentence1"], example["sentence2"]: 입력 예시에서 "sentence1" 및 "sentence2" 필드에서 각각의 문장 데이터를 추출합니다.
- tokenizer(..., truncation=True): 앞서 초기화한 토크나이저를 사용하여 두 문장을 토큰화합니다. truncation=True는 토큰화된 입력에 대해 자르기(truncation)를 수행하도록 지시합니다.
이 함수를 이용하면 MRPC 데이터셋의 각 예시에 대해 사용자가 원하는 방식으로 토큰화를 수행할 수 있습니다. 이러한 사용자 정의 토크나이즈 함수는 데이터셋을 처리하거나 모델에 입력을 제공하는 등의 작업에서 유용하게 사용될 수 있습니다.
This function takes a dictionary (like the items of our dataset) and returns a new dictionary with the keys input_ids, attention_mask, and token_type_ids. Note that it also works if the example dictionary contains several samples (each key as a list of sentences) since the tokenizer works on lists of pairs of sentences, as seen before. This will allow us to use the option batched=True in our call to map(), which will greatly speed up the tokenization. The tokenizer is backed by a tokenizer written in Rust from the 🤗 Tokenizers library. This tokenizer can be very fast, but only if we give it lots of inputs at once.
이 함수는 사전(데이터세트의 항목과 같은)을 가져와 input_ids, attention_mask 및 token_type_ids 키가 있는 새 사전을 반환합니다. 이전에 본 것처럼 토크나이저는 문장 쌍 목록에서 작동하므로 예제 사전에 여러 샘플(각 키가 문장 목록)이 포함되어 있는 경우에도 작동합니다. 이렇게 하면 map() 호출에서 일괄=True 옵션을 사용할 수 있어 토큰화 속도가 크게 향상됩니다. 토크나이저는 🤗 Tokenizers 라이브러리에서 Rust로 작성된 토크나이저의 지원을 받습니다. 이 토크나이저는 매우 빠르지만 한 번에 많은 입력을 제공하는 경우에만 가능합니다.
Note that we’ve left the padding argument out in our tokenization function for now. This is because padding all the samples to the maximum length is not efficient: it’s better to pad the samples when we’re building a batch, as then we only need to pad to the maximum length in that batch, and not the maximum length in the entire dataset. This can save a lot of time and processing power when the inputs have very variable lengths!
지금은 토큰화 함수에 패딩 인수를 남겨 두었습니다. 이는 모든 샘플을 최대 길이까지 채우는 것이 효율적이지 않기 때문입니다. 배치를 작성할 때 샘플을 채우는 것이 더 낫습니다. 그러면 배치의 최대 길이가 아니라 해당 배치의 최대 길이까지만 채우면 됩니다. 전체 데이터 세트. 이는 입력의 길이가 매우 다양할 때 많은 시간과 처리 능력을 절약할 수 있습니다!
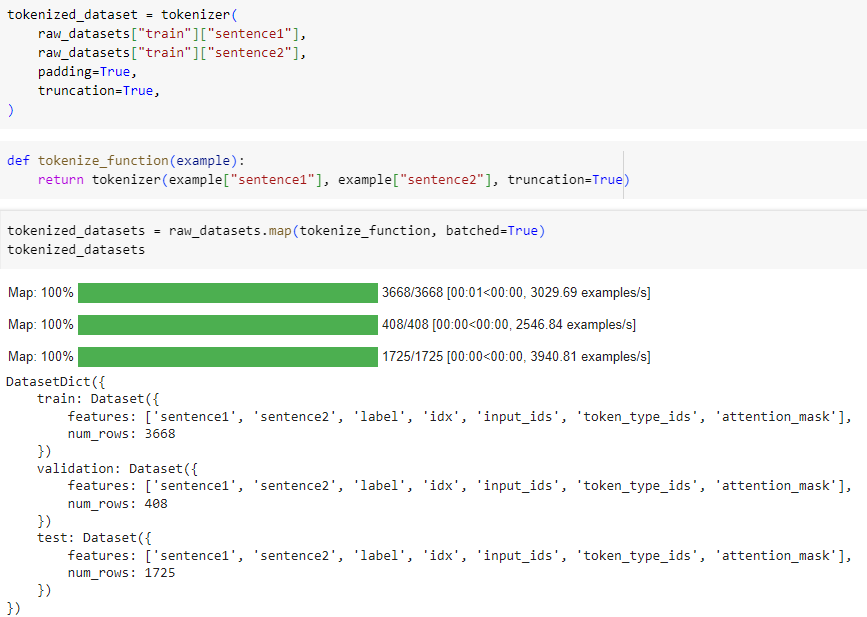
Here is how we apply the tokenization function on all our datasets at once. We’re using batched=True in our call to map so the function is applied to multiple elements of our dataset at once, and not on each element separately. This allows for faster preprocessing.
모든 데이터 세트에 토큰화 기능을 한 번에 적용하는 방법은 다음과 같습니다. 우리는 map 호출에서 일괄 처리=True를 사용하여 함수가 각 요소에 개별적으로 적용되는 것이 아니라 데이터세트의 여러 요소에 동시에 적용됩니다. 이를 통해 더 빠른 전처리가 가능합니다.
tokenized_datasets = raw_datasets.map(tokenize_function, batched=True)
tokenized_datasets
이 코드는 Hugging Face Transformers 라이브러리를 사용하여 MRPC(Microsoft Research Paraphrase Corpus) 데이터셋을 토큰화하는 작업을 수행합니다. map 함수를 사용하여 사용자가 정의한 tokenize_function 함수를 데이터셋의 각 예시에 적용하고, 결과로 토큰화된 데이터셋을 얻습니다. 코드를 단계별로 설명하겠습니다.
해석:
- raw_datasets: 원시 MRPC 데이터셋 객체입니다.
- map(tokenize_function, batched=True): map 함수를 사용하여 tokenize_function을 데이터셋의 각 예시에 적용합니다. batched=True는 배치(batch) 단위로 토큰화 함수를 적용하도록 지시합니다. 이렇게 함으로써 토큰화 함수가 더 효율적으로 동작하게 됩니다.
- tokenized_datasets: 토큰화된 결과를 저장하는 변수입니다. 이 변수에는 토큰화된 입력, 토큰 ID, 어텐션 마스크 등의 정보가 포함되어 있습니다.
따라서 코드를 실행하면 tokenized_datasets 변수에는 토큰화된 MRPC 데이터셋이 저장되게 됩니다. 이제 이 토큰화된 데이터셋을 사용하여 모델 훈련이나 추론과 같은 NLP 작업을 수행할 수 있습니다.
The way the 🤗 Datasets library applies this processing is by adding new fields to the datasets, one for each key in the dictionary returned by the preprocessing function:
🤗 데이터 세트 라이브러리가 이 처리를 적용하는 방법은 전처리 함수에서 반환된 사전의 각 키에 대해 하나씩 데이터 세트에 새 필드를 추가하는 것입니다.
DatasetDict({
    train: Dataset({
        features: ['attention_mask', 'idx', 'input_ids', 'label', 'sentence1', 'sentence2', 'token_type_ids'],
        num_rows: 3668
    })
    validation: Dataset({
        features: ['attention_mask', 'idx', 'input_ids', 'label', 'sentence1', 'sentence2', 'token_type_ids'],
        num_rows: 408
    })
    test: Dataset({
        features: ['attention_mask', 'idx', 'input_ids', 'label', 'sentence1', 'sentence2', 'token_type_ids'],
        num_rows: 1725
    })
})
You can even use multiprocessing when applying your preprocessing function with map() by passing along a num_proc argument. We didn’t do this here because the 🤗 Tokenizers library already uses multiple threads to tokenize our samples faster, but if you are not using a fast tokenizer backed by this library, this could speed up your preprocessing.
num_proc 인수를 전달하여 map()으로 전처리 함수를 적용할 때 다중 처리를 사용할 수도 있습니다. 🤗 Tokenizers 라이브러리는 이미 여러 스레드를 사용하여 샘플을 더 빠르게 토큰화하기 때문에 여기서는 이 작업을 수행하지 않았지만, 이 라이브러리에서 지원하는 빠른 토크나이저를 사용하지 않는 경우 전처리 속도가 빨라질 수 있습니다.
Our tokenize_function returns a dictionary with the keys input_ids, attention_mask, and token_type_ids, so those three fields are added to all splits of our dataset. Note that we could also have changed existing fields if our preprocessing function returned a new value for an existing key in the dataset to which we applied map().
tokenize_function은 input_ids, attention_mask 및 token_type_ids 키가 포함된 사전을 반환하므로 해당 세 필드가 데이터 세트의 모든 분할에 추가됩니다. 전처리 함수가 map()을 적용한 데이터 세트의 기존 키에 대한 새 값을 반환한 경우 기존 필드를 변경할 수도 있습니다.
The last thing we will need to do is pad all the examples to the length of the longest element when we batch elements together — a technique we refer to as dynamic padding.
마지막으로 해야 할 일은 요소를 일괄 처리할 때 가장 긴 요소의 길이에 맞춰 모든 예제를 채우는 것입니다. 이 기술을 동적 패딩이라고 합니다.
Dynamic padding
https://youtu.be/7q5NyFT8REg?si=Yc_qyVujnfNI--vg
The function that is responsible for putting together samples inside a batch is called a collate function. It’s an argument you can pass when you build a DataLoader, the default being a function that will just convert your samples to PyTorch tensors and concatenate them (recursively if your elements are lists, tuples, or dictionaries). This won’t be possible in our case since the inputs we have won’t all be of the same size. We have deliberately postponed the padding, to only apply it as necessary on each batch and avoid having over-long inputs with a lot of padding. This will speed up training by quite a bit, but note that if you’re training on a TPU it can cause problems — TPUs prefer fixed shapes, even when that requires extra padding.
배치 내에서 샘플을 모으는 function 을 collate function 이라고 합니다. 이는 DataLoader를 빌드할 때 전달할 수 있는 인수이며, 기본값은 샘플을 PyTorch 텐서로 변환하고 연결하는 함수입니다(요소가 목록, 튜플 또는 사전인 경우 반복적으로). 우리가 가지고 있는 입력의 크기가 모두 동일하지 않기 때문에 우리의 경우에는 이것이 불가능합니다. 우리는 의도적으로 패딩을 연기하여 각 배치에 필요한 경우에만 적용하고 많은 패딩으로 인해 지나치게 긴 입력이 발생하는 것을 방지했습니다. 이렇게 하면 훈련 속도가 상당히 빨라지지만 TPU에서 훈련하는 경우 문제가 발생할 수 있습니다. TPU는 추가 패딩이 필요한 경우에도 고정된 모양을 선호합니다.
To do this in practice, we have to define a collate function that will apply the correct amount of padding to the items of the dataset we want to batch together. Fortunately, the 🤗 Transformers library provides us with such a function via DataCollatorWithPadding. It takes a tokenizer when you instantiate it (to know which padding token to use, and whether the model expects padding to be on the left or on the right of the inputs) and will do everything you need:
실제로 이를 수행하려면 일괄 처리하려는 데이터 세트 항목에 올바른 양의 패딩을 적용하는 대조 기능을 정의해야 합니다. 다행히 🤗 Transformers 라이브러리는 DataCollatorWithPadding을 통해 이러한 기능을 제공합니다. 인스턴스화할 때(사용할 패딩 토큰, 모델이 입력의 왼쪽 또는 오른쪽에 패딩을 예상하는지 여부를 파악하기 위해) 토크나이저를 사용하고 필요한 모든 작업을 수행합니다.
from transformers import DataCollatorWithPadding

data_collator = DataCollatorWithPadding(tokenizer=tokenizer)
이 코드는 Hugging Face Transformers 라이브러리를 사용하여 훈련 데이터 배치를 처리하기 위한 데이터 콜레이터(Data Collator)를 초기화하는 예제입니다. 코드를 단계별로 설명하겠습니다.
해석:
- DataCollatorWithPadding: Hugging Face Transformers 라이브러리에서 제공하는 데이터 콜레이터 중 하나입니다. 이 데이터 콜레이터는 패딩(padding)을 추가하여 배치(batch)의 모든 입력 시퀀스를 동일한 길이로 만들어주는 역할을 합니다.
- tokenizer=tokenizer: 데이터 콜레이터를 초기화할 때, 해당 데이터 콜레이터가 어떤 토크나이저를 사용할지를 지정합니다. 여기서는 이전에 초기화한 BERT 모델의 토크나이저를 사용합니다.
이렇게 초기화된 데이터 콜레이터는 훈련할 때 패딩을 적용하고 배치를 처리하는 데 사용됩니다. 토크나이저가 생성한 토큰 ID, 어텐션 마스크 등의 정보에 패딩을 추가하여 배치 내의 모든 시퀀스를 동일한 길이로 맞춰주는 역할을 합니다. 이는 모델의 효율적인 훈련을 도와줍니다.
To test this new toy, let’s grab a few samples from our training set that we would like to batch together. Here, we remove the columns idx, sentence1, and sentence2 as they won’t be needed and contain strings (and we can’t create tensors with strings) and have a look at the lengths of each entry in the batch:
이 새로운 장난감을 테스트하기 위해 훈련 세트에서 함께 배치할 샘플 몇 개를 가져옵니다. 여기에서는 필요하지 않고 문자열을 포함하는 idx, 문장1 및 문장2 열을 제거하고(문자열로 텐서를 생성할 수 없음) 배치에 있는 각 항목의 길이를 살펴봅니다.
samples = tokenized_datasets["train"][:8]
samples = {k: v for k, v in samples.items() if k not in ["idx", "sentence1", "sentence2"]}
[len(x) for x in samples["input_ids"]]
이 코드는 토큰화된 MRPC(Microsoft Research Paraphrase Corpus) 데이터셋에서 훈련 세트의 처음 8개 예시에 대한 정보를 샘플링하고, 각 샘플의 입력 시퀀스의 길이를 확인하는 예제입니다. 코드를 단계별로 설명하겠습니다.
해석:
- tokenized_datasets["train"][:8]: 토큰화된 MRPC 데이터셋의 훈련 세트에서 처음 8개의 예시를 추출합니다.
- {k: v for k, v in samples.items() if k not in ["idx", "sentence1", "sentence2"]}: 샘플에서 필요한 정보만을 남기고, "idx", "sentence1", "sentence2" 등의 필드를 제외한 정보를 새로운 딕셔너리로 만듭니다. 여기서는 "input_ids" 등의 토큰화된 입력 정보만을 남깁니다.
- [len(x) for x in samples["input_ids"]]: 샘플링된 각 예시의 "input_ids" 필드의 길이를 리스트로 반환합니다. 이는 각 입력 시퀀스의 토큰 개수를 나타냅니다.
따라서 코드를 실행하면 훈련 세트의 처음 8개 예시에 대해 각 입력 시퀀스의 토큰 개수를 확인할 수 있습니다. 이는 패딩을 고려하여 모든 시퀀스가 동일한 길이로 맞추어지는지를 확인하는 데 도움이 됩니다.
[50, 59, 47, 67, 59, 50, 62, 32]No surprise, we get samples of varying length, from 32 to 67. Dynamic padding means the samples in this batch should all be padded to a length of 67, the maximum length inside the batch. Without dynamic padding, all of the samples would have to be padded to the maximum length in the whole dataset, or the maximum length the model can accept. Let’s double-check that our data_collator is dynamically padding the batch properly:
당연히 32에서 67까지 다양한 길이의 샘플을 얻습니다. 동적 패딩은 이 배치의 샘플이 모두 배치 내부의 최대 길이인 67의 길이로 패딩되어야 함을 의미합니다. 동적 패딩이 없으면 모든 샘플은 전체 데이터 세트의 최대 길이 또는 모델이 허용할 수 있는 최대 길이까지 패딩되어야 합니다. data_collator가 배치를 동적으로 적절하게 채우고 있는지 다시 확인해 보겠습니다.
batch = data_collator(samples)
{k: v.shape for k, v in batch.items()}
{'attention_mask': torch.Size([8, 67]),
 'input_ids': torch.Size([8, 67]),
 'token_type_ids': torch.Size([8, 67]),
 'labels': torch.Size([8])}
이 코드는 앞서 설명한 데이터 콜레이터(Data Collator)를 사용하여 샘플들(samples)을 배치(batch)로 처리하고, 처리된 배치의 각 요소의 모양(shape)을 확인하는 예제입니다. 코드를 단계별로 설명하겠습니다.
해석:
- data_collator(samples): 앞서 초기화한 데이터 콜레이터를 사용하여 샘플들을 배치로 처리합니다. 이 과정에서 패딩이 적용되어 모든 시퀀스가 동일한 길이로 맞춰집니다.
- {k: v.shape for k, v in batch.items()}: 처리된 배치의 각 요소에 대해 모양(shape)을 확인합니다. 딕셔너리 컴프리헨션을 사용하여 각 텐서의 이름과 모양을 딕셔너리로 정리합니다.
따라서 코드를 실행하면 처리된 배치에 대한 정보가 출력됩니다. 이는 모델에 입력으로 제공되는 배치의 각 텐서의 모양이나 차원을 확인하는 데 도움이 됩니다.

Looking good! Now that we’ve gone from raw text to batches our model can deal with, we’re ready to fine-tune it!
좋아 보이네! 이제 원시 텍스트에서 모델이 처리할 수 있는 배치로 전환했으므로 미세 조정할 준비가 되었습니다!
✏️ Try it out! Replicate the preprocessing on the GLUE SST-2 dataset. It’s a little bit different since it’s composed of single sentences instead of pairs, but the rest of what we did should look the same. For a harder challenge, try to write a preprocessing function that works on any of the GLUE tasks.
✏️ 한번 사용해 보세요! GLUE SST-2 데이터 세트에서 전처리를 복제합니다. 쌍이 아닌 단일 문장으로 구성되어 있기 때문에 조금 다르지만 나머지 부분은 동일하게 보일 것입니다. 더 어려운 문제를 해결하려면 모든 GLUE 작업에서 작동하는 전처리 함수를 작성해 보세요.
Summary
이 단원은 데이터를 가져와서 Fine-Tunning 이 가능하도록 Model이 처리할 수 있는 형태로 바꾸는 작업을 설명하고 있음.
입력된 텍스트를 토큰화 해서 숫자로 바꿔 줘야하고 또한 그 크기 (행렬의 크기)도 Model 이 처리할 수 있도록 같게 해 줘야 함.
이 때 padding을 너무 많이 주게 되면 (예: Max) 자원 낭비가 되고 시간도 오래 걸리므로 가장 긴 입력 sentence에 맞게 혹은 특정 길이로 맞춰 주어야 함.
이때 padding은 마지막 단계인 batch 단에서 해주고 Hugging face에서 제공하는 DataCollatorWithPadding 클래스를 사용해서 처리하면 편리함
'Hugging Face > NLP Course' 카테고리의 다른 글
| HF-NLP-SHARING MODELS AND TOKENIZERS-Using pretrained models (0) | 2023.12.27 |
|---|---|
| HF-NLP-SHARING MODELS AND TOKENIZERS-The Hugging Face Hub (0) | 2023.12.26 |
| HF-NLP-FINE-TUNING A PRETRAINED MODEL-Fine-tuning, Check! (1) | 2023.12.26 |
| HF-NLP-FINE-TUNING A PRETRAINED MODEL-A full training (1) | 2023.12.26 |
| HF-NLP-FINE-TUNING A PRETRAINED MODEL-Fine-tuning a model with the Trainer API (1) | 2023.12.26 |
| HF-NLP-FINE-TUNING A PRETRAINED MODEL-Introduction (0) | 2023.12.26 |
| HF-NLP-USING 🤗 TRANSFORMERS : End-of-chapter quiz (0) | 2023.12.25 |
| HF-NLP-USING 🤗 TRANSFORMERS : Basic usage completed! (0) | 2023.12.25 |
| HF-NLP-USING 🤗 TRANSFORMERS : Putting it all together (0) | 2023.12.25 |
| HF-NLP-USING 🤗 TRANSFORMERS : Handling multiple sequences (0) | 2023.12.25 |