반응형
블로그 이미지
개발자로서 현장에서 일하면서 새로 접하는 기술들이나 알게된 정보 등을 정리하기 위한 블로그입니다. 운 좋게 미국에서 큰 회사들의 프로젝트에서 컬설턴트로 일하고 있어서 새로운 기술들을 접할 기회가 많이 있습니다. 미국의 IT 프로젝트에서 사용되는 툴들에 대해 많은 분들과 정보를 공유하고 싶습니다.
솔웅

최근에 올라온 글

최근에 달린 댓글

최근에 받은 트랙백

글 보관함

카테고리


반응형

1. Imported Libraries

pandas : https://en.wikipedia.org/wiki/Pandas_(software)


pandas (software) - Wikipedia

Python programming library for data manipulation and analysis In computer programming, pandas is a software library written for the Python programming language for data manipulation and analysis. In particular, it offers data structures and operations for

en.wikipedia.org

In computer programming, pandas is a software library written for the Python programming language for data manipulation and analysis. In particular, it offers data structures and operations for manipulating numerical tables and time series. It is free software released under the three-clause BSD license.[2] The name is derived from the term "panel data", an econometrics term for data sets that include observations over multiple time periods for the same individuals


https://pandas.pydata.org/


Python Data Analysis Library — pandas: Python Data Analysis Library

Python Data Analysis Library pandas is an open source, BSD-licensed library providing high-performance, easy-to-use data structures and data analysis tools for the Python programming language. pandas is a NumFOCUS sponsored project. This will help ensure t

pandas.pydata.org


numpy : https://en.wikipedia.org/wiki/NumPy


NumPy - Wikipedia

From Wikipedia, the free encyclopedia Jump to navigation Jump to search Numerical programming library for the Python programming language NumPy (pronounced (NUM-py) or sometimes [2][3] (NUM-pee)) is a library for the Python programming language, adding sup

en.wikipedia.org

NumPy (pronounced /ˈnʌmp/ (NUM-py) or sometimes /ˈnʌmpi/[2][3] (NUM-pee)) is a library for the Python programming language, adding support for large, multi-dimensional arrays and matrices, along with a large collection of high-level mathematical functions to operate on these arrays. The ancestor of NumPy, Numeric, was originally created by Jim Hugunin with contributions from several other developers. In 2005, Travis Oliphant created NumPy by incorporating features of the competing Numarray into Numeric, with extensive modifications. NumPy is open-source software and has many contributors.


https://www.numpy.org/


NumPy — NumPy

NumPy NumPy is the fundamental package for scientific computing with Python. It contains among other things: a powerful N-dimensional array object sophisticated (broadcasting) functions tools for integrating C/C++ and Fortran code useful linear algebra, Fo

www.numpy.org

NumPy is the fundamental package for scientific computing with Python. It contains among other things:

  • a powerful N-dimensional array object
  • sophisticated (broadcasting) functions
  • tools for integrating C/C++ and Fortran code
  • useful linear algebra, Fourier transform, and random number capabilities

Besides its obvious scientific uses, NumPy can also be used as an efficient multi-dimensional container of generic data. Arbitrary data-types can be defined. This allows NumPy to seamlessly and speedily integrate with a wide variety of databases.

NumPy is licensed under the BSD license, enabling reuse with few restrictions.


boto3 : Interacting for S3   https://boto3.amazonaws.com/v1/documentation/api/latest/index.html


Boto 3 Documentation — Boto 3 Docs 1.9.148 documentation


boto3.amazonaws.com

Boto is the Amazon Web Services (AWS) SDK for Python. It enables Python developers to create, configure, and manage AWS services, such as EC2 and S3. Boto provides an easy to use, object-oriented API, as well as low-level access to AWS services.


sagemaker.amazon.common


2. https://docs.scipy.org/doc/numpy/reference/generated/numpy.random.seed.html


numpy.random.seed — NumPy v1.16 Manual

Parameters: seed : int or 1-d array_like, optional Seed for RandomState. Must be convertible to 32 bit unsigned integers.

docs.scipy.org

numpy.random.seed(seed=None)

Seed the generator.

This method is called when RandomState is initialized. It can be called again to re-seed the generator. For details, see RandomState.

Parameters:

seed : int or 1-d array_like, optional

Seed for RandomState. Must be convertible to 32 bit unsigned integers.

See also

RandomState


3. numpy.random.random_sample(size=None) : https://docs.scipy.org/doc/numpy/reference/generated/numpy.random.random_sample.html?highlight=random%20random_sample#numpy.random.random_sample


numpy.random.random_sample — NumPy v1.16 Manual

Parameters: size : int or tuple of ints, optional Output shape. If the given shape is, e.g., (m, n, k), then m * n * k samples are drawn. Default is None, in which case a single value is returned.

docs.scipy.org

numpy.random.randint : https://docs.scipy.org/doc/numpy/reference/generated/numpy.random.randint.html


numpy.random.randint — NumPy v1.16 Manual

Parameters: low : int Lowest (signed) integer to be drawn from the distribution (unless high=None, in which case this parameter is one above the highest such integer). high : int, optional If provided, one above the largest (signed) integer to be drawn fro

docs.scipy.org

4. 

5. df : https://pandas.pydata.org/pandas-docs/stable/reference/api/pandas.DataFrame.html


pandas.DataFrame — pandas 0.24.2 documentation

Parameters: data : ndarray (structured or homogeneous), Iterable, dict, or DataFrame Dict can contain Series, arrays, constants, or list-like objects Changed in version 0.23.0: If data is a dict, argument order is maintained for Python 3.6 and later. index

pandas.pydata.org


6. df - Print values

7. 파일로 저장 pandas.DataFrame.to_csv : https://pandas.pydata.org/pandas-docs/stable/reference/api/pandas.DataFrame.to_csv.html


pandas.DataFrame.to_csv — pandas 0.24.2 documentation

Parameters: path_or_buf : str or file handle, default None File path or object, if None is provided the result is returned as a string. If a file object is passed it should be opened with newline=’‘, disabling universal newlines. Changed in version 0.24.0:

pandas.pydata.org

8. 함수 : 3개의 파라미터를 받음 - 파일을 S3에 저장하는 함수

9. 함수 : boto3를 사용해서 해당 파일을 S3 버킷으로부터 다운 받음

boto3.Session().resource('s3') : https://boto3.amazonaws.com/v1/documentation/api/latest/guide/session.html


Session — Boto 3 Docs 1.9.148 documentation

Session A session manages state about a particular configuration. By default a session is created for you when needed. However it is possible and recommended to maintain your own session(s) in some scenarios. Sessions typically store: Credentials Region Ot

boto3.amazonaws.com

10. 8번 함수를 실행시켜 해당 파일을 S3에 저장

upload_fileobj : https://boto3.amazonaws.com/v1/documentation/api/latest/reference/services/s3.html?highlight=upload_fileobj#S3.Bucket.upload_fileobj


S3 — Boto 3 Docs 1.9.148 documentation

The response of this operation contains an EventStream member. When iterated the EventStream will yield events based on the structure below, where only one of the top level keys will be present for any given event. Response Syntax { 'Payload': EventStream(

boto3.amazonaws.com

11. 9번 함수를 실행시켜 해당 파일을 S3로부터 다운 받음

Bucket object download_fileobj : https://boto3.amazonaws.com/v1/documentation/api/latest/reference/services/s3.html?highlight=download_fileobj#S3.Bucket.download_fileobj


S3 — Boto 3 Docs 1.9.148 documentation

The response of this operation contains an EventStream member. When iterated the EventStream will yield events based on the structure below, where only one of the top level keys will be present for any given event. Response Syntax { 'Payload': EventStream(

boto3.amazonaws.com

12. 

13. 처음 시작 5개 데이터를 출력함

df.head() : https://pandas.pydata.org/pandas-docs/stable/reference/api/pandas.DataFrame.head.html


pandas.DataFrame.head — pandas 0.24.2 documentation

Return the first n rows. This function returns the first n rows for the object based on position. It is useful for quickly testing if your object has the right type of data in it. Parameters: n : int, default 5 Number of rows to select. Returns: obj_head :

pandas.pydata.org

14. 해당 컬럼들을 매트릭스에 담음 ??? 

pandas.DataFrame.as_matrix : https://pandas.pydata.org/pandas-docs/stable/reference/api/pandas.DataFrame.as_matrix.html?highlight=as_matrix#pandas.DataFrame.as_matrix


pandas.DataFrame.as_matrix — pandas 0.24.2 documentation

Parameters: columns : list, optional, default:None If None, return all columns, otherwise, returns specified columns.

pandas.pydata.org

15. X 값들

16. ???

17. y 컬럼을 매트릭스에 담음


18. y 값 형태. 10줄에 1개 컬럼

19. y 값

20. y 값을 한줄에 표시함

numpy.ravel : https://docs.scipy.org/doc/numpy/reference/generated/numpy.ravel.html


numpy.ravel — NumPy v1.16 Manual

Parameters: a : array_like Input array. The elements in a are read in the order specified by order, and packed as a 1-D array. order : {‘C’,’F’, ‘A’, ‘K’}, optional The elements of a are read using this index order. ‘C’ means to index the elements in row-m

docs.scipy.org

21. y 값

23. 함수 : 전달받은 파일을 ????

write_numpy_to_dense_tensor : https://github.com/aws/sagemaker-python-sdk/blob/master/src/sagemaker/amazon/common.py


aws/sagemaker-python-sdk

A library for training and deploying machine learning models on Amazon SageMaker - aws/sagemaker-python-sdk

github.com

read_records

24. 함수 : 해당 파일을 ?????

25. write_recordio_file 함수를 실행 함


26. 첫 3 줄만 출력

27. read_recordio_file 함수 실행

32. 해당 파일을 S3에 저장함

33. 해당 파일을 S3에서 다운 받음


반응형

AWS Machine Learning - Types of ML models etc.

2019. 5. 9. 10:04 | Posted by 솔웅


반응형

AWS Machine Learning


* Supervised Learning : Training Set and Test Set


Types of ML Models

Amazon ML supports three types of ML models: binary classification, multiclass classification, and regression. The type of model you should choose depends on the type of target that you want to predict.

Binary Classification Model

ML models for binary classification problems predict a binary outcome (one of two possible classes). To train binary classification models, Amazon ML uses the industry-standard learning algorithm known as logistic regression.

Examples of Binary Classification Problems

  • "Is this email spam or not spam?"

  • "Will the customer buy this product?"

  • "Is this product a book or a farm animal?"

  • "Is this review written by a customer or a robot?"

Multiclass Classification Model

ML models for multiclass classification problems allow you to generate predictions for multiple classes (predict one of more than two outcomes). For training multiclass models, Amazon ML uses the industry-standard learning algorithm known as multinomial logistic regression.

Examples of Multiclass Problems

  • "Is this product a book, movie, or clothing?"

  • "Is this movie a romantic comedy, documentary, or thriller?"

  • "Which category of products is most interesting to this customer?"

Regression Model

ML models for regression problems predict a numeric value. For training regression models, Amazon ML uses the industry-standard learning algorithm known as linear regression.

Examples of Regression Problems

  • "What will the temperature be in Seattle tomorrow?"

  • "For this product, how many units will sell?"

  • "What price will this house sell for?"

ML 모델 유형

Amazon ML은 이진수 분류, 멀티클래스 분류 및 회귀라는 세 가지 유형의 ML 모델을 지원합니다. 선택해야 하는 모델 유형은 예측하려는 목표의 유형에 따라 따릅니다.

이진 분류 모델

이진 분류 문제에 대한 ML 모델은 이진 결과(가능성이 있는 두 가지 클래스 중 하나)를 예측합니다. 이진수 분류 모델을 교육하기 위해 은 '로지스틱 회귀'로 알려진 업계 표준 학습 알고리즘을 사용합니다.

이진 분류 문제의 예

  • "이 이메일은 스팸입니까? 스팸이 아닙니까?"

  • "고객이 이 제품을 구입할 것입니까?"

  • "이 제품은 책입니까? 아니면 가축입니까?"

  • "이 리뷰는 고객이 작성합니까? 로봇이 작성합니까?"

멀티클래스 분류 모델

멀티클래스 분류 문제에 대해 ML 모델을 사용하면 여러 클래스에 대한 예측을 생성할 수 있습니다(세 개 이상의 결과 중 하나를 예측). 멀티클래스 모델을 교육하기 위해 은 '다항 로지스틱 회귀'로 알려진 업계 표준 학습 알고리즘을 사용합니다.

멀티클래스 문제의 예

  • "이 제품은 책, 영화 또는 의류입니까?"

  • "이 영화는 로맨틱 코미디, 다큐멘터리 또는 스릴러입니까?"

  • "이 고객이 가장 관심을 갖는 제품 카테고리는 무엇입니까?"

회귀 모델

회귀 문제에 대해 ML 모델은 숫자 값을 예측합니다. 회귀 모델을 교육하기 위해 은 '선형 회귀'로 알려진 업계 표준 학습 알고리즘을 사용합니다.

회귀 문제의 예

  • "내일 시애틀의 기온은 어떨까요?"

  • "이 제품의 판매량이 얼마나 될까요?"

  • "이 집의 매매 가격이 얼마나 될까요?"


- Unsupervised Learning : Only data,
  Clustering Algorithm :
  Dimensionality Reduction
  Group words that are used in similar context or have similar meaning


Reinforcement Learning 
  Decision Making under uncertainty
  Autonomous Driving
  Games
  Reinforcement uses Reward Functions to reward correct decision and punish incorrect decision


Reinforcement Learning with Amazon SageMaker RL

Reinforcement learning (RL) is a machine learning technique that attempts to learn a strategy, called a policy, that optimizes an objective for an agent acting in an environment. For example, the agent might be a robot, the environment might be a maze, and the goal might be to successfully navigate the maze in the smallest amount of time. In RL, the agent takes an action, observes the state of the environment, and gets a reward based on the value of the current state of the environment. The goal is to maximize the long-term reward that the agent receives as a result of its actions. RL is well-suited for solving problems where an agent can make autonomous decisions.

Topics

Why is Reinforcement Learning Important?

RL is well-suited for solving large, complex problems. For example, supply chain management, HVAC systems, industrial robotics, game artificial intelligence, dialog systems, and autonomous vehicles. Because RL models learn by a continuous process of receiving rewards and punishments for every action taken by the agent, it is possible to train systems to make decisions under uncertainty and in dynamic environments.

Markov Decision Process (MDP)

RL is based on models called Markov Decision Processes (MDPs). An MDP consists of a series of time steps. Each time step consists of the following:

Environment

Defines the space in which the RL model operates. This can be either a real-world environment or a simulator. For example, if you train a physical autonomous vehicle on a physical road, that would be a real-world environment. If you train a computer program that models an autonomous vehicle driving on a road, that would be a simulator.

State

Specifies all information about the environment and past steps that is relevant to the future. For example, in an RL model in which a robot can move in any direction at any time step, then the position of the robot at the current time step is the state, because if we know where the robot is, it isn't necessary to know the steps it took to get there.

Action

What the agent does. For example, the robot takes a step forward.

Reward

A number that represents the value of the state that resulted from the last action that the agent took. For example, if the goal is for a robot to find treasure, the reward for finding treasure might be 5, and the reward for not finding treasure might be 0. The RL model attempts to find a strategy that optimizes the cumulative reward over the long term. This strategy is called a policy.

Observation

Information about the state of the environment that is available to the agent at each step. This might be the entire state, or it might be just a part of the state. For example, the agent in a chess-playing model would be able to observe the entire state of the board at any step, but a robot in a maze might only be able to observe a small portion of the maze that it currently occupies.

Typically, training in RL consists of many episodes. An episode consists of all of the time steps in an MDP from the initial state until the environment reaches the terminal state.

Key Features of Amazon SageMaker RL

To train RL models in Amazon SageMaker RL, use the following components:

  • A deep learning (DL) framework. Currently, Amazon SageMaker supports RL in TensorFlow and Apache MXNet.

  • An RL toolkit. An RL toolkit manages the interaction between the agent and the environment, and provides a wide selection of state of the art RL algorithms. Amazon SageMaker supports the Intel Coach and Ray RLlib toolkits. For information about Intel Coach, see https://nervanasystems.github.io/coach/. For information about Ray RLlib, see https://ray.readthedocs.io/en/latest/rllib.html.

  • An RL environment. You can use custom environments, open-source environments, or commercial environments. For information, see RL Environments in Amazon SageMaker.

The following diagram shows the RL components that are supported in Amazon SageMaker RL.


Amazon SageMaker RL을 사용한 강화 학습

강화 학습(RL)은 환경에서 작동하는 에이전트에 대한 목표를 최적화하는 전략(정책이라고 함)을 배우려고 시도하는 기계 학습 기법입니다. 예를 들어, 에이전트는 로봇, 환경은 미로, 목표는 최단시간 내에 미로를 성공적으로 탈출하는 것일 수 있습니다. RL에서 에이전트는 행동을 취하고, 환경의 상태를 관찰하고, 환경의 현재 상태 값에 따라 보상을 받습니다. 목표는 행동의 결과로 에이전트가 받는 장기 보상을 극대화하는 것입니다. RL은 에이전트가 자율 의사결정을 내릴 수 있는 문제를 해결하는 데 매우 적합합니다.

주제

강화 학습이 중요한 이유는 무엇입니까?

RL은 크고 복잡한 문제를 해결하는 데 매우 적합합니다. 예를 들어, 공급망 관리, HVAC 시스템, 산업용 로봇, 게임 인공 지능, 음성 대화 시스템 및 자율 주행 차량 등이 있습니다. RL 모델은 에이전트가 취하는 모든 행동에 대해 보상과 처벌을 받는 연속 프로세스를 통해 학습하기 때문에 동적인 환경에서 불확실성이 존재할 때 시스템이 의사를 결정하도록 훈련할 수 있습니다.

마코프 의사결정 과정(MDP)

RL은 마코프 의사결정 과정(MDP)라는 모델을 기반으로 합니다. MDP는 일련의 시간 단계로 구성됩니다. 각 시간 단계는 다음과 같은 요소로 구성됩니다.

환경

RL 모델이 작동하는 공간을 정의합니다. 이러한 공간은 실제 환경 또는 시뮬레이터일 수 있습니다. 예를 들어, 실제 도로에서 자율 주행 차량을 훈련하는 경우는 환경이 실제 환경입니다. 도로 위를 주행하는 자율 주행 차량을 모델링하는 컴퓨터 프로그램을 훈련하는 경우에는 환경이 시뮬레이터입니다.

상태

환경에 대한 모든 정보와 미래와 관련된 과거의 모든 단계를 지정합니다. 예를 들어, 로봇이 언제든지 어떤 방향으로든 이동할 수 있는 RL 모델에서는 현재 시간 단계에서 로봇의 위치가 상태입니다. 로봇 위치를 알면 해당 위치에 도착하기 위해 어떤 단계를 수행했는지 알 필요가 없기 때문입니다.

작업

작업은 에이전트가 수행합니다. 예를 들어 로봇이 앞으로 나아갑니다.

보상

에이전트가 수행한 마지막 작업의 상태 값을 나타내는 숫자입니다. 예를 들어, 목표가 로봇이 보물을 찾도록 하는 것이라면 보물을 찾은 경우 보상이 5이고, 보물을 찾지 못한 경우에는 보상이 0일 수 있습니다. RL 모델은 장기간 누적된 보상을 최적화하는 전략을 찾으려고 합니다. 이러한 전략을 정책이라고 합니다.

관측치

각 단계마다 에이전트가 사용할 수 있는 환경 상태에 대한 정보입니다. 전체 상태이거나 상태의 일부분일 수 있습니다. 예를 들어, 체스 시합 모델의 에이전트는 모든 단계에서 체스판의 전체 상태를 관찰할 수 있지만 미로 속의 로봇은 현재 마주하고 있는 미로의 작은 부분 밖에 관찰할 수 없습니다.

일반적으로 RL의 훈련은 많은 에피소드로 구성됩니다. 에피소드는 초기 상태에서 환경이 최종 상태에 도달할 때까지 MDP의 모든 시간 단계로 구성됩니다.

Amazon SageMaker RL의 주요 기능

Amazon SageMaker RL에서 RL 모델을 훈련하려면 다음 구성 요소를 사용합니다.

  • 딥 러닝(DL) 프레임워크. 현재, Amazon SageMaker는 TensorFlow 및 Apache MXNet에서 RL을 지원합니다.

  • RL 도구 키트. RL 도구 키트는 에이전트와 환경 간의 상호 작용을 관리하고, RL 알고리즘의 광범위한 상태 선택 항목을 제공합니다. Amazon SageMaker는 Intel Coach 및 Ray RLlib 도구 키트를 제공합니다. Intel Coach에 대한 자세한 정보는 https://nervanasystems.github.io/coach/를 참조하십시오. Ray RLlib에 대한 자세한 정보는 https://ray.readthedocs.io/en/latest/rllib.html을 참조하십시오.

  • RL 환경. 사용자 지정 환경, 오픈 소스 환경 또는 상용 환경을 사용할 수 있습니다. 자세한 정보는 Amazon SageMaker의 RL 환경 단원을 참조하십시오.

다음 다이어그램은 Amazon SageMaker RL에서 지원되는 RL 구성 요소를 보여 줍니다.


- refer to the picture above -


* Data types  
* Data in Real Life : Numeric, Text, Categorical values
* Categorical : Cartesian Transformation - Combine categorical features to form new features
* Text Type : NGRAM, OSB Transformation, Stemming, Lower Case
* Numeric Data :


Data Transformations Reference

Topics

N-gram Transformation

The n-gram transformation takes a text variable as input and produces strings corresponding to sliding a window of (user-configurable) n words, generating outputs in the process. For example, consider the text string "I really enjoyed reading this book".

Specifying the n-gram transformation with window size=1 simply gives you all the individual words in that string:


{"I", "really", "enjoyed", "reading", "this", "book"}

Specifying the n-gram transformation with window size =2 gives you all the two-word combinations as well as the one-word combinations:


{"I really", "really enjoyed", "enjoyed reading", "reading this", "this book", "I", "really", "enjoyed", "reading", "this", "book"}

Specifying the n-gram transformation with window size = 3 will add the three-word combinations to this list, yielding the following:


{"I really enjoyed", "really enjoyed reading", "enjoyed reading this", "reading this book", "I really", "really enjoyed", "enjoyed reading", "reading this", "this book", "I", "really", "enjoyed", "reading", "this", "book"}

You can request n-grams with a size ranging from 2-10 words. N-grams with size 1 are generated implicitly for all inputs whose type is marked as text in the data schema, so you do not have to ask for them. Finally, keep in mind that n-grams are generated by breaking the input data on whitespace characters. That means that, for example, punctuation characters will be considered a part of the word tokens: generating n-grams with a window of 2 for string "red, green, blue" will yield {"red,", "green,", "blue,", "red, green", "green, blue"}. You can use the punctuation remover processor (described later in this document) to remove the punctuation symbols if this is not what you want.

To compute n-grams of window size 3 for variable var1:


"ngram(var1, 3)"

Orthogonal Sparse Bigram (OSB) Transformation

The OSB transformation is intended to aid in text string analysis and is an alternative to the bi-gram transformation (n-gram with window size 2). OSBs are generated by sliding the window of size n over the text, and outputting every pair of words that includes the first word in the window.

To build each OSB, its constituent words are joined by the "_" (underscore) character, and every skipped token is indicated by adding another underscore into the OSB. Thus, the OSB encodes not just the tokens seen within a window, but also an indication of number of tokens skipped within that same window.

To illustrate, consider the string "The quick brown fox jumps over the lazy dog", and OSBs of size 4. The six four-word windows, and the last two shorter windows from the end of the string are shown in the following example, as well OSBs generated from each:

Window, {OSBs generated}


"The quick brown fox", {The_quick, The__brown, The___fox} "quick brown fox jumps", {quick_brown, quick__fox, quick___jumps} "brown fox jumps over", {brown_fox, brown__jumps, brown___over} "fox jumps over the", {fox_jumps, fox__over, fox___the} "jumps over the lazy", {jumps_over, jumps__the, jumps___lazy} "over the lazy dog", {over_the, over__lazy, over___dog} "the lazy dog", {the_lazy, the__dog} "lazy dog", {lazy_dog}

Orthogonal sparse bigrams are an alternative for n-grams that might work better in some situations. If your data has large text fields (10 or more words), experiment to see which works better. Note that what constitutes a large text field may vary depending on the situation. However, with larger text fields, OSBs have been empirically shown to uniquely represent the text due to the special skip symbol (the underscore).

You can request a window size of 2 to 10 for OSB transformations on input text variables.

To compute OSBs with window size 5 for variable var1:

"osb(var1, 5)"

Lowercase Transformation

The lowercase transformation processor converts text inputs to lowercase. For example, given the input "The Quick Brown Fox Jumps Over the Lazy Dog", the processor will output "the quick brown fox jumps over the lazy dog".

To apply lowercase transformation to the variable var1:

"lowercase(var1)"

Remove Punctuation Transformation

Amazon ML implicitly splits inputs marked as text in the data schema on whitespace. Punctuation in the string ends up either adjoining word tokens, or as separate tokens entirely, depending on the whitespace surrounding it. If this is undesirable, the punctuation remover transformation may be used to remove punctuation symbols from generated features. For example, given the string "Welcome to AML - please fasten your seat-belts!", the following set of tokens is implicitly generated:


{"Welcome", "to", "Amazon", "ML", "-", "please", "fasten", "your", "seat-belts!"}

Applying the punctuation remover processor to this string results in this set:


{"Welcome", "to", "Amazon", "ML", "please", "fasten", "your", "seat-belts"}

Note that only the prefix and suffix punctuation marks are removed. Punctuations that appear in the middle of a token, e.g. the hyphen in "seat-belts", are not removed.

To apply punctuation removal to the variable var1:

"no_punct(var1)"

Quantile Binning Transformation

The quantile binning processor takes two inputs, a numerical variable and a parameter called bin number, and outputs a categorical variable. The purpose is to discover non-linearity in the variable's distribution by grouping observed values together.

In many cases, the relationship between a numeric variable and the target is not linear (the numeric variable value does not increase or decrease monotonically with the target). In such cases, it might be useful to bin the numeric feature into a categorical feature representing different ranges of the numeric feature. Each categorical feature value (bin) can then be modeled as having its own linear relationship with the target. For example, let's say you know that the continuous numeric feature account_age is not linearly correlated with likelihood to purchase a book. You can bin age into categorical features that might be able to capture the relationship with the target more accurately.

The quantile binning processor can be used to instruct Amazon ML to establish n bins of equal size based on the distribution of all input values of the age variable, and then to substitute each number with a text token containing the bin. The optimum number of bins for a numeric variable is dependent on characteristics of the variable and its relationship to the target, and this is best determined through experimentation. Amazon ML suggests the optimal bin number for a numeric feature based on data statistics in the Suggested Recipe.

You can request between 5 and 1000 quantile bins to be computed for any numeric input variable.

To following example shows how to compute and use 50 bins in place of numeric variable var1:

"quantile_bin(var1, 50)"

Normalization Transformation

The normalization transformer normalizes numeric variables to have a mean of zero and variance of one. Normalization of numeric variables can help the learning process if there are very large range differences between numeric variables because variables with the highest magnitude could dominate the ML model, no matter if the feature is informative with respect to the target or not.

To apply this transformation to numeric variable var1, add this to the recipe:

normalize(var1)

This transformer can also take a user defined group of numeric variables or the pre-defined group for all numeric variables (ALL_NUMERIC) as input:

normalize(ALL_NUMERIC)

Note

It is not mandatory to use the normalization processor for numeric variables.

Cartesian Product Transformation

The Cartesian transformation generates permutations of two or more text or categorical input variables. This transformation is used when an interaction between variables is suspected. For example, consider the bank marketing dataset that is used in Tutorial: Using Amazon ML to Predict Responses to a Marketing Offer. Using this dataset, we would like to predict whether a person would respond positively to a bank promotion, based on the economic and demographic information. We might suspect that the person's job type is somewhat important (perhaps there is a correlation between being employed in certain fields and having the money available), and the highest level of education attained is also important. We might also have a deeper intuition that there is a strong signal in the interaction of these two variables—for example, that the promotion is particularly well-suited to customers who are entrepreneurs who earned a university degree.

The Cartesian product transformation takes categorical variables or text as input, and produces new features that capture the interaction between these input variables. Specifically, for each training example, it will create a combination of features, and add them as a standalone feature. For example, let's say our simplified input rows look like this:

target, education, job

0, university.degree, technician

0, high.school, services

1, university.degree, admin

If we specify that the Cartesian transformation is to be applied to the categorical variables education and job fields, the resultant feature education_job_interaction will look like this:

target, education_job_interaction

0, university.degree_technician

0, high.school_services

1, university.degree_admin

The Cartesian transformation is even more powerful when it comes to working on sequences of tokens, as is the case when one of its arguments is a text variable that is implicitly or explicitly split into tokens. For example, consider the task of classifying a book as being a textbook or not. Intuitively, we might think that there is something about the book's title that can tell us it is a textbook (certain words might occur more frequently in textbooks' titles), and we might also think that there is something about the book's binding that is predictive (textbooks are more likely to be hardcover), but it's really the combination of some words in the title and binding that is most predictive. For a real-world example, the following table shows the results of applying the Cartesian processor to the input variables binding and title:

TextbookTitleBindingCartesian product of no_punct(Title) and Binding

1 Economics: Principles, Problems, Policies Hardcover {"Economics_Hardcover", "Principles_Hardcover", "Problems_Hardcover", "Policies_Hardcover"}
0 The Invisible Heart: An Economics Romance Softcover {"The_Softcover", "Invisible_Softcover", "Heart_Softcover", "An_Softcover", "Economics_Softcover", "Romance_Softcover"}
0 Fun With Problems Softcover {"Fun_Softcover", "With_Softcover", "Problems_Softcover"}

The following example shows how to apply the Cartesian transformer to var1 and var2:

cartesian(var1, var2)


데이터 변환 참조

주제

n-gram 변환

n-gram 변환은 텍스트 변수를 입력으로 가져오고 (사용자가 구성 가능한) n 단어 창을 슬라이딩하는 문자열을 생성하여 해당 프로세스에서 출력을 생성합니다. 예를 들어 "I really enjoyed reading this book"이라는 텍스트 문자열을 생각해 보겠습니다.

창 크기 = 1인 n-gram 변환을 지정하면 다음과 같이 해당 문자열에 있는 모든 개별 단어가 제공됩니다.


{"I", "really", "enjoyed", "reading", "this", "book"}

창 크기 = 2인 n-gram 변환을 지정하면 다음과 같이 모든 2단어 조합과 모든 1단어 조합이 제공됩니다.


{"I really", "really enjoyed", "enjoyed reading", "reading this", "this book", "I", "really", "enjoyed", "reading", "this", "book"}

창 크기 = 3인 n-gram 변환을 지정하면 이 목록에 3단어 조합을 추가하여 다음을 산출합니다.


{"I really enjoyed", "really enjoyed reading", "enjoyed reading this", "reading this book", "I really", "really enjoyed", "enjoyed reading", "reading this", "this book", "I", "really", "enjoyed", "reading", "this", "book"}

n-gram을 2~10개 단어 범위의 크기로 요청할 수 있습니다. 크기가 1인 n-gram은 데이터 스키마에서 텍스트로 표시된 유형의 모든 입력에 대해 암시적으로 생성되므로, 사용자가 요청할 필요가 없습니다. 마지막으로, n-gram은 공백 문자에 대한 입력 데이터를 분해하여 생성된다는 것을 기억해야 합니다. 예를 들어 구두점 문자는 다음과 같이 단어 토큰의 일부로 간주됩니다. 문자열 "red, green, blue"에 대해 2개의 창으로 n-gram을 생성하면 {"red,", "green,", "blue,", "red, green", "green, blue"}로 산출됩니다. 구두점 제거 프로세서(이 문서의 뒷부분에서 설명)를 사용하여 원하지 않는 구두점을 제거할 수 있습니다.

변수 var1에 대해 창 크기가 3인 n-gram을 계산하려면:


"ngram(var1, 3)"

Orthogonal Sparse Bigram(OSB) 변환

OSB 변환은 텍스트 문자열 분석을 보조하는 목적이며 bi-gram 변환(창 크기가 2인 n-gram)을 대체하는 변환입니다. OSB는 n 단어 크기의 창을 텍스트 위로 슬라이딩하고 창의 첫 번째 단어가 포함된 모든 단어 페어를 출력하여 생성됩니다.

각 OSB를 구축하기 위해 구성 단어는 "_"(밑줄) 문자로 결합되며, 건너뛴 모든 토큰은 OSB에 또 다른 밑줄을 추가하여 표시됩니다. 따라서 OSB는 창 내에 확인되는 토큰뿐만 아니라 동일한 창 내에서 건너뛴 토큰의 수도 표시합니다.

예를 들어 "The quick brown fox jumps over the lazy dog"라는 문자열과 크기가 4인 OSB를 생각해 보겠습니다. 여섯 개의 4 단어 창 및 문자열 끝에 있는 더 짧은 길이의 마지막 창은 다음 예제에서 각 창에서 생성된 OSB와 함께 표시됩니다.

창, {생성된 OSB}


"The quick brown fox", {The_quick, The__brown, The___fox} "quick brown fox jumps", {quick_brown, quick__fox, quick___jumps} "brown fox jumps over", {brown_fox, brown__jumps, brown___over} "fox jumps over the", {fox_jumps, fox__over, fox___the} "jumps over the lazy", {jumps_over, jumps__the, jumps___lazy} "over the lazy dog", {over_the, over__lazy, over___dog} "the lazy dog", {the_lazy, the__dog} "lazy dog", {lazy_dog}

Orthogonal Sparse Bigram은 일부 상황에서 효과적으로 작용할 수 있는 n-gram의 대체 변환입니다. 데이터에 큰 텍스트 필드(10개 이상의 단어)가 있는 경우 실험을 통해 효과적인 방식을 살펴봅니다. 큰 텍스트 필드를 구성하는 내용은 상황에 따라 다를 수 있음을 참고하십시오. 그러나 큰 텍스트 필드를 사용하는 OSB는 특수 건너뛰기 기호(밑줄)로 인해 텍스트를 고유하게 나타내는 것으로 실증되었습니다.

입력 텍스트 변수의 OSB 변환에 대해 2~10의 창 크기를 요청할 수 있습니다.

변수 var1에 대해 창 크기가 5인 OSB를 계산하려면:

"osb(var1, 5)"

소문자 변환

소문자 변환 프로세서는 텍스트 입력을 소문자로 변환합니다. 예를 들어 프로세서는 "The Quick Brown Fox Jumps Over the Lazy Dog"라는 입력을 "the quick brown fox jumps over the lazy dog"라고 출력합니다.

변수 var1에 소문자 변환을 적용하려면:

"lowercase(var1)"

구두점 변환 제거

Amazon ML은 공백이 있는 데이터 스키마의 텍스트로 표시된 입력을 암시적으로 분리합니다. 문자열의 구두점은 주변의 공백에 따라 인접한 단어 토큰으로 끝나거나 완전히 별개의 토큰으로 끝납니다. 이것이 바람직하지 않은 경우, 생성된 특성의 구두점을 제거하는 데 구두점 제거 변환을 사용할 수 있습니다. 예를 들어 "Welcome to AML - please fasten your seat-belts!"라는 문자열이 있으면 다음과 같은 토큰 집합이 암시적으로 생성됩니다.


{"Welcome", "to", "Amazon", "ML", "-", "please", "fasten", "your", "seat-belts!"}

구두점 제거 프로세서를 이 문자열에 적용하면 다음과 같은 집합이 됩니다.


{"Welcome", "to", "Amazon", "ML", "please", "fasten", "your", "seat-belts"}

접두사 및 접미사 구두점만 제거됩니다. 토큰 중간에 나타나는 구두점("seat-belts"에 있는 하이픈 등)은 제거되지 않습니다.

변수 var1에 구두점 변환을 적용하려면:

"no_punct(var1)"

Quartile binning 변환

Quantile binning 프로세서는 숫자 변수 및 bin number라는 파라미터의 두 가지 입력을 사용해서 카테고리 변수를 출력합니다. 그 목적은 관측된 값을 그룹화하여 변수의 배포에서 비선형성을 발견하는 것입니다.

많은 경우에 숫자 변수와 대상 간의 관계는 선형적이지 않습니다(숫자 변수 값은 대상에 따라 점차 증가하거나 감소하지 않음). 이 경우 다양한 범위의 숫자 특성을 나타내는 카테고리 특성으로 숫자 특성을 비닝하는 것이 유용할 수 있습니다. 각 카테고리 특성 값(빈)은 대상과의 선형 관계를 갖도록 모델링될 수 있습니다. 예를 들어 연속적인 숫자 특성 account_age가 책을 구입할 가능성과 선형적으로 관련이 없다는 것을 알고 있다고 가정해 보겠습니다. 사용자는 대상과의 관계를 더욱 정확하게 캡처할 수 있는 카테고리 특성으로 age를 비닝할 수 있습니다.

quantile binning 프로세서는 Amazon ML이 age 변수의 모든 입력 값 배포를 기반으로 동일한 크기의 빈 n개를 설정한 다음 각 번호를 빈을 포함하는 텍스트 토큰으로 대체하도록 하는 데 사용될 수 있습니다. 숫자 변수에 대한 최적의 빈 수는 변수의 특징과 대상과의 관계에 따라 달라지며, 이는 실험을 통해 가장 효과적으로 결정됩니다. Amazon ML은 제안된 레시피의 데이터 통계를 기반으로 숫자 특성에 대한 최적의 빈 수를 제시합니다.

숫자 입력 변수에 대해 5~1000개의 quantile 빈을 계산하도록 요청할 수 있습니다.

다음 예제에서는 숫자 변수 var1 대신 50개의 빈을 계산하여 사용하는 방법을 보여 줍니다.

"quantile_bin(var1, 50)"

정규화 변환

정규화 변환기는 평균 값이 0이고 분산 값이 1인 숫자 변수를 정규화합니다. 특성이 대상과 관련하여 많은 정보가 되는지 여부와 관계없이 가장 큰 크기의 변수가 ML 모델의 대부분을 차지할 수 있기 때문에, 숫자 변수의 정규화는 숫자 변수 사이에 범위 차이가 매우 큰 경우에 학습 프로세스에 도움이 될 수 있습니다.

숫자 변수 var1에 이 변환을 적용하려면 다음과 같이 레시피에 추가합니다.

normalize(var1)

이 변환기는 숫자 변수의 사용자 정의 그룹 또는 모든 숫자 변수(ALL_NUMERIC)의 사전 정의된 그룹을 입력으로 사용할 수 있습니다.

normalize(ALL_NUMERIC)

참고

숫자 변수에 정규화 프로세서를 사용하는 것은 필수가 아닙니다.

데카르트 곱 변환

데카르트 변환은 두 개 이상의 텍스트 또는 카테고리 입력 변수의 순열을 생성합니다. 이 변환은 변수 간에 상호 작용이 있다고 생각될 때 사용합니다. 예를 들어 자습서: Amazon ML을 사용한 마케팅 반응 예측에서 사용되는 은행 마케팅 데이터 집합을 고려해 보겠습니다. 이 데이터 집합을 사용하여 경제 및 인구 통계 정보를 기반으로 은행 홍보에 긍정적인 반응을 보이는지 예측하려고 합니다. 해당하는 사람의 직업 유형이 상당히 중요하다고 생각할 수 있으며(특정 분야에서 근무하는 것과 사용 가능한 비용 간에 상관 관계가 있을 수 있음), 가장 높은 수준의 교육을 받은 사실도 중요하다고 간주할 수 있습니다. 또한 이 두 변수의 상호 작용에 강력한 신호가 있다는 것도 알 수 있습니다. 예를 들어 특히 학사 학위를 취득한 사업가 고객에게 홍보하는 것이 적합합니다.

데카르트 곱 변환은 카테고리 변수 또는 텍스트를 입력으로 사용하고, 이러한 입력 변수 간의 상호 작용을 캡처하는 새로운 특성을 생성합니다. 특히, 각 교육 예제에 대해 특성의 조합을 생성하고 이를 독립적인 특성으로 추가합니다. 예를 들어 다음과 같은 간소화된 입력 행이 있다고 가정하겠습니다.

target, education, job

0, university.degree, technician

0, high.school, services

1, university.degree, admin

데카르트 변환이 카테고리 변수 education 및 job 필드에 적용되도록 지정하면 결과적으로 다음과 같은 education_job_interaction 특성을 볼 수 있습니다.

target, education_job_interaction

0, university.degree_technician

0, high.school_services

1, university.degree_admin

데카르트 변환은 인수 중 하나가 암시적으로 또는 명시적으로 토큰으로 분리되는 텍스트 변수 같은 토큰 시퀀스 작업에서 더욱 강력하게 작용합니다. 예를 들어 책을 교과서로 분류할지 여부에 대한 작업을 생각해 보겠습니다. 직관적으로, 교과서라고 말할 수 있는 책의 제목에 대해 생각할 수 있으며(특정 단어는 교과서의 제목에서 더 자주 나타날 수 있음), 책의 표지에 대해 예측 가능한 점이 있다고 생각할 수도 있지만(교과서는 하드 커버가 될 가능성이 더 큼), 실제로 제목과 표지에 있는 단어의 조합이야말로 가장 예측 가능합니다. 실제 사례에서 다음 표는 데카르트 프로세서를 입력 변수 표지 및 제목에 적용한 결과를 보여 줍니다.

교과서제목표지no_punct(제목) 및 표지의 데카르트 곱

1 Economics: Principles, Problems, Policies Hardcover {"Economics_Hardcover", "Principles_Hardcover", "Problems_Hardcover", "Policies_Hardcover"}
0 The Invisible Heart: An Economics Romance Softcover {"The_Softcover", "Invisible_Softcover", "Heart_Softcover", "An_Softcover", "Economics_Softcover", "Romance_Softcover"}
0 Fun With Problems Softcover {"Fun_Softcover", "With_Softcover", "Problems_Softcover"}

다음 예는 var1 및 var2에 대해 데카르트 변환기를 적용하는 방법을 보여 줍니다.

cartesian(var1, var2)

반응형


반응형

Udemy - AWS Machine Learning, AI, SageMaker - With Python


Summary


Section 3 Linear Regression


23. Summary


Squared Loss Function is parabolic in nature. It has an important property of not only telling us the loss at a given weight, but also tells us which way to go to minimize loss


Gradient Descent optimization algorithm uses loss function to move the weights of all the features and iteratively adjusts the weights until optimal value is reached


Batch Gradient Descent predicts y value for all training examples and then adjusts the value of weights based on loss. It can converge much slower when training set is very large. Training set order does not matter as every single example in the training set is considered before making adjustments.


Stochastic Gradient Descent predicts y value for next training example and immediately adjusts the value of weights. It can converge faster when training set is very large. Training set should be random order otherwise model will not learn correctly. AWS ML uses stochastic Gradient Descent


Section 4 AWS - Linear Regression Models


27. Concept - How to evaluate regression model accuracy?


Linear Regression - Residuals


- AWS ML Console provides a Histogram that shows distribution of examples that were over estimated and underestimated and to what extent

- Available as "explore model performance" option under Evaluation -> Summary

- Ideal: Over/Under estimation should be a normal curve centered at 0.

- Structural Issue: When you observe vast majority of example falling into one side. Adding more relevant features can help remedy the situation.


31. Model Performance Summary and Conclusion

RMSE (Root Mean Square Error) is the evaluation metric for Linear Regression. Smaller the value of RMSE, better the predictive accuracy of model. Perfect model would have RMSE of 0.


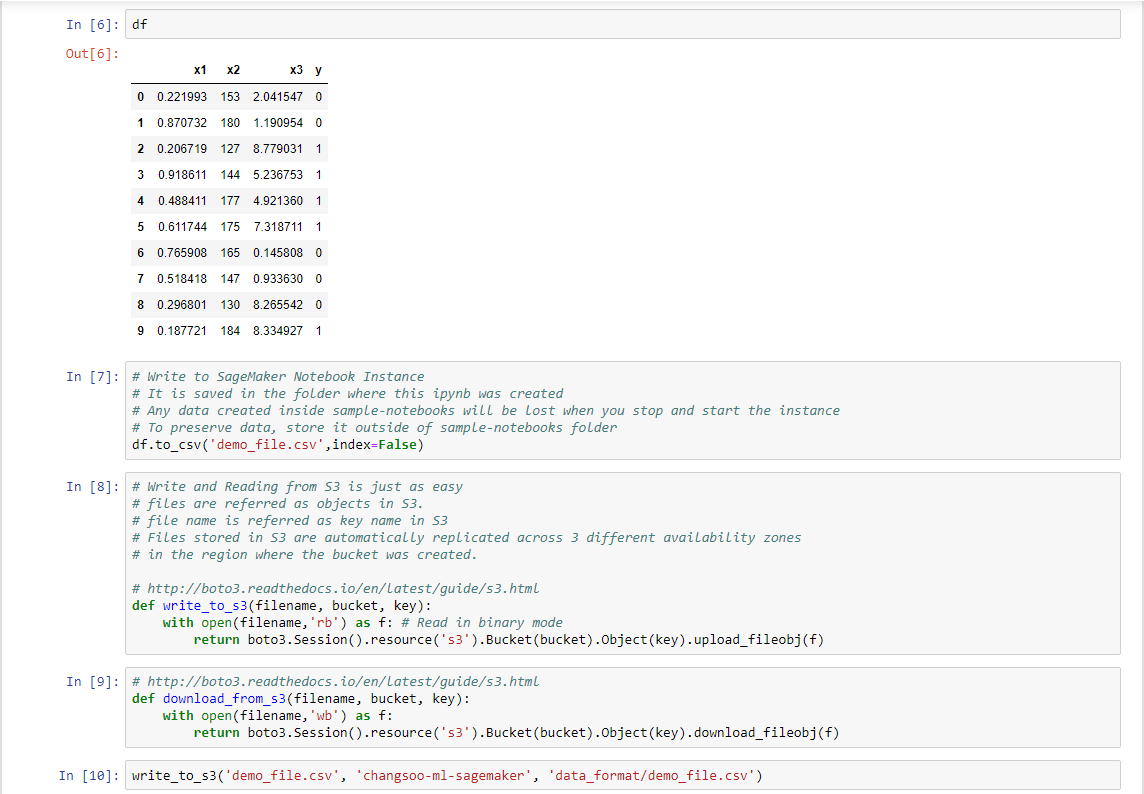
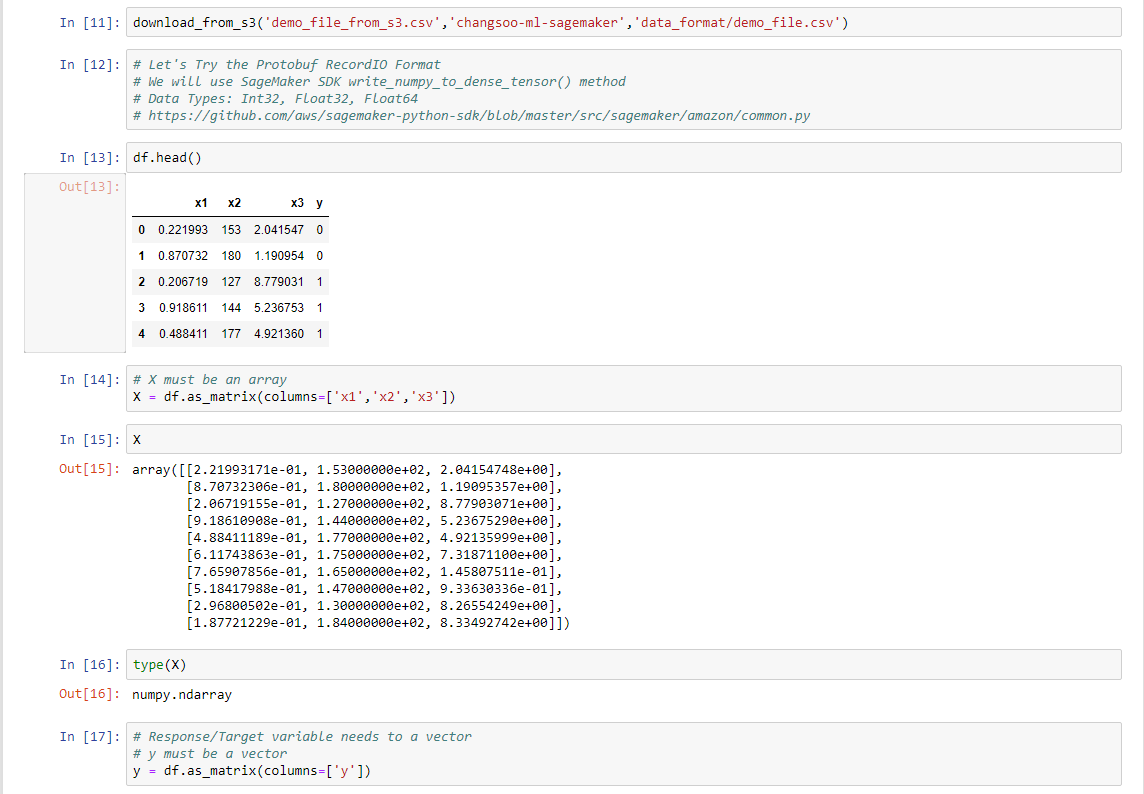
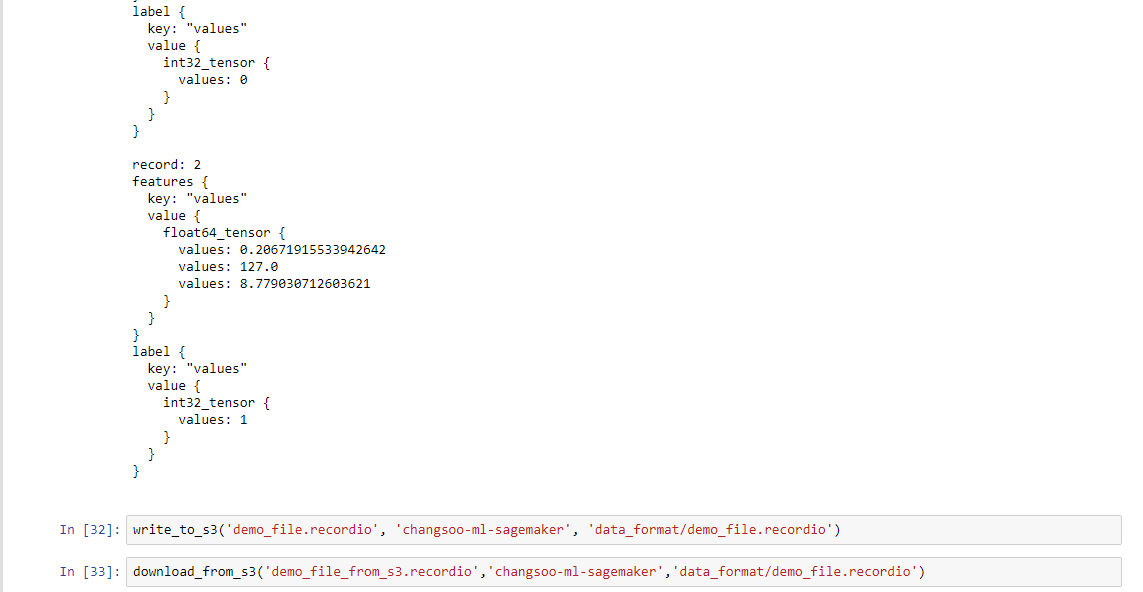
To prepare data for AWS ML, it requires data to be in

1. CSV file available in S3

2. AWS Redshift Datawarehouse

3. AWS Relational Database Service (RDS) MySQL DB


Batch Prediction results are stored by AWS ML to S3 in the specified bucket


We pulled the data from S3 to local folder and plotted them


Based on the distribution of data, AWS ML suggests a recipe for processing data.

In case of numeric features, it may suggest binning the data instead of treating a raw numeric

For this example, treating x as numeric provided best results


Section 5 Adding Features To Improve Model


35. Summary

1. Underfitting occurs when model does not accurately capture relationship between features and target

2. Underfitting would cause large training errors and evaluation errors   

  Training RMSE: 385.1816, Evaluation RMSE: 257.8979, Baseline RMSE: 437.311

3. Evaluation Summary - Prediction overestimation and underestimation histogram provided by AWS ML console provides important clues on how the model is behaving, under-estimation and over-estimation needs to be balanced and centered around 0

4. Box plot also highlights distribution differences between predicted and actual-negatives

5. To address underfitting, add higher order polynomials or more relevant features to capture complex relationship

  Training RMSE: 132.2032, Evaluation RMSE: 63.6847, Baseline RMSE: 437.311

6. When working with datasets containing 100s or even 1000s of features, it important to rely on these metrics and distribution to gain insight into model performance


Section 6 Normalization


37. Concept: Normalization to smoothen magnitude differences


Normalization Transformation (Numeric)

- When there are very large differences in magnitude of features, features that have large magnitude can dominate Model

- Example : We saw this in Quadratic Extra Features dataset

- Normalization is a process of transforming features to have a mean of 0 and variance of 1. This will ensure all features have similar scale

  : Feature normalized = (feature - mean) / (sigma)

    where,

mean = mean of feature x

sigma = standard deviation of feature x

  : Usage : normalize (numericFeature0

- Optimization algorithm may also converge faster with normalized features compared to features that have very large scale differences


39. Summary

1. Having lot of features and complex features can help improve prediction accuracy

2. When feature ranges are orders of magnitude different, it can dominate the outcome. Normalization is a process of transforming features to have a mean of 0 and  variance of 1. This will ensure all feature have similar scale.

3. Without Normalization:

  Training RMSE: 83973.66, Evaluation RMSE: 158260.62, Baseline RMSE: 437.31

4. With Normalization:

  Training RMSE: 72.35, Evaluation RMSE: 51.7387, Baseline RMSE: 437.31

5. Normalization can be easily enabled using AWS ML Transformation recipes


Section 7 Adding Complex Features

46. Summary

Adding polynomial features allows us fit more complex shapes


To add polynomial features that combines all input features, use sci-kit module library. Anaconda includes these modules by default


We saw good performance with degree 4 and any additional feature may bring incremental improvement, but with added complexity of managing features.


1. Model Degree 1 Training RMSE:0.5063, Evaluation RMSE:0.4308, Baseline RMSE:0.689

2. Model Degree 4 Training RMSE:0.2563, Evaluation RMSE:0.1493, Baseline RMSE:0.689

3. Model Degree 15 Training RMSE:0.2984, Evaluation RMSE:0.1222, Baseline RMSE:0.689


Section 8 Kaggle Bike Hourly Rental Prediction


50. Linear Regression Wrapup and Summary


AWS ML - Linear Regression

* Linear Model

* Gradient Descent and Stochastic Gradient Descent

* Squared Error Loss Function

* AWS ML Training, Evaluation, Interactive Prediction, Batch Prediction

* Prediction Quality

  - RMSE

  - Residual Histograms

* Data visualization

* Normalization

* Higher order polynomials


Section 9 - Logistic Regression Models


Image result for Linear vs. Logistic regression model

In short: Linear Regression gives continuous output. i.e. any value between a range of values. ... GLM(Generalized linear models) does not assume a linear relationship between dependent and independent variables. However, it assumes a linear relationship between link function and independent variables in logit model.


https://stackoverflow.com/questions/12146914/what-is-the-difference-between-linear-regression-and-logistic-regression


https://techdifferences.com/difference-between-linear-and-logistic-regression.html
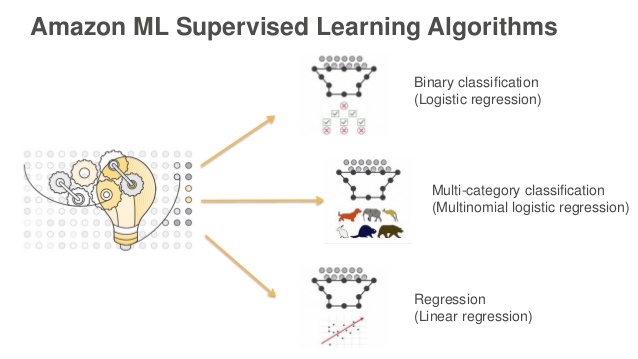

58. Summary

Binary Classifier : Predicts positive class probability of an observation

Logistic or Sigmod function has an important property where output is between 0 and 1 for any input. This output is used by binary classifiers as a probability of positive class.

True Positive - Samples that are actual-positives correctly predicted as positive

True Negative - Samples that are actual-negatives correctly predicted as negative

False Negative - Sampleas that are actual-positives incorrectly predicted as negative

False Positive - Samples that are actual-negatives incorrectly predicted as positive

Logistic Loss Function is parabolic in nature. It has an important property of not only telling us the loss at a given weight. but also tells us which way to go to minimize loss

Gradient Descent optimization algorithm uses loss function to move the weights of all the features and iteratively adjusts the weights until optimal value is reached

Batch Gradient Descent predicts y value for all training examples and then adjusts the value of weights based on loss. It can converge much slower when training set is very large. Training set order does not matter as every single example in the training set is considered before making adjustments.

Stochastic Gradient Descent predicts y value for next training example and immediately adjusts the value of weights. It can converge faster when training set is very large. Training set should be random order otherwise model will not learn correctly. AWS ML uses stochastic Gradient Descent


Section 10 


62

Classification Metrics

True Positive = count(model correctly predicted positives). Students who passed exam correctly classified as pass.

True Negative = count (model correctly predicted negatives). Students who failed exam correctly classfied as fail.

False Positive = count (model misclassified negative as positive). Students who failed exam incorrectly classified as pass.

False Negative = count (model misclassified positive as negative). Students who passes exam incorrectly classified as fail.


* True Positive Rate, Recall, Probability of detection - Fraction of positive predicted correctly. larger value indicates better predictive accuracy.


TPR = True Positive / Actual Positive


* False Positive Rate, probability of false alarm - Fraction of negative predicted as positive. Smaller value indicates better predictive accuracy


FPR = False Positive / Actual Negative


* Precision - Fraction of true positive among all predicted positive. Larger value indicates better predictive accuracy


Precision = True Positive / Predicted Positive


* Accuracy - Fraction of correct predictions. Larger value indicates better predictive accuracy

Accuracy = True Positive + True Negative / negative

where, n is the number of examples


63. 

Classification Insights with AWS Histograms


Histogram - Binary Classifier


* Positive and Negative histograms

* Interactive tool to test effect of various cut-off thresholds

* Ability to save a threshold for the model

* Available under :

Model -> Evaluation Summary -> Explore Performance

https://docs.aws.amazon.com/machine-learning/latest/dg/binary-model-insights.html


64

Concept: AUC Metric


AUC - Binary Classifer

* Area Under Curve(AUC) metric - 0 to 1. Larger Value indicates better predictive accuracy

* AUC is the area of a curve formed by plotting True Positive Rate against False positive Rate at different cut-off thresholds

* AUC value of 0.5 is baseline and it is considered random-guess

* AUC closer to 1 indicates better predictive accuracy

* AUC closer to 0 indicates model has learned correct patterns, but flipping predictions (0's are predicted as 1's and vice versa).


69 Summary

For Binary Classification, Area Under Curve (AUC) is the evaluation metric to assess the quality of model


AUC is the area of a curve formed by plotting True Positive Rate against False Positive Rate at different cut-off thresholds.

* AUC metric closer to 1 indicates highly accurate prediction

* AUC metric 0.5 indicates random guess - Baseline AUC

* AUC metric closer to 0 indicates model has learned from the features, but predictions are flipped


Advanced Metrics

* Accuracy - Fraction of correct predictions. Larger value indicates better predictive accuracy

* True Positive Rate - Probability of detection. Out of all positive, how many were correctly predicted as positive. Larger value indicates better predictive accuracy

* False Positive Rate _ Probability of false alarm. Smaller value indicates better predictive accuracy. Out of all negatives, how many were incorrectly predicted as positive.

* Precision - out of all predicted as positive, how man are true positive? Larger value indicates better predictive accuracy.


Section 11

72 Concept: Evaluating Predictive Quality of Multiclass Classifiers


Multi-class metrics


* F1 Score - Harmonic mean of Recall and Precision. Larger F1 Score indicates better predictive accuracy. Binary Metic


F1 Score = 2.Precision.Recall / Precision + Recall


* Average F1 Score - For multi-class problems, average of class wise F1 score is used for accessing predictive quality


* Baseline F1 Score - Hypothentical model that predicts only most frequent class as the answer 


Concept: Confusion Matrix To Evaluating Predictive Quality


Multiclass - Metrics - Confusion Matrix


* Accessible from Model -> Evaluation Summary -> Explore Model performance


* Concise table that shows percentage and count of correct classification and incorrect classifications


* Visual look at model performance


* Up to 10 classes are shown - listed from most frequent to least frequent


* For more than 10 classes, first 9 most freq. classes are shown and 10th class will collapse rest of the classes and mark as otherwise

* Option to download confusion matrix


* https://docs.aws.amazon.com/machine-learning/latest/dg/multiclass-model-insights.html


77. Summary


Multi-Class Evaluation Metric

1. F1 Score is a binary classification metic. It is harmonic mean of precision and recall

F1 Score = 2 X Precision X Recall / (Precision + Recall)

Higher F1 Score reflects better predictive accuracy

2. Multi-Class Evaluation

Average of class wise F1 Score

3. Baseline F1 Score = Hypothetical model that predicts only most frequent class as the answer

4. Visualization - Confusion Matrix - Available on AWS ML Console

Matrix. Rows = true class. Columns = predicted class

Cell color - diagonal indicates true class prediction %

Cell color - non-diagonal indicates incorrect prediction %

Last column is F1 score for that class. Last but one column is true class distribution

Last row is predicted class distribution

Upto 10 classes are shown - listed from most frequent to least frequent

For more than 10 classes, first 9 most freq. classes are shown and 10th class will collapse rest of the classes and mark as otherwise

You can download the confusion matrix thru url-Explore Performance page under Evaluations


Prediction Summary

1. Eval with default recipe settings. Average F1 score: 0.905

2. Eval with numeric recipe settings: Average F1 score: 0.827

3. Batch prediction Results (predict all 150 example outcome)

  a. With default recipe settings: Average F1 Score: 0.973

  b. With numeric recipe settings:Average F1 Score: 0.78

4. Classification was better with binning. Versicolor classification was impacted when numeric setting was used

5. Higher F1 Score implies better prediction accuracy


Section 12 Text Based Classification with AWS Twitter Dataset


78. AWS Twitter Feed Classification for Customer Service

https://github.com/aws-samples/machine-learning-samples/tree/master/social-media 


79. Lab: Train, Evaluate Model and Assess Predictive Quality, 80. Lab: Interactive Prediction with AWS

- Practice


81. Logistic Regression Summary


AWS ML - Logistic Regression

- Linear Model

- Logistic/Sigmoid Function to produce a probability

- Stochastic Gradient Descent

- Logistic Loss function

- AWS ML Training, Evaluation, Interactive Prediction, Batch Prediction

- Prediction Quality 

  : TPR

  : FPR

  : Accuracy

  :Prediction

  : AUC Metrics

  : F1 Score

  : Average F1 Score for multi-class

- Data visualization

- Text Processing

- Normalization

- Higher order polynomials


Section 13


82. Recipe Overview


Recipe

- Recipe is a set of instructions for pre-processing data

- Recipe is a JSON like document

- Consists of three parts: Groups, Assignments, Outputs

- Groups - Groups are collection of features for which similar transformation needs to be applied

  : Built-in Group : ALL_TEXT, ALL_NUMERIC, ALL_CATEGORICAL, ALL_BINARY

  : Define your own groups

- Assignments - Enable creation of new features derived from existing ones

- Outputs - List features used for learning process and optionally apply transformation


Recipe is automatically applied to training data, evaluation data and to data submitted through real-time and batch prediction APIs


83. Recepe Example


84. Text Transformation


* N-gram Text Transformation

- Tokenizes input text and combines them into a slideing window of n-words, where n is specified in the recipe

- Usage: ngram(textFeature, n), where n is the size

- By default all text data is tokenized with n=1

  : Example: "Customer requests urgent response" text is tokenized as {"Customer", "requests", "urgent", "response"}

- With n=2, it generates one word and two word combinations

  : {"Customer requests", "requests urgent", urgent response", "Customer", "requests", "urgent", "response"}

- N-grams of size up to 10 is supported

- N-grams breaks texts at whitespace. Punctuations will be considered part of word

- You can remove punctuations using no_punct transformation


* OSB Text Transformation

- Orthogonal Spare Bigram (OSB) Transformation provides more word combinations compared to n-gram

- Usage: osb(textFeature, size)

- Puts one underscore to indicate word boundary as well as every word skipped

- For example (AWS Document provided sample).

https://docs.aws.amazon.com/ko_kr/machine-learning/latest/dg/data-transformations-reference.html

Text: "The quick brown fox jumps over the lazy dog". osb(text,4)

WINDOW,{OSB GENERATED}

"The quick brown fox", {The_quick, The__brown, The___fox}

"quick brown fox jumps", {quick_brown, quick__fox, quick___jumps}

"brown fox jumps over", {brown_fox, brown__jumps, brown___over}

"fox jumps over the", {fox_jumps, fox__over, fox___the}

"jumps over the lazy", {jumps_over, jumps__the, jumps___lazy}

"over the lazy dog", {over_the, over__lazy, over___dog}

"the lazy dog", {the_lazy, the__dog}

"lazy dog", {lazy_dog}


* Lowercase and Punctuation


- Lower Case Transformation converts text to lowercase

  : Usage : lowercase(textFeature)

  : Example: "The Quick Brown Fox Jumps Over the Lazy Dog" ->  "the quick brown fox jumps over the lazy dog"

- Remove punctuation Transformation - removes punctuations at word boundaries

  : Usage: nopunct(textFeature)

  : Example: "Customer Number: 123. Ord-No: AB1235" will be by default tokenized as

    {"Customer","Number:","123.","Ord-No:","AB1235"}

  : With nopunct transformation -> {"Customer","Number","123","ord-No","AB1235"}

  : Note: only prefix, suffix punctuations are removed. Embedded punctuations are not removed "Ord-No"


85. Numeric Transformation - Quantile Binning


* Quantile Binning Transformation (Numeric)

- Used for converting a numeric value into a categorical bin number

- Usage: quantile_bin(numericFeature, n), where n is the number of bins

- AWS ML uses this information to establish n bins of equal size based on the distribution of all values of the specified numeric feature.

- It then maps incoming numericFeature value to corresponding bin and outputs bin number as categorical value

- AWS ML Recommendation: In some cases, relationship between numeric variable and target is not linear...... binning might be usful in those scenarios

- We actually saw where binning improved predictive accuracy with Iris Dataset


86. Numeric Transformation - Normalization


Normalization Transformation (Numeric)


- When there are very large differences in magnitude of features, features that have large magnitude can dominate Model

- Example: We saw this in Quadratic Extra Features dataset

- Normalization is a process of transforming features to have a mean of 0 and variance of 1. This will enshre all features have similar scale.

  : Example Feature normalized = (feature - mean)/(sigma)

    where,

mean = mean of feature x

sigma = standard deviation of feature x

  : Usage normalize(numericFeature)

- Optimization algorithm may also converge faster with normalized features compared to features that have very large scale differences


87. Cartesian Product Transformation - Categorical and Text


* Cartesian Product Transformation (Categorical, Text)

- Cartesian transformation generates permutations of two or more text and categorical input variables

- For example: Season and Hour combined may have stronger influence on bike rentals. Instead of treating these two as separate features, we can create a new feature Season_Hour that will combine these values.

- Usage cartesian(feature1, feature2)

- Combined features may be able to more accurately related the target attribute

Table


88. Summary

Data Transformation


Section: 14 Hyper Parameters, Model Optimization and Lifecycle

Hyper Parameters allow you to control the model building process and quality


90. Data Rearrangement, Maximum model Size, passes, Shuffle Type

Table


93. Improving Model Quality

Optimizing Model

- To improve a model following are some options

  : Add more training examples

  : Add more relevant features

  : Model hyperparameter tuning

- Quality Metrics of Training Data and Evaluation Data can provide important clues to improve model performance


94. Model Maintenance


- Models may need to be periodically rebuilt or updated to 

  : Keep in-sync with new patterns

  : Support new more relevant features

  : Support new class - in multi - class problems

  : Changes in assumptions or distribution of data that was used to train model

  : Changes to cut-off threshold

  Example: Home price changes month to month depending on several factors

- Have a plan to evaluate model with new data periodically. Example: Weekly, Monthly, Quartly

- Models are probabilistic in nature...

  : Binary Class - Provides bestAnswer(1 or 0) and a raw prediction score. Cut-off score is configurable

  : Multi Class - Provides prediction score for each class. It can be interpreted as probability of observation belonging to the class. Class with highest score is the best answer

  : Regression : Provides a score that contains raw numeric prediction of the target attribute.

- When models are changed, predicted results would also change - Quality metrics like AUC, F1 Score, RMSE can be used to determine whether to go ahead with proposed model change


95. AWS Machine Learning System Limits

- AWS ML imposes certain limits to ensure robust and reliable service

- Some are soft limits and can be increased by contacting AWS Customer Service

- Size of each observation: 100KB

- Size of training data: 100GB

- Size of batch prediction input: 1TB (single file limit. can be overcome by creating more batch files)

- No. of records per batch file: 100 million

- No. of variables/features: 10,000

- Throughput per second for realtime prediction: 200 requests/second

- Max Number of classes per multi-class model: 100


96. AWS Machine Learning Pricing


- Data Analysis and Model Building Fee - $0.42 per Hour of building time

  : Number of computer hours required for data analysis, model training and evaluation

  : Depends on size of input data, attributes, types of transformations applied

- Predictions Fees

  : Batch predictions - $0.10/1,000 predictions founded to the nearest 1,000

  : Real-time predictions - $0.0001 per prediction + Capacity reservation charge of $0.001 per hour for each 10MB provisioned for your model


Section 15 Integration of AWS Machine Learning With Your Application


98. Introduction


AWS ML Integration


- Speed!

  : Turn your ideas into cool products in a matter of days

  : Traditional approach would require months


- Highly scalable, secure service with redundancy built-in

  : Scale automatically to train model with very large datasets

  : Scale automatically to support high volume prediction needs

  : Real-time prediction with capacity reservation

  : Secure - Limit access to Authenticated and Authorized services and users


- Server less!


- Software Integration

  : AWS Machine Learning - Complete functionality is accessible through SDK and Command Line Interfaces

  : Model building and Prediction can be fully automated using SDK

  : AWS SDKs in multiple lanuages - Python, Java, .NET, Javascript, Ruby, C++, ....

  : Complete list languages https://aws.amazon.com/tools/ 


99. Integration Scenarios


Connectivity and Security Options


- You Data Center -> AWS ML Cloud Service  

  : Security: Key Based Authentication + IAM Policy + SSL

- AWS Hosted Application -> AWS ML Cloud Service

  : Security : IAM Role + SSL

- Browser, Apps on Phone -> AWS ML Cloud Service

  : Option 1: AWS Cognito Based Authentication + IAM Role + SSL

  : Choice of authentication providers: Cognito, Google, Amazon, Facebook, Twitter, OpenID, Customer

  : Option 2 : Key Based Authentication + IAM Policy + SSL


100. Security using IAM


Users belong to AWS root account. Cognito Users are application level users. Application belongs to AWS root account.


반응형

Troubleshooting

2019. 1. 2. 04:01 | Posted by 솔웅


반응형


Troubleshooting AWS DeepRacer Issues


Here you'll find troubleshooting tips for frequently asked questions as well as late-coming bug fixes.


여기 자주 묻는 질문과 최근에 수정된 버그 관련한 troubleshooting tips들이 있습니다.


How to Switch AWS DeepRacer Compute Module Power Source from Battery to Power Outlet?


If the compute module battery level is low when you set up your AWS DeepRacer for the first time, follow the steps below to switch the compute power supply from the battery to a power outlet:


처음으로 AWS DeepRacer를 설정할 때 컴퓨팅 모듈 배터리 수준이 낮 으면 다음 단계에 따라 배터리에서 전원 콘센트로 컴퓨팅 전원 공급 장치를 전환하십시오.


  1. Unplug the USB-C cable from the vehicle's compute power port.

    차량의 컴퓨 트 전원 포트에서 USB-C 케이블을 분리합니다.


2. Attach the AC power cord and the USB-C cable to the computer module power adapter (A). Plug the power cord to a power outlet (C) and plug the USB-C cable the vehicle's computer module power port (B).


AC 전원 코드와 USB-C 케이블을 컴퓨터 모듈 전원 어댑터 (A)에 연결하십시오. 전원 코드를 전원 콘센트 (C)에 꽂고 USB-C 케이블을 차량의 컴퓨터 모듈 전원 포트 (B)에 연결합니다.


How to Connect Your AWS DeepRacer to Your Wi-Fi Network?


To use your AWS DeepRacer, you must connect the vehicle to your home or office Wi-Fi network. To connect the vehicle to your Wi-Fi network, follow the steps below:


AWS DeepRacer를 사용하려면 차량을 가정용 또는 사무실 Wi-Fi 네트워크에 연결해야합니다. 차량을 Wi-Fi 네트워크에 연결하려면 다음 단계를 따르십시오.

  1. Have a USB flash drive on hand.
    USB 플래시 드라이브를 준비하십시오.

  2. Plug in the USB flash drive to your computer.
    USB 플래시 드라이브를 컴퓨터에 연결하십시오.

  3. Open a web browser on your computer and navigate tohttps://d1.awsstatic.com/deepracer/wifi-creds.txt to download the Wi-Fi configuration file and copy it to the USB drive.
    컴퓨터에서 웹 브라우저를 열고 https://d1.awsstatic.com/deepracer/wifi-creds.txt로 이동하여 Wi-Fi 구성 파일을 다운로드하고 USB 드라이브로 복사하십시오.

  4. Open the Wi-Fi configuration file in a text editor and type the name (SSID) and password of your Wi-Fi network in the corresponding fields.
    텍스트 편집기에서 Wi-Fi 구성 파일을 열고 해당 필드에 Wi-Fi 네트워크의 이름 (SSID)과 암호를 입력하십시오.

  5. Eject the USB drive from your computer and then plug it into the USB port on the back of the vehicle.
    컴퓨터에서 USB 드라이브를 추출한 다음 차량 후면의 USB 포트에 연결하십시오.


6. Watch the Wi-Fi LED on the vehicle to blink and then to turn blue. The vehicle is now connected to the Wi-Fi network. Unplug the USB drive and skip the next step.
차량의 Wi-Fi LED가 깜박이면 파란색으로 켜십시오. 이제 차량이 Wi-Fi 네트워크에 연결됩니다. USB 드라이브를 분리하고 다음 단계를 건너 뜁니다.


7. If the Wi-Fi LED turns red after blinking, unplug the USB drive from the vehicle. Plug the USB drive back to your computer, verify that the configuration contains the correct network name and password, correct any mistakes or typos, save the file. Repeat Step 5.
Wi-Fi LED가 깜박이면 빨간색으로 켜지면 USB 드라이브를 차량에서 분리하십시오. USB 드라이브를 컴퓨터에 다시 연결하고 구성에 올바른 네트워크 이름과 암호가 포함되어 있는지 확인하고 실수 나 오타를 수정하고 파일을 저장하십시오. 5 단계를 반복하십시오.


How to Charge the AWS DeepRacer Drive Module Battery?


Follow the steps below to charge your AWS DeepRacer drive module battery:


다음 단계에 따라 AWS DeepRacer 드라이브 모듈 배터리를 충전하십시오.

  1. Optionally remove from the vehicle the drive module battery.
    선택적으로 차량에서 드라이브 모듈 배터리를 제거하십시오.

  2. Attach the battery charger to the battery, as depicted as follows:
    다음과 같이 배터리 충전기를 배터리에 연결하십시오.


3. Plug the power cord of battery charger into a power outlet.
배터리 충전기의 전원 코드를 콘센트에 연결하십시오.


How to Charge the AWS DeepRacer Compute Module Battery?


Follow the steps below to charge your AWS DeepRacer compute module battery:


아래 단계에 따라 AWS DeepRacer 컴퓨팅 모듈 배터리를 충전하십시오.


  1. Optionally remove the compute module battery from the vehicle.
    선택적으로 차량에서 컴퓨팅 모듈 배터리를 제거하십시오.

  2. Attach the compute power charger to the compute module battery.
    컴퓨팅 파워 차저를 컴퓨팅 모듈 배터리에 연결하십시오.

  3. Plug the power cord of the compute battery charger into a power outlet.
    컴퓨터 배터리 충전기의 전원 코드를 전원 콘센트에 연결하십시오.


How to Maintain Vehicle's Wi-Fi Connection?


The following troubleshooting guide provides you tips for maintaining your vehicle's connection.


다음 문제 해결 안내서는 차량 연결을 유지 보수하기위한 요령을 제공합니다.


How to Troubleshoot Wi-Fi Connection if Vehicle's Wi-Fi LED Indicator Flashes Blue, Then Turns Red for Two Seconds, and Finally Off?

Wi-Fi 연결 문제를 해결하는 방법 차량의 Wi-Fi LED 표시등이 파란색으로 깜박 인 다음 2 초 동안 빨간색으로 켜고 마지막으로 꺼지는 경우?


Check the following to verify you have the valid Wi-Fi connection settings.


유효한 Wi-Fi 연결 설정을 확인하려면 다음을 확인하십시오.


  • Verify that the USB drive has only one disk partition with only one wifi-creds.txt file on it. If multiple wifi-creds.txt files are found, all of them will be processed in the order they were found, which may lead to unpredictable behavior.
    USB 드라이브에 wifi-creds.txt 파일이 하나만있는 디스크 파티션이 하나만 있는지 확인하십시오. 여러 wifi-creds.txt 파일을 찾으면 모든 파일이 발견 된 순서대로 처리되므로 예기치 않은 동작이 발생할 수 있습니다.

  • Verify the Wi-Fi network's SSID and password are correctly specified in wifi-creds.txt file. An example of this file is shown as follows:

    Wi-Fi 네트워크의 SSID 및 비밀번호가 wifi-creds.txt 파일에 올바르게 지정되어 있는지 확인하십시오. 이 파일의 예는 다음과 같습니다.


###################################################################################
#                                   AWS DeepRacer                                 #
# File name: wifi-creds.txt                                                       #
#                                                                                 # 
# ...                                                                             #
###################################################################################

# Provide your SSID and password below
ssid: ' MyHomeWi-Fi'
password: myWiFiPassword


  • Verify both the field names of ssid and password in the wifi-creds.txt file are in lower case.
    wifi-creds.txt 파일의 ssid 및 password 필드 이름이 모두 소문자인지 확인하십시오.

  • Verify that each of the field name and value is separated by one colon (:). For example. ssid : ' MyHomeWi-Fi'
    각 필드 이름과 값이 콜론 (:)으로 구분되어 있는지 확인하십시오. 예를 들어. ssid : 'MyHomeWi-Fi'

  • Verify that the field value containing a space is enclosed by a pair of single quotes. On Mac, TextEdit or some other text editor shows single quotes as of the '...' form, but not of ‘...’. If the field value does not contain spaces, the value can be without single quotes.
    공백이 포함 된 필드 값이 작은 따옴표로 묶여 있는지 확인하십시오. Mac에서는 TextEdit 또는 다른 텍스트 편집기에서 '...'형식으로 작은 따옴표를 표시하지만 '...'는 표시하지 않습니다. 필드 값에 공백이 없으면 작은 따옴표없이 값을 입력 할 수 있습니다.

What Does It Mean When the Vehicle's Wi-Fi or Power LED Indicator Flashes Blue?

차량의 Wi-Fi 또는 전원 LED 표시등이 파란색으로 깜박일 때의 의미는 무엇입니까?


If the USB drive contains wifi-creds.txt file, the Wi-Fi LED indicator flashes blue while the vehicle is attempting to connect to the Wi-Fi network specified in the file.


USB 드라이브에 wifi-creds.txt 파일이 있으면 차량이 파일에 지정된 Wi-Fi 네트워크에 연결을 시도하는 동안 Wi-Fi LED 표시등이 파란색으로 깜박입니다.


If the USB drive has the models directory, the Power LED flashes blue while the vehicle is attempting to load the model files inside the directory.


USB 드라이브에 models 디렉토리가 있으면 차량이 디렉토리 안에 모델 파일을로드하려고 시도하는 동안 전원 LED가 파란색으로 깜박입니다.


If the USB drive has both the wifi-creds.txt file and the models directory, the vehicle will process the two sequentially, starting with an attempt to connect to Wi-Fi and then loading models.


USB 드라이브에 wifi-creds.txt 파일과 models 디렉토리가 모두있는 경우 차량은 Wi-Fi에 연결 한 다음 모델을로드하려는 시도부터 시작하여 두 개를 순차적으로 처리합니다.


The Wi-Fi LED might also turn red for two seconds if the Wi-Fi connection attempt fails.


Wi-Fi 연결 시도가 실패하면 Wi-Fi LED가 2 초 동안 빨간색으로 변할 수 있습니다.


How Can I Connect to Vehicle's Device Console Using its Hostname?

호스트 이름을 사용하여 차량의 장치 콘솔에 어떻게 연결할 수 있습니까?


When connecting to the vehicle's device console using its hostname, make sure you type: https://hostname.local in the browser, where hostname value (of the AMSS-1234 format) is printed on the bottom of the AWS DeepRacer vehicle. )


호스트 이름을 사용하여 차량의 장치 콘솔에 연결할 때, 브라우저에 https : //hostname.local을 입력하십시오. 여기서 호스트 이름 값 (AMSS-1234 형식)이 AWS DeepRacer 차량 하단에 인쇄됩니다. )


How to Connect to Vehicle's Device Console Using its IP Address?

IP 주소를 사용하여 차량의 장치 콘솔에 연결하는 방법?


To connect to the device console using IP address as shown in the device-status.txt file (found on the USB drive), make sure the following conditions are met.


USB 드라이브에있는 device-status.txt 파일에 표시된대로 IP 주소를 사용하여 장치 콘솔에 연결하려면 다음 조건이 충족되는지 확인하십시오.


  • Check your laptop or mobile devices are in the same network as the AWS DeepRacer vehicle.
    랩톱 또는 모바일 장치가 AWS DeepRacer 차량과 동일한 네트워크에 있는지 확인하십시오.

  • Check if you have connected to any VPN, if so, disconnect first.
    VPN에 연결했는지 확인하십시오. 그렇다면 먼저 연결을 끊으십시오.

  • Try a different Wi-Fi network. For example, turn on personal hotspot on your phone.
    다른 Wi-Fi 네트워크를 사용해보십시오. 예를 들어 휴대 전화에서 개인 핫 스폿을 켭니다.


Document History for AWS DeepRacer Developer Guide

  • API version: latest

  • Latest documentation update: November 28, 2018

ChangeDescriptionDate
AWS DeepRacer Developer GuideInitial release of the documentation to help the AWS DeepRacer user to learn reinforcement learning and explore its applications for autonomous racing, using the AWS DeepRacer console, the AWS RoboMaker simulator, and a AWS DeepRacer scale model vehicle.November 28, 2018


AWS Glossary

Numbers and Symbols | A | B | C | D | E | F | G | H | I | J | K | L | M | N | O | P | Q | R | S | T | U | V | W | X, Y, Z


반응형

Drive Your Vehicle

2019. 1. 1. 01:19 | Posted by 솔웅


반응형

Drive Your AWS DeepRacer Vehicle


After you have finished training and evaluating a AWS DeepRacer model in the AWS DeepRacer simulator, you can deploy the trained model to your AWS DeepRacer vehicle, set the vehicle to drive itself based on the trained model, and evaluate the performance in a physical environment to mimic a real-world autonomous racing experience.


AWS DeepRacer 시뮬레이터에서 AWS DeepRacer 모델을 교육하고 평가를 마친 후에는 숙련 된 모델을 AWS DeepRacer 차량에 배치하고 훈련 된 모델을 기반으로 차량을 운전하도록 설정하고 실제 환경에서의 성능을 평가할 수 있습니다. 실제 자율 경주 경험을 모방합니다.


To drive your vehicle for the first time, you must set up the vehicle, install any software updates and calibrate its drive-chain system. Before doing that, let's get an inspection of the vehicle.


차량을 처음 운전하려면 차량을 설치하고 소프트웨어 업데이트를 설치하고 드라이브 체인 시스템을 보정해야합니다. 그렇게하기 전에 차량 점검을 시작하십시오.


Inspect Your AWS DeepRacer Vehicle


The first AWS DeepRacer vehicle available is the AWS DeepRacer car. It is a Wi-Fi-enabled and battery-powered 1/18 scale model car with a camera mounted on the front and a compute module on the chassis. The scale model car, also known as the scale car, is capable of driving itself by running inference in the compute module, based on a deployed reinforcement learning model. Without deploying any reinforcement learning model, you can drive the manually.


첫 번째 AWS DeepRacer 용으로 사용할 수 있는 것은  AWS DeepRacer car입니다. Wi-Fi가 가능하고 배터리 구동 방식의 1/18 스케일 모델 차량으로 전면에 카메라가 장착되고 섀시의 컴퓨팅 모듈이 장착되어 있습니다. 스케일 자동차라고도 불리는 스케일 모델 자동차는 배치 된 reinforcement learning 모델을 기반으로 컴퓨팅 모듈에서 추론을 실행하여 스스로를 운전할 수 있습니다. reinforcement learning 모델을 배치하지 않고 수동으로 운전할 수도 있습니다.


Specification of AWS DeepRacer Car

Your AWS DeepRacer vehicle consists of the following modules and accessories:


AWS DeepRacer 차량은 다음 모듈 및 액세서리로 구성됩니다.


Module Comments
Chassis (1) Including the camera (1a) and the compute module (1b).
Compute module (1b) To run inference on a trained AWS DeepRacer model for autonomous driving.
Camera (1a) To interact with the vehicle's environment. Images captured by the camera can be streamed into the streaming video player on the vehicle's device console
Compute module battery (2) To power the compute module to run inference on a downloaded AWS DeepRacer model.
Compute module-battery connector cable (3) USB C-to-USB C cable to connect the compute module (1b) with the battery (2).
Compute module power cord (4) To charge the compute module and the compute module battery.
Compute module power adapter (5) To charge the compute module and the compute module battery.
Pins (6) Including the spare ones (in black), to fasten parts to the chassis.
Cover (7) To be removed when setting up the vehicle.
Drive module power charger (8) To charge the drive module battery.
Drive module power adapter (9) To charge the drive module battery.
Drive module battery (10) To power the vehicle drive module.
USB-to-μUSB cable (11) To support USB-OTG functionality.


To get your AWS DeepRacer vehicle running, make sure that you have following items ready:


AWS DeepRacer 차량이 작동하게하려면 다음 품목이 준비되어 있어야합니다.


  • A computer with a USB port and access to the internet.

  • A USB flash drive.

  • A Wi-Fi network.

  • An AWS account.


Set Up Your AWS DeepRacer Vehicle


To set up your AWS DeepRacer, go to https://aws.amazon.com/startyourengines and follow the on-screen instructions to prep the vehicle. The preparation includes


AWS DeepRacer를 설정하려면 https://aws.amazon.com/startyourengines로 이동 한 다음 화면의 지시에 따라 차량을 준비하십시오. 준비 내용은 다음과 같습니다.


  • Assemble the vehicle.

  • Configure the Wi-Fi connection of the vehicle.

  • Get the IP address of the vehicle's device console.

  • Update your vehicle's software, if a newer version is available.

  • Test signing in to the vehicle's device console.


After the preparation, you can proceed with testing drive your vehicle. For the instructions, see Drive Your AWS DeepRacer Vehicle.


준비가 끝나면 차량 운전 시험을 계속할 수 있습니다. 자세한 지침은 AWS DeepRacer 차량 운전을 참조하십시오.


Before going for a ride, you may want to calibrate your AWS DeepRacer vehicle to align the wheels, to set maximum steering, and to limit maximum throttle. For instructions, see Calibrate Your AWS DeepRacer Vehicle.


주행하기 전에 바퀴를 정렬하고 최대 조향을 설정하고 최대 스로틀을 제한하기 위해 AWS DeepRacer 차량을 보정해야 할 수 있습니다. 자세한 내용은 AWS DeepRacer 차량 보정을 참조하십시오.


Calibrate Your AWS DeepRacer Vehicle


Either before or after test driving your vehicle, you may want to calibrate the vehicle. To do so, follow the steps below:


차량 운전 시험 전후에 차량 보정을 원할 수 있습니다. 그렇게하려면 다음 단계를 따르십시오.


To calibrate your AWS DeepRacer vehicle:

  1. Open the device console of your vehicle at https://{your_vehicle_device_console_ip_address}.

  2. Open the Calibration page.

  3. Calibrate the vehicle's controls, including the maximum throttle.

  4. On the Calibration page, choose Edit in Steering and then follow the steps below to calibrate the vehicle's steering:
    보정 페이지에서 스티어링에서 편집을 선택한 다음 아래 단계에 따라 차량의 조향 보정을 조정하십시오.

    1. Raise the vehicle so that the wheels are free to rotate. Choose Next.
      바퀴가 자유롭게 회전 할 수 있도록 차량을 들어 올리십시오. 다음을 선택하십시오.

    2. Under Calibrate center on the device console, gradually move the slider to the position where the vehicles wheels become aligned in parallel. Set a number (e.g., 0) to record the position as the centering position. Choose Next.
      장치 콘솔의 조정 센터에서 차량 휠이 평행하게 정렬되는 위치로 슬라이더를 점차 이동하십시오. 위치를 중심 위치로 기록하는 숫자 (예 : 0)를 설정하십시오. 다음을 선택하십시오.

    3. Under Calibrate left steering on the device console, gradually move the slider to the left until the vehicle front wheels stops turning left. Set a number (e.g., -25) to record the position as the left maximum steering. Choose Next.
      장치 콘솔의 왼쪽 조정 조정에서 차량 앞 바퀴가 왼쪽으로 돌아갈 때까지 슬라이더를 점차 왼쪽으로 움직입니다. 왼쪽 최대 조정으로 위치를 기록하려면 숫자 (예 : -25)를 설정하십시오. 다음을 선택하십시오.

    4. Under Calibrate right steering on the device console, gradually move the slider to the right until the vehicles front wheels stop turning right. Set a number (e.g., 25) to record the position as the right maximum steering. Choose Done.
      장치 콘솔에서 오른쪽 조타 보정 아래에서 차량 앞 바퀴가 오른쪽으로 회전하는 것을 멈출 때까지 슬라이더를 점차 오른쪽으로 움직입니다. 오른쪽 최대 조정으로 위치를 기록하는 숫자 (예 : 25)를 설정합니다. 완료를 선택하십시오.   

  5. On the Calibration page, choose Edit for Throttle and then follow the steps below to calibrate the vehicle's throttle:
    보정 페이지에서 스로틀에 맞게 편집을 선택한 다음 아래 단계에 따라 차량의 스로틀을 보정하십시오.

    1. Raise the vehicle so that the wheels are free to turn. Choose Next on the device console.
      바퀴가 자유롭게 회전 할 수 있도록 차량을 들어 올리십시오. 장치 콘솔에서 다음을 선택하십시오.

    2. Under Calibrate stopped throttle on the device console, gradually move the slider to a position where the vehicles wheels stops turning. Set the number 0) to record the position as the stopped throttle. Choose Next.
      장치 콘솔에서 정지 된 스로틀 보정에서 점차적으로 슬라이더를 차량 바퀴가 돌지 않는 위치로 이동하십시오. 번호 0을 설정하십시오.) 정지 된 스로틀로 위치를 기록하십시오. 다음을 선택하십시오.

    3. Under Calibrate forward throttle on the device console, gradually move the slider to a position until the vehicle wheels reaches their forward maximum speed. Set a number between 1 and 100 (e.g., 50) to record the position as the forward maximum speed. Choose Next.
      장치 콘솔에서 정방향 스로틀 조정에서 차량 바퀴가 최대 속도에 도달 할 때까지 슬라이더를 점차적으로 움직이십시오. 최대 속도로 위치를 기록하려면 1에서 100 사이의 숫자 (예 : 50)를 설정하십시오. 다음을 선택하십시오.

    4. Under Calibrate backward throttle on the device console, gradually move the slider to a position until the vehicles wheels reach their backward maximum speed. Set a number between -100 and -1 (e.g., -50) to record the position as the backward maximum speed. Choose Done.
      장치 콘솔에서 역방향 스로틀 보정에서 차량 바퀴가 후진 최대 속도에 도달 할 때까지 슬라이더를 점차적으로 위치로 이동합니다. -100에서 -1 사이의 숫자 (예 : -50)를 설정하여 역방향 최대 속도로 위치를 기록합니다. 완료를 선택하십시오.


Build Your AWS DeepRacer Track


To build your own track to race your AWS DeepRacer vehicle and to achieve the best results, pay attention to the following factors.


AWS DeepRacer 차량 경주를위한 자신의 트랙을 만들고 최상의 결과를 얻으려면 다음 요소에주의하십시오.


  • Build your track to replicate the environment used in training. This is because models trained to follow track based on the road markings can exhibit different behaviors than models trained to follow the track based on other conditions or features.
    트랙을 제작하여 교육에 사용 된 환경을 복제하십시오. 도로 표식을 기반으로 추적하는 모델은 다른 조건이나 기능을 기반으로 추적 된 모델과 다른 행동을 나타낼 수 있기 때문입니다.

  • Lay out your track using the same shape as the shape of the training track. For example, if you have uploaded to your vehicle a model trained on the Re:invent 2018 track, your track shape should look like this:
    트레이닝 트랙의 모양과 같은 모양을 사용하여 트랙을 배치하십시오. 예를 들어 Re : invent 2018 트랙에서 훈련 된 모델을 차량에 업로드 한 경우 트랙 모양은 다음과 같아야합니다.


  • Restrict the curb-side (turning) radius to the following limits:
    커브 쪽 (선회) 반지름을 다음 제한값으로 제한하십시오.

    • At least 45 inches for corners smaller than or equal to 90 degrees
      모서리가 90도 이하인 경우 최소 45 인치

    • At least 55 inches for corners greater than 90 degrees.
      모서리가 90도 이상인 경우 최소 55 인치.

  • Construct the track to have a smooth and uniform color surface of at least 30 inches wide and with minimal resistance.
    최소한 30 인치 너비의 부드럽고 균일 한 색 표면과 최소한의 저항을 지니도록 트랙을 만듭니다.

  • Mark the track along the both sides with clear, unbroken and uniform-colored lines of 2-inch wide. The color of the markings should be of high contrast with respect to the track surface and barriers. Duct tapes have shown to be effective in some experiments.
    2 인치 너비의 명확하고 깨지지 않고 균일 한 색상의 선으로 양쪽면을 따라 트랙을 표시하십시오. 표시의 색은 궤도면과 장벽에 대해 높은 콘트라스트 여야합니다. 덕트 테이프는 일부 실험에서 효과가있는 것으로 나타났습니다.

  • Paint the off-track surface a color of sufficient contrast with respect to the on-track surface color.
    트랙 표면의 색상과 대비하여 오프 트랙 표면에 충분한 대비 색상을 칠합니다.

  • For safety reasons, encircle the track with uniform-colored barriers of at least 2.5 feet tall and at 2 feet away from the track at all points along the track.
    안전상의 이유로, 트랙을 따라 모든 지점에서 최소 2.5 피트, 트랙에서 2 피트 떨어진 균일 한 색상의 장벽을 사용하여 트랙을 둘러싸십시오.

The following example track represents a scaled version of the track used at re:Invent 2018.


다음 예제 트랙은 Invent 2018에서 사용 된 트랙의 스케일 버전을 나타냅니다.


Drive Your AWS DeepRacer Vehicle


After setting up your AWS DeepRacer vehicle, you can start to drive your vehicle manually or let it drive autonomously, using the vehicle's device console.


AWS DeepRacer 차량을 설치 한 후에는 차량의 장치 콘솔을 사용하여 수동으로 차량을 주행하거나 자율 주행 할 수 있습니다.


For autonomous driving, you must have trained an AWS DeepRacer model and have the trained model artifacts deployed to the vehicle. In the autonomous racing mode, the model running in the inference engine controls the vehicle's driving directions and speed. Without a trained model downloaded to the vehicle, you can use the vehicle's device console to drive the vehicle manually.


자율 주행을 위해서는 AWS DeepRacer 모델을 교육하고 숙련 된 모델 아티팩트를 차량에 배치해야합니다. 자율 레이싱 모드에서는 추론 엔진에서 실행되는 모델이 차량의 주행 방향과 속도를 제어합니다. 훈련 된 모델을 차량에 다운로드하지 않으면 차량의 장치 콘솔을 사용하여 차량을 수동으로 운전할 수 있습니다.


Drive Your AWS DeepRacer Vehicle Manually

If you have not trained any model or have not deployed any trained model to your AWS DeepRacer vehicle, you can't let it drive itself. But you can drive it manually.

To drive a AWS DeepRacer vehicle manually, follow the steps below.


모델을 교육하지 않았거나 숙련 된 모델을 AWS DeepRacer 차량에 배치하지 않은 경우 자체 모델을 운전하게 할 수 없습니다. 그러나 수동으로 운전할 수 있습니다.


To drive your AWS DeepRacer vehicle manually


AWS DeepRacer 차량을 수동으로 주행하려면 다음 단계를 따르십시오.


  1. If you have not already done so, sign in to your vehicle device console, using your computer, tablet or mobile phone. For more information, see Set Up Your AWS DeepRacer Vehicle .
    아직하지 않았다면 컴퓨터, 태블릿 또는 휴대 전화를 사용하여 차량용 장치 콘솔에 로그인하십시오. 자세한 내용은 AWS DeepRacer 차량 설정을 참조하십시오.

  2. On the vehicle's streaming video player on the device console, click, tap or touch a position within the displayed track to drive the vehicle. The track image displayed on the video player is from the vehicle's camera.
    기기 콘솔의 차량 스트리밍 비디오 플레이어에서 표시된 트랙 내의 위치를 클릭하거나 탭하거나 터치하여 차량을 운전하십시오. 비디오 플레이어에 표시된 트랙 이미지는 차량의 카메라에서 가져온 것입니다.

  3. Repeat Step 2 to continue driving the vehicle along the track.
    2 단계를 반복하여 트랙을 따라 차량 주행을 계속하십시오.


Drive Your AWS DeepRacer Vehicle Autonomously


To drive your AWS DeepRacer vehicle autonomously


AWS DeepRacer 차량을 자율적으로 운전하려면


  1. Make sure that you have a trained AWS DeepRacer model ready. If not, follow this quick-start instruction to train your model.
    숙련 된 AWS DeepRacer 모델을 준비하십시오. 그렇지 않은 경우이 빠른 시작 지침에 따라 모델을 교육하십시오.

  2. On the AWS DeepRacer console, choose a finished training job and then download the chosen model artifacts.
    AWS DeepRacer 콘솔에서 완료된 교육 작업을 선택한 다음 선택한 모델 아티팩트를 다운로드합니다.

  3. Connect your AWS DeepRacer vehicle to your computer via the USB cable and then copy the downloaded model artifacts to the Model folder on the USB drive.
    AWS DeepRacer 차량을 USB 케이블을 통해 컴퓨터에 연결 한 다음 다운로드 한 모델 아티팩트를 USB 드라이브의 Model 폴더에 복사하십시오.

  4. Follow the vehicle setup instructions to sign in to the vehicle's device console, and then do the following for autonomous driving:
    차량 설치 지침에 따라 차량의 장치 콘솔에 로그인 한 다음 자율 주행을 위해 다음을 수행하십시오.

    1. Choose the autonomous racing mode.
      자율 레이싱 모드를 선택하십시오.

    2. Choose a model from the list of the models downloaded in the previous step (Step 3). This will start loading the model into the inference engine and the process takes about 10 seconds to complete.
       이전 단계 (3 단계)에서 다운로드 한 모델 목록에서 모델을 선택하십시오. 이렇게하면 모델을 추론 엔진에로드하기 시작하고 프로세스 완료까지 약 10 초가 소요됩니다.

    3. Place your vehicle on the track, tap the Start Driving button to set the vehicle to drive itself.
      트랙에 차량을 놓고 Start Driving (운전 시작) 버튼을 탭하면 차량이 주행하도록 설정할 수 있습니다.

    4. Watch the vehicle drive on the physical track or the projected track on the device console.
      물리적 인 트랙이나 장치 콘솔의 투영 된 트랙에서 차량 드라이브를보십시오.

    5. After the vehicle stops (you may need to manually stop it), you can repeat from Step 4.2 to choose a different model for another drive.
      차량이 정지 한 후 (수동으로 정지해야 할 수도 있음), 4.2 단계를 반복하여 다른 드라이브의 다른 모델을 선택할 수 있습니다.


Restore Your AWS DeepRacer Vehicle to Factory Settings


At some point of time after trying out your AWS DeepRacer vehicle, you may want to reset the device to its factory settings and start afresh. The discussions presented below explains how to restore your AWS DeepRacer vehicle to factory settings.


AWS DeepRacer 차량을 사용해 본 후 어느 시점에서 장치를 공장 출하 상태로 재설정하고 다시 시작할 수 있습니다. 아래에 제시된 토론에서는 AWS DeepRacer 차량을 공장 설정으로 복원하는 방법에 대해 설명합니다.


Prepare for Factory Reset to Your AWS DeepRacer Vehicle


To prepare for the factory reset, you'll perform the following tasks:


초기화를 위해 다음 작업을 수행합니다.


  • Format the USB drive into the following two partitions:

    • FAT32 of 2GB

    • NTFS of at least 16GB

  • Make the USB drive bootable to start the factory reset on reboot:

    • Burn the required custom Ubuntu ISO image to the FAT32 partition to make the USB drive bootable.

    • Copy the required factory restore files to the NTFS partition of the USB drive.

Depending on the computer you use, specific tasks may differ from one operating system to another. To illustrate, we present the step-by-step instructions to prepare the USB drive using a computer running Ubuntu (e.g., the computer module of the AWS DeepRacer vehicle) and a computer running Windows.


사용하는 컴퓨터에 따라 특정 작업이 운영 체제마다 다를 수 있습니다. 예를 들어 Ubuntu를 실행하는 컴퓨터 (예 : AWS DeepRacer 차량의 컴퓨터 모듈)와 Windows를 실행하는 컴퓨터를 사용하여 USB 드라이브를 준비하는 단계별 지침을 제공합니다.


The instructions for using other Linux/Unix computers are similar to the Ubuntu instructions discussed below. You just need to replace the apt-get commands with the corresponding commands supported by the other Linux/Unix system of your choosing.


다른 Linux / Unix 컴퓨터 사용법은 아래에서 설명하는 Ubuntu 지침과 비슷합니다. apt-get 명령을 다른 Linux / Unix 시스템에서 지원하는 해당 명령으로 바꾸면됩니다.


Before starting to prepare for the factory reset, make sure you have the following items ready:


공장 초기화 준비를 시작하기 전에 다음 품목을 준비했는지 확인하십시오.


  • One USB flash drive of at least 32GB capacity.
    최소 32GB 용량의 USB 플래시 드라이브 1 개.

  • Your AWS DeepRacer vehicle to restore the factory settings to.
    공장 설정을 복원 할 AWS DeepRacer 차량.

  • A computer, when not using your AWS DeepRacer vehicle's compute module, to partition the USB drive and to make it bootable.
    컴퓨터가 AWS DeepRacer 차량의 컴퓨팅 모듈을 사용하지 않을 때 USB 드라이브를 분할하여 부팅 가능하게 만듭니다.


Partition and Make Bootable the USB Drive Using A Ubuntu Computer


In the following, we'll use the AWS DeepRacer vehicle computer module as a Ubuntu computer. The same instructions apply to a Linux computer running Ubuntu. The instructions on other flavors of Linux/Unix operating systems are similar. You just need to replace the apt-get * commands with their corresponding commands supported by the other Linux/Unix system of your choosing.


다음에서는 AWS DeepRacer 차량용 컴퓨터 모듈을 Ubuntu 컴퓨터로 사용하겠습니다. 동일한 지침이 Ubuntu를 실행하는 Linux 컴퓨터에도 적용됩니다. Linux / Unix 운영 체제의 다른 기능에 대한 지침도 비슷합니다. apt-get * 명령을 다른 Linux / Unix 시스템에서 지원하는 해당 명령으로 바꾸면됩니다.


To partition the USB drive and make it bootable


USB 드라이브를 파티션하고 부팅 가능하게하려면


1. To format the USB drive running Ubuntu commands on the AWS DeepRacer vehicle or a computer running Ubuntu:


Ubuntu 명령을 실행하는 USB 드라이브를 AWS DeepRacer 차량 또는 Ubuntu를 실행하는 컴퓨터에서 포맷하려면 다음을 수행하십시오.


a. On AWS DeepRacer vehicle compute module, run the following commands to install and launch GParted.


AWS DeepRacer 차량 계산 모듈에서 다음 명령을 실행하여 GParted를 설치하고 시작합니다.   


sudo apt-get update; sudo apt-get install gparted
sudo gparted


b. On the newly created GParted console, choose /dev/sda in the drop-down menu on the top-right corner and then delete all existing partitions.


새로 생성 된 GParted 콘솔의 오른쪽 상단 모서리에있는 드롭 다운 메뉴에서 / dev / sda를 선택한 다음 기존 파티션을 모두 삭제하십시오.


If the partitions are locked, right click to choose unmount.


파티션이 잠겨 있으면 마우스 오른쪽 버튼을 클릭하여 마운트 해제를 선택하십시오.


c. To create the FAT32 partition of 2GB capacity, choose the file icon on the top-left, set the parameters similar to the following., and then choose Add.


2GB 용량의 FAT32 파티션을 만들려면 왼쪽 상단의 파일 아이콘을 선택하고 다음과 유사한 매개 변수를 설정 한 다음 추가를 선택하십시오.


d. To create the NTFS partition of at least 16GB capacity, choose the file icon again, set the parameters similar to the following, and choose Add.


최소 16GB 용량의 NTFS 파티션을 만들려면 파일 아이콘을 다시 선택하고 다음과 유사한 매개 변수를 설정 한 다음 추가를 선택하십시오.


e. To apply the changes, choose the green tick.


변경 사항을 적용하려면 녹색 눈금을 선택하십시오.


2. To make the USB drive bootable from the FAT32 partition, follow the steps below:
FAT32 파티션에서 USB 드라이브를 부팅 가능하게 만들려면 다음 단계를 따르십시오.

  1. Download the customized Ubuntu ISO image.
    사용자 정의 된 Ubuntu ISO 이미지를 다운로드하십시오.

  2. To make the formatted USB drive bootable using UNetbootin on your AWS DeepRacer device, do the following:
    AWS DeepRacer 장치에서 UNetbootin을 사용하여 포맷 된 USB 드라이브를 부팅 가능하게 만들려면 다음을 수행하십시오.

    1. On your AWS DeepRacer compute module, run the following command to install and launch UNetbootin.
      AWS DeepRacer 컴퓨팅 모듈에서 다음 명령을 실행하여 UNetbootin을 설치하고 실행하십시오.   

sudo apt-get update; sudo apt-get install unetbootin
sudo unetbootin


On the UNetbootin window, do the following:

  1. Check the Disimage radio button.

  2. For the disk image, choose ISO from the drop-down menu.

  3. Open the file picker to choose the downloaded Ubuntu ISO file.

  4. For Type, choose USB Drive.

  5. For Drive, choose /dev/sda1.

  6. Choose OK.

Note

The customized Ubuntu image may be more recent than what's shown here. If so, use the most recent version of the Ubuntu image


사용자 정의 된 우분투 이미지는 여기에 표시된 것보다 더 최근의 것일 수 있습니다. 그렇다면 최신 버전의 Ubuntu 이미지를 사용하십시오.


If you get a /dev/sda1 not mounted alert message, choose OK to close the message, unplug the USB drive, replug the drive, and then follow the steps above create the Ubuntu ISO image


/ dev / sda1 not mounted 경고 메시지가 표시되면 OK를 선택하여 메시지를 닫고 USB 드라이브를 분리 한 다음 드라이브를 다시 연결하고 위의 단계를 수행하여 Ubuntu ISO 이미지를 만듭니다.


  1. To copy the factory restore files to the NTFS partition of the USB drive, follow the steps below:
    팩토리 복원 파일을 USB 드라이브의 NTFS 파티션에 복사하려면 다음 단계를 수행하십시오.

    1. Download the compressed factory restore package (~3.5GB).

    2. Unzip the downloaded package, and

    3. Copy the following uncompressed files to the second (NTFS) partition of the USB drive:

      • Image files (~9GB):

        • image_dlrc_1109_18WW45.5-2.bin

        • image_dlrc_1109_18WW45.5-2.bin.md5

      • Script files:

        • usb_flash.sh

        • set_hostname.py

        • dlrc_key.py


Partition and Make Bootable the USB Drive Using a MacOS Computer


Follow the instructions below to use a MacOS computer to prepare the USB drive for factory reset.


아래 지침에 따라 MacOS 컴퓨터를 사용하여 USB 드라이브를 공장 출하 상태로 초기화하십시오.


To partition the USB drive and make it bootable using a MacOS computer


USB 드라이브를 파티션하고 MacOS 컴퓨터를 사용하여 부팅 가능하게하려면


To format the USB drive, follow the steps below:


USB 드라이브를 포맷하려면 다음 단계를 따르십시오.


  1. Plug in the USB drive to your MacOS computer.

  2. Press command + space to open the search tool bar and then type Disk Utility.

    Alternatively, you can choose Finder->Applications->Utilties->Disk Utility to open the Disk Utility.

  3. Choose Generic Flash Disk on the left pane of Disk Utility. Then choose Erase on the top.


d. On the Erase "Generic Flash Disk Media"? page, choose Mac OS Extended (Journaled) for Format, choose GUID Partition Map for Scheme, and then choose Erase.


"일반 플래시 디스크 미디어"지우기? 페이지에서 Format의 Mac OS Extended (Journaled)를 선택하고 Scheme의 GUID Partition Map을 선택한 다음 Erase를 선택하십시오.


e. On the Disk Utility console, choose Partition from the menu on the top and then choose the + button on the Partition device … pop-up.


디스크 유틸리티 콘솔의 상단 메뉴에서 파티션을 선택한 다음 파티션 장치 ... 팝업에서 + 버튼을 선택하십시오.


f. To create the FAT32 partition of 2GB capacity, under Partition Information type Boot (or another name of your choosing) for Name, choose MS-DOS (FAT) for Format, set Size to 2 GB. (Do not choose Apply yet.)


2GB 용량의 FAT32 파티션을 만들려면 파티션 정보 유형에서 Boot (또는 선택한 다른 이름)에서 Name을 선택하고 Format에 MS-DOS (FAT)를 선택하고 Size를 2GB로 설정하십시오. 아직 적용을 선택하지 마십시오.


g. To create the partition for the updated AWS DeepRacer image, click or tap a point in the other (Untitled) partition, under Partition Information type Flash (or another name of your choosing) for Name, choose ExFat for Format, leave the remaining capacity (in GB) of the USB drive in Size. And then choose Apply.


업데이트 된 AWS DeepRacer 이미지의 파티션을 만들려면 다른 (제목 없음) 파티션의 한 지점을 클릭하거나, 파티션 정보 유형 Flash (또는 선택한 다른 이름)에서 Name을 클릭하고 ExFat for Format을 선택한 다음 남은 용량을 남겨 둡니다 GB 단위)의 USB 드라이브를 크기에 맞 춥니 다. 그런 다음 적용을 선택하십시오.


h. On the ensuing pop-up window, choose Partition to confirm creation of the specified new partitions.


계속되는 팝업 창에서 파티션을 선택하여 지정된 새 파티션 작성을 확인하십시오.


i. On the Disk Utility console, choose the BOOT partition on the left pane and then choose Info from the menu on the top. Make note of the BSD device node value. In this tutorial, the value is dsa1. You will need to supply this path when making the USB drive bootable from the FAT32 partition.


디스크 유틸리티 콘솔의 왼쪽 창에서 BOOT 파티션을 선택한 다음 맨 위에있는 메뉴에서 정보를 선택하십시오. BSD 장치 노드 값을 적어 두십시오. 이 자습서에서 값은 dsa1입니다. USB 드라이브를 FAT32 파티션에서 부팅 가능하게 만들 때이 경로를 제공해야합니다.


2. To make the USB drive bootable from the FAT32 partition, follow the steps below:
FAT32 파티션에서 USB 드라이브를 부팅 가능하게 만들려면 다음 단계를 따르십시오.

  1. Download the customized Ubuntu image.

  2. Go to https://unetbootin.github.io/ to download the UNetbootin software. Then start the UNetbootin console.

  3. On the UNetbootin console, do the following:

    1. Check the Disimage radio button.

    2. For the disk image, choose ISO from the drop-down menu.

    3. Open the file picker to choose the downloaded Ubuntu ISO file.

    4. For Type, choose USB Drive.

    5. For Drive, choose /dev/sda1.

    6. Choose OK.


Note


The customized Ubuntu image may be more recent than what's shown here. If so, use the most recent version of the Ubuntu image.


사용자 정의 된 우분투 이미지는 여기에 표시된 것보다 더 최근의 것일 수 있습니다. 그렇다면 최신 버전의 Ubuntu 이미지를 사용하십시오.


If you get a /dev/sda1 not mounted alert message, choose OK to close the message, unplug the USB drive, replug the drive, and then follow the steps above create the Ubuntu ISO image.


 / dev / sda1 not mounted 경고 메시지가 표시되면 OK를 선택하여 메시지를 닫고 USB 드라이브를 분리 한 다음 드라이브를 다시 연결하고 위의 단계를 수행하여 Ubuntu ISO 이미지를 만듭니다.


3. To copy the factory restore files to the NTFS partition of the USB drive, follow the steps below:


팩토리 복원 파일을 USB 드라이브의 NTFS 파티션에 복사하려면 다음 단계를 수행하십시오.

    1. Download the compressed factory restore package (~3.5GB).

    2. Unzip the downloaded package.

    3. Copy the following uncompressed files to the second (NTFS) partition of the USB drive:

      • Image files (~9GB):

        • image_dlrc_1109_18WW45.5-2.bin

        • image_dlrc_1109_18WW45.5-2.bin.md5

      • Script files:

        • usb_flash.sh

        • set_hostname.py

        • dlrc_key.py


Partition and Make Bootable the USB Drive Using a Windows Computer


Follow the instructions below to use a Windows computer to prepare the USB drive for factory reset.


아래의 지침에 따라 Windows 컴퓨터를 사용하여 USB 드라이브를 출고시 초기화하도록 준비하십시오.


To partition the USB drive and make it bootable using a Windows computer


Windows 컴퓨터를 사용하여 USB 드라이브를 파티션하고 부팅 가능하게하려면


1. To format the USB drive, follow the steps below:


USB 드라이브를 포맷하려면 다음 단계를 따르십시오.


a. Open the Windows command prompt, type diskmgmt.msc, and choose OK to launch the Windows Disk Management Console.


Windows 명령 프롬프트를 열고 diskmgmt.msc를 입력 한 다음 확인을 선택하여 Windows 디스크 관리 콘솔을 시작합니다.   


b. From the Disk Management console, choose the USB drive, for example, Disk 1 Removable (D:) below, delete all the partitions, and make the drive unallocated.


디스크 관리 콘솔에서 USB 드라이브 (예 : 아래의 디스크 1 이동식 (D :))를 선택하고 모든 파티션을 삭제 한 다음 드라이브 할당을 해제하십시오.


c. To create the FAT32 partition of 2GB capacity, right click the USB drive on the Disk Management console and choose New Simple Volume from the context menu.


2GB 용량의 FAT32 파티션을 만들려면 디스크 관리 콘솔에서 USB 드라이브를 마우스 오른쪽 단추로 클릭하고 컨텍스트 메뉴에서 새 단순 볼륨을 선택하십시오.


d. On the New Simple Volume Wizard, choose 2048 for Simple volume size in MB and then choose Next.


새 단순 볼륨 마법사에서 2048을 단순 볼륨 크기 (MB)로 선택한 다음 다음을 선택하십시오.


e. On the New Simple Volume Wizard page and under Format Partition, choose the Format this volume with the following settings. Then, choose FAT32 for File system, Default for Allocation unit size and any label (e.g., BOOT) for Volume label. Finally, choose Next to create the FAT32 partition.


새 단순 볼륨 마법사 페이지에서 파티션 포맷 아래에서 다음 설정으로이 볼륨 포맷을 선택하십시오. 그런 다음 파일 시스템에 대해 FAT32, 할당 단위 크기에 대해 기본값 및 볼륨 레이블에 대해 모든 레이블 (예 : BOOT)을 선택하십시오. 마지막으로 Next를 선택하여 FAT32 파티션을 만듭니다.


f. To create the NTFS partition of the remaining disk capacity, right click the USB drive on the Disk Management console and choose New Simple Volume from the context menu. Then, choose the Format this volume with the following settings option. Then choose NTFS for File system, Default for Allocation unit size, and a label (e.g, Flask) for Volume label. Finally, choose Next to start creating the NTFS partition.


디스크 용량의 NTFS 파티션을 만들려면 디스크 관리 콘솔에서 USB 드라이브를 마우스 오른쪽 단추로 클릭하고 컨텍스트 메뉴에서 새 단순 볼륨을 선택하십시오. 그런 다음이 볼륨을 다음 설정으로 포맷 옵션을 선택하십시오. 그런 다음 파일 시스템에 NTFS, 할당 단위 크기에 대해 기본값, 볼륨 레이블에 레이블 (예 : 플라스크)을 선택하십시오. 마지막으로 Next를 선택하여 NTFS 파티션 생성을 시작하십시오.


2. To make the USB drive bootable from the FAT32 partition, follow the steps below:


FAT32 파티션에서 USB 드라이브를 부팅 가능하게 만들려면 다음 단계를 따르십시오.

  1. Download the customized Ubuntu image.

  2. Go to https://unetbootin.github.io/ to download the UNetbootin software. Then start the UNetbootin console.

  3. On the UNetbootin console, do the following:

    1. Check the Disimage radio button.

    2. For the disk image, choose ISO from the drop-down menu.

    3. Open the file picker to choose the downloaded Ubuntu ISO file.

    4. For Type, choose USB Drive.

    5. For Drive, choose /dev/sda1.

    6. Choose OK.


Note


The customized Ubuntu image may be more recent than what's shown here. If so, use the most recent version of the Ubuntu image.


사용자 정의 된 우분투 이미지는 여기에 표시된 것보다 더 최근의 것일 수 있습니다. 그렇다면 최신 버전의 Ubuntu 이미지를 사용하십시오.


If you get a /dev/sda1 not mounted alert message, choose OK to close the message, unplug the USB drive, replug the drive, and then follow the steps above create the Ubuntu ISO image.


 / dev / sda1 not mounted 경고 메시지가 표시되면 OK를 선택하여 메시지를 닫고 USB 드라이브를 분리 한 다음 드라이브를 다시 연결하고 위의 단계를 수행하여 Ubuntu ISO 이미지를 만듭니다.


3. To copy the factory restore files to the NTFS partition of the USB drive, follow the steps below:


팩토리 복원 파일을 USB 드라이브의 NTFS 파티션에 복사하려면 다음 단계를 수행하십시오.

    1. Download the compressed factory restore package (~3.5GB).

    2. Unzip the downloaded package.

    3. Copy the following uncompressed files to the second (NTFS) partition of the USB drive:

      • Image files (~9GB):

        • image_dlrc_1109_18WW45.5-2.bin

        • image_dlrc_1109_18WW45.5-2.bin.md5

      • Script files:

        • usb_flash.sh

        • set_hostname.py

        • dlrc_key.py


Restore Your AWS DeepRacer Vehicle to Factory Settings


Follow the instructions below to restore your AWS DeepRacer vehicle to its factory settings. Make sure you have made proper preparations as described in Prepare for Factory Reset to Your AWS DeepRacer Vehicle.


아래 지침에 따라 AWS DeepRacer 차량을 공장 출하 상태로 복원하십시오. AWS DeepRacer 차량에 대한 공장 초기화 준비에 설명 된대로 적절한 준비를했는지 확인하십시오.


Note


After the factory reset, all data stored on your AWS DeepRacer vehicle will be erased.


초기화가 완료되면 AWS DeepRacer 차량에 저장된 모든 데이터가 지워집니다.


To restore your AWS DeepRacer vehicle to its factory settings


AWS DeepRacer 차량을 공장 출하 상태로 복원하려면


  1. Insert the prepared USB drive to your AWS DeepRacer compute module. Turn on the power and repeatedly press the ESC key to enter BIOS.
    준비된 USB 드라이브를 AWS DeepRacer 컴퓨팅 모듈에 삽입하십시오. 전원을 켜고 ESC 키를 반복해서 눌러 BIOS로 들어갑니다.

  2. From the BIOS window, choose Boot From File, then The option with USB in it, then EFI, then BOOT, and finally BOOTx64.EFI.
    BIOS 창에서 Boot from File을 선택한 다음 USB with The 옵션을 선택한 다음 EFI, BOOT 및 BOOTx64.EFI를 차례로 선택하십시오.

  3. After the compute module is booted, wait for the device reset to start automatically when the power LED indicator starts to flash and a terminal window is presented to display the progress. You don't provide any further user input at this stage.
    컴퓨팅 모듈이 부팅 된 후, 전원 LED 표시등이 깜박이기 시작하고 터미널 창이 표시되어 진행 상황을 표시 할 때 장치 재설정이 자동으로 시작될 때까지 기다립니다. 이 단계에서는 사용자 입력을 더 이상 제공하지 않습니다.

    If some error happens and the recovery fails, restart the procedure from Step 1. For detailed error messages, see the result.log file generated on the USB drive.
    일부 오류가 발생하여 복구가 실패하면 1 단계에서 절차를 다시 시작하십시오. 자세한 오류 메시지는 USB 드라이브에서 생성 된 result.log 파일을 참조하십시오.

  4. Wait for about 6 minutes for the power LED to stop flashing when the terminal closes automatically and the factory reset completes. The device then reboots itself automatically.
    단말기가 자동으로 닫히고 공장 초기화가 완료되면 전원 LED가 깜박임을 멈출 때까지 약 6 분간 기다리십시오. 그런 다음 장치가 자동으로 재부팅됩니다.

  5. After the device is restored to factory settings, disconnect the USB drive from the vehicle's compute module.
    장치가 공장 설정으로 복원 된 후 USB 드라이브를 차량의 컴퓨팅 모듈에서 분리하십시오.

After the factory reset, your AWS DeepRacer vehicle software is likely outdated. To update the vehicle software, go to the AWS DeepRacer device console and follow the instructions therein.


공장 초기화 후에는 AWS DeepRacer 차량 소프트웨어가 구식 일 수 있습니다. 차량 소프트웨어를 업데이트하려면 AWS DeepRacer 장치 콘솔로 이동하여 지침을 따르십시오.


반응형

Train and Evaluate Models

2018. 12. 31. 11:41 | Posted by 솔웅


반응형


Train and Evaluate AWS DeepRacer Models


In general, to train your reinforcement learning model, you describe all of the environment, including states, actions and reward to ensure it captures the problem you are trying to solve. The AWS DeepRacer service have defined the states and actions for you and gives you the option of defining the reward so that you can focus on learning about reinforcement learning.


일반적으로 reinforcement learning 모델을 훈련하려면 해결하려는 문제를 파악할 수 있도록 상태, actions 및 reward를 포함한 모든 환경을 묘사해야 합니다. AWS DeepRacer 서비스는 상태와 행동을 정의해 주고 여러분이 reinforcement learning에 대한 학습에 집중할 수 있도록 보상을 정의 할 수있는 옵션을 제공합니다.


For example, in autonomous racing, the agent can be a vehicle with sensors. A well-marked driving track can be the environment. A positive reward would be when the vehicle stays on the track and a negative reward would be when it's off the track.


예를 들어, 자율주행(경주)에서 에이전트는 센서가있는 차량이 될 수 있습니다. 잘 표시된 주행 경로가 환경이 될 수 있습니다. 긍정적 인 보상은 차량이 궤도에 머물러있을 때가되고 부정적인 보상은 궤도를 벗어 났을 때입니다.


Let's say that you're interested in having the vehicle drive without getting off a straight track. The reward function takes images as input from the sensors and produces a score after sorting out the current position. Speed and the position of any obstacles nearby might also be involved. A simple form of the reward function could be that the score is zero if the vehicle is on the track, -1 if it's off the track, and +1 if reaches the finish line. With this reward function, the vehicle gets penalized for going off the track and rewarded for reaching the destination.


직선 트랙에서 벗어나지 않는 차량 주행에 관심이 있다고 가정 해 봅시다. 보상 기능은 이미지를 센서에서 입력 받아 현재 위치를 파악 한 후 점수를 생성합니다. 주변 장애물의 위치와 속도가 관련 될 수 있습니다. 보상 기능의 간단한 형태는 차량이 트랙에 있으면 점수가 0이고, 트랙에서 벗어난 경우에는 -1이며, 결승선에 도달하면 +1이 될 수 있습니다. 이 보상 기능으로 차량은 트랙에서 벗어나면 패널티를 받고 목적지에 도착하면 보상을 받게됩니다.


Training the vehicle involves repeated episodes along the track from start to finish. In an episode the agent interacts with the track to take the optimal course of actions by maximizing the expected future reward. At the end, the training produces a reinforcement learning model. After the training, the agent can follow the model to infer the optimal choice of actions in any given state, when the model is evaluated or deployed to run on a physical agent, such as an AWS DeepRacer scale vehicle.


차량을 훈련시키는 것은 처음부터 끝까지 트랙을 따라 반복되는 에피소드를 포함합니다. 에피소드에서 에이전트는 트랙과 상호 작용하여 예상되는 미래 보상을 최대화하여 최적의 행동 과정을 취합니다. 결국 교육은 보강 학습 (reinforcement learning) 모델을 생성합니다. 교육을 마친 후에 에이전트는 AWS DeepRacer scale vehicle과 같은 물리적 에이전트에서 실행되도록 모델을 평가하거나 배치 할 때 주어진 상태에서 최적의 동작 선택을 추론하도록 모델을 추적 할 수 있습니다.


To train a reinforcement learning model in practice, you must choose a learning algorithm. For autonomous driving, the proximal policy optimization (PPO) algorithm is a suitable choice. You can then choose a deep-learning framework supporting the chosen algorithm, unless you want to write one from scratch. AWS DeepRacer integrates with Amazon SageMaker to make some popular deep-learning frameworks, such as TensorFlow, readily available in the AWS DeepRacer console. Using a framework simplifies configuring and executing training jobs and lets you focus on building and enhancing reward functions specific to your problems.


실제로 보강 학습 (reinforcement learning) 모델을 훈련 시키려면 학습 알고리즘을 선택해야합니다. 자율 주행의 경우 proximal policy optimization (PPO) 알고리즘이 적합한 선택입니다. 그런 다음 (scratch를 바탕으로 직접 코드를 작성하고 싶지 않으면) 선택된 알고리즘을 지원하기 위해 딥러닝 프레임워크를 선택할 수 있습니다.  AWS DeepRacer는 AWS DeepRacer 콘솔에서 쉽게 사용할 수있는 TensorFlow와 같은 인기있는 deep-learning frameworks,를 만들기 위해 Amazon SageMaker와 통합됩니다. 프레임 워크를 사용하면 교육 작업 구성 및 실행이 간단 해지고 문제에 특화된 보상 기능을 구축하고 강화할 수 있습니다.


Training a reinforcement learning model is an iterative process. First, it can be a challenge to define a reward function to cover all important behaviors of an agent in an environment all at once. Second, hyperparameters are often tuned to ensure satisfactory training performance. Both require experimentation. A prudent approach is to start with a simple reward function and then progressively enhance it. AWS DeepRacer facilitates this iterative process by enabling you to clone a trained model and then use it to jump-start the next round training. At each iteration you can introduce one or a few more sophisticated treatments to the reward function to handle previous ignored variables or you can systematically adjust hyperparameters until the result converges.


reinforcement learning 모델을 훈련하는 것은 반복적 인 과정입니다. 첫째, 한 번에 모든 환경에서 에이전트의 모든 중요한 동작을 다루는 보상 기능을 정의하는 것이 어려울 수 있습니다. 둘째, hyperparameters는 종종 만족스러운 교육 수행을 보장하기 위해 조정됩니다. 둘 다 실험이 필요합니다. 신중한 접근법은 간단한 보상 기능으로 시작한 다음 점진적으로 향상시키는 것입니다. AWS DeepRacer는 숙련 된 모델을 복제하여 다음 라운드 교육을 시작하기 위해 이 반복 프로세스를 용이하게합니다. 반복 할 때마다 보상 함수에 하나 이상의 정교한 처리 방법을 사용하여 이전의 무시 된 변수를 처리하거나 결과가 수렴 될 때까지 체계적으로 hyperparameters를 조정할 수 있습니다.


As with general practice in machine learning, you must evaluate a trained reinforcement learning model to ascertain its efficacy before deploying it to a physical agent for running inference in a real-world situation. For autonomous racing, the evaluation can be based on how often a vehicle stays on a given track from start to finish or how fast it can finish the course without getting off the track. The AWS DeepRacer simulation runs in the AWS RoboMaker simulator and lets you run the evaluation and post the performance metrics.


machine learning의 general practic 처럼 실제 상황에서 추론을 실행하기 위해 실제 에이전트에 적용하기 전에 훈련 된 reinforcement learning모델을 평가하여 효과를 확인해야합니다. 자율 경주(주행)의 경우, 평가는 차량이 처음부터 끝까지 주어진 트랙에 얼마나 자주 머물러 있는지 또는 트랙에서 벗어나지 않고 얼마나 빨리 코스를 마칠 수 있는지에 따라 결정됩니다. AWS DeepRacer 시뮬레이션은 AWS RoboMaker 시뮬레이터에서 실행되며 평가를 실행하고 성능 메트릭을 게시 할 수 있습니다.


The following sections discuss these topics in details.


Choose a Reinforcement Learning Framework and Algorithm


Using a machine learning framework to train any machine learning model is useful. It allows you to focus on things specific to your system while leveraging tested general-purpose implementations of underlying algorithms. You should use one whenever possible.


machine learning 프레임 워크를 사용하여 어떤 machine learning 모델을 훈련하는 것은 아주 유용합니다. 그것은 당신이 당신의 시스템에 특정한 것에 초점을 맞추고 테스트 된 범용 알고리즘의 구현을 활용할 수있게합니다. 사용 가능하면 그 기능을 사용해야 합니다.


To train your reinforcement learning model for AWS DeepRacer, you can choose one of the following currently supported deep-learning frameworks and algorithms for you to train a reinforcement learning model for AWS DeepRacer.


AWS DeepRacer에 reinforcement learning 모델을 훈련하려면 AWS DeepRacer에 대한 reinforcement learning 모델을 교육하기 위해 현재 지원되는 deep-learning 프레임 워크들 및 알고리즘들 중 하나를 선택할 수 있습니다.


Reinforcement learning frameworks and algorithms supported by AWS DeepRacer vehicles

AWS DeepRacer 차량이 지원하는 보강 학습 프레임 워크 및 알고리즘


FrameworksAlgorithm

Comment

TensorFlowPPO

The proximal policy optimization (PPO) algorithm achieves

policy gradient convergence by introducing a penalty to the

objective function to represent the constraint on the policy gradient.


proximal policy optimization (PPO) 알고리즘은    

목적 함수에 페널티를 도입하는 것으로 policy gradient convergence를

달성합니다. 이로써 policy gradient에 대한 제약조건을 나타냅니다.


This section explains how to train and evaluate a AWS DeepRacer model using the AWS DeepRacer console calling Amazon SageMaker and AWS RoboMaker behind the scenes.


이 섹션에서는 AWS DeepRacer 콘솔을 사용하여 Amazon SageMaker 및 AWS RoboMaker를 현장에서 호출하여 AWS DeepRacer 모델을 교육하고 평가하는 방법에 대해 설명합니다.


Start Training AWS DeepRacer Models

To start training a reinforcement learning model, you can use the AWS DeepRacer console to create a training job, choose a supported framework and an available algorithm, add a reward function, and configure training settings, including hyperparameters, and then watch training to proceed in the simulator. You can find the step-by-step instructions in Train Your First AWS DeepRacer Model for Autonomous Racing . Here, we focus on how to create the reward function, start from a simple one for autonomous racing in a straight track.


reinforcement learning 모델을 시작하려면 AWS DeepRacer 콘솔을 사용하여 훈련 작업을 만들고, 지원되는 프레임 워크 및 사용 가능한 알고리즘을 선택하고, 보상 기능을 추가하고, hyperparameters를 포함한 훈련 설정을 구성한 다음 시뮬레이터에서 진행되는 훈련 과정을 지켜봅니다.  Autonomous Racing을 위한 첫 번째 AWS DeepRacer 모델 훈련에서 단계별 지침을 찾을 수 있습니다. 여기서는 보상 기능을 만드는 방법에 초점을 맞춥니다. 직선 트랙에서 자율적인 경주를 위한 간단한 기능부터 시작합니다.


Create a Reward Function


For a reinforcement learning model, the reward function prescribes an immediate reward or penalty when the agent takes an action in a given state. Its purpose is to encourage the agent to do more to help accomplishing the agent's goals and, in the meantime, to do less (or none) to prevent the agent from accomplishing its goals. It amounts to the environment's providing feedback to agent actions, affecting the agent behavior and has impacts on the training performance. When using the AWS DeepRacer console to train model with a supported framework, the reward function is the only application-specific part and depends on your input.


reinforcement learning 모델의 경우, 보상 기능은 agent가 주어진 상태에서 조치를 취할 때 즉각적인 보상 또는 벌금을 규정합니다. 그 목적은 에이전트가 목표를 달성하는 쪽으로 일을 하는 것을을 돕고, 에이전트가 목표를 달성하지 못하는 쪽으로 일을 하는 것을 방지하는 데 도움을 줍니다. 이는 환경이 에이전트 작업에 피드백을 제공하고 에이전트 동작에 영향을 미치며 훈련 퍼포먼스에 영향을 미칩니다. AWS DeepRacer 콘솔을 사용하여 지원되는 프레임 워크로 모델을 교육 할 때 보상 기능은 응용 프로그램 관련 부분 중 하나이며 사용자의 입력에 따라 다릅니다.


Constructing a reward function is like creating an incentive plan. If not carefully considered, it can lead to unintended consequences of opposite effect. This is possible because the reward function is local in time, but the final tasks depend on expected rewards from future. Real-world behaviors are rarely representable by linear functions and short-term incentives are not guaranteed to lead to long-term rewards. A good practice to create a reward a function is to start with a simple one that covers basic scenarios. And then iteratively enhance it to handle more actions, until all the behaviors are considered.


보상 기능을 구축하는 것은 인센티브 플랜을 만드는 것과 같습니다. 신중하게 고려하지 않으면 반대 효과의 의도하지 않은 결과를 초래할 수 있습니다. 이는 보상 기능이 시간상 현지에 있기 때문에 가능하지만 최종 작업은 미래의 예상 보상에 달려 있습니다. 실세계 행동은 linear 기능으로는 거의 표현할 수 없으며 단기 인센티브는 장기 보상으로 이어지지 않을 수도 있습니다. 함수에 보상을 생성하는 좋은 방법은 기본 시나리오를 다루는 간단한 것으로 시작하는 것입니다. 그런 다음 모든 동작을 고려할 때까지 더 많은 동작을 처리하도록 반복적으로 향상시킵니다.


For example, to train an AWS DeepRacer agent to drive autonomously on a well-marked track, we create the reward function with the following signature:


예를 들어 잘 표시된 트랙에서 자율적으로 작동하도록 AWS DeepRacer 에이전트를 훈련 시키려면 다음 서명을 사용하여 보상 기능을 만듭니다.


def reward_function(self, on_track, x, y, distance_from_center,

car_orientation, progress, steps, throttle, streering,

track_width, waypoints, closest_waypoint):


where the input parameters, as described in the following table, represent the state in which an action is to be taken and the output is a real value in the range of [-100000.0, 100000.0].


다음 표에서 설명하는 입력 매개 변수는 조치를 취할 상태를 나타내고 출력은 [-100000.0, 100000.0] 범위의 실제 값입니다.


Input Parameters of AWS DeepRacer Reward Functions

ParameterTypeRangeDescription
on_trackbooleanTrue|FalseThe vehicle is off track (False) if the front of the vehicle is outside of the white lines, otherwise, it's on track (True).
xfloat[0,inf]Location of the vehicle along the x-axis, starting from 0.
yfloat[0,inf]Location of the vehicle along the y-axis, starting from 0.
distance_from_centerfloat[0,track_width/2]Displacement from the center line of the track as defined bywaypoints.
car_orientationfloat[-π, π]Orientation of the vehicle around its z-axis as measured against the x-axis in radians. If the vehicle starts in the direction of the x-axis of the track, the car_orientation is 0 at the starting point.
progressfloat[0,1]Percentage of track completed.
stepsint[0,n]Number of steps completed.
throttlefloat[0,1]Vehicle's speed. 0 indicates stopped and 1 means at the maximum speed.
steeringfloat[-1,1]Steering position. -1 means right and 1 means left.
track_widthfloat[0,inf]Track width.
waypoint(float,float)(x,y)A coorindate of (x, y) defining a point on the track.
waypointslist[(x,y), …]An ordered list of waypoints.
closest_waypointint[0, number of waypoints -1]The zero-based index of the closest waypoint given the vehicle's x and y positions as measured by the Euclidean distance. It can be in front of the vehicle or behind it.


We can start building the reward function by first considering the most basic situation, namely, driving on a straight track from start to finish without getting off the track. In this scenario, the reward function logic depends only on_track and progress. As a trial, you could start with the following logic:


가장 기본적인 상황 즉, 트랙에서 내리지 않고 곧바로 직선으로 주행함으로써 보상 기능을 구축 할 수 있습니다. 이 시나리오에서 보상 기능 로직은 on_track 및 진행에만 의존합니다. trial로 다음과 같은 논리로 시작할 수 있습니다.


def reward_function(self, on_track, x, y, distance_from_center, car_orientation, progress,
         steps, throttle, streering, track_width, waypoints, closest_waypoint):
    if not on_track:
        reward = -1
    else if progress == 1 :
        reward = 10
    return reward


This logic penalizes the agent when it drives itself off the track while rewards the agent when it drives to the finishing line. It's reasonable for achieving the stated goal. However, the agent will roam freely between the starting point and the finishing line, including driving backwards on the track. This means that not only the training could take a long time to complete, but also the trained model would lead to a less efficient driving when deployed to a running vehicle.


이 로직은 agent가 트랙에서 벗어나면 agent에게 불이익을 주고 final 라인으로 이동할 때 보상을줍니다. 명시된 목표를 달성하는 것이 합리적입니다. 에이전트는 트랙에서 뒤로 운전하는 것을 포함하여 시작 지점과 마무리 지점 사이를 자유롭게 돌아 다닙니다. 이것은 훈련이 완료되는 데 오랜 시간이 걸릴뿐만 아니라 훈련 된 모델이 운전중인 차량에 배치 될 때 덜 효율적인 운전으로 이어질 수 있음을 의미합니다.


In practice, an agent learns more effectively if it can do so bit by bit throughout the course of training. This implies that a reward function should give out smaller rewards step by step along the track. For the agent to drive on the straight track, we can improve the reward function as follows:


실제로 에이전트는 훈련 과정에서 조금씩 조금씩 진전시키면서 더 효과적으로 훈련합니다. 이것은 보상 기능이 트랙을 따라 단계적으로 조금씩 조금씩 제공해야 함을 의미합니다. 에이전트가 직선으로 주행하기 위해서는 다음과 같이 보상 기능을 향상시킬 수 있습니다.


def reward_function(self, on_track, x, y, distance_from_center, car_orientation, progress,
         steps, throttle, streering, track_width, waypoints, closest_waypoint):
    if not on_track:
        reward = -1
    else:
        reward = progress
    return reward


With this function, the agent gets more reward the closer it reaches the finishing line. This should reduce or eliminate unproductive trials of driving backwards. In general, we want the reward function to distribute the reward more evenly over the action space. Creating an effective reward function can be a challenging undertaking. You should start with a simple one and progressively enhance or improve the function, with systematic experimentation, to become more robust and efficient.


이 기능을 사용하면 agent가 마무리 라인에 가까울수록 좀 더 많은 보상을 얻습니다. 이것은 자율 운전 중 비생산적인 시도를 줄이거 나 없애도록 합니다. 일반적으로 보상 기능을 통해 보상을 행동 공간에 균등하게 분배해야합니다. 효과적인 보상 기능을 만드는 것은 어려운 일이 될 수 있습니다. 단순한 것으로 시작하여 체계적인 실험을 통해 점진적으로 기능을 향상 시켜보다 강력하고 효율적으로 만들어야합니다.


Iterate Training to Improve AWS DeepRacer Models and Training Performance


After you have successfully trained your AWS DeepRacer model for the simple straight track, you can verify that your AWS DeepRacer vehicle (virtual or physical) can drive itself without going off the track. If you let the vehicle run on a looped track, it won't stay on the track. The reward function has ignored the actions to make turns to follow the track.


간단한 직선 트랙에 대한 AWS DeepRacer 모델을 성공적으로 훈련 한 후에 AWS DeepRacer 차량 (가상 또는 물리적)이 트랙에서 벗어나지 않고 스스로 운전할 수 있는지 확인할 수 있습니다. 루프 된 트랙에서 차량을 주행 시키면 트랙을 벗어날 겁니다. 위의 보상 기능은 트랙을 따라가는 동작은 고려하지 않았기 때문입니다.


To make your vehicle handle those actions, you must enhance the reward function to give out a reward when the agent makes a permissible turn and produce a penalty if the agent makes an illegal turn. Then, you're ready to start another round of training. To take advantage of the prior trainings, you can start the new training by cloning the previous trained model, passing along the previously learned knowledge. You can follow this pattern to progressively add more features to the reward function to train your AWS DeepRacer vehicle to drive in increasingly more complex environments.


차량이 그러한 행동을 처리하게하려면, agent가 허용 된 회전 이내의 행동에 보상을 제공하고 그 허용된 회전 밖으로 이탈 할 경우 벌점을 주는 보상 기능을 강화해야합니다. 그럼 이제 다시 한 번 훈련을 시작할 준비가되었습니다. 이전 훈련을 활용하려면 이전에 학습 한 지식을 전달하면서 이전에 훈련 된 모델을 복제하여 새 교육을 시작할 수 있습니다. 이 패턴을 따라 보상 기능에 점차적으로 기능을 추가하여 점점 더 복잡한 환경에서 운전할 수 있도록 AWS DeepRacer 차량을 교육 할 수 있습니다.


You can also apply this iterative process to improve the training performance by systematically tuning the hyperparameters used in training. Hyperparameters, such as learning rate, future reward discount, batch size included to compute gradient descent, number of episodes in a training session, and number of steps in an episode, are empirical factors affecting how fast and how stable the total average expected reward converges to the global maximum. Optimal values require systematic experimentation until proven effective. Cloning a previously trained model as the starting point of a new round of training with modified hyperparameters leverages already learned knowledge and could help improving the overall training efficiency.


또한 이 반복 프로세스를 적용하여 훈련에 사용되는 hyperparameters를 체계적으로 조정하여 교육 성능을 향상시킬 수 있습니다. learning rate, future reward discount, 훈련 세션에서 gradient descent와 에피소드 횟수를 계산하는 것을 포함한 일괄 처리 크기 및 에피소드에서의 스텝 수와 같은 hyperparameters는 얼마나 빠르고 얼마나 안정적으로 효과를 극대화하기 위해 평균적인 기대 보상을 커버하느냐에 영향을 주는 경험적 요인입니다. 최적의 값은 입증 된 효과가있을 때까지 체계적인 실험이 필요합니다. 이전에 숙련 된 모델을 수정 된 hyperparameters를 사용하여 새로운 교육 라운드의 시작점으로 복제하면 이미 학습 한 지식을 활용하고 전반적인 교육 효율성을 향상시킬 수 있습니다.


In this section, you learn how to clone a trained model with an enhanced reward function or a modified set of hyperparameters. Before walking through the steps to clone a model for continued training, we illustrate how to update the reward function to handle new situations. We also explain the range and meaning of hyperparameter values used in the supported reinforcement learning algorithms.


이 절에서는 향상된 보상 기능 또는 수정 된 hyperparameters 세트를 사용하여 훈련 된 모델을 복제하는 방법을 학습합니다. 지속적인 교육을 위해 모델을 복제하는 단계를 거치기 전에 새로운 상황을 처리하기 위해 보상 기능을 업데이트하는 방법을 설명합니다. 지원되는 강화 학습 알고리즘에 사용 된 hyperparameters 값의 범위와 의미에 대해서도 설명합니다.


Progressively Enhance Reward Functions for More Complex Situations


This section shows how to iteratively enhance and improve a reward function with a series of example functions that take the input parameters as described elsewhere:


이 섹션에서는 다른 곳에서 설명한대로 입력 매개 변수를 사용하는 일련의 예제 함수를 사용하여 보상 함수를 반복적으로 향상시키는 방법을 보여줍니다.


Example 1: Follow the Track Center

In this example, we start with a reward function to keep the vehicle driving close to the center of a track.


이 예에서는 차량의 주행을 트랙의 중심에 가깝게 유지하는 보상 기능으로 시작합니다.


The following reward function returns more reward when the vehicle is closer to the center of a track. The logic goes as follows:


다음 보상 기능은 차량이 트랙의 중심에 가까울 때 더 많은 보상을 반환합니다. 논리는 다음과 같습니다.


  • If the vehicle's distance from the track center is less than 20% of the track width, the output reward is 10.

  • 트랙 센터에서 차량까지의 거리가 트랙 너비의 20 %보다 작 으면 출력 보상은 10입니다.

  • If the distance is greater than 20% and less than 50% of the track width, the reward is 3.

  • 트랙 센터에서 차량까지의 거리가 트랙 폭의 20 %보다 크고 50 %보다 작 으면 보상은 3입니다.

  • If the distance is greater than 50% and less than 80% of the track width, the reward is 1.

  • 트랙 센터에서 차량까지의 거리가 트랙 폭의 50 %보다 크고 80 %보다 작 으면 보상은 1입니다.

  • If the distance is greater than 80% of the track width, which is assumed to be crashed or off the track, the reward is 0.01.

  • 트랙 센터에서 차량까지의 거리가 트랙 폭의 80 %보다 커 트랙을 벗어나거나 충돌 됐다고 간주되는 경우 보상은 0.01입니다.

In AWS DeepRacer, we can implement this function as follows:


AWS DeepRacer에서 이 기능을 아래와 같이 구현할 수 있습니다.


def reward_function(on_track, x, y, distance_from_center, car_orientation, progress, steps,
        throttle, streering, track_width, waypoints, closest_waypoint):

    import math

    marker_1 = 0.2 * track_width
    marker_2 = 0.5 * track_width
    marker_3 = 0.8 * track_width

    if distance_from_center >= 0.0 and distance_from_center <= marker_1:
                reward = 10
    elif distance_from_center <= marker_2:
                reward = 3
    elif distance_from_center <= marker_3:
                reward = 1
    else:
        reward = 1e-2  # likely crashed/ close to off track
   
    return float(reward)


The effect of this reward function is to keep the vehicle to drive as close to the track center as possible.


이 보상 기능의 효과는 차량을 가능한 한 트랙 중심에 가깝게 운전하는 것입니다.


In addition to the discrete version, you could also employ a continuous one to return the reward of the following form:


discrete version 외에도 다음 양식의 보상을 받기 위해 연속 버전을 사용할 수도 있습니다.


reward = exp(-a * distance_from_center)


Here a is a constant and distance_from_center is between 0 and 1.


상수와 distance_from_center는 0과 1 사이 입니다.


Example 2: Follow Center Line without Excessive Turns


In the following example function, we add rewards or penalties to steering to prevent the vehicle from turning away from the center line of the track.


다음 예제 기능에서는 차량이 트랙의 중심선에서 벗어나는 것을 방지하기 위해 조향에 보상이나 페널티를 추가합니다.


def reward_function2(on_track, x, y, distance_from_center, car_orientation, progress, steps,
        throttle, streering, track_width, waypoints, closest_waypoint):
   
    import math

    marker_1 = 0.2 * track_width
    marker_2 = 0.5 * track_width
    marker_3 = 0.8 * track_width

    if distance_from_center >= 0.0 and distance_from_center <= marker_1:
                reward = 10
    elif distance_from_center <= marker_2:
                reward = 3
    elif distance_from_center <= marker_3:
                reward = 1
    else:
        reward = 1e-2  # likely crashed/ close to off track

    # penalize reward if the vehicle is steering way too much
    ABS_STEERING_THRESHOLD = 0.3
    if math.abs(steering) > ABS_STEERING_THRESHOLD:
        reward -= 0.5 * math.abs(steering)

    reward = max([0.0, reward])
    return float(reward)


Example 3: Follow Center Line with Straight Orientation


In this example, we add rewards or penalties to vehicle's orientations to keep the vehicle's body straight while it drives along the track center.


이 예에서는 트랙 센터를 따라 운전하는 동안 차량의 몸체를 똑바로 유지하기 위해 차량의 방향에 보상 또는 벌금을 추가합니다.


def reward_function3(on_track, x, y, distance_from_center, car_orientation, progress, steps,
        throttle, streering, track_width, waypoints, closest_waypoint):
   

    import math

    marker_1 = 0.2 * track_width
    marker_2 = 0.5 * track_width
    marker_3 = 0.8 * track_width

    if distance_from_center >= 0.0 and distance_from_center <= marker_1:
        reward = 10
    elif distance_from_center <= marker_2:
        reward = 3
    elif distance_from_center <= marker_3:
        reward = 1
    else:
        reward = 1e-2  # likely crashed/ close to off track

    waypoint_yaw = waypoints[closest_waypoint][-1]

    # penalize reward if orientation of the vehicle deviates way too much when compared to ideal orientation
    if math.abs(car_orientation - waypoint_yaw) >= math.radians(5):
        reward *= 0.5

    return float(reward)


If you use an orientation to detect if a vehicle is to make turns, this reward function should help other vehicles recognize the intention more clearly when a vehicle in the front makes turns.


차량이 회전해야 하는 경우를 감지하기 orientation 사용한다면 이 보상 기능은 앞 차량이 회전할 때 그 의도를 보다 분명히 감지하도록 도울 수 있어야 합니다.


Systematically Tune Hyperparameters for Optimal Training Performances


The following table shows the hyperparameters that can be adjusted to tune the performance of training using a supported algorithm:


다음 표는 지원되는 알고리즘을 사용하여 학습 성능을  조정할 수있는 hyperparameters를 보여줍니다.


Algorithm-specific hyperparameters and their effects

AlgorithmHyperparametersDescription
PPO

Batch size

The number of images used for each gradient descent update.

A larger Batch size value leads to more stable updates, but slower training.

Required

Yes

Valid values

Positive integer of (32, 64, 128, 256, 512)

Default value

32

PPO

Number of epochs

The number of passes through the experience buffer during gradient

descent. A smaller num_epoch value promotes more stable updates,

but slower training. A larger Number of epochsvalue is acceptable

when the bath size is large.

Required

No

Valid values

Positive integer between [3 - 10]

Default value

3

PPO

Learning rate

Controls how much each gradient descent contributes to an update.

A larger value can increase the training speed, but may cause

the expected rewards not to convergence if it's too large.

Required

No

Valid values

Real number between [10-5- 10-3]

Default value

0.001

PPO

Exploration

A type of exploration used in training reinforcement learning models

. Use the categorical exploration (CategoricalParameters)

for a discrete action space and use the epsilon exploration

(EpsilonGreedy) for a continuous action space:

  • The categorical exploration takes action according to the probability

  • distribution of the action space of the policy network.

  • The epsilon exploration takes action at random with an epsilon

  • distribution. The initial value is 1 and then linearly decreased to

  • 0.1 over X steps, where X is typically between10,000 and 100,000.

As the training progresses, the exploration helps prevent the neural network from being trapped in parts of the action space (local maxima). As the result, the neural network learns what actions to take with more certainty and confidence, as the training progresses.
Required

No

Valid values

String literal of CategoricalParameters orEpsilonGreedy

Default value

EpsilonGreedy

PPOEntropy

A degree of the randomness the agent takes action with. The larger the entropy, the more random actions the agent will take for exploration.

Required

No

Valid values

Real number between [10-4- 10-2]

Default value

0.5

PPODiscount factor

A factor specifies how much of the future reward contributes to the expected rewards. The larger the Discount factor value is, the farther out contributions the agent considers to take an action. If it is 0, only the immediate reward is considered. If it is 1, the full-range future rewards are included. As a simplified example, if the agent takes order of 100 steps to take a turn, then discount factor of 0.99 is a good value, if it takes 1000 steps, then 0.999 is a good value.

Required

No

Valid values

Real number between [0- 1]

Default value

0.999

PPOLoss type

Type of the objective function for optimization. A good training algorithm should make incremental changes to the agent's strategy so that it gradually transitions from taking random actions to taking strategic actions to increase reward. But if it makes too big a change then the training becomes unstable and the agent ends up not learning. The Huber loss and Mean squared error loss types behave similarly for small updates. But as the updates become larger, Huber loss takes smaller increments compared to Mean squared error loss. When you have convergence problems, use the Huber loss type. When convergence is good and you want to train faster, use the Mean squared error loss type.

Required

No

Valid values

(Huber loss, Mean squared error loss)

Default value

Huber loss

PPONumber of episodes between each training

This parameter tells the agent how frequently it should train it's neural networks. If this value is low, the agent gets a small amount of experience between updates. For problems that are easy to solve, a small number suffices and learning is fast. For more complex problems, it is better to gather more experience so that the agent observes variations of the effect of its actions. Learning will be slower in this case but more stable.

Recommended values are (10, 20, 40).

Required

No

Valid values

[1 - 1000]

Default value

20


Clone a Trained Model to Start a New Training Pass


In this section, you learn how to clone a trained model using the AWS DeepRacer console.


이 섹션에서는 AWS DeepRacer 콘솔을 사용하여 훈련 된 모델을 복제하는 방법을 학습합니다.


To iterate training the reinforcement learning model using the AWS DeepRacer console

AWS DeepRacer 콘솔을 사용하여 강화 학습 모델을 반복 학습하려면


  1. Sign in to the AWS DeepRacer console, if you're not already signed in.
    아직 로그인하지 않은 경우 AWS DeepRacer 콘솔에 로그인하십시오.

  2. On the Models page, choose a trained model and then choose Clone from the Action drop-down menu list.
    모델 페이지에서 숙련 된 모델을 선택한 다음 작업 드롭 다운 메뉴 목록에서 복제를 선택하십시오.

  3. For Model details, do the following:
    모델 세부 정보를 보려면 다음을 수행하십시오.

    1. Type RL_model_1 in Model name, if you don't want a name to be generated for the cloned model.
      복제 된 모델에 대해 이름을 생성하지 않으려면 모델 이름에 RL_model_1을 입력하십시오.

    2. Optionally, give a description for the to-be-cloned model in Model description - optional.
      선택적으로, 모델 설명 - 선택 사항에서 복제 할 모델에 대한 설명을 제공하십시오.

  4. For Environment simulation, choose another track option.
    환경 시뮬레이션의 경우 다른 트랙 옵션을 선택하십시오.

  5. For Reward function, choose Advanced. Modify the reward function, e.g., to consider steering.
    보상 기능의 경우 고급을 선택하십시오. 예를 들어 조정을 고려하여 보상 기능을 수정하십시오.

  6. Expand Algorithm settings and try different options, e.g., changing Batch size value from 32 to 64 or increasing the Learning rate to speed up the training.
    알고리즘 설정을 확장하고 배치 옵션 값을 32에서 64로 변경하거나 학습 속도를 높여 교육 속도를 높이는 등 다양한 옵션을 시도해보십시오.

  7. Experiment with difference choices of the Stop conditions. And then choose Start trainingto begin new round of training.
    Stop 조건의 차이점을 실험 해보십시오. 그런 다음 교육 시작을 선택하여 새로운 교육 과정을 시작하십시오.

As with training a robust machine learning model in general, it is important that you conduct systematic experimentation to come up with the best solution.


일반적으로 머신러닝 모델을 좀 더 견고하고 강력하게 훈련하는 것과 마찬가지로 체계적인 실험을 수행하여 최상의 솔루션을 찾는 것이 중요합니다.


Evaluate Trained AWS DeepRacer Models


To evaluate a model is to test the performance of a trained model. In AWS DeepRacer, the standard performance metric is the average time of finishing three consecutive laps. Evaluating an AWS DeepRacer model involves the following tasks:

모델을 평가하는 것은 훈련 된 모델의 성능을 테스트하는 것입니다. AWS DeepRacer에서 표준 성능 메트릭은 연속 3 랩을 완료하는 평균 시간입니다. AWS DeepRacer 모델 평가에는 다음 작업이 포함됩니다.

  1. Configure and start an evaluation job.
    평가 작업을 구성하고 시작하십시오.

  2. Observe the evaluation in progress while the job is running. This can be done in the AWS DeepRacer simulator.
    작업이 진행되는 동안 진행중인 평가를 관찰하십시오. 이 작업은 AWS DeepRacer 시뮬레이터에서 수행 할 수 있습니다.

  3. Inspect the evaluation summary after the evaluation job is done. You can terminate an evaluation job in progress at any time.
    평가 작업이 완료되면 평가 요약을 검토하십시오. 진행중인 평가 작업을 언제든지 종료 할 수 있습니다.

You can test a model in multiple evaluation jobs, but you must run them one after another. AWS DeepRacer only keeps the latest evaluation job status and the result.


여러 평가 작업에서 모델을 테스트 할 수 있지만 하나씩 실행해야합니다. AWS DeepRacer는 최신 평가 작업 상태 및 결과 만 유지합니다.


You can evaluate an AWS DeepRacer model using the AWS DeepRacer simulator as a virtual environment.


AWS DeepRacer 시뮬레이터를 가상 환경으로 사용하여 AWS DeepRacer 모델을 평가할 수 있습니다.


For step-by-step instructions to run an AWS DeepRacer evaluation job in simulation, see Evaluate Your AWS DeepRacer Models in Simulation.


시뮬레이션에서 AWS DeepRacer 평가 작업을 실행하기위한 단계별 지침은 시뮬레이션에서 AWS DeepRacer 모델 평가를 참조하십시오.


For more information about how to run an AWS DeepRacer evaluation job with an AWS DeepRacer vehicle in a physical environment, see Drive Your AWS DeepRacer Vehicle .


실제 환경에서 AWS DeepRacer 차량으로 AWS DeepRacer 평가 작업을 실행하는 방법에 대한 자세한 내용은 AWS DeepRacer 차량 운전을 참조하십시오.


Train and Evaluate AWS DeepRacer Models Using Amazon SageMaker Notebooks


The AWS DeepRacer console provides you with an integrated experience to train and evaluate your AWS DeepRacer models. It's integrated because AWS DeepRacer uses Amazon SageMaker and AWS RoboMaker behind the scenes. The integration includes detailed reinforcement learning tasks and makes training more readily accessible to beginners.


AWS DeepRacer 콘솔은 AWS DeepRacer 모델을 교육하고 평가할 수있는 통합 된 경험을 제공합니다. AWS DeepRacer는 밑의 레이어에서 Amazon SageMaker와 AWS RoboMaker를 사용함으로서 그러한 것들을 통합하고 있습니다.. 통합에는 자세한 보강 학습 과제가 포함되어있어 초보자가보다 쉽게 학습 할 수 있습니다.


If you're an experienced user of Amazon SageMaker or if you're determined to learn how to use Amazon SageMaker and AWS RoboMaker to train and evaluate your AWS DeepRacer models, then you can manually create an Amazon SageMaker notebook. You can then clone a reinforcement learning sample notebook instance and use it as a template to perform the predefined tasks that train and evaluate an AWS DeepRacer model.


Amazon SageMaker를 사용하는 숙련 된 사용자이거나 Amazon SageMaker 및 AWS RoboMaker를 사용하여 AWS DeepRacer 모델을 교육하고 평가하는 방법을 배우고자 한다면 Amazon SageMaker notebook을 수동으로 만들 수 있습니다. 그런 다음 reinforcement learning 예제 notebook 인스턴스를 복제하고 이를 템플릿으로 사용하여 AWS DeepRacer 모델을 학습하고 평가하는 미리 정의 된 작업을 수행 할 수 있습니다.


After the training, you can copy the trained model artifacts to your AWS DeepRacer vehicle for test runs in a physical environment.


교육을 마친 후 훈련 된 모델 아티팩트를 AWS DeepRacer 차량에 복사하여 실제 환경에서 테스트를 실행할 수 있습니다.


The tutorial presents step-by-step instructions to walk you through these tasks.


이 자습서에서는 이러한 작업을 단계별로 안내합니다.


Create an Amazon SageMaker Notebook


To train an AWS DeepRacer model directly on Amazon SageMaker, follow the steps below and create an Amazon SageMaker notebook instance.


Amazon SageMaker에서 직접 AWS DeepRacer 모델을 교육하려면 다음 단계를 수행하고 Amazon SageMaker 노트북 인스턴스를 만드십시오.


To create an Amazon SageMaker notebook instance to train and evaluate your AWS DeepRacer models


AWS DeepRacer 모델을 교육하고 평가할 Amazon SageMaker 노트북 인스턴스를 생성하려면


  1. Sign in to the Amazon SageMaker console at https://console.aws.amazon.com/sagemaker. Choose one of the supported regions.
    https://console.aws.amazon.com/sagemaker에서 Amazon SageMaker 콘솔에 로그인하십시오. 지원되는 지역 중 하나를 선택하십시오.

  2. From the navigation pane, choose Notebook instances and then choose Create notebook instance.


  3. 탐색 창에서 Notebook instances를 선택한 다음 Create notebook instance를 선택하십시오.

  4. On the Create notebook instance page, do the following:
    노트북 인스턴스 작성 페이지에서 다음을 수행하십시오.

    1. Type a name. For example, my-deepracer-model) for the Notebook instance name.
      이름을 입력하십시오. 노트북 인스턴스 이름에 대한 my-deepracer-model).

    2. If the IAM role drop-down menu is not populated with an existing IAM role, choose Create a new role, Enter a custom IAM role ARN, or Use existing role and then follow the instructions.
      IAM 역할 드롭 다운 메뉴가 기존 IAM 역할로 채워지지 않은 경우 새 역할 만들기, 사용자 지정 IAM 역할 ARN 입력 또는 기존 역할 사용을 선택하고 지침을 따릅니다.

    3. Leave the default choices for all other options and then choose Create notebook instance.
      다른 모든 옵션의 기본 선택 항목을 그대로두고 노트북 인스턴스 작성을 선택하십시오.

    For more information, see creating an Amazon SageMaker notebook instance.
    자세한 내용은 Amazon SageMaker 노트북 인스턴스 만들기를 참조하십시오.

  5. Wait for the notebook instance's Status to change from Pending to InService. Then choose Open Jupyter.
    노트북 인스턴스의 Status가 Pending에서 InService로 변경 될 때까지 기다립니다. 그 다음 Open Jupyter를 선택하십시오.

  6. On the Jupyter page (which is the home page of the newly created notebook), do the following:
    Jupyter 페이지 (새로 만든 전자 필기장의 홈 페이지)에서 다음을 수행하십시오.

    1. Choose the SageMaker Examples tab.
      SageMaker 예제 탭을 선택하십시오.

    2. Expand the Reinforcement Learning entry from the example list.
      예제 목록에서 강화 학습 항목을 확장하십시오.

    3. For this exercise, choose Use next to the rl_deepracer_coach_robomaker.ipynb item.
      이 연습에서는 rl_deepracer_coach_robomaker.ipynb 항목 옆에있는 Use를 선택하십시오.

    4. On the Create a copy in your home directory dialog, choose Create copy.
      홈 디렉토리의 사본 작성 대화 상자에서 사본 작성을 선택하십시오.

    At this point, the notebook instance is running and you can begin to train the model.

    이 시점에서 노트북 인스턴스가 실행 중이며 모델을 학습 할 수 있습니다.

    You are charged for a running instance according to the selected instance type. To avoid being charged for a running instance when you're not ready to use it, shut down the instance.

    선택한 인스턴스 유형에 따라 실행중인 인스턴스에 대해 요금이 부과됩니다. 실행중인 인스턴스를 사용할 준비가되지 않았을 때 실행중인 인스턴스에 대해 요금이 부과되지 않도록하려면 인스턴스를 종료하십시오.


Initialize the Amazon SageMaker Notebook Instance


To use an Amazon SageMaker notebook instance to train your AWS DeepRacer model, first properly initialize the instance for the required job. The initialization includes the following.


AWS DeepRacer 모델을 교육하기 위해 Amazon SageMaker 노트북 인스턴스를 사용하려면 먼저 필요한 작업에 대해 인스턴스를 올바르게 초기화하십시오. 초기화에는 다음이 포함됩니다.


  • Import required libraries. 필수 라이브러리 가져 오기.

  • Set up training output storage. 훈련용 출력 저장 장치 설정

  • Grant access permissions for Amazon SageMaker and AWS RoboMaker.
    Amazon SageMaker 및 AWS RoboMaker에 대한 액세스 권한을 부여하십시오.

  • Configure VPC for Amazon SageMaker and AWS RoboMaker to interact with each other.
    Amazon SageMaker와 AWS RoboMaker가 서로 상호 작용할 수 있도록 VPC를 구성합니다.


Follow the steps below for detailed instructions to initialize a notebook instance.


노트북 인스턴스를 초기화하는 자세한 방법은 아래 단계를 따르십시오.


To initialize an Amazon SageMaker notebook instance


  1. To import the required library to do training, choose the notebook instance's first code block. For example, choose the one under the Imports heading. Next, choose Run from the notebook's menu bar to execute the code block. You can use the Shift-Enter key-command shortcuts to start running the code block.

    교육을 수행하는 데 필요한 라이브러리를 가져 오려면 노트북 인스턴스의 첫 번째 코드 블록을 선택하십시오. 예를 들어, Imports 제목 아래에있는 것을 선택하십시오. 그런 다음, 노트북의 메뉴 막대에서 실행을 선택하여 코드 블록을 실행하십시오. Shift-Enter 키 명령 단축키를 사용하여 코드 블록 실행을 시작할 수 있습니다.


Before the code execution starts, the code block status shows In [ ]. When the execution is under way, the status becomes In [*]. After the code execution is complete, the status becomes In [n], where n corresponds to the order of invocations. Because the importation code cell is the first, n=1. If you run the command again after the first run, the status becomes In [2].


코드 실행이 시작되기 전에 코드 블록 상태가 In []을 표시합니다. 실행이 진행 중일 때 상태는 In [*]이됩니다. 코드 실행이 완료되면 상태가 In [n]이되며, 여기서 n은 호출 순서와 일치합니다. 가져 오기 코드 셀이 첫 번째이므로 n = 1입니다. 처음 실행 한 후 명령을 다시 실행하면 상태가 [2]가됩니다.


For asynchronous execution, the code cell returns immediately to show the completed status. For synchronous executions, subsequent calls are blocked until the current code cell execution is completed when the status turns from In [*] to In [n].


비동기 실행의 경우 코드 셀은 즉시 반환되어 완료 상태를 표시합니다. 동기 실행의 경우 상태가 In [*]에서 In [n]으로 바뀔 때 현재 코드 셀 실행이 완료 될 때까지 후속 호출이 차단됩니다.


2. To set up the training output storage, choose the code block under Setup S3 bucket, and then choose Run from the notebook instance menu or press the Shift+Enter keys.


training output storage를 설정하려면 Setup S3 bucket에서 코드 블록을 선택한 다음 노트북 인스턴스 메뉴에서 Run을 선택하거나 Shift + Enter 키를 누릅니다.


When the execution completes, you can verify this bucket in Amazon S3 console.


실행이 완료되면 Amazon S3 콘솔에서이 버킷을 확인할 수 있습니다.


To view the s3_output_path variable value, append print(s3_output_path) to the above code cell and rerun the code.


s3_output_path 변수 값을 보려면 print (s3_output_path)를 위 코드 셀에 추가하고 코드를 다시 실행하십시오.


3. To define local variables to name the training job, to specify the training time, and to select an AWS availability region, run the code block under Define Variables.


교육 작업의 이름을 지정하고 교육 시간을 지정하고 AWS 가용성 영역을 선택하기 위해 지역 변수를 정의하려면 변수 정의 아래의 코드 블록을 실행하십시오.


The example notebook instance sets the job duration as 5 hours by default, which should be sufficient for this exercise. To speed up the end-to-end experience, you can change the job duration to 1 or 2 hours before running the code cell.


예제 노트북 인스턴스는 작업 기간을 기본적으로 5 시간으로 설정합니다. 이는이 연습에 충분해야합니다. 엔드 - 투 - 엔드 환경의 속도를 높이려면 코드 셀을 실행하기 전에 작업 기간을 1 ~ 2 시간으로 변경하십시오.


4. To permit this notebook instance to access the output storage from Amazon SageMaker, run the code cell under Create an IAM role.


이 노트북 인스턴스가 Amazon SageMaker의 출력 스토리지에 액세스 할 수있게하려면 IAM 역할 생성에서 코드 셀을 실행하십시오.


try:
    role = sagemaker.get_execution_role()
except:
    role = get_execution_role('sagemaker')

print("Using IAM role arn: {}".format(role))


When executed, this code block creates a new IAM role containing the following IAM policy.


이 코드 블록을 실행하면 다음 IAM 정책을 포함하는 새 IAM 역할이 만들어집니다.


{
    "Version": "2012-10-17",
    "Statement": [
        {
            "Effect": "Allow",
            "Action": [
                "s3:GetObject",
                "s3:PutObject",
                "s3:DeleteObject",
                "s3:ListBucket"
            ],
            "Resource": [
                "arn:aws:s3:::*"
            ]
        }
    ]
}


The created IAM role has Amazon SageMaker as its trusted entity.


생성 된 IAM 역할은 Amazon SageMaker를 신뢰할 수있는 엔터티로 사용합니다.


5. Because AWS RoboMaker is involved to render the training process, it also needs the permissions to access the same output storage. To do so, you must makerobomaker.amazonaws.com as another trusted entity of the role. For the specific instructions, run the code cell under Permission setup for invoking AWS RoboMaker from this notebook.


AWS RoboMaker는 교육 프로세스를 렌더링하는 데 관련되어 있으므로 동일한 출력 저장소에 액세스 할 수있는 권한도 필요합니다. 이렇게하려면 robomaker.amazonaws.com을 역할의 신뢰할 수있는 다른 엔터티로 만들어야합니다. 특정 지침을 보려면이 노트에서 AWS RoboMaker를 호출하기위한 권한 설정에서 코드 셀을 실행하십시오.


display(Markdown(generate_help_for_robomaker_trust_relationship(role)))


6. To enable VPC mode for Amazon SageMaker and AWS RoboMaker to communicate with each other over network, run the two code cells below Configure VPC. By default, the notebook instance uses your default VPC, security group, and subnets to configure the VPC mode. If you don't want open VPC for other traffic, make sure to set the Inbound Rules and Outbound Rules for the specified security group to allow incoming traffic from itself only.


Amazon SageMaker 및 AWS RoboMaker에서 VPC 모드를 활성화하여 네트워크를 통해 서로 통신하려면 VPC 구성 아래의 두 코드 셀을 실행하십시오. 기본적으로 노트북 인스턴스는 기본 VPC, 보안 그룹 및 서브넷을 사용하여 VPC 모드를 구성합니다. 다른 트래픽에 대해 열린 VPC를 사용하지 않으려면 수신 트래픽 자체 만 허용하도록 지정된 보안 그룹에 대한 인바운드 규칙 및 아웃 바운드 규칙을 설정해야합니다.


At this point, you're done with initializing the training and are ready to move on to set up the training environment.


이 시점에서 교육을 초기화하고 교육 환경을 설정하기 위해 준비를 마쳤습니다.


Set Up the Training Environment


The environment for training your AWS DeepRacer model in this notebook instance is defined in the src/robomaker/environments/deepracer_env.py file. This environment file contains definitions of the track, states, actions, and the reward function used for the training. You can modify these definitions when setting up your training environment.


이 노트북 인스턴스에서 AWS DeepRacer 모델을 교육하는 환경은 src / robomaker / environments / deepracer_env.py 파일에 정의되어 있습니다. 이 환경 파일에는 트랙, 상태, 조치 및 학습에 사용 된 보상 기능에 대한 정의가 들어 있습니다. 교육 환경을 설정할 때 이러한 정의를 수정할 수 있습니다.


Given a track, states, and actions, the reward function makes your AWS DeepRacer model unique from others. Thus, the most important part of environment setup involves editing the reward function definition (def reward_function(…)) in the deepracer_env.py file. To edit thedeepracer_env.py file to customize the reward function, follow the steps below:


트랙, 주 및 액션이 주어지면 보상 기능을 통해 AWS DeepRacer 모델이 다른 모델과 차별화됩니다. 따라서 환경 설정에서 가장 중요한 부분은 deepracer_env.py 파일에서 보상 기능 정의 (def reward_function (...))를 편집하는 것입니다. deepracer_env.py 파일을 편집하여 보상 기능을 사용자 정의하려면 다음 단계를 따르십시오.


To modify the reward function in the deepracer_env.py file:

deepracer_env.py 파일에서 보상 기능을 수정하려면 다음을 수행하십시오.


  1. Go back to the Amazon SageMaker notebook window on the Amazon SageMaker console and choose the Files tab.
    Amazon SageMaker 콘솔의 Amazon SageMaker 노트북 창으로 돌아가서 파일 탭을 선택하십시오.

  2. Navigate to the src/robomaker/environments folder and choose deepracer_env.py to open the environment file in the Amazon SageMaker code editor.
    src / robomaker / environments 폴더로 이동하고 deepracer_env.py를 선택하여 Amazon SageMaker 코드 편집기에서 환경 파일을 엽니 다.


3. In the Python code editor, scroll down to the def reward_function definition block. The default reward_function, as shown as follows, is focused to keep the vehicle driving along the track center by decreasing the reward as the vehicle deviates further away from the center.

파이썬 코드 편집기에서 def reward_function 정의 블록까지 아래로 스크롤하십시오. 다음과 같이 기본 reward_function은 차량이 센터에서 더 멀리 벗어날 때 보상을 줄임으로써 트랙 센터를 따라 차량을 계속 주행시키는 데 중점을 둡니다.


Replace the above default reward_function definition with the following definition:

위의 기본 reward_function 정의를 다음 정의로 바꿉니다.

    def reward_function(self, on_track, x, y, distance_from_center, car_orientation, progress, steps,
                        throttle, steering, track_width, waypoints, closest_waypoints):
        reward = 1e-3
        if distance_from_center >= 0.0 and distance_from_center <= 0.03:
            reward = 1.0
           
        # add steering penalty
        if abs(steering) > 0.5:
            reward *= 0.80
           
        # add throttle penalty
        if throttle < 0.5:
            reward *= 0.80
           
        return reward


This reward function returns a reward of 1.0 when the vehicle is no more than 3 percent away from the track center. This contributes to keeping the vehicle along the track center. In addition, it reduces the reward by 20 percent if the vehicle steers left or right by more than 50 percent of the maximum allowed turns. This contributes to discouraging the vehicle to make too drastic turns. It also reduces the reward by 20 percent if the vehicle travels at less than 50 percent of maximum allowed throttle. This contributes to preventing the vehicle to move too slow, which is important for time trials. In all other cases, the reward function returns a small reward of 0.003. This has the effect of keeping the vehicle to do whatever it does.


이 보상 기능은 차량이 트랙 센터에서 3 % 이상 떨어지지 않은 경우 1.0의 보상을 반환합니다. 이것은 트랙 센터를 따라 차량을 유지하는 데 기여합니다. 또한, 차량이 최대 허용 회전 수의 50 % 이상 왼쪽이나 오른쪽으로 조종 할 경우 보상을 20 % 줄입니다. 이것은 차량이 너무 급하게 회전하는 것을 방해하는 데 기여합니다. 또한 차량이 최대 허용 스로틀의 50 % 미만으로 주행하면 보상을 20 % 줄입니다. 이것은 차량이 너무 천천히 움직이는 것을 방지하는데 기여하는데, 이것은 시련을 위해 중요합니다. 다른 모든 경우에 보상 함수는 0.003의 작은 보상을 반환합니다. 이것은 차량이 무엇을 하든지 유지하도록하는 효과가 있습니다.


The expected behavior, as dictated by this updated reward function, is to make the vehicle drive sufficiently fast along the middle of the track without making excessive turns.


이 업데이트 된 보상 기능에 의해 지시되는 예상되는 동작은 과도한 회전을하지 않고 트랙의 중간을 따라 차량 구동을 충분히 빠르게하는 것입니다.


4. Choose File → Save to save the change of the reward function.


Notice that the environment file is shared by both Amazon SageMaker and AWS RoboMaker, also known as nodes. When it's used by Amazon SageMaker, the node_type isSAGEMAKER_TRAINING_WORKER. When it's used by AWS RoboMaker, the node_type is SIMULATION_WORKER.


환경 파일은 Amazon SageMaker와 AWS RoboMaker (노드라고도 함)에서 공유됩니다. Amazon SageMaker에서 사용하는 경우 node_type은 SAGEMAKER_TRAINING_WORKER입니다. AWS RoboMaker에서 사용하는 경우 node_type은 SIMULATION_WORKER입니다.


As part of the environment setup, you can optionally modify the hyperparameters used in training. The hyperparameters are defined in the deepracer.py file under the src/robomaker/presetsdirectory. The instruction to edit the hyperparameters values is similar to those described above. For this exercise, use the default hyperparameter values.


환경 설정의 일부로 선택적으로 교육에 사용되는 하이퍼 매개 변수를 수정할 수 있습니다. 하이퍼 매개 변수는 deepracer.py 파일의 src / robomaker / presets 디렉토리에 정의되어 있습니다. 하이퍼 파라미터 값을 편집하는 명령은 위에서 설명한 것과 비슷합니다. 이 연습에서는 기본 하이퍼 매개 변수 값을 사용하십시오.


Train Your AWS DeepRacer Model


Training your model with Amazon SageMaker and AWS RoboMaker amounts to executing the code in the training_worker.py file under the notebook's src directory. The training_worker.py file is designated as the entry point of your training job.


Amazon SageMaker 및 AWS RoboMaker를 사용하여 모델을 교육하면 노트북 src 디렉토리의 training_worker.py 파일에서 코드가 실행됩니다. training_worker.py 파일은 교육 작업의 시작점으로 지정됩니다.


The training process involves using AWS RoboMaker to emulate driving experiences in the environment, relaying the experiences at fixed intervals to Amazon SageMaker as input to train the deep neural network, and updating the network weights to an S3 location.


교육 과정에는 AWS RoboMaker를 사용하여 환경에서 운전 경험을 에뮬레이션하고 일정한 간격으로 경험을 Amazon SageMaker에 입력으로 전달하여 심 신경 네트워크를 교육하고 네트워크 가중치를 S3 위치로 업데이트합니다.


While the training is in progress, you can have specified training metrics logged to Amazon CloudWatch Logs or displayed to the AWS RoboMaker terminal.


교육이 진행되는 동안 Amazon CloudWatch Log에 기록되거나 AWS RoboMaker 단말기에 표시되는 교육 메트릭을 지정할 수 있습니다.


To train your AWS DeepRacer model

  1. If you would like to view the training_worker.py code, you can uncomment the code cell under Training Entrypoint and then choose Run.
    training_worker.py 코드를 보려면 교육 Entrypoint에서 코드 셀의 주석 처리를 제거한 다음 실행을 선택하십시오.


    Alternatively, you can open the src/training_worker.py file directly from the notebook's home directory accessible through the Files tab.

    또는 파일 탭을 통해 액세스 할 수있는 노트북의 홈 디렉토리에서 src / training_worker.py 파일을 직접 열 수도 있습니다.

    2.
    To start an Amazon SageMaker job to train your AWS DeepRacer model, do the following:

Amazon SageMaker 작업을 시작하여 AWS DeepRacer 모델을 교육하려면 다음을 수행하십시오.

a. To prepare for running AWS RoboMaker, run the first code cell under Train the RL model using the Python SDK Script mode.

AWS RoboMaker를 실행할 준비를하려면 Python SDK Script 모드를 사용하여 RL 모델 교육에서 첫 번째 코드 셀을 실행하십시오.


This uploads the preset and environment to the S3 location for AWS RoboMaker to read.


그러면 프리셋 및 환경이 AWS RoboMaker가 읽을 수있는 S3 위치로 업로드됩니다.


b. To define training metrics to watch in either CloudWatch Logs or in an AWS RoboMaker console window, run the second code cell under Train the RL model using the Python SDK Script mode.


CloudWatch 로그 또는 AWS RoboMaker 콘솔 창에서 볼 수있는 교육 메트릭을 정의하려면 Python SDK 스크립트 모드를 사용하여 RL 모델 교육에서 두 번째 코드 셀을 실행하십시오.


You can watch the specified metrics to monitor the training and to find out the effectiveness of your chosen reward function in CloudWatch Logs or using an AWS RoboMaker terminal.


지정된 측정 항목을보고 교육을 모니터링하고 CloudWatch 로그에서 선택한 보상 기능의 효과를 확인하거나 AWS RoboMaker 터미널을 사용하여 확인할 수 있습니다.


c. To start a Amazon SageMaker training job for your AWS DeepRacer model, run the third code cell under Train the RL model using the Python SDK Script mode.


AWS DeepRacer 모델에 대한 Amazon SageMaker 교육 작업을 시작하려면 Python SDK 스크립트 모드를 사용하여 RL 모델 교육에서 세 번째 코드 셀을 실행하십시오.


This Amazon SageMaker training job uses the TensorFlow framework and runs on a specified EC2 compute instance type. The output lists the job name. You can track the status of this training job in Amazon SageMaker.


이 Amazon SageMaker 교육 작업은 TensorFlow 프레임 워크를 사용하며 지정된 EC2 계산 인스턴스 유형에서 실행됩니다. 출력에는 작업 이름이 나열됩니다. Amazon SageMaker에서이 교육 작업의 상태를 추적 할 수 있습니다.


3. To start an environment emulation job in AWS RoboMaker, run the code cell under Start the Robomaker job .


AWS RoboMaker에서 환경 에뮬레이션 작업을 시작하려면 Robomaker 작업 시작 아래에서 코드 셀을 실행하십시오.


4. After the training and emulation jobs are created, to create an AWS RoboMaker simulation application to run the simulation, run the three code cells under Create Simulations Application, in the order of display.


교육 및 에뮬레이션 작업이 생성 된 후 시뮬레이션을 실행하는 AWS RoboMaker 시뮬레이션 응용 프로그램을 만들려면 시뮬레이션 순서 생성 응용 프로그램에서 세 개의 코드 셀을 표시 순서대로 실행하십시오.


5. To start the simulation on AWS RoboMaker and share the simulated data, run the code cell under Launch the Simulation job on RoboMaker.


AWS RoboMaker에서 시뮬레이션을 시작하고 시뮬레이션 된 데이터를 공유하려면 RoboMaker에서 시뮬레이션 작업 시작 아래의 코드 셀을 실행하십시오.


6. To watch the simulations in AWS RoboMaker, run the code cell under Visualizing the simulations in RoboMaker and then choose the Simulation 1 link from the output.


AWS RoboMaker에서 시뮬레이션을 보려면 RoboMaker에서 시뮬레이션 시각화에서 코드 셀을 실행 한 다음 출력에서 시뮬레이션 1 링크를 선택하십시오.


Alternatively, you can go to the AWS RoboMaker console directly to open the simulation job.


또는 AWS RoboMaker 콘솔로 직접 가서 시뮬레이션 작업을 열 수도 있습니다.


After the simulation job is initialized, the AWS RoboMaker console makes available the following visualization utilities:


시뮬레이션 작업이 초기화되면 AWS RoboMaker 콘솔에서 다음과 같은 시각화 유틸리티를 사용할 수 있습니다.


  • Gazebo: an emulation of 3D worlds for simulating autonomous vehicle in the chosen track.
    선택한 트랙에서 자율 주행 차량을 시뮬레이션하기위한 3D 세계의 에뮬레이션입니다.

  • rqt: Qt-based framework and plugins for ROS GUI development.
    ROS GUI 개발을위한 Qt 기반 프레임 워크 및 플러그인.

  • ivis: ROS visualizer for displaying the field of vision as captured by the vehicle's front-facing camera.
    차량의 전면 카메라로 촬영 한 시야를 표시하는 ROS 시각화 장치.

  • Terminal: A terminal application to provide command line access on the simulation job host.
    시뮬레이션 작업 호스트에서 명령 줄 액세스를 제공하는 터미널 응용 프로그램입니다.


a. To view your vehicle learning in the 3D simulation, double-click or tap Gazebo.

3D 시뮬레이션에서 차량 학습을 보려면 두 번 클릭하거나 Gazebo를 누릅니다.


You watch the simulated vehicle navigate along the track in repeated trials starting from the starting point and ending at going off-track or reaching the finishing line. In the beginning, the vehicle can stay on the track briefly. As time goes on, it learns to stay on the track longer.


시뮬레이트 된 차량이 출발점에서 출발하여 오프 트랙으로 이동하거나 피니시 라인에 도달하는 반복 된 시도에서 트랙을 따라 탐색하는 것을 보았습니다. 처음에는 차량이 트랙에 잠시 머무를 수 있습니다. 시간이 지남에 따라 트랙에 더 오래 머무르는 법을 배웁니다.


b. To access rqt utilities, double-click or tap rqt and choose a plugin.
rqt 유틸리티에 액세스하려면 두 번 클릭하거나 rqt를 누르고 플러그인을 선택하십시오.


For more information about the plugins, see AWS RoboMaker plugins.

플러그인에 대한 자세한 내용은 AWS RoboMaker 플러그인을 참조하십시오.


c. To view the front-facing vision of the vehicle, double-click or tap rvis. Choose Add to create a visualization. And then choose the By topic tab, scroll down to choose/camera/zed/rgb/image_rec_color/Image, choose OK.


차량의 앞을 향한 시야를 보려면 두 번 클릭하거나 rvis를 누릅니다. 추가를 선택하여 시각화를 만듭니다. 그런 다음 항목 별 탭을 선택하고 /cr/zed/rgb/ image_rec_color / Image를 선택하여 아래로 스크롤 한 다음 확인을 선택하십시오.


d. To use the terminal, double-click or tap Terminal to open a terminal window on the simulation job host and type appropriate shell command.

터미널을 사용하려면 더블 클릭하거나 터미널을 눌러 시뮬레이션 작업 호스트에서 터미널 창을 열고 적절한 쉘 명령을 입력하십시오.


With the simulation job host terminal opened, you can call Linux shell commands to view (more or tail) the logs or performing other operations.


시뮬레이션 작업 호스트 터미널이 열린 상태에서 Linux 셸 명령을 호출하여 로그를 보거나 (또는 더 많이) 로그를 보거나 다른 작업을 수행 할 수 있습니다.


To view the reward of the last 10 steps in the simulation logs, you can type the following shell command in the terminal:


시뮬레이션 로그에서 마지막 10 단계의 보상을 보려면 터미널에 다음과 같은 쉘 명령을 입력 할 수 있습니다.


tail tmp/simulation-logs/stdout_and_stderr


7. To visualize the training performance, run the two code cells under Plot metrics for training job. When all is done successfully, you see a plot of Training reward vs Episode # similar to the following.


교육 성능을 시각화하려면 교육 작업을위한 Plot 메트릭 아래의 두 코드 셀을 실행하십시오. 모든 것이 성공적으로 완료되면 교육 보상과 에피소드 #의 음모가 다음과 유사하게 나타납니다.


In this particular example, the training reward appears to start to plateau. Perhaps more data are needed to verify if it's true. If the training job is running, you can run the code cell under Plot metrics for training job again to include more recent data into the plot. If they persist, the onset of large fluctuations can indicate certain deficiency in the reward function. Thus, you might update the reward function definition. In any case, you need to collect more data with more training.


이 특별한 예에서 교육 보상은 고원에 서기 시작합니다. 아마도 사실인지 확인하기 위해 더 많은 데이터가 필요합니다. 교육 작업이 실행중인 경우 최신 데이터를 플롯에 포함 시키려면 교육용 작업 메트릭에서 코드 셀을 다시 실행할 수 있습니다. 그것이 지속된다면 큰 변동의 시작은 보상 기능의 특정 결함을 나타낼 수 있습니다. 따라서 보상 기능 정의를 갱신 할 수 있습니다. 어떤 경우 든 더 많은 교육을 통해 더 많은 데이터를 수집해야합니다.


After training has elapsed the specified amount of time, you can locate the trained model artifacts in the training job's S3 bucket, e.g., s3://<bucket>/<sagemaker-training-job-name>/output/model.tar.gz. Download the model artifacts file, copy it to a USB drive and then transfer the file to your AWS DeepRacer vehicle's compute module.


지정된 시간이 경과 한 후에는 교육 작업의 S3 버켓에서 훈련 된 모델 아티팩트 (예 : s3 : // <bucket> / <sagemaker-training-job-name> / output / models.tar)를 찾을 수 있습니다. gz. 모델 아티팩트 파일을 다운로드하여 USB 드라이브에 복사 한 다음 파일을 AWS DeepRacer 차량의 컴퓨팅 모듈로 전송하십시오.


  • To clean up when you're done with training and no longer need the AWS RoboMaker and Amazon SageMaker resources, run the two code cells under Clean Up.
    교육을 마치고 더 이상 AWS RoboMaker 및 Amazon SageMaker 리소스가 필요 없으면 정리하려면 Clean Up 아래의 두 코드 셀을 실행하십시오.

  • To evaluate the model that has been trained thus far, run the code cell under Evaluation.
    지금까지 교육을받은 모델을 평가하려면 평가에서 코드 셀을 실행하십시오.

    If successful, a simulation job is created for the task in AWS RoboMaker. Make note of the job name in the output below the code cell. You may need it to open the simulation job in the AWS RoboMaker console. This simulation job is similar to the simulation job for training. It provides the same utilities for you view the evaluation in progress in the AWS RoboMaker console. In particular, you can watch the evaluation trials in Gazebo.

    성공하면 AWS RoboMaker에서 해당 작업에 대한 시뮬레이션 작업이 생성됩니다. 코드 셀 아래의 출력에서 작업 이름을 기록하십시오. AWS RoboMaker 콘솔에서 시뮬레이션 작업을 열 때 필요할 수 있습니다. 이 시뮬레이션 작업은 교육을위한 시뮬레이션 작업과 유사합니다. AWS RoboMaker 콘솔에서 진행중인 평가를 볼 수있는 동일한 유틸리티를 제공합니다. 특히 Gazebo에서 평가판을 볼 수 있습니다.

  • When you're done with evaluating the model and want to terminate the simulation application, run the code cell under Clean Up Simulation Application Resource.

    모델 평가를 마치고 시뮬레이션 애플리케이션을 종료하려면 시뮬레이션 시뮬레이션 애플리케이션 리소스 정리 아래에서 코드 셀을 실행하십시오.

반응형

Secure Calling AWS Services

2018. 12. 27. 10:16 | Posted by 솔웅


반응형


Secure Calling AWS DeepRacer and Other AWS Services

To run AWS DeepRacer securely, you must have appropriate security settings configured in your account. The security settings allow you to call the AWS DeepRacer service and also allow the AWS DeepRacer service to call other AWS services on your behalf. To grant the necessary permissions, you'll work with IAM roles and policies.


AWS DeepRacer를 안전하게 실행하려면 계정에 적절한 보안 설정을 구성해야합니다. 보안 설정을 사용하면 AWS DeepRacer 서비스를 호출 할 수 있으며 AWS DeepRacer 서비스가 사용자 대신 다른 AWS 서비스를 호출 할 수 있습니다. 필요한 사용 권한을 부여하려면 IAM 역할 및 정책을 사용하십시오.


If the IAM roles and policies for your account have not yet been created, you can use the AWS DeepRacer console with a single click. You can also use the IAM console or SDK to create the required roles and policy manually. The information presented in this section helps you understand what types of IAM roles and policies are needed..


계정에 대한 IAM 역할 및 정책이 아직 작성되지 않은 경우 한 번의 클릭으로 AWS DeepRacer 콘솔을 사용할 수 있습니다. IAM 콘솔 또는 SDK를 사용하여 필요한 역할 및 정책을 수동으로 만들 수도 있습니다. 이 섹션의 정보는 필요한 IAM 역할 및 정책의 유형을 이해하는 데 도움이됩니다.


AWS Services Accessed by AWS DeepRacer Directly or Indirectly


AWS DeepRacer uses the following AWS service to manage required resources:


AWS DeepRacer는 다음 AWS 서비스를 사용하여 필요한 리소스를 관리합니다.


Amazon S3

To store trained model artifacts in an Amazon S3 bucket.

AWS Lambda

To create and run the reward functions.

AWS CloudFormation

To create training jobs for AWS DeepRacer models.

Amazon SageMaker

To train the AWS DeepRacer models.

AWS RoboMaker

To simulate an environment for both training and evaluation.


The dependent AWS Lambda, AWS CloudFormation, Amazon SageMaker and AWS RoboMaker in turn use other AWS services including CloudWatch and CloudWatch Logs.


AWS Lambda, AWS CloudFormation, Amazon SageMaker 및 AWS RoboMaker에 대해 CloudWatch 및 CloudWatch Logs와 같은 다른 AWS 서비스를 사용할 수 있습니다.


The following table shows AWS services used by AWS DeepRacer, directly or indirectly.


다음 표는 AWS DeepRacer가 직접 또는 간접적으로 사용하는 AWS 서비스를 보여줍니다.


AWS Services that AWS DeepRacer uses directly or indirectly

AWS service principal

Comments

application-autoscaling

Indirectly called by Amazon SageMaker to automatically scale its operations.

cloudformation

Directly called by AWS DeepRacer to create training jobs for reinforcement

learning models.

cloudwatch

Directly called by AWS DeepRacer to log its operations.

Indirectly called by AWS RoboMaker to log its operations.

Indirectly called by Amazon SageMaker to log its operations.

ec2

Indirectly called by AWS CloudFormation and Amazon SageMaker to create

and run training jobs.

ecr

Indirectly called by AWS RoboMaker to work with

Amazon Elastic Container Registry.

kinesisvideo

Directly called by AWS DeepRacer to view cached training streams.

Indirectly called by AWS RoboMaker to cache training streams.

lambda

Directly called by AWS DeepRacer to create and run the reward functions.

logs

Directly called by AWS DeepRacer to log its operations.

Indirectly called by AWS Lambda to log its operations.

Indirectly called by AWS RoboMaker to log its operations.

robomaker

Directly called by AWS DeepRacer to render a virtual reinforcement learning

environment in a simulation.

s3

Indirectly called by AWS RoboMaker to list a bucket beginning with 'deepracer'

 and to read objects in the bucket, or write objects to the bucket.

Indirectly called by Amazon SageMaker to perform
Amazon SageMaker-specific storage operations.

Directly called by AWS DeepRacer to create, list, and delete buckets

 that have names starting with "deepracer." Also called to download

objects from the buckets, upload objects to the buckets, or delete

objects from the buckets.

sagemaker

Directly called by AWS DeepRacer to train reinforcement learning models.


In order to use AWS DeepRacer and call these services, you must have appropriate IAM roles created with required policies attached to them. You'll learn the details about these policies and roles in Identity and Access Management for AWS DeepRacer.


AWS DeepRacer를 사용하고 이러한 서비스를 호출하려면 필요한 정책이 첨부 된 적절한 IAM 역할이 있어야합니다. AWS DeepRacer의 ID 및 액세스 관리에서 이러한 정책 및 역할에 대한 세부 정보를 배우게됩니다.


Identity and Access Management for AWS DeepRacer


This section explains the details of the relevant IAM roles and policies required for you to use AWS DeepRacer.


이 섹션에서는 AWS DeepRacer를 사용하는 데 필요한 IAM 역할 및 정책에 대해 자세히 설명합니다.


Permissions for Direct Access to AWS Services by AWS DeepRacer


The following IAM policy defines the required permissions for AWS DeepRacer to directly access the dependent AWS services.


다음 IAM 정책은 AWS DeepRacer가 종속 AWS 서비스에 직접 액세스하는 데 필요한 권한을 정의합니다.


{
    "Version": "2012-10-17",
    "Statement": [
        {
            "Effect": "Allow",
            "Action": [
                "deepracer:*"
            ],
            "Resource": "*"
        },
        {
            "Effect": "Allow",
            "Action": [
                "cloudformation:*",
                "robomaker:*",
                "sagemaker:*",
                "states:*",
                "sts:*"
            ],
            "Resource": "*"
        },
        {
            "Effect": "Allow",
            "Action": [
                "iam:PassRole"
            ],
            "Resource": [
                "arn:aws:iam::*:role/AWSDeepRacer*",
                "arn:aws:iam::*:role/service-role/AWSDeepRacer*"
            ]
        },
        {
            "Effect": "Allow",
            "Action": [
                "cloudwatch:GetMetricData",
                "logs:CreateLogGroup",
                "logs:CreateLogStream",
                "logs:DescribeLogStreams",
                "logs:GetLogEvents"
            ],
            "Resource": "*"
        },
        {
            "Effect": "Allow",
            "Action": [
                "lambda:CreateFunction",
                "lambda:DeleteFunction",
                "lambda:GetFunction",
                "lambda:InvokeFunction",
                "lambda:UpdateFunctionCode"
            ],
            "Resource": [
                "arn:aws:lambda:*:*:function:*DeepRacer*",
                "arn:aws:lambda:*:*:function:*Deepracer*",
                "arn:aws:lambda:*:*:function:*deepracer*",
                "arn:aws:lambda:*:*:function:*dr-*"
            ]
        },
        {
            "Effect": "Allow",
            "Action": [
                "s3:GetObject",
                "s3:GetBucketLocation",
                "s3:DeleteObject",
                "s3:ListBucket",
                "s3:ListAllMyBuckets",
                "s3:PutObject",
                "s3:PutBucketPolicy"
            ],
            "Resource": [
                "arn:aws:s3:::*DeepRacer*",
                "arn:aws:s3:::*Deepracer*",
                "arn:aws:s3:::*deepracer*",
                "arn:aws:s3:::dr-*"
            ]
        },
        {
            "Effect": "Allow",
            "Action": [
                "s3:GetObject"
            ],
            "Resource": "*",
            "Condition": {
                "StringEqualsIgnoreCase": {
                    "s3:ExistingObjectTag/DeepRacer": "true"
                }
            }
        },
        {
            "Effect": "Allow",
            "Action": [
                "kinesisvideo:CreateStream",
                "kinesisvideo:DeleteStream",
                "kinesisvideo:DescribeStream",
                "kinesisvideo:GetDataEndpoint",
                "kinesisvideo:PutMedia",
                "kinesisvideo:TagStream"
            ],
            "Resource": [
                "arn:aws:kinesisvideo:*:*:stream/dr-*"
            ]
        }
    ]
}


The IAM role, which has this policy attached to, must have AWS DeepRacer as its trusted entity. This is shown in the following trust policy:


이 정책이 첨부 된 IAM 역할은 AWS DeepRacer를 신뢰할 수있는 엔터티로 가져야합니다. 이것은 다음 트러스트 정책에 표시됩니다.


{
  "Version": "2012-10-17",
  "Statement": [
    {
      "Sid": "",
      "Effect": "Allow",
      "Principal": {
        "Service": "deepracer.amazonaws.com"
      },
      "Action": "sts:AssumeRole"
    }
  ]
}


Permissions for Indirect Access to AWS Services via AWS Lambda by AWS DeepRacer


For AWS DeepRacer to call Lambda to create and run the reward function of your AWS DeepRacer model, you must grant permissions that allow Lambda to call the AWS services that Lambda relies upon. Typically, this involves an IAM role that has a trust relationship with Lambda as a trusted entity and a policy with the required permissions attached.


AWS DeepRacer가 AWS DeepRacer 모델의 보상 기능을 만들고 실행하기 위해 Lambda를 호출하려면 Lambda가 Lambda가 의존하는 AWS 서비스를 호출 할 수있는 권한을 부여해야합니다. 일반적으로이 작업에는 람다와 신뢰할 수있는 엔터티로 트러스트 관계가 있고 필요한 사용 권한이 첨부 된 정책이있는 IAM 역할이 포함됩니다.


The AWS DeepRacer console helps you create this IAM role with the IAM policy with a single click of a button. For your convenience, we list the IAM policy with the necessary permissions attached to the IAM role as follows:


AWS DeepRacer 콘솔을 사용하면 한 번의 클릭으로 IAM 정책을 사용하여이 IAM 역할을 만들 수 있습니다. 편의를 위해 다음과 같이 IAM 역할에 첨부 된 필요한 권한이있는 IAM 정책을 나열합니다.


{
    "Version": "2012-10-17",
    "Statement": [
        {
            "Effect": "Allow",
            "Action": [
                "logs:CreateLogGroup",
                "logs:CreateLogStream",
                "logs:PutLogEvents"
            ],
            "Resource": "*"
        }
    ]
}


The IAM role, which has this policy attached to, must have Lambda as its trusted entity. This is shown in the following trust policy:


이 정책이 첨부 된 IAM 역할에는 람다가 신뢰할 수있는 엔터티 여야합니다. 이것은 다음 트러스트 정책에 표시됩니다.


{
  "Version": "2012-10-17",
  "Statement": [
    {
      "Sid": "",
      "Effect": "Allow",
      "Principal": {
        "Service": [
          "lambda.amazonaws.com"
        ]
      },
      "Action": "sts:AssumeRole"
    }
  ]
}


Permissions for Indirect Access to AWS Services via Amazon SageMaker by AWS DeepRacer


For AWS DeepRacer to call Amazon SageMaker to train a model, you must grant permissions that allow Amazon SageMaker to call the AWS services that Amazon SageMaker relies upon. Typically, this involves an IAM role that has a trust relationship with Amazon SageMaker as a trusted entity and a policy with the required permissions attached.


AWS DeepRacer가 모델을 교육하기 위해 Amazon SageMaker를 호출하려면 Amazon SageMaker가 Amazon SageMaker가 사용하는 AWS 서비스를 호출 할 수 있도록 허용해야합니다. 일반적으로이 작업에는 Amazon SageMaker와 신뢰할 수있는 엔터티의 트러스트 관계가 있고 필요한 권한이 첨부 된 정책이있는 IAM 역할이 포함됩니다.


The AWS DeepRacer console helps you create this IAM role with the IAM policy with a single click of a button. For your convenience, we list the IAM policy with the necessary permissions attached to the IAM role as follows:


AWS DeepRacer 콘솔을 사용하면 한 번의 클릭으로 IAM 정책을 사용하여이 IAM 역할을 만들 수 있습니다. 편의를 위해 다음과 같이 IAM 역할에 첨부 된 필요한 권한이있는 IAM 정책을 나열합니다.


{
    "Version": "2012-10-17",
    "Statement": [
        {
            "Effect": "Allow",
            "Action": [
                "sagemaker:*"
            ],
            "Resource": "*"
        },
        {
            "Effect": "Allow",
            "Action": [
                "ecr:GetAuthorizationToken",
                "ecr:GetDownloadUrlForLayer",
                "ecr:BatchGetImage",
                "ecr:BatchCheckLayerAvailability",
                "cloudwatch:PutMetricData",
                "cloudwatch:PutMetricAlarm",
                "cloudwatch:DescribeAlarms",
                "cloudwatch:DeleteAlarms",
                "ec2:CreateNetworkInterface",
                "ec2:CreateNetworkInterfacePermission",
                "ec2:DeleteNetworkInterface",
                "ec2:DeleteNetworkInterfacePermission",
                "ec2:DescribeNetworkInterfaces",
                "ec2:DescribeVpcs",
                "ec2:DescribeDhcpOptions",
                "ec2:DescribeSubnets",
                "ec2:DescribeSecurityGroups",
                "ec2:DescribeVpcEndpoints",
                "application-autoscaling:DeleteScalingPolicy",
                "application-autoscaling:DeleteScheduledAction",
                "application-autoscaling:DeregisterScalableTarget",
                "application-autoscaling:DescribeScalableTargets",
                "application-autoscaling:DescribeScalingActivities",
                "application-autoscaling:DescribeScalingPolicies",
                "application-autoscaling:DescribeScheduledActions",
                "application-autoscaling:PutScalingPolicy",
                "application-autoscaling:PutScheduledAction",
                "application-autoscaling:RegisterScalableTarget",
                "logs:CreateLogGroup",
                "logs:CreateLogStream",
                "logs:DescribeLogStreams",
                "logs:GetLogEvents",
                "logs:PutLogEvents"
            ],
            "Resource": "*"
        },
        {
            "Effect": "Allow",
            "Action": [
                "s3:GetObject",
                "s3:PutObject",
                "s3:DeleteObject"
            ],
            "Resource": [
                "arn:aws:s3:::*SageMaker*",
                "arn:aws:s3:::*Sagemaker*",
                "arn:aws:s3:::*sagemaker*"
            ]
        },
        {
            "Effect": "Allow",
            "Action": [
                "s3:CreateBucket",
                "s3:GetBucketLocation",
                "s3:ListBucket",
                "s3:ListAllMyBuckets"
            ],
            "Resource": "*"
        },
        {
            "Effect": "Allow",
            "Action": [
                "s3:GetObject"
            ],
            "Resource": "*",
            "Condition": {
                "StringEqualsIgnoreCase": {
                    "s3:ExistingObjectTag/SageMaker": "true"
                }
            }
        },
        {
            "Action": "iam:CreateServiceLinkedRole",
            "Effect": "Allow",
            "Resource": "arn:aws:iam::*:role/aws-service-role/sagemaker.application-autoscaling.amazonaws.com/AWSServiceRoleForApplicationAutoScaling_SageMakerEndpoint",
            "Condition": {
                "StringLike": {
                    "iam:AWSServiceName": "sagemaker.application-autoscaling.amazonaws.com"
                }
            }
        },
        {
            "Effect": "Allow",
            "Action": [
                "iam:PassRole"
            ],
            "Resource": "*",
            "Condition": {
                "StringEquals": {
                    "iam:PassedToService": "sagemaker.amazonaws.com"
                }
            }
        }
    ]
}


The IAM role, which has this policy attached to, must have Amazon SageMaker as its trusted entity. This is shown in the following trust policy:


이 정책이 첨부 된 IAM 역할에는 Amazon SageMaker가 신뢰할 수있는 엔터티 여야합니다. 이것은 다음 트러스트 정책에 표시됩니다.


{
  "Version": "2012-10-17",
  "Statement": [
    {
      "Sid": "",
      "Effect": "Allow",
      "Principal": {
        "Service": [
          "sagemaker.amazonaws.com"
        ]
      },
      "Action": "sts:AssumeRole"
    }
  ]
}


Permissions for Indirect Access to AWS Services via AWS RoboMaker by AWS DeepRacer


For AWS DeepRacer to call AWS RoboMaker in order to render a virtual environment, grant permissions that allow AWS DeepRacer to call the AWS services that AWS RoboMaker relies upon. Typically, this involves creating an IAM role with a trust relationship with AWS RoboMaker as a trusted entity and an attached policy with the required permissions.


AWS DeepRacer가 가상 환경을 렌더링하기 위해 AWS RoboMaker를 호출하려면 AWS DeepRacer가 AWS RoboMaker가 의존하는 AWS 서비스를 호출 할 수있는 권한을 부여합니다. 일반적으로 AWS RoboMaker와의 신뢰 관계가있는 IAM 역할을 신뢰할 수있는 엔터티로 만들고 필요한 권한이있는 첨부 된 정책을 만듭니다.


The AWS DeepRacer console helps you create this IAM role with the IAM policy with a single click of a button. For your convenience, we list the IAM policy with the necessary permissions attached to the IAM role as follows:


AWS DeepRacer 콘솔을 사용하면 한 번의 클릭으로 IAM 정책을 사용하여이 IAM 역할을 만들 수 있습니다. 편의를 위해 다음과 같이 IAM 역할에 첨부 된 필요한 권한이있는 IAM 정책을 나열합니다.


{
    "Version": "2012-10-17",
    "Statement": [
        {
            "Effect": "Allow",
            "Action": [
                "robomaker:*"
            ],
            "Resource": "*"
        },
        {
            "Effect": "Allow",
            "Action": [
                "cloudwatch:PutMetricData",
                "ec2:CreateNetworkInterfacePermission",
                "ec2:DeleteNetworkInterface",
                "ec2:DescribeNetworkInterfaces",
                "ec2:DescribeSubnets",
                "ec2:DescribeSecurityGroups",
                "ec2:DescribeVpcs"
            ],
            "Resource": "*"
        },
        {
            "Effect": "Allow",
            "Action": [
                "logs:CreateLogGroup",
                "logs:CreateLogStream",
                "logs:DescribeLogStreams",
                "logs:PutLogEvents"
            ],
            "Resource": [
                "arn:aws:logs:*:*:log-group:/aws/robomaker/SimulationJobs",
                "arn:aws:logs:*:*:log-group:/aws/robomaker/SimulationJobs:log-stream:*"
            ]
        },
        {
            "Effect": "Allow",
            "Action": [
                "s3:GetObject",
                "s3:GetBucketLocation",
                "s3:ListBucket",
                "s3:ListAllMyBuckets",
                "s3:PutObject"
            ],
            "Resource": [
                "arn:aws:s3:::*DeepRacer*",
                "arn:aws:s3:::*Deepracer*",
                "arn:aws:s3:::*deepracer*",
                "arn:aws:s3:::dr-*"
            ]
        },
        {
            "Effect": "Allow",
            "Action": [
                "s3:GetObject"
            ],
            "Resource": "*",
            "Condition": {
                "StringEqualsIgnoreCase": {
                    "s3:ExistingObjectTag/DeepRacer": "true"
                }
            }
        },
        {
            "Effect": "Allow",
            "Action": [
                "kinesisvideo:CreateStream",
                "kinesisvideo:DescribeStream",
                "kinesisvideo:GetDataEndpoint",
                "kinesisvideo:PutMedia",
                "kinesisvideo:TagStream"
            ],
            "Resource": [
                "arn:aws:kinesisvideo:*:*:stream/dr-*"
            ]
        }
    ]
}


The IAM role, which has this policy attached to, must have AWS RoboMaker as its trusted entity. This is shown in the following trust policy:


이 정책이 첨부 된 IAM 역할은 AWS RoboMaker를 신뢰할 수있는 엔터티로 가져야합니다. 이것은 다음 트러스트 정책에 표시됩니다.


{
  "Version": "2012-10-17",
  "Statement": [
    {
      "Sid": "",
      "Effect": "Allow",
      "Principal": {
        "Service": [
          "robomaker.amazonaws.com"
        ]
      },
      "Action": "sts:AssumeRole"
    }
  ]
}


Permissions for Indirect Access to AWS Services via AWS CloudFormation by AWS DeepRacer


For AWS DeepRacer to call AWS CloudFormation in order to create a training job for your AWS DeepRacer model, grant permissions that allow AWS DeepRacer to call the AWS services that AWS CloudFormation relies upon. Typically, this involves creating an IAM role with a trust relationship with AWS CloudFormation as a trusted entity and an attached policy with the required permissions.


AWS DeepRacer 모델에 대한 교육 작업을 생성하기 위해 AWS DeepRacer가 AWS CloudFormation을 호출하기 위해 AWS DeepRacer가 AWS CloudFormation이 의존하는 AWS 서비스를 호출 할 수있는 권한을 부여합니다. 일반적으로 AWS CloudFormation과 트러스트 관계가있는 IAM 역할을 신뢰할 수있는 엔터티로 만들고 필요한 권한이있는 첨부 된 정책을 만듭니다.


The AWS DeepRacer console helps you create this IAM role with the IAM policy with a single click of a button. For your convenience, we list the IAM policy with the necessary permissions attached to the IAM role as follows:


AWS DeepRacer 콘솔을 사용하면 한 번의 클릭으로 IAM 정책을 사용하여이 IAM 역할을 만들 수 있습니다. 편의를 위해 다음과 같이 IAM 역할에 첨부 된 필요한 권한이있는 IAM 정책을 나열합니다.


{
    "Version": "2012-10-17",
    "Statement": [
        {
            "Effect": "Allow",
            "Action": [
                "cloudformation:*"
            ],
            "Resource": "*"
        },
        {
            "Effect": "Allow",
            "Action": [
                "ec2:AllocateAddress",
                "ec2:AttachInternetGateway",
                "ec2:AssociateRouteTable",
                "ec2:AuthorizeSecurityGroupEgress",
                "ec2:AuthorizeSecurityGroupIngress",
                "ec2:CreateInternetGateway",
                "ec2:CreateNatGateway",
                "ec2:CreateNetworkAcl",
                "ec2:CreateNetworkAclEntry",
                "ec2:CreateRoute",
                "ec2:CreateRouteTable",
                "ec2:CreateSecurityGroup",
                "ec2:CreateSubnet",
                "ec2:CreateTags",
                "ec2:CreateVpc",
                "ec2:DeleteInternetGateway",
                "ec2:DeleteNatGateway",
                "ec2:DeleteNetworkAcl",
                "ec2:DeleteNetworkAclEntry",
                "ec2:DeleteRoute",
                "ec2:DeleteRouteTable",
                "ec2:DeleteSecurityGroup",
                "ec2:DeleteSubnet",
                "ec2:DeleteTags",
                "ec2:DeleteVpc",
                "ec2:DescribeAddresses",
                "ec2:DescribeInternetGateways",
                "ec2:DescribeNatGateways",
                "ec2:DescribeNetworkAcls",
                "ec2:DescribeRouteTables",
                "ec2:DescribeSecurityGroups",
                "ec2:DescribeSubnets",
                "ec2:DescribeTags",
                "ec2:DescribeVpcs",
                "ec2:DetachInternetGateway",
                "ec2:DisassociateRouteTable",
                "ec2:ModifyVpcAttribute",
                "ec2:ReleaseAddress",
                "ec2:ReplaceNetworkAclAssociation",
                "ec2:RevokeSecurityGroupEgress",
                "ec2:RevokeSecurityGroupIngress"
            ],
            "Resource": "*"
        }
    ]
}


The IAM role, which has this policy attached to, must have AWS CloudFormation as its trusted entity. This is shown in the following trust policy:


이 정책이 첨부 된 IAM 역할은 AWS CloudFormation을 신뢰할 수있는 엔터티로 가져야합니다. 이것은 다음 트러스트 정책에 표시됩니다.


{
  "Version": "2012-10-17",
  "Statement": [
    {
      "Sid": "",
      "Effect": "Allow",
      "Principal": {
        "Service": [
          "cloudformation.amazonaws.com"
        ]
      },
      "Action": "sts:AssumeRole"
    }
  ]
}


반응형

Get Started with AWS DeepRacer

2018. 12. 25. 21:52 | Posted by 솔웅


반응형


Get Started with AWS DeepRacer


To help you get started quickly with AWS DeepRacer, we walk you through essential steps using the AWS DeepRacer console. Use the console to: Create a training job that trains a reinforcement learning model for autonomous racing and also evaluates the trained model in a simulated environment.


AWS DeepRacer를 빠르게 시작하는 데 도움이되도록 AWS DeepRacer 콘솔을 사용하여 필수 단계를 안내합니다. 콘솔을 사용하여 다음을 수행 할 수 있습니다. 자율 경주를 위한 강화 학습 모델reinforcement learning model을 훈련하고 시뮬레이트 된 환경에서 훈련 된 모델을 평가하는 훈련 작업을 만듭니다.


Train Your First AWS DeepRacer Model for Autonomous Racing


Using the AWS DeepRacer console, you can follow built-in templates to train and evaluate an AWS DeepRacer model.


AWS DeepRacer 콘솔을 사용하여 내장 된 템플릿을 따라 AWS DeepRacer 모델을 학습하고 평가할 수 있습니다.


To train a reinforcement learning model for autonomous racing using the AWS DeepRacer console


AWS DeepRacer 콘솔을 사용하여 자율 경주용 reinforcement learning model을 훈련하기


  1. Sign in to the AWS DeepRacer console(https://console.aws.amazon.com/deepracer).

  2. On the AWS DeepRacer home page, choose Create model.

    If you aren't on the home page, choose Reinforcement learning on the primary navigation pane and then choose Create model.

    AWS DeepRacer 홈 페이지에 있지 않은 경우 primary navigation pane에서 Reinforcement learning을 선택한 다음 Create model을 선택하십시오.

  3. Under Model details on the Create model page, do the following:

    1. Type a name for the to-be-trained model in the Model name input field. Use this name to identify this model in the list of AWS DeepRacer models you've created or on the leaderboards displaying the evaluation metrics of the model.


      모델 이름 입력 필드에 to-be-trained model의 이름을 입력하십시오. 이 이름을 사용하여 작성한 AWS DeepRacer 모델 목록 또는 모델의 평가 메트릭을 표시하는 leaderboards에서이 모델을 식별하십시오.


  1. Optionally, provide a brief description of the model in the Model description - optional input field. The description, for example, can provide a summary of the model features and limitations.

    옵션으로 Model description에 해당 모델에 대한 간단한 설명을 제공합니다. 이 설명은 예를 들어 해당 모델 기능에 대한 요약과 제한 사항등에 대한 정보를 제공할 수 있습니다

  2. For Permissions and storage, choose the Create resources button to create the required IAM roles and an S3 bucket, if they don't already exist.

    Permissions 및 storage에 대해 Create resources 버튼을 선택하여 필수 IAM roles와 S3 버킷을 만듭니다. (만약 그것들이 존재하지 않을 경우)

    If the resources have been created, you're notified as such as shown in the following screenshot:

    리소스가 생성 된 경우 다음 스크린 샷과 같이 알림을받습니다.


The S3 bucket is used to store the trained model artifacts. And the IAM roles contain relevant IAM policies to grant AWS DeepRacer permissions to call other AWS services on your behalf. For more information about the required IAM roles and policies, see Identity and Access Management for AWS DeepRacer.


S3 버킷은 훈련된 모델 artifacts를 저장하는 데 사용됩니다. 또한 IAM roles에는 AWS DeepRacer 권한을 부여하여 관련 AWS 서비스를 호출하는 관련 IAM 정책이 포함됩니다. 필요한 IAM 역할 및 정책에 대한 자세한 내용은 AWS DeepRacer의 ID 및 액세스 관리를 참조하십시오.


  1.  


  2. Under Environment simulation, choose an available track as a virtual environment with which your agent interacts to train a reinforcement learning model through trials and errors.

    환경 시뮬레이션에서 시도 및 오류를 통해 reinforcement learning 모델을 학습하기 위해 agent가 상호 작용하는 가상 환경으로, 사용 가능한 트랙을 선택하십시오.


  3. Under Reward function, choose the Basic function or Advanced function and use the predefined code without modification.

    보상 기능에서 기본 기능 또는 고급 기능을 선택하고 수정없이 미리 정의 된 코드를 사용하시면 됩니다.

    To modify or replace the predefined reward function code, choose the Insert code button to insert the code into the code editor and change it.

    미리 정의 된 보상 기능 코드를 수정하거나 교체하려면 코드 삽입 단추를 선택하여 코드 편집기에 코드를 삽입하고 변경하십시오.

  4. To customize hyperparameters, expand Algorithm settings and set Hyperparameters as follows:

    hyperparameters를 사용자 정의하려면 알고리즘 설정을 expand하고 다음과 같이 hyperparameters를 설정하십시오.

    1. For Batch size, choose an available options or leave the default choice (64) as-is.

    2. For Number of epochs, set a valid value or leave the default (10) as-is.

    3. For Learning rate, set a valid value or leave the default value (0.0003) as-is.

    4. For Exploration, choose one of the available options or leave the default value (Categorical Parameters) as-is.

    5. For Entropy, set a valid value or leave the default value (0.01) as-is.

    6. For Discount factor, set a valid value or leave the default value (0.99) as-is.

    7. For Loss type, choose an available options or leave the default choice (Huber) as-is.

    8. For Number of episodes between each training, set a valid value or leave the default value (20) as-is.

    For more information about hyperparameters, see Systematically Tune Hyperparameters for Optimal Training Performances.

    hyperparameters에 대한 자세한 내용은 Systematically Tune Hyperparameters for Optimal Training Performances를 참조하십시오.


  5. Under Stop conditions, set the conditions to terminate long-running (and possible run-away) training session:

    정지 조건에서 장기 실행 (및 가능한 런 - 어웨이) 훈련 세션을 종료하는 조건을 설정하십시오.

    1. For Max. Time, set a valid value or leave the default value (60 mins) as-is.

      Max. Time에 대해서는, 유효한 값을 설정하거나 기본값 (60 분)을 그대로 두십시오.

    For more information about stop conditions, see Train and Evaluate AWS DeepRacer Models.

    정지 조건에 대한 자세한 내용은 Train and Evaluate AWS DeepRacer Models를 참조하십시오.


  6. Choose Start training to start creating the model and provisions the training job instance. The process takes a few minutes. You can watch the status change on the Models page.

    모델을 만들고 훈련 작업 인스턴스를 제공하기 위해  Start training을 선택하십시오. 이 과정은 몇 분이 걸립니다. Models page에서 상태 변경을 볼 수 있습니다.

  7. After the training is initialized, the status becomes Training. You can now choose the model name to open the mode details page.

    훈련이 초기화 된 후 status는 Training이됩니다. 이제 모델 이름을 선택하여 모드 세부 정보 페이지를 열 수 있습니다.


10. On the model details page, watch the training progress in the simulator.


모델 세부 정보 페이지에서 시뮬레이터의 교육 진행 상황을 확인하십시오.


As seen in the simulator, as the agent maneuvers the curve on the track, it gets repeatedly knocked off the track until it masters the correct steering. The training stops when the specified stop condition is met. The training has converged if the TrainingRewardScore value plateaus with respect to the training time. You can choose Stop training to manually stop the training job when the training has converged before the specified stop condition is met. If the training has not converged when the training stops, you should do the following: Create a new training job. Tune some hyperparameters or extend the training time. Repeat the training until the average reward converges. If you choose Stop training, the process could take a few minutes to complete.

시뮬레이터에서 볼 수 있듯이 에이전트가 트랙에서 커브를 움직이면 올바른 스티어링을 마스터 할 때까지 트랙에서 반복적으로 knocked off됩니다. 지정한 중지 조건이 충족되면 교육이 중지됩니다. 트레이닝 시간과 관련하여 TrainingRewardScore 값이 안정되면 교육이 수렴됩니다. 지정된 중지 조건이 충족되기 전에 학습이 수렴되었을 때 수동으로 학습 작업을 중지하려면 학습 중지를 선택할 수 있습니다. 교육이 중지되었을 때 교육이 수렴되지 않은 경우 다음을 수행해야합니다. 새 교육 작업을 작성하십시오. 일부 hyperparameters를 조정하거나 교육 시간을 연장하십시오. 평균 보상이 수렴 할 때까지 훈련을 반복하십시오. 교육 중지를 선택하면 프로세스가 완료되는 데 몇 분이 걸릴 수 있습니다.

After the training job finishes, continue next to evaluate the trained model to gauge its performance.


교육 작업이 끝난 후에는 다음 단계로 진행하여 숙련 된 모델을 평가하여 성능을 측정하십시오.


Evaluate Your AWS DeepRacer Models in Simulation

After training completes, follow the steps below to evaluate the trained model.

교육이 끝나면 아래 단계에 따라 숙련 된 모델을 평가하십시오.


  1. In the Evaluation section, choose Start evaluation to begin the evaluation.

    평가 섹션에서 평가 시작을 선택하여 평가를 시작합니다.

    You can start evaluation only when your model is a ready state. A model is ready when the training completes. Even if the training doesn't complete, the model that has been trained up to the failing point can still be ready.

    모델이 준비 상태 인 경우에만 평가를 시작할 수 있습니다. 교육이 완료되면 모델이 준비됩니다. 교육이 완료되지 않더라도 실패한 지점까지 훈련 된 모델을 계속 준비 할 수 있습니다.


2. Under Select environment to start evaluation, choose the track option you specified in the training steps.


평가를 시작하기위해 Select environment에서 교육 단계에서 지정한 트랙 옵션을 선택하십시오.


You can choose any track for evaluating your model, however, you can only expect the best performance on the track used to train the model.


모델을 평가하기 위해 아무 트랙이나 선택할 수는 있지만 모델을 학습하는 데 사용 된 트랙에서만 최상의 성능을 기대할 수 있습니다.


3, To specify the stop condition, leave the default value (3 trials) as-is forNumber of trials. You can specify at most 5 trial runs at a time.


정지 조건을 지정하려면 시도 횟수에 대한 기본값 (3 회)을 그대로 두십시오. 한 번에 최대 5 회의 시험 실행을 지정할 수 있습니다.


4. Choose Start evaluation to start creating and initializing the evaluation job.

평가 작업 생성 및 초기화를 시작하려면 평가 시작을 선택합니다.


This initialization process takes about a few minutes to complete.


이 초기화 프로세스는 완료하는 데 몇 분 정도 걸립니다.


5. Once evaluation is in progress, choose Stop evaluation if you would like to stop the evaluation for any reason.

평가가 진행되면 어떤 이유에서든 평가를 중단하려면 평가 중지를 선택하십시오.


To stop an evaluation job, choose Stop evaluation on the upper-right corner of the Evaluation pane and then confirm to stop the evaluation.


평가 작업을 중지하려면 평가 창의 오른쪽 위 모서리에있는 평가 중지를 선택한 다음 평가를 중지하도록 확인하십시오.


6. After evaluation completed successfully, view the performance results underEvaluation.


평가가 성공적으로 완료되면 평가에서 성능 결과를보십시오.


For this training, the performance (of ~30%-40% completion) is not of production quality. The agent couldn't manage to finish the course at all. This is understandable because the TrainingRewardScore value didn't appear to have converged. You can improve the performance by extending the Max. time value. For example, by doubling the training time, you should improve the performance significantly, as shown by the following evaluation results:


이 훈련의 경우 성능 (~ 30 % ~ 40 % 완성)은 production quality가 아닙니다. 에이전트가 해당 과정을 전혀 마치지 못한 것입니다. 이는 TrainingRewardScore 값이 수렴하지 않은 것으로 이해할 수 있습니다. Max. time값을 확장하여 성능을 향상시킬 수 있습니다. 예를 들어 훈련 시간을 두 배로 늘리면 다음과 같은 평가 결과에 나타난 것처럼 성능을 크게 향상시켜야합니다.


This time the agent managed to complete the entire track (of 100% completion) one time at a slower speed (in 1 minute and 23 seconds). If you looked at the TrainingRewardScore plot for the training, you would have seen the training score had begun to converge.


이번에는 에이전트가 전체 트랙 (100 % 완료)을 한 번 더 느린 속도 (1 분 23 초)로 완료했습니다. 교육을 위해 TrainingRewardScore 플롯을 보면 훈련 점수가 수렴하기 시작했을 것입니다.


Now you've finished training and evaluating your first AWS DeepRacer model for autonomous racing with clicks or taps of a few buttons and some patience. The wizard provided by the AWS DeepRacer console did most of the heavy lifting.


이제 몇 번의 버튼 클릭과 몇 번의 인내로 자율 경주를위한 첫 번째 AWS DeepRacer 모델을 교육하고 평가를 마쳤습니다. AWS DeepRacer 콘솔이 제공하는 마법사는 대부분의 어려운 작업을 수행했습니다.


From here on, you can proceed to improve the model by cloning the model, tweaking the reward function, tuning hyperparameters, and then iterating the process until the TrainingRewardScore value converges and the performance metrics improve. For more information on how to improve the training, see Train and Evaluate AWS DeepRacer Models.


여기에서 모델을 복제하고 보상 기능을 조정하고 hyperparameters를 조정 한 다음 TrainingRewardScore 값이 수렴되고 성능 메트릭이 향상 될 때까지 프로세스를 반복하여 모델을 향상시킬 수 있습니다. 교육을 향상시키는 방법에 대한 자세한 내용은 AWS DeepRacer 모델 학습 및 평가를 참조하십시오.


Having trained a satisfactory AWS DeepRacer model, you're ready to test it with an AWS DeepRacer vehicle in a physical environment. For more information about testing an AWS DeepRacer model with a physical agent, see Drive Your AWS DeepRacer Vehicle .


만족스러운 AWS DeepRacer 모델을 훈련하면 실제 환경에서 AWS DeepRacer 차량으로 테스트 할 수 있습니다. 물리적 에이전트로 AWS DeepRacer 모델을 테스트하는 방법에 대한 자세한 내용은 AWS DeepRacer Vehicle을 참조하십시오.

반응형

AWS DeepRacer - AWS account Setup

2018. 12. 24. 23:59 | Posted by 솔웅


반응형


Set Up for AWS DeepRacer


Before you can begin using AWS DeepRacer, you need an AWS account and an IAM user. In addition, you should also have appropriate IAM roles and policies. These allow you to grant necessary permissions for AWS DeepRacer to call dependent AWS services, such as Amazon SageMaker and AWS RoboMaker.


AWS DeepRacer를 사용하려면 먼저 AWS 계정과 IAM 사용자가 필요합니다. 또한 적절한 IAM 역할과 정책이 있어야합니다. 이를 통해 AWS DeepRacer가 Amazon SageMaker 및 AWS RoboMaker와 같은 종속 AWS 서비스를 호출하는 데 필요한 권한을 부여 할 수 있습니다.


Sign Up for an AWS Account


To use AWS services, you need an AWS account. If you don't have one, sign up for one now.


AWS 서비스를 사용하려면 AWS 계정이 필요합니다. 가지고 있지 않다면 지금 가입하십시오.


The AWS account is free. You pay only for the AWS services that you use.


AWS 계정은 무료입니다. 귀하가 사용하는 AWS 서비스에 대해서만 비용을 지불합니다.


To sign up for an AWS account

  1. Go to https://console.aws.amazon.com.

  2. Choose Create a Free Account.

  3. Follow the instructions on the page.


    Part of the sign-up process involves receiving a phone call and entering a PIN using the phone keypad.

    가입 절차에는 전화를 받고 전화 키패드를 사용하여 PIN을 입력하는 과정이 포함됩니다.


If successful, the above sign-up procedure creates an account with root user credentials, as identified by the email address that you provide. Although you can use this AWS account root user to sign in to AWS, we recommend that you create an IAM user with administrative privileges to manage your account. You can also create IAM users with more restrictive permissions for your team members to call specified AWS services under your account. The instructions are given in the next section.


로그인에 성공하면 위의 가입 절차에서 제공 한 전자 메일 주소로 식별되는 루트 사용자 자격 증명을 사용하여 계정을 만듭니다. 이 AWS 계정 루트 사용자를 사용하여 AWS에 로그인 할 수 있지만 관리 권한이있는 IAM 사용자를 생성하여 계정을 관리하는 것이 좋습니다. 팀 구성원이 계정에서 지정된 AWS 서비스를 호출 할 수 있도록보다 제한적인 권한을 가진 IAM 사용자를 만들 수도 있습니다. 지침은 다음 섹션에서 제공됩니다.


Create an IAM User


The following procedure walks you through the steps to create an AWS Identity and Access Management (IAM) user with administrative privileges. This is preferred to using the root user of your AWS account. To use AWS DeepRacer to sign in to AWS DeepRacer and other services.


다음 절차는 관리자 권한으로 AWS ID 및 액세스 관리 (IAM) 사용자를 생성하는 단계를 안내합니다. 이는 AWS 계정의 루트 사용자를 사용하는 것이 더 좋습니다. AWS DeepRacer를 사용하여 AWS DeepRacer 및 기타 서비스에 로그인하십시오.


To create an IAM user

  1. Sign in to the AWS Management Console and open the IAM console at https://console.aws.amazon.com/iam/.

  2. In the navigation pane, choose Users, then choose Add user.

  3. For Access type, choose both Programmatic Access to call APIs of permitted AWS services and AWS Management Console Access to launch the AWS Management Console for permitted services.

  4. For Console password, choose Autogenerated password or Custom password. If you choose Custom password, type a password.

  5. Choose whether to require the user to reset the password at the next sign-in, then choose Next: Permissions.

  6. For Set permissions for <user name>, choose Attach existing policies directly, AdministrativeAccess, and Next: Review.

  7. Review the settings. To return to the previous page to make changes, choose Previous. To create the user, choose Create user.


For a non-administrative user to use AWS DeepRacer, follow the same steps above to create an IAM user, but attach appropriate non-administrative access IAM roles and policies. If the role is not already created, the AWS DeepRacer service creates an appropriate IAM role with required policies upon request. You don't have to manually specify the access permission for AWS DeepRacer. For instructions to create the required roles and policies, see Identity and Access Management for AWS DeepRacer.


관리자가 아닌 사용자가 AWS DeepRacer를 사용하려면 위와 동일한 단계를 수행하여 IAM 사용자를 만들고 적절한 비 관리 액세스 IAM 역할 및 정책을 첨부하십시오. 역할이 아직 생성되지 않은 경우 AWS DeepRacer 서비스는 요청시 필요한 정책이있는 적절한 IAM 역할을 만듭니다. AWS DeepRacer에 대한 액세스 권한을 수동으로 지정할 필요는 없습니다. 필요한 역할 및 정책을 만드는 방법은 AWS DeepRacer의 ID 및 액세스 관리를 참조하십시오.


Now that you have an AWS account and IAM user, you're ready to explore AWS DeepRacer to learn reinforcement learning and to explore its application to autonomous racing.


이제 AWS 계정과 IAM 사용자가 생겨 났으므로 AWS DeepRacer를 탐색하여 보강 학습을 배우고 자율적 인 경주 응용 프로그램을 탐색 할 수 있습니다.


반응형

What Is AWS DeepRacer?

2018. 12. 24. 02:18 | Posted by 솔웅


반응형


AWS DeepRacer consists of the following components:


AWS DeepRacer는 다음과 같은 콤포넌트들로 구성돼 있다.


  • An AWS Machine Learning service to train and evaluate reinforcement learning models.

  • 강화 학습 모델들을 훈련하고 평가하기 위한 AWS Machine Learning service

  • AWS DeepRacer scale model vehicles that can drive themselves by running inference on a trained reinforcement learning model.

  • AWS DeepRacer scale model 차량은 훈련된 reinforcement learning model 을 기반한 추론을 실행함으로서 스스로 운전할 수 있음

  • AWS DeepRacer Racing Leagues for the participants to learn from and inspire each other through competitions on model performances.

  • AWS DeepRacer Racing Leagues는 참가자들이 DeepRacer 운행관련 경쟁을 통해 서로 배우고 영감을 주고받는 기회를 제공함


It provides you with an interactive learning platform for users of all levels to learnreinforcement learning and to prototype autonomous driving applications.

이를 통해 모든 사용자가 reinforcement learning을 배우고 자율 주행 어플리케이션의 기본 틀을 만들 수 있는 상호 작용하는 learning platform을 여러분에게 제공하게 됩니다.


With a cloud-based simulator and an AWS DeepRacer model vehicle, AWS DeepRacer lets you train, evaluate, and experiment with reinforcement learning models for autonomous racing in a virtual or physical environment.


클라우드 기반 시뮬레이터와 AWS DeepRacer model 차량을 가지고 여러분이 가상 혹은 실제 환경에서 자율 주행 레이싱을 하도록 reinforcement learning models을 이용해 훈련하고 평가하고 실험할 수 있도록  AWS DeepRacer는 그 기회를 제공합니다.


Topics


The AWS DeepRacer Console


The AWS DeepRacer console is a graphical user interface to interact with the AWS DeepRacer service. You can use the console to train a reinforcement learning model, to evaluate the model performance in simulation as rendered by the AWS RoboMaker simulator.

AWS DeepRacer console은  AWS DeepRacer service와 상호 작용하는 graphical user interface 입니다. 이 콘솔을 사용하여 AWS RoboMaker 시뮬레이터에서 렌더링 한 시뮬 레이션에서 모델 성능을 평가하는 강화 학습 모델을 학습 할 수 있습니다.


In summary, the AWS DeepRacer console supports the following features:

요약하면 AWS DeepRacer 콘솔은 다음 기능을 지원합니다.

  • The AWS DeepRacer console lets you create a training job to train a reinforcement learning model, with a specified reward function, optimization algorithm, environment, and hyperparameters.

  • AWS DeepRacer console을 사용하면 reinforcement learning model 트레이닝을 위한 훈련작업을 만들 수 있습니다. 이 작업은 특정 보상기능, 최적화된 알고리즘, 환경 그리고 hyperparameters 등을 사용해서 이루어 질 수 있습니다.

  • The AWS DeepRacer console provides a simulated track for you to train and evaluate a model on a selected track.

  • AWS DeepRacer console은 훈련하기 위한 시뮬레이트 된 트랙과 해당 트랙에서의 모델 평가 등을 제공합니다.

  • The AWS DeepRacer console lets you clone a trained model to retrain it by tuning hyperparameters to optimize your model's performance.

  • AWS DeepRacer console을 사용하면 hyperparameters를 튜닝함으로서 훈련 모델을 복제해 해당 모델의 성능을 최적화 할 수 있습니다.


AWS DeepRacer Vehicles as Physical Agents


The AWS DeepRacer vehicle is a scaled-down physical vehicle that can drive itself on a real track using a deployed reinforcement learning model.

AWS DeepRacer 차량은 deploy된 reinforcement learning model을 하용해 실제 트랙에서 차량을 드라이브 할 수 있는 실제 차량의 축소본입니다.

  • You can manually control the vehicle, or turn the autonomous mode that requires a deployed model.

  • 여러분은 직접 수동으로 차량을 컨트롤 할 수 있으며 자율 모드를 켜 필요한 deployed model을 이용할 수도 있습니다.

  • The autonomous mode runs inference on the vehicle's compute module, aided with images from the camera.

  • 자율 모드는 차량의 compute module에서 inference(추론)을 실행하게 되며 이 과정에서 카메라를 통해 얻은 이미지를 활용하게 됩니다.


The AWS DeepRacer League


The AWS DeepRacer League is an important component of AWS DeepRacer. It is intended to foster communal learning and collaborative exploration through sharing and competitions.


AWS DeepRacer 리그는  AWS DeepRacer의 중요한 구성 요소입니다. 공유 및 경쟁을 통해 공동 학습 및 공동 탐사를 촉진하기위한 것입니다.


Learning with a group of like-minded developers can be rewarding because group members can share insights and learn from each other. Competitions can serve as powerful motivations for participants to inspire each other. AWS DeepRacer then ranks the performance for the users to discover the good, better, and best models of the group.


이 분야에 흥미를 가지고 있는 개발자들과 함께 배운다는 것은 매우 도움이 됩니다. 왜냐하면 서로 서로 자기가 이해한 것과 배운것들을 나눌 수 있기 때문이죠. 이 리그 참가자들은 경쟁을 통해 서로에게 강력한 모티베이션을 받을 수 있습니다. AWS DeepRacer는 참가자들의 퍼포먼스를 보고 그 그룹의 최고 수상자와 대상 우수상등을 평가하게 됩니다.


AWS DeepRacer As an End-to-End Learning Platform


Reinforcement learning, especially deep reinforcement learning, has proven effective in solving a wide array of autonomous decision-making problems. It has applications in financial trading, data center cooling, fleet logistics, and autonomous racing, to name a few.

Reinforcement learning 특히 심층 Reinforcement learning은 광범위한 자율적 의사결정 문제를 해결하는데 아주 효과적임이 입증 되었습니다. 금융 거래, 데이터 센터 냉각(온도 관리) 그리고 자율 주행 경주 분야에 이를 이용한 어플리케이션들이 있습니다.


As someone new to reinforcement learning, you might be intrigued by it's potential to solve real-world problems. You might like to acquire the necessary skills to tackle challenges in your business or application domain. However, reinforcement learning has a steep learning curve due to extensive technological scope and depth the field depends on. Real-world experimentation requires constructing a physical agent (e.g., an autonomous racing car). It also requires that you secure a physical environment (e.g., a driving track or public road), which can be costly, hazardous, and time-consuming. The requirements go beyond merely understanding reinforcement learning.

reinforcement learning에 대해 잘 모르시는 분들이 있다면 여러분은 아마 곧 이 방법론이 실제 세상의 여러가지 문제들을 해결할 수 있는 그 잠재력이 있다는 것에 대해 알게 되고 흥미를 가지게 될 것입니다. 여러분의 사업이나 application domain에 있는 문제들을 해결하는데 필요한 기술들을 얻으실 수 있을 겁니다.  reinforcement learning은 광범위한 기술 범위와 해당 분야의 깊이의 특성으로 인해 가파른 학습 곡선을 갖습니다. 실제 세상에서의 실험은 물리적인 시설이 요구 됩니다. (예: 자율 주행 레이싱 자동차 등). 또한 준비하기에 비싸고, 위험하고 시간 소모적일 수 있는 물리적인 환경도 확보해야 합니다. (예: 운전 트랙, 공공 도로 등) 단순히 reinforcement learning에 대해 이해하는 것 만으로 충족되지 않는 그 이상의 요구되는 조건들이 있다는 것입니다.


To help lower the learning curve, AWS DeepRacer simplifies the process in three ways:

배움의 기복을 줄이기 위해 AWS DeepRacer는 다음과 같은 세가지 방법으로 프로세스를 단순화 합니다.


  • By offering a wizard to guide training and evaluating reinforcement learning models pre-defined environments including states, actions and customizable reward functions.

  • 사전 정의된 상태, 동작 그리고 사용자 정의 가능한 보상기능 등을 포함한 환경이 있는 reinforcement learning models을 가지고 wizard를 통해 훈련과 평가 등을 가이드 하는 기능을 제공합니다.

  • By providing a simulator to emulate interactions between a virtual agent and a virtual environment.

  • 가상 에이전트와 가상 환경 사이의 상호 작용들을 에뮬레이트 하기 위한 시뮬레이터를 제공합니다.

  • By offering an AWS DeepRacer vehicle as a physical agent for evaluation of a trained model in a physical environment. This closely resembles a real-world use case.

  • 실제 물리적인 AWS DeepRacer 자동차를 제공해 실제 물리적 환경에서 훈련된 모델을 평가 할 수 있도록 합니다. 이는 실제 세상에서의 use case와 유사한 상황과 결과를 제공할 겁니다.


At a high level, using AWS DeepRacer to develop reinforcement learning skills and to explore its application goes as follows:


대략적으로 AWS DeepRacer를 사용해서 reinforcement learning 기술을 개발하고 실제 응용프로그램을 개발하고 배우는 과정은 다음과 같습니다.


  1. Create and train a reinforcement learning model using a wizard on the AWS DeepRacer console.

    AWS DeepRacer 콘솔에서 wizard를 사용해 reinforcement learning model을 생성하고 훈련합니다.

  2. Evaluate the trained model on a chosen track to observe how it performs and to determine how to tune the model.

    트랙을 선택해서 훈련된 모델을 평가하여 그 모델이 어떻게 작동하고 어떻게 개선되어야 하는지를 알수 있도록 합니다.

  3. Deploy the trained model to an AWS DeepRacer vehicle. Let the vehicle drive itself on a track that is built according to AWS DeepRacer track specifications for a physical experience.

    해당 훈련된 모델을 AWS DeepRacer 차량에 Deploy 합니다. 그 차량이 해당 트랙에서 스스로 드라이브 하도록 합니다. 이 트랙은 실제 물리적 환경에서의 실험을 위해 AWS DeepRacer에서 지정한 스펙에 맞도록 만들어 진 트랙 입니다.


AWS DeepRacer Basic Concepts and Terminology


AWS DeepRacer builds on the following concepts and uses the following terminology.

AWS DeepRacer

Also referred to as AWS DeepRacer vehicle. One type of AWS DeepRacer vehicle is an AWS DeepRacer car that is a 1:18-scale model car. It has a mounted camera and an on-board compute module. The module can run inference against a deployed reinforcement learning model in order to drive itself along a track. The compute module and the vehicle chassis are powered by dedicated batteries known as the compute battery and the drive battery, respectively.

AWS DeepRacer vehicle이라고도 합니다. 이는 실제 차량의 1/18로 축소된 AWS DeepRacer 차량입니다. 이 차량에는 카메라와 compute module이 장착돼 있습니다. 이 모듈은 이 차량에 deploy된 트랙에서 스스로 드라이브할 수 있도록 미리 훈련된 reinforcement learning model과 작동하여 inference(추론)를 하게 됩니다. compute module과 차량 새새들은 compute battery라고 알려진 전용 배터리와 driver 배터리를 통해 전원이 공급되게 됩니다.


AWS DeepRacer service

An AWS Machine Learning service for learning and exploring reinforcement learning with applications focused on autonomous racing. The AWS DeepRacer service supports the following features:

AWS 머쉰 러닝은 자율 주행에 촛점을 맞춘 어플리케이션으로 reinforcement learning을 배우고 탐구하기 위한 서비스 입니다. AWS DeepRacer service는 다음과 같은 기능을 지원합니다.

  1. Training a reinforcement learning model on the cloud.

    클라우드상에서의 reinforcement learning model 훈련하기

  2. Evaluating the trained model in the AWS DeepRacer console.

    AWS DeepRacer 콘솔에서 훈련된 모델을 평가하기

  3. Download the trained model artifacts to an AWS DeepRacer vehicle.

     AWS DeepRacer 차량에 훈뎐된 모델 artifacts 다운로드하기


Reinforcement learning

A machine learning method that is focused on autonomous decision making by an agent to achieve specified goals through interactions with an environment. In reinforcement learning, learning is achieved through trial and error and training does not require labeled input, but relies on the reward hypothesis. The hypothesis stipulates that all goals can be achieved by maximizing the expected future reward over all action sequences. In reinforcement learning, designing the reward function is critical. The better crafted reward function, the better the agent can decide what actions to take to reach the goal.

For autonomous racing, the agent is a vehicle. The environment includes traveling routes and traffic conditions. The goal is for the vehicle to reach its destination in a timely manner without accidents. Rewards are scores used to encourage safe and speedy travel to the destination. The scores penalize dangerous and wasteful driving.


machine learning 방법론으로 자율적인 의사결정에 촛점을 맞춘 기계학습 방법입니다. 이는 어떤 환경과 상호 작용함을 통해 지정된 목표를 달성하기 위한 에이전트에 의해 수행됩니다.
reinforcement learning에서 learning은 어떠한 input을 필요로하지 않고 reward hypothesis에 의해 시도하고 실패하는 과정을 통해 획득되어 집니다.
hypothesis(가설)은 모든 action sequences를 통해 기대되는 미래의 보상을 극대화 함으로서 목표를 달성할 수 있다고 규정하고 있다. 좀 더 나은 보상 기능 (reward function)과 좀 더 나은 에이전트는 그 목표를 달성하기 위한 액션들을 결정할 수 있다. 자율 주행에서 에이전트는 차량이 된다. 환경은 주행하는 루트(트랙)과 traffic(교통) conditions이 포함된다. 그 차량의 목표는 사고 없이 최단시간에 목적지에 도달하는 것이다. 보상 (Rewards)는 목적지까지 안전하고 빨리 주행하도록 하는 점수 이다. 이 점수는 위험하고 시간낭비적인 주행에 대해서는 페널티를 줍니다.


To encourage learning during the training process, the reinforcement learning agent must be allowed to pursue individual actions that might not result in higher rewards from time to time. This practice is referred to as the exploration and exploitation trade-off. It helps reduce or remove the likelihood that the agent might be misguided into spurious destinations.


훈련 과정에서 해당 학습을 장려하기 위해 reinforcement learning은 수시로 좀 더 높은 보상을 얻을 수 없는 개별적인 액션들에 대해 멈출 수 있도록 하는 기능이 반드시 허용되어야 합니다. 이러한 practice는 탐구와 착취 (exploitation)의 거래라고 합니다. 이 방법은 에이전트가 잘못된 가이드로 인해 잘못된 목적지에 도달할 가능성을 줄이거나 제거하는데 도움이 됩니다.


For a more formal definition, see reinforcement learning on Wikipedia.


Reinforcement learning model

The environment prescribes the states it has, the actions that can be taken by the agent and the rewards that will be received by taking these actions. The strategy with which the agent decides its action is referred to as a policy. Hence the policy takes the environment state as input and outputs the action to take. In deep reinforcement learning, the policy is often represented by a deep neural network, and we refer to this as the reinforcement learning model. It is used to run inference both in simulation and in the AWS DeepRacer model vehicle to power autonomous racing. Each training job generates one model. A model can be generated even if the training job is terminated early. A model is immutable, which means it cannot be modified and overwritten after it's created.

환경은 에이전트가 취할 수있는 조치와 이러한 조치를 취함으로써 수령 할 보상을 규정합니다. 에이전트가 조치를 결정하는 전략을 정책이라고합니다. 따라서 정책은 환경 상태를 입력으로 취하여 취할 조치를 출력합니다. 심층 강화 학습에서는 정책이 심층 신경 네트워크로 대표되는 경우가 많으며 이를 보강 학습 모델이라고합니다. 시뮬레이션 및 AWS DeepRacer 모델 차량에서 추측을 실행하여 자율적 인 경주에 힘을 실어주는 데 사용됩니다. 각 교육 작업은 하나의 모델을 생성합니다. 훈련 작업이 조기에 종료 되더라도 모델을 생성 할 수 있습니다. 모델은 변경 불가능합니다. 즉, 모델을 수정 한 후에는 덮어 쓸 수 없습니다.


Training job

A training job is a workload that trains a reinforcement learning model and outputs the trained model artifacts to run inference on. Each training job produces one and only one model. The AWS DeepRacer console creates a training job for you when you create and train a model. For each job, you can do the following:

교육 작업은 보강 학습 모델을 훈련하고 유추 된 실행을 위해 훈련 된 모델 아티팩트를 출력하는 워크로드입니다. 각 교육 과정은 하나의 모델 만 생성합니다. AWS DeepRacer 콘솔은 모델을 생성하고 훈련 할 때 교육용 작업을 생성합니다. 각 작업에 대해 다음을 수행 할 수 있습니다.

  • View the training progress while the job is running.

  • View the training summary after the job is done.

  • Terminate a training job in progress at any time.

  • 작업이 진행되는 동안 교육 과정을 봅니다.
    작업이 완료된 후 교육 요약을 봅니다.
    진행중인 교육 일을 언제든지 종료합니다.


Evaluation job

An evaluation job is a workload that tests the performance of a model measured by given metrics after the training job is done. With AWS DeepRacer, the standard performance metric is the driving time an agent takes to complete a lap in a track and an additional metric is the percentage of the lap completed. To evaluate a trained model in AWS DeepRacer, you can do the following:


평가 작업은 교육 작업이 완료된 후 주어진 측정 항목으로 측정 된 모델의 성능을 테스트하는 workload입니다. AWS DeepRacer의 표준 성능 메트릭은 에이전트가 트랙에서 랩을 완료하는 데 걸리는 주행 시간이며 추가 메트릭은 완료된 랩의 백분율입니다. AWS DeepRacer에서 숙련 된 모델을 평가하려면 다음을 수행하십시오.


  • Configure and start an evaluation job.

  • View the evaluation progress while the job is running.

  • View the evaluation summary after the job is done.

  • Terminate an evaluation job at any time.

    평가 작업을 구성하고 시작하십시오.
    작업이 실행되는 동안 평가 진행률을 봅니다.
    작업 완료 후 평가 요약을 봅니다.
    언제든지 평가 작업을 종료합니다.


AWS DeepRacer simulator

A virtual environment, set up as a racing track, within which our agent can act, receive rewards, and learn how to race around the track.

레이싱 트랙으로 설정되는 가상 환경. 상담원이 행동하고 보상을받으며 트랙 주위에서 경주하는 방법을 배웁니다.


AWS DeepRacer vehicle

See AWS DeepRacer


AWS DeepRacer car

A type of AWS DeepRacer vehicle that is a 1/18 scale model car.

1/18 의 비율로 축소된 모델 자동차 인 AWS DeepRacer 차량 유형입니다.


Machine-learning frameworks

Refer to the software libraries used for building machine learning algorithms. Supported frameworks for AWS DeepRacer include Tensorflow.

기계 학습 알고리즘을 작성하는 데 사용되는 소프트웨어 라이브러리를 참조하십시오. AWS DeepRacer에 지원되는 프레임 워크에는 Tensorflow가 포함됩니다.


Policy network

A policy network is the neural network that is trained. It takes video images as input and predicts the next step actions for the agent. Depending on the algorithm, it may also evaluate the value of current state.

정책 네트워크는 훈련 된 신경 네트워크입니다. 비디오 이미지를 입력으로 받아 에이전트의 다음 단계 조치를 예측합니다. 알고리즘에 따라 현재 상태 값을 평가할 수도 있습니다.


Optimization algorithm

An optimization algorithm is the algorithm used to train a model. For supervised training, it calls for optimization by minimizing a loss function with a particular strategy to update weights. For reinforcement learning, it implements optimization by maximizing the expected future rewards with a particular reward function.

최적화 알고리즘은 모델을 훈련시키는 데 사용되는 알고리즘입니다. 감독 학습의 경우, 가중치를 업데이트하기위한 특정 전략으로 손실 함수를 최소화하여 최적화를 요구합니다. 강화 학습의 경우 특정 보상 기능으로 예상되는 미래 보상을 최대화하여 최적화를 구현합니다.


Hyperparameters

Hyperparameters are the tunable parameters that can be used to optimize the training performance.

하이퍼 매개 변수는 교육 성능을 최적화하는 데 사용할 수있는 튜너블 매개 변수입니다.


AWS DeepRacer Track

An AWS DeepRacer track is the virtual environment on which a model is trained and on which the trained model can be evaluated.

AWS DeepRacer 트랙은 모델을 학습하고 훈련 된 모델을 평가할 수있는 가상 환경입니다.


Reward function

A reward function is a signaling function that indicates to the agent whether the action performed resulted in:

보상 기능은 수행 된 조치가 다음과 같은 결과를 가져 왔는지 여부를 에이전트에게 표시하는 신호 기능입니다.

  • A good outcome that should be reinforced.

  • A neutral outcome.

  • A bad outcome that should be discouraged.

    좋은 결과가 강화되어야합니다.
    중립적 인 결과.
    나쁜 결과는 벌을 주어야 합니다


The reward function is a critical component of reinforcement learning. It determines the behavior that the agent will learn by incentivizing specific actions over others. The user provides the reward function by using the Python language, and this reward function is used to train the reinforcement learning model by using the optimizing algorithm.

보상 기능은 보강 학습의 중요한 구성 요소입니다. 에이전트가 다른 사람들보다 특정 행동을 장려함으로써 행동을 결정합니다. 사용자는 Python 언어를 사용하여 보상 기능을 제공하며이 보상 기능은 최적화 알고리즘을 사용하여 강화 학습 모델을 학습하는 데 사용됩니다.

Total reward means the sum of all the reward the agent received during an episode.

총 보상은 에피소드 중에 상담원이받은 모든 보상의 합계를 의미합니다.


AWS DeepRacer Episode

Episode is one simulation iteration from the starting state, e.g., the start of the lap, to a termination state, going off-track, or finishing the lap.

에피소드는 시작 상태, 예를 들어 랩의 시작에서 종료 상태, 오프 트랙으로 진행하거나 랩을 완료하는 것과 같은 하나의 시뮬레이션 반복이다.


반응형
이전 1 2 3 4 5 6 7 ··· 12 다음