

https://d2l.ai/chapter_computer-vision/semantic-segmentation-and-dataset.html
14.9. Semantic Segmentation and the Dataset — Dive into Deep Learning 1.0.3 documentation
d2l.ai
14.9. Semantic Segmentation and the Dataset
When discussing object detection tasks in Section 14.3–Section 14.8, rectangular bounding boxes are used to label and predict objects in images. This section will discuss the problem of semantic segmentation, which focuses on how to divide an image into regions belonging to different semantic classes. Different from object detection, semantic segmentation recognizes and understands what are in images in pixel level: its labeling and prediction of semantic regions are in pixel level. Fig. 14.9.1 shows the labels of the dog, cat, and background of the image in semantic segmentation. Compared with in object detection, the pixel-level borders labeled in semantic segmentation are obviously more fine-grained.
섹션 14.3–섹션 14.8에서 개체 감지 작업을 논의할 때 사각형 경계 상자는 이미지의 개체에 레이블을 지정하고 예측하는 데 사용됩니다. 이 섹션에서는 이미지를 다른 의미semantic 클래스에 속하는 영역으로 나누는 방법에 중점을 둔 의미 분할 semantic segmentation 문제에 대해 설명합니다. 객체 감지와 달리 semantic segmentation은 픽셀 수준에서 이미지에 있는 것을 인식하고 이해합니다. 의미 영역 semantic regions 의 라벨링 및 예측은 픽셀 수준에서 이루어집니다. 그림 14.9.1은 시맨틱 세그멘테이션에서 이미지의 개, 고양이, 배경의 라벨을 보여준다. 개체 감지와 비교할 때 시맨틱 분할semantic segmentation에서 레이블이 지정된 픽셀 수준 경계는 분명히 더 세분화됩니다.

14.9.1. Image Segmentation and Instance Segmentation
There are also two important tasks in the field of computer vision that are similar to semantic segmentation, namely image segmentation and instance segmentation. We will briefly distinguish them from semantic segmentation as follows.
컴퓨터 비전 분야에는 시맨틱 분할semantic segmentation과 유사한 두 가지 중요한 작업, 즉 이미지 분할image segmentation과 인스턴스 분할instance segmentation이 있습니다. 다음과 같이 시맨틱 분할과 간략하게 구분합니다.
- Image segmentation divides an image into several constituent regions. The methods for this type of problem usually make use of the correlation between pixels in the image. It does not need label information about image pixels during training, and it cannot guarantee that the segmented regions will have the semantics that we hope to obtain during prediction. Taking the image in Fig. 14.9.1 as input, image segmentation may divide the dog into two regions: one covers the mouth and eyes which are mainly black, and the other covers the rest of the body which is mainly yellow.
이미지 분할은 이미지를 여러 구성 영역으로 나눕니다. 이러한 유형의 문제에 대한 방법은 일반적으로 이미지의 픽셀 간의 상관 관계를 사용합니다. 훈련하는 동안 이미지 픽셀에 대한 레이블 정보가 필요하지 않으며 분할된 영역이 예측 중에 얻고자 하는 의미 체계를 가질 것이라고 보장할 수 없습니다. 그림 14.9.1의 이미지를 입력으로 사용하면 이미지 분할은 개를 두 영역으로 나눌 수 있습니다. 하나는 주로 검은색인 입과 눈을 덮고 다른 하나는 주로 노란색인 몸의 나머지 부분을 덮습니다. - Instance segmentation is also called simultaneous detection and segmentation. It studies how to recognize the pixel-level regions of each object instance in an image. Different from semantic segmentation, instance segmentation needs to distinguish not only semantics, but also different object instances. For example, if there are two dogs in the image, instance segmentation needs to distinguish which of the two dogs a pixel belongs to.
인스턴스 분할은 동시 감지 및 분할이라고도 합니다. 이미지에서 각 개체 인스턴스의 픽셀 수준 영역을 인식하는 방법을 연구합니다. 시맨틱 분할과 달리 인스턴스 분할은 시맨틱뿐만 아니라 다른 객체 인스턴스도 구분해야 합니다. 예를 들어, 이미지에 두 마리의 개가 있는 경우 인스턴스 분할은 픽셀이 속한 두 개 중 어느 것을 구별해야 합니다.
14.9.2. The Pascal VOC2012 Semantic Segmentation Dataset
One of the most important semantic segmentation dataset is Pascal VOC2012. In the following, we will take a look at this dataset.
가장 중요한 시맨틱 분할 데이터 세트는 Pascal VOC2012입니다. 다음에서는 이 데이터 세트를 살펴보겠습니다.
%matplotlib inline
import os
import torch
import torchvision
from d2l import torch as d2l
The tar file of the dataset is about 2 GB, so it may take a while to download the file. The extracted dataset is located at ../data/VOCdevkit/VOC2012.
데이터셋의 tar 파일은 약 2GB이므로 파일을 다운로드하는데 다소 시간이 걸릴 수 있습니다. 추출된 데이터 세트는 ../data/VOCdevkit/VOC2012에 있습니다.
#@save
d2l.DATA_HUB['voc2012'] = (d2l.DATA_URL + 'VOCtrainval_11-May-2012.tar',
                           '4e443f8a2eca6b1dac8a6c57641b67dd40621a49')

voc_dir = d2l.download_extract('voc2012', 'VOCdevkit/VOC2012')- #@save: 주석으로, 코드 조각을 문서로 저장할 때 사용되는 주석입니다.
- d2l.DATA_HUB['voc2012']: d2l.DATA_HUB 딕셔너리에 'voc2012'라는 키를 가진 항목을 추가합니다. 이 항목은 데이터 다운로드를 위한 URL 및 체크섬 정보를 포함하는 튜플입니다.
- d2l.DATA_URL + 'VOCtrainval_11-May-2012.tar': d2l.DATA_URL과 문자열을 합쳐서 VOC2012 데이터의 URL을 생성합니다.
- '4e443f8a2eca6b1dac8a6c57641b67dd40621a49': 다운로드한 파일의 체크섬(해시 값)입니다.
- voc_dir = d2l.download_extract('voc2012', 'VOCdevkit/VOC2012'): 'voc2012' 데이터를 다운로드하고 압축을 해제하여 voc_dir 변수에 저장합니다. download_extract 함수는 주어진 키에 해당하는 데이터를 다운로드하고 압축을 해제합니다. 여기서 'voc2012' 데이터는 VOC2012 데이터셋을 의미하며, VOCdevkit/VOC2012 경로에 압축을 해제합니다.
이 코드는 'voc2012' 데이터를 다운로드하고 압축을 해제하여 데이터가 저장될 디렉토리 경로인 voc_dir을 설정하는 내용을 나타냅니다. VOC2012 데이터셋은 객체 검출과 이미지 분류 등 다양한 컴퓨터 비전 작업에 사용되는 데이터셋입니다.
Downloading ../data/VOCtrainval_11-May-2012.tar from http://d2l-data.s3-accelerate.amazonaws.com/VOCtrainval_11-May-2012.tar...
After entering the path ../data/VOCdevkit/VOC2012, we can see the different components of the dataset. The ImageSets/Segmentation path contains text files that specify training and test samples, while the JPEGImages and SegmentationClass paths store the input image and label for each example, respectively. The label here is also in the image format, with the same size as its labeled input image. Besides, pixels with the same color in any label image belong to the same semantic class. The following defines the read_voc_images function to read all the input images and labels into the memory.
../data/VOCdevkit/VOC2012 경로를 입력하면 데이터 세트의 다양한 구성 요소를 볼 수 있습니다. ImageSets/Segmentation 경로에는 교육 및 테스트 샘플을 지정하는 텍스트 파일이 포함되어 있으며 JPEGImages 및 SegmentationClass 경로는 각각 각 예제에 대한 입력 이미지와 레이블을 저장합니다. 여기의 레이블도 레이블이 지정된 입력 이미지와 크기가 같은 이미지 형식입니다. 게다가 어떤 레이블 이미지에서 같은 색상을 가진 픽셀은 같은 의미 클래스에 속합니다. 다음은 모든 입력 이미지와 레이블을 메모리로 읽어들이는 read_voc_images 함수를 정의합니다.
#@save
def read_voc_images(voc_dir, is_train=True):
    """Read all VOC feature and label images."""
    txt_fname = os.path.join(voc_dir, 'ImageSets', 'Segmentation',
                             'train.txt' if is_train else 'val.txt')
    mode = torchvision.io.image.ImageReadMode.RGB
    with open(txt_fname, 'r') as f:
        images = f.read().split()
    features, labels = [], []
    for i, fname in enumerate(images):
        features.append(torchvision.io.read_image(os.path.join(
            voc_dir, 'JPEGImages', f'{fname}.jpg')))
        labels.append(torchvision.io.read_image(os.path.join(
            voc_dir, 'SegmentationClass' ,f'{fname}.png'), mode))
    return features, labels

train_features, train_labels = read_voc_images(voc_dir, True)- #@save: 주석으로, 코드 조각을 문서로 저장할 때 사용되는 주석입니다.
- def read_voc_images(voc_dir, is_train=True):: read_voc_images라는 함수를 정의합니다. 이 함수는 VOC 데이터셋의 특징 이미지와 라벨 이미지를 읽어오는 역할을 합니다.
- voc_dir: VOC 데이터셋이 저장된 디렉토리 경로입니다.
- is_train=True: 훈련 데이터인지 여부를 나타내는 변수입니다.
- txt_fname = os.path.join(voc_dir, 'ImageSets', 'Segmentation', 'train.txt' if is_train else 'val.txt'): 훈련 데이터 또는 검증 데이터 이미지 파일 이름이 나열된 텍스트 파일의 경로를 생성합니다.
- mode = torchvision.io.image.ImageReadMode.RGB: 읽어온 이미지를 RGB 형식으로 읽어오도록 설정합니다.
- with open(txt_fname, 'r') as f:: 텍스트 파일을 열고 f라는 이름으로 사용합니다.
- images = f.read().split(): 파일에서 읽은 이미지 파일 이름들을 공백으로 분리하여 리스트로 저장합니다.
- features, labels = [], []: 특징 이미지와 라벨 이미지를 저장할 빈 리스트 features와 labels를 생성합니다.
- for i, fname in enumerate(images):: 이미지 파일 이름들을 반복하면서 처리합니다.
- features.append(torchvision.io.read_image(os.path.join(voc_dir, 'JPEGImages', f'{fname}.jpg'))): 이미지 파일을 읽어와 특징 이미지 리스트에 추가합니다.
- labels.append(torchvision.io.read_image(os.path.join(voc_dir, 'SegmentationClass' ,f'{fname}.png'), mode)): 라벨 이미지 파일을 읽어와 라벨 이미지 리스트에 추가합니다.
- return features, labels: 읽어온 특징 이미지와 라벨 이미지 리스트를 반환합니다.
- train_features, train_labels = read_voc_images(voc_dir, True): VOC 데이터셋에서 훈련 데이터의 특징 이미지와 라벨 이미지를 읽어와 각각 train_features와 train_labels 변수에 할당합니다.
이 코드는 VOC 데이터셋에서 훈련 데이터의 특징 이미지와 라벨 이미지를 읽어오는 함수 read_voc_images를 정의하고 이를 호출하여 train_features와 train_labels를 생성하는 내용을 나타냅니다.
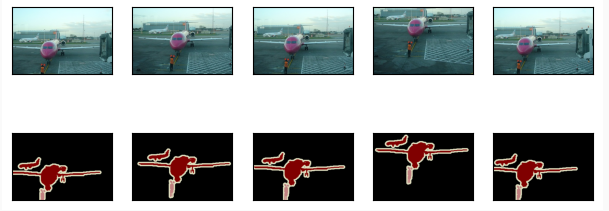
We draw the first five input images and their labels. In the label images, white and black represent borders and background, respectively, while the other colors correspond to different classes.
처음 5개의 입력 이미지와 레이블을 그립니다. 레이블 이미지에서 흰색과 검은색은 각각 테두리와 배경을 나타내고 나머지 색상은 다른 클래스에 해당합니다.
n = 5
imgs = train_features[:n] + train_labels[:n]
imgs = [img.permute(1,2,0) for img in imgs]
d2l.show_images(imgs, 2, n);- n = 5: 변수 n에 5를 할당합니다. 이는 표시할 이미지의 개수를 의미합니다.
- imgs = train_features[:n] + train_labels[:n]: train_features 리스트에서 처음부터 n개의 이미지와 train_labels 리스트에서 처음부터 n개의 이미지를 선택하여 리스트 imgs에 결합합니다. 이렇게 하면 특징 이미지와 해당하는 라벨 이미지가 번갈아가며 포함된 리스트가 생성됩니다.
- imgs = [img.permute(1,2,0) for img in imgs]: imgs 리스트 내의 이미지들의 차원을 변경합니다. 각 이미지의 차원을 (채널, 높이, 너비)에서 (높이, 너비, 채널)로 변경하면 이미지가 보다 일반적인 형태로 표현됩니다.
- d2l.show_images(imgs, 2, n);: imgs 리스트에 포함된 이미지들을 2개의 열로 나누어서 n개씩 그립니다. d2l.show_images 함수는 이미지를 그리는 함수로서 여러 이미지를 그룹으로 나누어서 표시합니다.
이 코드는 훈련 데이터셋에서 특징 이미지와 라벨 이미지를 일정 개수만큼 선택하고, 차원을 변경한 후에 이를 그룹으로 나누어서 표시하는 내용을 나타냅니다.

Next, we enumerate the RGB color values and class names for all the labels in this dataset.
다음으로 이 데이터 세트의 모든 레이블에 대한 RGB 색상 값과 클래스 이름을 열거합니다.
#@save
VOC_COLORMAP = [[0, 0, 0], [128, 0, 0], [0, 128, 0], [128, 128, 0],
                [0, 0, 128], [128, 0, 128], [0, 128, 128], [128, 128, 128],
                [64, 0, 0], [192, 0, 0], [64, 128, 0], [192, 128, 0],
                [64, 0, 128], [192, 0, 128], [64, 128, 128], [192, 128, 128],
                [0, 64, 0], [128, 64, 0], [0, 192, 0], [128, 192, 0],
                [0, 64, 128]]

#@save
VOC_CLASSES = ['background', 'aeroplane', 'bicycle', 'bird', 'boat',
               'bottle', 'bus', 'car', 'cat', 'chair', 'cow',
               'diningtable', 'dog', 'horse', 'motorbike', 'person',
               'potted plant', 'sheep', 'sofa', 'train', 'tv/monitor']
- #@save: 주석으로, 코드 조각을 문서로 저장할 때 사용되는 주석입니다.
- VOC_COLORMAP: VOC 데이터셋에서 클래스 인덱스에 따라 색상을 부여하는 컬러맵을 정의한 변수입니다. 각 클래스에 대해 RGB 값으로 색상을 지정하여 클래스를 시각화할 때 사용됩니다.
- VOC_CLASSES: VOC 데이터셋에서 정의된 클래스 이름들을 나열한 변수입니다. 이 변수에는 배경과 다양한 객체 클래스들의 이름이 포함되어 있습니다.
이 코드는 VOC 데이터셋에서 클래스들의 컬러맵과 클래스 이름들을 정의하는 내용을 나타냅니다. VOC 데이터셋은 객체 검출, 분할 등의 작업에 사용되는 데이터셋으로, 이러한 정보들은 시각화 및 레이블 관련 작업에서 사용됩니다.
With the two constants defined above, we can conveniently find the class index for each pixel in a label. We define the voc_colormap2label function to build the mapping from the above RGB color values to class indices, and the voc_label_indices function to map any RGB values to their class indices in this Pascal VOC2012 dataset.
위에서 정의한 두 상수를 사용하면 레이블의 각 픽셀에 대한 클래스 인덱스를 편리하게 찾을 수 있습니다. 우리는 voc_colormap2label 함수를 정의하여 위의 RGB 색상 값에서 클래스 인덱스로의 매핑을 구축하고 voc_label_indices 함수를 정의하여 RGB 값을 이 Pascal VOC2012 데이터 세트의 클래스 인덱스로 매핑합니다.
#@save
def voc_colormap2label():
    """Build the mapping from RGB to class indices for VOC labels."""
    colormap2label = torch.zeros(256 ** 3, dtype=torch.long)
    for i, colormap in enumerate(VOC_COLORMAP):
        colormap2label[
            (colormap[0] * 256 + colormap[1]) * 256 + colormap[2]] = i
    return colormap2label

#@save
def voc_label_indices(colormap, colormap2label):
    """Map any RGB values in VOC labels to their class indices."""
    colormap = colormap.permute(1, 2, 0).numpy().astype('int32')
    idx = ((colormap[:, :, 0] * 256 + colormap[:, :, 1]) * 256
           + colormap[:, :, 2])
return colormap2label[idx]- #@save: 주석으로, 코드 조각을 문서로 저장할 때 사용되는 주석입니다.
- voc_colormap2label(): VOC 데이터셋의 클래스 컬러맵을 이용하여 RGB 값에서 클래스 인덱스로 매핑하는 함수입니다. VOC 데이터셋의 클래스 컬러맵을 이용하여 RGB 값의 조합을 클래스 인덱스로 변환하는 매핑을 생성하고 반환합니다.
- colormap2label = torch.zeros(256 ** 3, dtype=torch.long): 256^3 크기의 모든 조합에 대한 클래스 인덱스를 담는 텐서를 생성합니다.
- for i, colormap in enumerate(VOC_COLORMAP):: VOC 컬러맵의 각 색상에 대해 반복합니다.
- (colormap[0] * 256 + colormap[1]) * 256 + colormap[2]: RGB 값을 클래스 인덱스로 변환하여 텐서의 해당 위치에 클래스 인덱스를 저장합니다.
- voc_label_indices(colormap, colormap2label): 주어진 VOC 라벨 컬러맵을 이용하여 RGB 값을 클래스 인덱스로 변환하는 함수입니다.
- colormap.permute(1, 2, 0).numpy().astype('int32'): 라벨 컬러맵을 높이-너비-채널 형태에서 너비-채널-높이 형태로 변경하고, 넘파이 배열로 변환하며 데이터 타입을 'int32'로 변환합니다.
- ((colormap[:, :, 0] * 256 + colormap[:, :, 1]) * 256 + colormap[:, :, 2]): RGB 값을 클래스 인덱스로 변환하는 계산을 수행하여 클래스 인덱스 텐서 idx를 생성합니다.
- return colormap2label[idx]: 생성한 클래스 인덱스 텐서 idx를 이용하여 RGB 값의 클래스 인덱스로 변환한 결과를 반환합니다.
이 코드는 VOC 데이터셋의 라벨 컬러맵과 RGB 값들을 클래스 인덱스로 변환하기 위한 함수들을 정의하는 내용을 나타냅니다. 이러한 함수들은 데이터셋 시각화 및 레이블 처리 작업에서 사용됩니다.
For example, in the first example image, the class index for the front part of the airplane is 1, while the background index is 0.
예를 들어, 첫 번째 예제 이미지에서 비행기 앞부분의 클래스 인덱스는 1이고 배경 인덱스는 0입니다.
y = voc_label_indices(train_labels[0], voc_colormap2label())
y[105:115, 130:140], VOC_CLASSES[1]
- y = voc_label_indices(train_labels[0], voc_colormap2label()): train_labels 리스트에서 첫 번째 라벨 이미지를 이용하여 voc_colormap2label() 함수를 통해 라벨 컬러맵을 클래스 인덱스로 변환한 결과를 변수 y에 할당합니다.
- y[105:115, 130:140], VOC_CLASSES[1]: y 변수의 특정 범위를 선택하여 그 값을 출력하고, VOC_CLASSES 리스트의 두 번째 클래스 이름을 출력합니다.
이 코드는 VOC 데이터셋의 첫 번째 라벨 이미지에 대해 라벨 컬러맵을 클래스 인덱스로 변환한 결과를 변수 y에 저장하고, 이 변수에서 특정 영역의 값을 선택하여 출력하는 내용을 나타냅니다. 또한, VOC_CLASSES 리스트에서 두 번째 클래스의 이름을 출력합니다. 이를 통해 라벨 이미지의 레이블 정보를 확인할 수 있습니다.
(tensor([[0, 0, 0, 0, 0, 0, 0, 0, 0, 1],
         [0, 0, 0, 0, 0, 0, 0, 1, 1, 1],
         [0, 0, 0, 0, 0, 0, 1, 1, 1, 1],
         [0, 0, 0, 0, 0, 1, 1, 1, 1, 1],
         [0, 0, 0, 0, 0, 1, 1, 1, 1, 1],
         [0, 0, 0, 0, 1, 1, 1, 1, 1, 1],
         [0, 0, 0, 0, 0, 1, 1, 1, 1, 1],
         [0, 0, 0, 0, 0, 1, 1, 1, 1, 1],
         [0, 0, 0, 0, 0, 0, 1, 1, 1, 1],
         [0, 0, 0, 0, 0, 0, 0, 0, 1, 1]]),
 'aeroplane')
14.9.2.1. Data Preprocessing
In previous experiments such as in Section 8.1–Section 8.4, images are rescaled to fit the model’s required input shape. However, in semantic segmentation, doing so requires rescaling the predicted pixel classes back to the original shape of the input image. Such rescaling may be inaccurate, especially for segmented regions with different classes. To avoid this issue, we crop the image to a fixed shape instead of rescaling. Specifically, using random cropping from image augmentation, we crop the same area of the input image and the label.
섹션 8.1–섹션 8.4와 같은 이전 실험에서 이미지는 모델의 필수 입력 모양에 맞게 크기가 조정됩니다. 그러나 의미론적 분할에서 그렇게 하려면 예측된 픽셀 클래스를 입력 이미지의 원래 모양으로 다시 스케일링해야 합니다. 이러한 크기 조정은 특히 클래스가 다른 분할 영역의 경우 부정확할 수 있습니다. 이 문제를 방지하기 위해 크기를 다시 조정하는 대신 이미지를 고정된 모양으로 자릅니다. 특히, 이미지 확대에서 임의 자르기를 사용하여 입력 이미지와 레이블의 동일한 영역을 자릅니다.
#@save
def voc_rand_crop(feature, label, height, width):
    """Randomly crop both feature and label images."""
    rect = torchvision.transforms.RandomCrop.get_params(
        feature, (height, width))
    feature = torchvision.transforms.functional.crop(feature, *rect)
    label = torchvision.transforms.functional.crop(label, *rect)
    return feature, label

imgs = []
for _ in range(n):
    imgs += voc_rand_crop(train_features[0], train_labels[0], 200, 300)

imgs = [img.permute(1, 2, 0) for img in imgs]
d2l.show_images(imgs[::2] + imgs[1::2], 2, n);- #@save: 주석으로, 코드 조각을 문서로 저장할 때 사용되는 주석입니다.
- voc_rand_crop(feature, label, height, width): 특징 이미지와 라벨 이미지를 주어진 높이와 너비에 맞춰 무작위로 잘라내는 함수입니다.
- rect = torchvision.transforms.RandomCrop.get_params(feature, (height, width)): 무작위로 자르기 위한 좌표 정보를 얻습니다. 이 때, get_params 함수는 무작위 자르기를 위해 필요한 좌표 정보를 반환합니다.
- feature = torchvision.transforms.functional.crop(feature, *rect): 주어진 좌표 정보를 이용하여 특징 이미지를 무작위로 잘라냅니다.
- label = torchvision.transforms.functional.crop(label, *rect): 주어진 좌표 정보를 이용하여 라벨 이미지도 무작위로 잘라냅니다.
- imgs = []: 빈 리스트 imgs를 생성합니다.
- for _ in range(n):: n번 반복하는 루프를 실행합니다.
- imgs += voc_rand_crop(train_features[0], train_labels[0], 200, 300): voc_rand_crop 함수를 사용하여 특징 이미지와 라벨 이미지를 200x300 크기로 무작위로 자르고, imgs 리스트에 추가합니다.
- imgs = [img.permute(1, 2, 0) for img in imgs]: imgs 리스트 내의 이미지들의 차원을 변경합니다. 각 이미지의 차원을 (채널, 높이, 너비)에서 (높이, 너비, 채널)로 변경하면 이미지가 보다 일반적인 형태로 표현됩니다.
- d2l.show_images(imgs[::2] + imgs[1::2], 2, n);: imgs 리스트에 포함된 이미지들을 두 개의 열로 나누어서 그룹으로 나눈 뒤에 표시합니다. 이 때, 첫 번째 그룹은 imgs의 짝수 인덱스 이미지들로, 두 번째 그룹은 홀수 인덱스 이미지들로 구성됩니다.
이 코드는 VOC 데이터셋의 첫 번째 특징 이미지와 라벨 이미지를 무작위로 자르고, 이를 시각화하여 표시하는 내용을 나타냅니다. 이를 통해 데이터 증강과 이미지 처리 과정을 이해할 수 있습니다.
14.9.2.2. Custom Semantic Segmentation Dataset Class
We define a custom semantic segmentation dataset class VOCSegDataset by inheriting the Dataset class provided by high-level APIs. By implementing the __getitem__ function, we can arbitrarily access the input image indexed as idx in the dataset and the class index of each pixel in this image. Since some images in the dataset have a smaller size than the output size of random cropping, these examples are filtered out by a custom filter function. In addition, we also define the normalize_image function to standardize the values of the three RGB channels of input images.
상위 수준 API에서 제공하는 Dataset 클래스를 상속하여 사용자 지정 시맨틱 세분화 데이터 세트 클래스 VOCSegDataset을 정의합니다. __getitem__ 함수를 구현하면 데이터셋에서 idx로 인덱싱된 입력 이미지와 이 이미지의 각 픽셀의 클래스 인덱스에 임의로 액세스할 수 있습니다. 데이터 세트의 일부 이미지는 임의 자르기의 출력 크기보다 크기가 작기 때문에 이러한 예는 사용자 정의 필터 기능으로 필터링됩니다. 또한 normalize_image 함수를 정의하여 입력 이미지의 세 RGB 채널 값을 표준화합니다.
#@save
class VOCSegDataset(torch.utils.data.Dataset):
    """A customized dataset to load the VOC dataset."""

    def __init__(self, is_train, crop_size, voc_dir):
        self.transform = torchvision.transforms.Normalize(
            mean=[0.485, 0.456, 0.406], std=[0.229, 0.224, 0.225])
        self.crop_size = crop_size
        features, labels = read_voc_images(voc_dir, is_train=is_train)
        self.features = [self.normalize_image(feature)
                         for feature in self.filter(features)]
        self.labels = self.filter(labels)
        self.colormap2label = voc_colormap2label()
        print('read ' + str(len(self.features)) + ' examples')

    def normalize_image(self, img):
        return self.transform(img.float() / 255)

    def filter(self, imgs):
        return [img for img in imgs if (
            img.shape[1] >= self.crop_size[0] and
            img.shape[2] >= self.crop_size[1])]

    def __getitem__(self, idx):
        feature, label = voc_rand_crop(self.features[idx], self.labels[idx],
                                       *self.crop_size)
        return (feature, voc_label_indices(label, self.colormap2label))

    def __len__(self):
        return len(self.features)
- #@save: 주석으로, 코드 조각을 문서로 저장할 때 사용되는 주석입니다.
- class VOCSegDataset(torch.utils.data.Dataset):: torch.utils.data.Dataset 클래스를 상속하여 커스텀 데이터셋 클래스 VOCSegDataset을 정의합니다. 이 클래스는 VOC 데이터셋을 불러오고 처리하기 위한 기능을 제공합니다.
- self.transform: VOC 데이터셋의 이미지를 정규화하는 변환을 수행하는 객체를 생성합니다.
- self.crop_size: 임의로 자를 크기를 저장하는 변수입니다.
- features, labels = read_voc_images(voc_dir, is_train=is_train): read_voc_images 함수를 이용하여 특징 이미지와 라벨 이미지를 불러옵니다.
- self.features = [self.normalize_image(feature) for feature in self.filter(features)]: 특징 이미지들을 필터링하고 정규화합니다.
- self.labels = self.filter(labels): 라벨 이미지들도 필터링합니다.
- self.colormap2label = voc_colormap2label(): 라벨 컬러맵을 클래스 인덱스로 매핑하는 매핑을 생성합니다.
- def normalize_image(self, img):: 이미지를 정규화하는 함수입니다.
- def filter(self, imgs):: 이미지들을 필터링하는 함수입니다.
- def __getitem__(self, idx):: 데이터셋에서 특정 인덱스의 아이템을 가져오는 메서드입니다.
- def __len__(self):: 데이터셋의 길이를 반환하는 메서드입니다.
이 코드는 VOC 데이터셋을 커스텀 데이터셋 클래스로 정의하는 내용을 나타냅니다. 이 클래스는 데이터셋을 불러오고 처리하는 기능을 제공하여 모델 학습 등에 활용될 수 있습니다.
14.9.2.3. Reading the Dataset
We use the custom VOCSegDataset class to create instances of the training set and test set, respectively. Suppose that we specify that the output shape of randomly cropped images is 320×480. Below we can view the number of examples that are retained in the training set and test set.
맞춤형 VOCSegDataset 클래스를 사용하여 훈련 세트와 테스트 세트의 인스턴스를 각각 생성합니다. 임의로 자른 이미지의 출력 모양이 320×480이라고 지정한다고 가정합니다. 아래에서 훈련 세트와 테스트 세트에 보관된 예의 수를 볼 수 있습니다.
crop_size = (320, 480)
voc_train = VOCSegDataset(True, crop_size, voc_dir)
voc_test = VOCSegDataset(False, crop_size, voc_dir)- crop_size = (320, 480): 임의로 자를 크기를 (320, 480)로 지정합니다.
- voc_train = VOCSegDataset(True, crop_size, voc_dir): VOCSegDataset 클래스를 이용하여 VOC 데이터셋의 학습용 데이터셋 voc_train을 생성합니다. True는 학습 데이터셋을 의미하며, crop_size와 voc_dir은 해당 클래스의 생성자에 필요한 인자입니다.
- voc_test = VOCSegDataset(False, crop_size, voc_dir): VOCSegDataset 클래스를 이용하여 VOC 데이터셋의 테스트용 데이터셋 voc_test를 생성합니다. False는 테스트 데이터셋을 의미하며, crop_size와 voc_dir은 해당 클래스의 생성자에 필요한 인자입니다.
이 코드는 학습용과 테스트용 VOC 데이터셋을 생성하는 내용을 나타냅니다. 이를 통해 데이터셋을 생성하여 모델 학습 및 평가에 활용할 수 있습니다.
read 1114 examples
read 1078 examples
Setting the batch size to 64, we define the data iterator for the training set. Let’s print the shape of the first minibatch. Different from in image classification or object detection, labels here are three-dimensional tensors.
배치 크기를 64로 설정하고 훈련 세트에 대한 데이터 반복자를 정의합니다. 첫 번째 미니 배치의 모양을 인쇄해 봅시다. 이미지 분류 또는 객체 감지와 달리 여기서 레이블은 3차원 텐서입니다.
batch_size = 64
train_iter = torch.utils.data.DataLoader(voc_train, batch_size, shuffle=True,
                                    drop_last=True,
                                    num_workers=d2l.get_dataloader_workers())
for X, Y in train_iter:
    print(X.shape)
    print(Y.shape)
break- batch_size = 64: 배치 크기를 64로 지정합니다.
- train_iter = torch.utils.data.DataLoader(voc_train, batch_size, shuffle=True, drop_last=True, num_workers=d2l.get_dataloader_workers()): torch.utils.data.DataLoader 클래스를 사용하여 학습용 데이터셋 voc_train을 불러오는 데이터 로더 train_iter를 생성합니다. 이 데이터 로더는 배치 크기를 batch_size로 설정하고, 데이터를 섞어서 가져오며(shuffle=True), 마지막 배치를 무시합니다(drop_last=True), 병렬로 데이터를 로딩할 때 사용할 워커의 수를 d2l.get_dataloader_workers()로 설정합니다.
- for X, Y in train_iter:: train_iter에서 배치 단위로 데이터를 가져옵니다.
- print(X.shape): 현재 배치의 특징 이미지 X의 모양을 출력합니다.
- print(Y.shape): 현재 배치의 라벨 이미지 Y의 모양을 출력합니다.
- break: 첫 번째 배치만 확인하고 반복을 종료합니다.
이 코드는 데이터 로더를 사용하여 학습용 데이터셋을 배치 단위로 불러와서 모양을 확인하는 내용을 나타냅니다. 이를 통해 데이터 로딩 및 배치 처리 과정을 이해할 수 있습니다.
torch.Size([64, 3, 320, 480])
torch.Size([64, 320, 480])
14.9.2.4. Putting It All Together
Finally, we define the following load_data_voc function to download and read the Pascal VOC2012 semantic segmentation dataset. It returns data iterators for both the training and test datasets.
마지막으로 Pascal VOC2012 시맨틱 분할 데이터 세트를 다운로드하고 읽기 위해 다음 load_data_voc 함수를 정의합니다. 교육 및 테스트 데이터 세트 모두에 대한 데이터 반복자를 반환합니다.
#@save
def load_data_voc(batch_size, crop_size):
    """Load the VOC semantic segmentation dataset."""
    voc_dir = d2l.download_extract('voc2012', os.path.join(
        'VOCdevkit', 'VOC2012'))
    num_workers = d2l.get_dataloader_workers()
    train_iter = torch.utils.data.DataLoader(
        VOCSegDataset(True, crop_size, voc_dir), batch_size,
        shuffle=True, drop_last=True, num_workers=num_workers)
    test_iter = torch.utils.data.DataLoader(
        VOCSegDataset(False, crop_size, voc_dir), batch_size,
        drop_last=True, num_workers=num_workers)
return train_iter, test_iter- #@save: 주석으로, 코드 조각을 문서로 저장할 때 사용되는 주석입니다.
- def load_data_voc(batch_size, crop_size):: load_data_voc 함수를 정의합니다. 이 함수는 VOC 시맨틱 세그멘테이션 데이터셋을 불러오는 역할을 합니다.
- voc_dir = d2l.download_extract('voc2012', os.path.join('VOCdevkit', 'VOC2012')): VOC 데이터셋을 다운로드하고 압축을 해제한 경로를 voc_dir에 저장합니다.
- num_workers = d2l.get_dataloader_workers(): 데이터 로더가 사용할 워커의 수를 가져옵니다.
- train_iter = torch.utils.data.DataLoader(VOCSegDataset(True, crop_size, voc_dir), batch_size, shuffle=True, drop_last=True, num_workers=num_workers): 학습 데이터셋을 위한 데이터 로더 train_iter를 생성합니다. True는 학습 데이터셋을 의미하며, VOCSegDataset 클래스를 사용하여 데이터셋을 불러옵니다.
- test_iter = torch.utils.data.DataLoader(VOCSegDataset(False, crop_size, voc_dir), batch_size, drop_last=True, num_workers=num_workers): 테스트 데이터셋을 위한 데이터 로더 test_iter를 생성합니다. False는 테스트 데이터셋을 의미하며, VOCSegDataset 클래스를 사용하여 데이터셋을 불러옵니다.
- return train_iter, test_iter: 학습 데이터셋과 테스트 데이터셋의 데이터 로더를 반환합니다.
이 코드는 VOC 시맨틱 세그멘테이션 데이터셋을 불러오기 위한 함수를 정의한 내용을 나타냅니다. 이 함수를 통해 모델 학습 및 평가에 활용할 수 있는 데이터 로더를 얻을 수 있습니다.
14.9.3. Summary
- Semantic segmentation recognizes and understands what are in an image in pixel level by dividing the image into regions belonging to different semantic classes.
시맨틱 분할은 이미지를 서로 다른 시맨틱 클래스에 속하는 영역으로 나누어 이미지에 있는 것을 픽셀 수준으로 인식하고 이해합니다. - One of the most important semantic segmentation dataset is Pascal VOC2012.
가장 중요한 시맨틱 분할 데이터 세트 중 하나는 Pascal VOC2012입니다. - In semantic segmentation, since the input image and label correspond one-to-one on the pixel, the input image is randomly cropped to a fixed shape rather than rescaled.
시맨틱 분할에서 입력 이미지와 레이블은 픽셀에서 일대일로 대응하므로 입력 이미지는 크기를 다시 조정하지 않고 고정된 모양으로 무작위로 자릅니다.
14.9.4. Exercises
- How can semantic segmentation be applied in autonomous vehicles and medical image diagnostics? Can you think of other applications?
- Recall the descriptions of data augmentation in Section 14.1. Which of the image augmentation methods used in image classification would be infeasible to be applied in semantic segmentation?
'Dive into Deep Learning > D2L Computer Vision' 카테고리의 다른 글
| D2L - 14.12. Neural Style Transfer (1) | 2023.08.21 |
|---|---|
| D2L - 14.11. Fully Convolutional Networks (0) | 2023.08.21 |
| D2L - 14.10. Transposed Convolution (1) | 2023.08.21 |
| D2L - 14.8. Region-based CNNs (R-CNNs) (0) | 2023.08.20 |
| D2L - 14.7. Single Shot Multibox Detection (0) | 2023.08.19 |
| D2L - 14.6. The Object Detection Dataset (0) | 2023.08.19 |
| D2L - 14.5. Multiscale Object Detection (0) | 2023.08.19 |
| D2L - 14.4. Anchor Boxes (0) | 2023.08.19 |
| D2L - 14.3. Object Detection and Bounding Boxes (0) | 2023.08.19 |
| D2L - 14.2. Fine-Tuning (0) | 2023.08.19 |