

https://d2l.ai/chapter_computer-vision/neural-style.html
14.12. Neural Style Transfer — Dive into Deep Learning 1.0.3 documentation
d2l.ai
14.12. Neural Style Transfer
If you are a photography enthusiast, you may be familiar with the filter. It can change the color style of photos so that landscape photos become sharper or portrait photos have whitened skins. However, one filter usually only changes one aspect of the photo. To apply an ideal style to a photo, you probably need to try many different filter combinations. This process is as complex as tuning the hyperparameters of a model.
사진 애호가라면 필터에 익숙할 것입니다. 사진의 색상 스타일을 변경하여 풍경 사진을 더 선명하게 하거나 인물 사진의 피부를 하얗게 만들 수 있습니다. 그러나 하나의 필터는 일반적으로 사진의 한 측면만 변경합니다. 사진에 이상적인 스타일을 적용하려면 아마도 다양한 필터 조합을 시도해야 할 것입니다. 이 프로세스는 모델의 하이퍼파라미터 조정만큼 복잡합니다.
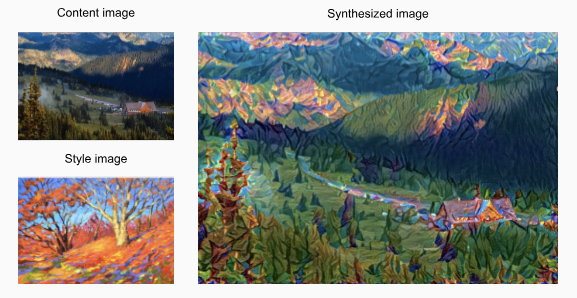
In this section, we will leverage layerwise representations of a CNN to automatically apply the style of one image to another image, i.e., style transfer (Gatys et al., 2016). This task needs two input images: one is the content image and the other is the style image. We will use neural networks to modify the content image to make it close to the style image in style. For example, the content image in Fig. 14.12.1 is a landscape photo taken by us in Mount Rainier National Park in the suburbs of Seattle, while the style image is an oil painting with the theme of autumn oak trees. In the output synthesized image, the oil brush strokes of the style image are applied, leading to more vivid colors, while preserving the main shape of the objects in the content image.
이 섹션에서는 CNN의 레이어별 표현을 활용하여 한 이미지의 스타일을 다른 이미지에 자동으로 적용합니다(예: 스타일 전송)(Gatys et al., 2016). 이 작업에는 두 개의 입력 이미지가 필요합니다. 하나는 콘텐츠 이미지이고 다른 하나는 스타일 이미지입니다. 신경망을 사용하여 콘텐츠 이미지를 스타일에서 스타일 이미지에 가깝게 수정합니다. 예를 들어 그림 14.12.1의 콘텐츠 이미지는 시애틀 교외의 레이니어산 국립공원에서 저희가 촬영한 풍경 사진이고, 스타일 이미지는 가을 참나무를 주제로 한 유화입니다. 출력된 합성 이미지에서는 스타일 이미지의 오일 브러시 스트로크가 적용되어 콘텐츠 이미지에서 오브젝트의 주요 형태를 유지하면서 보다 선명한 색상을 연출합니다.
14.12.1. Method
Fig. 14.12.2 illustrates the CNN-based style transfer method with a simplified example. First, we initialize the synthesized image, for example, into the content image. This synthesized image is the only variable that needs to be updated during the style transfer process, i.e., the model parameters to be updated during training. Then we choose a pretrained CNN to extract image features and freeze its model parameters during training. This deep CNN uses multiple layers to extract hierarchical features for images. We can choose the output of some of these layers as content features or style features. Take Fig. 14.12.2 as an example. The pretrained neural network here has 3 convolutional layers, where the second layer outputs the content features, and the first and third layers output the style features.
그림 14.12.2는 CNN 기반의 style transfer 방법을 단순화한 예와 함께 보여준다. 먼저, 예를 들어 합성 이미지를 콘텐츠 이미지로 초기화합니다. 이 합성 이미지는 스타일 전송 프로세스 중에 업데이트해야 하는 유일한 변수, 즉 훈련 중에 업데이트할 모델 매개변수입니다. 그런 다음 사전 훈련된 CNN을 선택하여 훈련 중에 이미지 특징을 추출하고 모델 매개변수를 동결합니다. 이 심층 CNN은 여러 계층을 사용하여 이미지의 계층적 특징을 추출합니다. 이러한 레이어 중 일부의 출력을 콘텐츠 기능 또는 스타일 기능으로 선택할 수 있습니다. 그림 14.12.2를 예로 들어 보겠습니다. 여기서 사전 훈련된 신경망에는 3개의 컨볼루션 레이어가 있습니다. 여기서 두 번째 레이어는 콘텐츠 기능을 출력하고 첫 번째 및 세 번째 레이어는 스타일 기능을 출력합니다.

Next, we calculate the loss function of style transfer through forward propagation (direction of solid arrows), and update the model parameters (the synthesized image for output) through backpropagation (direction of dashed arrows). The loss function commonly used in style transfer consists of three parts: (i) content loss makes the synthesized image and the content image close in content features; (ii) style loss makes the synthesized image and style image close in style features; and (iii) total variation loss helps to reduce the noise in the synthesized image. Finally, when the model training is over, we output the model parameters of the style transfer to generate the final synthesized image.
다음으로 순방향 전파(실선 화살표 방향)를 통해 스타일 전송의 손실 함수를 계산하고 역전파(파선 화살표 방향)를 통해 모델 매개변수(출력용 합성 이미지)를 업데이트합니다. 스타일 전송에서 일반적으로 사용되는 손실 함수는 세 부분으로 구성됩니다. (i) 콘텐츠 손실은 합성 이미지와 콘텐츠 이미지를 콘텐츠 기능에 가깝게 만듭니다. (ii) 스타일 손실은 합성 이미지와 스타일 이미지를 스타일 특징에 가깝게 만듭니다. (iii) 전체 변형 손실은 합성 이미지의 노이즈를 줄이는 데 도움이 됩니다. 마지막으로 모델 학습이 끝나면 style transfer의 모델 파라미터를 출력하여 최종 합성 이미지를 생성합니다.
In the following, we will explain the technical details of style transfer via a concrete experiment.
다음에서는 구체적인 실험을 통해 스타일 이전의 기술적 세부 사항을 설명합니다.
14.12.2. Reading the Content and Style Images
First, we read the content and style images. From their printed coordinate axes, we can tell that these images have different sizes.
먼저 콘텐츠와 스타일 이미지를 읽습니다. 인쇄된 좌표축에서 이러한 이미지의 크기가 다르다는 것을 알 수 있습니다.
%matplotlib inline
import torch
import torchvision
from torch import nn
from d2l import torch as d2l

d2l.set_figsize()
content_img = d2l.Image.open('../img/rainier.jpg')
d2l.plt.imshow(content_img);
위 코드는 딥러닝 모델을 사용하여 이미지를 분석하고 시각화하는 예제입니다.
- %matplotlib inline은 Jupyter Notebook에서 Matplotlib 그래프를 인라인으로 표시하는 명령입니다. 그래프를 보다 쉽게 시각화하기 위해 사용됩니다.
- import torch는 파이토치 라이브러리를 임포트합니다.
- import torchvision은 torchvision 라이브러리를 임포트합니다. torchvision은 컴퓨터 비전 관련 작업을 위한 데이터셋, 모델 등을 제공합니다.
- from torch import nn은 파이토치의 nn 모듈을 가져옵니다. 이 모듈은 신경망 구성 요소를 정의하는 데 사용됩니다.
- from d2l import torch as d2l은 D2L 라이브러리에서 torch 모듈을 가져와 d2l이란 이름으로 사용한다는 것을 의미합니다.
- d2l.set_figsize()는 Matplotlib 그래프의 크기를 설정하는 함수입니다.
- content_img = d2l.Image.open('../img/rainier.jpg')는 'rainier.jpg' 이미지 파일을 열어 content_img에 저장합니다. d2l.Image.open은 D2L 라이브러리의 이미지 처리 함수로, 이미지 파일을 열고 처리하는 기능을 제공합니다.
- d2l.plt.imshow(content_img)는 content_img를 Matplotlib을 사용하여 이미지로 표시합니다. 이를 통해 'rainier.jpg' 이미지가 출력됩니다.
즉, 이 코드는 'rainier.jpg' 이미지를 열어서 Matplotlib을 사용하여 화면에 표시하는 예제입니다.

style_img = d2l.Image.open('../img/autumn-oak.jpg')
d2l.plt.imshow(style_img);
위 코드는 스타일 이미지를 열고 화면에 표시하는 예제입니다.
- style_img = d2l.Image.open('../img/autumn-oak.jpg')는 'autumn-oak.jpg' 이미지 파일을 열어 style_img에 저장합니다. d2l.Image.open은 D2L 라이브러리의 이미지 처리 함수로, 이미지 파일을 열고 처리하는 기능을 제공합니다.
- d2l.plt.imshow(style_img)는 style_img를 Matplotlib을 사용하여 이미지로 표시합니다. 이를 통해 'autumn-oak.jpg' 이미지가 출력됩니다.
즉, 이 코드는 'autumn-oak.jpg' 이미지를 열어서 Matplotlib을 사용하여 화면에 표시하는 예제입니다.

14.12.3. Preprocessing and Postprocessing
Below, we define two functions for preprocessing and postprocessing images. The preprocess function standardizes each of the three RGB channels of the input image and transforms the results into the CNN input format. The postprocess function restores the pixel values in the output image to their original values before standardization. Since the image printing function requires that each pixel has a floating point value from 0 to 1, we replace any value smaller than 0 or greater than 1 with 0 or 1, respectively.
아래에서 이미지 전처리 및 후처리를 위한 두 가지 함수를 정의합니다. 전처리 함수는 입력 이미지의 3개 RGB 채널 각각을 표준화하고 결과를 CNN 입력 형식으로 변환합니다. 후처리 기능은 출력 이미지의 픽셀 값을 표준화 이전의 원래 값으로 복원합니다. 이미지 인쇄 기능은 각 픽셀이 0에서 1까지의 부동 소수점 값을 가져야 하므로 0보다 작은 값 또는 1보다 큰 값을 각각 0 또는 1로 바꿉니다.
rgb_mean = torch.tensor([0.485, 0.456, 0.406])
rgb_std = torch.tensor([0.229, 0.224, 0.225])

def preprocess(img, image_shape):
    transforms = torchvision.transforms.Compose([
        torchvision.transforms.Resize(image_shape),
        torchvision.transforms.ToTensor(),
        torchvision.transforms.Normalize(mean=rgb_mean, std=rgb_std)])
    return transforms(img).unsqueeze(0)

def postprocess(img):
    img = img[0].to(rgb_std.device)
    img = torch.clamp(img.permute(1, 2, 0) * rgb_std + rgb_mean, 0, 1)
    return torchvision.transforms.ToPILImage()(img.permute(2, 0, 1))
위 코드는 이미지 전처리와 후처리를 수행하는 함수들을 정의하는 예제입니다.
- rgb_mean과 rgb_std는 이미지 전처리 및 후처리에 사용될 평균과 표준편차를 정의한 텐서입니다. 이 값들은 일반적으로 이미지를 정규화(normalize)하는 데 사용됩니다.
- preprocess(img, image_shape) 함수는 이미지를 주어진 image_shape로 리사이징하고, ToTensor 변환과 Normalize 변환을 순차적으로 적용하여 이미지를 전처리합니다. 마지막에 .unsqueeze(0)를 사용하여 배치 차원을 추가합니다. 이 함수는 이미지를 모델의 입력으로 사용하기 위해 변환하는데 사용됩니다.
- postprocess(img) 함수는 모델의 출력 이미지를 원본 이미지 형식으로 복원하는데 사용됩니다. 먼저, 이미지 텐서에서 배치 차원을 제거한 다음, 평균과 표준편차를 사용하여 역정규화(normalize)를 수행합니다. 마지막으로 ToPILImage 변환을 사용하여 텐서를 PIL 이미지로 변환합니다. 이 함수는 모델의 출력을 실제 이미지로 변환하여 시각화하는데 사용됩니다.
요약하면, 이 코드는 이미지를 모델 입력으로 전처리하거나, 모델의 출력을 실제 이미지로 후처리하는 함수들을 정의하는 예제입니다.
14.12.4. Extracting Features
We use the VGG-19 model pretrained on the ImageNet dataset to extract image features (Gatys et al., 2016).
우리는 ImageNet 데이터 세트에서 사전 훈련된 VGG-19 모델을 사용하여 이미지 특징을 추출합니다(Gatys et al., 2016).
pretrained_net = torchvision.models.vgg19(pretrained=True)위 코드는 torchvision 라이브러리를 사용하여 미리 학습된 VGG-19 모델을 가져오는 예제입니다.
- torchvision.models.vgg19(pretrained=True)은 VGG-19 모델을 가져오는 함수입니다. 이 함수는 미리 학습된 가중치를 가진 VGG-19 모델을 반환합니다. pretrained=True로 설정하면 사전 학습된 가중치가 자동으로 로드됩니다.
VGG-19은 컨볼루션 신경망 아키텍처로, 주로 이미지 분류 작업에 사용됩니다. 사전 학습된 모델을 사용하면 이미지 특징 추출 및 전이 학습에 유용한 특성을 제공할 수 있습니다.
Downloading: "https://download.pytorch.org/models/vgg19-dcbb9e9d.pth" to /home/ci/.cache/torch/hub/checkpoints/vgg19-dcbb9e9d.pth
100%|██████████| 548M/548M [00:02<00:00, 213MB/s]
In order to extract the content features and style features of the image, we can select the output of certain layers in the VGG network. Generally speaking, the closer to the input layer, the easier to extract details of the image, and vice versa, the easier to extract the global information of the image. In order to avoid excessively retaining the details of the content image in the synthesized image, we choose a VGG layer that is closer to the output as the content layer to output the content features of the image. We also select the output of different VGG layers for extracting local and global style features. These layers are also called style layers. As mentioned in Section 8.2, the VGG network uses 5 convolutional blocks. In the experiment, we choose the last convolutional layer of the fourth convolutional block as the content layer, and the first convolutional layer of each convolutional block as the style layer. The indices of these layers can be obtained by printing the pretrained_net instance.
이미지의 콘텐츠 특징과 스타일 특징을 추출하기 위해 VGG 네트워크에서 특정 레이어의 출력을 선택할 수 있습니다. 일반적으로 입력 레이어에 가까울수록 이미지의 세부 정보를 추출하기 쉽고 그 반대의 경우도 이미지의 전체 정보를 추출하기 쉽습니다. 합성된 이미지에서 콘텐츠 이미지의 세부 사항이 과도하게 유지되는 것을 피하기 위해 출력에 가까운 VGG 레이어를 콘텐츠 레이어로 선택하여 이미지의 콘텐츠 특징을 출력합니다. 또한 로컬 및 글로벌 스타일 기능을 추출하기 위해 다양한 VGG 레이어의 출력을 선택합니다. 이러한 레이어를 스타일 레이어라고도 합니다. 섹션 8.2에서 언급했듯이 VGG 네트워크는 5개의 컨볼루션 블록을 사용합니다. 실험에서는 네 번째 컨볼루션 블록의 마지막 컨볼루션 레이어를 콘텐츠 레이어로 선택하고 각 컨볼루션 블록의 첫 번째 컨볼루션 레이어를 스타일 레이어로 선택합니다. 이러한 레이어의 인덱스는 pretrained_net 인스턴스를 인쇄하여 얻을 수 있습니다.
style_layers, content_layers = [0, 5, 10, 19, 28], [25]위 코드는 스타일 전이 네트워크를 구성하는 데 사용되는 레이어의 인덱스를 지정하는 예제입니다.
- style_layers: 스타일 이미지의 스타일 특징을 포착하는 데 사용되는 레이어의 인덱스 리스트입니다. VGG-19 모델에서는 이들 인덱스에 해당하는 레이어는 스타일 정보를 추출하는데 적절합니다. 스타일 이미지의 다양한 특징을 반영하기 위해 여러 개의 레이어를 선택합니다.
- content_layers: 내용 이미지의 내용 특징을 포착하는 데 사용되는 레이어의 인덱스 리스트입니다. VGG-19 모델에서는 이들 인덱스에 해당하는 레이어가 내용 정보를 추출하는데 적절합니다. 일반적으로 스타일 이미지와는 달리 내용 이미지의 특징은 더 깊은 레이어에서 추출됩니다.
이렇게 선택한 스타일 레이어와 내용 레이어의 인덱스는 스타일 전이 네트워크에서 각각의 이미지로부터 추출한 스타일과 내용의 특징을 활용하여 새로운 이미지를 생성하는데 사용됩니다.
When extracting features using VGG layers, we only need to use all those from the input layer to the content layer or style layer that is closest to the output layer. Let’s construct a new network instance net, which only retains all the VGG layers to be used for feature extraction.
VGG 레이어를 사용하여 피처를 추출할 때 입력 레이어에서 콘텐츠 레이어 또는 출력 레이어에 가장 가까운 스타일 레이어까지 모두 사용하면 됩니다. 기능 추출에 사용할 모든 VGG 레이어만 유지하는 새로운 네트워크 인스턴스 네트워크를 구성해 보겠습니다.
net = nn.Sequential(*[pretrained_net.features[i] for i in
                      range(max(content_layers + style_layers) + 1)])
위 코드는 스타일 전이 네트워크를 구성하기 위해 미리 학습된 VGG-19 모델에서 특정 레이어들을 추출하여 Sequential 모듈로 묶는 과정을 수행합니다.
- pretrained_net.features: VGG-19 모델의 features 부분은 컨볼루션 레이어들을 포함하는 Sequential 모듈입니다. 이 부분이 입력 이미지를 컨볼루션 레이어들을 통해 특성으로 변환하는 부분입니다.
- content_layers와 style_layers: 위에서 설명한 것처럼 내용과 스타일을 추출할 레이어들의 인덱스 리스트입니다.
- range(max(content_layers + style_layers) + 1): 선택한 내용 레이어와 스타일 레이어의 최대 인덱스까지의 범위를 생성합니다. 이 범위는 VGG-19 모델의 features 모듈에서 추출할 레이어들의 인덱스 범위를 의미합니다.
nn.Sequential을 사용하여 pretrained_net의 features 모듈에서 선택한 인덱스 범위에 해당하는 레이어들을 추출하여 순차적으로 연결한 net을 생성합니다. 이렇게 생성된 net은 스타일 전이 네트워크에서 입력 이미지를 특성으로 변환하는 역할을 수행합니다.
Given the input X, if we simply invoke the forward propagation net(X), we can only get the output of the last layer. Since we also need the outputs of intermediate layers, we need to perform layer-by-layer computation and keep the content and style layer outputs.
입력 X가 주어지면 순방향 전파 net(X)를 호출하기만 하면 마지막 레이어의 출력만 얻을 수 있습니다. 중간 레이어의 출력도 필요하므로 레이어별 계산을 수행하고 콘텐츠 및 스타일 레이어 출력을 유지해야 합니다.
def extract_features(X, content_layers, style_layers):
    contents = []
    styles = []
    for i in range(len(net)):
        X = net[i](X)
        if i in style_layers:
            styles.append(X)
        if i in content_layers:
            contents.append(X)
    return contents, styles
위 코드는 입력 이미지를 스타일 전이 네트워크를 통해 특성으로 추출하는 함수를 정의하는 부분입니다.
- X: 입력 이미지를 나타내는 텐서입니다.
- content_layers: 내용을 추출할 레이어들의 인덱스 리스트입니다.
- style_layers: 스타일을 추출할 레이어들의 인덱스 리스트입니다.
함수는 입력 이미지 X를 net에 통과시켜 가면 각 레이어에서의 출력을 계산합니다. 만약 현재 레이어의 인덱스가 style_layers에 속한다면, 해당 레이어의 출력을 스타일을 추출하는 데 사용될 스타일 리스트인 styles에 추가합니다. 마찬가지로 현재 레이어의 인덱스가 content_layers에 속한다면, 해당 레이어의 출력을 내용을 추출하는 데 사용될 내용 리스트인 contents에 추가합니다.
따라서 함수의 반환값은 내용과 스타일을 추출한 특성을 나타내는 리스트인 contents와 styles입니다.
Two functions are defined below: the get_contents function extracts content features from the content image, and the get_styles function extracts style features from the style image. Since there is no need to update the model parameters of the pretrained VGG during training, we can extract the content and the style features even before the training starts. Since the synthesized image is a set of model parameters to be updated for style transfer, we can only extract the content and style features of the synthesized image by calling the extract_features function during training.
아래에 두 가지 함수가 정의되어 있습니다. get_contents 함수는 콘텐츠 이미지에서 콘텐츠 특징을 추출하고 get_styles 함수는 스타일 이미지에서 스타일 특징을 추출합니다. 훈련 중에 사전 훈련된 VGG의 모델 매개변수를 업데이트할 필요가 없기 때문에 훈련이 시작되기 전에 콘텐츠와 스타일 특징을 추출할 수 있습니다. 합성 이미지는 스타일 전달을 위해 업데이트할 모델 매개변수의 집합이므로 훈련 중에 extract_features 함수를 호출해야만 합성 이미지의 콘텐츠 및 스타일 특징을 추출할 수 있습니다.
def get_contents(image_shape, device):
    content_X = preprocess(content_img, image_shape).to(device)
    contents_Y, _ = extract_features(content_X, content_layers, style_layers)
    return content_X, contents_Y

def get_styles(image_shape, device):
    style_X = preprocess(style_img, image_shape).to(device)
    _, styles_Y = extract_features(style_X, content_layers, style_layers)
    return style_X, styles_Y
위 코드는 입력 이미지에서 내용과 스타일을 추출하는 함수들을 정의하는 부분입니다.
- get_contents(image_shape, device): 이 함수는 내용 이미지로부터 내용을 추출하는 역할을 합니다.
- image_shape: 이미지의 크기를 지정합니다.
- device: 사용할 디바이스를 지정합니다.
- get_styles(image_shape, device): 이 함수는 스타일 이미지로부터 스타일을 추출하는 역할을 합니다.
- image_shape: 이미지의 크기를 지정합니다.
- device: 사용할 디바이스를 지정합니다.
14.12.5. Defining the Loss Function
Now we will describe the loss function for style transfer. The loss function consists of the content loss, style loss, and total variation loss.
이제 스타일 전송을 위한 손실 함수에 대해 설명하겠습니다. 손실 함수는 콘텐츠 손실, 스타일 손실 및 총 변형 손실로 구성됩니다.
14.12.5.1. Content Loss
Similar to the loss function in linear regression, the content loss measures the difference in content features between the synthesized image and the content image via the squared loss function. The two inputs of the squared loss function are both outputs of the content layer computed by the extract_features function.
선형 회귀의 손실 함수와 유사하게 콘텐츠 손실은 제곱 손실 함수를 통해 합성 이미지와 콘텐츠 이미지 간의 콘텐츠 특징 차이를 측정합니다. 제곱 손실 함수의 두 입력은 모두 extract_features 함수로 계산된 콘텐츠 계층의 출력입니다.
def content_loss(Y_hat, Y):
    # We detach the target content from the tree used to dynamically compute
    # the gradient: this is a stated value, not a variable. Otherwise the loss
    # will throw an error.
    return torch.square(Y_hat - Y.detach()).mean()
위 코드는 내용 손실 함수를 정의하는 부분입니다.
content_loss(Y_hat, Y) 함수는 추출된 내용 특성 Y_hat와 목표 내용 특성 Y 사이의 손실을 계산합니다. Y를 detach() 함수를 사용하여 연결된 계산 그래프에서 분리하여 계산하므로, 이것은 변수가 아닌 값으로 취급되어 경사도 계산 시 에러를 방지할 수 있습니다. 함수 내에서는 torch.square() 함수를 사용하여 제곱을 계산하고, 그 후에 평균을 계산하여 내용 손실을 반환합니다.
14.12.5.2. Style Loss
Style loss, similar to content loss, also uses the squared loss function to measure the difference in style between the synthesized image and the style image. To express the style output of any style layer, we first use the extract_features function to compute the style layer output. Suppose that the output has 1 example, c channels, height ℎ, and width w, we can transform this output into matrix X with c rows and ℎw columns. This matrix can be thought of as the concatenation of c vectors x1,…,xo, each of which has a length of ℎw. Here, vector xi represents the style feature of channel i.
스타일 손실은 콘텐츠 손실과 마찬가지로 제곱 손실 함수를 사용하여 합성 이미지와 스타일 이미지 간의 스타일 차이를 측정합니다. 스타일 레이어의 스타일 출력을 표현하기 위해 먼저 extract_features 함수를 사용하여 스타일 레이어 출력을 계산합니다. 출력에 1개의 채널, 높이 ℎ, 너비 w가 있다고 가정하면 이 출력을 c 행과 ℎw 열이 있는 행렬 X로 변환할 수 있습니다. 이 행렬은 각각 길이가 ℎw인 c 벡터 x1,…,xo의 연결로 생각할 수 있습니다. 여기서 벡터 xi는 채널 i의 스타일 특징을 나타냅니다.
In the Gram matrix of these vectors XX**⊤∈ℝ**c×c, element xij in row i and column j is the dot product of vectors xi and xj. It represents the correlation of the style features of channels i and j. We use this Gram matrix to represent the style output of any style layer. Note that when the value of ℎw is larger, it likely leads to larger values in the Gram matrix. Note also that the height and width of the Gram matrix are both the number of channels c. To allow style loss not to be affected by these values, the gram function below divides the Gram matrix by the number of its elements, i.e., cℎw.
이러한 벡터 XX**⊤∈ℝ**c×c의 그람 행렬에서 i행과 j열의 요소 xij는 벡터 xi와 xj의 내적입니다. 채널 i와 j의 스타일 특징의 상관관계를 나타냅니다. 이 그램 매트릭스를 사용하여 모든 스타일 레이어의 스타일 출력을 나타냅니다. ℎw의 값이 클수록 그람 행렬에서 더 큰 값이 될 가능성이 높습니다. 또한 그램 행렬의 높이와 너비는 모두 채널 c의 수입니다. 스타일 손실이 이러한 값의 영향을 받지 않도록 하기 위해 아래의 gram 함수는 Gram 행렬을 해당 요소의 수, 즉 cℎw로 나눕니다.
def gram(X):
    num_channels, n = X.shape[1], X.numel() // X.shape[1]
    X = X.reshape((num_channels, n))
    return torch.matmul(X, X.T) / (num_channels * n)
위 코드는 그람 행렬 함수를 정의하는 부분입니다.
gram(X) 함수는 입력으로 들어온 특성 맵 X의 그람 행렬을 계산합니다. 그람 행렬은 특성 맵의 채널 간 상관 관계를 캡처하는데 사용되며, 스타일 손실을 계산하는 데 활용됩니다.
함수 내에서는 먼저 X의 크기를 조정하여 num_channels을 채널 수로, n을 각 채널에서의 픽셀 수로 변환합니다. 그런 다음 torch.matmul() 함수를 사용하여 X와 X.T (전치된 X)의 행렬 곱을 계산하고, 이를 (num_channels * n)로 나누어 그람 행렬을 구합니다. 이렇게 구한 그람 행렬은 스타일 손실 계산에 사용됩니다.
Obviously, the two Gram matrix inputs of the squared loss function for style loss are based on the style layer outputs for the synthesized image and the style image. It is assumed here that the Gram matrix gram_Y based on the style image has been precomputed.
분명히 스타일 손실에 대한 제곱 손실 함수의 두 그램 매트릭스 입력은 합성 이미지와 스타일 이미지에 대한 스타일 레이어 출력을 기반으로 합니다. 여기서는 스타일 이미지를 기반으로 하는 그램 행렬 gram_Y가 미리 계산되었다고 가정합니다.
def style_loss(Y_hat, gram_Y):
    return torch.square(gram(Y_hat) - gram_Y.detach()).mean()
위 코드는 스타일 손실 함수를 정의하는 부분입니다.
style_loss(Y_hat, gram_Y) 함수는 스타일 이미지의 그람 행렬 gram_Y와 생성된 이미지의 특성 맵 Y_hat 간의 스타일 손실을 계산합니다. 스타일 손실은 생성된 이미지의 특성 맵이 스타일 이미지의 스타일을 얼마나 잘 따라가는지를 나타내는 지표입니다.
함수 내에서는 Y_hat의 그람 행렬을 계산하기 위해 gram(Y_hat) 함수를 호출하고, 이를 gram_Y와 비교하여 차이의 제곱을 계산한 후 평균을 취합니다. 이로써 스타일 손실을 구하게 됩니다. gram_Y를 detach()하여 그람 행렬의 계산 그래프를 분리하여 오류가 발생하지 않도록 합니다.
Gram Matrix 란?
A Gram Matrix, also known as a Gramian Matrix or a Gramian, is a mathematical construct used in linear algebra and signal processing. It is derived from the inner products of a set of vectors and provides insights into the relationships between these vectors. The Gram Matrix is particularly useful in various applications, including image processing, machine learning, and the analysis of functions.
Gram 행렬은 선형 대수 및 신호 처리에서 사용되는 수학적인 개념으로, 벡터들의 내적(inner product)에서 유도되며 이러한 벡터들 간의 관계에 대한 통찰력을 제공합니다. Gram 행렬은 이미지 처리, 기계 학습, 함수 분석과 같은 다양한 응용 분야에서 특히 유용하게 활용됩니다.
Given a set of vectors in an -dimensional space, the Gram Matrix is defined as follows:
이 -차원 공간에서 주어진 벡터들의 집합이라고 할 때, Gram 행렬 은 다음과 같이 정의됩니다:
여기서 \(x_i^T\)는 벡터 \(x_i\)의 전치(transpose)를 나타내며, \(x_i^T x_j\)는 벡터 \(x_i\)와 \(x_j\)의 내적(점곱)을 나타냅니다.
Gram 행렬은 대칭적이고 양의 준정부호(positive semi-definite)를 가집니다. 즉, 고유값은 비음수입니다. 이는 벡터들 간의 유사성 또는 상관 관계를 포착합니다. 예를 들어 이미지 처리에서, 이미지 특징 벡터들의 집합의 Gram 행렬은 텍스처나 스타일 정보를 분석하는 데 사용될 수 있으며, 이는 딥 러닝에서의 신경망 스타일 전이(neural style transfer)와 같은 기법의 기초입니다.
기계 학습에서는 Gram 행렬은 서포트 벡터 머신(SVM)의 커널 방법 및 데이터 포인트 간의 쌍별 유사성을 필요로하는 다른 알고리즘에서 사용됩니다. 이는 이러한 알고리즘들이 변환된 특징 벡터를 명시적으로 계산하지 않고도 더 높은 차원 공간에서 작동할 수 있게 합니다.
종합적으로, Gram 행렬은 다양한 의미 맥락에서 벡터 간의 관계와 유사성에 대한 통찰력을 제공하는 다재다능한 수학적 도구입니다. 이는 신호 처리부터 기계 학습까지 다양한 분야에서 응용 가능한 중요한 개념입니다.
14.12.5.3. Total Variation Loss
Sometimes, the learned synthesized image has a lot of high-frequency noise, i.e., particularly bright or dark pixels. One common noise reduction method is total variation denoising. Denote by xi,j the pixel value at coordinate (i,j). Reducing total variation loss makes values of neighboring pixels on the synthesized image closer.
때로는 학습된 합성 이미지에 많은 고주파 노이즈, 즉 특히 밝거나 어두운 픽셀이 있습니다. 일반적인 노이즈 감소 방법 중 하나는 전체 변형 노이즈 제거입니다. 좌표(i,j)의 픽셀 값을 xi,j로 표시합니다. 총 변형 손실을 줄이면 합성 이미지의 인접 픽셀 값이 더 가까워집니다.

def tv_loss(Y_hat):
    return 0.5 * (torch.abs(Y_hat[:, :, 1:, :] - Y_hat[:, :, :-1, :]).mean() +
                  torch.abs(Y_hat[:, :, :, 1:] - Y_hat[:, :, :, :-1]).mean())
위 코드는 전체 변위 손실 함수를 정의하는 부분입니다.
tv_loss(Y_hat) 함수는 생성된 이미지의 특성 맵 Y_hat에 대한 전체 변위 손실을 계산합니다. 전체 변위 손실은 생성된 이미지의 픽셀 간의 변화 정도를 나타내며, 이미지의 부드러움과 노이즈 제거에 기여합니다.
함수 내에서는 Y_hat의 특성 맵에 대해 수직 방향 및 수평 방향으로 픽셀 간의 차이를 계산하고, 절댓값을 취하여 평균을 계산합니다. 이렇게 계산된 두 차이의 평균을 더한 후 0.5를 곱하여 최종적인 전체 변위 손실을 계산합니다.
14.12.5.4. Loss Function
The loss function of style transfer is the weighted sum of content loss, style loss, and total variation loss. By adjusting these weight hyperparameters, we can balance among content retention, style transfer, and noise reduction on the synthesized image.
스타일 전송의 손실 함수는 콘텐츠 손실, 스타일 손실 및 총 변형 손실의 가중 합입니다. 이러한 가중치 하이퍼파라미터를 조정하여 합성 이미지의 콘텐츠 유지, 스타일 전송 및 노이즈 감소 간의 균형을 맞출 수 있습니다.
content_weight, style_weight, tv_weight = 1, 1e4, 10

def compute_loss(X, contents_Y_hat, styles_Y_hat, contents_Y, styles_Y_gram):
    # Calculate the content, style, and total variance losses respectively
    contents_l = [content_loss(Y_hat, Y) * content_weight for Y_hat, Y in zip(
        contents_Y_hat, contents_Y)]
    styles_l = [style_loss(Y_hat, Y) * style_weight for Y_hat, Y in zip(
        styles_Y_hat, styles_Y_gram)]
    tv_l = tv_loss(X) * tv_weight
    # Add up all the losses
    l = sum(styles_l + contents_l + [tv_l])
    return contents_l, styles_l, tv_l, l
위 코드는 이미지 생성을 위한 전체 손실을 계산하는 함수를 정의하는 부분입니다.
compute_loss(X, contents_Y_hat, styles_Y_hat, contents_Y, styles_Y_gram) 함수는 생성된 이미지 X와 이에 대한 콘텐츠 및 스타일 특성 맵의 예측 contents_Y_hat 및 styles_Y_hat, 그리고 정답 콘텐츠 및 스타일 그람 매트릭스 contents_Y와 styles_Y_gram을 사용하여 전체 손실을 계산합니다.
함수 내에서는 콘텐츠 손실, 스타일 손실, 그리고 전체 변위 손실을 계산합니다. 각각의 손실에는 content_weight, style_weight, tv_weight 가중치가 곱해진 후 합산되어 최종 손실 l이 계산됩니다.
이렇게 계산된 각 손실들을 반환하며, 생성된 이미지의 품질을 조정하는 데 사용됩니다.
14.12.6. Initializing the Synthesized Image
In style transfer, the synthesized image is the only variable that needs to be updated during training. Thus, we can define a simple model, SynthesizedImage, and treat the synthesized image as the model parameters. In this model, forward propagation just returns the model parameters.
스타일 전송에서 합성 이미지는 학습 중에 업데이트해야 하는 유일한 변수입니다. 따라서 간단한 모델인 SynthesizedImage를 정의하고 합성된 이미지를 모델 매개변수로 처리할 수 있습니다. 이 모델에서 정방향 전파는 모델 매개변수만 반환합니다.
class SynthesizedImage(nn.Module):
    def __init__(self, img_shape, **kwargs):
        super(SynthesizedImage, self).__init__(**kwargs)
        self.weight = nn.Parameter(torch.rand(*img_shape))

    def forward(self):
        return self.weight
위 코드는 신경망 모델을 정의하는 클래스인 SynthesizedImage를 나타냅니다.
SynthesizedImage 클래스는 nn.Module을 상속하여 정의되며, 생성된 이미지를 나타내는 모델입니다. 생성된 이미지는 nn.Parameter를 통해 모델의 학습 가능한 매개변수로서 정의됩니다. 생성된 이미지의 크기는 img_shape로 주어지며, 이는 self.weight 매개변수의 형태가 됩니다.
forward 메서드는 해당 모델의 순전파(forward) 연산을 수행하는 부분으로, 단순히 self.weight 값을 반환합니다. 이렇게 정의된 클래스는 이미지 생성 과정에서 모델을 사용하여 이미지를 조작하고 업데이트하는 데 활용될 수 있습니다.
Next, we define the get_inits function. This function creates a synthesized image model instance and initializes it to the image X. Gram matrices for the style image at various style layers, styles_Y_gram, are computed prior to training.
다음으로 get_inits 함수를 정의합니다. 이 함수는 합성된 이미지 모델 인스턴스를 생성하고 이미지 X로 초기화합니다. 다양한 스타일 레이어에서 스타일 이미지에 대한 그램 매트릭스(style_Y_gram)는 훈련 전에 계산됩니다.
def get_inits(X, device, lr, styles_Y):
    gen_img = SynthesizedImage(X.shape).to(device)
    gen_img.weight.data.copy_(X.data)
    trainer = torch.optim.Adam(gen_img.parameters(), lr=lr)
    styles_Y_gram = [gram(Y) for Y in styles_Y]
    return gen_img(), styles_Y_gram, trainer
위 코드는 생성된 이미지의 초기화 및 학습에 필요한 초기화 요소를 얻는 함수 get_inits를 나타냅니다.
이 함수는 다음과 같은 역할을 수행합니다:
- X: 원본 이미지
- device: 사용할 디바이스 (CPU 또는 GPU)
- lr: 학습률
- styles_Y: 스타일 이미지의 Gram 행렬들
위 매개변수들을 이용하여 다음 작업을 수행합니다:
- SynthesizedImage 모델의 인스턴스 gen_img를 생성하고, 해당 모델의 가중치를 원본 이미지 X의 데이터로 초기화합니다.
- styles_Y의 각 스타일 이미지에 대한 Gram 행렬을 계산하여 styles_Y_gram에 저장합니다.
- gen_img, styles_Y_gram, 그리고 Adam 옵티마이저를 생성하여 반환합니다.
이렇게 생성된 이미지와 초기화에 필요한 정보는 실제 이미지를 생성하고 업데이트하는 학습 과정에서 활용될 것입니다.
14.12.7. Training
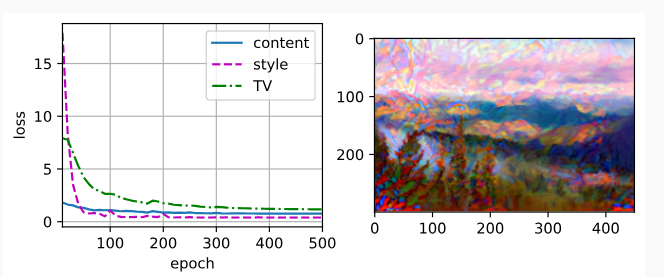
When training the model for style transfer, we continuously extract content features and style features of the synthesized image, and calculate the loss function. Below defines the training loop.
스타일 전달을 위해 모델을 훈련할 때 합성 이미지의 콘텐츠 특징과 스타일 특징을 지속적으로 추출하고 손실 함수를 계산합니다. 아래는 훈련 루프를 정의합니다.
def train(X, contents_Y, styles_Y, device, lr, num_epochs, lr_decay_epoch):
    X, styles_Y_gram, trainer = get_inits(X, device, lr, styles_Y)
    scheduler = torch.optim.lr_scheduler.StepLR(trainer, lr_decay_epoch, 0.8)
    animator = d2l.Animator(xlabel='epoch', ylabel='loss',
                            xlim=[10, num_epochs],
                            legend=['content', 'style', 'TV'],
                            ncols=2, figsize=(7, 2.5))
    for epoch in range(num_epochs):
        trainer.zero_grad()
        contents_Y_hat, styles_Y_hat = extract_features(
            X, content_layers, style_layers)
        contents_l, styles_l, tv_l, l = compute_loss(
            X, contents_Y_hat, styles_Y_hat, contents_Y, styles_Y_gram)
        l.backward()
        trainer.step()
        scheduler.step()
        if (epoch + 1) % 10 == 0:
            animator.axes[1].imshow(postprocess(X))
            animator.add(epoch + 1, [float(sum(contents_l)),
                                     float(sum(styles_l)), float(tv_l)])
    return X
위 코드는 스타일 전이 네트워크를 학습하는 함수 train을 나타냅니다.
이 함수는 다음과 같은 역할을 수행합니다:
- X: 원본 이미지
- contents_Y: 내용 이미지의 특징
- styles_Y: 스타일 이미지의 특징
- device: 사용할 디바이스 (CPU 또는 GPU)
- lr: 학습률
- num_epochs: 에포크 수
- lr_decay_epoch: 학습률 감소를 적용할 에포크 간격
위 매개변수들을 이용하여 다음 작업을 수행합니다:
- 생성된 이미지 X, 스타일 이미지의 Gram 행렬들 styles_Y_gram, 그리고 Adam 옵티마이저를 초기화하고 얻습니다.
- StepLR 스케줄러를 생성하여 학습률을 조정하는데 사용합니다.
- 애니메이션을 위한 Animator를 초기화합니다.
- 주어진 에포크 수만큼 학습을 반복하면서 다음을 수행합니다:
- 옵티마이저의 그래디언트를 초기화합니다.
- 생성된 이미지 X를 스타일 전이 네트워크에 통과시켜 내용과 스타일 특징을 추출합니다.
- 내용 손실, 스타일 손실, 총 변동 손실을 계산합니다.
- 총 손실에 대한 역전파를 수행하고 옵티마이저를 업데이트합니다.
- 스케줄러를 업데이트하여 학습률을 조정합니다.
- 일정 에포크마다 생성된 이미지를 시각화하고, 내용 손실, 스타일 손실, 변동 손실을 기록합니다.
- 최종적으로 생성된 이미지 X를 반환합니다.
Now we start to train the model. We rescale the height and width of the content and style images to 300 by 450 pixels. We use the content image to initialize the synthesized image.
이제 모델 학습을 시작합니다. 콘텐츠 및 스타일 이미지의 높이와 너비를 300 x 450픽셀로 재조정합니다. 콘텐츠 이미지를 사용하여 합성 이미지를 초기화합니다.
device, image_shape = d2l.try_gpu(), (300, 450)  # PIL Image (h, w)
net = net.to(device)
content_X, contents_Y = get_contents(image_shape, device)
_, styles_Y = get_styles(image_shape, device)
output = train(content_X, contents_Y, styles_Y, device, 0.3, 500, 50)
위 코드는 주어진 내용 이미지와 스타일 이미지를 사용하여 스타일 전이 네트워크를 학습하고, 생성된 이미지를 반환하는 작업을 수행합니다.
- device와 image_shape를 설정합니다. device는 학습에 사용할 디바이스(CPU 또는 GPU)를 결정하고, image_shape는 생성될 이미지의 크기를 결정합니다.
- net을 지정된 디바이스로 옮깁니다. 이는 네트워크를 선택한 디바이스에서 실행하도록 하는 역할을 합니다.
- get_contents 함수를 사용하여 내용 이미지의 특징을 추출합니다. 추출한 내용 이미지와 특징을 content_X와 contents_Y로 저장합니다.
- get_styles 함수를 사용하여 스타일 이미지의 특징을 추출합니다. 추출한 스타일 이미지와 특징을 styles_X와 styles_Y로 저장합니다.
- train 함수를 호출하여 스타일 전이 네트워크를 학습합니다. content_X, contents_Y, styles_Y, device, 학습률(0.3), 에포크 수(500), 학습률 감소 에포크(50)를 매개변수로 전달합니다. 학습된 결과로 생성된 이미지를 output에 저장합니다.
즉, 위 코드는 주어진 내용 이미지와 스타일 이미지를 이용하여 스타일 전이 네트워크를 학습하고, 학습된 결과로 생성된 이미지를 반환합니다.
We can see that the synthesized image retains the scenery and objects of the content image, and transfers the color of the style image at the same time. For example, the synthesized image has blocks of color like those in the style image. Some of these blocks even have the subtle texture of brush strokes.
합성된 이미지는 콘텐츠 이미지의 풍경과 사물을 그대로 유지함과 동시에 스타일 이미지의 색상을 전달함을 알 수 있다. 예를 들어 합성 이미지에는 스타일 이미지와 같은 색상 블록이 있습니다. 이러한 블록 중 일부는 브러시 스트로크의 미묘한 질감을 가지고 있습니다.
14.12.8. Summary
- The loss function commonly used in style transfer consists of three parts: (i) content loss makes the synthesized image and the content image close in content features; (ii) style loss makes the synthesized image and style image close in style features; and (iii) total variation loss helps to reduce the noise in the synthesized image.
- 스타일 전송에서 일반적으로 사용되는 손실 함수는 세 부분으로 구성됩니다. (i) 콘텐츠 손실은 합성 이미지와 콘텐츠 이미지를 콘텐츠 기능에 가깝게 만듭니다. (ii) 스타일 손실은 합성 이미지와 스타일 이미지를 스타일 특징에 가깝게 만듭니다. (iii) 전체 변형 손실은 합성 이미지의 노이즈를 줄이는 데 도움이 됩니다.
- We can use a pretrained CNN to extract image features and minimize the loss function to continuously update the synthesized image as model parameters during training.
- 사전 훈련된 CNN을 사용하여 이미지 특징을 추출하고 손실 함수를 최소화하여 훈련 중에 합성된 이미지를 모델 매개변수로 지속적으로 업데이트할 수 있습니다.
- We use Gram matrices to represent the style outputs from the style layers.
- 스타일 레이어의 스타일 출력을 나타내기 위해 그램 매트릭스를 사용합니다.
14.12.9. Exercises
- How does the output change when you select different content and style layers?
- Adjust the weight hyperparameters in the loss function. Does the output retain more content or have less noise?
- Use different content and style images. Can you create more interesting synthesized images?
- Can we apply style transfer for text? Hint: you may refer to the survey paper by Hu et al. (2022).
'Dive into Deep Learning > D2L Computer Vision' 카테고리의 다른 글
| D2L - 14.11. Fully Convolutional Networks (0) | 2023.08.21 |
|---|---|
| D2L - 14.10. Transposed Convolution (1) | 2023.08.21 |
| D2L - 14.9. Semantic Segmentation and the Dataset (0) | 2023.08.20 |
| D2L - 14.8. Region-based CNNs (R-CNNs) (0) | 2023.08.20 |
| D2L - 14.7. Single Shot Multibox Detection (0) | 2023.08.19 |
| D2L - 14.6. The Object Detection Dataset (0) | 2023.08.19 |
| D2L - 14.5. Multiscale Object Detection (0) | 2023.08.19 |
| D2L - 14.4. Anchor Boxes (0) | 2023.08.19 |
| D2L - 14.3. Object Detection and Bounding Boxes (0) | 2023.08.19 |
| D2L - 14.2. Fine-Tuning (0) | 2023.08.19 |