https://www.pinecone.io/learn/series/langchain/langchain-intro/
LangChain: Introduction and Getting Started | Pinecone
Large Language Models (LLMs) entered the world stage with the release of OpenAI’s GPT-3 in 2020 [1]. Since then, they’ve enjoyed a steady growth in popularity. That is until late 2022. Interest in LLMs and the broader discipline of generative AI has sk
www.pinecone.io
LangChain: Introduction and Getting Started
Large Language Models (LLMs) entered the world stage with the release of OpenAI’s GPT-3 in 2020 [1]. Since then, they’ve enjoyed a steady growth in popularity.
LLM(대형 언어 모델)은 2020년 OpenAI의 GPT-3 출시로 세계 무대에 진출했습니다[1]. 그 이후로 그들은 꾸준히 인기를 얻었습니다.
That is until late 2022. Interest in LLMs and the broader discipline of generative AI has skyrocketed. The reasons for this are likely the continuous upward momentum of significant advances in LLMs.
이는 2022년 말까지입니다. LLM과 생성 AI의 광범위한 분야에 대한 관심이 급증했습니다. 그 이유는 LLM의 상당한 발전이 지속적으로 증가하고 있기 때문일 것입니다.
We saw the dramatic news about Google’s “sentient” LaMDA chatbot. The first high-performance and open-source LLM called BLOOM was released. OpenAI released their next-generation text embedding model and the next generation of “GPT-3.5” models.
우리는 Google의 "지각력 있는" LaMDA 챗봇에 대한 극적인 소식을 보았습니다. BLOOM이라는 최초의 고성능 오픈 소스 LLM이 출시되었습니다. OpenAI는 차세대 텍스트 임베딩 모델과 차세대 "GPT-3.5" 모델을 출시했습니다.
After all these giant leaps forward in the LLM space, OpenAI released ChatGPT — thrusting LLMs into the spotlight.
LLM 공간에서 이러한 큰 도약을 마친 후 OpenAI는 ChatGPT를 출시하여 LLM을 주목하게 되었습니다.
LangChain appeared around the same time. Its creator, Harrison Chase, made the first commit in late October 2022. Leaving a short couple of months of development before getting caught in the LLM wave.
LangChain도 비슷한 시기에 등장했습니다. 제작자인 Harrison Chase는 2022년 10월 말에 첫 번째 커밋을 했습니다. 몇 달의 짧은 개발 기간을 거쳐 LLM 물결에 휩싸였습니다.
Despite being early days for the library, it is already packed full of incredible features for building amazing tools around the core of LLMs. In this article, we’ll introduce the library and start with the most straightforward component offered by LangChain — LLMs.
라이브러리는 초기 단계임에도 불구하고 이미 LLM 핵심을 중심으로 놀라운 도구를 구축하기 위한 놀라운 기능으로 가득 차 있습니다. 이 기사에서는 라이브러리를 소개하고 LangChain이 제공하는 가장 간단한 구성 요소인 LLM부터 시작하겠습니다.
https://youtu.be/nE2skSRWTTs?si=fTiKJZwYyYhNr4_c
LangChain
At its core, LangChain is a framework built around LLMs. We can use it for chatbots, Generative Question-Answering (GQA), summarization, and much more.
LangChain의 핵심은 LLM을 중심으로 구축된 프레임워크입니다. 챗봇, 생성적 질문 답변(GQA), 요약 등에 사용할 수 있습니다.
The core idea of the library is that we can “chain” together different components to create more advanced use cases around LLMs. Chains may consist of multiple components from several modules:
라이브러리의 핵심 아이디어는 다양한 구성 요소를 함께 " chain "하여 LLM에 대한 고급 사용 사례를 만들 수 있다는 것입니다. 체인은 여러 모듈의 여러 구성 요소로 구성될 수 있습니다.
- Prompt templates: Prompt templates are templates for different types of prompts. Like “chatbot” style templates, ELI5 question-answering, etc
- 프롬프트 템플릿: 프롬프트 템플릿은 다양한 유형의 프롬프트에 대한 템플릿입니다. "챗봇" 스타일 템플릿, ELI5 질문 답변 등
- LLMs: Large language models like GPT-3, BLOOM, etc GPT-3, BLOOM 등과 같은 대규모 언어 모델
- Agents: Agents use LLMs to decide what actions should be taken. Tools like web search or calculators can be used, and all are packaged into a logical loop of operations.
- 에이전트: 에이전트는 LLM을 사용하여 취해야 할 조치를 결정합니다. 웹 검색이나 계산기와 같은 도구를 사용할 수 있으며 모두 논리적 작업 루프로 패키지됩니다.
- Memory: Short-term memory, long-term memory. 단기기억, 장기기억.
We will dive into each of these in much more detail in upcoming chapters of the LangChain handbook.
For now, we’ll start with the basics behind prompt templates and LLMs. We’ll also explore two LLM options available from the library, using models from Hugging Face Hub or OpenAI.
지금은 프롬프트 템플릿과 LLM의 기본 사항부터 시작하겠습니다. 또한 Hugging Face Hub 또는 OpenAI의 모델을 사용하여 라이브러리에서 사용할 수 있는 두 가지 LLM 옵션도 살펴보겠습니다.
Our First Prompt Templates
Prompts being input to LLMs are often structured in different ways so that we can get different results. For Q&A, we could take a user’s question and reformat it for different Q&A styles, like conventional Q&A, a bullet list of answers, or even a summary of problems relevant to the given question.
LLM에 입력되는 프롬프트는 종종 다른 결과를 얻을 수 있도록 다른 방식으로 구성됩니다. Q&A의 경우 사용자의 질문을 받아 일반적인 Q&A, 답변의 글머리 기호 목록, 특정 질문과 관련된 문제 요약 등 다양한 Q&A 스타일로 형식을 변경할 수 있습니다.
Creating Prompts in LangChain
Let’s put together a simple question-answering prompt template. We first need to install the langchain library.
간단한 질문 답변 프롬프트 템플릿을 만들어 보겠습니다. 먼저 langchain 라이브러리를 설치해야 합니다.
!pip install langchain
Follow along with the code via the walkthrough!
From here, we import the PromptTemplate class and initialize a template like so:
여기에서 PromptTemplate 클래스를 가져오고 다음과 같이 템플릿을 초기화합니다.
from langchain import PromptTemplate

template = """Question: {question}

Answer: """
prompt = PromptTemplate(
        template=template,
    input_variables=['question']
)

# user question
question = "Which NFL team won the Super Bowl in the 2010 season?"
이 코드는 Python 언어를 사용하여 langchain 패키지에서 PromptTemplate 클래스를 사용하는 간단한 예제입니다.
- from langchain import PromptTemplate: langchain 패키지에서 PromptTemplate 클래스를 가져옵니다.
- template = """Question: {question}\n\nAnswer: """: PromptTemplate에 전달할 템플릿 문자열을 정의합니다. {question}은 나중에 변수로 대체될 부분입니다.
- prompt = PromptTemplate(template=template, input_variables=['question']): PromptTemplate 클래스의 인스턴스를 생성합니다. 여기서 템플릿과 입력 변수가 지정됩니다. template에는 앞에서 정의한 템플릿 문자열이, input_variables에는 입력으로 받을 변수들이 리스트로 지정됩니다. 이 경우에는 'question' 변수를 입력으로 받습니다.
- question = "Which NFL team won the Super Bowl in the 2010 season?": 사용자의 질문을 나타내는 변수를 정의합니다.
코드는 질문 변수를 이용하여 PromptTemplate 클래스에 정의된 템플릿에 맞게 포맷팅한 후, 그 결과를 출력할 준비를 마칩니다. 이것은 대화 시스템이나 언어 생성 모델에서 사용될 수 있는 일반적인 템플릿 기반의 입력 처리 방식을 보여주는 예제입니다.
When using these prompt template with the given question we will get:
주어진 질문에 이러한 프롬프트 템플릿을 사용하면 다음과 같은 결과를 얻을 수 있습니다.
Question: Which NFL team won the Super Bowl in the 2010 season? Answer:
For now, that’s all we need. We’ll use the same prompt template across both Hugging Face Hub and OpenAI LLM generations.
지금은 그것이 우리에게 필요한 전부입니다. Hugging Face Hub와 OpenAI LLM 세대 모두에서 동일한 프롬프트 템플릿을 사용할 것입니다.
Hugging Face Hub LLM
The Hugging Face Hub endpoint in LangChain connects to the Hugging Face Hub and runs the models via their free inference endpoints. We need a Hugging Face account and API key to use these endpoints.
LangChain의 Hugging Face Hub 엔드포인트는 Hugging Face Hub에 연결되어 무료 추론 엔드포인트를 통해 모델을 실행합니다. 이러한 엔드포인트를 사용하려면 Hugging Face 계정과 API 키가 필요합니다.
Once you have an API key, we add it to the HUGGINGFACEHUB_API_TOKEN environment variable. We can do this with Python like so:
API 키가 있으면 이를 HUGGINGFACEHUB_API_TOKEN 환경 변수에 추가합니다. Python으로 다음과 같이 이를 수행할 수 있습니다.
import os

os.environ['HUGGINGFACEHUB_API_TOKEN'] = 'HF_API_KEY'
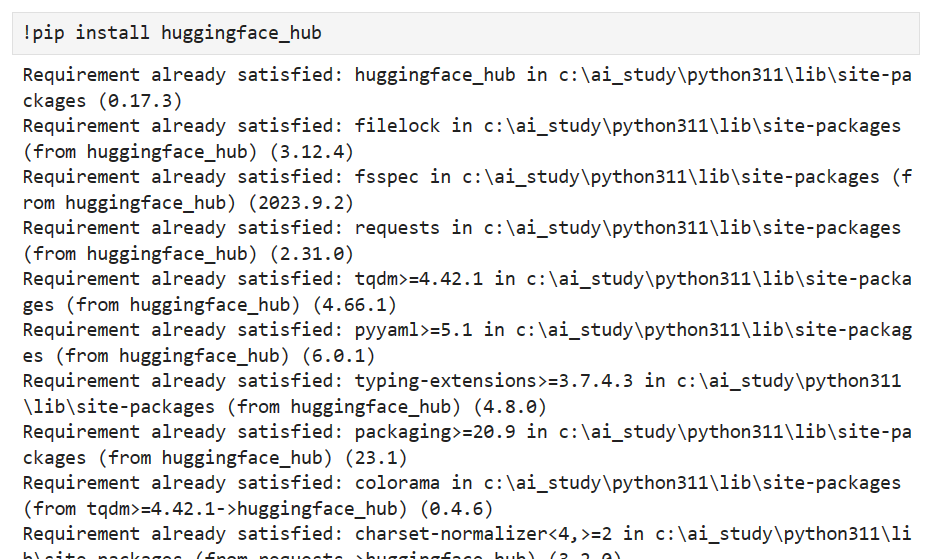
Next, we must install the huggingface_hub library via Pip.
다음으로 Pip을 통해 Huggingface_hub 라이브러리를 설치해야 합니다.
!pip install huggingface_hub
Now we can generate text using a Hub model. We’ll use google/flan-t5-x1.
이제 허브 모델을 사용하여 텍스트를 생성할 수 있습니다. 우리는 google/flan-t5-x1을 사용하겠습니다.
The default Hugging Face Hub inference APIs do not use specialized hardware and, therefore, can be slow. They are also not suitable for running larger models like bigscience/bloom-560m or google/flan-t5-xxl (note xxl vs. xl).
기본 Hugging Face Hub 추론 API는 특수 하드웨어를 사용하지 않으므로 속도가 느릴 수 있습니다. 또한 bigscience/bloom-560m 또는 google/flan-t5-xxl(xxl과 xl 참고)과 같은 대규모 모델을 실행하는 데에도 적합하지 않습니다.
from langchain import HuggingFaceHub, LLMChain

# initialize Hub LLM
hub_llm = HuggingFaceHub(
        repo_id='google/flan-t5-xl',
    model_kwargs={'temperature':1e-10}
)

# create prompt template > LLM chain
llm_chain = LLMChain(
    prompt=prompt,
    llm=hub_llm
)

# ask the user question about NFL 2010
print(llm_chain.run(question))
green bay packers
이 코드는 langchain 패키지를 사용하여 Hugging Face Hub의 언어 모델을 초기화하고, 해당 모델을 사용하여 주어진 질문에 대한 응답을 생성하는 예제입니다. 아래는 코드의 각 부분에 대한 설명입니다:
- from langchain import HuggingFaceHub, LLMChain: langchain 패키지에서 Hugging Face Hub 및 LLMChain 클래스를 가져옵니다.
- hub_llm = HuggingFaceHub(repo_id='google/flan-t5-xl', model_kwargs={'temperature':1e-10}): Hugging Face Hub의 언어 모델을 초기화합니다. repo_id는 모델의 저장소 식별자이며, 이 경우에는 'google/flan-t5-xl'을 사용합니다. model_kwargs는 모델에 대한 추가적인 매개변수를 설정하는 것으로, 여기에서는 'temperature'를 매우 작은 값으로 설정하고 있습니다.
- llm_chain = LLMChain(prompt=prompt, llm=hub_llm): Prompt와 Hugging Face Hub에서 초기화된 언어 모델을 사용하여 LLMChain 클래스의 인스턴스를 생성합니다. 이것은 언어 생성 모델과 템플릿 기반 입력 처리를 결합하는 것으로 보입니다.
- print(llm_chain.run(question)): LLMChain의 run 메서드를 사용하여 주어진 질문에 대한 응답을 생성하고 출력합니다. 이는 템플릿과 언어 생성 모델을 조합하여 사용자의 입력에 대한 응답을 생성하는 간단한 예제입니다.
For this question, we get the correct answer of "green bay packers".
이 질문에 대한 정답은 '그린베이패커스'입니다.
Asking Multiple Questions
If we’d like to ask multiple questions, we can try two approaches:
여러 가지 질문을 하고 싶다면 두 가지 접근 방식을 시도해 볼 수 있습니다.
- Iterate through all questions using the generate method, answering them one at a time.
generate 메소드를 사용하여 모든 질문을 반복하고 한 번에 하나씩 답변합니다. - Place all questions into a single prompt for the LLM; this will only work for more advanced LLMs.
모든 질문을 LLM의 단일 프롬프트에 배치하세요. 이는 고급 LLM에만 적용됩니다.
Starting with option (1), let’s see how to use the generate method:
옵션 (1)부터 시작하여 generate 메소드를 사용하는 방법을 살펴보겠습니다.
qs = [
    {'question': "Which NFL team won the Super Bowl in the 2010 season?"},
    {'question': "If I am 6 ft 4 inches, how tall am I in centimeters?"},
    {'question': "Who was the 12th person on the moon?"},
    {'question': "How many eyes does a blade of grass have?"}
]
res = llm_chain.generate(qs)
res
이 코드는 여러 개의 질문이 담긴 리스트를 사용하여 이전에 초기화한 llm_chain을 통해 각 질문에 대한 응답을 생성하는 예제입니다. 아래는 코드의 각 부분에 대한 설명입니다:
- qs = [...]: 여러 개의 질문을 딕셔너리 형태로 담은 리스트를 정의합니다. 각 딕셔너리는 'question' 키를 가지고 해당 질문을 값으로 가지고 있습니다.
- res = llm_chain.generate(qs): llm_chain의 generate 메서드를 사용하여 여러 개의 질문에 대한 응답을 생성합니다. 이 메서드는 주어진 질문 리스트에 대한 응답을 반환합니다. 결과는 res 변수에 저장됩니다.
- res: 생성된 응답이 담긴 변수를 출력합니다. 이 변수에는 각 질문에 대한 모델의 응답이 딕셔너리 형태로 저장되어 있습니다.
이 코드는 한 번에 여러 질문에 대한 응답을 생성하는 과정을 보여주는 예제로, 대량의 데이터나 다양한 입력에 대한 처리에 유용할 수 있습니다.
LLMResult(generations=[[Generation(text='green bay packers', generation_info=None)], [Generation(text='184', generation_info=None)], [Generation(text='john glenn', generation_info=None)], [Generation(text='one', generation_info=None)]], llm_output=None)
Here we get bad results except for the first question. This is simply a limitation of the LLM being used.
여기서는 첫 번째 질문을 제외하고는 나쁜 결과를 얻었습니다. 이는 단순히 사용되는 LLM의 제한 사항입니다.
If the model cannot answer individual questions accurately, grouping all queries into a single prompt is unlikely to work. However, for the sake of experimentation, let’s try it.
모델이 개별 질문에 정확하게 대답할 수 없는 경우 모든 쿼리를 단일 프롬프트로 그룹화하는 것은 작동하지 않을 수 있습니다. 하지만 실험을 위해 시도해 보겠습니다.
multi_template = """Answer the following questions one at a time.

Questions:
{questions}

Answers:
"""
long_prompt = PromptTemplate(template=multi_template, input_variables=["questions"])

llm_chain = LLMChain(
    prompt=long_prompt,
    llm=flan_t5
)

qs_str = (
    "Which NFL team won the Super Bowl in the 2010 season?\n" +
    "If I am 6 ft 4 inches, how tall am I in centimeters?\n" +
    "Who was the 12th person on the moon?" +
    "How many eyes does a blade of grass have?"
)

print(llm_chain.run(qs_str))
이 코드는 여러 개의 질문을 한 번에 받아들이고, 이에 대한 응답을 생성하는 예제입니다. 아래는 코드의 각 부분에 대한 설명입니다:
- multi_template = """Answer the following questions one at a time...\n""": 여러 개의 질문을 받아들이고, 이에 대한 응답을 생성하는 템플릿 문자열을 정의합니다. {questions}는 나중에 변수로 대체될 부분입니다.
- long_prompt = PromptTemplate(template=multi_template, input_variables=["questions"]): PromptTemplate 클래스를 사용하여 템플릿을 초기화합니다. input_variables에는 변수로 사용할 부분이 들어있는 리스트가 포함되어 있습니다.
- llm_chain = LLMChain(prompt=long_prompt, llm=flan_t5): 앞서 초기화한 long_prompt와 언어 모델 flan_t5를 사용하여 LLMChain 클래스의 인스턴스를 생성합니다.
- qs_str = "...": 여러 개의 질문을 줄바꿈을 사용하여 하나의 문자열로 정의합니다.
- print(llm_chain.run(qs_str)): llm_chain의 run 메서드를 사용하여 주어진 여러 개의 질문에 대한 응답을 생성하고 출력합니다.
이 코드는 여러 질문을 동시에 받아들이고, 이에 대한 응답을 생성하는 간단한 템플릿 및 언어 모델 활용 예제입니다.
If I am 6 ft 4 inches, how tall am I in centimeters
As expected, the results are not helpful. We’ll see later that more powerful LLMs can do this.
예상대로 결과는 도움이 되지 않습니다. 나중에 더 강력한 LLM이 이를 수행할 수 있다는 것을 알게 될 것입니다.
OpenAI LLMs
The OpenAI endpoints in LangChain connect to OpenAI directly or via Azure. We need an OpenAI account and API key to use these endpoints.
LangChain의 OpenAI 엔드포인트는 직접 또는 Azure를 통해 OpenAI에 연결됩니다. 이러한 엔드포인트를 사용하려면 OpenAI 계정과 API 키가 필요합니다.
Once you have an API key, we add it to the OPENAI_API_TOKEN environment variable. We can do this with Python like so:
API 키가 있으면 이를 OPENAI_API_TOKEN 환경 변수에 추가합니다. Python으로 다음과 같이 이를 수행할 수 있습니다.
import os

os.environ['OPENAI_API_TOKEN'] = 'OPENAI_API_KEY'
Next, we must install the openai library via Pip.
다음으로 Pip을 통해 openai 라이브러리를 설치해야 합니다.
Now we can generate text using OpenAI’s GPT-3 generation (or completion) models. We’ll use text-davinci-003.
이제 OpenAI의 GPT-3 생성(또는 완성) 모델을 사용하여 텍스트를 생성할 수 있습니다. text-davinci-003을 사용하겠습니다.
from langchain.llms import OpenAI

davinci = OpenAI(model_name='text-davinci-003')
Alternatively, if you’re using OpenAI via Azure, you can do:
또는 Azure를 통해 OpenAI를 사용하는 경우 다음을 수행할 수 있습니다.
from langchain.llms import AzureOpenAI

llm = AzureOpenAI(
    deployment_name="your-azure-deployment",
    model_name="text-davinci-003"
)
We’ll use the same simple question-answer prompt template as before with the Hugging Face example. The only change is that we now pass our OpenAI LLM davinci:
이전에 Hugging Face 예와 동일한 간단한 질문-답변 프롬프트 템플릿을 사용하겠습니다. 유일한 변경 사항은 이제 OpenAI LLM davinci를 통과했다는 것입니다.
llm_chain = LLMChain(
    prompt=prompt,
    llm=davinci
)

print(llm_chain.run(question))
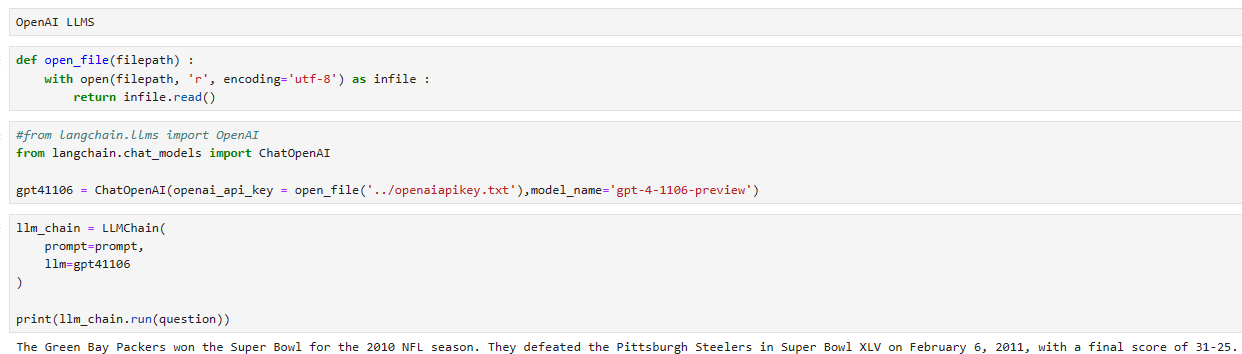
The Green Bay Packers won the Super Bowl in the 2010 season.
제 로컬에서는 2023년 11월 6일 OpenAI에서 발표된 gpt-4-1106-preview 모델을 사용했습니다.
결과는 아래와 같습니다.
As expected, we’re getting the correct answer. We can do the same for multiple questions using generate:
예상대로 정답이 나오네요. 생성을 사용하여 여러 질문에 대해 동일한 작업을 수행할 수 있습니다.
qs = [
    {'question': "Which NFL team won the Super Bowl in the 2010 season?"},
    {'question': "If I am 6 ft 4 inches, how tall am I in centimeters?"},
    {'question': "Who was the 12th person on the moon?"},
    {'question': "How many eyes does a blade of grass have?"}
]
llm_chain.generate(qs)
LLMResult(generations=[[Generation(text=' The Green Bay Packers won the Super Bowl in the 2010 season.', generation_info={'finish_reason': 'stop', 'logprobs': None})], [Generation(text=' 193.04 centimeters', generation_info={'finish_reason': 'stop', 'logprobs': None})], [Generation(text=' Charles Duke was the 12th person on the moon. He was part of the Apollo 16 mission in 1972.', generation_info={'finish_reason': 'stop', 'logprobs': None})], [Generation(text=' A blade of grass does not have any eyes.', generation_info={'finish_reason': 'stop', 'logprobs': None})]], llm_output={'token_usage': {'total_tokens': 124, 'prompt_tokens': 75, 'completion_tokens': 49}})
로컬에서 gpt-4-1106-preview를 사용해서 얻은 값은 아래와 같습니다.
LLMResult(generations=[[ChatGeneration(text='The Green Bay Packers won the Super Bowl for the 2010 NFL season. They defeated the Pittsburgh Steelers in Super Bowl XLV on February 6, 2011, with a final score of 31-25.', generation_info={'finish_reason': 'stop'}, message=AIMessage(content='The Green Bay Packers won the Super Bowl for the 2010 NFL season. They defeated the Pittsburgh Steelers in Super Bowl XLV on February 6, 2011, with a final score of 31-25.'))], [ChatGeneration(text='To convert feet and inches to centimeters, you can use the following conversions:\n\n1 inch = 2.54 centimeters\n1 foot = 12 inches\n\nFirst, convert your height to inches only:\n\n6 feet 4 inches = (6 * 12) + 4 inches\n= 72 + 4 inches\n= 76 inches\n\nNow convert inches to centimeters:\n\n76 inches * 2.54 cm/inch = 193.04 centimeters\n\nSo, if you are 6 feet 4 inches tall, you are 193.04 centimeters tall.', generation_info={'finish_reason': 'stop'}, message=AIMessage(content='To convert feet and inches to centimeters, you can use the following conversions:\n\n1 inch = 2.54 centimeters\n1 foot = 12 inches\n\nFirst, convert your height to inches only:\n\n6 feet 4 inches = (6 * 12) + 4 inches\n= 72 + 4 inches\n= 76 inches\n\nNow convert inches to centimeters:\n\n76 inches * 2.54 cm/inch = 193.04 centimeters\n\nSo, if you are 6 feet 4 inches tall, you are 193.04 centimeters tall.'))], [ChatGeneration(text='The 12th and last person to walk on the Moon was Eugene Cernan. He was the commander of the Apollo 17 mission, which landed on the Moon in December 1972. Cernan, along with Harrison Schmitt, explored the lunar surface during this mission before returning to Earth. Eugene Cernan is often remembered for being the last human to leave footprints on the lunar surface, as no manned missions have returned to the Moon since Apollo 17.', generation_info={'finish_reason': 'stop'}, message=AIMessage(content='The 12th and last person to walk on the Moon was Eugene Cernan. He was the commander of the Apollo 17 mission, which landed on the Moon in December 1972. Cernan, along with Harrison Schmitt, explored the lunar surface during this mission before returning to Earth. Eugene Cernan is often remembered for being the last human to leave footprints on the lunar surface, as no manned missions have returned to the Moon since Apollo 17.'))], [ChatGeneration(text='A blade of grass does not have eyes. Plants do not have eyes like animals do; instead, they have cells and structures that can sense light and allow them to orient themselves and grow towards light sources, a process known as phototropism. However, this sensing capability is not analogous to vision as experienced by animals with eyes.', generation_info={'finish_reason': 'stop'}, message=AIMessage(content='A blade of grass does not have eyes. Plants do not have eyes like animals do; instead, they have cells and structures that can sense light and allow them to orient themselves and grow towards light sources, a process known as phototropism. However, this sensing capability is not analogous to vision as experienced by animals with eyes.'))]], llm_output={'token_usage': {'prompt_tokens': 101, 'completion_tokens': 329, 'total_tokens': 430}, 'model_name': 'gpt-4-1106-preview'}, run=[RunInfo(run_id=UUID('ea1a84b0-eb29-4da0-9850-76b54fbf90d8')), RunInfo(run_id=UUID('477f0185-7bc3-4767-b598-52b113878efd')), RunInfo(run_id=UUID('32846093-23ba-48a5-be5c-58bfc7ded427')), RunInfo(run_id=UUID('c41409a1-7fc0-410a-a15f-b8457e2343d9'))])
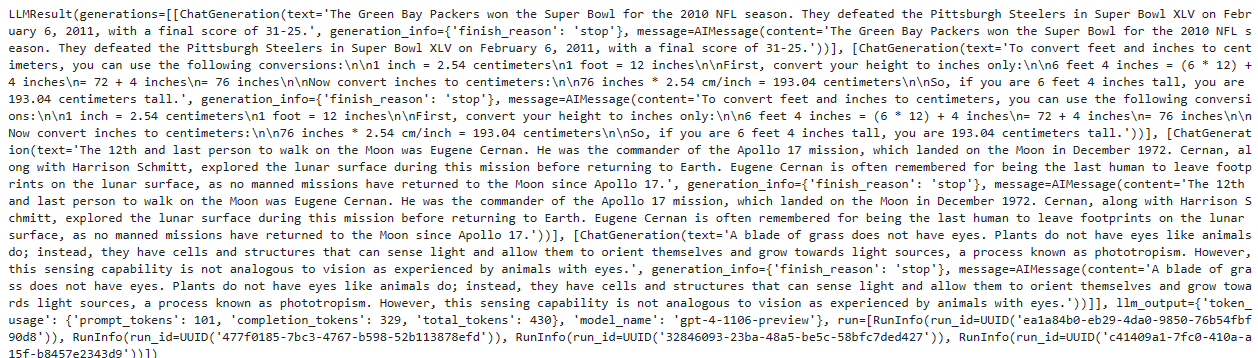
최신 모델이라서 그런지 답이 훨씬 자세하게 나옵니다.
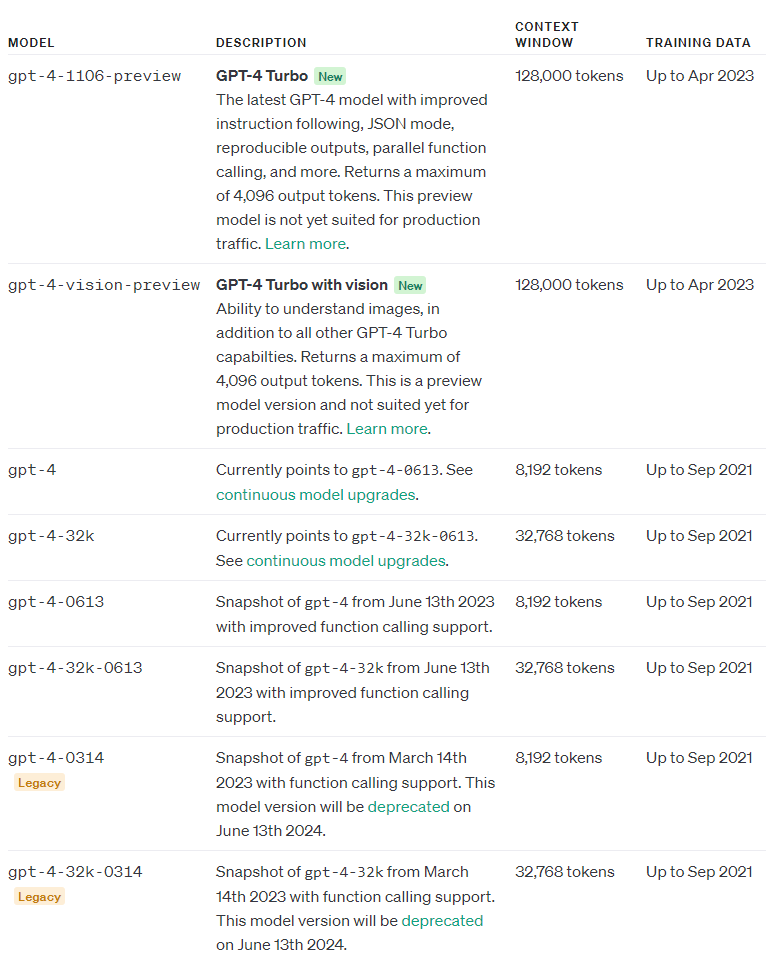
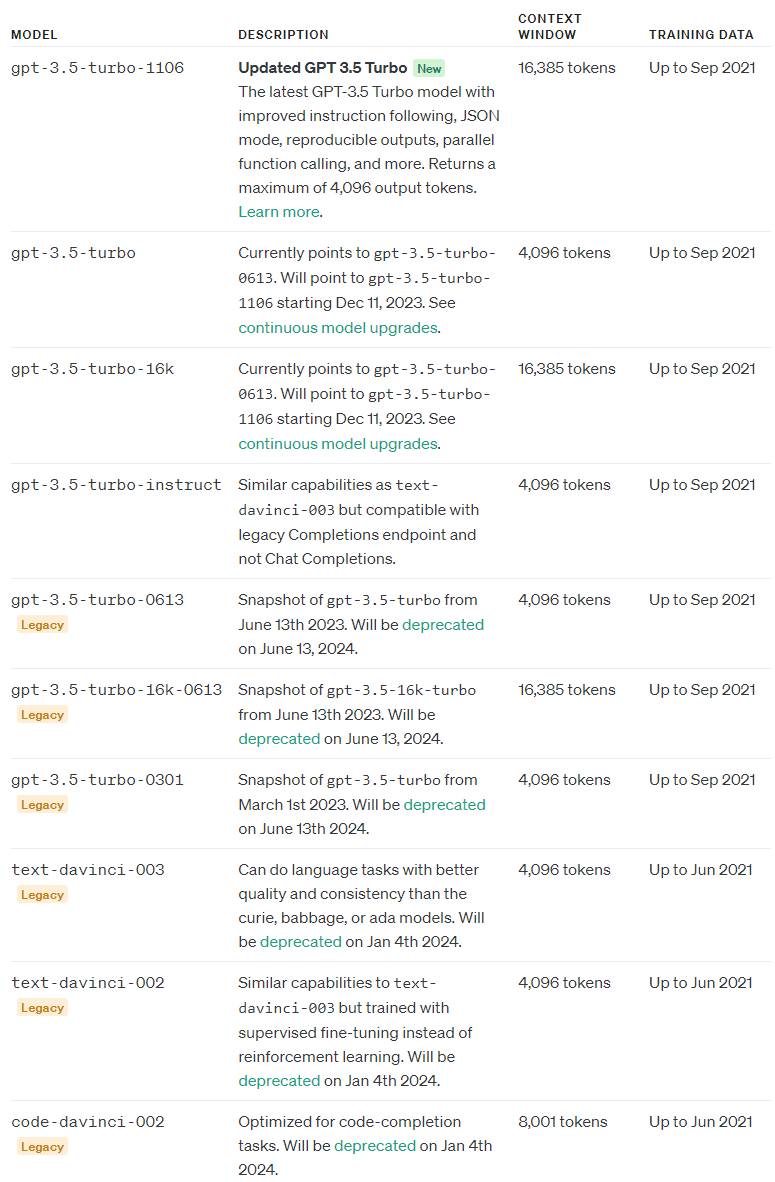
참고로 2023년 11월 9일 현재 사용하는 gpt-4와 gpt-3의 모델들은 아래와 같습니다.
다시 Pinecorn 교재로 들어가 보겠습니다.
Most of our results are correct or have a degree of truth. The model undoubtedly functions better than the google/flan-t5-xl model. As before, let’s try feeding all questions into the model at once.
대부분의 결과는 정확하거나 어느 정도 진실입니다. 이 모델은 의심할 여지 없이 google/flan-t5-xl 모델보다 더 잘 작동합니다. 이전과 마찬가지로 모든 질문을 모델에 한 번에 입력해 보겠습니다.
llm_chain = LLMChain(
    prompt=long_prompt,
    llm=davinci
)

qs_str = (
    "Which NFL team won the Super Bowl in the 2010 season?\n" +
    "If I am 6 ft 4 inches, how tall am I in centimeters?\n" +
    "Who was the 12th person on the moon?" +
    "How many eyes does a blade of grass have?"
)

print(llm_chain.run(qs_str))
The New Orleans Saints won the Super Bowl in the 2010 season.
6 ft 4 inches is 193 centimeters.
The 12th person on the moon was Harrison Schmitt.
A blade of grass does not have eyes.
로컬에서 gpt4 turbo로 돌린 결과는 아래와 같습니다.

1. The NFL team that won the Super Bowl for the 2010 season (Super Bowl XLV, played on February 6, 2011) was the Green Bay Packers. They defeated the Pittsburgh Steelers with a score of 31-25.

2. If you are 6 feet 4 inches tall, to convert your height to centimeters (cm), you would first convert the feet to inches and then convert inches to centimeters using the conversion factor: 1 inch = 2.54 cm.
6 feet x 12 inches/foot = 72 inches
4 inches are already in inches
So, total inches = 72 + 4 = 76 inches
Now convert inches to centimeters:
76 inches x 2.54 cm/inch = 193.04 cm
Therefore, you are 193.04 centimeters tall.

3. The 12th person to walk on the moon was Harrison Schmitt. He was part of the Apollo 17 mission, which was the last manned lunar landing mission of NASA's Apollo program.

4. A blade of grass does not have eyes. Eyes are complex organs associated with animals, and grass is a type of plant. Plants do not have eyes or sensory organs like animals. They do have sensory mechanisms to respond to light, gravity, and other environmental stimuli, but these are not analogous to eyes.
As we keep rerunning the query, the model will occasionally make errors, but at other times manage to get all answers correct.
쿼리를 계속 재실행하면 모델이 가끔 오류를 일으키기도 하지만 때로는 모든 답변이 정확해지는 경우도 있습니다.
That’s it for our introduction to LangChain — a library that allows us to build more advanced apps around LLMs like OpenAI’s GPT-3 models or the open-source alternatives available via Hugging Face.
이것이 바로 OpenAI의 GPT-3 모델이나 Hugging Face를 통해 제공되는 오픈 소스 대안과 같은 LLM을 중심으로 고급 앱을 구축할 수 있는 라이브러리인 LangChain에 대한 소개입니다.
As mentioned, LangChain can do much more than we’ve demonstrated here. We’ll be covering these other features in upcoming articles.
앞서 언급했듯이 LangChain은 여기서 설명한 것보다 훨씬 더 많은 일을 할 수 있습니다. 향후 에서 이러한 다른 기능을 다룰 예정입니다.
References
[1] GPT-3 Archived Repo (2020), OpenAI GitHub
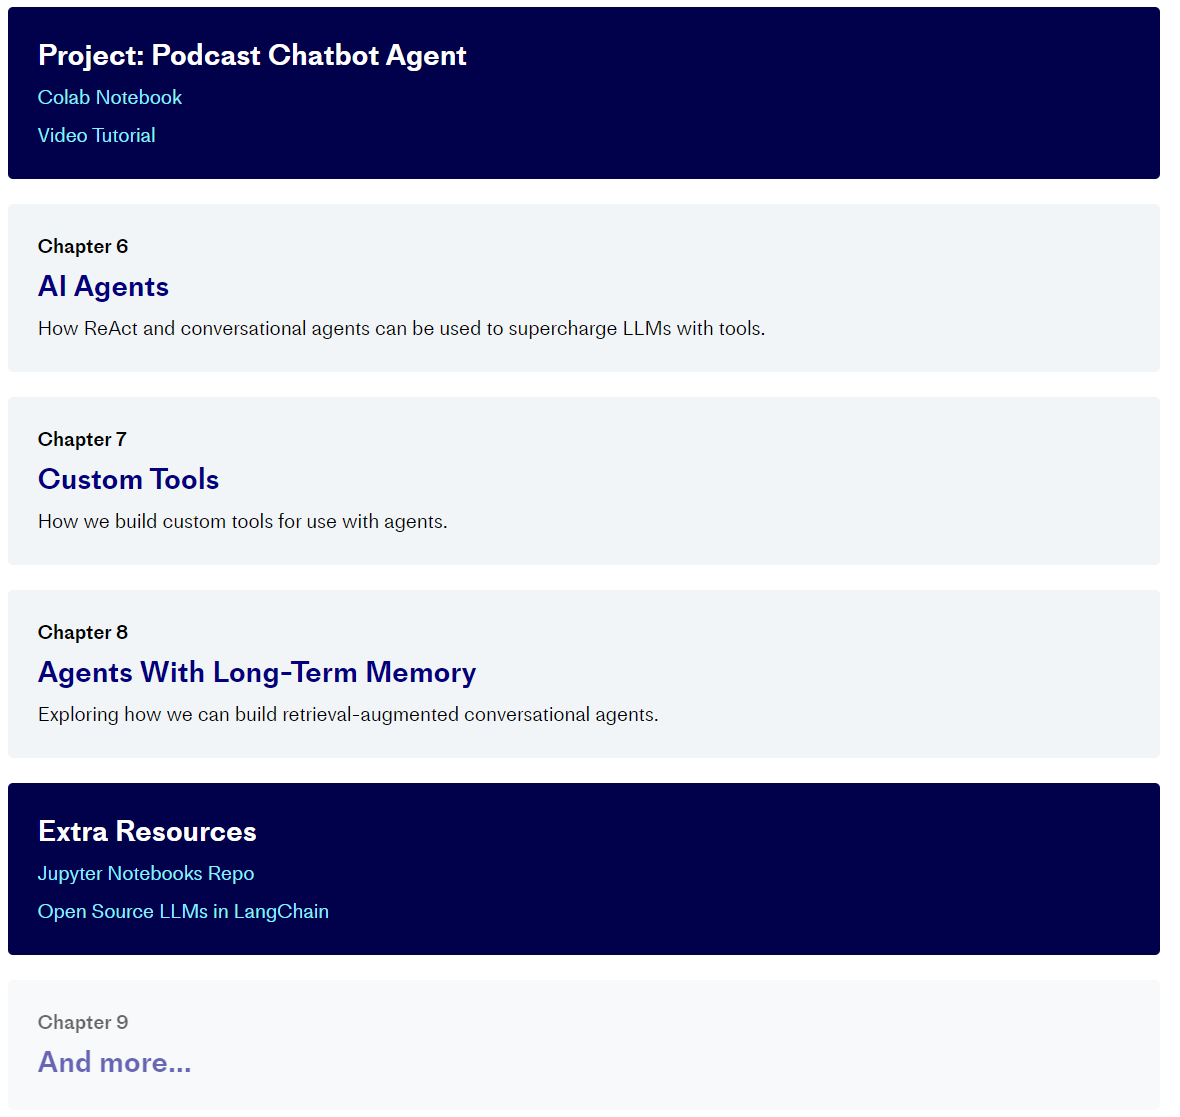
'Pinecone > LangChain AI Handbook' 카테고리의 다른 글
| Chapter 7. Custom Tools (0) | 2023.11.17 |
|---|---|
| Chapter 6. AI Agents (1) | 2023.11.16 |
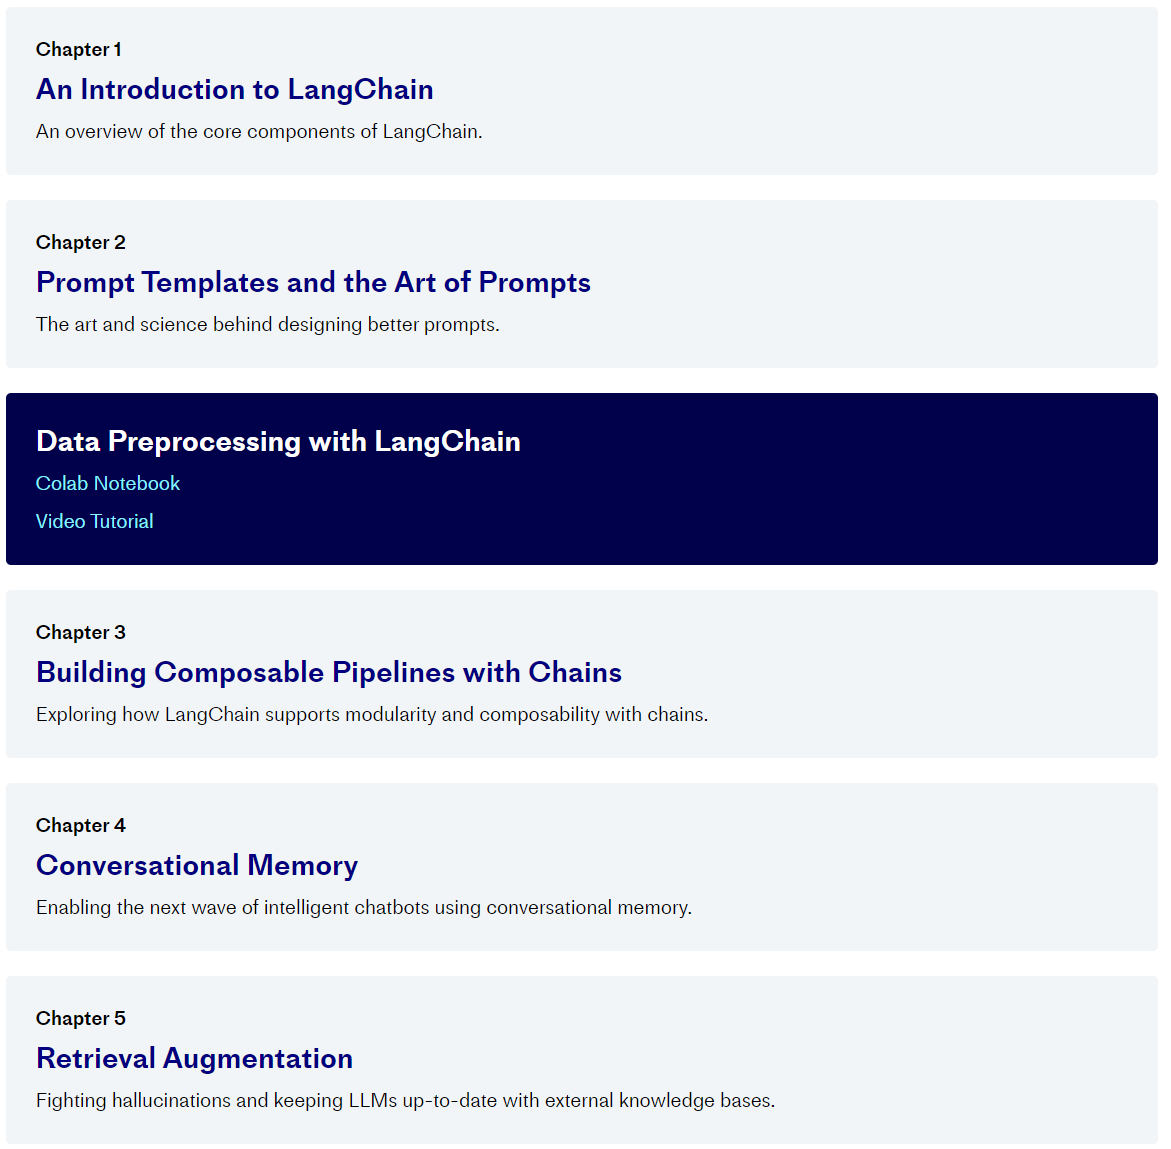
| Chapter 5. Retrieval Augmentation (1) | 2023.11.15 |
| Chapter 4. Conversational Memory (1) | 2023.11.15 |
| Chapter 3. Building Composable Pipelines with Chains (1) | 2023.11.14 |
| Chapter 2. Prompt Templates and the Art of Prompts (0) | 2023.11.13 |
| 0. Pinecone - LangChain AI Handbook (0) | 2023.11.08 |