개발자로서 현장에서 일하면서 새로 접하는 기술들이나 알게된 정보 등을 정리하기 위한 블로그입니다. 운 좋게 미국에서 큰 회사들의 프로젝트에서 컬설턴트로 일하고 있어서 새로운 기술들을 접할 기회가 많이 있습니다. 미국의 IT 프로젝트에서 사용되는 툴들에 대해 많은 분들과 정보를 공유하고 싶습니다.
Oftentimes you may want to experiment with, or even expose to the end user, multiple different ways of doing things. In order to make this experience as easy as possible, we have defined two methods.
종종 작업을 수행하는 여러 가지 다른 방법을 실험하거나 최종 사용자에게 노출시키고 싶을 수도 있습니다. 이 경험을 가능한 한 쉽게 만들기 위해 두 가지 방법을 정의했습니다.
First, aconfigurable_fieldsmethod. This lets you configure particular fields of a runnable.
첫째, configurable_fields 메소드입니다. 이를 통해 실행 가능 항목의 특정 필드를 구성할 수 있습니다.
Second, aconfigurable_alternativesmethod. With this method, you can list out alternatives for any particular runnable that can be set during runtime.
둘째, configurable_alternatives 방법입니다. 이 방법을 사용하면 런타임 중에 설정할 수 있는 특정 실행 가능 항목에 대한 대안을 나열할 수 있습니다.
With LLMs we can configure things like temperature
LLM을 사용하면 온도와 같은 항목을 구성할 수 있습니다.
from langchain.chat_models import ChatOpenAI
from langchain.prompts import PromptTemplate

model = ChatOpenAI(temperature=0).configurable_fields(
    temperature=ConfigurableField(
        id="llm_temperature",
        name="LLM Temperature",
        description="The temperature of the LLM",
    )
)
이 코드는 "langchain" 라이브러리를 사용하여 LLM (Language Model)에 대한 설정을 구성하고 온라인으로 제어할 수 있는 옵션을 추가하는 예시를 제공합니다.
모듈 및 클래스 가져오기:
langchain.chat_models 모듈에서 ChatOpenAI 클래스를 가져옵니다. 이 클래스는 OpenAI의 대화 모델을 사용하기 위한 도구를 제공합니다.
langchain.prompts 모듈에서 PromptTemplate 클래스를 가져옵니다. 이 클래스는 템플릿을 만들기 위한 도구를 제공합니다.
모델 설정:
"model" 변수에는 "ChatOpenAI(temperature=0)"를 사용하여 대화 모델을 생성합니다. "temperature=0"은 모델의 출력을 보다 결정적으로 만듭니다.
.configurable_fields()를 사용하여 모델에 구성 가능한 필드를 추가하고 설정합니다. 이러한 필드는 모델의 동작을 온라인으로 변경할 수 있는 옵션을 제공합니다.
구성 가능한 필드로 "temperature"을 추가합니다.
id="llm_temperature": 필드의 고유 식별자로 "llm_temperature"를 설정합니다.
name="LLM Temperature": 필드의 이름으로 "LLM Temperature"를 설정합니다.
description="The temperature of the LLM": 필드의 설명으로 "The temperature of the LLM"을 설정합니다.
이 코드는 "Langchain" 라이브러리를 사용하여 대화 모델의 설정을 구성 가능한 필드를 통해 정의하고, 이를 온라인으로 변경할 수 있는 옵션으로 제공하는 예시를 나타냅니다. "temperature"은 모델의 동작을 조절하는 중요한 매개변수 중 하나입니다.
model.invoke("pick a random number")
이 코드는 "model"을 사용하여 "pick a random number"라는 메시지를 모델에 전달하여 실행하는 부분을 설명하고 있습니다.
"model.invoke("pick a random number")":
이 부분은 "model"을 사용하여 "pick a random number"라는 메시지를 모델에 전달하여 실행하는 부분입니다.
모델은 이 메시지를 처리하고 결과를 생성합니다.
이 코드는 모델을 사용하여 특정 메시지를 모델에 전달하고, 모델이 해당 메시지를 처리한 후에 결과를 얻는 방법을 보여줍니다. "pick a random number" 메시지에 대한 모델의 응답은 다양할 수 있으며, 해당 메시지에 따라 모델이 적절한 응답을 생성할 것입니다.
AIMessage(content='7')
model.with_config(configurable={"llm_temperature": .9}).invoke("pick a random number")
이 코드는 모델 설정을 변경하고, 변경된 설정을 사용하여 "pick a random number" 메시지를 모델에 전달하여 실행하는 부분을 설명하고 있습니다.
configurable={"llm_temperature": .9}는 "llm_temperature"라는 설정 옵션을 변경하며, 온라인에서 모델의 온도(temperature)를 0.9로 설정합니다.
.invoke("pick a random number"):
이 부분은 변경된 설정을 가진 모델을 사용하여 "pick a random number"라는 메시지를 모델에 전달하여 실행하는 부분입니다.
모델은 이 메시지를 변경된 설정에 따라 처리하고 결과를 생성합니다.
이 코드는 모델의 설정을 변경하여 모델이 다른 동작을 하도록 만들고, 변경된 설정을 사용하여 "pick a random number" 메시지를 모델에 전달하여 실행하는 방법을 보여줍니다. 변경된 설정은 모델의 동작을 조절하며, 이 경우에는 온도(temperature)를 조정하는 예시입니다.
AIMessage(content='34')
We can also do this when its used as part of a chain
체인의 일부로 사용될 때도 이 작업을 수행할 수 있습니다.
prompt = PromptTemplate.from_template("Pick a random number above {x}")
chain = prompt | model
이 코드는 대화 체인을 설정하고 사용자에게 특정 명령을 전달하기 위한 템플릿을 생성하는 예제를 보여줍니다.
PromptTemplate.from_template("Pick a random number above {x}"):
이 부분은 "PromptTemplate.from_template()"을 사용하여 대화 템플릿을 생성합니다. 이 템플릿은 사용자에게 "Pick a random number above {x}"라는 명령을 전달하고, "{x}" 부분은 나중에 사용자가 지정할 수 있는 매개변수 또는 변수를 나타냅니다.
chain = prompt | model:
이 부분은 "chain"이라는 실행 체인을 설정합니다. 이 체인은 "prompt" (대화 템플릿)과 모델을 연결합니다.
사용자에게 명령을 전달하기 위한 템플릿은 "prompt"로 지정되며, 모델은 이 템플릿에 따라 작동합니다.
이 코드는 사용자에게 "Pick a random number above {x}"라는 명령을 전달하기 위한 템플릿을 생성하고, 이 명령을 모델과 연결하여 모델이 해당 명령을 처리하고 응답을 생성할 수 있도록 하는 예시를 보여줍니다. 이때, "{x}" 부분은 나중에 사용자가 지정할 수 있는 값입니다.
ChatPromptValue(messages=[HumanMessage(content="You are an assistant for question-answering tasks. Use the following pieces of retrieved context to answer the question. If you don't know the answer, just say that you don't know. Use three sentences maximum and keep the answer concise.\nQuestion: foo \nContext: bar \nAnswer:")])
ChatPromptValue(messages=[HumanMessage(content="[INST]<<SYS>> You are an assistant for question-answering tasks. Use the following pieces of retrieved context to answer the question. If you don't know the answer, just say that you don't know. Use three sentences maximum and keep the answer concise.<</SYS>> \nQuestion: foo \nContext: bar \nAnswer: [/INST]")])
이 코드는 HubRunnable을 사용하여 Hub에서 가져온 리포지토리 커밋(commit)을 설정하고, 설정된 커밋을 기반으로 특정 질문과 컨텍스트를 처리하고 실행하는 예시를 나타냅니다.
HubRunnable 및 설정:
HubRunnable("rlm/rag-prompt")는 "HubRunnable"을 생성하고, 이 HubRunnable은 "rlm/rag-prompt" 리포지토리에서 컨텐츠를 가져오도록 구성되어 있습니다.
.configurable_fields()를 사용하여 설정 가능한 필드를 추가하고 설정합니다. 이 경우 "owner_repo_commit"이라는 설정 옵션을 추가하며, "hub_commit"이라는 식별자와 설명이 포함되어 있습니다.
첫 번째 실행:
prompt.invoke({"question": "foo", "context": "bar"})는 "prompt"를 사용하여 "question"과 "context" 값을 갖는 JSON 객체를 HubRunnable에 전달하고 실행합니다.
설정 변경 및 두 번째 실행:
prompt.with_config(configurable={"hub_commit": "rlm/rag-prompt-llama"})는 "hub_commit" 설정 값을 "rlm/rag-prompt-llama"로 변경하는 부분입니다.
.invoke({"question": "foo", "context": "bar"})는 변경된 설정을 가진 "prompt"를 사용하여 두 번째 실행을 수행합니다.
이 코드는 HubRunnable을 사용하여 특정 Hub 리포지토리에서 커밋을 설정하고, 설정된 커밋을 기반으로 특정 질문과 컨텍스트를 처리하고 실행하는 예시를 제공합니다. 설정을 변경함으로써 다른 커밋에서 실행을 수행할 수 있습니다.
from langchain.chat_models import ChatOpenAI, ChatAnthropic
from langchain.schema.runnable import ConfigurableField
from langchain.prompts import PromptTemplate
llm = ChatAnthropic(temperature=0).configurable_alternatives(
    # This gives this field an id
    # When configuring the end runnable, we can then use this id to configure this field
    ConfigurableField(id="llm"),
    # This sets a default_key.
    # If we specify this key, the default LLM (ChatAnthropic initialized above) will be used
    default_key="anthropic",
    # This adds a new option, with name `openai` that is equal to `ChatOpenAI()`
    openai=ChatOpenAI(),
    # This adds a new option, with name `gpt4` that is equal to `ChatOpenAI(model="gpt-4")`
    gpt4=ChatOpenAI(model="gpt-4"),
    # You can add more configuration options here
)
prompt = PromptTemplate.from_template("Tell me a joke about {topic}")
chain = prompt | llm
# By default it will call Anthropic
chain.invoke({"topic": "bears"})
AIMessage(content=" Here's a silly joke about bears:\n\nWhat do you call a bear with no teeth?\nA gummy bear!")
# We can use `.with_config(configurable={"llm": "openai"})` to specify an llm to use
chain.with_config(configurable={"llm": "openai"}).invoke({"topic": "bears"})
AIMessage(content="Sure, here's a bear joke for you:\n\nWhy don't bears wear shoes?\n\nBecause they already have bear feet!")
# If we use the `default_key` then it uses the default
chain.with_config(configurable={"llm": "anthropic"}).invoke({"topic": "bears"})
AIMessage(content=" Here's a silly joke about bears:\n\nWhat do you call a bear with no teeth?\nA gummy bear!")
이 코드는 ChatAnthropic 및 다른 대화 모델(ChatOpenAI 및 모델 구성)을 사용하여 설정 가능한 대화 모델 체인을 설정하고, 설정을 변경하여 특정 대화 모델을 사용하여 특정 주제에 관한 농담을 생성하는 예시를 제공합니다.
모듈 및 클래스 가져오기:
langchain.chat_models 모듈에서 ChatOpenAI 및 ChatAnthropic 클래스를 가져옵니다. 이 클래스들은 대화 모델을 설정하고 사용하는 데 도움을 줍니다.
langchain.schema.runnable 모듈에서 ConfigurableField 클래스를 가져옵니다. 이 클래스는 설정 가능한 필드를 정의하는 데 사용됩니다.
langchain.prompts 모듈에서 PromptTemplate 클래스를 가져옵니다. 이 클래스는 대화 템플릿을 생성하는 데 사용됩니다.
대화 모델 및 설정 가능한 대화 모델 체인 설정:
ChatAnthropic(temperature=0)는 "ChatAnthropic" 대화 모델을 설정합니다. 이 모델은 온도(temperature)를 0으로 설정합니다.
.configurable_alternatives()를 사용하여 설정 가능한 대화 모델 옵션을 정의합니다.
"ConfigurableField"를 사용하여 "llm"이라는 설정 옵션을 추가하고 식별자를 지정합니다.
"default_key"를 사용하여 기본 LLM(ChatAnthropic 초기화)을 설정합니다.
다른 대화 모델 옵션을 추가합니다. "openai" 및 "gpt4"라는 이름의 옵션을 추가하고, 각각 "ChatOpenAI()" 및 "ChatOpenAI(model="gpt-4")"와 연결합니다.
이외에 필요한 설정 옵션을 추가할 수 있습니다.
대화 체인 설정:
"PromptTemplate.from_template()"를 사용하여 대화 템플릿을 생성합니다. 이 템플릿은 "{topic}" 부분을 나중에 사용자가 지정할 수 있는 변수로 사용하며, "Tell me a joke about {topic}"라는 메시지를 생성합니다.
chain = prompt | llm는 템플릿과 설정 가능한 대화 모델을 연결하여 실행 체인을 설정합니다.
대화 모델 및 설정 변경 및 실행:
"chain.invoke({"topic": "bears"})"는 설정 가능한 대화 모델 체인을 사용하여 주제가 "bears"인 농담을 생성합니다.
"chain.with_config(configurable={"llm": "openai"})"는 "llm" 설정 옵션을 "openai"로 변경하여 "ChatOpenAI" 대화 모델을 사용하여 동일한 주제에 관한 농담을 생성합니다.
"chain.with_config(configurable={"llm": "anthropic"})"는 "llm" 설정 옵션을 "anthropic" (기본 설정)으로 변경하여 "ChatAnthropic" 대화 모델을 사용하여 동일한 주제에 관한 농담을 생성합니다.
이 코드는 다양한 대화 모델 옵션을 설정하고 설정을 변경하여 다른 모델을 사용하여 특정 주제에 관한 농담을 생성하는 방법을 나타냅니다.
With Prompts
We can do a similar thing, but alternate between prompts
비슷한 작업을 수행할 수 있지만 프롬프트를 번갈아 가며 수행할 수 있습니다.
llm = ChatAnthropic(temperature=0)
prompt = PromptTemplate.from_template("Tell me a joke about {topic}").configurable_alternatives(
    # This gives this field an id
    # When configuring the end runnable, we can then use this id to configure this field
    ConfigurableField(id="prompt"),
    # This sets a default_key.
    # If we specify this key, the default LLM (ChatAnthropic initialized above) will be used
    default_key="joke",
    # This adds a new option, with name `poem`
    poem=PromptTemplate.from_template("Write a short poem about {topic}"),
    # You can add more configuration options here
)
chain = prompt | llm
# By default it will write a joke
chain.invoke({"topic": "bears"})
AIMessage(content=" Here's a silly joke about bears:\n\nWhat do you call a bear with no teeth?\nA gummy bear!")
# We can configure it write a poem
chain.with_config(configurable={"prompt": "poem"}).invoke({"topic": "bears"})
AIMessage(content=' Here is a short poem about bears:\n\nThe bears awaken from their sleep\nAnd lumber out into the deep\nForests filled with trees so tall\nForaging for food before nightfall \nTheir furry coats and claws so sharp\nSniffing for berries and fish to nab\nLumbering about without a care\nThe mighty grizzly and black bear\nProud creatures, wild and free\nRuling their domain majestically\nWandering the woods they call their own\nBefore returning to their dens alone')
이 코드는 ChatAnthropic 대화 모델을 사용하여 설정 가능한 대화 템플릿 체인을 설정하고, 설정을 변경하여 농담 또는 시를 작성하는 예시를 제공합니다.
대화 모델 및 설정 가능한 대화 템플릿 설정:
ChatAnthropic(temperature=0)는 "ChatAnthropic" 대화 모델을 설정합니다. 이 모델은 온도(temperature)를 0으로 설정합니다.
PromptTemplate.from_template("Tell me a joke about {topic}")는 대화 템플릿을 생성하고, "{topic}" 부분은 나중에 사용자가 지정할 수 있는 변수로 사용됩니다.
.configurable_alternatives()를 사용하여 설정 가능한 대화 템플릿 옵션을 정의합니다.
"ConfigurableField"를 사용하여 "prompt"이라는 설정 옵션을 추가하고 식별자를 지정합니다.
"default_key"를 사용하여 기본 설정을 "joke"로 설정합니다. 이는 초기에 농담을 작성할 것을 의미합니다.
다른 대화 템플릿 옵션을 추가할 수 있습니다. "poem"이라는 이름의 옵션을 추가하고, 시를 작성하는 템플릿을 연결합니다.
대화 체인 설정:
chain = prompt | llm는 템플릿과 설정 가능한 대화 모델을 연결하여 실행 체인을 설정합니다.
농담 또는 시 작성:
"chain.invoke({"topic": "bears"})"는 설정 가능한 대화 템플릿 체인을 사용하여 주제가 "bears"인 농담을 생성합니다.
"chain.with_config(configurable={"prompt": "poem"})"는 "prompt" 설정 옵션을 "poem"으로 변경하여 동일한 주제에 대한 시를 생성합니다.
이 코드는 설정 가능한 대화 템플릿과 대화 모델을 사용하여 사용자가 설정을 변경함으로써 농담 또는 시를 작성하는 방법을 나타냅니다. "joke" 및 "poem" 설정을 변경하여 원하는 유형의 대화를 생성할 수 있습니다.
With Prompts and LLMs
We can also have multiple things configurable! Here's an example doing that with both prompts and LLMs.
여러 가지를 구성할 수도 있습니다! 프롬프트와 LLM을 모두 사용하여 이를 수행하는 예는 다음과 같습니다.
llm = ChatAnthropic(temperature=0).configurable_alternatives(
    # This gives this field an id
    # When configuring the end runnable, we can then use this id to configure this field
    ConfigurableField(id="llm"),
    # This sets a default_key.
    # If we specify this key, the default LLM (ChatAnthropic initialized above) will be used
    default_key="anthropic",
    # This adds a new option, with name `openai` that is equal to `ChatOpenAI()`
    openai=ChatOpenAI(),
    # This adds a new option, with name `gpt4` that is equal to `ChatOpenAI(model="gpt-4")`
    gpt4=ChatOpenAI(model="gpt-4"),
    # You can add more configuration options here
)
prompt = PromptTemplate.from_template("Tell me a joke about {topic}").configurable_alternatives(
    # This gives this field an id
    # When configuring the end runnable, we can then use this id to configure this field
    ConfigurableField(id="prompt"),
    # This sets a default_key.
    # If we specify this key, the default LLM (ChatAnthropic initialized above) will be used
    default_key="joke",
    # This adds a new option, with name `poem`
    poem=PromptTemplate.from_template("Write a short poem about {topic}"),
    # You can add more configuration options here
)
chain = prompt | llm
# We can configure it write a poem with OpenAI
chain.with_config(configurable={"prompt": "poem", "llm": "openai"}).invoke({"topic": "bears"})
AIMessage(content="In the forest, where tall trees sway,\nA creature roams, both fierce and gray.\nWith mighty paws and piercing eyes,\nThe bear, a symbol of strength, defies.\n\nThrough snow-kissed mountains, it does roam,\nA guardian of its woodland home.\nWith fur so thick, a shield of might,\nIt braves the coldest winter night.\n\nA gentle giant, yet wild and free,\nThe bear commands respect, you see.\nWith every step, it leaves a trace,\nOf untamed power and ancient grace.\n\nFrom honeyed feast to salmon's leap,\nIt takes its place, in nature's keep.\nA symbol of untamed delight,\nThe bear, a wonder, day and night.\n\nSo let us honor this noble beast,\nIn forests where its soul finds peace.\nFor in its presence, we come to know,\nThe untamed spirit that in us also flows.")
# We can always just configure only one if we want
chain.with_config(configurable={"llm": "openai"}).invoke({"topic": "bears"})
AIMessage(content="Sure, here's a bear joke for you:\n\nWhy don't bears wear shoes?\n\nBecause they have bear feet!")
이 코드는 ChatAnthropic 및 ChatOpenAI 대화 모델을 설정 가능한 대화 모델 체인으로 결합하고, 설정을 변경하여 다양한 대화 모델 및 대화 템플릿 옵션을 사용할 수 있는 예시를 제공합니다.
Saving configurations
We can also easily save configured chains as their own objects
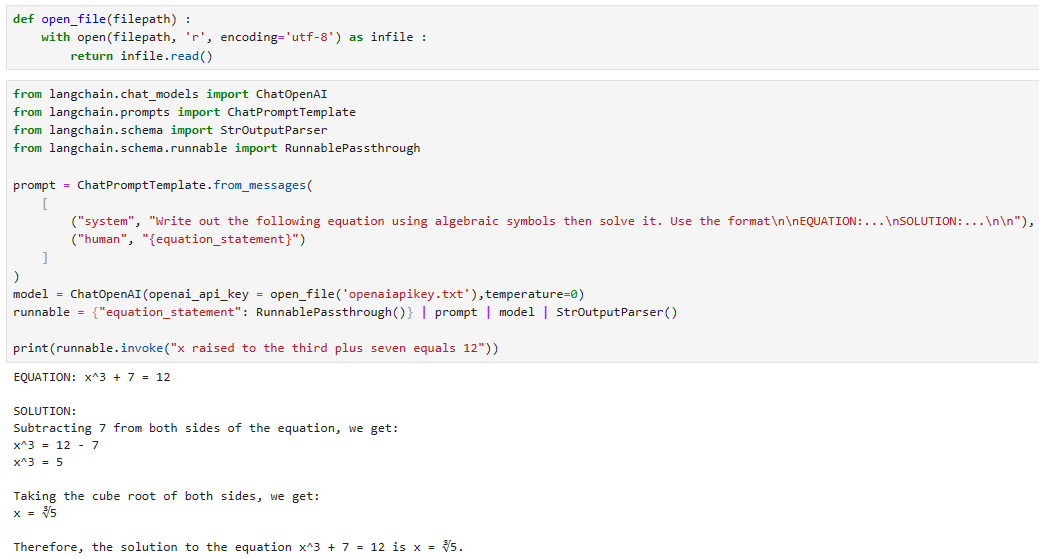
Sometimes we want to invoke a Runnable within a Runnable sequence with constant arguments that are not part of the output of the preceding Runnable in the sequence, and which are not part of the user input. We can useRunnable.bind()to easily pass these arguments in.
때때로 우리는 시퀀스의 이전 Runnable 출력의 일부가 아니고 사용자 입력의 일부도 아닌 상수 인수를 사용하여 Runnable 시퀀스 내에서 Runnable을 호출하려고 합니다. Runnable.bind()를 사용하여 이러한 인수를 쉽게 전달할 수 있습니다.
Suppose we have a simple prompt + model sequence:
간단한 프롬프트 + 모델 시퀀스가 있다고 가정해 보겠습니다.
from langchain.chat_models import ChatOpenAI
from langchain.prompts import ChatPromptTemplate
from langchain.schema import StrOutputParser
from langchain.schema.runnable import RunnablePassthrough

prompt = ChatPromptTemplate.from_messages(
    [
        ("system", "Write out the following equation using algebraic symbols then solve it. Use the format\n\nEQUATION:...\nSOLUTION:...\n\n"),
        ("human", "{equation_statement}")
    ]
)
model = ChatOpenAI(temperature=0)
runnable = {"equation_statement": RunnablePassthrough()} | prompt | model | StrOutputParser()

print(runnable.invoke("x raised to the third plus seven equals 12"))
이 코드는 "langchain" 라이브러리를 사용하여 주어진 방정식을 해결하기 위한 대화 모델을 설정하고 실행하는 예시를 보여줍니다.
모듈 및 클래스 가져오기:
langchain.chat_models 모듈에서 ChatOpenAI 클래스를 가져옵니다. 이 클래스는 OpenAI의 대화 모델을 사용하기 위한 도구를 제공합니다.
langchain.prompts 모듈에서 ChatPromptTemplate 클래스를 가져옵니다. 이 클래스는 대화 형식의 템플릿을 만들기 위한 도구를 제공합니다.
langchain.schema 모듈에서 StrOutputParser 클래스를 가져옵니다. 이 클래스는 출력을 파싱하기 위한 도구를 제공합니다.
langchain.schema.runnable 모듈에서 RunnablePassthrough 클래스를 가져옵니다. 이 클래스는 실행 가능한 객체를 나타내는 클래스입니다.
대화 템플릿 설정:
"prompt" 변수에는 "ChatPromptTemplate.from_messages()"를 사용하여 대화 템플릿을 생성합니다. 이 템플릿은 시스템 메시지와 사용자 메시지를 포함합니다. 사용자는 방정식을 입력하고 시스템은 방정식과 그 해를 출력할 것을 요청합니다.
모델 및 실행 가능한 체인 설정:
"model" 변수에는 "ChatOpenAI(temperature=0)"를 사용하여 대화 모델을 생성합니다. "temperature=0"은 모델의 출력을 보다 결정적으로 만듭니다.
"runnable" 변수에는 실행 가능한 체인을 설정합니다. 이 체인은 다음과 같이 구성됩니다:
"equation_statement" 변수를 "RunnablePassthrough()"와 조합하여 방정식 문장을 처리합니다.
"prompt" 템플릿을 추가합니다.
대화 모델(model)을 추가합니다.
출력 파서(StrOutputParser)를 추가합니다.
실행 및 결과 출력:
"runnable.invoke("x raised to the third plus seven equals 12")"를 사용하여 주어진 방정식을 실행합니다.
결과를 출력합니다.
이 코드는 주어진 방정식을 해결하기 위한 대화 모델을 설정하고 실행하여 결과를 출력하는 예시를 나타냅니다.
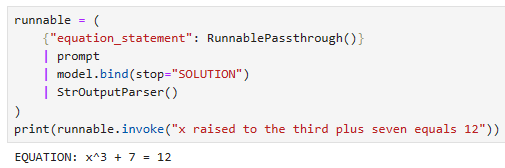
and want to call the model with certainstopwords:
특정 중지 단어로 모델을 호출하고 싶습니다.
runnable = (
    {"equation_statement": RunnablePassthrough()}
    | prompt
    | model.bind(stop="SOLUTION")
    | StrOutputParser()
)
print(runnable.invoke("x raised to the third plus seven equals 12"))
이 코드는 방정식을 처리하고 해결하기 위한 실행 체인을 설정하고, 주어진 방정식을 실행하여 결과를 출력하는 예시를 보여줍니다.
실행 체인 설정:
"runnable" 변수에는 실행 체인을 설정합니다.
이 체인은 다음과 같이 구성됩니다:
{"equation_statement": RunnablePassthrough()}: "equation_statement" 변수를 "RunnablePassthrough()"와 조합하여 방정식 문장을 처리합니다. 이 부분은 사용자가 입력한 방정식 문장을 체인으로 전달합니다.
"prompt": 이전 설명에서 정의된 "prompt" 템플릿을 추가합니다. 이 템플릿은 시스템 메시지와 사용자 메시지를 포함하며 방정식을 입력하는 역할을 합니다.
"model.bind(stop="SOLUTION")": 모델(model)에 "SOLUTION"이라는 종료 토큰을 지정하여, 모델이 "SOLUTION"이라는 토큰을 만날 때까지 출력을 생성하도록 설정합니다.
"StrOutputParser()": 출력 파서(StrOutputParser())를 추가합니다. 이 파서는 모델 출력을 파싱하고 처리합니다.
실행 및 결과 출력:
"runnable.invoke("x raised to the third plus seven equals 12")"를 사용하여 주어진 방정식을 실행합니다.
실행 결과를 출력합니다.
이 코드는 주어진 방정식을 처리하고 해결하기 위한 실행 체인을 설정하고, 결과를 출력하는 예시를 나타냅니다. 결과는 방정식의 해결책을 포함합니다.
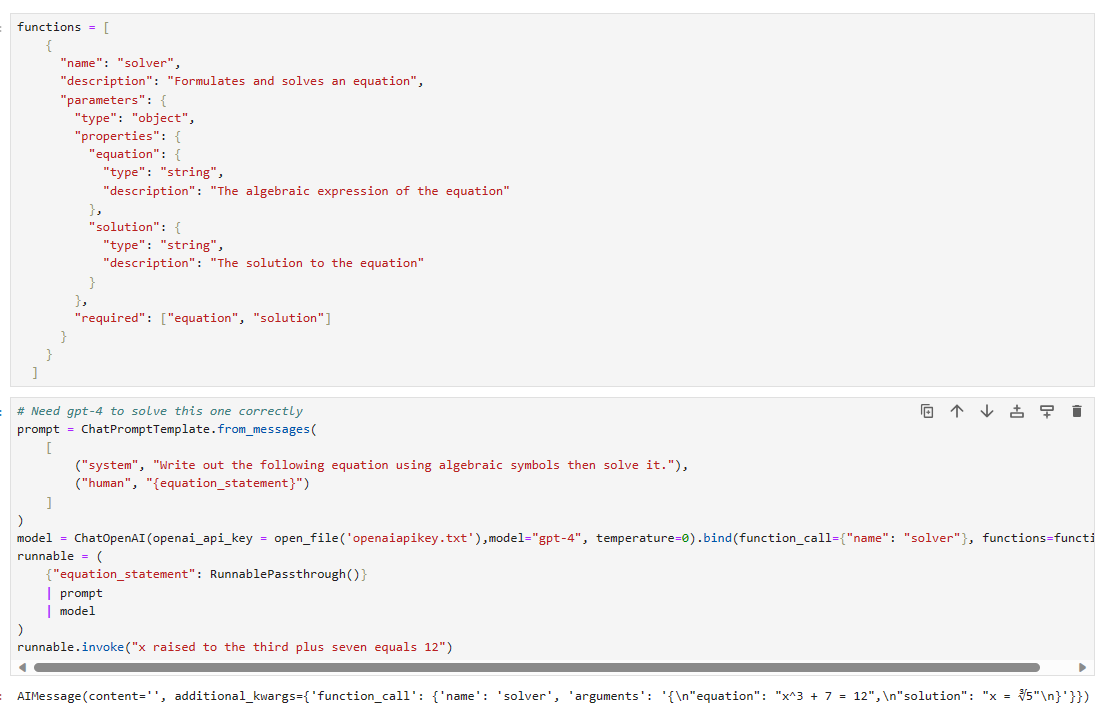
Attaching OpenAI functions
One particularly useful application of binding is to attach OpenAI functions to a compatible OpenAI model:
바인딩의 특히 유용한 응용 프로그램 중 하나는 OpenAI 기능을 호환되는 OpenAI 모델에 연결하는 것입니다.
functions = [
    {
      "name": "solver",
      "description": "Formulates and solves an equation",
      "parameters": {
        "type": "object",
        "properties": {
          "equation": {
            "type": "string",
            "description": "The algebraic expression of the equation"
          },
          "solution": {
            "type": "string",
            "description": "The solution to the equation"
          }
        },
        "required": ["equation", "solution"]
      }
    }
  ]
이 코드는 "functions"라는 변수에 대한 목록을 설정하며, 이 목록은 함수에 대한 정보를 포함합니다. 이 함수 정보는 JSON 형식으로 표현되며, 주어진 함수에 대한 이름, 설명, 그리고 함수의 매개변수에 대한 정보를 제공합니다.
functions 변수는 함수 정보를 담고 있는 리스트입니다.
name: 함수의 이름을 나타냅니다. 이 경우, 함수의 이름은 "solver"입니다.
description: 함수의 설명을 나타냅니다. 이 경우, "solver" 함수는 "방정식을 구성하고 풉니다"라는 설명을 갖습니다.
parameters: 함수의 매개변수에 대한 정보를 나타냅니다.
type: 매개변수의 형식을 지정합니다. 이 경우, "object"로 설정되어 있으므로, 객체 형태의 매개변수를 가집니다.
properties: 객체 형태의 매개변수에 포함된 속성들을 정의합니다.
"equation": 방정식의 대수적 표현에 대한 정보를 정의합니다. 이 매개변수는 문자열 형식을 갖고 있으며, "description"은 "방정식의 대수적 표현"입니다.
"solution": 방정식의 해결책에 대한 정보를 정의합니다. 이 매개변수 역시 문자열 형식을 갖고 있으며, "description"은 "방정식의 해결책"입니다.
required: 필수적으로 제공되어야 하는 매개변수를 정의합니다. "equation"과 "solution"은 반드시 제공되어야 하는 매개변수입니다.
이 코드는 "solver"라는 함수에 대한 정보를 정의하고, 해당 함수가 어떤 매개변수를 필요로 하며 어떤 역할을 하는지 설명합니다. 이러한 정보는 API 또는 서비스의 사용자에게 함수의 사용 방법을 설명하는 데 사용될 수 있습니다.
# Need gpt-4 to solve this one correctly
prompt = ChatPromptTemplate.from_messages(
    [
        ("system", "Write out the following equation using algebraic symbols then solve it."),
        ("human", "{equation_statement}")
    ]
)
model = ChatOpenAI(model="gpt-4", temperature=0).bind(function_call={"name": "solver"}, functions=functions)
runnable = (
    {"equation_statement": RunnablePassthrough()}
    | prompt
    | model
)
runnable.invoke("x raised to the third plus seven equals 12")
이 코드는 GPT-4 모델을 사용하여 방정식을 구성하고 풀기 위한 프로세스를 설정하고 실행하는 예시를 제공합니다.
실행 체인 설정:
"prompt" 변수에는 "ChatPromptTemplate.from_messages()"를 사용하여 대화 템플릿을 생성합니다. 이 템플릿은 시스템 메시지와 사용자 메시지를 포함합니다. 시스템 메시지에서는 사용자에게 방정식을 구성하고 풀어달라는 지시가 포함되어 있고, 사용자는 "equation_statement" 변수를 사용하여 방정식을 제공합니다.
모델 및 함수 설정:
"model" 변수에는 "ChatOpenAI(model="gpt-4", temperature=0)"를 사용하여 GPT-4 모델을 생성합니다. "temperature=0"은 모델의 출력을 보다 결정적으로 만듭니다.
"model.bind(function_call={"name": "solver"}, functions=functions)"를 사용하여 모델에 함수 호출을 바인딩합니다. "function_call"은 호출할 함수의 이름을 지정하고, "functions"는 함수의 정의를 포함하는 목록입니다. 이 경우, "solver" 함수가 호출될 것입니다.
실행 가능한 체인 설정:
"runnable" 변수에는 실행 가능한 체인을 설정합니다.
이 체인은 다음과 같이 구성됩니다:
{"equation_statement": RunnablePassthrough()}: "equation_statement" 변수를 "RunnablePassthrough()"와 조합하여 방정식 문장을 처리합니다.
"prompt" 템플릿을 추가합니다.
GPT-4 모델(model)을 추가합니다.
실행 및 결과 출력:
"runnable.invoke("x raised to the third plus seven equals 12")"를 사용하여 주어진 방정식을 실행합니다. 이 방정식은 "x raised to the third plus seven equals 12"로 주어집니다.
이 코드는 GPT-4 모델을 사용하여 방정식을 구성하고 풀기 위한 프로세스를 설정하고, 결과를 출력하는 예시를 나타냅니다. GPT-4 모델은 더 복잡한 방정식을 다루기 위해 사용됩니다.
In an effort to make it as easy as possible to create custom chains, we've implemented a"Runnable"protocol that most components implement. This is a standard interface with a few different methods, which makes it easy to define custom chains as well as making it possible to invoke them in a standard way. The standard interface exposed includes:
사용자 정의 체인을 최대한 쉽게 생성하기 위한 노력의 일환으로 우리는 대부분의 구성 요소가 구현하는 "실행 가능" 프로토콜을 구현했습니다. 이는 몇 가지 다른 메소드가 포함된 표준 인터페이스로, 사용자 정의 체인을 쉽게 정의할 수 있을 뿐만 아니라 표준 방식으로 호출할 수도 있습니다. 노출된 표준 인터페이스에는 다음이 포함됩니다.
stream: stream back chunks of the response 응답의 청크를 다시 스트리밍합니다.
invoke: call the chain on an input 입력에서 체인을 호출합니다.
batch: call the chain on a list of inputs 입력 목록에서 체인을 호출합니다.
These also have corresponding async methods: 여기에는 해당하는 비동기 메서드도 있습니다.
astream: stream back chunks of the response async 응답 비동기 청크를 다시 스트리밍합니다.
ainvoke: call the chain on an input async 입력 비동기에서 체인 호출
abatch: call the chain on a list of inputs async 비동기 입력 목록에서 체인을 호출합니다.
astream_log: stream back intermediate steps as they happen, in addition to the final response 최종 응답 외에도 중간 단계가 발생하면 다시 스트리밍합니다.
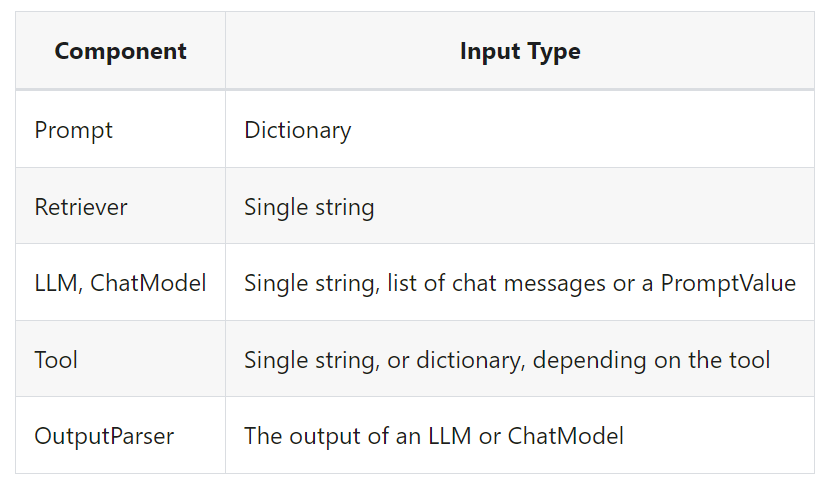
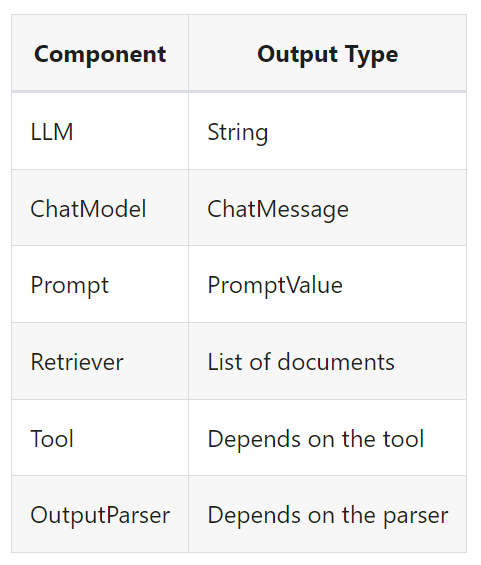
The type of the input varies by component:
입력 유형은 구성 요소에 따라 다릅니다.
The output type also varies by component:
출력 유형도 구성요소에 따라 다릅니다.
All runnables expose properties to inspect the input and output types:
모든 실행 가능 항목은 입력 및 출력 유형을 검사하기 위한 속성을 노출합니다.
input_schema: an input Pydantic model auto-generated from the structure of the Runnable
input_schema: Runnable의 구조에서 자동 생성된 입력 Pydantic 모델
output_schema: an output Pydantic model auto-generated from the structure of the Runnable
output_schema: Runnable의 구조에서 자동 생성된 출력 Pydantic 모델
Let's take a look at these methods! To do so, we'll create a super simple PromptTemplate + ChatModel chain.
이러한 방법들을 살펴보겠습니다! 이를 위해 매우 간단한 PromptTemplate + ChatModel 체인을 생성하겠습니다.
from langchain.prompts import ChatPromptTemplate
from langchain.chat_models import ChatOpenAI

model = ChatOpenAI()
prompt = ChatPromptTemplate.from_template("tell me a joke about {topic}")
chain = prompt | model
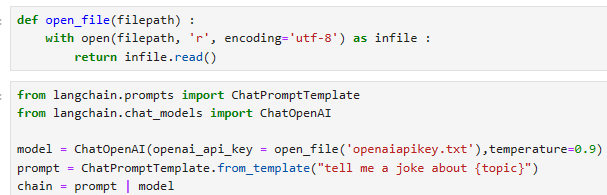
이 코드는 "langchain" 라이브러리를 사용하여 OpenAI의 언어 모델을 활용하는 예시를 제공합니다.
ChatPromptTemplate 클래스는 대화 생성에 사용되는 템플릿을 만들고 활용하는 데 도움을 주는 클래스입니다.
from langchain.chat_models import ChatOpenAI:
"langchain" 라이브러리에서 ChatOpenAI 클래스를 가져오는 명령입니다.
ChatOpenAI 클래스는 OpenAI의 언어 모델을 활용하는 데 사용되는 클래스입니다.
model = ChatOpenAI(openai_api_key = open_file('openaiapikey.txt'), temperature=0.9):
ChatOpenAI 클래스의 인스턴스를 생성합니다.
openai_api_key 매개변수에 OpenAI API 키를 파일로부터 읽어온 값을 전달합니다.
temperature 매개변수는 모델의 창의성을 조절하는 요소로, 0.9로 설정되어 있으며 높을수록 더 다양한 출력이 생성됩니다.
prompt = ChatPromptTemplate.from_template("tell me a joke about {topic}"):
ChatPromptTemplate 클래스의 from_template 메서드를 사용하여 템플릿을 생성합니다.
템플릿 문자열 "tell me a joke about {topic}"은 {topic} 부분이 나중에 대체될 변수를 나타냅니다.
chain = prompt | model:
prompt와 model을 결합하여 대화 체인을 생성합니다.
이러한 체인을 사용하면 템플릿을 모델과 함께 사용하여 모델에게 대화 형식으로 질문을 하고 응답을 받을 수 있습니다.
이 코드는 주어진 주제에 대한 재미있는 농담을 생성하기 위해 OpenAI 모델을 사용하는 예시를 나타내고 있습니다. 모델은 주어진 API 키 및 설정과 함께 템플릿을 사용하여 대화를 생성하고 대화의 연장으로 대화를 계속할 수 있습니다.
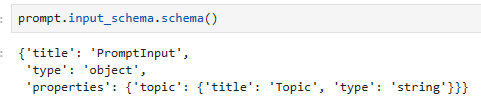
Input Schema
A description of the inputs accepted by a Runnable. This is a Pydantic model dynamically generated from the structure of any Runnable. You can call.schema()on it to obtain a JSONSchema representation.
Runnable이 허용하는 입력에 대한 설명입니다. 이는 Runnable의 구조에서 동적으로 생성된 Pydantic 모델입니다. .schema()를 호출하여 JSONSchema 표현을 얻을 수 있습니다.
# The input schema of the chain is the input schema of its first part, the prompt.
chain.input_schema.schema()
이 코드는 "chain"이라는 객체의 입력 스키마(input schema)를 설명하고 있습니다. "chain"은 여러 부분으로 구성된 대화 체인이며, 이 코드는 체인의 입력 스키마를 확인하는 부분에 대한 설명입니다.
# 체인의 입력 스키마는 체인의 첫 번째 부분인 prompt의 입력 스키마와 동일합니다.
chain.input_schema.schema()
"chain"은 여러 부분으로 이루어진 대화 체인을 나타내는 객체입니다. 이 대화 체인은 대화를 구성하고 관리하는 데 사용됩니다.
chain.input_schema.schema()은 체인의 입력 스키마를 확인하는 코드입니다. 입력 스키마는 데이터나 정보의 구조와 형식을 정의하는데 사용됩니다.
주석(#)은 코드에 설명을 추가하는 데 사용되며, 이 경우에는 주석으로 코드의 목적을 설명하고 있습니다.
이 코드에서 "chain"의 입력 스키마는 "prompt"라는 첫 번째 부분의 입력 스키마와 동일하다고 설명하고 있습니다. 즉, 체인의 입력 스키마는 체인의 첫 번째 부분인 "prompt"에서 정의한 입력 스키마와 일치합니다.
입력 스키마의 역할은 데이터의 형식, 구조, 및 유효성 검사에 관련됩니다. 이 코드는 입력 스키마를 확인하는 용도로 사용되며, 체인의 구조와 입력 데이터에 대한 정보를 얻을 수 있습니다.
이 코드는 체인의 입력 스키마를 확인하고 첫 번째 부분 "prompt"의 입력 스키마와 일치한다는 점을 강조하는 목적으로 사용됩니다.
prompt.input_schema.schema()
model.input_schema.schema()
return 값
{'title': 'ChatOpenAIInput',
 'anyOf': [{'type': 'string'},
  {'$ref': '#/definitions/StringPromptValue'},
  {'$ref': '#/definitions/ChatPromptValueConcrete'},
  {'type': 'array',
   'items': {'anyOf': [{'$ref': '#/definitions/AIMessage'},
     {'$ref': '#/definitions/HumanMessage'},
     {'$ref': '#/definitions/ChatMessage'},
     {'$ref': '#/definitions/SystemMessage'},
     {'$ref': '#/definitions/FunctionMessage'}]}}],
 'definitions': {'StringPromptValue': {'title': 'StringPromptValue',
   'description': 'String prompt value.',
   'type': 'object',
   'properties': {'text': {'title': 'Text', 'type': 'string'},
    'type': {'title': 'Type',
     'default': 'StringPromptValue',
     'enum': ['StringPromptValue'],
     'type': 'string'}},
   'required': ['text']},
  'AIMessage': {'title': 'AIMessage',
   'description': 'A Message from an AI.',
   'type': 'object',
   'properties': {'content': {'title': 'Content', 'type': 'string'},
    'additional_kwargs': {'title': 'Additional Kwargs', 'type': 'object'},
    'type': {'title': 'Type',
     'default': 'ai',
     'enum': ['ai'],
     'type': 'string'},
    'example': {'title': 'Example', 'default': False, 'type': 'boolean'}},
   'required': ['content']},
  'HumanMessage': {'title': 'HumanMessage',
   'description': 'A Message from a human.',
   'type': 'object',
   'properties': {'content': {'title': 'Content', 'type': 'string'},
    'additional_kwargs': {'title': 'Additional Kwargs', 'type': 'object'},
    'type': {'title': 'Type',
     'default': 'human',
     'enum': ['human'],
     'type': 'string'},
    'example': {'title': 'Example', 'default': False, 'type': 'boolean'}},
   'required': ['content']},
  'ChatMessage': {'title': 'ChatMessage',
   'description': 'A Message that can be assigned an arbitrary speaker (i.e. role).',
   'type': 'object',
   'properties': {'content': {'title': 'Content', 'type': 'string'},
    'additional_kwargs': {'title': 'Additional Kwargs', 'type': 'object'},
    'type': {'title': 'Type',
     'default': 'chat',
     'enum': ['chat'],
     'type': 'string'},
    'role': {'title': 'Role', 'type': 'string'}},
   'required': ['content', 'role']},
  'SystemMessage': {'title': 'SystemMessage',
   'description': 'A Message for priming AI behavior, usually passed in as the first of a sequence\nof input messages.',
   'type': 'object',
   'properties': {'content': {'title': 'Content', 'type': 'string'},
    'additional_kwargs': {'title': 'Additional Kwargs', 'type': 'object'},
    'type': {'title': 'Type',
     'default': 'system',
     'enum': ['system'],
     'type': 'string'}},
   'required': ['content']},
  'FunctionMessage': {'title': 'FunctionMessage',
   'description': 'A Message for passing the result of executing a function back to a model.',
   'type': 'object',
   'properties': {'content': {'title': 'Content', 'type': 'string'},
    'additional_kwargs': {'title': 'Additional Kwargs', 'type': 'object'},
    'type': {'title': 'Type',
     'default': 'function',
     'enum': ['function'],
     'type': 'string'},
    'name': {'title': 'Name', 'type': 'string'}},
   'required': ['content', 'name']},
  'ChatPromptValueConcrete': {'title': 'ChatPromptValueConcrete',
   'description': 'Chat prompt value which explicitly lists out the message types it accepts.\nFor use in external schemas.',
   'type': 'object',
   'properties': {'messages': {'title': 'Messages',
     'type': 'array',
     'items': {'anyOf': [{'$ref': '#/definitions/AIMessage'},
       {'$ref': '#/definitions/HumanMessage'},
       {'$ref': '#/definitions/ChatMessage'},
       {'$ref': '#/definitions/SystemMessage'},
       {'$ref': '#/definitions/FunctionMessage'}]}},
    'type': {'title': 'Type',
     'default': 'ChatPromptValueConcrete',
     'enum': ['ChatPromptValueConcrete'],
     'type': 'string'}},
   'required': ['messages']}}}
Output Schema
A description of the outputs produced by a Runnable. This is a Pydantic model dynamically generated from the structure of any Runnable. You can call.schema()on it to obtain a JSONSchema representation.
Runnable이 생성한 출력에 대한 설명입니다. 이는 Runnable의 구조에서 동적으로 생성된 Pydantic 모델입니다. .schema()를 호출하여 JSONSchema 표현을 얻을 수 있습니다.
# The output schema of the chain is the output schema of its last part, in this case a ChatModel, which outputs a ChatMessage
chain.output_schema.schema()
이 코드는 "chain" 객체의 출력 스키마를 설명하고 있습니다. "chain"은 여러 부분으로 구성된 대화 체인이며, 이 코드는 체인의 출력 스키마를 확인하는 부분에 대한 설명입니다.
# 체인의 출력 스키마는 마지막 부분인 ChatModel의 출력 스키마와 동일합니다. 이 경우에는 ChatMessage가 출력됩니다.
chain.output_schema.schema()
"chain"은 여러 부분으로 이루어진 대화 체인을 나타내는 객체입니다. 이 대화 체인은 대화의 구조와 출력을 관리하는 데 사용됩니다.
chain.output_schema.schema()은 체인의 출력 스키마를 확인하는 코드입니다. 출력 스키마는 데이터나 정보의 구조와 형식을 정의하는데 사용됩니다.
주석(#)은 코드에 설명을 추가하는 데 사용되며, 이 경우에는 주석으로 코드의 목적을 설명하고 있습니다.
이 코드에서 "chain"의 출력 스키마는 이 체인의 마지막 부분인 "ChatModel"에서 정의한 출력 스키마와 일치한다고 설명하고 있습니다. 마지막 부분인 "ChatModel"이 "ChatMessage"를 출력하므로, 체인의 출력 스키마도 "ChatMessage"와 일치합니다.
출력 스키마의 역할은 데이터의 형식, 구조, 및 유효성 검사에 관련됩니다. 이 코드는 출력 스키마를 확인하는 용도로 사용되며, 체인의 구조와 출력 데이터에 대한 정보를 얻을 수 있습니다.
이 코드는 체인의 출력 스키마를 확인하고 마지막 부분 "ChatModel"의 출력 스키마와 일치한다는 점을 강조하는 목적으로 사용됩니다.
return 값
{'title': 'ChatOpenAIOutput',
 'anyOf': [{'$ref': '#/definitions/AIMessage'},
  {'$ref': '#/definitions/HumanMessage'},
  {'$ref': '#/definitions/ChatMessage'},
  {'$ref': '#/definitions/SystemMessage'},
  {'$ref': '#/definitions/FunctionMessage'}],
 'definitions': {'AIMessage': {'title': 'AIMessage',
   'description': 'A Message from an AI.',
   'type': 'object',
   'properties': {'content': {'title': 'Content', 'type': 'string'},
    'additional_kwargs': {'title': 'Additional Kwargs', 'type': 'object'},
    'type': {'title': 'Type',
     'default': 'ai',
     'enum': ['ai'],
     'type': 'string'},
    'example': {'title': 'Example', 'default': False, 'type': 'boolean'}},
   'required': ['content']},
  'HumanMessage': {'title': 'HumanMessage',
   'description': 'A Message from a human.',
   'type': 'object',
   'properties': {'content': {'title': 'Content', 'type': 'string'},
    'additional_kwargs': {'title': 'Additional Kwargs', 'type': 'object'},
    'type': {'title': 'Type',
     'default': 'human',
     'enum': ['human'],
     'type': 'string'},
    'example': {'title': 'Example', 'default': False, 'type': 'boolean'}},
   'required': ['content']},
  'ChatMessage': {'title': 'ChatMessage',
   'description': 'A Message that can be assigned an arbitrary speaker (i.e. role).',
   'type': 'object',
   'properties': {'content': {'title': 'Content', 'type': 'string'},
    'additional_kwargs': {'title': 'Additional Kwargs', 'type': 'object'},
    'type': {'title': 'Type',
     'default': 'chat',
     'enum': ['chat'],
     'type': 'string'},
    'role': {'title': 'Role', 'type': 'string'}},
   'required': ['content', 'role']},
  'SystemMessage': {'title': 'SystemMessage',
   'description': 'A Message for priming AI behavior, usually passed in as the first of a sequence\nof input messages.',
   'type': 'object',
   'properties': {'content': {'title': 'Content', 'type': 'string'},
    'additional_kwargs': {'title': 'Additional Kwargs', 'type': 'object'},
    'type': {'title': 'Type',
     'default': 'system',
     'enum': ['system'],
     'type': 'string'}},
   'required': ['content']},
  'FunctionMessage': {'title': 'FunctionMessage',
   'description': 'A Message for passing the result of executing a function back to a model.',
   'type': 'object',
   'properties': {'content': {'title': 'Content', 'type': 'string'},
    'additional_kwargs': {'title': 'Additional Kwargs', 'type': 'object'},
    'type': {'title': 'Type',
     'default': 'function',
     'enum': ['function'],
     'type': 'string'},
    'name': {'title': 'Name', 'type': 'string'}},
   'required': ['content', 'name']}}}
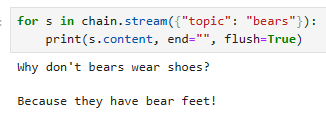
Stream
for s in chain.stream({"topic": "bears"}):
    print(s.content, end="", flush=True)
이 코드는 "chain" 객체를 사용하여 대화를 생성하고 출력하는 부분을 설명하고 있습니다.
for s in chain.stream({"topic": "bears"})::
이 부분은 "chain" 객체를 사용하여 대화를 생성하는 반복문입니다.
"chain.stream({"topic": "bears"})"은 주어진 입력 매개변수인 {"topic": "bears"}를 사용하여 대화를 시작하고 그 결과를 반복적으로 처리합니다.
print(s.content, end="", flush=True):
"s"는 반복문에서 가져온 대화의 한 부분을 나타냅니다.
"s.content"는 대화의 내용을 나타내며, 이 부분은 출력됩니다.
"end=""`"는 "print" 함수가 줄 바꿈 문자를 출력하지 않도록 합니다. 따라서 출력이 연이어 나타납니다.
"flush=True"는 출력을 즉시 표시하도록 하는 옵션으로, 출력이 즉시 화면에 나타납니다.
이 코드는 "chain"을 사용하여 주제가 "bears"인 대화를 생성하고 해당 대화를 반복적으로 처리하여 출력합니다. 출력은 줄 바꿈 없이 연이어 표시되며, flush=True 옵션을 사용하여 즉시 표시됩니다.
Invoke
chain.invoke({"topic": "bears"})
이 코드는 "chain" 객체를 사용하여 대화를 생성하고 실행하는 부분을 설명하고 있습니다.
chain.invoke({"topic": "bears"}):
이 부분은 "chain" 객체를 사용하여 대화를 생성하고 실행하는 명령입니다.
{"topic": "bears"}는 입력 매개변수로 주어진 딕셔너리를 나타냅니다. 여기서 "topic"은 대화 주제를 설정하는데 사용되는 키이며, "bears"는 주제로 설정됩니다.
이 코드는 "chain"을 사용하여 주제가 "bears"인 대화를 생성하고 실행합니다. 이로써 대화 모델은 "bears" 주제에 관한 대화를 생성하고 결과를 반환합니다.
{"topic": "bears"}와 {"topic": "cats"}는 입력 매개변수로 주어진 딕셔너리의 목록을 나타냅니다. 각 딕셔너리에는 "topic" 키와 대화 주제를 설정하는 값이 포함되어 있습니다.
이 코드는 "chain"을 사용하여 "bears" 주제와 "cats" 주제에 관한 여러 대화를 생성하고 처리합니다. 이로써 대화 모델은 주어진 주제에 따라 대화를 생성하고 결과를 반환합니다.
Async Stream
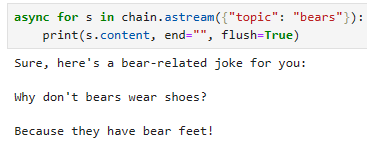
async for s in chain.astream({"topic": "bears"}):
    print(s.content, end="", flush=True)
이 코드는 비동기로 "chain" 객체를 사용하여 대화를 생성하고 출력하는 부분을 설명하고 있습니다.
async for s in chain.astream({"topic": "bears"})::
이 부분은 비동기 반복문으로, "chain" 객체를 사용하여 대화를 생성하고 결과를 처리합니다.
chain.astream({"topic": "bears"})은 주어진 입력 매개변수인 {"topic": "bears"}를 사용하여 대화를 시작하고 비동기 스트림을 통해 결과를 받아옵니다.
print(s.content, end="", flush=True):
"s"는 스트림에서 가져온 대화의 한 부분을 나타냅니다.
"s.content"는 대화의 내용을 나타내며, 이 부분은 출력됩니다.
"end=""`"는 "print" 함수가 줄 바꿈 문자를 출력하지 않도록 합니다. 따라서 출력이 연이어 나타납니다.
"flush=True"는 출력을 즉시 표시하도록 하는 옵션으로, 출력이 즉시 화면에 나타납니다.
이 코드는 "chain"을 사용하여 주제가 "bears"인 대화를 생성하고 비동기 스트림을 통해 결과를 받아오며, 결과를 출력합니다. 출력은 줄 바꿈 없이 연이어 표시되며, flush=True 옵션을 사용하여 즉시 표시됩니다.
Async Invoke
await chain.ainvoke({"topic": "bears"})
이 코드는 "chain" 객체를 사용하여 대화를 생성하고 실행하는 비동기 방식을 설명하고 있습니다.
await chain.ainvoke({"topic": "bears"}):
이 부분은 "chain" 객체를 사용하여 비동기로 대화를 생성하고 실행하는 명령입니다.
{"topic": "bears"}는 입력 매개변수로 주어진 딕셔너리를 나타냅니다. 여기서 "topic"은 대화 주제를 설정하는데 사용되는 키이며, "bears"는 주제로 설정됩니다.
이 코드는 "chain"을 사용하여 "bears" 주제에 관한 대화를 생성하고 실행합니다. await 키워드는 비동기 작업이 완료될 때까지 대기하도록 하며, 대화의 실행이 완료되면 결과를 반환합니다.
Async Batch
await chain.abatch([{"topic": "bears"}])
이 코드는 "chain" 객체를 사용하여 대화를 생성하고 실행하는 비동기 일괄 처리 방법을 설명하고 있습니다.
await chain.abatch([{"topic": "bears"}]):
이 부분은 "chain" 객체를 사용하여 비동기로 대화를 생성하고 실행하는 명령입니다.
{"topic": "bears"}는 입력 매개변수로 주어진 딕셔너리의 목록을 나타냅니다. 각 딕셔너리에는 "topic" 키와 대화 주제를 설정하는 값이 포함되어 있습니다.
이 코드는 "chain"을 사용하여 "bears" 주제에 관한 대화를 생성하고 실행합니다. await 키워드는 비동기 작업이 완료될 때까지 대기하도록 하며, 대화의 실행이 완료되면 결과를 반환합니다.
Async Stream Intermediate Steps
All runnables also have a method.astream_log()which is used to stream (as they happen) all or part of the intermediate steps of your chain/sequence.
모든 runnables는 체인/시퀀스의 중간 단계 전체 또는 일부를 스트리밍하는 데 사용되는 .astream_log() 메서드도 있습니다.
This is useful to show progress to the user, to use intermediate results, or to debug your chain.
이는 사용자에게 진행 상황을 표시하거나, 중간 결과를 사용하거나, 체인을 디버깅하는 데 유용합니다.
You can stream all steps (default) or include/exclude steps by name, tags or metadata.
모든 단계를 스트리밍(기본값)하거나 이름, 태그 또는 메타데이터별로 단계를 포함/제외할 수 있습니다.
This method yieldsJSONPatchops that when applied in the same order as received build up the RunState.
이 메서드는 수신된 순서와 동일한 순서로 적용될 때 RunState를 구축하는 JSONPatch 작업을 생성합니다.
class LogEntry(TypedDict):
    id: str
    """ID of the sub-run."""
    name: str
    """Name of the object being run."""
    type: str
    """Type of the object being run, eg. prompt, chain, llm, etc."""
    tags: List[str]
    """List of tags for the run."""
    metadata: Dict[str, Any]
    """Key-value pairs of metadata for the run."""
    start_time: str
    """ISO-8601 timestamp of when the run started."""

    streamed_output_str: List[str]
    """List of LLM tokens streamed by this run, if applicable."""
    final_output: Optional[Any]
    """Final output of this run.
    Only available after the run has finished successfully."""
    end_time: Optional[str]
    """ISO-8601 timestamp of when the run ended.
    Only available after the run has finished."""


class RunState(TypedDict):
    id: str
    """ID of the run."""
    streamed_output: List[Any]
    """List of output chunks streamed by Runnable.stream()"""
    final_output: Optional[Any]
    """Final output of the run, usually the result of aggregating (`+`) streamed_output.
    Only available after the run has finished successfully."""

    logs: Dict[str, LogEntry]
    """Map of run names to sub-runs. If filters were supplied, this list will
    contain only the runs that matched the filters."""
위의 코드는 Python 3.8 이상에서 사용 가능한 TypedDict를 사용하여 두 개의 타입 딕셔너리(LogEntry 및 RunState)를 정의하고 있습니다. 이 타입 딕셔너리는 특정 키와 그에 상응하는 데이터 형식을 명시적으로 정의함으로써 딕셔너리의 구조를 제한하고 코드의 가독성과 안정성을 향상시킵니다.
LogEntry 타입 딕셔너리:
id: str: 서브런의 ID를 나타내는 문자열.
name: str: 실행 중인 객체의 이름을 나타내는 문자열.
type: str: 실행 중인 객체의 유형(예: 프롬프트, 체인, llm 등)을 나타내는 문자열.
tags: List[str]: 실행에 대한 태그 목록을 나타내는 문자열 리스트.
metadata: Dict[str, Any]: 실행에 대한 메타데이터를 나타내는 키-값 쌍의 딕셔너리.
start_time: str: 실행이 시작된 ISO-8601 타임스탬프를 나타내는 문자열.
streamed_output_str: List[str]: 이 실행에 의해 스트리밍된 LLM 토큰의 목록(적용 가능한 경우).
final_output: Optional[Any]: 이 실행의 최종 출력. 실행이 성공적으로 완료된 후에만 사용 가능한 옵셔널 타입 데이터.
end_time: Optional[str]: 실행이 종료된 ISO-8601 타임스탬프. 실행이 성공적으로 완료된 후에만 사용 가능한 옵셔널 타입 데이터.
RunState 타입 딕셔너리:
id: str: 실행의 ID를 나타내는 문자열.
streamed_output: List[Any]: Runnable.stream()에 의해 스트리밍된 출력 청크 목록을 나타내는 리스트.
final_output: Optional[Any]: 실행의 최종 출력. 일반적으로 streamed_output을 집계한 결과입니다. 실행이 성공적으로 완료된 후에만 사용 가능한 옵셔널 타입 데이터.
logs: Dict[str, LogEntry]: 실행의 이름과 서브런(로그 엔트리) 간의 매핑. 필터가 제공된 경우 해당 필터와 일치하는 실행만 포함합니다.
이러한 타입 딕셔너리는 데이터 구조와 형식을 명확히 정의하며, 이러한 정보를 사용하는 코드에서 유용한 형식 검증과 가독성을 제공합니다.
Streaming JSONPatch chunks
This is useful eg. to stream theJSONPatchin an HTTP server, and then apply the ops on the client to rebuild the run state there. SeeLangServefor tooling to make it easier to build a webserver from any Runnable.
이는 유용합니다. HTTP 서버에서 JSONPatch를 스트리밍한 다음 클라이언트에 작업을 적용하여 실행 상태를 다시 빌드합니다. Runnable에서 웹 서버를 더 쉽게 구축할 수 있는 도구는 LangServe를 참조하세요.
from langchain.embeddings import OpenAIEmbeddings
from langchain.schema.output_parser import StrOutputParser
from langchain.schema.runnable import RunnablePassthrough
from langchain.vectorstores import FAISS
template = """Answer the question based only on the following context:
{context}
Question: {question}
"""
prompt = ChatPromptTemplate.from_template(template)
vectorstore = FAISS.from_texts(["harrison worked at kensho"], embedding=OpenAIEmbeddings())
retriever = vectorstore.as_retriever()
retrieval_chain = (
{"context": retriever.with_config(run_name='Docs'), "question": RunnablePassthrough()}
| prompt
| model
| StrOutputParser()
)
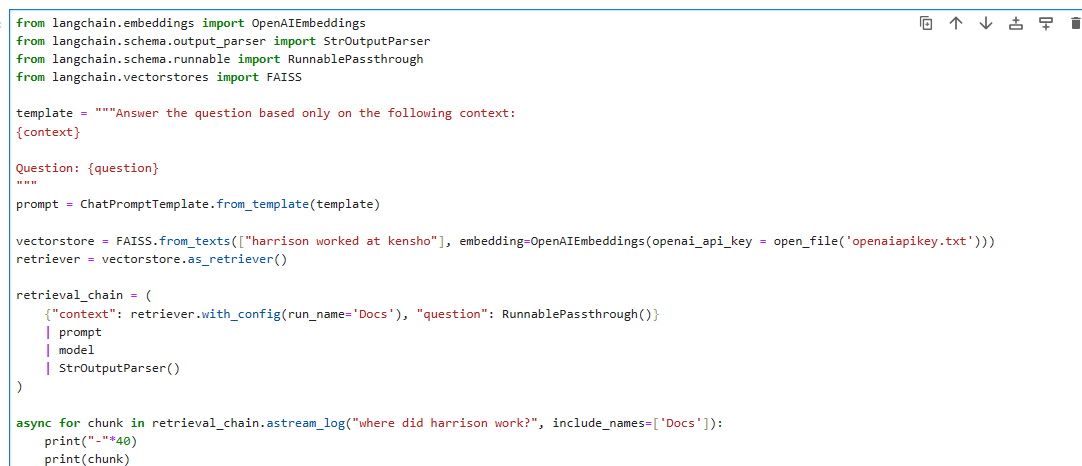
async for chunk in retrieval_chain.astream_log("where did harrison work?", include_names=['Docs']):
print("-"*40)
print(chunk)
이 코드는 "langchain" 라이브러리를 사용하여 OpenAI 모델을 활용하여 질문 응답 시스템을 구축하는 예시를 제공합니다.
모듈 및 클래스 가져오기:
langchain.embeddings 모듈에서 OpenAIEmbeddings 클래스를 가져옵니다. 이 클래스는 OpenAI의 임베딩을 사용하기 위한 도구를 제공합니다.
langchain.schema.output_parser 모듈에서 StrOutputParser 클래스를 가져옵니다. 이 클래스는 출력을 파싱하는 데 사용됩니다.
langchain.schema.runnable 모듈에서 RunnablePassthrough 클래스를 가져옵니다. 이 클래스는 실행 가능한 객체를 나타내는 클래스입니다.
langchain.vectorstores 모듈에서 FAISS 클래스를 가져옵니다. 이 클래스는 FAISS 벡터 저장소를 만들고 관리하는 도구를 제공합니다.
템플릿 정의:
"template" 변수에는 질문에 대한 컨텍스트와 질문 자체를 템플릿으로 정의합니다.
질문 응답 시스템 구성:
"prompt" 변수에는 "ChatPromptTemplate.from_template(template)"을 사용하여 템플릿을 기반으로한 대화 템플릿을 생성합니다.
"vectorstore" 변수에는 "FAISS.from_texts"를 사용하여 벡터 저장소를 생성합니다. 이 벡터 저장소는 "harrison worked at kensho"와 같은 텍스트로 초기화되며, OpenAI 임베딩을 사용하여 벡터를 생성합니다.
"retriever" 변수에는 "vectorstore.as_retriever()"를 사용하여 정보 검색(retrieval)을 위한 객체를 생성합니다.
실행 체인 설정:
"retrieval_chain" 변수에는 실행 체인을 설정합니다. 이 체인은 다음과 같이 구성됩니다:
"context"와 "question" 매개변수를 사용하여 "retriever.with_config(run_name='Docs')"와 "RunnablePassthrough()"를 결합합니다.
"prompt" 템플릿을 추가합니다.
모델(model)을 추가합니다.
출력 파서(StrOutputParser)를 추가합니다.
결과 검색 및 출력:
비동기 반복문(async for)을 사용하여 질문을 실행하고 결과를 검색합니다.
retrieval_chain.astream_log("where did harrison work?", include_names=['Docs'])를 사용하여 "where did harrison work?"라는 질문을 실행하고, 실행 결과를 가져옵니다.
실행 결과를 출력합니다.
이 코드는 OpenAI 모델을 사용하여 컨텍스트와 질문을 기반으로 질문 응답 시스템을 구현하고, 결과를 출력하는 과정을 나타냅니다.
나는 OpenAI key를 외부 파일에서 읽어 오도록 아래와 같이 코딩 했음
return 값
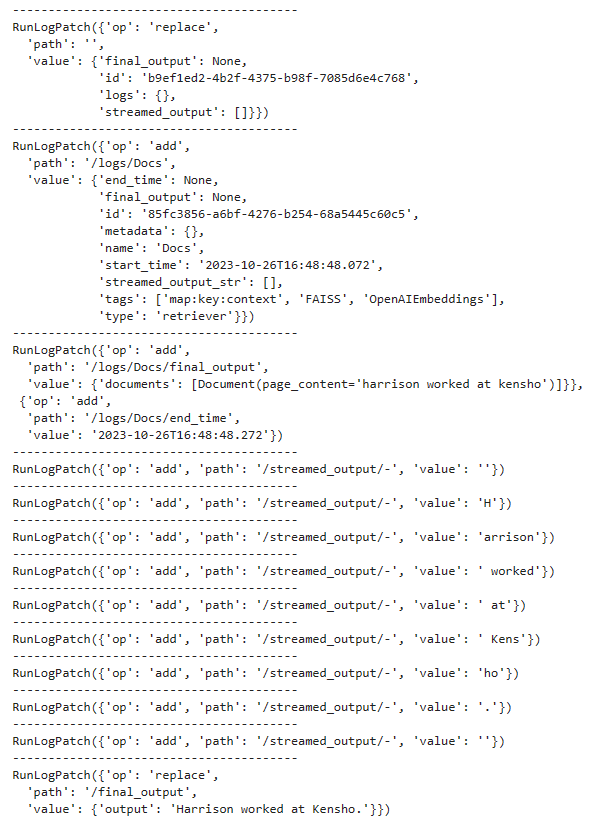
Streaming the incremental RunState
You can simply passdiff=Falseto get incremental values ofRunState. You get more verbose output with more repetitive parts.
간단히 diff=False를 전달하여 RunState의 증분 값을 얻을 수 있습니다. 반복되는 부분이 많아지면 더 자세한 출력을 얻을 수 있습니다.
async for chunk in retrieval_chain.astream_log("where did harrison work?", include_names=['Docs'], diff=False):
    print("-"*70)
    print(chunk)
이 코드는 질문 응답 시스템을 통해 질문을 실행하고 결과를 비동기적으로 가져오는 부분을 설명하고 있습니다.
async for chunk in retrieval_chain.astream_log("where did harrison work?", include_names=['Docs'], diff=False)::
이 부분은 비동기 반복문으로, "retrieval_chain" 객체를 사용하여 질문을 실행하고 결과를 비동기적으로 처리합니다.
retrieval_chain.astream_log("where did harrison work?", include_names=['Docs'], diff=False)는 "where did harrison work?"라는 질문을 실행하고 결과를 가져오는 코드입니다.
include_names=['Docs']는 결과에 대한 필터로, "Docs"라는 이름을 가진 실행에 대한 결과만 포함합니다.
diff=False는 결과를 비교(diff)하지 않도록 설정합니다.
print("-"*70):
이 부분은 구분선을 출력합니다. 출력 결과를 시각적으로 구분하기 위해 사용됩니다.
print(chunk):
"chunk"는 질문 실행의 결과를 나타냅니다.
이 부분은 실행 결과를 출력합니다.
이 코드는 "retrieval_chain"을 사용하여 "where did harrison work?"라는 질문을 실행하고 결과를 가져오며, 결과를 출력합니다. 결과는 "Docs"라는 이름을 가진 실행에 대한 것만 포함되며, diff를 비활성화하고 결과를 출력합니다.
Let's take a look at how LangChain Expression Language supports parallel requests. For example, when using aRunnableParallel(often written as a dictionary) it executes each element in parallel.
LangChain Expression Language가 어떻게 병렬 요청을 지원하는지 살펴보겠습니다. 예를 들어 RunnableParallel(종종 사전으로 작성됨)을 사용하면 각 요소가 병렬로 실행됩니다.
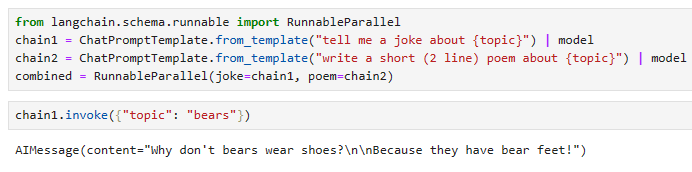
from langchain.schema.runnable import RunnableParallel
chain1 = ChatPromptTemplate.from_template("tell me a joke about {topic}") | model
chain2 = ChatPromptTemplate.from_template("write a short (2 line) poem about {topic}") | model
combined = RunnableParallel(joke=chain1, poem=chain2)
chain1.invoke({"topic": "bears"})
이 코드는 "langchain" 라이브러리를 사용하여 두 개의 병렬 실행 체인을 생성하고, 이 두 체인을 조합하여 단일 실행 객체를 만들고, 그 중 하나인 "chain1"을 사용하여 특정 주제에 대한 실행을 시작하는 예시를 보여줍니다
모듈 및 클래스 가져오기:
langchain.schema.runnable 모듈에서 RunnableParallel 클래스를 가져옵니다. 이 클래스는 병렬 실행을 관리하고 조합하는 데 사용됩니다.
실행 체인 생성:
"chain1"은 "ChatPromptTemplate.from_template("tell me a joke about {topic}") | model"를 사용하여 생성됩니다. 이 체인은 주어진 주제에 관한 농담을 생성하기 위해 대화 템플릿과 모델을 조합합니다.
"chain2"는 "ChatPromptTemplate.from_template("write a short (2 line) poem about {topic}") | model"를 사용하여 생성됩니다. 이 체인은 주어진 주제에 관한 짧은 시를 생성하기 위해 대화 템플릿과 모델을 조합합니다.
병렬 실행 조합:
"combined"는 "RunnableParallel(joke=chain1, poem=chain2)"를 사용하여 생성됩니다. 이 객체는 "joke" 및 "poem"이라는 이름으로 "chain1"과 "chain2"를 조합한 것입니다. 이를 통해 "joke" 및 "poem" 실행을 병렬로 시작하고 결과를 처리할 수 있습니다.
실행 시작:
"chain1.invoke({"topic": "bears"})"을 사용하여 "chain1"을 실행합니다. 이 부분은 "bears" 주제에 관한 농담을 생성하는 실행을 시작합니다.
이 코드는 두 개의 병렬 실행 체인을 생성하고 실행하기 위한 방법을 보여주며, "chain1"을 사용하여 "bears" 주제에 관한 실행을 시작합니다.
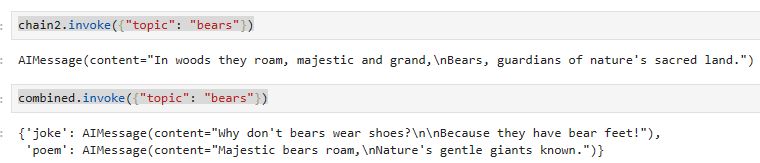
chain2.invoke({"topic": "bears"})
combined.invoke({"topic": "bears"})
이 코드는 "chain2"와 "combined" 두 실행 체인을 사용하여 "bears" 주제에 관한 실행을 시작하는 부분을 설명하고 있습니다.
"chain2.invoke({"topic": "bears"})":
이 부분은 "chain2"를 사용하여 "bears" 주제에 관한 실행을 시작합니다. "chain2"는 주어진 주제에 관한 짧은 시를 생성하기 위한 실행을 나타냅니다.
"combined.invoke({"topic": "bears"})":
이 부분은 "combined"를 사용하여 "bears" 주제에 관한 실행을 시작합니다. "combined"는 "joke" 및 "poem"이라는 이름으로 두 개의 실행 체인을 병렬로 조합한 것입니다.
이 코드는 "chain2"와 "combined" 두 실행 체인을 사용하여 "bears" 주제에 관한 실행을 시작하며, 각 실행은 주어진 주제에 따라 농담 또는 시를 생성하는 목적을 갖고 있습니다.
Parallelism on batches
Parallelism can be combined with other runnables. Let's try to use parallelism with batches.
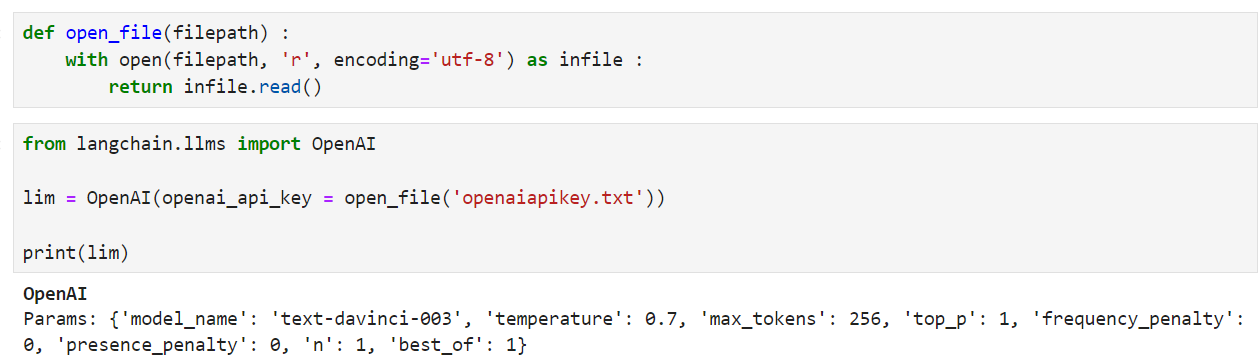
나는 openai api key 세팅을 아래와 같이 별도의 txt 파일에 두고 이를 불러와서 씀.
LangChain에 OpenAI key를 세팅하고 OpenAI에게 질문을 해서 답변을 받는 가장 간단한 코딩.
langchain.llms에 있는 OpenAI 모듈을 사용해서 api key를 세팅한 후 질문을 보내면 답변을 받을 수 있음.
위 코드는 파스타를 좋아하는 사람이 휴가때 가기 좋은 곳 5곳을 질문했고 그에 대한 답을 얻었음.
(변수 lim에 openAI 세팅이 되 있음. 원래는 llm 인데 lim 으로 오타가 난 것임. 참고 바람)
위 코드는 langchain의 PromptTemplate으로 프롬프트를 관리하는 간단한 예제이다.
위 예제에서는 질문 안에 있는 음식(food)을 변수로 처리해서 별도로 값을 입력 받아서 prompt를 완성할 수 있게 하는 소스코드임.
질문을 던질 때 food에 dessert를 넣어서 디저트를 좋아하는 사람이 갈만한 휴가 장소 5곳을 물었고 그에 대한 답을 OpenAI로 부터 받았음.
위 코드는 langchain.chains 의 LLMChain 을 사용해서 OpenAI에 질문을 던지는 방법을 보여 준다.
소스코드가 하는 일은 위와 같다.
이번에는 food에 fruit을 넣어서 질문을 했고 위와는 다른 답변을 얻어 냈다.
다음은 Agents 에 대해 살펴 본다.
google-search-results 모듈을 인스톨 한다.
필요한 모듈을 import 한다.
그리고 llm 변수에 OpenAI 모델을 load 한다.
참고로 open_file() 함수는 위에 세팅해 두었던 것인데 이 부분을 따로 사용하려면 아래 함수를 넣는다.
def open_file(filepath) :
    with open(filepath, 'r', encoding='utf-8') as infile :
        return infile.read()
그 다음 필요한 툴을 로드한다.
# Load in some tools to use

# os.environ["SERPAPI_API_KEY"] = "..."

tools = load_tools(["serpapi", "llm-math"], llm=llm)
이 모듈을 실행하려면 SerpAPI 계정이 있어야 한다. 이 서비스는 유료인 것 같음.
# Finally, let's initialize an agent with:
# 1. The tools
# 2. The language model
# 3. The type of agent we want to use.

agent = initialize_agent(tools, llm, agent="zero-shot-react-description", verbose=True)
이제 agent를 초기화 한다.
initialize_agent() 메소드를 사용하고 파라미터로 tools와 llm 그리고 agent 를 전달한다.
# Now let's test it out!
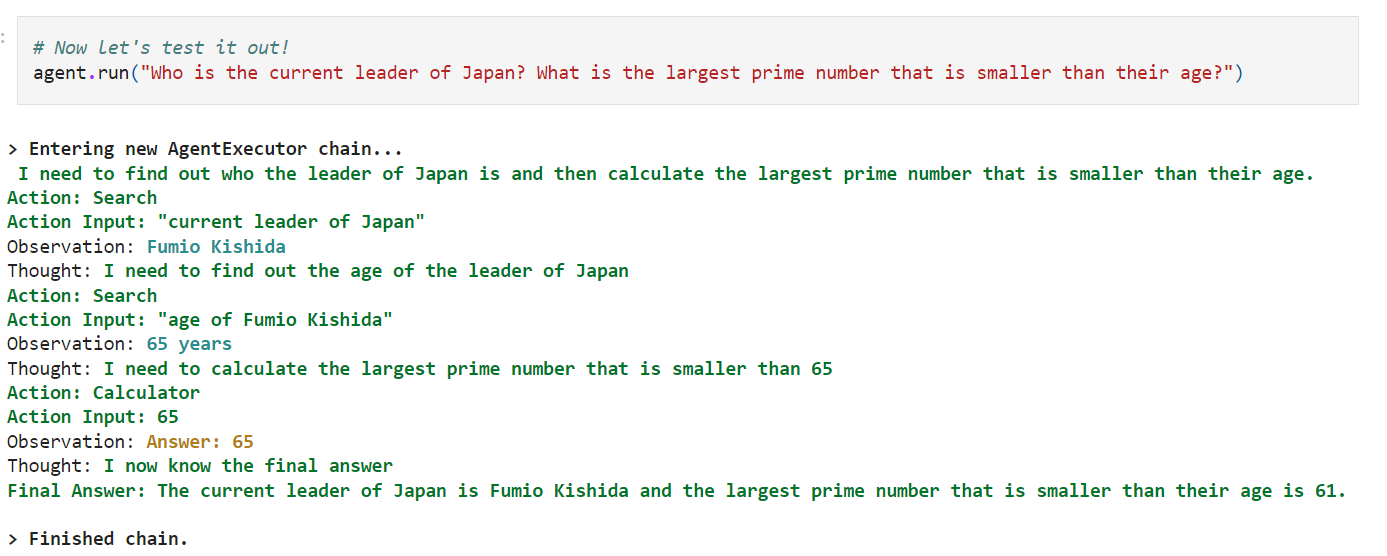
agent.run("Who is the current leader of Japan? What is the largest prime number that is smaller than their age?")
이제 이 agent를 run 하면 된다. 이때 원하는 prompt를 전달한다.
prompt에는 두가지 질문이 있다. 일본의 현재 리더는 누구인가? 그리고 나이보다 작은 가장 큰 소수는 무엇입니까? 이다.
위 유투브 클립에서는 아래와 같은 답변을 얻어 냈다.
위 질문에 답변을 하기 위해 이 agent 는 여러 일을 하게 된다.
처음에 자기가 할 일을 얘기한다. 이 agent 가 할 일은 일본의 수상이 누구인지 찾고 그 수상의 나이를 찾아서 그 나이보다 작은 가장 큰 소수를 찾는 일을 하는 것이다.
처음 질문에 대한 답변은 Fumio Kishida이다.
그 다음 이 수상의 나이를 찾아야 한다. age of Fumio Kishida. 나이는 65세이다.
그리고 나서 65보다 작은 가장 큰 소수를 찾는 거다.
65가 소수이기 때문에 답은 65 이다.
그리고 나서 final answer를 내 놓는다.
이 작업은 chain을 통해 이루어 진다.
다음은 Memory에 대해서 알아본다.
우선 ConversationChain 모듈을 import해야 한다.
그 다음 OpenAI를 세팅하고 나서 ConversationChain을 초기화 한다.
그 다음 predict() 메소드를 사용해서 실행한다. 결과는 다음과 같다.
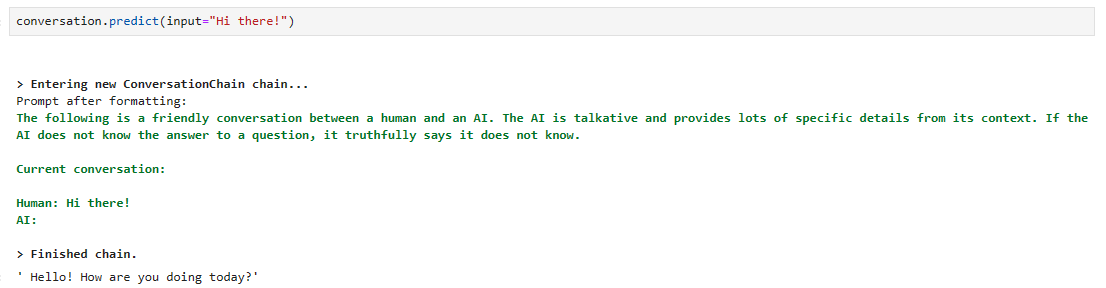
conversation.predict(input="Hi there!")
Hi there라는 프롬프트를 보냈더니 자기가 알아서 prompt를 포맷해서 전달합니다.
prompt 앞에 이 시스템 조건을 붙입니다.
The following is a friendly conversation between a human and an AI. The AI is talkative and provides lots of specific details from its context. If the AI does not know the answer to a question, it truthfully says it does not know.
다음은 인간과 AI의 친근한 대화이다. AI는 말이 많고 상황에 맞는 구체적인 세부 정보를 많이 제공합니다. AI가 질문에 대한 답을 모른다면, 사실은 모른다고 말합니다.
그 다음 전달한 prompt 'hi there!를 붙입니다.
그럼 답변으로 Hello! How are you doing today? 를 받았습니다.
conversation.predict(input="I'm doing well! Just having a conversation with an AI.")
그 다음 이어서 질문을 합니다.
그러면 이전 prompt에다가 현재의 prompt를 추가해서 보냅니다.
이렇게 함으로서 대화가 맥락이 끊기지 않고 계속 이어질 수 있도록 합니다.
맥락이 끊어지지 않도록 하기 위해서 이전 prompt를 계속 memory 하게 됩니다.
이 일을 하는게 ConversationChain입니다.
conversation.predict(input="what is an alternative phrase for the first thing I said to you?")
그 다음. 내가 너한테 맨 먼저 한 말이 뭐지? 라고 물어봅니다.
맨 먼저 한 말은 Hi there! 였고 OpenAI는 잘 대답합니다.
대화들을 계속 기억하고 있다는 이야기 입니다.
그 다음에는 그 내가 맨 처음 한 얘기는 어떤 의미인지에 대해 질문합니다.
conversation.predict(input="what is an alternative phrase for the first thing I said to you?")
OpenAI 는 Hi there!는 그냥 인사말이었다고 답변을 하네요.
뭔가 대화가 되어 가는 느낌 입니다.
이상 Greg Kamradt 가 운영하는 채널에 있는 LangChain 101: Quickstart Guide를 살펴 봤습니다.
LangChain Expression Language or LCEL is a declarative way to easily compose chains together. There are several benefits to writing chains in this manner (as opposed to writing normal code):
LangChain 표현 언어(LCEL)는 체인을 쉽게 구성하는 선언적 방법입니다. 이러한 방식으로 체인을 작성하면 다음과 같은 여러 이점이 있습니다(일반 코드 작성과 반대).
Async, Batch, and Streaming SupportAny chain constructed this way will automatically have full sync, async, batch, and streaming support. This makes it easy to prototype a chain in a Jupyter notebook using the sync interface, and then expose it as an async streaming interface.
비동기, 배치 및 스트리밍 지원 이러한 방식으로 구성된 모든 체인은 자동으로 전체 동기화, 비동기, 배치 및 스트리밍을 지원합니다. 이를 통해 동기화 인터페이스를 사용하여 Jupyter 노트북에서 체인의 프로토타입을 쉽게 만든 다음 이를 비동기 스트리밍 인터페이스로 노출할 수 있습니다.
FallbacksThe non-determinism of LLMs makes it important to be able to handle errors gracefully. With LCEL you can easily attach fallbacks to any chain.
폴백 LLM의 비결정성으로 인해 오류를 적절하게 처리하는 것이 중요합니다. LCEL을 사용하면 모든 체인에 폴백을 쉽게 연결할 수 있습니다.
ParallelismSince LLM applications involve (sometimes long) API calls, it often becomes important to run things in parallel. With LCEL syntax, any components that can be run in parallel automatically are.
병렬성 LLM 응용 프로그램에는 (때때로 긴) API 호출이 포함되므로 작업을 병렬로 실행하는 것이 중요해지는 경우가 많습니다. LCEL 구문을 사용하면 병렬로 실행될 수 있는 모든 구성 요소가 자동으로 실행됩니다.
Seamless LangSmith Tracing IntegrationAs your chains get more and more complex, it becomes increasingly important to understand what exactly is happening at every step. With LCEL,allsteps are automatically logged toLangSmithfor maximal observability and debuggability.
원활한 LangSmith 추적 통합 체인이 점점 더 복잡해짐에 따라 모든 단계에서 정확히 무슨 일이 일어나고 있는지 이해하는 것이 점점 더 중요해지고 있습니다. LCEL을 사용하면 관찰 가능성과 디버그 가능성을 극대화하기 위해 모든 단계가 자동으로 LangSmith에 기록됩니다.
Using LangChain will usually require integrations with one or more model providers, data stores, APIs, etc. For this example, we'll use OpenAI's model APIs.
LangChain을 사용하려면 일반적으로 하나 이상의 모델 공급자, 데이터 저장소, API 등과의 통합이 필요합니다. 이 예에서는 OpenAI의 모델 API를 사용합니다.
First we'll need to install their Python package:
먼저 Python 패키지를 설치해야 합니다.
pip install openai
Accessing the API requires an API key, which you can get by creating an account and headinghere. Once we have a key we'll want to set it as an environment variable by running:
API에 액세스하려면 API 키가 필요합니다. API 키는 계정을 생성하고 여기에서 얻을 수 있습니다. 키가 있으면 다음을 실행하여 이를 환경 변수로 설정하려고 합니다.
export OPENAI_API_KEY="..."
If you'd prefer not to set an environment variable you can pass the key in directly via theopenai_api_keynamed parameter when initiating the OpenAI LLM class:
환경 변수를 설정하지 않으려는 경우 OpenAI LLM 클래스를 시작할 때 openai_api_key라는 매개변수를 통해 직접 키를 전달할 수 있습니다.
from langchain.llms import OpenAI

llm = OpenAI(openai_api_key="...")
나는 아래 방법 이용함.
Building an application
Now we can start building our language model application. LangChain provides many modules that can be used to build language model applications. Modules can be used as stand-alones in simple applications and they can be combined for more complex use cases.
이제 언어 모델 애플리케이션 구축을 시작할 수 있습니다. LangChain은 언어 모델 애플리케이션을 구축하는 데 사용할 수 있는 많은 모듈을 제공합니다. 모듈은 간단한 애플리케이션에서 독립 실행형으로 사용할 수 있으며 더 복잡한 사용 사례에서는 결합할 수 있습니다.
The most common and most important chain that LangChain helps create contains three things:
LangChain이 생성하는 데 도움이 되는 가장 일반적이고 가장 중요한 체인에는 다음 세 가지가 포함됩니다.
LLM: The language model is the core reasoning engine here. In order to work with LangChain, you need to understand the different types of language models and how to work with them.
LLM: 언어 모델은 여기서 핵심 추론 엔진입니다. LangChain을 사용하려면 다양한 유형의 언어 모델과 이를 사용하는 방법을 이해해야 합니다.
Prompt Templates: This provides instructions to the language model. This controls what the language model outputs, so understanding how to construct prompts and different prompting strategies is crucial.
프롬프트 템플릿: 언어 모델에 대한 지침을 제공합니다. 이는 언어 모델의 출력을 제어하므로 프롬프트와 다양한 프롬프트 전략을 구성하는 방법을 이해하는 것이 중요합니다.
Output Parsers: These translate the raw response from the LLM to a more workable format, making it easy to use the output downstream.
출력 파서: LLM의 원시 응답을 보다 실행 가능한 형식으로 변환하여 출력 다운스트림을 쉽게 사용할 수 있도록 합니다.
In this getting started guide we will cover those three components by themselves, and then go over how to combine all of them. Understanding these concepts will set you up well for being able to use and customize LangChain applications. Most LangChain applications allow you to configure the LLM and/or the prompt used, so knowing how to take advantage of this will be a big enabler.
이 시작 가이드에서는 이 세 가지 구성 요소를 단독으로 다룬 다음 이 모든 구성 요소를 결합하는 방법을 살펴보겠습니다. 이러한 개념을 이해하면 LangChain 애플리케이션을 사용하고 사용자 정의하는 데 도움이 됩니다. 대부분의 LangChain 애플리케이션에서는 LLM 및/또는 사용되는 프롬프트를 구성할 수 있으므로 이를 활용하는 방법을 아는 것이 큰 도움이 될 것입니다.
LLMs
There are two types of language models, which in LangChain are called:
LangChain에는 두 가지 유형의 언어 모델이 있습니다.
LLMs: this is a language model which takes a string as input and returns a string
LLM: 문자열을 입력으로 받아 문자열을 반환하는 언어 모델입니다.
ChatModels: this is a language model which takes a list of messages as input and returns a message
ChatModels: 메시지 목록을 입력으로 받아 메시지를 반환하는 언어 모델입니다.
The input/output for LLMs is simple and easy to understand - a string. But what about ChatModels? The input there is a list ofChatMessages, and the output is a singleChatMessage. AChatMessagehas two required components:
LLM의 입력/출력은 간단하고 이해하기 쉽습니다. 즉, 문자열입니다. 하지만 ChatModel은 어떻습니까? 입력에는 ChatMessage 목록이 있고 출력은 단일 ChatMessage입니다. ChatMessage에는 두 가지 필수 구성 요소가 있습니다.
content: This is the content of the message 메시지의 내용입니다..
role: This is the role of the entity from which theChatMessageis coming from. ChatMessage가 나오는 엔터티의 역할입니다.
LangChain provides several objects to easily distinguish between different roles:
LangChain은 서로 다른 역할을 쉽게 구별할 수 있는 여러 개체를 제공합니다.
HumanMessage: AChatMessagecoming from a human/user.
AIMessage: AChatMessagecoming from an AI/assistant.
SystemMessage: AChatMessagecoming from the system.
FunctionMessage: AChatMessagecoming from a function call.
If none of those roles sound right, there is also aChatMessageclass where you can specify the role manually. For more information on how to use these different messages most effectively, see our prompting guide.
이러한 역할 중 어느 것도 적절하지 않은 경우 역할을 수동으로 지정할 수 있는 ChatMessage 클래스도 있습니다. 이러한 다양한 메시지를 가장 효과적으로 사용하는 방법에 대한 자세한 내용은 메시지 안내 가이드를 참조하세요.
LangChain provides a standard interface for both, but it's useful to understand this difference in order to construct prompts for a given language model. The standard interface that LangChain provides has two methods:
LangChain은 두 가지 모두에 대한 표준 인터페이스를 제공하지만 주어진 언어 모델에 대한 프롬프트를 구성하려면 이러한 차이점을 이해하는 것이 유용합니다. LangChain이 제공하는 표준 인터페이스에는 두 가지 방법이 있습니다.
predict: Takes in a string, returns a string 문자열을 받아 문자열을 반환합니다.
predict_messages: Takes in a list of messages, returns a message. 메시지 목록을 가져와 메시지를 반환합니다.
Let's see how to work with these different types of models and these different types of inputs. First, let's import an LLM and a ChatModel.
이러한 다양한 유형의 모델과 다양한 유형의 입력을 사용하여 작업하는 방법을 살펴보겠습니다. 먼저 LLM과 ChatModel을 가져오겠습니다.
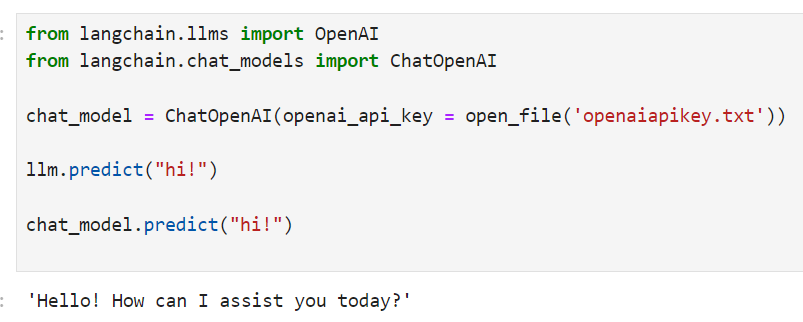
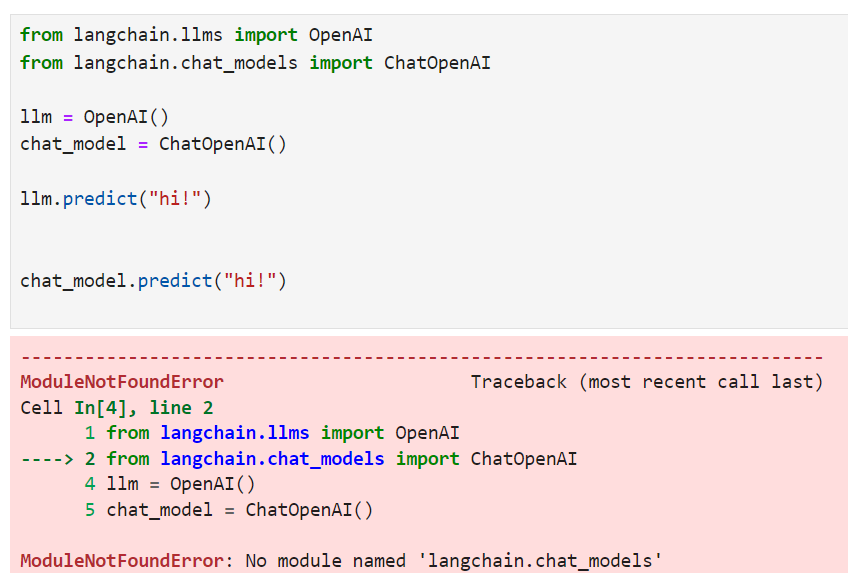
from langchain.llms import OpenAI
from langchain.chat_models import ChatOpenAI

llm = OpenAI()
chat_model = ChatOpenAI()

llm.predict("hi!")
>>> "Hi"

chat_model.predict("hi!")
>>> "Hi"
Note) 아래와 같은 에러메시지가 나오면 Langchain을 최신 버전으로 업그레이드 합니다.
pip install langchain --upgrade
TheOpenAIandChatOpenAIobjects are basically just configuration objects. You can initialize them with parameters liketemperatureand others, and pass them around.
OpenAI 및 ChatOpenAI 개체는 기본적으로 구성 개체입니다. temperature 및 기타 매개변수로 초기화하고 전달할 수 있습니다.
Next, let's use thepredictmethod to run over a string input.
다음으로 예측 메서드를 사용하여 문자열 입력을 실행해 보겠습니다.
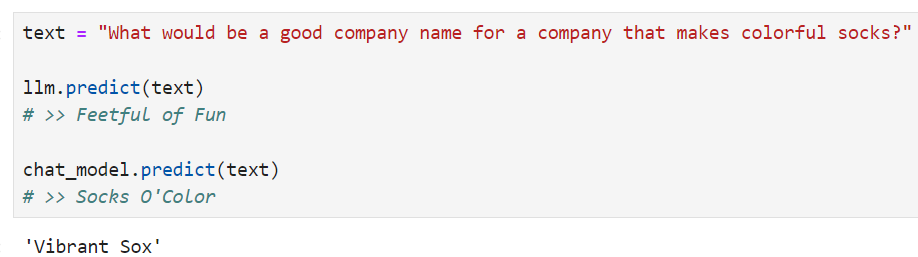
text = "What would be a good company name for a company that makes colorful socks?"

llm.predict(text)
# >> Feetful of Fun

chat_model.predict(text)
# >> Socks O'Color
Finally, let's use thepredict_messagesmethod to run over a list of messages.
마지막으로 Predict_messages 메서드를 사용하여 메시지 목록을 살펴보겠습니다.
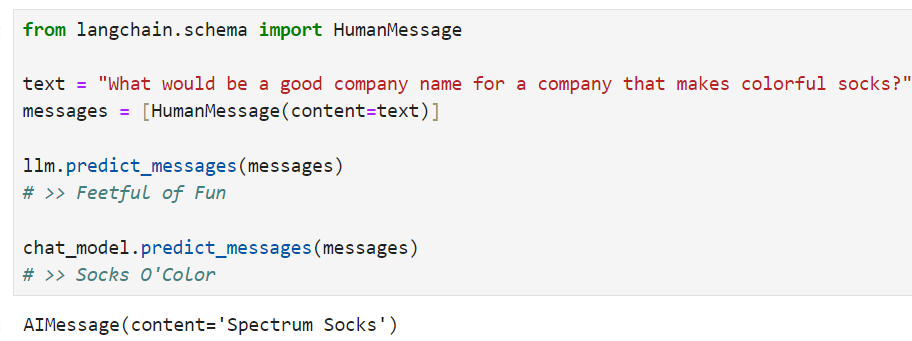
from langchain.schema import HumanMessage

text = "What would be a good company name for a company that makes colorful socks?"
messages = [HumanMessage(content=text)]

llm.predict_messages(messages)
# >> Feetful of Fun

chat_model.predict_messages(messages)
# >> Socks O'Color
For both these methods, you can also pass in parameters as keyword arguments. For example, you could pass intemperature=0to adjust the temperature that is used from what the object was configured with. Whatever values are passed in during run time will always override what the object was configured with.
두 가지 방법 모두 매개변수를 키워드 인수로 전달할 수도 있습니다. 예를 들어, 온도=0을 전달하여 객체 구성에 사용되는 온도를 조정할 수 있습니다. 런타임 중에 전달되는 값은 항상 개체 구성을 재정의합니다.
Prompt templates
Most LLM applications do not pass user input directly into an LLM. Usually they will add the user input to a larger piece of text, called a prompt template, that provides additional context on the specific task at hand.
대부분의 LLM 응용 프로그램은 사용자 입력을 LLM에 직접 전달하지 않습니다. 일반적으로 그들은 현재 특정 작업에 대한 추가 컨텍스트를 제공하는 프롬프트 템플릿이라는 더 큰 텍스트에 사용자 입력을 추가합니다.
In the previous example, the text we passed to the model contained instructions to generate a company name. For our application, it'd be great if the user only had to provide the description of a company/product, without having to worry about giving the model instructions.
이전 예에서 모델에 전달한 텍스트에는 회사 이름을 생성하는 지침이 포함되어 있습니다. 우리 애플리케이션의 경우 사용자가 모델 지침을 제공하는 것에 대해 걱정할 필요 없이 회사/제품에 대한 설명만 제공하면 좋을 것입니다.
PromptTemplates help with exactly this! They bundle up all the logic for going from user input into a fully formatted prompt. This can start off very simple - for example, a prompt to produce the above string would just be:
PromptTemplate이 바로 이 작업에 도움이 됩니다! 사용자 입력을 완전히 형식화된 프롬프트로 전환하기 위한 모든 논리를 묶습니다. 이는 매우 간단하게 시작할 수 있습니다. 예를 들어 위 문자열을 생성하라는 프롬프트는 다음과 같습니다.
from langchain.prompts import PromptTemplate

prompt = PromptTemplate.from_template("What is a good name for a company that makes {product}?")
prompt.format(product="colorful socks")
What is a good name for a company that makes colorful socks?
However, the advantages of using these over raw string formatting are several. You can "partial" out variables - e.g. you can format only some of the variables at a time. You can compose them together, easily combining different templates into a single prompt. For explanations of these functionalities, see thesection on promptsfor more detail.
그러나 원시 문자열 형식화에 비해 이를 사용하면 여러 가지 장점이 있습니다. 변수를 "부분적으로" 출력할 수 있습니다. 한 번에 일부 변수만 형식화할 수 있습니다. 다양한 템플릿을 하나의 프롬프트로 쉽게 결합하여 함께 구성할 수 있습니다. 이러한 기능에 대한 설명은 프롬프트 섹션을 참조하세요.
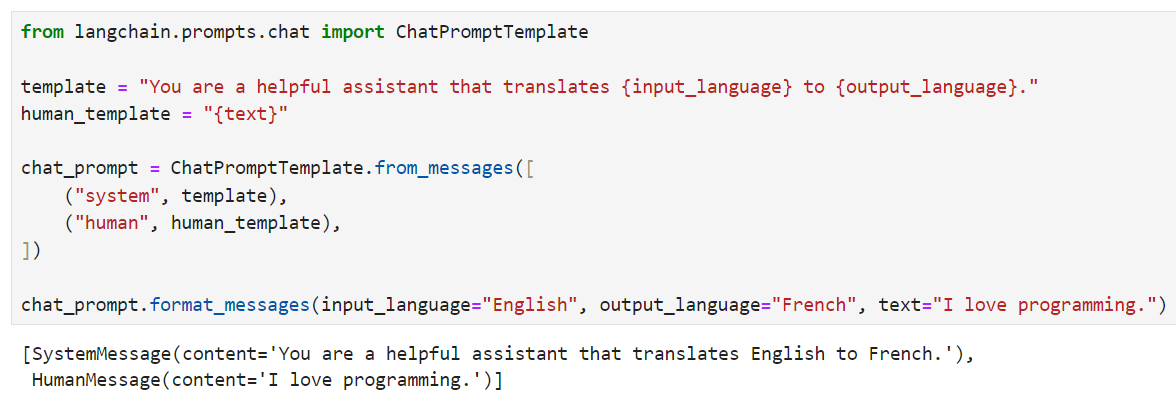
PromptTemplates can also be used to produce a list of messages. In this case, the prompt not only contains information about the content, but also each message (its role, its position in the list, etc) Here, what happens most often is a ChatPromptTemplate is a list of ChatMessageTemplates. Each ChatMessageTemplate contains instructions for how to format that ChatMessage - its role, and then also its content. Let's take a look at this below:
PromptTemplate을 사용하여 메시지 목록을 생성할 수도 있습니다. 이 경우 프롬프트에는 콘텐츠에 대한 정보뿐만 아니라 각 메시지(해당 역할, 목록에서의 위치 등)도 포함됩니다. 여기서 가장 자주 발생하는 것은 ChatPromptTemplate이 ChatMessageTemplate의 목록이라는 것입니다. 각 ChatMessageTemplate에는 해당 ChatMessage(해당 역할 및 콘텐츠)의 형식을 지정하는 방법에 대한 지침이 포함되어 있습니다. 아래에서 이에 대해 살펴보겠습니다.
from langchain.prompts.chat import ChatPromptTemplate

template = "You are a helpful assistant that translates {input_language} to {output_language}."
human_template = "{text}"

chat_prompt = ChatPromptTemplate.from_messages([
    ("system", template),
    ("human", human_template),
])

chat_prompt.format_messages(input_language="English", output_language="French", text="I love programming.")
[
    SystemMessage(content="You are a helpful assistant that translates English to French.", additional_kwargs={}),
    HumanMessage(content="I love programming.")
]
Output parsers
OutputParsers convert the raw output of an LLM into a format that can be used downstream. There are few main type of OutputParsers, including:
OutputParser는 LLM의 원시 출력을 다운스트림에서 사용할 수 있는 형식으로 변환합니다. 다음을 포함하여 몇 가지 주요 유형의 OutputParser가 있습니다.
Convert text from LLM -> structured information (e.g. JSON)
LLM에서 텍스트 변환 -> 구조화된 정보(예: JSON)
Convert a ChatMessage into just a string
ChatMessage를 문자열로 변환
Convert the extra information returned from a call besides the message (like OpenAI function invocation) into a string.
메시지(예: OpenAI 함수 호출) 외에 호출에서 반환된 추가 정보를 문자열로 변환합니다.
In this getting started guide, we will write our own output parser - one that converts a comma separated list into a list.
이 시작 가이드에서는 쉼표로 구분된 목록을 목록으로 변환하는 자체 출력 구문 분석기를 작성합니다.
from langchain.schema import BaseOutputParser

class CommaSeparatedListOutputParser(BaseOutputParser):
    """Parse the output of an LLM call to a comma-separated list."""


    def parse(self, text: str):
        """Parse the output of an LLM call."""
        return text.strip().split(", ")

CommaSeparatedListOutputParser().parse("hi, bye")
# >> ['hi', 'bye']
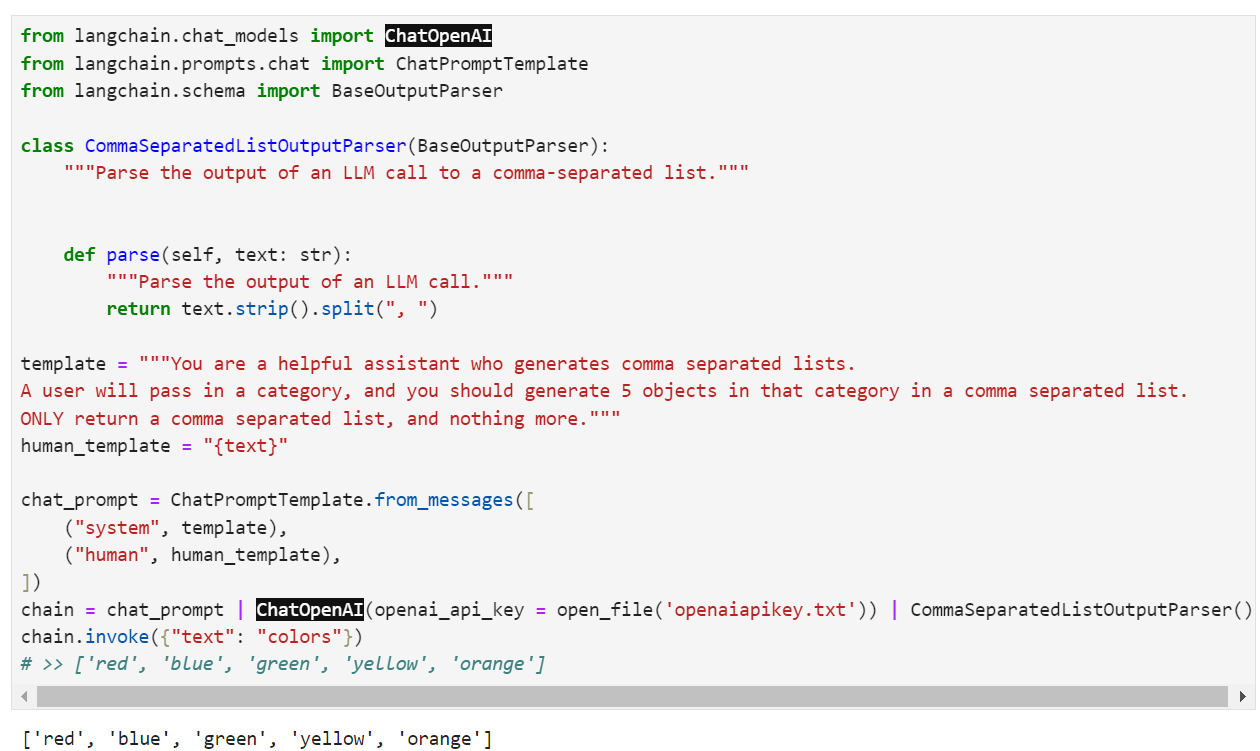
PromptTemplate + LLM + OutputParser
We can now combine all these into one chain. This chain will take input variables, pass those to a prompt template to create a prompt, pass the prompt to a language model, and then pass the output through an (optional) output parser. This is a convenient way to bundle up a modular piece of logic. Let's see it in action!
이제 이 모든 것을 하나의 체인으로 결합할 수 있습니다. 이 체인은 입력 변수를 가져와 프롬프트 템플릿에 전달하여 프롬프트를 생성하고, 프롬프트를 언어 모델에 전달한 다음 (선택 사항) 출력 구문 분석기를 통해 출력을 전달합니다. 이는 모듈식 로직 조각을 묶는 편리한 방법입니다. 실제로 확인해 봅시다!
from langchain.chat_models import ChatOpenAI
from langchain.prompts.chat import ChatPromptTemplate
from langchain.schema import BaseOutputParser

class CommaSeparatedListOutputParser(BaseOutputParser):
    """Parse the output of an LLM call to a comma-separated list."""


    def parse(self, text: str):
        """Parse the output of an LLM call."""
        return text.strip().split(", ")

template = """You are a helpful assistant who generates comma separated lists.
A user will pass in a category, and you should generate 5 objects in that category in a comma separated list.
ONLY return a comma separated list, and nothing more."""
human_template = "{text}"

chat_prompt = ChatPromptTemplate.from_messages([
    ("system", template),
    ("human", human_template),
])
chain = chat_prompt | ChatOpenAI() | CommaSeparatedListOutputParser()
chain.invoke({"text": "colors"})
# >> ['red', 'blue', 'green', 'yellow', 'orange']
Note that we are using the|syntax to join these components together. This|syntax is called the LangChain Expression Language. To learn more about this syntax, read the documentationhere.
우리는 | 이러한 구성 요소를 함께 결합하는 구문입니다. 이 | 구문을 LangChain 표현 언어라고 합니다. 이 구문에 대해 자세히 알아보려면 여기에서 설명서를 읽어보세요.
This is it! We've now gone over how to create the core building block of LangChain applications. There is a lot more nuance in all these components (LLMs, prompts, output parsers) and a lot more different components to learn about as well. To continue on your journey:
여기까지 입니다! 이제 우리는 LangChain 애플리케이션의 핵심 빌딩 블록을 생성하는 방법을 살펴보았습니다. 이러한 모든 구성 요소(LLM, 프롬프트, 출력 구문 분석기)에는 훨씬 더 많은 미묘한 차이가 있으며, 배워야 할 구성 요소도 훨씬 더 많습니다. 여행을 계속하려면:
This will install the bare minimum requirements of LangChain. A lot of the value of LangChain comes when integrating it with various model providers, datastores, etc. By default, the dependencies needed to do that are NOT installed. However, there are two other ways to install LangChain that do bring in those dependencies.
LangChain의 최소 요구 사항을 설치하겠습니다. LangChain의 많은 가치는 LangChain을 다양한 모델 공급자, 데이터 저장소 등과 통합할 때 발생합니다. 기본적으로 이를 수행하는 데 필요한 종속성은 설치되지 않습니다. 그러나 이러한 종속성을 가져오는 LangChain을 설치하는 다른 두 가지 방법이 있습니다.
To install modules needed for the common LLM providers, run:
일반 LLM 공급자에 필요한 모듈을 설치하려면 다음을 실행하세요.
pip install langchain[llms]
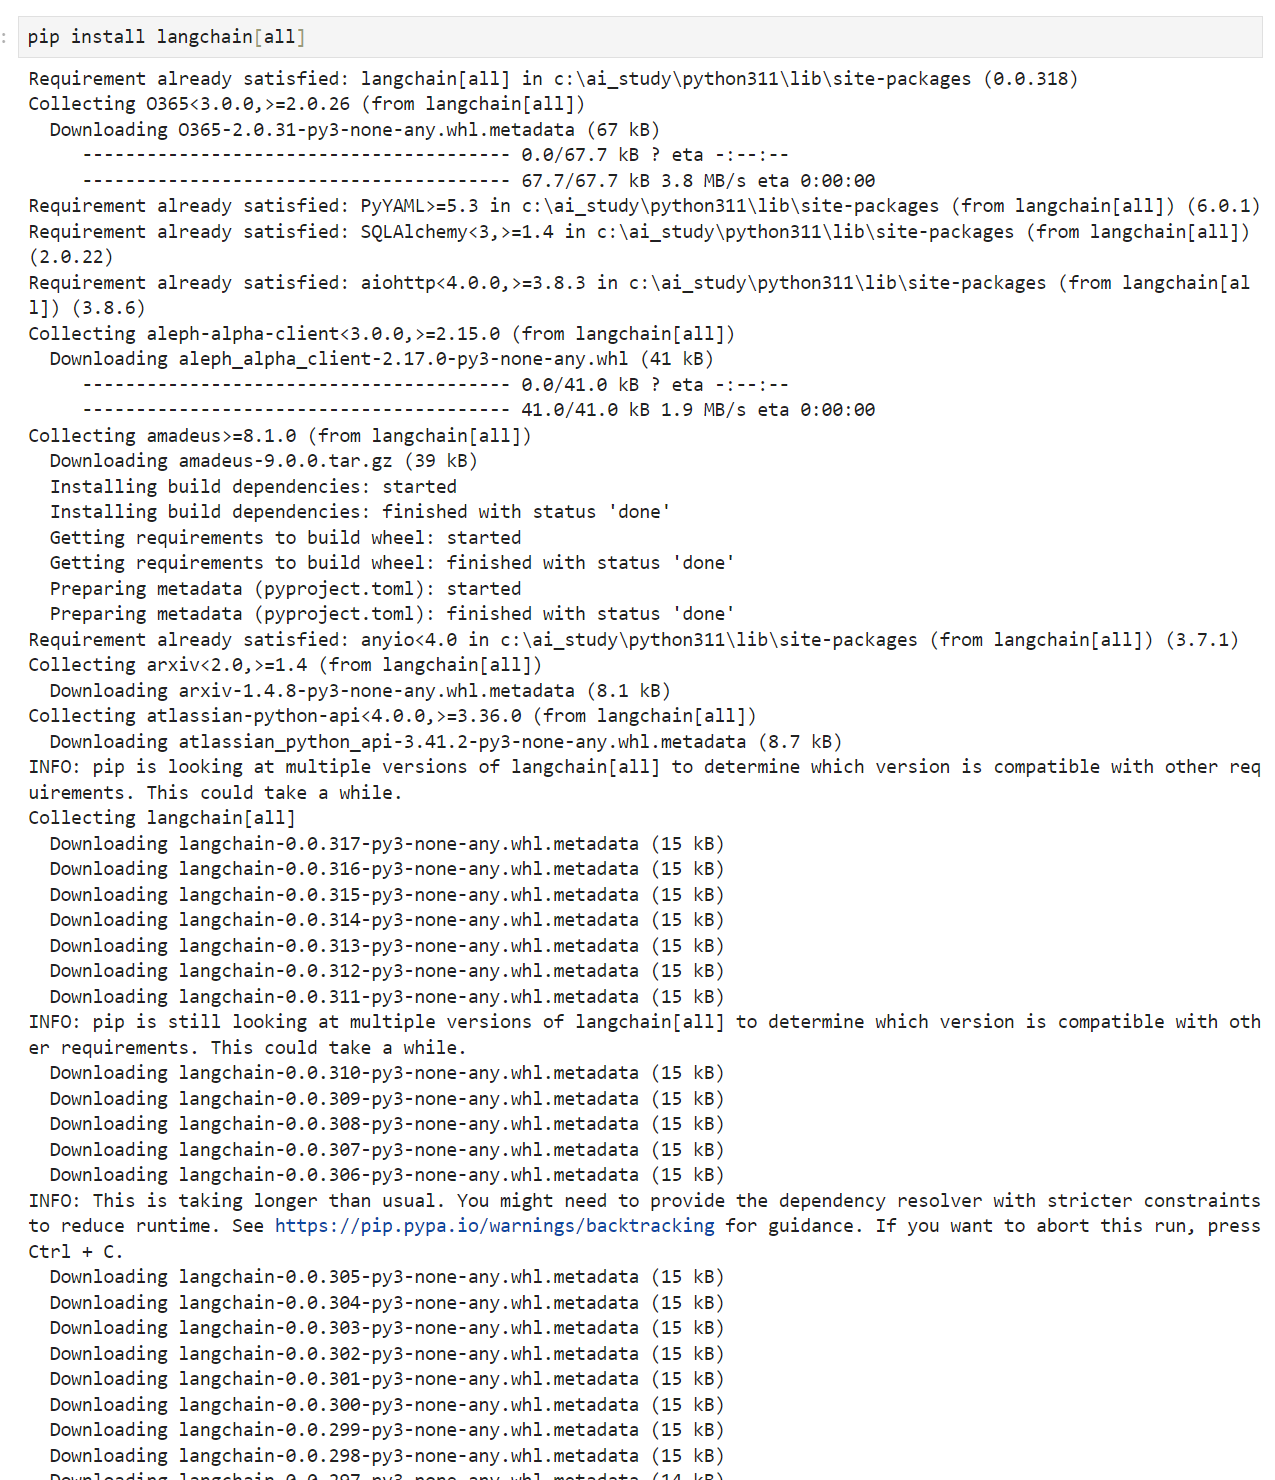
To install all modules needed for all integrations, run:
모든 통합에 필요한 모든 모듈을 설치하려면 다음을 실행하세요.
pip install langchain[all]
Note that if you are usingzsh, you'll need to quote square brackets when passing them as an argument to a command, for example:
zsh를 사용하는 경우 명령에 대한 인수로 전달할 때 대괄호를 인용해야 합니다. 예를 들면 다음과 같습니다.
pip install 'langchain[all]'
If you want to install from source, you can do so by cloning the repo and be sure that the directory isPATH/TO/REPO/langchain/libs/langchainrunning:
소스에서 설치하려면 repo를 복제하여 설치할 수 있으며 디렉터리가 PATH/TO/REPO/langchain/libs/langchain이 실행 중인지 확인하세요.
LangChainis a framework for developing applications powered by language models. It enables applications that:
LangChain은 언어 모델을 기반으로 하는 애플리케이션을 개발하기 위한 프레임워크입니다. 이는 다음과 같은 애플리케이션을 가능하게 합니다.
Are context-aware: connect a language model to sources of context (prompt instructions, few shot examples, content to ground its response in, etc.)
상황 인식: 언어 모델을 상황 소스( prompt instructions, few shot examples, content to ground its response in, etc. )에 연결합니다.
Reason: rely on a language model to reason (about how to answer based on provided context, what actions to take, etc.)
이유: 추론하기 위해 언어 모델에 의존합니다(제공된 맥락에 따라 대답하는 방법, 취해야 할 조치 등에 대해).
The main value props of LangChain are:
LangChain의 주요 가치 제안은 다음과 같습니다:
Components: abstractions for working with language models, along with a collection of implementations for each abstraction. Components are modular and easy-to-use, whether you are using the rest of the LangChain framework or not
구성요소: 각 추상화에 대한 구현 모음과 함께 언어 모델 작업을 위한 추상화입니다. LangChain 프레임워크의 나머지 부분을 사용하는지 여부에 관계없이 구성 요소는 모듈식이며 사용하기 쉽습니다.
Off-the-shelf chains: a structured assembly of components for accomplishing specific higher-level tasks
기성품 체인: 특정 상위 수준 작업을 수행하기 위한 구성 요소의 구조화된 어셈블리
Off-the-shelf chains make it easy to get started. For complex applications, components make it easy to customize existing chains and build new ones.
기성품 체인을 사용하면 쉽게 시작할 수 있습니다. 복잡한 애플리케이션의 경우 구성요소를 사용하면 기존 체인을 쉽게 맞춤화하고 새 체인을 구축할 수 있습니다.
LangChain is part of a rich ecosystem of tools that integrate with our framework and build on top of it. Check out our growing list ofintegrationsanddependent repos.
LangChain은 우리의 프레임워크와 통합되고 그 위에 구축되는 풍부한 도구 생태계의 일부입니다. 점점 늘어나는 통합 및 종속 저장소 목록을 확인하세요.
Our community is full of prolific developers, creative builders, and fantastic teachers. Check outYouTube tutorialsfor great tutorials from folks in the community, andGalleryfor a list of awesome LangChain projects, compiled by the folks atKyroLabs.
우리 커뮤니티는 활발한 개발자, 창의적인 개발자, 환상적인 교사로 가득 차 있습니다. YouTube 튜토리얼에서 커뮤니티 사람들의 훌륭한 튜토리얼을 확인하고 갤러리에서 KyroLabs 사람들이 편집한 멋진 LangChain 프로젝트 목록을 확인하세요.
While we cannot possibly introduce every single PyTorch function and class (and the information might become outdated quickly), theAPI documentationand additionaltutorialsand examples provide such documentation. This section provides some guidance for how to explore the PyTorch API.
PyTorch의 모든 기능과 클래스를 모두 소개할 수는 없지만(정보가 빨리 구식이 될 수 있음) API 문서와 추가 튜토리얼 및 예제에서 이러한 문서를 제공합니다. 이 섹션에서는 PyTorch API를 탐색하는 방법에 대한 몇 가지 지침을 제공합니다.
import torch
2.7.1.Functions and Classes in a Module
To know which functions and classes can be called in a module, we invoke thedirfunction. For instance, we can query all properties in the module for generating random numbers:
모듈에서 어떤 함수와 클래스를 호출할 수 있는지 알기 위해 dir 함수를 호출합니다. 예를 들어 난수 생성을 위해 모듈의 모든 속성을 쿼리할 수 있습니다.
print(dir(torch.distributions))
주어진 코드는 PyTorch에서 확률 분포와 관련된 클래스와 함수를 탐색하기 위해 사용되는 코드입니다. 코드는 PyTorch의 torch 라이브러리를 사용하며, torch.Distributions 모듈 아래에 있는 클래스와 함수를 나열합니다. 아래는 코드의 설명입니다:
import torch: PyTorch 라이브러리를 임포트합니다. PyTorch는 딥 러닝 및 확률적 모델링을 위한 라이브러리로 널리 사용됩니다.
print(dir(torch.Distributions)): torch.Distributions 모듈 아래에 있는 클래스와 함수를 나열하고 출력합니다. 이 명령은 해당 모듈에 포함된 모든 객체 및 함수의 이름을 보여줍니다. 이를 통해 PyTorch에서 제공하는 확률 분포와 관련된 클래스와 함수의 리스트를 확인할 수 있습니다.
PyTorch의 torch.Distributions 모듈에는 다양한 확률 분포를 다루는 클래스와 함수가 포함되어 있으며, 이러한 분포를 사용하여 확률적 모델링을 수행할 수 있습니다. 이 코드를 실행하면 해당 모듈의 내용을 확인할 수 있으며, 확률 분포와 관련된 작업을 수행할 때 유용한 클래스와 함수를 찾을 수 있습니다.
Generally, we can ignore functions that start and end with__(special objects in Python) or functions that start with a single_(usually internal functions). Based on the remaining function or attribute names, we might hazard a guess that this module offers various methods for generating random numbers, including sampling from the uniform distribution (uniform), normal distribution (normal), and multinomial distribution (multinomial).
일반적으로 __(파이썬의 특수 객체)로 시작하고 끝나는 함수나 단일 _(일반적으로 내부 함수)로 시작하는 함수를 무시할 수 있습니다. 나머지 함수 또는 속성 이름을 기반으로 이 모듈이 균일 분포(균일), 정규 분포(정규) 및 다항 분포(다항)로부터의 샘플링을 포함하여 난수를 생성하는 다양한 방법을 제공한다고 추측할 수 있습니다.
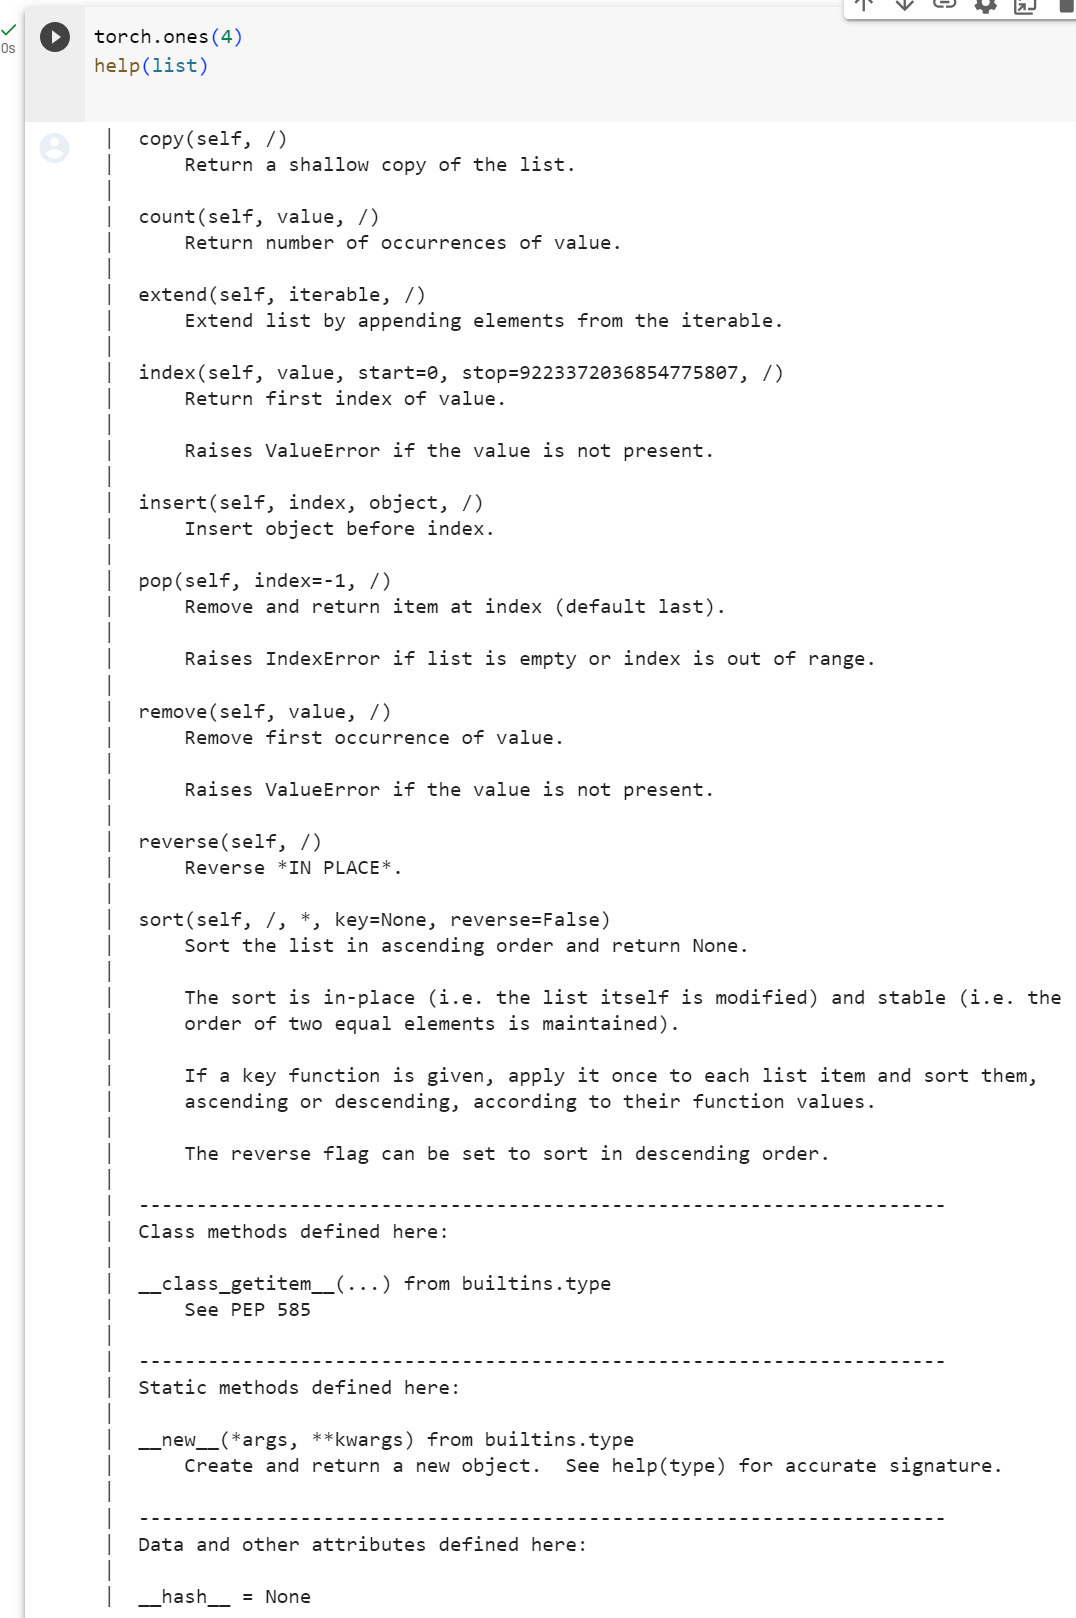
2.7.2.Specific Functions and Classes
For specific instructions on how to use a given function or class, we can invoke thehelpfunction. As an example, let’s explore the usage instructions for tensors’onesfunction.
주어진 함수나 클래스를 사용하는 방법에 대한 구체적인 지침을 보려면 도움말 함수를 호출할 수 있습니다. 예를 들어, 텐서의 함수에 대한 사용 지침을 살펴보겠습니다.
help(torch.ones)
주어진 코드는 PyTorch에서 torch.Ones 함수에 대한 도움말 문서를 출력하는 코드입니다. help() 함수는 파이썬 내장 함수로, 주어진 객체나 함수에 대한 도움말 문서를 출력합니다. 아래는 코드의 설명입니다:
help(torch.Ones): 이 코드는 PyTorch의 torch.Ones 함수에 대한 도움말을 요청합니다. torch.Ones 함수는 텐서를 생성하며, 모든 요소가 1인 텐서를 생성합니다. 이 함수의 도움말 문서에는 함수의 사용법, 매개변수, 반환값 등에 대한 정보가 포함되어 있을 것입니다.
도움말 문서는 함수나 클래스의 사용법을 이해하고 해당 함수 또는 클래스를 효과적으로 활용하기 위해 유용한 정보를 제공합니다. PyTorch와 같은 라이브러리의 도움말 문서를 읽어보면 함수나 클래스의 매개변수와 반환값에 대한 이해를 높일 수 있으며, 코드를 개발하고 디버그하는 데 도움이 됩니다.
Help on built-in function ones in module torch:

ones(...)
    ones(*size, *, out=None, dtype=None, layout=torch.strided, device=None, requires_grad=False) -> Tensor

    Returns a tensor filled with the scalar value `1`, with the shape defined
    by the variable argument :attr:`size`.

    Args:
        size (int...): a sequence of integers defining the shape of the output tensor.
            Can be a variable number of arguments or a collection like a list or tuple.

    Keyword arguments:
        out (Tensor, optional): the output tensor.
        dtype (:class:`torch.dtype`, optional): the desired data type of returned tensor.
            Default: if ``None``, uses a global default (see :func:`torch.set_default_tensor_type`).
        layout (:class:`torch.layout`, optional): the desired layout of returned Tensor.
            Default: ``torch.strided``.
        device (:class:`torch.device`, optional): the desired device of returned tensor.
            Default: if ``None``, uses the current device for the default tensor type
            (see :func:`torch.set_default_tensor_type`). :attr:`device` will be the CPU
            for CPU tensor types and the current CUDA device for CUDA tensor types.
        requires_grad (bool, optional): If autograd should record operations on the
            returned tensor. Default: ``False``.

    Example::

        >>> torch.ones(2, 3)
        tensor([[ 1.,  1.,  1.],
                [ 1.,  1.,  1.]])

        >>> torch.ones(5)
        tensor([ 1.,  1.,  1.,  1.,  1.])
From the documentation, we can see that theonesfunction creates a new tensor with the specified shape and sets all the elements to the value of 1. Whenever possible, you should run a quick test to confirm your interpretation:
문서에서 ones 함수가 지정된 모양을 가진 새 텐서를 생성하고 모든 요소를 1의 값으로 설정하는 것을 볼 수 있습니다. 가능할 때마다 빠른 테스트를 실행하여 해석을 확인해야 합니다.
torch.ones(4)
주어진 코드는 PyTorch에서 torch.Ones(4)를 사용하여 모든 요소가 1로 초기화된 1차원 텐서를 생성하는 코드입니다. 아래는 코드의 설명입니다:
torch.Ones(4): 이 코드는 PyTorch에서 torch.Ones 함수를 호출하여 4개의 요소로 구성된 1차원 텐서를 생성합니다. torch.Ones 함수는 모든 요소가 1로 초기화된 텐서를 생성하는 함수입니다. 따라서 이 코드는 길이가 4이고 모든 요소가 1로 초기화된 1차원 텐서를 생성합니다.
이렇게 생성된 텐서는 PyTorch를 사용하여 다양한 수치 연산을 수행하는 데 사용할 수 있으며, 데이터 처리 및 머신 러닝 작업에서 유용하게 활용될 수 있습니다.
tensor([1., 1., 1., 1.])
In the Jupyter notebook, we can use?to display the document in another window. For example,list?will create content that is almost identical tohelp(list), displaying it in a new browser window. In addition, if we use two question marks, such aslist??, the Python code implementing the function will also be displayed.
Jupyter 노트북에서는? 문서를 다른 창에 표시하려면 예를 들어 목록? help(list)와 거의 동일한 콘텐츠를 생성하여 새 브라우저 창에 표시합니다. 또한 list??와 같은 물음표 두 개를 사용하면 해당 함수를 구현하는 Python 코드도 표시됩니다.
The official documentation provides plenty of descriptions and examples that are beyond this book. We emphasize important use cases that will get you started quickly with practical problems, rather than completeness of coverage. We also encourage you to study the source code of the libraries to see examples of high-quality implementations of production code. By doing this you will become a better engineer in addition to becoming a better scientist.
공식 문서는 이 책보다 더 많은 설명과 예제를 제공합니다. 우리는 적용 범위의 완전성보다는 실제 문제를 빠르게 시작할 수 있는 중요한 사용 사례를 강조합니다. 또한 프로덕션 코드의 고품질 구현 예를 보려면 라이브러리의 소스 코드를 연구하는 것이 좋습니다. 이렇게 함으로써 당신은 더 나은 과학자가 될 뿐만 아니라 더 나은 엔지니어가 될 것입니다.
One way or another, machine learning is all about uncertainty. In supervised learning, we want to predict something unknown (thetarget) given something known (thefeatures). Depending on our objective, we might attempt to predict the most likely value of the target. Or we might predict the value with the smallest expected distance from the target. And sometimes we wish not only to predict a specific value but toquantify our uncertainty. For example, given some features describing a patient, we might want to knowhow likelythey are to suffer a heart attack in the next year. In unsupervised learning, we often care about uncertainty. To determine whether a set of measurements are anomalous, it helps to know how likely one is to observe values in a population of interest. Furthermore, in reinforcement learning, we wish to develop agents that act intelligently in various environments. This requires reasoning about how an environment might be expected to change and what rewards one might expect to encounter in response to each of the available actions.
어떤 식으로든 머신러닝은 불확실성에 관한 것입니다. 지도 학습 supervised learning에서는 알려진 것(특성)을 고려하여 알려지지 않은 것(목표)을 예측하려고 합니다. 목표에 따라 목표의 가장 가능성 있는 값을 예측하려고 시도할 수도 있습니다. 또는 대상으로부터 예상되는 거리가 가장 작은 값을 예측할 수도 있습니다. 때로는 특정 값을 예측하는 것뿐만 아니라 불확실성을 정량화하고 싶을 때도 있습니다. 예를 들어, 환자를 설명하는 일부 특징이 주어지면 해당 환자가 내년에 심장마비를 겪을 가능성이 얼마나 되는지 알고 싶을 수 있습니다. 비지도 학습 unsupervised learning 에서는 종종 불확실성에 관심을 갖습니다. 일련의 측정값이 비정상적인지 여부를 확인하려면 관심 모집단에서 값을 관찰할 가능성이 얼마나 되는지 아는 것이 도움이 됩니다. 또한 강화학습 reinforcement learning 에서는 다양한 환경에서 지능적으로 행동하는 에이전트를 개발하고자 합니다. 이를 위해서는 환경이 어떻게 변할 것으로 예상되는지, 그리고 사용 가능한 각 조치에 대한 응답으로 어떤 보상을 받을 수 있는지에 대한 추론이 필요합니다.
Probabilityis the mathematical field concerned with reasoning under uncertainty. Given a probabilistic model of some process, we can reason about the likelihood of various events. The use of probabilities to describe the frequencies of repeatable events (like coin tosses) is fairly uncontroversial. In fact,frequentistscholars adhere to an interpretation of probability that appliesonlyto such repeatable events. By contrastBayesianscholars use the language of probability more broadly to formalize reasoning under uncertainty. Bayesian probability is characterized by two unique features: (i) assigning degrees of belief to non-repeatable events, e.g., what is theprobabilitythat a dam will collapse?; and (ii) subjectivity. While Bayesian probability provides unambiguous rules for how one should update their beliefs in light of new evidence, it allows for different individuals to start off with differentpriorbeliefs.Statisticshelps us to reason backwards, starting off with collection and organization of data and backing out to what inferences we might draw about the process that generated the data. Whenever we analyze a dataset, hunting for patterns that we hope might characterize a broader population, we are employing statistical thinking. Many courses, majors, theses, careers, departments, companies, and institutions have been devoted to the study of probability and statistics. While this section only scratches the surface, we will provide the foundation that you need to begin building models.
확률 Probability 은 불확실성 하에서 추론과 관련된 수학적 분야입니다. 일부 프로세스의 확률적 모델이 주어지면 다양한 이벤트가 발생할 가능성에 대해 추론할 수 있습니다. 반복 가능한 사건(예: 동전 던지기)의 빈도를 설명하기 위해 확률을 사용하는 것은 논란의 여지가 없습니다. 사실, 빈도주의 학자들은 그러한 반복 가능한 사건에만 적용되는 확률의 해석을 고수합니다. 대조적으로 베이지안 학자들은 불확실성 하에서 추론을 공식화하기 위해 확률이라는 언어를 보다 광범위하게 사용합니다. 베이지안 확률은 두 가지 고유한 특징이 특징입니다. (i) 반복 불가능한 사건에 대한 신뢰도 할당(예: 댐이 붕괴할 확률은 얼마입니까?) (ii) 주관성. 베이지안 확률은 새로운 증거에 비추어 자신의 믿음을 업데이트하는 방법에 대한 명확한 규칙을 제공하지만, 개인마다 다른 이전 믿음으로 시작할 수 있습니다. 통계는 데이터 수집 및 구성부터 시작하여 데이터를 생성한 프로세스에 대해 어떤 추론을 이끌어낼 수 있는지 역으로 추론하는 데 도움이 됩니다. 우리는 데이터 세트를 분석하고 더 광범위한 인구를 특징짓는 패턴을 찾을 때마다 통계적 사고를 사용합니다. 많은 과정, 전공, 논문, 경력, 학과, 회사 및 기관에서 확률과 통계 연구에 전념해 왔습니다. 이 섹션에서는 표면적인 내용만 다루지만 모델 구축을 시작하는 데 필요한 기초를 제공합니다.
%matplotlib inline
import random
import torch
from torch.distributions.multinomial import Multinomial
from d2l import torch as d2l
이 코드는 다음 작업을 수행하기 위해 필요한 라이브러리 및 설정을 가져오고 있습니다:
%matplotlib inline: 이는 IPython 환경에서 Matplotlib를 사용하여 그래프 및 이미지를 노트북에 직접 표시하도록 설정합니다. 즉, 그래프를 노트북 내에서 바로 볼 수 있도록 합니다.
random: Python의 기본 모듈로서, 무작위 수를 생성하는 데 사용됩니다.
torch: PyTorch 라이브러리입니다. 딥러닝 작업을 수행하는 데 사용됩니다.
Multinomial: PyTorch에서 제공하는 분포 클래스 중 하나인 다항 분포(Multinomial distribution)에 대한 모듈입니다. 다항 분포는 여러 범주 중 하나를 샘플링하는 확률 모델을 나타냅니다.
d2l: "Dive into Deep Learning" 프로젝트의 PyTorch 버전인 d2l(torch) 라이브러리입니다. 딥러닝 모델을 학습하고 시각화하는 데 도움이 되는 기능과 도구를 제공합니다.
이 코드는 딥러닝 모델을 구축하고 실험하기 위한 환경을 설정하는 데 사용될 수 있습니다.
2.6.1.A Simple Example: Tossing Coins
Imagine that we plan to toss a coin and want to quantify how likely we are to see heads (vs. tails). If the coin isfair, then both outcomes (heads and tails), are equally likely. Moreover if we plan to toss the coinntimes then the fraction of heads that weexpectto see should exactly match theexpectedfraction of tails. One intuitive way to see this is by symmetry: for every possible outcome withnhheads andnt=(n−nh)tails, there is an equally likely outcome withntheads andnhtails. Note that this is only possible if on average we expect to see1/2of tosses come up heads and1/2come up tails. Of course, if you conduct this experiment many times withn=1000000tosses each, you might never see a trial wherenh=ntexactly.
우리가 동전을 던질 계획을 세우고 앞면과 뒷면이 나올 확률을 정량화하고 싶다고 가정해 보세요. 동전이 공정하다면 두 가지 결과(앞면과 뒷면)의 확률은 동일합니다. 더욱이 동전을 n번 던질 계획이라면 우리가 볼 것으로 예상되는 앞면의 비율은 예상되는 뒷면의 비율과 정확히 일치해야 합니다. 이것을 보는 한 가지 직관적인 방법은 대칭을 이용하는 것입니다. nh개의 앞면과 nt=(n−nh)개의 꼬리가 있는 모든 가능한 결과에 대해 nt개의 앞면과 nh개의 꼬리가 있는 동일한 가능성의 결과가 있습니다. 이것은 평균적으로 던진 숫자 중 1/2이 앞면이 나오고 1/2이 뒷면이 나올 것으로 예상하는 경우에만 가능합니다. 물론 n=1000000번 던지기로 이 실험을 여러 번 수행하면 정확히 nh=nt인 실험을 결코 볼 수 없을 수도 있습니다.
Formally, the quantity1/2is called aprobabilityand here it captures the certainty with which any given toss will come up heads. Probabilities assign scores between0and1to outcomes of interest, calledevents. Here the event of interest isheadsand we denote the corresponding probabilityP(heads). A probability of1indicates absolute certainty (imagine a trick coin where both sides were heads) and a probability of0indicates impossibility (e.g., if both sides were tails). The frequenciesnh/nandnt/nare not probabilities but ratherstatistics. Probabilities aretheoreticalquantities that underly the data generating process. Here, the probability1/2is a property of the coin itself. By contrast, statistics areempiricalquantities that are computed as functions of the observed data. Our interests in probabilistic and statistical quantities are inextricably intertwined. We often design special statistics calledestimatorsthat, given a dataset, produceestimatesof model parameters such as probabilities. Moreover, when those estimators satisfy a nice property calledconsistency, our estimates will converge to the corresponding probability. In turn, these inferred probabilities tell about the likely statistical properties of data from the same population that we might encounter in the future.
공식적으로 1/2이라는 수량을 확률이라고 하며 여기서는 주어진 던지기에서 앞면이 나올 확실성을 포착합니다. 확률은 이벤트라고 하는 관심 결과에 0과 1 사이의 점수를 할당합니다. 여기서 관심 있는 이벤트는 앞면이고 해당 확률 P(앞면)를 나타냅니다. 확률 1은 절대적 확실성(양쪽이 앞면인 트릭 코인을 상상해 보세요)을 나타내고 확률 0은 불가능함(예: 양쪽이 뒷면인 경우)을 나타냅니다. 빈도 nh/n 및 nt/n은 확률이 아니라 통계입니다. 확률은 데이터 생성 프로세스의 기초가 되는 이론적 수량입니다. 여기서 확률 1/2은 코인 자체의 속성입니다. 대조적으로, 통계는 관찰된 데이터의 함수로 계산되는 경험적 수량입니다. 확률적 수량과 통계적 수량에 대한 우리의 관심은 서로 밀접하게 얽혀 있습니다. 우리는 주어진 데이터 세트에서 확률과 같은 모델 매개변수의 추정치를 생성하는 추정기라는 특수 통계를 설계하는 경우가 많습니다. 또한 이러한 추정기가 일관성이라는 좋은 속성을 충족하면 추정치가 해당 확률로 수렴됩니다. 결과적으로 이러한 추론된 확률은 우리가 미래에 접할 수 있는 동일한 모집단의 데이터에 대한 통계적 속성에 대해 알려줍니다.
Suppose that we stumbled upon a real coin for which we did not know the trueP(heads). To investigate this quantity with statistical methods, we need to (i) collect some data; and (ii) design an estimator. Data acquisition here is easy; we can toss the coin many times and record all the outcomes. Formally, drawing realizations from some underlying random process is calledsampling. As you might have guessed, one natural estimator is the ratio of the number of observedheadsto the total number of tosses.
우리가 실제 P(앞면)를 알지 못하는 실제 동전을 우연히 발견했다고 가정해 보십시오. 통계적 방법으로 이 수량을 조사하려면 (i) 일부 데이터를 수집해야 합니다. (ii) 추정기를 설계합니다. 여기서 데이터 수집은 쉽습니다. 동전을 여러 번 던지고 모든 결과를 기록할 수 있습니다. 공식적으로는 일부 기본 무작위 프로세스에서 구현한 그림을 샘플링이라고 합니다. 짐작할 수 있듯이 자연 추정량 중 하나는 총 던지기 횟수에 대한 관찰된 앞면 숫자의 비율입니다.
Now, suppose that the coin was in fact fair, i.e.,P(heads)=0.5. To simulate tosses of a fair coin, we can invoke any random number generator. There are some easy ways to draw samples of an event with probability0.5. For example Python’srandom.randomyields numbers in the interval[0,1]where the probability of lying in any sub-interval[a,b]⊂[0,1]is equal tob−a. Thus we can get out0and1with probability0.5each by testing whether the returned float number is greater than0.5:
이제 동전이 실제로 공정했다고 가정합니다. 즉, P(heads)=0.5입니다. 공정한 동전 던지기를 시뮬레이션하기 위해 난수 생성기를 호출할 수 있습니다. 확률이 0.5인 사건의 샘플을 추출하는 몇 가지 쉬운 방법이 있습니다. 예를 들어 Python의 random.random은 하위 구간 [a,b]⊂[0,1]에 속할 확률이 b−a와 같은 구간 [0,1]의 숫자를 생성합니다. 따라서 반환된 부동 소수점 숫자가 0.5보다 큰지 테스트하여 각각 0.5 확률로 0과 1을 얻을 수 있습니다.
num_tosses = 100: num_tosses라는 변수를 정의하고 100으로 설정합니다. 이는 동전을 100번 던지겠다는 것을 나타냅니다.
heads = sum([random.random() > 0.5 for _ in range(num_tosses)]): heads 변수는 동전 던지기 실험에서 앞면(heads)이 나온 횟수를 나타냅니다. 리스트 내포(list comprehension)를 사용하여 0.5보다 큰 임의의 숫자(0~1 범위)를 100번 생성하고, 이 숫자가 0.5보다 크면(True인 경우), random.random() > 0.5는 1(참)이 됩니다. 그리고 sum() 함수를 사용하여 1의 개수를 세어 앞면(heads) 횟수를 계산합니다.
tails = num_tosses - heads: tails 변수는 동전 던지기 실험에서 뒷면(tails)이 나온 횟수를 나타냅니다. 전체 던진 횟수(num_tosses)에서 앞면(heads) 횟수를 뺌으로써 얻습니다.
이 코드는 무작위로 동전을 100번 던진 후 앞면(heads)과 뒷면(tails)이 나오는 횟수를 계산하고 출력합니다. 결과는 매번 다를 수 있으며, 대략적으로 동전 던지기의 확률을 시뮬레이션합니다.
heads, tails: [44, 56]
More generally, we can simulate multiple draws from any variable with a finite number of possible outcomes (like the toss of a coin or roll of a die) by calling the multinomial function, setting the first argument to the number of draws and the second as a list of probabilities associated with each of the possible outcomes. To simulate ten tosses of a fair coin, we assign probability vector[0.5,0.5], interpreting index 0 as heads and index 1 as tails. The function returns a vector with length equal to the number of possible outcomes (here, 2), where the first component tells us the number of occurrences of heads and the second component tells us the number of occurrences of tails.
보다 일반적으로, 다항 함수를 호출하고 첫 번째 인수를 무승부 횟수로 설정하고 두 번째 인수를 가능한 각 결과와 관련된 확률 목록입니다. 공정한 동전 던지기 10회를 시뮬레이션하기 위해 확률 벡터 [0.5, 0.5]를 할당하여 인덱스 0을 앞면으로 해석하고 인덱스 1을 뒷면으로 해석합니다. 이 함수는 가능한 결과 수(여기서는 2)와 동일한 길이의 벡터를 반환합니다. 여기서 첫 번째 구성 요소는 앞면이 나타나는 횟수를 나타내고 두 번째 구성 요소는 꼬리가 나타나는 횟수를 알려줍니다.
이 코드는 다수의 동전 던지기 실험을 시뮬레이션하는 데 사용됩니다. 코드를 간단히 설명하겠습니다:
fair_probs = torch.tensor([0.5, 0.5]): fair_probs는 각 동전이 앞면(heads) 또는 뒷면(tails)을 나올 확률을 나타내는 텐서입니다. 여기서 [0.5, 0.5]는 공평한(fair) 동전을 나타내며, 앞면과 뒷면이 나올 확률이 각각 50%입니다.
Multinomial(100, fair_probs): 이 부분은 Multinomial 분포에서 무작위 표본(sample)을 생성하는데 사용됩니다. 100은 시행 횟수, fair_probs는 각 결과(앞면 또는 뒷면)가 나올 확률을 나타내는 확률 분포입니다.
.sample(): 이 메서드는 Multinomial 분포를 따르는 난수 생성을 수행합니다. 여기서는 100번의 동전 던지기 시뮬레이션을 수행하며, 각 시행에서 앞면 또는 뒷면이 나오는 횟수를 반환합니다.
결과로 나오는 텐서는 [heads_count, tails_count]와 같은 형태를 가지며, heads_count는 앞면이 나온 횟수, tails_count는 뒷면이 나온 횟수를 나타냅니다. 위의 fair_probs에서는 공평한 동전을 사용했으므로, heads_count와 tails_count는 대략적으로 50, 50이 될 것입니다.하지만 시뮬레이션 결과는 무작위성에 의해 실제로는 다를 수 있습니다.
tensor([50., 50.])
Each time you run this sampling process, you will receive a new random value that may differ from the previous outcome. Dividing by the number of tosses gives us thefrequencyof each outcome in our data. Note that these frequencies, just like the probabilities that they are intended to estimate, sum to1.
이 샘플링 프로세스를 실행할 때마다 이전 결과와 다를 수 있는 새로운 임의 값을 받게 됩니다. 던지는 횟수로 나누면 데이터의 각 결과 빈도를 알 수 있습니다. 추정하려는 확률과 마찬가지로 이러한 빈도의 합은 1이 됩니다.
Multinomial(100, fair_probs).sample() / 100
이 코드는 앞면(heads)과 뒷면(tails)이 나오는 확률이 0.5로 동일한 공평한 동전을 100번 던진 후에 각 결과의 상대 빈도를 계산합니다. 코드를 설명하겠습니다.
Multinomial(100, fair_probs): 이 부분은 Multinomial 분포에서 100번의 시행을 수행하여 무작위로 결과를 샘플링합니다. 100은 시행 횟수이고, fair_probs는 각 결과(앞면 또는 뒷면)가 나올 확률을 나타내는 확률 분포입니다.
.sample(): 이 메서드는 Multinomial 분포를 따르는 난수 생성을 수행합니다. 따라서 이 부분의 결과는 [heads_count, tails_count]와 같은 형태의 텐서로, heads_count는 앞면이 나오는 횟수, tails_count는 뒷면이 나오는 횟수를 나타냅니다.
/ 100: 여기서 나눗셈 연산을 수행하여 각 결과의 상대적인 빈도를 계산합니다. 각 결과(앞면 또는 뒷면)의 횟수를 100으로 나누면 각 결과가 나오는 상대적인 확률을 얻을 수 있습니다. 이 결과는 공평한 동전에서 앞면 또는 뒷면이 나올 확률에 가까워질 것이며, 대략적으로 [0.5, 0.5]가 될 것입니다.
즉, 이 코드는 공평한 동전 던지기 실험을 100번 수행하여 앞면과 뒷면의 상대적인 빈도(확률)를 계산합니다.
tensor([0.4800, 0.5200])
Here, even though our simulated coin is fair (we ourselves set the probabilities[0.5,0.5]), the counts of heads and tails may not be identical. That is because we only drew a relatively small number of samples. If we did not implement the simulation ourselves, and only saw the outcome, how would we know if the coin were slightly unfair or if the possible deviation from1/2was just an artifact of the small sample size? Let’s see what happens when we simulate 10,000 tosses.
여기서, 시뮬레이션된 코인이 공정하더라도(우리가 직접 확률 [0.5, 0.5] 설정) 앞면과 뒷면의 개수가 동일하지 않을 수 있습니다. 그 이유는 상대적으로 적은 수의 샘플만 추출했기 때문입니다. 시뮬레이션을 직접 구현하지 않고 결과만 본다면 동전이 약간 불공평한지, 아니면 1/2에서 벗어날 수 있는 편차가 단지 작은 샘플 크기의 인공물인지 어떻게 알 수 있습니까? 10,000번의 던지기를 시뮬레이션하면 어떤 일이 일어나는지 살펴보겠습니다.
이 코드는 공평한 동전을 10,000번 던지고, 그 결과를 사용하여 각 결과(앞면 또는 뒷면)의 상대적인 확률을 계산합니다. 코드를 단계별로 설명하겠습니다.
Multinomial(10000, fair_probs): 이 부분은 Multinomial 분포에서 10,000번의 시행을 수행하여 무작위로 결과를 샘플링합니다. 10,000은 시행 횟수이고, fair_probs는 각 결과(앞면 또는 뒷면)가 나올 확률을 나타내는 확률 분포입니다. 이 부분에서는 10,000번의 독립적인 동전 던지기 시뮬레이션을 수행합니다.
.sample(): 이 메서드는 Multinomial 분포를 따르는 난수 생성을 수행합니다. 따라서 이 부분의 결과는 [heads_count, tails_count]와 같은 형태의 텐서로, heads_count는 앞면이 나오는 횟수, tails_count는 뒷면이 나오는 횟수를 나타냅니다.
/ 10,000: 마지막으로, 각 결과(앞면 또는 뒷면)의 횟수를 10,000으로 나누면 각 결과가 나오는 상대적인 확률을 얻을 수 있습니다. 이 결과는 공평한 동전에서 앞면 또는 뒷면이 나오는 확률에 가까워질 것이며, 대략적으로 [0.5, 0.5]가 될 것입니다.
따라서 이 코드는 공평한 동전 던지기 실험을 10,000번 수행하여 앞면과 뒷면의 상대적인 빈도(확률)를 계산합니다.
tensor([0.4966, 0.5034])
In general, for averages of repeated events (like coin tosses), as the number of repetitions grows, our estimates are guaranteed to converge to the true underlying probabilities. The mathematical formulation of this phenomenon is called thelaw of large numbersand thecentral limit theoremtells us that in many situations, as the sample sizengrows, these errors should go down at a rate of(1/√n). Let's get some more intuition by studying how our estimate evolves as we grow the number of tosses from 1 to 10,000.
일반적으로 반복되는 사건(예: 동전 던지기)의 평균의 경우 반복 횟수가 증가함에 따라 우리의 추정치는 실제 기본 확률로 수렴됩니다. 이 현상의 수학적 공식을 대수의 법칙이라고 하며 중심 극한 정리는 많은 상황에서 표본 크기 n이 커짐에 따라 이러한 오류가 (1/√n)의 비율로 감소해야 함을 알려줍니다. 던지기 횟수를 1회에서 10,000회까지 증가시키면서 추정치가 어떻게 변화하는지 연구하여 좀 더 직관력을 갖도록 합시다.
이 코드는 공평한 동전 던지기 실험에서 상대적인 확률을 추정하고 그 추정치를 그래프로 표현하는 부분입니다.
counts = Multinomial(1, fair_probs).sample((10000,)): 이 부분은 공평한 동전을 1번 던질 때, 앞면(coin=heads) 또는 뒷면(coin=tails)이 나오는 횟수를 10,000번 샘플링합니다. counts는 10,000번의 시뮬레이션 결과를 담고 있는 텐서입니다.
cum_counts = counts.cumsum(dim=0): 누적 횟수(cumulative counts)를 계산합니다. 이것은 각 시뮬레이션 스텝에서 앞면과 뒷면의 상대적인 누적 횟수를 나타냅니다.
estimates = cum_counts / cum_counts.sum(dim=1, keepdims=True): 이 부분에서는 누적 횟수를 누적 합으로 나눠 상대적인 확률을 계산합니다. 이것은 각 시뮬레이션 스텝에서 앞면과 뒷면의 상대적인 확률을 나타냅니다.
estimates = estimates.numpy(): 계산된 확률 추정치를 NumPy 배열로 변환합니다.
그래프를 그리는 부분: 계산된 확률 추정치를 이용하여 앞면(coin=heads)과 뒷면(coin=tails)의 확률 변화를 그래프로 표현합니다. d2l.plt.plot(estimates[:, 0], label=("P(coin=heads)"))는 앞면의 확률을 나타내는 그래프를 그리고, d2l.plt.plot(estimates[:, 1], label=("P(coin=tails)"))는 뒷면의 확률을 나타내는 그래프를 그립니다. d2l.plt.axhline(y=0.5, color='black', linestyle='dashed')는 확률 0.5에 수평 점선을 추가합니다. 나머지 코드는 그래프의 레이블과 축 이름을 설정하고 범례를 추가합니다.
결과적으로 이 코드는 공평한 동전 던지기 실험에서 시뮬레이션된 결과를 기반으로 앞면과 뒷면의 확률을 추정하고, 그 추정치를 그래프로 시각화합니다. 동전 던지기 시뮬레이션 횟수가 증가함에 따라 추정치가 공평한 동전의 확률(0.5)로 수렴하는 것을 관찰할 수 있습니다.
Each solid curve corresponds to one of the two values of the coin and gives our estimated probability that the coin turns up that value after each group of experiments. The dashed black line gives the true underlying probability. As we get more data by conducting more experiments, the curves converge towards the true probability. You might already begin to see the shape of some of the more advanced questions that preoccupy statisticians: How quickly does this convergence happen? If we had already tested many coins manufactured at the same plant, how might we incorporate this information?
각 실선은 동전의 두 값 중 하나에 해당하며 각 실험 그룹 후에 동전이 해당 값을 나타낼 확률을 추정합니다. 검은 점선은 실제 기본 확률을 나타냅니다. 더 많은 실험을 수행하여 더 많은 데이터를 얻을수록 곡선은 실제 확률로 수렴됩니다. 통계학자들을 사로잡는 고급 질문 중 일부의 형태가 이미 보이기 시작했을 수도 있습니다. 이 수렴은 얼마나 빨리 발생합니까? 동일한 공장에서 제조된 많은 동전을 이미 테스트했다면 이 정보를 어떻게 통합할 수 있을까요?
2.6.2.A More Formal Treatment
We have already gotten pretty far: posing a probabilistic model, generating synthetic data, running a statistical estimator, empirically assessing convergence, and reporting error metrics (checking the deviation). However, to go much further, we will need to be more precise.
우리는 이미 확률 모델 제시, 합성 데이터 생성, 통계 추정기 실행, 경험적 수렴 평가, 오류 측정항목 보고(편차 확인) 등 꽤 많은 작업을 수행했습니다. 그러나 더 나아가려면 더 정확해야 합니다.
When dealing with randomness, we denote the set of possible outcomesSand call it thesample spaceoroutcome space. Here, each element is a distinct possibleoutcome. In the case of rolling a single coin,S={heads,tails}. For a single die,S={1,2,3,4,5,6}. When flipping two coins, possible outcomes are{(heads,heads),(heads,tails),(tails,heads),(tails,tails)}.Eventsare subsets of the sample space. For instance, the event “the first coin toss comes up heads” corresponds to the set{(heads,heads),(heads,tails)}. Whenever the outcomezof a random experiment satisfiesz∈A, then eventAhas occurred. For a single roll of a die, we could define the events “seeing a5” (A={5}) and “seeing an odd number” (B={1,3,5}). In this case, if the die came up5, we would say that bothAandBoccurred. On the other hand, ifz=3, thenAdid not occur butBdid.
무작위성을 다룰 때 가능한 결과 집합 S를 표시하고 이를 표본 공간 또는 결과 공간이라고 부릅니다. 여기서 각 요소는 서로 다른 가능한 결과입니다. 단일 동전을 굴리는 경우 S={heads,tails}입니다. 단일 주사위의 경우 S={1,2,3,4,5,6}입니다. 두 개의 동전을 뒤집을 때 가능한 결과는 {(앞면, 앞면),(앞면,뒷면),(뒷면,앞면),(뒷면,뒷면)}입니다. 사건은 표본 공간의 부분 집합입니다. 예를 들어, "첫 번째 동전 던지기에서 앞면이 나옵니다" 이벤트는 {(앞면, 앞면),(앞면, 뒷면)} 집합에 해당합니다. 무작위 실험의 결과 z가 z∈A를 충족할 때마다 사건 A가 발생합니다. 주사위를 한 번 굴릴 때 "5를 보는 것"(A={5})과 "홀수를 보는 것"(B={1,3,5}) 이벤트를 정의할 수 있습니다. 이 경우 주사위가 5가 나오면 A와 B가 모두 발생했다고 말할 수 있습니다. 반면, z=3이면 A는 발생하지 않았지만 B는 발생했습니다.
Aprobabilityfunction maps events onto real values P:A⊆S→[0,1]. The probability, denoted P(A), of an eventAin the given sample spaceS, has the following properties:
확률 함수는 사건을 실제 값 P:A⊆S→[0,1]에 매핑합니다. 주어진 표본 공간 S에서 사건 A의 확률 P(A)는 다음과 같은 속성을 갖습니다.
The probability of any eventAis a nonnegative real number, i.e.,P(A)≥0;
어떤 사건 A의 확률은 음이 아닌 실수입니다. 즉, P(A)≥0입니다.
The probability of the entire sample space is1, i.e.,P(S)=1;
전체 표본 공간의 확률은 1입니다. 즉, P(S)=1입니다.
For any countable sequence of eventsA1,A2,…that aremutually exclusive(i.e.,Ai∩Aj=∅for alli≠j), the probability that any of them happens is equal to the sum of their individual probabilities, i.e.,P(⋃i=1∞ Ai)=∑i=1∞ P(Ai).
상호 배타적인 사건 A1,A2,…의 셀 수 있는 시퀀스에 대해(즉, 모든 i≠j에 대해 Ai∩Aj=∅), 그 중 하나가 발생할 확률은 개별 확률의 합과 같습니다. 즉, P(⋃i=1∞ Ai)=∑i=1∞ P(Ai).
These axioms of probability theory, proposed byKolmogorov (1933), can be applied to rapidly derive a number of important consequences. For instance, it follows immediately that the probability of any eventAorits complementA′occurring is 1 (becauseA∪A′=S). We can also prove thatP(∅)=0because1=P(S∪S′)=P(S∪∅)=P(S)+P(∅)=1+P(∅). Consequently, the probability of any eventAandits complement A′occurring simultaneously isP(A∩A′)=0. Informally, this tells us that impossible events have zero probability of occurring.
Kolmogorov(1933)가 제안한 확률 이론의 이러한 공리는 여러 가지 중요한 결과를 신속하게 도출하는 데 적용될 수 있습니다. 예를 들어, 임의의 사건 A 또는 그 보수 A'가 발생할 확률은 1입니다(A∪A'=S이기 때문에). 1=P(S∪S′)=P(S∪∅)=P(S)+P(∅)=1+P(∅)이기 때문에 P(∅)=0임을 증명할 수도 있습니다. 결과적으로, 사건 A와 그 보수 A'가 동시에 발생할 확률은 P(A∩A')=0입니다. 비공식적으로 이는 불가능한 사건이 발생할 확률이 0이라는 것을 알려줍니다.
2.6.3.Random Variables
When we spoke about events like the roll of a die coming up odds or the first coin toss coming up heads, we were invoking the idea of arandom variable. Formally, random variables are mappings from an underlying sample space to a set of (possibly many) values. You might wonder how a random variable is different from the sample space, since both are collections of outcomes. Importantly, random variables can be much coarser than the raw sample space. We can define a binary random variable like “greater than 0.5” even when the underlying sample space is infinite, e.g., points on the line segment between0and1. Additionally, multiple random variables can share the same underlying sample space. For example “whether my home alarm goes off” and “whether my house was burgled” are both binary random variables that share an underlying sample space. Consequently, knowing the value taken by one random variable can tell us something about the likely value of another random variable. Knowing that the alarm went off, we might suspect that the house was likely burgled.
주사위를 굴려 앞면이 나올 확률이나 첫 번째 동전 던지기에서 앞면이 나올 때와 같은 사건에 대해 이야기할 때 우리는 무작위 변수라는 아이디어를 떠올렸습니다. 공식적으로 확률 변수는 기본 표본 공간에서 (아마도 많은) 값 세트로의 매핑입니다. 둘 다 결과 모음이기 때문에 확률 변수가 표본 공간과 어떻게 다른지 궁금할 것입니다. 중요한 것은 확률 변수가 원시 표본 공간보다 훨씬 더 거칠 수 있다는 것입니다. 기본 표본 공간이 무한하더라도(예: 0과 1 사이 선분의 점) "0.5보다 큼"과 같은 이진 확률 변수를 정의할 수 있습니다. 또한 여러 확률 변수가 동일한 기본 표본 공간을 공유할 수 있습니다. 예를 들어 "내 집 알람이 울리는지 여부"와 "내 집에 도난이 발생했는지 여부"는 모두 기본 표본 공간을 공유하는 이진 무작위 변수입니다. 결과적으로, 하나의 무작위 변수가 취하는 값을 알면 다른 무작위 변수의 가능한 값에 대해 알 수 있습니다. 경보기가 울렸다는 것을 알면 집에 도둑이 들었을 가능성이 있다고 의심할 수 있습니다.
Every value taken by a random variable corresponds to a subset of the underlying sample space. Thus the occurrence where the random variable Xtakes valuev, denoted byX=v, is aneventandP(X=v)denotes its probability. Sometimes this notation can get clunky, and we can abuse notation when the context is clear. For example, we might useP(X)to refer broadly to thedistributionofX, i.e., the function that tells us the probability thatXtakes any given value. Other times we write expressions likeP(X,Y)=P(X)P(Y), as a shorthand to express a statement that is true for all of the values that the random variablesXandYcan take, i.e., for alli,jit holds thatP(X=i and Y=j)=P(X=i)P(Y=j). Other times, we abuse notation by writingP(v)when the random variable is clear from the context. Since an event in probability theory is a set of outcomes from the sample space, we can specify a range of values for a random variable to take. For example,P(1≤X≤3)denotes the probability of the event{1≤X≤3}.
무작위 변수가 취한 모든 값은 기본 표본 공간의 하위 집합에 해당합니다. 따라서 확률 변수 X가 X=v로 표시되는 값 v를 취하는 발생은 이벤트이고 P(X=v)는 해당 확률을 나타냅니다. 때로는 이 표기법이 투박해질 수 있으며, 문맥이 명확할 때 표기법을 남용할 수 있습니다. 예를 들어, P(X)를 사용하여 X의 분포, 즉 X가 주어진 값을 취할 확률을 알려주는 함수를 광범위하게 나타낼 수 있습니다. 다른 경우에는 확률 변수 X와 Y가 취할 수 있는 모든 값에 대해 참인 진술을 표현하기 위해 P(X,Y)=P(X)P(Y)와 같은 표현식을 작성합니다. 모든 i,j는 P(X=i and Y=j)=P(X=i)P(Y=j)를 유지합니다. 다른 경우에는 무작위 변수가 문맥에서 명확할 때 P(v)를 작성하여 표기법을 남용합니다. 확률 이론의 사건은 표본 공간의 결과 집합이므로 무작위 변수가 취할 값의 범위를 지정할 수 있습니다. 예를 들어 P(1<X<<3)은 사건 {1<<X<<3}의 확률을 나타냅니다.
Note that there is a subtle difference betweendiscreterandom variables, like flips of a coin or tosses of a die, andcontinuousones, like the weight and the height of a person sampled at random from the population. In this case we seldom really care about someone’s exact height. Moreover, if we took precise enough measurements, we would find that no two people on the planet have the exact same height. In fact, with fine enough measurements, you would never have the same height when you wake up and when you go to sleep. There is little point in asking about the exact probability that someone is 1.801392782910287192 meters tall. Instead, we typically care more about being able to say whether someone’s height falls into a given interval, say between 1.79 and 1.81 meters. In these cases we work with probabilitydensities. The height of exactly 1.80 meters has no probability, but nonzero density. To work out the probability assigned to an interval, we must take anintegralof the density over that interval.
동전 던지기나 주사위 던지기와 같은 이산형 확률 변수와 모집단에서 무작위로 추출된 사람의 체중 및 키와 같은 연속 변수 사이에는 미묘한 차이가 있습니다. 이 경우 우리는 누군가의 정확한 키에 대해 거의 신경 쓰지 않습니다. 더욱이, 우리가 충분히 정확하게 측정한다면, 지구상에 정확히 같은 키를 가진 사람은 두 명도 없다는 것을 알게 될 것입니다. 사실, 충분히 세밀하게 측정하면 잠에서 깰 때와 잠에 들 때의 키가 결코 같지 않을 것입니다. 누군가의 키가 1.801392782910287192미터일 정확한 확률에 대해 묻는 것은 별 의미가 없습니다. 대신, 우리는 일반적으로 누군가의 키가 주어진 간격, 즉 1.79미터에서 1.81미터 사이에 속하는지 여부를 말할 수 있는지에 더 관심을 둡니다. 이 경우 우리는 확률 밀도를 사용하여 작업합니다. 정확히 1.80미터의 높이는 확률은 없지만 밀도는 0이 아닙니다. 구간에 할당된 확률을 계산하려면 해당 구간에 대한 밀도를 적분해야 합니다.
2.6.4.Multiple Random Variables
You might have noticed that we could not even make it through the previous section without making statements involving interactions among multiple random variables (recallP(X,Y)=P(X)P(Y)). Most of machine learning is concerned with such relationships. Here, the sample space would be the population of interest, say customers who transact with a business, photographs on the Internet, or proteins known to biologists. Each random variable would represent the (unknown) value of a different attribute. Whenever we sample an individual from the population, we observe a realization of each of the random variables. Because the values taken by random variables correspond to subsets of the sample space that could be overlapping, partially overlapping, or entirely disjoint, knowing the value taken by one random variable can cause us to update our beliefs about which values of another random variable are likely. If a patient walks into a hospital and we observe that they are having trouble breathing and have lost their sense of smell, then we believe that they are more likely to have COVID-19 than we might if they had no trouble breathing and a perfectly ordinary sense of smell.
여러 확률 변수 간의 상호 작용을 포함하는 진술을 작성하지 않고는 이전 섹션을 완료할 수도 없다는 점을 눈치챘을 것입니다(P(X,Y)=P(X)P(Y)를 기억하세요). 대부분의 기계 학습은 이러한 관계와 관련이 있습니다. 여기서 표본 공간은 관심 모집단, 즉 기업과 거래하는 고객, 인터넷 사진, 생물학자에게 알려진 단백질이 될 것입니다. 각 무작위 변수는 다른 속성의 (알 수 없는) 값을 나타냅니다. 모집단에서 개인을 샘플링할 때마다 각 무작위 변수가 실현되는 것을 관찰합니다. 무작위 변수가 취한 값은 중복되거나, 부분적으로 겹치거나, 완전히 분리될 수 있는 표본 공간의 하위 집합에 해당하기 때문에, 하나의 무작위 변수가 취한 값을 알면 다른 무작위 변수의 어떤 값이 가능성이 높은지에 대한 우리의 믿음을 업데이트할 수 있습니다. . 환자가 병원에 들어왔을 때 호흡 곤란을 겪고 후각을 잃은 것을 관찰하면, 우리는 호흡 곤란이 없고 완전히 평범한 후각이 있는 경우보다 코로나19에 걸릴 가능성이 더 높다고 믿습니다.
When working with multiple random variables, we can construct events corresponding to every combination of values that the variables can jointly take. The probability function that assigns probabilities to each of these combinations (e.g. A=aandB=b) is called thejoint probabilityfunction and simply returns the probability assigned to the intersection of the corresponding subsets of the sample space. Thejoint probabilityassigned to the event where random variablesAandBtake valuesaandb, respectively, is denotedP(A=a,B=b), where the comma indicates “and”. Note that for any valuesaandb, it follows that
여러 확률 변수를 사용하여 작업할 때 변수가 공동으로 취할 수 있는 모든 값 조합에 해당하는 이벤트를 구성할 수 있습니다. 이러한 각 조합(예: A=a 및 B=b)에 확률을 할당하는 확률 함수를 결합 확률 함수라고 하며 단순히 표본 공간의 해당 하위 집합의 교차점에 할당된 확률을 반환합니다. 확률 변수 A와 B가 각각 a와 b 값을 갖는 사건에 할당된 결합 확률은 P(A=a,B=b)로 표시되며, 여기서 쉼표는 "and"를 나타냅니다. 임의의 값 a와 b에 대해 다음이 따른다는 점에 유의하십시오.
since forA=aandB=bto happen,A=ahas to happenandB=balso has to happen. Interestingly, the joint probability tells us all that we can know about these random variables in a probabilistic sense, and can be used to derive many other useful quantities, including recovering the individual distributionsP(A)and P(B). To recover P(A=a)we simply sum up P(A=a,B=v)over all values vthat the random variable Bcan take: P(A=a)=∑vP(A=a,B=v).
A=a와 B=b가 발생하려면 A=a가 발생해야 하고 B=b도 발생해야 하기 때문입니다. 흥미롭게도 결합 확률은 우리가 확률적 의미에서 이러한 확률 변수에 대해 알 수 있는 모든 것을 알려주고 개별 분포 P(A) 및 P(B)를 복구하는 것을 포함하여 다른 많은 유용한 양을 도출하는 데 사용될 수 있습니다. P(A=a)를 복구하려면 모든 값 v에 대해 P(A=a,B=v)를 간단히 합산하면 됩니다.확률 변수 B는 P(A=a)=∑vP(A=a,B=v)를 취할 수 있습니다.
The ratioP(A=a,B=b)/P(A=a)≤1turns out to be extremely important. It is called theconditional probability, and is denoted via the “∣” symbol:
P(A=a,B=b)/P(A=a)≤1 비율은 매우 중요합니다. 조건부 확률이라고 하며 "∣" 기호로 표시됩니다.
It tells us the new probability associated with the eventB=b, once we condition on the factA=atook place. We can think of this conditional probability as restricting attention only to the subset of the sample space associated withA=aand then renormalizing so that all probabilities sum to 1. Conditional probabilities are in fact just ordinary probabilities and thus respect all of the axioms, as long as we condition all terms on the same event and thus restrict attention to the same sample space. For instance, for disjoint eventsBand B′, we have thatP(B∪B′∣A=a)=P(B∣A=a)+P(B′∣A=a).
A=a가 발생했다는 사실을 조건으로 하면 사건 B=b와 관련된 새로운 확률을 알려줍니다. 이 조건부 확률은 A=a와 관련된 표본 공간의 하위 집합에만 주의를 제한하고 모든 확률의 합이 1이 되도록 재정규화하는 것으로 생각할 수 있습니다. 조건부 확률은 실제로 일반적인 확률이므로 모든 공리를 존중합니다. 모든 항을 동일한 사건에 대해 조건을 지정하여 동일한 표본 공간에 주의를 기울이는 한. 예를 들어, 분리된 사건 B와 B'에 대해 P(B∪B'∣A=a)=P(B∣A=a)+P(B'∣A=a)가 됩니다.
Using the definition of conditional probabilities, we can derive the famous result calledBayes’ theorem. By construction, we have thatP(A,B)=P(B∣A)P(A)and P(A,B)=P(A∣B)P(B). Combining both equations yields P(B∣A)P(A) = P(A∣B)P(B)and hence
조건부 확률의 정의를 사용하면 베이즈 정리라는 유명한 결과를 도출할 수 있습니다. 구성에 따르면 P(A,B)=P(B∣A)P(A) 및 P(A,B)=P(A∣B)P(B)가 있습니다. 두 방정식을 결합하면 P(B∣A)P(A) = P(A∣B)P(B)가 생성되므로
Bayes' theorem 이란?
베이즈 정리(Bayes' theorem)는 확률 이론의 중요한 개념 중 하나로, 조건부 확률을 계산하는 데 사용됩니다. 이 정리는 머신 러닝, 통계학, 확률 이론, 생물학, 의학, 자연어 처리 및 다양한 분야에서 다양한 응용을 가지고 있습니다. 베이즈 정리는 역사적으로 영국의 수학자 토머스 베이즈(Thomas Bayes)의 이름을 따서 명명되었습니다.
베이즈 정리의 일반적인 형태는 다음과 같습니다:
P(A|B) = (P(B|A) * P(A)) / P(B)
여기서 각 요소의 의미는 다음과 같습니다:
P(A|B): 사건 B가 발생한 조건에서 사건 A가 발생할 확률, 즉 A의 조건부 확률.
P(B|A): 사건 A가 발생한 조건에서 사건 B가 발생할 확률, 즉 B의 조건부 확률.
P(A): 사건 A가 발생할 사전 확률.
P(B): 사건 B가 발생할 사전 확률.
베이즈 정리의 주요 아이디어는 조건부 확률을 계산할 때, 사전 확률과 관련 사건들 간의 확률을 사용하여 업데이트할 수 있다는 것입니다. 즉, 사건 B가 발생한 후에는 사건 A의 확률을 더 정확하게 추정할 수 있습니다.
베이즈 정리의 응용 분야 중 하나는 베이지안 통계(Bayesian statistics)입니다. 이 방법론은 불확실성을 다루는데 특히 유용하며, 사후 확률을 업데이트하고 불확실성을 줄이는 데 활용됩니다. 머신 러닝에서는 베이지안 모델링을 통해 다양한 문제를 해결하고 불확실성을 고려한 예측을 수행하는데 사용됩니다.
베이즈 정리는 많은 현실 세계의 문제를 다루는데 유용한 도구로, 사후 확률을 업데이트하고 불확실성을 처리하기 위해 다양한 분야에서 활발하게 사용됩니다.
This simple equation has profound implications because it allows us to reverse the order of conditioning. If we know how to estimate P(B∣A), P(A), and P(B), then we can estimate P(A∣B). We often find it easier to estimate one term directly but not the other and Bayes’ theorem can come to the rescue here. For instance, if we know the prevalence of symptoms for a given disease, and the overall prevalences of the disease and symptoms, respectively, we can determine how likely someone is to have the disease based on their symptoms. In some cases we might not have direct access toP(B), such as the prevalence of symptoms. In this case a simplified version of Bayes’ theorem comes in handy:
이 간단한 방정식은 조건화 순서를 뒤집을 수 있기 때문에 심오한 의미를 갖습니다. P(B∣A), P(A), P(B)를 추정하는 방법을 안다면 P(A∣B)를 추정할 수 있습니다. 우리는 종종 한 항을 직접 추정하는 것이 더 쉽지만 다른 항은 그렇지 않다는 것을 알게 되며 여기서 베이즈 정리가 도움이 될 수 있습니다. 예를 들어, 특정 질병에 대한 증상의 유병률과 질병 및 증상의 전반적인 유병률을 각각 안다면 증상을 기반으로 누군가가 질병에 걸릴 가능성이 얼마나 되는지 판단할 수 있습니다. 어떤 경우에는 증상의 유병률과 같이 P(B)에 직접 접근할 수 없을 수도 있습니다. 이 경우 베이즈 정리의 단순화된 버전이 유용합니다.
Since we know thatP(A∣B)must be normalized to1, i.e.,∑aP(A=a∣B)=1, we can use it to compute
P(A∣B)가 1로 정규화되어야 함, 즉 ∑aP(A=a∣B)=1이라는 것을 알고 있으므로 이를 사용하여 계산할 수 있습니다.
In Bayesian statistics, we think of an observer as possessing some (subjective) prior beliefs about the plausibility of the available hypotheses encoded in thepriorP(H), and alikelihood functionthat says how likely one is to observe any value of the collected evidence for each of the hypotheses in the classP(E∣H). Bayes’ theorem is then interpreted as telling us how to update the initialprior P(H)in light of the available evidence Eto produceposteriorbeliefs P(H∣E) = P(E∣H)P(H)/P(E). Informally, this can be stated as “posterior equals prior times likelihood, divided by the evidence”. Now, because the evidence P(E)is the same for all hypotheses, we can get away with simply normalizing over the hypotheses.
베이지안 통계에서 우리는 관찰자가 사전 P(H)에 인코딩된 사용 가능한 가설의 타당성에 대한 일부 (주관적) 사전 신념과 수집된 값을 관찰할 가능성이 얼마나 되는지 알려주는 우도 함수를 보유하고 있다고 생각합니다. P(E∣H) 클래스의 각 가설에 대한 증거. 베이즈 정리는 사후 신념 P(H∣E) = P(E∣H)P(H)/P(E)를 생성하기 위해 이용 가능한 증거 E에 비추어 초기 사전 P(H)를 업데이트하는 방법을 알려주는 것으로 해석됩니다. 비공식적으로, 이는 "사후는 이전 가능성과 증거를 나눈 값과 동일합니다"라고 말할 수 있습니다. 이제 증거 P(E)는 모든 가설에 대해 동일하므로 단순히 가설에 대해 정규화하면 됩니다.
Note that∑aP(A=a∣B)=1also allows us tomarginalizeover random variables. That is, we can drop variables from a joint distribution such as P(A,B). After all, we have that Independence is another fundamentally important concept that forms the backbone of many important ideas in statistics.
∑aP(A=a∣B)=1을 사용하면 무작위 변수를 소외시킬 수도 있습니다. 즉, P(A,B)와 같은 결합 분포에서 변수를 삭제할 수 있습니다. 결국 우리는 독립성이 통계학의 많은 중요한 아이디어의 중추를 형성하는 또 다른 근본적으로 중요한 개념이라는 것을 알고 있습니다.
In short, two variables areindependentif conditioning on the value of Adoes not cause any change to the probability distribution associated with Band vice versa. More formally, independence, denoted A⊥B, requires that P(A∣B) = P(A)and, consequently, that P(A,B) = P(A∣B)P(B) = P(A)P(B). Independence is often an appropriate assumption. For example, if the random variable Arepresents the outcome from tossing one fair coin and the random variable Brepresents the outcome from tossing another, then knowing whether Acame up heads should not influence the probability of Bcoming up heads.
간단히 말해서, A 값에 대한 조건이 B와 관련된 확률 분포에 어떠한 변화도 일으키지 않고 그 반대의 경우에도 두 변수는 독립적입니다. 보다 공식적으로, A⊥B로 표시되는 독립성은 P(A∣B) = P(A)를 요구하며 결과적으로 P(A,B) = P(A∣B)P(B) = P(A)를 충족해야 합니다. P(B). 독립성은 종종 적절한 가정입니다. 예를 들어, 확률 변수 A가 공정한 동전 하나를 던진 결과를 나타내고 확률 변수 B가 다른 동전을 던진 결과를 나타내는 경우 A가 앞면이 나오는지 여부를 아는 것이 B가 앞면이 나올 확률에 영향을 주어서는 안 됩니다.
Independence is especially useful when it holds among the successive draws of our data from some underlying distribution (allowing us to make strong statistical conclusions) or when it holds among various variables in our data, allowing us to work with simpler models that encode this independence structure. On the other hand, estimating the dependencies among random variables is often the very aim of learning. We care to estimate the probability of disease given symptoms specifically because we believe that diseases and symptoms arenotindependent.
독립성은 일부 기본 분포에서 데이터를 연속적으로 추출할 때(강력한 통계적 결론을 내릴 수 있음) 데이터의 다양한 변수 간에 유지될 때 특히 유용하며 이 독립성 구조를 인코딩하는 더 간단한 모델로 작업할 수 있습니다. 반면, 확률 변수 간의 종속성을 추정하는 것이 학습의 목적인 경우가 많습니다. 우리는 질병과 증상이 독립적이지 않다고 믿기 때문에 특정 증상에 따른 질병의 확률을 추정하는 데 관심을 둡니다.
Note that because conditional probabilities are proper probabilities, the concepts of independence and dependence also apply to them. Two random variables Aand Bareconditionally independentgiven a third variable Cif and only if P(A,B∣C) = P(A∣C)P(B∣C). Interestingly, two variables can be independent in general but become dependent when conditioning on a third. This often occurs when the two random variables Aand Bcorrespond to causes of some third variable C. For example, broken bones and lung cancer might be independent in the general population but if we condition on being in the hospital then we might find that broken bones are negatively correlated with lung cancer. That is because the broken boneexplains awaywhy some person is in the hospital and thus lowers the probability that they are hospitalized because of having lung cancer.
조건부 확률은 고유 확률이므로 독립성과 종속성의 개념도 적용됩니다. 두 개의 확률 변수 A와 B는 P(A,B∣C) = P(A∣C)P(B∣C)인 경우에만 세 번째 변수 C가 주어지면 조건부 독립입니다. 흥미롭게도 두 변수는 일반적으로 독립적일 수 있지만 세 번째 변수에 조건을 적용하면 종속성이 됩니다. 이는 두 개의 무작위 변수 A와 B가 세 번째 변수 C의 원인에 해당할 때 자주 발생합니다. 예를 들어, 부러진 뼈와 폐암은 일반 인구 집단에서는 독립적일 수 있지만 병원에 입원하는 것을 조건으로 하면 뼈가 부러진 것을 발견할 수 있습니다. 뼈는 폐암과 음의 상관관계가 있습니다. 이는 부러진 뼈가 어떤 사람이 병원에 있는 이유를 설명하여 폐암으로 인해 입원할 가능성을 낮추기 때문입니다.
And conversely, two dependent random variables can become independent upon conditioning on a third. This often happens when two otherwise unrelated events have a common cause. Shoe size and reading level are highly correlated among elementary school students, but this correlation disappears if we condition on age.
그리고 반대로, 두 개의 종속 확률 변수는 세 번째 변수에 대한 조건에 따라 독립 변수가 될 수 있습니다. 이는 서로 관련이 없는 두 가지 사건에 공통 원인이 있는 경우에 자주 발생합니다. 신발 사이즈와 독서 수준은 초등학생 사이에서 높은 상관관계가 있지만, 연령을 조건으로 하면 이러한 상관관계가 사라집니다.
2.6.5.An Example
Let’s put our skills to the test. Assume that a doctor administers an HIV test to a patient. This test is fairly accurate and fails only with 1% probability if the patient is healthy but reported as diseased, i.e., healthy patients test positive in 1% of cases. Moreover, it never fails to detect HIV if the patient actually has it. We useD1∈{0,1}to indicate the diagnosis (0if negative and1if positive) andH∈{0,1}to denote the HIV status.
우리의 능력을 시험해 봅시다. 의사가 환자에게 HIV 테스트를 실시한다고 가정합니다. 이 테스트는 매우 정확하며 환자가 건강하지만 질병이 있는 것으로 보고된 경우, 즉 건강한 환자가 1%의 사례에서 양성 반응을 보이는 경우 1% 확률로만 실패합니다. 더욱이, 환자가 실제로 HIV에 감염되어 있는 경우에도 HIV를 탐지하는 데 실패하지 않습니다. D1∈{0,1}을 사용하여 진단(음성인 경우 0, 양성인 경우 1)을 나타내고 H∈{0,1}을 사용하여 HIV 상태를 나타냅니다.
Note that the column sums are all 1 (but the row sums do not), since they are conditional probabilities. Let’s compute the probability of the patient having HIV if the test comes back positive, i.e., P(H=1∣D1=1). Intuitively this is going to depend on how common the disease is, since it affects the number of false alarms. Assume that the population is fairly free of the disease, e.g., P(H=1)=0.0015. To apply Bayes’ theorem, we need to apply marginalization to determine
조건부 확률이므로 열 합은 모두 1입니다(행 합은 그렇지 않음). 검사 결과가 양성으로 나오면 환자가 HIV에 감염될 확률을 계산해 보겠습니다(예: P(H=1∣D1=1)). 직관적으로 이것은 잘못된 경보의 수에 영향을 미치기 때문에 질병이 얼마나 흔한지에 따라 달라집니다. 인구에 질병이 전혀 없다고 가정합니다(예: P(H=1)=0.0015). 베이즈 정리를 적용하려면 주변화를 적용하여 다음을 결정해야 합니다.
In other words, there is only a 13.06% chance that the patient actually has HIV, despite the test being pretty accurate. As we can see, probability can be counterintuitive. What should a patient do upon receiving such terrifying news? Likely, the patient would ask the physician to administer another test to get clarity. The second test has different characteristics and it is not as good as the first one.
즉, 테스트가 매우 정확함에도 불구하고 환자가 실제로 HIV에 감염될 확률은 13.06%에 불과합니다. 보시다시피 확률은 직관에 반할 수 있습니다. 이런 무서운 소식을 접한 환자는 어떻게 해야 할까요? 아마도 환자는 명확성을 얻기 위해 의사에게 또 다른 검사를 실시해 달라고 요청할 것입니다. 두 번째 테스트는 특성이 다르고 첫 번째 테스트만큼 좋지 않습니다.
Unfortunately, the second test comes back positive, too. Let’s calculate the requisite probabilities to invoke Bayes’ theorem by assuming conditional independence:
불행히도 두 번째 테스트에서도 양성 반응이 나왔습니다. 조건부 독립을 가정하여 베이즈 정리를 적용하는 데 필요한 확률을 계산해 보겠습니다.
Now we can apply marginalization to obtain the probability that both tests come back positive:
이제 우리는 소외화를 적용하여 두 테스트가 모두 양성으로 돌아올 확률을 얻을 수 있습니다.
Finally, the probability of the patient having HIV given that both tests are positive is
마지막으로, 두 검사 모두 양성인 경우 환자가 HIV에 감염될 확률은 다음과 같습니다.
That is, the second test allowed us to gain much higher confidence that not all is well. Despite the second test being considerably less accurate than the first one, it still significantly improved our estimate. The assumption of both tests being conditionally independent of each other was crucial for our ability to generate a more accurate estimate. Take the extreme case where we run the same test twice. In this situation we would expect the same outcome both times, hence no additional insight is gained from running the same test again. The astute reader might have noticed that the diagnosis behaved like a classifier hiding in plain sight where our ability to decide whether a patient is healthy increases as we obtain more features (test outcomes).
즉, 두 번째 테스트를 통해 우리는 모든 것이 좋지 않다는 훨씬 더 높은 확신을 얻을 수 있었습니다. 두 번째 테스트는 첫 번째 테스트보다 정확도가 상당히 떨어졌음에도 불구하고 여전히 우리의 추정치를 크게 향상시켰습니다. 두 테스트가 서로 조건부 독립이라는 가정은 보다 정확한 추정치를 생성하는 데 매우 중요했습니다. 동일한 테스트를 두 번 실행하는 극단적인 경우를 생각해 보겠습니다. 이 상황에서는 두 번 모두 동일한 결과가 나올 것으로 예상되므로 동일한 테스트를 다시 실행해도 추가적인 통찰력을 얻을 수 없습니다. 기민한 독자는 진단이 더 많은 특징(테스트 결과)을 얻을수록 환자의 건강 여부를 결정하는 능력이 증가하는 눈에 잘 띄는 곳에 숨어 있는 분류기처럼 행동한다는 것을 알아차렸을 것입니다.
2.6.6.Expectations
Often, making decisions requires not just looking at the probabilities assigned to individual events but composing them together into useful aggregates that can provide us with guidance. For example, when random variables take continuous scalar values, we often care about knowing what value to expecton average. This quantity is formally called anexpectation. If we are making investments, the first quantity of interest might be the return we can expect, averaging over all the possible outcomes (and weighting by the appropriate probabilities). For instance, say that with 50% probability, an investment might fail altogether, with 40% probability it might provide a 2×return, and with 10% probability it might provide a 10×return 10×. To calculate the expected return, we sum over all returns, multiplying each by the probability that they will occur. This yields the expectation0.5⋅0+0.4⋅2+0.1⋅10=1.8. Hence the expected return is 1.8×.
종종 결정을 내리려면 개별 사건에 할당된 확률을 살펴보는 것뿐만 아니라 지침을 제공할 수 있는 유용한 집계로 이를 함께 구성해야 합니다. 예를 들어, 확률 변수가 연속적인 스칼라 값을 취하는 경우 우리는 평균적으로 어떤 값을 기대하는지 아는 데 종종 관심을 갖습니다. 이 수량을 공식적으로 기대값이라고 합니다. 투자를 하는 경우 첫 번째 관심 수량은 가능한 모든 결과에 대한 평균을 계산하고 적절한 확률에 따라 가중치를 부여하여 기대할 수 있는 수익일 수 있습니다. 예를 들어, 50% 확률로 투자가 완전히 실패할 수 있고, 40% 확률로 2배의 수익을 제공할 수 있으며, 10% 확률로 10배의 수익을 제공할 수 있다고 가정해 보겠습니다. 기대 수익을 계산하기 위해 우리는 모든 수익을 합산하고 각 수익에 발생할 확률을 곱합니다. 이는 기대값 0.5⋅0+0.4⋅2+0.1⋅10=1.8을 산출합니다. 따라서 기대수익률은 1.8×입니다.
In general, theexpectation(or average) of the random variableXis defined as
일반적으로 확률 변수 X의 기대값(또는 평균)은 다음과 같이 정의됩니다.
Likewise, for densities we obtainE[X]=∫x dp(x). Sometimes we are interested in the expected value of some function of x. We can calculate these expectations as
마찬가지로 밀도의 경우 E[X]=∫xdp(x)를 얻습니다. 때때로 우리는 x의 어떤 함수의 기대값에 관심이 있습니다. 우리는 이러한 기대치를 다음과 같이 계산할 수 있습니다.
for discrete probabilities and densities, respectively. Returning to the investment example from above,fmight be theutility(happiness) associated with the return. Behavior economists have long noted that people associate greater disutility with losing money than the utility gained from earning one dollar relative to their baseline. Moreover, the value of money tends to be sub-linear. Possessing 100k dollars versus zero dollars can make the difference between paying the rent, eating well, and enjoying quality healthcare versus suffering through homelessness. On the other hand, the gains due to possessing 200k versus 100k are less dramatic. Reasoning like this motivates the cliché that “the utility of money is logarithmic”.
이산 확률과 밀도에 대해 각각. 위의 투자 예로 돌아가면, f는 수익과 관련된 효용(행복)일 수 있습니다. 행동경제학자들은 사람들이 자신의 기준에 비해 1달러를 벌어서 얻는 효용보다 돈을 잃는 데 더 큰 비효용성을 연관시킨다는 점을 오랫동안 지적해 왔습니다. 더욱이 화폐의 가치는 준선형적인 경향이 있습니다. 10만 달러를 소유하는 것과 0달러를 소유하는 것은 집세를 내고, 잘 먹고, 양질의 의료 서비스를 받는 것과 노숙자로 고통받는 것 사이의 차이를 만들 수 있습니다. 반면에 200,000개와 100,000개를 소유함으로써 얻을 수 있는 이득은 덜 극적입니다. 이런 추론은 “돈의 효용은 대수적이다”라는 상투적인 말을 하게 만든다.
If the utility associated with a total loss were−1, and the utilities associated with returns of1,2, and10were1,2and4, respectively, then the expected happiness of investing would be0.5⋅(−1)+0.4⋅2+0.1⋅4=0.7(an expected loss of utility of 30%). If indeed this were your utility function, you might be best off keeping the money in the bank.
총 손실과 관련된 효용이 −1이고 수익 1, 2, 10과 관련된 효용이 각각 1, 2, 4라면 투자의 기대 행복은 0.5⋅(−1)+0.4가 됩니다. ⋅2+0.1⋅4=0.7(예상 효용 손실 30%). 실제로 이것이 유틸리티 기능이라면 돈을 은행에 보관하는 것이 가장 좋습니다.
For financial decisions, we might also want to measure howriskyan investment is. Here, we care not just about the expected value but how much the actual values tend tovaryrelative to this value. Note that we cannot just take the expectation of the difference between the actual and expected values. This is because the expectation of a difference is the difference of the expectations, i.e.,E[X−E[X]]=E[X]−E[E[X]]=0. However, we can look at the expectation of any non-negative function of this difference. Thevarianceof a random variable is calculated by looking at the expected value of thesquareddifferences:
재정적 결정을 위해 투자가 얼마나 위험한지 측정하고 싶을 수도 있습니다. 여기서는 기대값뿐만 아니라 이 값에 비해 실제 값이 얼마나 달라지는 경향이 있는지도 중요합니다. 실제 값과 예상 값의 차이를 기대하는 것만으로는 충분하지 않습니다. 이는 차이에 대한 기대가 기대의 차이, 즉 E[X−E[X]]=E[X]−E[E[X]]=0이기 때문입니다. 그러나 우리는 이 차이의 음이 아닌 함수에 대한 기대를 살펴볼 수 있습니다. 확률 변수의 분산은 차이 제곱의 기대값을 확인하여 계산됩니다.
Here the equality follows by expanding(X−E[X])**2 = X**2 − 2XE[X]+E[X]**2and taking expectations for each term. The square root of the variance is another useful quantity called thestandard deviation. While this and the variance convey the same information (either can be calculated from the other), the standard deviation has the nice property that it is expressed in the same units as the original quantity represented by the random variable.
여기서는 (X−E[X])**2 = X**2 − 2XE[X]+E[X]**2를 확장하고 각 항에 대한 기대값을 취하여 동등성을 따릅니다. 분산의 제곱근은 표준편차라고 불리는 또 다른 유용한 양입니다. 이것과 분산은 동일한 정보를 전달하지만(둘 중 하나를 다른 것으로 계산할 수 있음), 표준 편차는 랜덤 변수가 나타내는 원래 양과 동일한 단위로 표현된다는 좋은 속성을 가지고 있습니다.
Lastly, the variance of a function of a random variable is defined analogously as
마지막으로, 확률 변수의 함수 분산은 다음과 유사하게 정의됩니다.
Returning to our investment example, we can now compute the variance of the investment. It is given by0.5⋅0+0.4⋅2**2+0.1⋅10**2−1.8**2=8.36. For all intents and purposes this is a risky investment. Note that by mathematical convention mean and variance are often referenced asμandσ**2. This is particularly the case whenever we use it to parametrize a Gaussian distribution.
투자 예로 돌아가서 이제 투자의 분산을 계산할 수 있습니다. 이는 0.5⋅0+0.4⋅2**2+0.1⋅10**2−1.8**2=8.36으로 제공됩니다. 모든 의도와 목적을 위해 이것은 위험한 투자입니다. 수학적 관례에 따라 평균과 분산은 종종 μ 및 σ**2로 참조됩니다. 특히 가우스 분포를 매개변수화하는 데 사용할 때마다 그렇습니다.
In the same way as we introduced expectations and variance forscalarrandom variables, we can do so for vector-valued ones. Expectations are easy, since we can apply them elementwise. For instance,μ def= Ex∼p[x]has coordinatesμ i = Ex∼p[xi].Covariancesare more complicated. We define them by taking expectations of theouter productof the difference between random variables and their mean:
스칼라 확률 변수에 대한 기대치와 분산을 도입한 것과 같은 방식으로 벡터 값 변수에 대해서도 그렇게 할 수 있습니다. 요소별로 적용할 수 있으므로 기대하기 쉽습니다. 예를 들어 μ def= Ex∼p[x]는 μ i = Ex∼p[xi] 좌표를 갖는다. 공분산은 더 복잡합니다. 우리는 확률 변수와 평균 간의 차이에 대한 외부 곱을 기대하여 이를 정의합니다.
This matrix∑is referred to as the covariance matrix. An easy way to see its effect is to consider some vectorvof the same size asx. It follows that
As such,∑allows us to compute the variance for any linear function ofxby a simple matrix multiplication. The off-diagonal elements tell us how correlated the coordinates are: a value of 0 means no correlation, where a larger positive value means that they are more strongly correlated.
따라서 ∑를 사용하면 간단한 행렬 곱셈을 통해 x의 모든 선형 함수에 대한 분산을 계산할 수 있습니다. 비대각선 요소는 좌표의 상관 관계를 알려줍니다. 값이 0이면 상관 관계가 없음을 의미하고 양수 값이 클수록 상관 관계가 더 강하다는 의미입니다.
2.6.7.Discussion
In machine learning, there are many things to be uncertain about! We can be uncertain about the value of a label given an input. We can be uncertain about the estimated value of a parameter. We can even be uncertain about whether data arriving at deployment is even from the same distribution as the training data.
머신러닝에는 불확실한 부분이 많습니다! 입력이 주어지면 레이블의 값이 불확실할 수 있습니다. 매개변수의 추정값이 불확실할 수 있습니다. 배포 시 도착하는 데이터가 교육 데이터와 동일한 분포에서 나온 것인지 여부도 불확실할 수 있습니다.
Byaleatoric uncertainty, we mean uncertainty that is intrinsic to the problem, and due to genuine randomness unaccounted for by the observed variables. Byepistemic uncertainty, we mean uncertainty over a model’s parameters, the sort of uncertainty that we can hope to reduce by collecting more data. We might have epistemic uncertainty concerning the probability that a coin turns up heads, but even once we know this probability, we are left with aleatoric uncertainty about the outcome of any future toss. No matter how long we watch someone tossing a fair coin, we will never be more or less than 50% certain that the next toss will come up heads. These terms come from mechanical modeling, (see e.g.,Der Kiureghian and Ditlevsen (2009)for a review on this aspect ofuncertainty quantification). It is worth noting, however, that these terms constitute a slight abuse of language. The termepistemicrefers to anything concerningknowledgeand thus, in the philosophical sense, all uncertainty is epistemic.
우연적 불확실성이란 문제에 내재된 불확실성, 관찰된 변수에 의해 설명되지 않는 진정한 무작위성으로 인한 불확실성을 의미합니다. 인식론적 불확실성이란 모델 매개변수에 대한 불확실성, 즉 더 많은 데이터를 수집하여 줄일 수 있는 불확실성을 의미합니다. 동전이 앞면이 나올 확률에 대해 인식론적 불확실성이 있을 수 있지만, 이 확률을 알더라도 미래 던지기의 결과에 대한 우연적 불확실성이 남아 있습니다. 누군가가 공정한 동전을 던지는 것을 얼마나 오랫동안 지켜보더라도 우리는 다음 번 던질 때 앞면이 나올 것이라는 확신을 50% 이상 또는 이하로 결코 확신할 수 없습니다. 이러한 용어는 기계적 모델링에서 유래되었습니다(불확도 정량화의 이러한 측면에 대한 검토는 Der Kiureghian 및 Ditlevsen(2009) 참조). 그러나 이러한 용어가 약간의 언어 남용을 구성한다는 점은 주목할 가치가 있습니다. 인식론이라는 용어는 지식에 관한 모든 것을 의미하므로 철학적 의미에서 모든 불확실성은 인식론적입니다.
We saw that sampling data from some unknown probability distribution can provide us with information that can be used to estimate the parameters of the data generating distribution. That said, the rate at which this is possible can be quite slow. In our coin tossing example (and many others) we can do no better than to design estimators that converge at a rate of1/ √ n, wherenis the sample size (e.g., the number of tosses). This means that by going from 10 to 1000 observations (usually a very achievable task) we see a tenfold reduction of uncertainty, whereas the next 1000 observations help comparatively little, offering only a 1.41 times reduction. This is a persistent feature of machine learning: while there are often easy gains, it takes a very large amount of data, and often with it an enormous amount of computation, to make further gains. For an empirical review of this fact for large scale language models seeRevelset al.(2016).
우리는 알려지지 않은 확률 분포의 샘플링 데이터가 데이터 생성 분포의 매개변수를 추정하는 데 사용할 수 있는 정보를 제공할 수 있음을 확인했습니다. 즉, 이것이 가능한 속도는 상당히 느릴 수 있습니다. 동전 던지기 예제(및 기타 여러 예제)에서 우리는 1/ √n의 비율로 수렴하는 추정기를 설계하는 것보다 더 나은 것을 할 수 없습니다. 여기서 n은 표본 크기(예: 던지기 횟수)입니다. 이는 10개에서 1000개의 관측값(일반적으로 매우 달성 가능한 작업)으로 이동하면 불확실성이 10배 감소한 반면, 다음 1000개의 관측값은 1.41배만 감소하여 비교적 거의 도움이 되지 않는다는 것을 의미합니다. 이는 기계 학습의 지속적인 특징입니다. 쉽게 얻을 수 있는 경우가 많지만 추가 이득을 얻으려면 매우 많은 양의 데이터와 엄청난 양의 계산이 필요한 경우가 많습니다. 대규모 언어 모델에 대한 이 사실에 대한 실증적 검토는 Revels et al. (2016).
We also sharpened our language and tools for statistical modeling. In the process of that we learned about conditional probabilities and about one of the most important equations in statistics—Bayes’ theorem. It is an effective tool for decoupling information conveyed by data through a likelihood termP(B∣A)that addresses how well observationsBmatch a choice of parametersA, and a prior probability P(A)which governs how plausible a particular choice of Awas in the first place. In particular, we saw how this rule can be applied to assign probabilities to diagnoses, based on the efficacy of the testandthe prevalence of the disease itself (i.e., our prior).
우리는 또한 통계 모델링을 위한 언어와 도구를 개선했습니다. 그 과정에서 우리는 조건부 확률과 통계에서 가장 중요한 방정식 중 하나인 베이즈 정리에 대해 배웠습니다. 이는 관측치 B가 매개변수 A의 선택과 얼마나 잘 일치하는지를 다루는 가능성 항 P(B∣A)와 매개변수 A의 선택이 얼마나 타당한지를 제어하는 사전 확률 P(A)를 통해 데이터에 의해 전달되는 정보를 분리하는 효과적인 도구입니다. A가 먼저였다. 특히, 우리는 테스트의 효능과 질병 자체의 유병률(예: 이전)을 기반으로 진단에 확률을 할당하기 위해 이 규칙을 적용할 수 있는 방법을 살펴보았습니다.
Lastly, we introduced a first set of nontrivial questions about the effect of a specific probability distribution, namely expectations and variances. While there are many more than just linear and quadratic expectations for a probability distribution, these two already provide a good deal of knowledge about the possible behavior of the distribution. For instance,Chebyshev’s inequalitystates that P(X|X− μ|≥k σ)≤1/k**2, whereμis the expectation,σ**2is the variance of the distribution, andk>1is a confidence parameter of our choosing. It tells us that draws from a distribution lie with at least 50% probability within a[− √ 2σ , √2σ ]interval centered on the expectation.
마지막으로, 특정 확률 분포, 즉 기대값과 분산의 효과에 대한 첫 번째 중요하지 않은 질문 세트를 소개했습니다. 확률 분포에 대한 선형 및 2차 기대치보다 더 많은 것이 있지만 이 두 가지는 이미 분포의 가능한 동작에 대한 많은 지식을 제공합니다. 예를 들어, 체비쇼프 부등식은 P(X|X− μ|≥k σ)≤1/k**2라고 말합니다. 여기서 μ는 기대값이고, σ**2는 분포의 분산이고, k>1은 우리가 선택한 신뢰 매개변수. 이는 기대값을 중심으로 [− √ 2σ , √ 2σ ] 간격 내에서 최소 50% 확률로 분포 거짓말에서 도출된다는 것을 알려줍니다.
2.6.8.Exercises
Give an example where observing more data can reduce the amount of uncertainty about the outcome to an arbitrarily low level.
더 많은 데이터를 관찰하면 결과에 대한 불확실성을 임의로 낮은 수준으로 줄일 수 있는 예를 들어보세요.
Give an example where observing more data will only reduce the amount of uncertainty up to a point and then no further. Explain why this is the case and where you expect this point to occur.
더 많은 데이터를 관찰하면 불확실성의 양이 어느 정도 줄어들 뿐 그 이상은 줄어들지 않는 예를 들어보세요. 왜 이런 일이 발생하는지, 그리고 이러한 상황이 어디서 발생할 것으로 예상하는지 설명하세요.
We empirically demonstrated convergence to the mean for the toss of a coin. Calculate the variance of the estimate of the probability that we see a head after drawingnsamples.
우리는 동전 던지기의 평균에 대한 수렴을 경험적으로 증명했습니다. n개의 샘플을 뽑은 후 머리가 보일 확률 추정치의 분산을 계산합니다.
How does the variance scale with the number of observations?
관측치 수에 따라 분산이 어떻게 확장되나요?
Use Chebyshev’s inequality to bound the deviation from the expectation.