개발자로서 현장에서 일하면서 새로 접하는 기술들이나 알게된 정보 등을 정리하기 위한 블로그입니다. 운 좋게 미국에서 큰 회사들의 프로젝트에서 컬설턴트로 일하고 있어서 새로운 기술들을 접할 기회가 많이 있습니다. 미국의 IT 프로젝트에서 사용되는 툴들에 대해 많은 분들과 정보를 공유하고 싶습니다.
In this chapter, you saw how to approach different NLP tasks using the high-levelpipeline()function from 🤗 Transformers. You also saw how to search for and use models in the Hub, as well as how to use the Inference API to test the models directly in your browser.
이 장에서는 🤗 Transformers의 고급 파이프라인() 함수를 사용하여 다양한 NLP 작업에 접근하는 방법을 살펴보았습니다. 또한 허브에서 모델을 검색하고 사용하는 방법과 추론 API를 사용하여 브라우저에서 직접 모델을 테스트하는 방법도 살펴보았습니다.
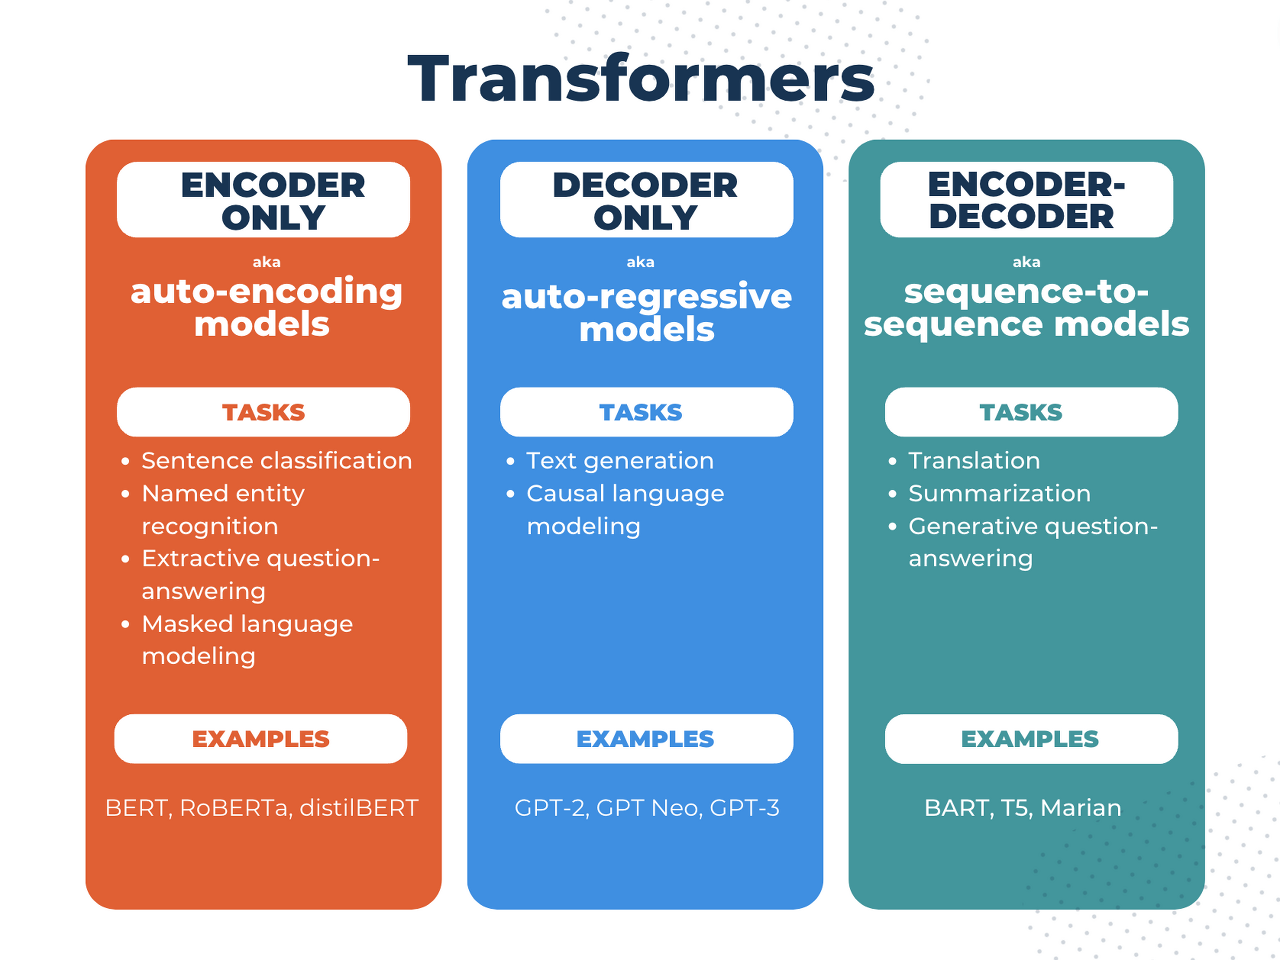
We discussed how Transformer models work at a high level, and talked about the importance of transfer learning and fine-tuning. A key aspect is that you can use the full architecture or only the encoder or decoder, depending on what kind of task you aim to solve. The following table summarizes this:
Transformer 모델이 높은 수준에서 작동하는 방식에 대해 논의하고 전이 학습 및 미세 조정의 중요성에 대해 이야기했습니다. 중요한 측면은 해결하려는 작업 종류에 따라 전체 아키텍처를 사용하거나 인코더나 디코더만 사용할 수 있다는 것입니다. 다음 표에 이 내용이 요약되어 있습니다.
If your intent is to use a pretrained model or a fine-tuned version in production, please be aware that, while these models are powerful tools, they come with limitations. The biggest of these is that, to enable pretraining on large amounts of data, researchers often scrape all the content they can find, taking the best as well as the worst of what is available on the internet.
프로덕션에서 사전 학습된 모델이나 미세 조정된 버전을 사용하려는 경우 이러한 모델은 강력한 도구이기는 하지만 제한 사항이 있다는 점에 유의하세요. 그 중 가장 큰 점은 많은 양의 데이터에 대한 사전 훈련을 활성화하기 위해 연구자들이 찾을 수 있는 모든 콘텐츠를 긁어내어 인터넷에서 사용할 수 있는 콘텐츠 중 최고와 최악의 콘텐츠를 취하는 경우가 많다는 것입니다.
To give a quick illustration, let’s go back the example of afill-maskpipeline with the BERT model:
빠른 설명을 위해 BERT 모델을 사용한 채우기 마스크 파이프라인의 예로 돌아가 보겠습니다.
from transformers import pipeline

unmasker = pipeline("fill-mask", model="bert-base-uncased")
result = unmasker("This man works as a [MASK].")
print([r["token_str"] for r in result])

result = unmasker("This woman works as a [MASK].")
print([r["token_str"] for r in result])
이 코드는 Hugging Face Transformers 라이브러리를 사용하여 BERT 모델을 활용하여 주어진 문장의 [MASK] 위치에 대한 예측을 수행하는 예제입니다.
from transformers import pipeline

# 'fill-mask' 파이프라인을 생성하고, 모델을 'bert-base-uncased'로 설정합니다.
unmasker = pipeline("fill-mask", model="bert-base-uncased")

# 첫 번째 문장에서 [MASK] 위치에 대한 예측을 수행하고 결과를 출력합니다.
result = unmasker("This man works as a [MASK].")
print([r["token_str"] for r in result])

# 두 번째 문장에서 [MASK] 위치에 대한 예측을 수행하고 결과를 출력합니다.
result = unmasker("This woman works as a [MASK].")
print([r["token_str"] for r in result])
여기에서 사용된 fill-mask 파이프라인은 주어진 문장에서 [MASK] 토큰의 위치에 대한 예측을 수행합니다. BERT 모델은 문맥을 고려하여 [MASK] 위치에 들어갈 수 있는 가장 적절한 토큰을 예측하게 됩니다.
출력된 결과는 각각의 [MASK] 위치에 대한 예측 결과를 나타냅니다. 출력은 확률이 높은 순으로 정렬되어 있으며, token_str 키를 통해 해당 토큰의 문자열 값을 확인할 수 있습니다.
이 코드는 BERT 모델을 활용하여 문장 내의 [MASK] 위치에 대한 토큰 예측을 수행하는 간단한 예제를 제시하고 있습니다.
When asked to fill in the missing word in these two sentences, the model gives only one gender-free answer (waiter/waitress). The others are work occupations usually associated with one specific gender — and yes, prostitute ended up in the top 5 possibilities the model associates with “woman” and “work.” This happens even though BERT is one of the rare Transformer models not built by scraping data from all over the internet, but rather using apparently neutral data (it’s trained on theEnglish WikipediaandBookCorpusdatasets).
이 두 문장에서 누락된 단어를 채워 달라는 요청을 받으면 모델은 성별에 관계없이 단 하나의 답변(웨이터/웨이트리스)만 제공합니다. 다른 것들은 일반적으로 하나의 특정 성별과 관련된 직업입니다. 그렇습니다. 매춘부는 모델이 "여성" 및 "일"과 연관시키는 상위 5가지 가능성에 포함되었습니다. 이는 BERT가 인터넷 전체에서 데이터를 스크랩하여 구축된 것이 아니라 명백히 중립적인 데이터(English Wikipedia 및 BookCorpus 데이터세트에서 훈련됨)를 사용하여 구축된 보기 드문 Transformer 모델 중 하나임에도 불구하고 발생합니다.
When you use these tools, you therefore need to keep in the back of your mind that the original model you are using could very easily generate sexist, racist, or homophobic content. Fine-tuning the model on your data won’t make this intrinsic bias disappear.
따라서 이러한 도구를 사용할 때는 사용 중인 원래 모델이 성차별, 인종 차별, 동성애 혐오 콘텐츠를 매우 쉽게 생성할 수 있다는 점을 염두에 두어야 합니다. 데이터에 대한 모델을 미세 조정해도 이러한 본질적인 편향이 사라지지는 않습니다.
Encoder-decoder models (also calledsequence-to-sequence models) use both parts of the Transformer architecture. At each stage, the attention layers of the encoder can access all the words in the initial sentence, whereas the attention layers of the decoder can only access the words positioned before a given word in the input.
인코더-디코더 모델(시퀀스-시퀀스 모델이라고도 함)은 Transformer 아키텍처의 두 부분을 모두 사용합니다. 각 단계에서 인코더의 어텐션 레이어는 초기 문장의 모든 단어에 액세스할 수 있는 반면, 디코더의 어텐션 레이어는 입력에서 특정 단어 앞에 위치한 단어에만 액세스할 수 있습니다.
The pretraining of these models can be done using the objectives of encoder or decoder models, but usually involves something a bit more complex. For instance,T5is pretrained by replacing random spans of text (that can contain several words) with a single mask special word, and the objective is then to predict the text that this mask word replaces.
이러한 모델의 사전 훈련은 인코더 또는 디코더 모델의 목적을 사용하여 수행될 수 있지만 일반적으로 좀 더 복잡한 작업이 포함됩니다. 예를 들어, T5는 임의의 텍스트 범위(여러 단어를 포함할 수 있음)를 단일 마스크 특수 단어로 대체하여 사전 학습되었으며, 그런 다음 목표는 이 마스크 단어가 대체할 텍스트를 예측하는 것입니다.
Sequence-to-sequence models are best suited for tasks revolving around generating new sentences depending on a given input, such as summarization, translation, or generative question answering.
Sequence-to-Sequence 모델은 요약, 번역 또는 생성적 질문 답변과 같이 주어진 입력에 따라 새로운 문장을 생성하는 작업에 가장 적합합니다.
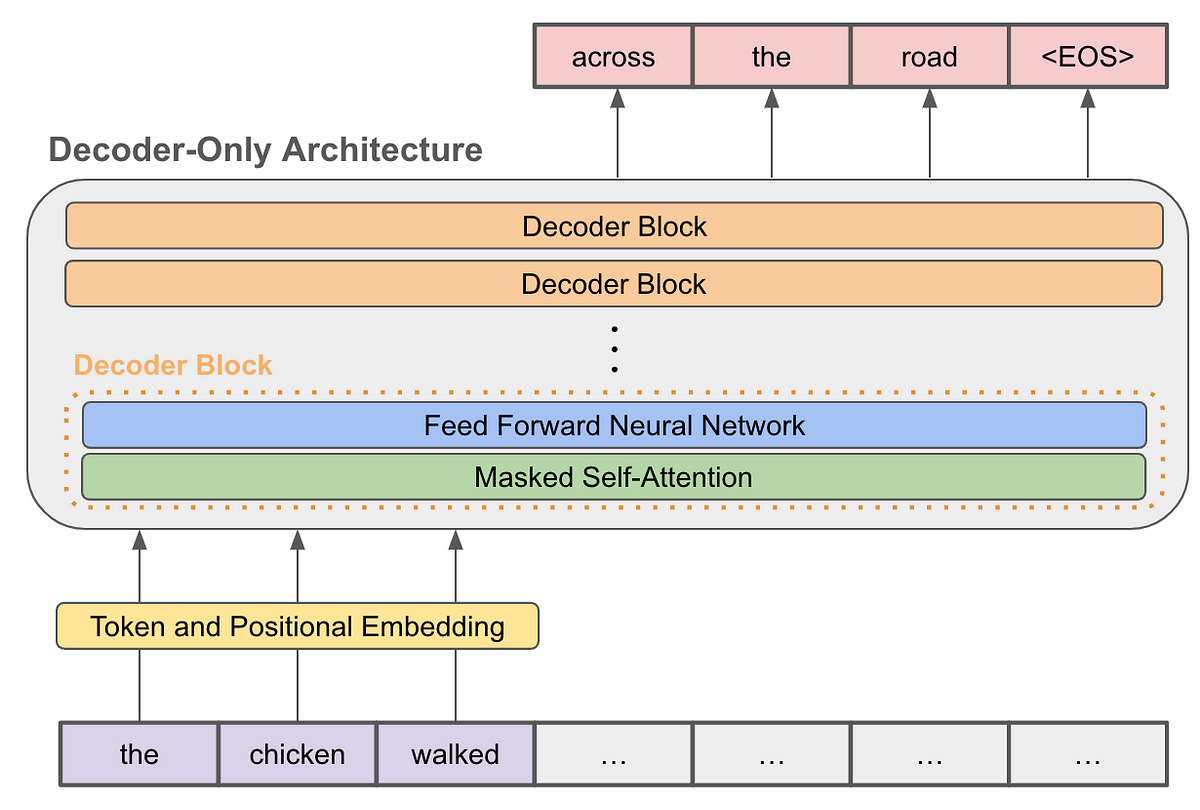
Decoder models use only the decoder of a Transformer model. At each stage, for a given word the attention layers can only access the words positioned before it in the sentence. These models are often calledauto-regressive models.
디코더 모델은 Transformer 모델의 디코더만 사용합니다. 각 단계에서 주어진 단어에 대해 어텐션 레이어는 문장에서 그 단어 앞에 위치한 단어에만 접근할 수 있습니다. 이러한 모델을 종종 자동 회귀 모델이라고 합니다.
The pretraining of decoder models usually revolves around predicting the next word in the sentence.
디코더 모델의 사전 학습은 일반적으로 문장의 다음 단어를 예측하는 것입니다.
These models are best suited for tasks involving text generation.
Encoder models use only the encoder of a Transformer model. At each stage, the attention layers can access all the words in the initial sentence. These models are often characterized as having “bi-directional” attention, and are often calledauto-encoding models.
인코더 모델은 Transformer 모델의 인코더만 사용합니다. 각 단계에서 Attention 레이어는 초기 문장의 모든 단어에 접근할 수 있습니다. 이러한 모델은 종종 "양방향" 주의를 기울이는 특징이 있으며 자동 인코딩 모델이라고도 합니다.
The pretraining of these models usually revolves around somehow corrupting a given sentence (for instance, by masking random words in it) and tasking the model with finding or reconstructing the initial sentence.
이러한 모델의 사전 학습은 일반적으로 주어진 문장을 어떻게든 손상시키고(예: 임의의 단어를 마스킹하여) 초기 문장을 찾거나 재구성하는 작업을 모델에 맡기는 것을 중심으로 진행됩니다.
Encoder models are best suited for tasks requiring an understanding of the full sentence, such as sentence classification, named entity recognition (and more generally word classification), and extractive question answering.
인코더 모델은 문장 분류, 명명된 엔터티 인식(더 일반적으로는 단어 분류), 추출적 질문 응답 등 전체 문장에 대한 이해가 필요한 작업에 가장 적합합니다.
In this section, we will take a high-level look at the architecture of Transformer models.
이 섹션에서는 Transformer 모델의 아키텍처를 high-level look 해 보겠습니다.
A bit of Transformer history
Here are some reference points in the (short) history of Transformer models:
다음은 Transformer 모델의 (짧은) 역사에 대한 몇 가지 참고 사항입니다.
TheTransformer architecturewas introduced in June 2017. The focus of the original research was on translation tasks. This was followed by the introduction of several influential models, including:
Transformer 아키텍처는 2017년 6월에 도입되었습니다. 원래 연구의 초점은 번역 작업이었습니다. 그 후 다음을 포함한 여러 영향력 있는 모델이 도입되었습니다.
June 2018:GPT, the first pretrained Transformer model, used for fine-tuning on various NLP tasks and obtained state-of-the-art results
2018년 6월: 최초의 사전 훈련된 Transformer 모델인 GPT는 다양한 NLP 작업의 미세 조정에 사용되어 최첨단 결과를 얻었습니다.
October 2018:BERT, another large pretrained model, this one designed to produce better summaries of sentences (more on this in the next chapter!)
2018년 10월: 또 다른 대형 사전 학습 모델인 BERT는 더 나은 문장 요약을 생성하도록 설계되었습니다(자세한 내용은 다음 장에서!).
February 2019:GPT-2, an improved (and bigger) version of GPT that was not immediately publicly released due to ethical concerns
2019년 2월: 윤리적 문제로 인해 즉시 공개되지 않은 개선된(및 더 큰) 버전의 GPT인 GPT-2
October 2019:DistilBERT, a distilled version of BERT that is 60% faster, 40% lighter in memory, and still retains 97% of BERT’s performance
2019년 10월: 60% 더 빠르고 메모리는 40% 가벼우면서도 여전히 BERT 성능의 97%를 유지하는 BERT의 증류 버전인 DitilBERT
October 2019:BARTandT5, two large pretrained models using the same architecture as the original Transformer model (the first to do so)
2019년 10월: BART 및 T5, 원래 Transformer 모델과 동일한 아키텍처를 사용하는 두 개의 사전 훈련된 모델(최초)
May 2020,GPT-3, an even bigger version of GPT-2 that is able to perform well on a variety of tasks without the need for fine-tuning (calledzero-shot learning)
2020년 5월, 미세 조정 없이 다양한 작업을 잘 수행할 수 있는 GPT-2의 더 큰 버전인 GPT-3(제로샷 학습이라고 함)
This list is far from comprehensive, and is just meant to highlight a few of the different kinds of Transformer models. Broadly, they can be grouped into three categories:
이 목록은 포괄적이지 않으며 단지 다양한 종류의 Transformer 모델 중 몇 가지를 강조하기 위한 것입니다. 크게는 세 가지 범주로 분류할 수 있습니다.
We will dive into these families in more depth later on.
나중에 이러한 계열에 대해 더 자세히 살펴보겠습니다.
Transformers are language models
All the Transformer models mentioned above (GPT, BERT, BART, T5, etc.) have been trained aslanguage models. This means they have been trained on large amounts of raw text in a self-supervised fashion. Self-supervised learning is a type of training in which the objective is automatically computed from the inputs of the model. That means that humans are not needed to label the data!
위에서 언급한 모든 Transformer 모델(GPT, BERT, BART, T5 등)은 언어 모델로 학습되었습니다. 이는 그들이 자기 감독 방식으로 대량의 원시 텍스트에 대해 훈련을 받았다는 것을 의미합니다. 자기 지도 학습은 모델의 입력으로부터 목표가 자동으로 계산되는 훈련 유형입니다. 이는 데이터에 라벨을 붙이는 데 사람이 필요하지 않다는 것을 의미합니다!
This type of model develops a statistical understanding of the language it has been trained on, but it’s not very useful for specific practical tasks. Because of this, the general pretrained model then goes through a process calledtransfer learning. During this process, the model is fine-tuned in a supervised way — that is, using human-annotated labels — on a given task.
이러한 유형의 모델은 훈련된 언어에 대한 통계적 이해를 발전시키지만 특정 실제 작업에는 그다지 유용하지 않습니다. 이로 인해 일반 사전 학습 모델은 전이 학습이라는 과정을 거칩니다. 이 프로세스 동안 모델은 주어진 작업에 대해 지도 방식, 즉 사람이 주석을 추가한 레이블을 사용하여 미세 조정됩니다.
An example of a task is predicting the next word in a sentence having read thenprevious words. This is calledcausal language modelingbecause the output depends on the past and present inputs, but not the future ones.
작업의 예는 n개의 이전 단어를 읽고 문장의 다음 단어를 예측하는 것입니다. 출력이 과거 및 현재 입력에 따라 달라지지만 미래 입력에는 영향을 받지 않기 때문에 이를 인과 언어 모델링이라고 합니다.
Another example ismasked language modeling, in which the model predicts a masked word in the sentence.
또 다른 예는 모델이 문장에서 마스크된 단어를 예측하는 마스크된 언어 모델링입니다.
Transformers are big models
Apart from a few outliers (like DistilBERT), the general strategy to achieve better performance is by increasing the models’ sizes as well as the amount of data they are pretrained on.
DistilBERT와 같은 몇 가지 이상값을 제외하고 더 나은 성능을 달성하기 위한 일반적인 전략은 모델의 크기와 사전 학습된 데이터의 양을 늘리는 것입니다.
Unfortunately, training a model, especially a large one, requires a large amount of data. This becomes very costly in terms of time and compute resources. It even translates to environmental impact, as can be seen in the following graph.
불행하게도 모델, 특히 대규모 모델을 훈련하려면 많은 양의 데이터가 필요합니다. 이는 시간과 컴퓨팅 리소스 측면에서 매우 비용이 많이 듭니다. 다음 그래프에서 볼 수 있듯이 이는 환경에 미치는 영향까지 해석됩니다.
And this is showing a project for a (very big) model led by a team consciously trying to reduce the environmental impact of pretraining. The footprint of running lots of trials to get the best hyperparameters would be even higher.
그리고 이것은 사전 훈련이 환경에 미치는 영향을 의식적으로 줄이기 위해 노력하는 팀이 이끄는 (매우 큰) 모델에 대한 프로젝트를 보여줍니다. 최상의 초매개변수를 얻기 위해 수많은 시도를 실행하는 데 드는 공간은 훨씬 더 커질 것입니다.
Imagine if each time a research team, a student organization, or a company wanted to train a model, it did so from scratch. This would lead to huge, unnecessary global costs!
연구팀, 학생 단체 또는 회사가 모델을 훈련하려고 할 때마다 처음부터 그렇게 했다고 상상해 보십시오. 이로 인해 막대하고 불필요한 글로벌 비용이 발생하게 됩니다!
This is why sharing language models is paramount: sharing the trained weights and building on top of already trained weights reduces the overall compute cost and carbon footprint of the community.
이것이 바로 언어 모델 공유가 중요한 이유입니다. 훈련된 가중치를 공유하고 이미 훈련된 가중치 위에 구축하면 커뮤니티의 전체 컴퓨팅 비용과 탄소 배출량이 줄어듭니다.
By the way, you can evaluate the carbon footprint of your models’ training through several tools. For exampleML CO2 ImpactorCode Carbonwhich is integrated in 🤗 Transformers. To learn more about this, you can read thisblog postwhich will show you how to generate anemissions.csvfile with an estimate of the footprint of your training, as well as thedocumentationof 🤗 Transformers addressing this topic.
그런데 여러 도구를 통해 모델 학습의 탄소 배출량을 평가할 수 있습니다. 예를 들어 🤗 Transformers에 통합된 ML CO2 Impact 또는 Code Carbon이 있습니다. 이에 대해 자세히 알아보려면 이 주제를 다루는 🤗 Transformers 문서뿐만 아니라 훈련 공간의 추정치를 포함하여 Emission.csv 파일을 생성하는 방법을 보여주는 이 블로그 게시물을 읽어보세요.
retrainingis the act of training a model from scratch: the weights are randomly initialized, and the training starts without any prior knowledge.
사전 훈련은 모델을 처음부터 훈련하는 행위입니다. 가중치는 무작위로 초기화되고 사전 지식 없이 훈련이 시작됩니다.
This pretraining is usually done on very large amounts of data. Therefore, it requires a very large corpus of data, and training can take up to several weeks.
이 사전 훈련은 일반적으로 매우 많은 양의 데이터에 대해 수행됩니다. 따라서 매우 많은 양의 데이터가 필요하며 훈련에는 최대 몇 주가 걸릴 수 있습니다.
Fine-tuning, on the other hand, is the training doneaftera model has been pretrained. To perform fine-tuning, you first acquire a pretrained language model, then perform additional training with a dataset specific to your task. Wait — why not simply train directly for the final task? There are a couple of reasons:
반면, 미세 조정은 모델이 사전 훈련된 후에 수행되는 훈련입니다. 미세 조정을 수행하려면 먼저 사전 훈련된 언어 모델을 획득한 다음 작업과 관련된 데이터 세트를 사용하여 추가 훈련을 수행합니다. 잠깐만요. 최종 작업을 위해 직접 훈련하면 어떨까요? 몇 가지 이유가 있습니다:
The pretrained model was already trained on a dataset that has some similarities with the fine-tuning dataset. The fine-tuning process is thus able to take advantage of knowledge acquired by the initial model during pretraining (for instance, with NLP problems, the pretrained model will have some kind of statistical understanding of the language you are using for your task).
사전 훈련된 모델은 미세 조정 데이터 세트와 일부 유사한 데이터 세트에 대해 이미 훈련되었습니다. 따라서 미세 조정 프로세스는 사전 훈련 중에 초기 모델에서 얻은 지식을 활용할 수 있습니다(예를 들어 NLP 문제의 경우 사전 훈련된 모델은 작업에 사용하는 언어에 대해 일종의 통계적 이해를 갖습니다).
Since the pretrained model was already trained on lots of data, the fine-tuning requires way less data to get decent results.
사전 훈련된 모델은 이미 많은 데이터에 대해 훈련되었으므로 미세 조정에 적절한 결과를 얻으려면 훨씬 적은 양의 데이터가 필요합니다.
For the same reason, the amount of time and resources needed to get good results are much lower.
같은 이유로 좋은 결과를 얻는 데 필요한 시간과 자원의 양은 훨씬 적습니다.
For example, one could leverage a pretrained model trained on the English language and then fine-tune it on an arXiv corpus, resulting in a science/research-based model. The fine-tuning will only require a limited amount of data: the knowledge the pretrained model has acquired is “transferred,” hence the termtransfer learning.
예를 들어, 영어로 훈련된 사전 훈련된 모델을 활용한 다음 arXiv 코퍼스에서 이를 미세 조정하여 과학/연구 기반 모델을 만들 수 있습니다. 미세 조정에는 제한된 양의 데이터만 필요합니다. 사전 훈련된 모델이 획득한 지식은 "전송"되므로 전이 학습이라는 용어가 사용됩니다.
Fine-tuning a model therefore has lower time, data, financial, and environmental costs. It is also quicker and easier to iterate over different fine-tuning schemes, as the training is less constraining than a full pretraining.
따라서 모델을 미세 조정하면 시간, 데이터, 재정, 환경 비용이 절감됩니다. 또한 훈련이 전체 사전 훈련보다 덜 제한적이므로 다양한 미세 조정 방식을 반복하는 것이 더 빠르고 쉽습니다.
This process will also achieve better results than training from scratch (unless you have lots of data), which is why you should always try to leverage a pretrained model — one as close as possible to the task you have at hand — and fine-tune it.
또한 이 프로세스는 처음부터 훈련하는 것보다 더 나은 결과를 얻을 수 있으므로(데이터가 많지 않은 경우) 항상 사전 훈련된 모델을 활용하려고 노력해야 합니다.— 현재 진행 중인 작업에 최대한 가깝게 설정하고 미세 조정하세요.
General architecture
In this section, we’ll go over the general architecture of the Transformer model. Don’t worry if you don’t understand some of the concepts; there are detailed sections later covering each of the components.
이 섹션에서는 Transformer 모델의 일반적인 아키텍처를 살펴보겠습니다. 일부 개념을 이해하지 못하더라도 걱정하지 마세요. 나중에 각 구성 요소를 다루는 자세한 섹션이 있습니다.
Encoder (left): The encoder receives an input and builds a representation of it (its features). This means that the model is optimized to acquire understanding from the input.
인코더(왼쪽): 인코더는 입력을 수신하고 이에 대한 representation (해당 features )을 작성합니다. 이는 모델이 입력으로부터 이해를 얻도록 최적화되었음을 의미합니다.
Decoder (right): The decoder uses the encoder’s representation (features) along with other inputs to generate a target sequence. This means that the model is optimized for generating outputs.
디코더(오른쪽): 디코더는 다른 입력과 함께 인코더의 representation ( features )을 사용하여 대상 시퀀스를 생성합니다. 이는 모델이 출력 생성에 최적화되어 있음을 의미합니다.
Each of these parts can be used independently, depending on the task:
이러한 각 부분은 작업에 따라 독립적으로 사용될 수 있습니다.
Encoder-only models: Good for tasks that require understanding of the input, such as sentence classification and named entity recognition.
인코더 전용 모델: 문장 분류 및 명명된 엔터티 인식과 같이 입력에 대한 이해가 필요한 작업에 적합합니다.
Decoder-only models: Good for generative tasks such as text generation.
디코더 전용 모델: 텍스트 생성과 같은 생성 작업에 적합합니다.
Encoder-decoder modelsorsequence-to-sequence models: Good for generative tasks that require an input, such as translation or summarization.
인코더-디코더 모델 또는 시퀀스-시퀀스 모델: 번역 또는 요약과 같이 입력이 필요한 생성 작업에 적합합니다.
We will dive into those architectures independently in later sections.
이후 섹션에서 이러한 아키텍처에 대해 독립적으로 살펴보겠습니다.
Attention layers
A key feature of Transformer models is that they are built with special layers calledattention layers. In fact, the title of the paper introducing the Transformer architecture was“Attention Is All You Need”! We will explore the details of attention layers later in the course; for now, all you need to know is that this layer will tell the model to pay specific attention to certain words in the sentence you passed it (and more or less ignore the others) when dealing with the representation of each word.
Transformer 모델의 주요 특징은 Attention 레이어라는 특수 레이어로 구축된다는 것입니다. 실제로 Transformer 아키텍처를 소개하는 논문의 제목은 "Attention Is All You Need"였습니다! 이 과정의 뒷부분에서 Attention 레이어에 대한 세부 사항을 살펴보겠습니다. 지금으로서 알아야 할 것은 이 레이어가 각 단어의 표현을 처리할 때 전달한 문장의 특정 단어에 특별한 주의를 기울이고 다른 단어는 거의 무시하도록 모델에 지시한다는 것입니다.
To put this into context, consider the task of translating text from English to French. Given the input “You like this course”, a translation model will need to also attend to the adjacent word “You” to get the proper translation for the word “like”, because in French the verb “like” is conjugated differently depending on the subject. The rest of the sentence, however, is not useful for the translation of that word. In the same vein, when translating “this” the model will also need to pay attention to the word “course”, because “this” translates differently depending on whether the associated noun is masculine or feminine. Again, the other words in the sentence will not matter for the translation of “this”. With more complex sentences (and more complex grammar rules), the model would need to pay special attention to words that might appear farther away in the sentence to properly translate each word.
이를 맥락에 맞게 이해하려면 텍스트를 영어에서 프랑스어로 번역하는 작업을 고려해 보세요. "You like thiscourse"라는 입력이 주어지면 번역 모델은 "like"라는 단어에 대한 적절한 번역을 얻기 위해 인접한 단어 "You"에도 주의를 기울여야 합니다. 왜냐하면 프랑스어에서는 동사 "like"가 주제에 따라 다르게 활용되기 때문입니다. 그러나 문장의 나머지 부분은 해당 단어를 번역하는 데 유용하지 않습니다. 같은 맥락에서, "this"를 번역할 때 모델은 "course"라는 단어에도 주의를 기울여야 합니다. "this"는 관련 명사가 남성인지 여성인지에 따라 다르게 번역되기 때문입니다. 다시 말하지만, 문장의 다른 단어는 "this"를 번역하는 데 중요하지 않습니다. 더 복잡한 문장(및 더 복잡한 문법 규칙)의 경우 모델은 각 단어를 적절하게 번역하기 위해 문장에서 더 멀리 나타날 수 있는 단어에 특별한 주의를 기울여야 합니다.
The same concept applies to any task associated with natural language: a word by itself has a meaning, but that meaning is deeply affected by the context, which can be any other word (or words) before or after the word being studied.
Now that you have an idea of what attention layers are all about, let’s take a closer look at the Transformer architecture.
동일한 개념이 자연어와 관련된 모든 작업에 적용됩니다. 단어 자체에는 의미가 있지만 해당 의미는 연구되는 단어 전후의 다른 단어(또는 단어)일 수 있는 문맥에 의해 깊은 영향을 받습니다.
이제 어텐션 레이어가 무엇인지 알았으니 Transformer 아키텍처를 자세히 살펴보겠습니다.
The original architecture
The Transformer architecture was originally designed for translation. During training, the encoder receives inputs (sentences) in a certain language, while the decoder receives the same sentences in the desired target language. In the encoder, the attention layers can use all the words in a sentence (since, as we just saw, the translation of a given word can be dependent on what is after as well as before it in the sentence). The decoder, however, works sequentially and can only pay attention to the words in the sentence that it has already translated (so, only the words before the word currently being generated). For example, when we have predicted the first three words of the translated target, we give them to the decoder which then uses all the inputs of the encoder to try to predict the fourth word.
Transformer 아키텍처는 원래 번역용으로 설계되었습니다. 학습 중에 인코더는 특정 언어로 된 입력(문장)을 수신하고 디코더는 원하는 대상 언어로 동일한 문장을 수신합니다. 인코더에서 어텐션 레이어는 문장의 모든 단어를 사용할 수 있습니다(방금 본 것처럼 주어진 단어의 번역은 문장의 앞과 뒤의 내용에 따라 달라질 수 있기 때문입니다). 그러나 디코더는 순차적으로 작동하며 이미 번역된 문장의 단어에만 주의를 기울일 수 있습니다. 즉, 현재 생성되고 있는 단어 앞의 단어에만 주의를 기울일 수 있습니다. 예를 들어, 번역된 대상의 처음 세 단어를 예측한 경우 이를 디코더에 제공하고 디코더는 인코더의 모든 입력을 사용하여 네 번째 단어를 예측하려고 시도합니다.
To speed things up during training (when the model has access to target sentences), the decoder is fed the whole target, but it is not allowed to use future words (if it had access to the word at position 2 when trying to predict the word at position 2, the problem would not be very hard!). For instance, when trying to predict the fourth word, the attention layer will only have access to the words in positions 1 to 3.
훈련 중에 작업 속도를 높이기 위해(모델이 대상 문장에 액세스할 수 있는 경우) 디코더에 전체 대상이 제공되지만 미래 단어를 사용할 수는 없습니다(예측을 시도할 때 위치 2의 단어에 액세스한 경우). 위치 2에 단어가 있으면 문제는 그리 어렵지 않을 것입니다!). 예를 들어, 네 번째 단어를 예측하려고 할 때 Attention 레이어는 위치 1~3의 단어에만 접근할 수 있습니다.
The original Transformer architecture looked like this, with the encoder on the left and the decoder on the right:
원래 Transformer 아키텍처는 다음과 같았습니다. 인코더는 왼쪽에 디코더는 오른쪽에 있습니다.
Note that the first attention layer in a decoder block pays attention to all (past) inputs to the decoder, but the second attention layer uses the output of the encoder. It can thus access the whole input sentence to best predict the current word. This is very useful as different languages can have grammatical rules that put the words in different orders, or some context provided later in the sentence may be helpful to determine the best translation of a given word.
디코더 블록의 첫 번째 attention layer 는 디코더에 대한 모든(과거) 입력에 주의를 기울이지만 두 번째 attention layer는 인코더의 출력을 사용합니다. 따라서 전체 입력 문장에 액세스하여 현재 단어를 가장 잘 예측할 수 있습니다. 이는 다양한 언어가 단어의 순서를 다르게 지정하는 문법 규칙을 가질 수 있거나 문장의 뒷부분에 제공되는 일부 컨텍스트가 특정 단어의 최상의 번역을 결정하는 데 도움이 될 수 있으므로 매우 유용합니다.
Theattention maskcan also be used in the encoder/decoder to prevent the model from paying attention to some special words — for instance, the special padding word used to make all the inputs the same length when batching together sentences.
어텐션 마스크는 모델이 일부 특수 단어(예: 문장을 일괄 처리할 때 모든 입력을 동일한 길이로 만드는 데 사용되는 특수 패딩 단어)에 주의를 기울이는 것을 방지하기 위해 인코더/디코더에서 사용할 수도 있습니다.
Architectures vs. checkpoints
As we dive into Transformer models in this course, you’ll see mentions ofarchitecturesandcheckpointsas well asmodels. These terms all have slightly different meanings:
이 과정에서 Transformer 모델을 자세히 살펴보면 모델뿐만 아니라 아키텍처와 체크포인트에 대한 언급도 볼 수 있습니다. 이러한 용어는 모두 약간 다른 의미를 갖습니다.
Architecture: This is the skeleton of the model — the definition of each layer and each operation that happens within the model.
아키텍처: 이는 모델의 뼈대입니다. 즉, 각 레이어의 정의와 모델 내에서 발생하는 각 작업입니다.
Checkpoints: These are the weights that will be loaded in a given architecture.
체크포인트: 특정 아키텍처에 로드될 가중치입니다.
Model: This is an umbrella term that isn’t as precise as “architecture” or “checkpoint”: it can mean both. This course will specifyarchitectureorcheckpointwhen it matters to reduce ambiguity.
모델: 이는 "아키텍처"나 "체크포인트"만큼 정확하지 않은 포괄적인 용어입니다. 두 가지 모두를 의미할 수 있습니다. 이 과정에서는 모호성을 줄이는 것이 중요한 경우 아키텍처 또는 체크포인트를 지정합니다.
For example, BERT is an architecture whilebert-base-cased, a set of weights trained by the Google team for the first release of BERT, is a checkpoint. However, one can say “the BERT model” and “thebert-base-casedmodel.”
예를 들어, BERT는 아키텍처인 반면 Google 팀이 BERT의 첫 번째 릴리스를 위해 훈련한 가중치 세트인 bert-base-cased는 체크포인트입니다. 그러나 "BERT 모델"과 "bert-base-cased 모델"이라고 말할 수 있습니다.
In this section, we will look at what Transformer models can do and use our first tool from the 🤗 Transformers library: thepipeline()function.
이 섹션에서는 Transformer 모델이 수행할 수 있는 작업을 살펴보고 🤗 Transformers 라이브러리의 첫 번째 도구인 파이프라인() 함수를 사용합니다.
👀 See thatOpen in Colabbutton on the top right? Click on it to open a Google Colab notebook with all the code samples of this section. This button will be present in any section containing code examples.
If you want to run the examples locally, we recommend taking a look at thesetup.
👀 오른쪽 상단에 Colab에서 열기 버튼이 보이시나요? 이 섹션의 모든 코드 샘플이 포함된 Google Colab 노트북을 열려면 클릭하세요. 이 버튼은 코드 예제가 포함된 모든 섹션에 표시됩니다. 예제를 로컬에서 실행하려면 설정을 살펴보는 것이 좋습니다.
Transformers are everywhere!
Transformer models are used to solve all kinds of NLP tasks, like the ones mentioned in the previous section. Here are some of the companies and organizations using Hugging Face and Transformer models, who also contribute back to the community by sharing their models:
Transformer 모델은 이전 섹션에서 언급한 것과 같은 모든 종류의 NLP 작업을 해결하는 데 사용됩니다. Hugging Face 및 Transformer 모델을 사용하고 모델을 공유하여 커뮤니티에 다시 기여하는 일부 회사 및 조직은 다음과 같습니다.
The🤗 Transformers libraryprovides the functionality to create and use those shared models. TheModel Hubcontains thousands of pretrained models that anyone can download and use. You can also upload your own models to the Hub!
🤗 Transformers 라이브러리는 이러한 공유 모델을 생성하고 사용할 수 있는 기능을 제공합니다. 모델 허브에는 누구나 다운로드하여 사용할 수 있는 수천 개의 사전 훈련된 모델이 포함되어 있습니다. 자신의 모델을 허브에 업로드할 수도 있습니다!
⚠️ The Hugging Face Hub is not limited to Transformer models. Anyone can share any kind of models or datasets they want!Create a huggingface.coaccount to benefit from all available features!
Before diving into how Transformer models work under the hood, let’s look at a few examples of how they can be used to solve some interesting NLP problems.
⚠️ Hugging Face Hub는 Transformer 모델에만 국한되지 않습니다. 누구나 원하는 모든 종류의 모델이나 데이터 세트를 공유할 수 있습니다! 사용 가능한 모든 기능을 활용하려면 Huggingface.co 계정을 만드세요! Transformer 모델이 내부적으로 어떻게 작동하는지 알아보기 전에, 몇 가지 흥미로운 NLP 문제를 해결하는 데 어떻게 사용될 수 있는지에 대한 몇 가지 예를 살펴보겠습니다.
The most basic object in the 🤗 Transformers library is thepipeline()function. It connects a model with its necessary preprocessing and postprocessing steps, allowing us to directly input any text and get an intelligible answer:
🤗 Transformers 라이브러리의 가장 기본적인 객체는 파이프라인() 함수입니다. 모델을 필요한 전처리 및 후처리 단계와 연결하여 텍스트를 직접 입력하고 이해하기 쉬운 답변을 얻을 수 있습니다.
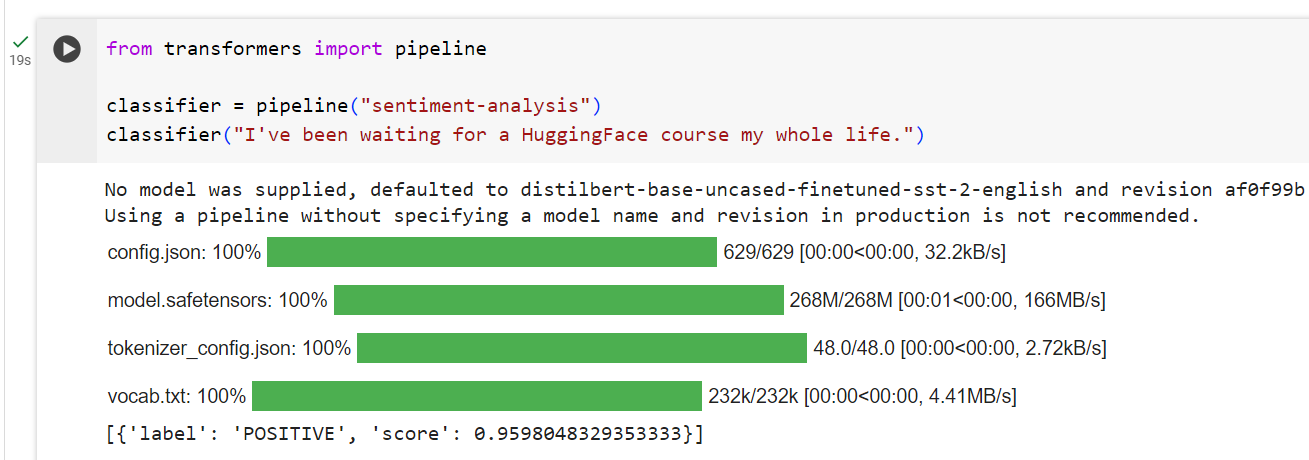
from transformers import pipeline

classifier = pipeline("sentiment-analysis")
classifier("I've been waiting for a HuggingFace course my whole life.")
By default, this pipeline selects a particular pretrained model that has been fine-tuned for sentiment analysis in English. The model is downloaded and cached when you create theclassifierobject. If you rerun the command, the cached model will be used instead and there is no need to download the model again.
기본적으로 이 파이프라인은 영어로 된 감정 분석을 위해 미세 조정된 특정 사전 학습 모델을 선택합니다. 분류자 개체를 생성하면 모델이 다운로드되고 캐시됩니다. 명령을 다시 실행하면 캐시된 모델이 대신 사용되며 모델을 다시 다운로드할 필요가 없습니다.
There are three main steps involved when you pass some text to a pipeline:
일부 텍스트를 파이프라인에 전달할 때 관련된 세 가지 주요 단계는 다음과 같습니다.
The text is preprocessed into a format the model can understand. 텍스트는 모델이 이해할 수 있는 형식으로 전처리됩니다.
The preprocessed inputs are passed to the model. 전처리된 입력이 모델에 전달됩니다.
The predictions of the model are post-processed, so you can make sense of them. 모델의 예측은 사후 처리되므로 이를 이해할 수 있습니다.
feature-extraction(get the vector representation of a text)
fill-mask
ner(named entity recognition)
question-answering
sentiment-analysis
summarization
text-generation
translation
zero-shot-classification
Let’s have a look at a few of these!
이들 중 몇 가지를 살펴보겠습니다!
Zero-shot classification
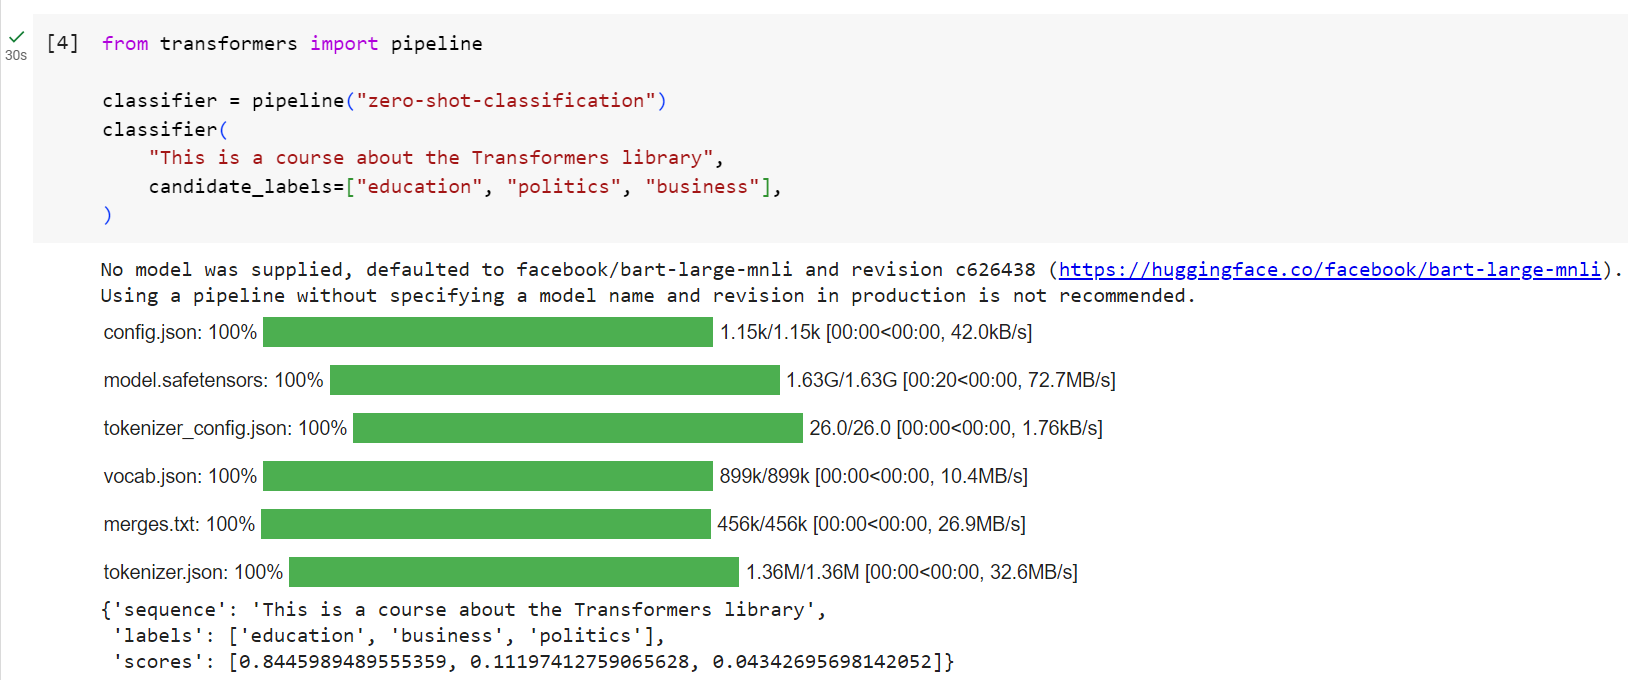
We’ll start by tackling a more challenging task where we need to classify texts that haven’t been labelled. This is a common scenario in real-world projects because annotating text is usually time-consuming and requires domain expertise. For this use case, thezero-shot-classificationpipeline is very powerful: it allows you to specify which labels to use for the classification, so you don’t have to rely on the labels of the pretrained model. You’ve already seen how the model can classify a sentence as positive or negative using those two labels — but it can also classify the text using any other set of labels you like.
라벨이 지정되지 않은 텍스트를 분류해야 하는 좀 더 어려운 작업부터 시작하겠습니다. 텍스트에 주석을 다는 것은 일반적으로 시간이 많이 걸리고 도메인 전문 지식이 필요하기 때문에 이는 실제 프로젝트에서 일반적인 시나리오입니다. 이 사용 사례의 경우 제로 샷 분류 파이프라인은 매우 강력합니다. 분류에 사용할 레이블을 지정할 수 있으므로 사전 훈련된 모델의 레이블에 의존할 필요가 없습니다. 모델이 두 레이블을 사용하여 문장을 긍정 또는 부정으로 분류하는 방법을 이미 확인했습니다. 하지만 원하는 다른 레이블 세트를 사용하여 텍스트를 분류할 수도 있습니다.
from transformers import pipeline

classifier = pipeline("zero-shot-classification")
classifier(
    "This is a course about the Transformers library",
    candidate_labels=["education", "politics", "business"],
)
{'sequence': 'This is a course about the Transformers library',
 'labels': ['education', 'business', 'politics'],
 'scores': [0.8445963859558105, 0.111976258456707, 0.043427448719739914]}
This pipeline is calledzero-shotbecause you don’t need to fine-tune the model on your data to use it. It can directly return probability scores for any list of labels you want!
이 파이프라인을 사용하기 위해 데이터 모델을 미세 조정할 필요가 없기 때문에 제로샷이라고 합니다. 원하는 라벨 목록에 대한 확률 점수를 직접 반환할 수 있습니다!
✏️Try it out!Play around with your own sequences and labels and see how the model behaves.
✏️ 한번 사용해 보세요! 자신만의 시퀀스와 라벨을 가지고 실험해보고 모델이 어떻게 작동하는지 확인하세요.
Text generation
Now let’s see how to use a pipeline to generate some text. The main idea here is that you provide a prompt and the model will auto-complete it by generating the remaining text. This is similar to the predictive text feature that is found on many phones. Text generation involves randomness, so it’s normal if you don’t get the same results as shown below.
이제 파이프라인을 사용하여 텍스트를 생성하는 방법을 살펴보겠습니다. 여기서 주요 아이디어는 프롬프트를 제공하면 모델이 나머지 텍스트를 생성하여 프롬프트를 자동 완성한다는 것입니다. 이는 많은 휴대폰에서 볼 수 있는 텍스트 예측 기능과 유사합니다. 텍스트 생성에는 무작위성이 포함되므로 아래와 같은 결과가 나오지 않는 것이 정상입니다.
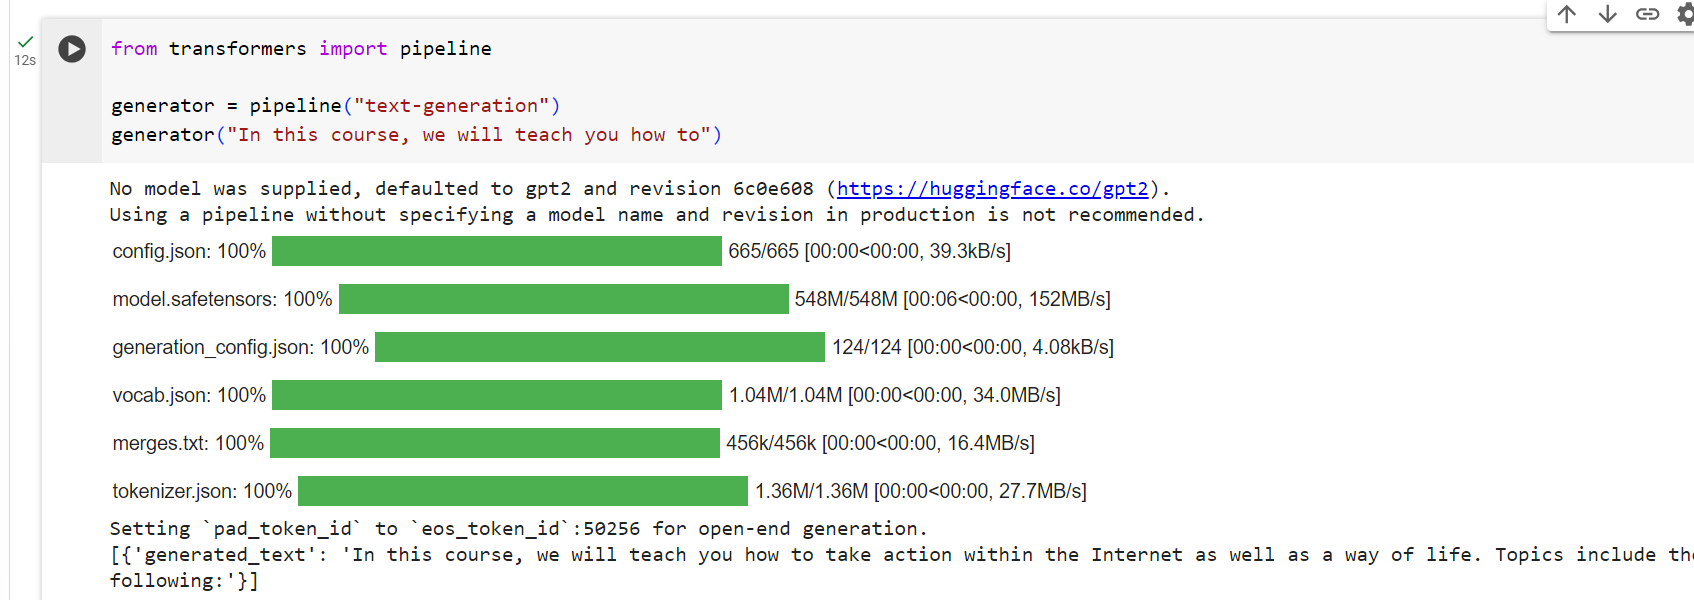
from transformers import pipeline

generator = pipeline("text-generation")
generator("In this course, we will teach you how to")
[{'generated_text': 'In this course, we will teach you how to understand and use '
                    'data flow and data interchange when handling user data. We '
                    'will be working with one or more of the most commonly used '
                    'data flows — data flows of various types, as seen by the '
                    'HTTP'}]
You can control how many different sequences are generated with the argumentnum_return_sequencesand the total length of the output text with the argumentmax_length.
num_return_sequences 인수를 사용하여 생성되는 서로 다른 시퀀스 수와 max_length 인수를 사용하여 출력 텍스트의 전체 길이를 제어할 수 있습니다.
✏️Try it out!Use thenum_return_sequencesandmax_lengtharguments to generate two sentences of 15 words each.
✏️ 한번 사용해 보세요! num_return_sequences 및 max_length 인수를 사용하여 각각 15개 단어로 구성된 두 문장을 생성합니다.
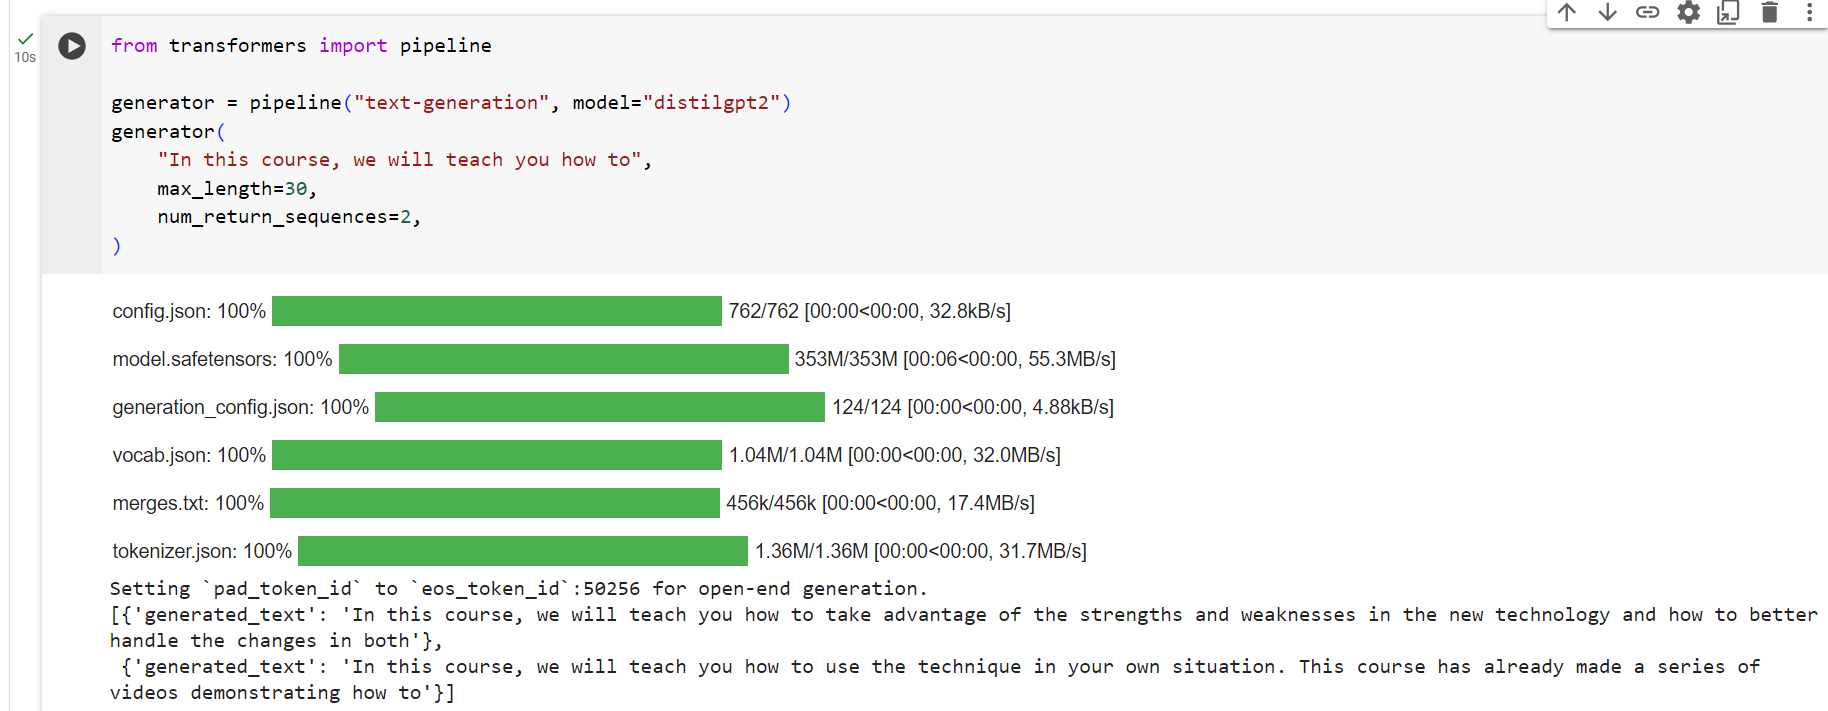
Using any model from the Hub in a pipeline
The previous examples used the default model for the task at hand, but you can also choose a particular model from the Hub to use in a pipeline for a specific task — say, text generation. Go to theModel Huband click on the corresponding tag on the left to display only the supported models for that task. You should get to a page likethis one.
이전 예제에서는 현재 작업에 기본 모델을 사용했지만 허브에서 특정 모델을 선택하여 특정 작업(예: 텍스트 생성)을 위한 파이프라인에서 사용할 수도 있습니다. 모델 허브로 이동하여 왼쪽에서 해당 태그를 클릭하면 해당 작업에 지원되는 모델만 표시됩니다. 이와 같은 페이지로 이동해야 합니다.
Let’s try thedistilgpt2model! Here’s how to load it in the same pipeline as before:
distilgpt2 모델을 사용해 봅시다! 이전과 동일한 파이프라인에서 이를 로드하는 방법은 다음과 같습니다.
from transformers import pipeline

generator = pipeline("text-generation", model="distilgpt2")
generator(
    "In this course, we will teach you how to",
    max_length=30,
    num_return_sequences=2,
)
[{'generated_text': 'In this course, we will teach you how to manipulate the world and '
                    'move your mental and physical capabilities to your advantage.'},
 {'generated_text': 'In this course, we will teach you how to become an expert and '
                    'practice realtime, and with a hands on experience on both real '
                    'time and real'}]
You can refine your search for a model by clicking on the language tags, and pick a model that will generate text in another language. The Model Hub even contains checkpoints for multilingual models that support several languages.
언어 태그를 클릭하여 모델 검색을 구체화하고 다른 언어로 텍스트를 생성할 모델을 선택할 수 있습니다. 모델 허브에는 여러 언어를 지원하는 다국어 모델에 대한 체크포인트도 포함되어 있습니다.
Once you select a model by clicking on it, you’ll see that there is a widget enabling you to try it directly online. This way you can quickly test the model’s capabilities before downloading it.
모델을 클릭하여 선택하면 온라인에서 직접 사용해 볼 수 있는 위젯이 표시됩니다. 이렇게 하면 모델을 다운로드하기 전에 모델의 기능을 빠르게 테스트할 수 있습니다.
✏️Try it out!Use the filters to find a text generation model for another language. Feel free to play with the widget and use it in a pipeline!
✏️ 한번 사용해 보세요! 필터를 사용하여 다른 언어에 대한 텍스트 생성 모델을 찾으세요. 위젯을 자유롭게 가지고 파이프라인에서 사용해 보세요!
The Inference API
All the models can be tested directly through your browser using the Inference API, which is available on the Hugging Facewebsite. You can play with the model directly on this page by inputting custom text and watching the model process the input data.
모든 모델은 Hugging Face 웹사이트에서 제공되는 Inference API를 사용하여 브라우저를 통해 직접 테스트할 수 있습니다. 이 페이지에서 사용자 정의 텍스트를 입력하고 모델이 입력 데이터를 처리하는 모습을 보면서 직접 모델을 가지고 놀 수 있습니다.
The Inference API that powers the widget is also available as a paid product, which comes in handy if you need it for your workflows. See thepricing pagefor more details.
위젯을 지원하는 Inference API는 유료 제품으로도 제공되므로 워크플로에 필요할 때 유용합니다. 자세한 내용은 가격 페이지를 참조하세요.
Mask filling
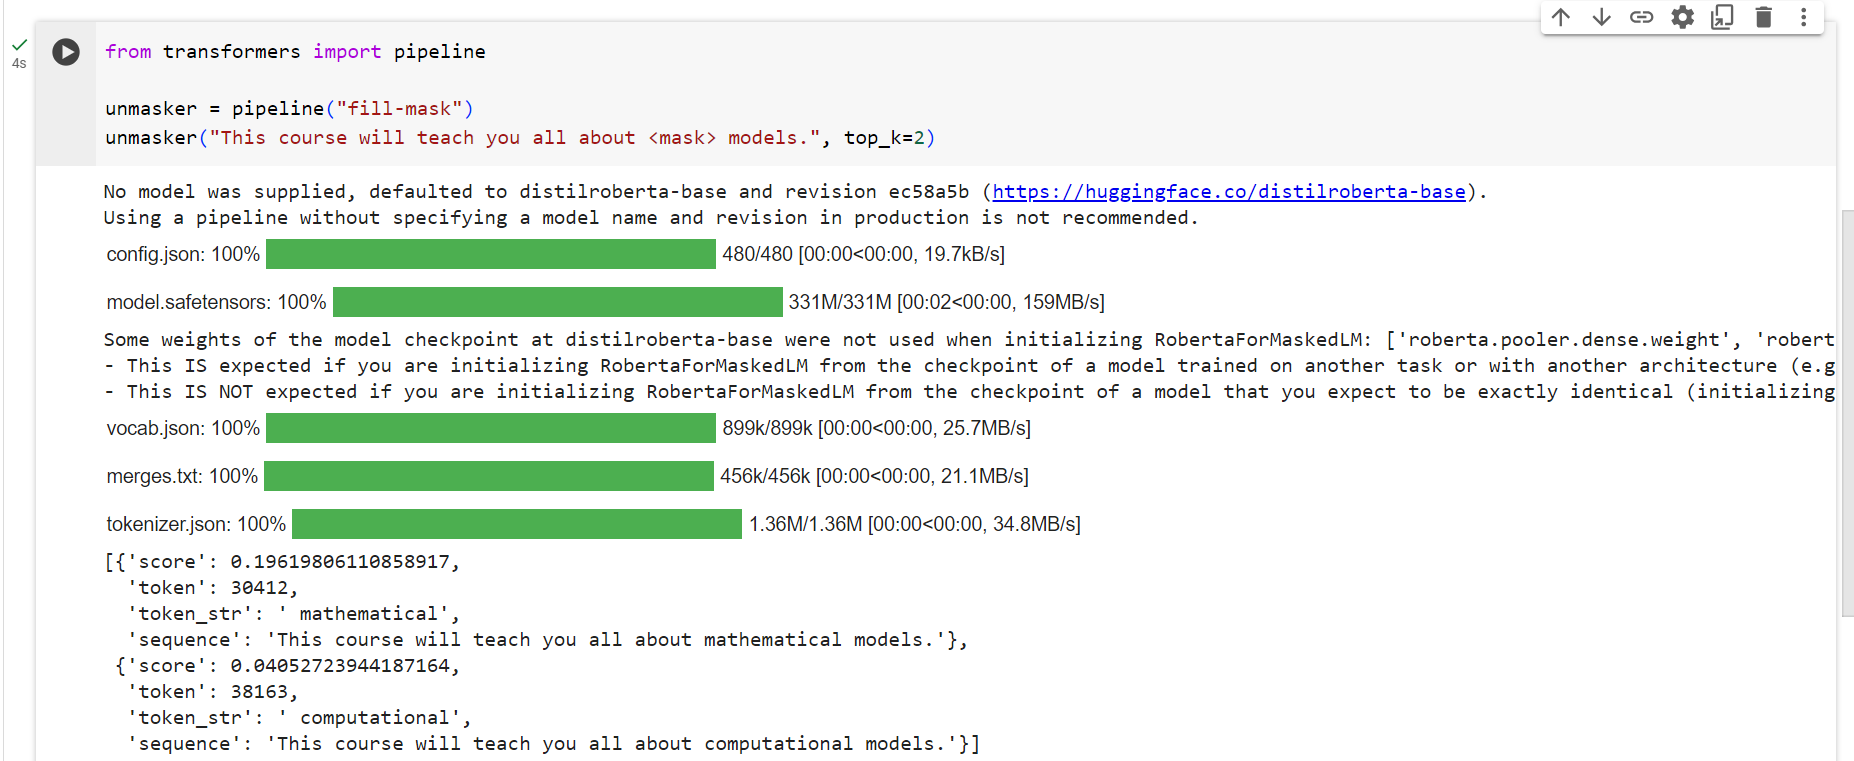
The next pipeline you’ll try isfill-mask. The idea of this task is to fill in the blanks in a given text:
시도할 다음 파이프라인은 채우기 마스크입니다. 이 작업의 아이디어는 주어진 텍스트의 빈칸을 채우는 것입니다.
from transformers import pipeline

unmasker = pipeline("fill-mask")
unmasker("This course will teach you all about <mask> models.", top_k=2)
[{'sequence': 'This course will teach you all about mathematical models.',
  'score': 0.19619831442832947,
  'token': 30412,
  'token_str': ' mathematical'},
 {'sequence': 'This course will teach you all about computational models.',
  'score': 0.04052725434303284,
  'token': 38163,
  'token_str': ' computational'}]
Thetop_kargument controls how many possibilities you want to be displayed. Note that here the model fills in the special<mask>word, which is often referred to as amask token. Other mask-filling models might have different mask tokens, so it’s always good to verify the proper mask word when exploring other models. One way to check it is by looking at the mask word used in the widget.
top_k 인수는 표시할 가능성의 수를 제어합니다. 여기서 모델은 종종 마스크 토큰이라고 하는 특수 <mask> 단어를 채웁니다. 다른 마스크 채우기 모델에는 다른 마스크 토큰이 있을 수 있으므로 다른 모델을 탐색할 때 항상 적절한 마스크 단어를 확인하는 것이 좋습니다. 이를 확인하는 한 가지 방법은 위젯에 사용된 마스크 단어를 보는 것입니다.
✏️Try it out!Search for thebert-base-casedmodel on the Hub and identify its mask word in the Inference API widget. What does this model predict for the sentence in ourpipelineexample above?
✏️ 한번 사용해 보세요! 허브에서 bert-base-cased 모델을 검색하고 Inference API 위젯에서 해당 마스크 단어를 식별합니다. 이 모델은 위 파이프라인 예의 문장에 대해 무엇을 예측합니까?
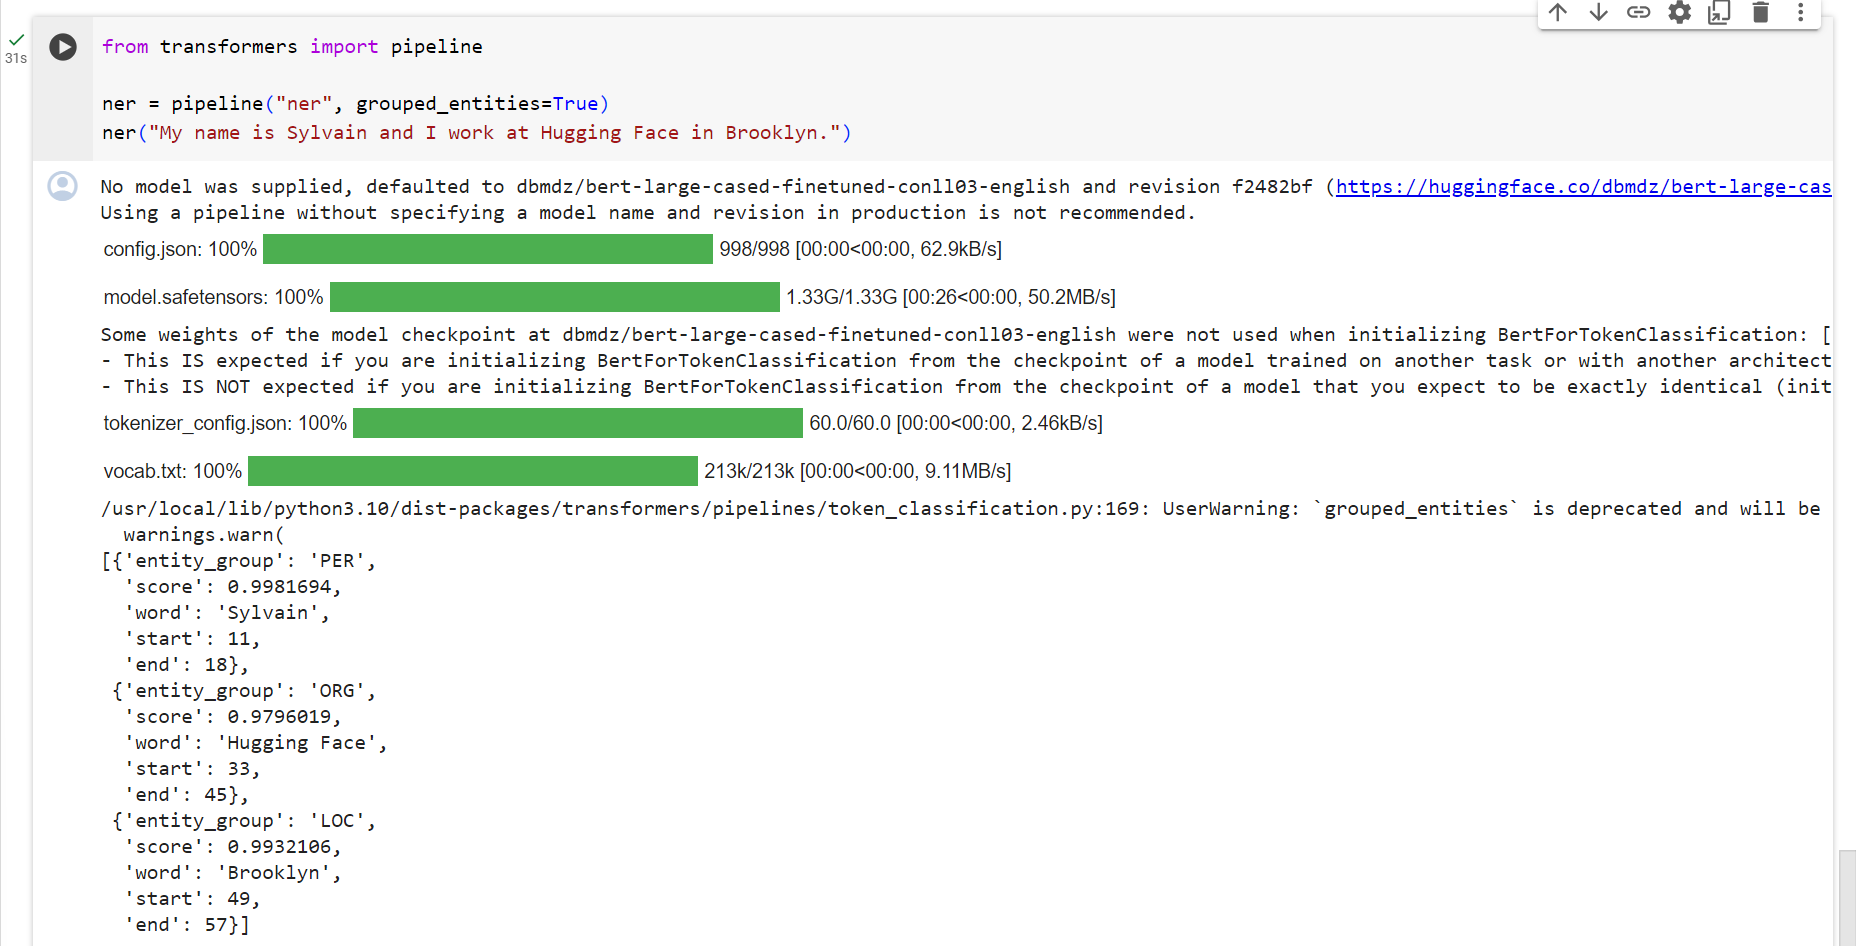
Named entity recognition
Named entity recognition (NER) is a task where the model has to find which parts of the input text correspond to entities such as persons, locations, or organizations. Let’s look at an example:
명명된 엔터티 인식(NER)은 모델이 입력 텍스트의 어느 부분이 사람, 위치 또는 조직과 같은 엔터티에 해당하는지 찾아야 하는 작업입니다. 예를 살펴보겠습니다:
from transformers import pipeline

ner = pipeline("ner", grouped_entities=True)
ner("My name is Sylvain and I work at Hugging Face in Brooklyn.")
Here the model correctly identified that Sylvain is a person (PER), Hugging Face an organization (ORG), and Brooklyn a location (LOC).
여기서 모델은 Sylvain이 사람(PER), Hugging Face가 조직(ORG), Brooklyn이 위치(LOC)임을 올바르게 식별했습니다.
We pass the optiongrouped_entities=Truein the pipeline creation function to tell the pipeline to regroup together the parts of the sentence that correspond to the same entity: here the model correctly grouped “Hugging” and “Face” as a single organization, even though the name consists of multiple words. In fact, as we will see in the next chapter, the preprocessing even splits some words into smaller parts. For instance,Sylvainis split into four pieces:S,##yl,##va, and##in. In the post-processing step, the pipeline successfully regrouped those pieces.
파이프라인 생성 함수에 grouped_entities=True 옵션을 전달하여 동일한 엔터티에 해당하는 문장 부분을 함께 재그룹화하도록 파이프라인에 지시합니다. 여기서 모델은 "Hugging"과 "Face"를 단일 조직으로 올바르게 그룹화했습니다. 이름은 여러 단어로 구성됩니다. 실제로 다음 장에서 살펴보겠지만 전처리는 일부 단어를 더 작은 부분으로 분할하기도 합니다. 예를 들어 Sylvain은 S, ##yl, ##va, ##in의 네 부분으로 나뉩니다. 사후 처리 단계에서 파이프라인은 해당 조각을 성공적으로 재그룹화했습니다.
✏️Try it out!Search the Model Hub for a model able to do part-of-speech tagging (usually abbreviated as POS) in English. What does this model predict for the sentence in the example above?
✏️ 한번 사용해 보세요! 영어로 품사 태깅(보통 POS로 약칭)을 수행할 수 있는 모델을 모델 허브에서 검색하세요. 이 모델은 위 예의 문장에 대해 무엇을 예측합니까?
Question answering
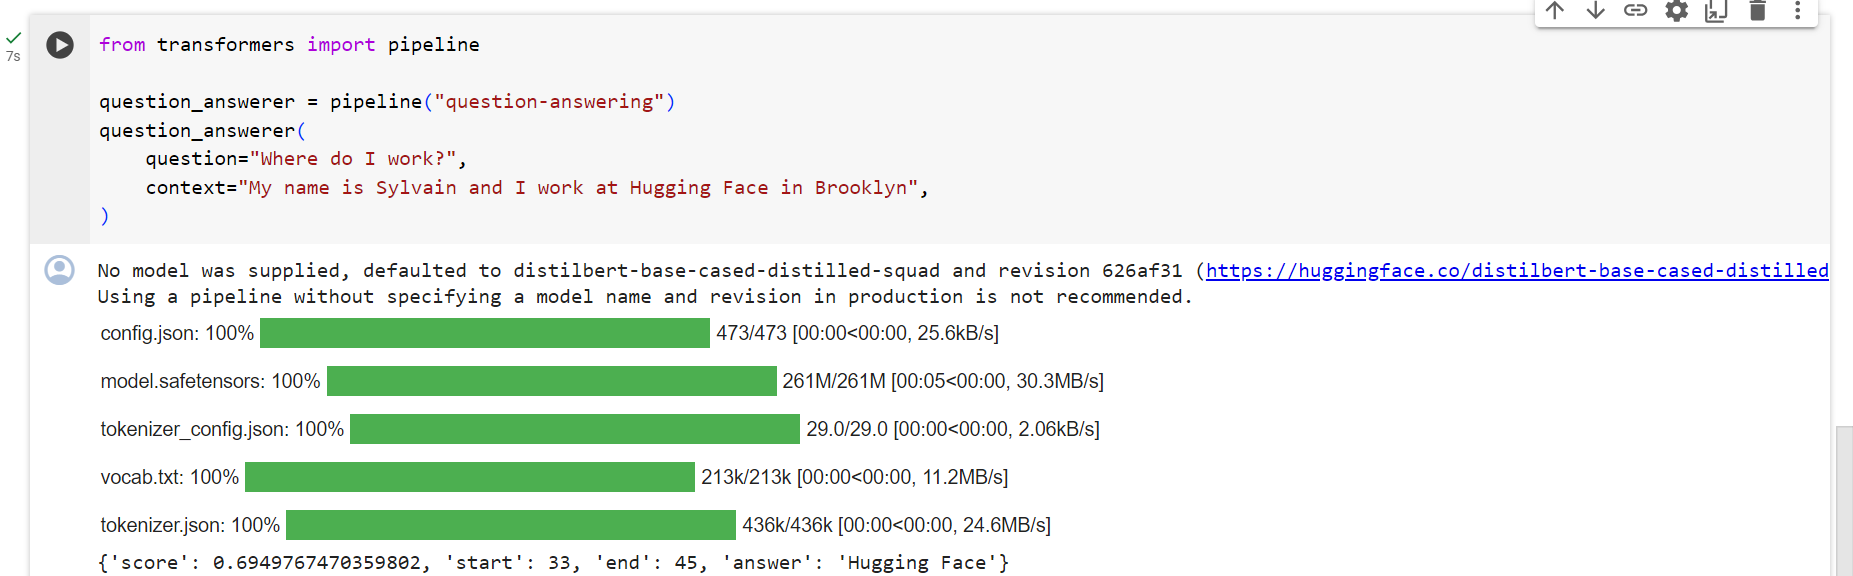
Thequestion-answeringpipeline answers questions using information from a given context:
질문 답변 파이프라인은 주어진 컨텍스트의 정보를 사용하여 질문에 답변합니다.
from transformers import pipeline

question_answerer = pipeline("question-answering")
question_answerer(
    question="Where do I work?",
    context="My name is Sylvain and I work at Hugging Face in Brooklyn",
)
Note that this pipeline works by extracting information from the provided context; it does not generate the answer.
이 파이프라인은 제공된 컨텍스트에서 정보를 추출하여 작동합니다. 답변을 생성하지 않습니다.
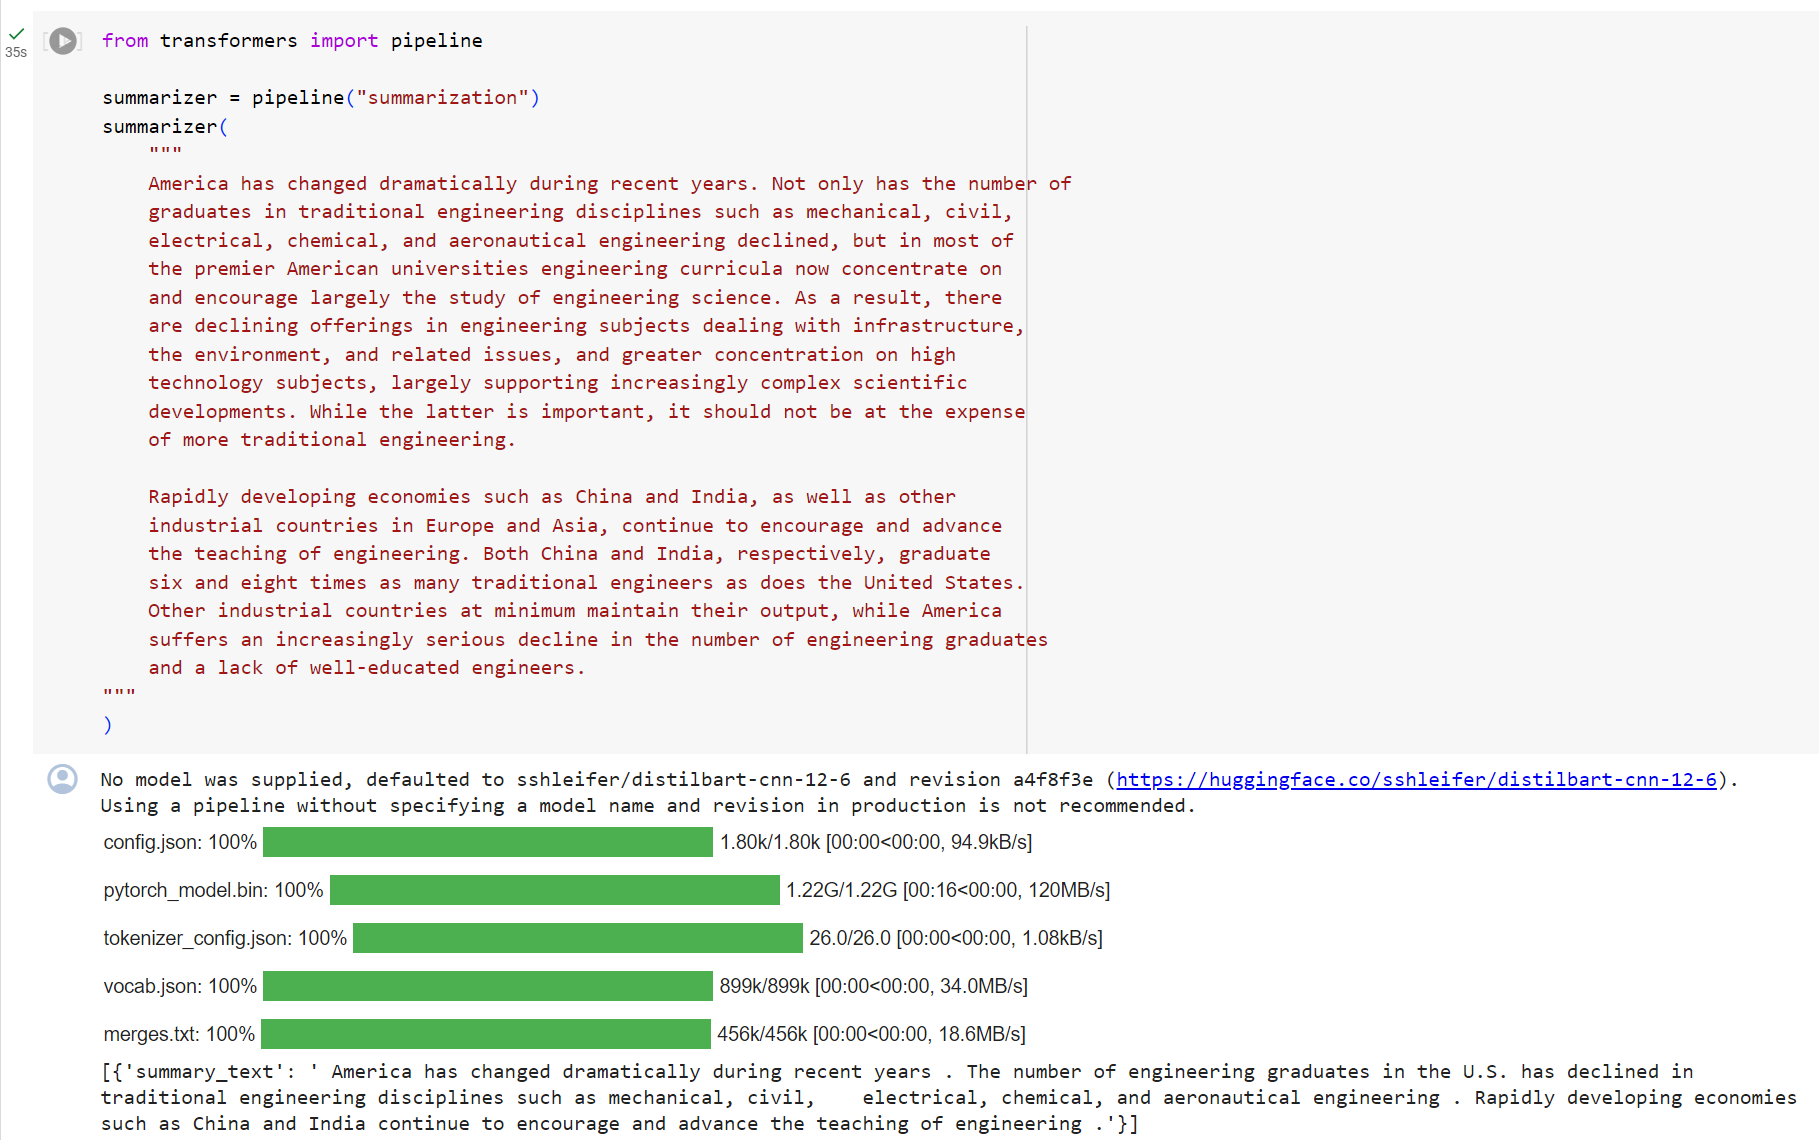
Summarization
Summarization is the task of reducing a text into a shorter text while keeping all (or most) of the important aspects referenced in the text. Here’s an example:
요약은 텍스트에서 참조된 모든 중요한 측면을 유지하면서 텍스트를 더 짧은 텍스트로 줄이는 작업입니다. 예는 다음과 같습니다.
from transformers import pipeline

summarizer = pipeline("summarization")
summarizer(
    """
    America has changed dramatically during recent years. Not only has the number of
    graduates in traditional engineering disciplines such as mechanical, civil,
    electrical, chemical, and aeronautical engineering declined, but in most of
    the premier American universities engineering curricula now concentrate on
    and encourage largely the study of engineering science. As a result, there
    are declining offerings in engineering subjects dealing with infrastructure,
    the environment, and related issues, and greater concentration on high
    technology subjects, largely supporting increasingly complex scientific
    developments. While the latter is important, it should not be at the expense
    of more traditional engineering.

    Rapidly developing economies such as China and India, as well as other
    industrial countries in Europe and Asia, continue to encourage and advance
    the teaching of engineering. Both China and India, respectively, graduate
    six and eight times as many traditional engineers as does the United States.
    Other industrial countries at minimum maintain their output, while America
    suffers an increasingly serious decline in the number of engineering graduates
    and a lack of well-educated engineers.
"""
)
[{'summary_text': ' America has changed dramatically during recent years . The '
                  'number of engineering graduates in the U.S. has declined in '
                  'traditional engineering disciplines such as mechanical, civil '
                  ', electrical, chemical, and aeronautical engineering . Rapidly '
                  'developing economies such as China and India, as well as other '
                  'industrial countries in Europe and Asia, continue to encourage '
                  'and advance engineering .'}]
Like with text generation, you can specify amax_lengthor amin_lengthfor the result.
텍스트 생성과 마찬가지로 결과에 대해 max_length 또는 min_length를 지정할 수 있습니다.
Translation
For translation, you can use a default model if you provide a language pair in the task name (such as"translation_en_to_fr"), but the easiest way is to pick the model you want to use on theModel Hub. Here we’ll try translating from French to English:
번역의 경우 작업 이름에 언어 쌍(예: "translation_en_to_fr")을 제공하면 기본 모델을 사용할 수 있지만 가장 쉬운 방법은 모델 허브에서 사용하려는 모델을 선택하는 것입니다. 여기서는 프랑스어를 영어로 번역해 보겠습니다.
from transformers import pipeline

translator = pipeline("translation", model="Helsinki-NLP/opus-mt-fr-en")
translator("Ce cours est produit par Hugging Face.")
[{'translation_text': 'This course is produced by Hugging Face.'}]
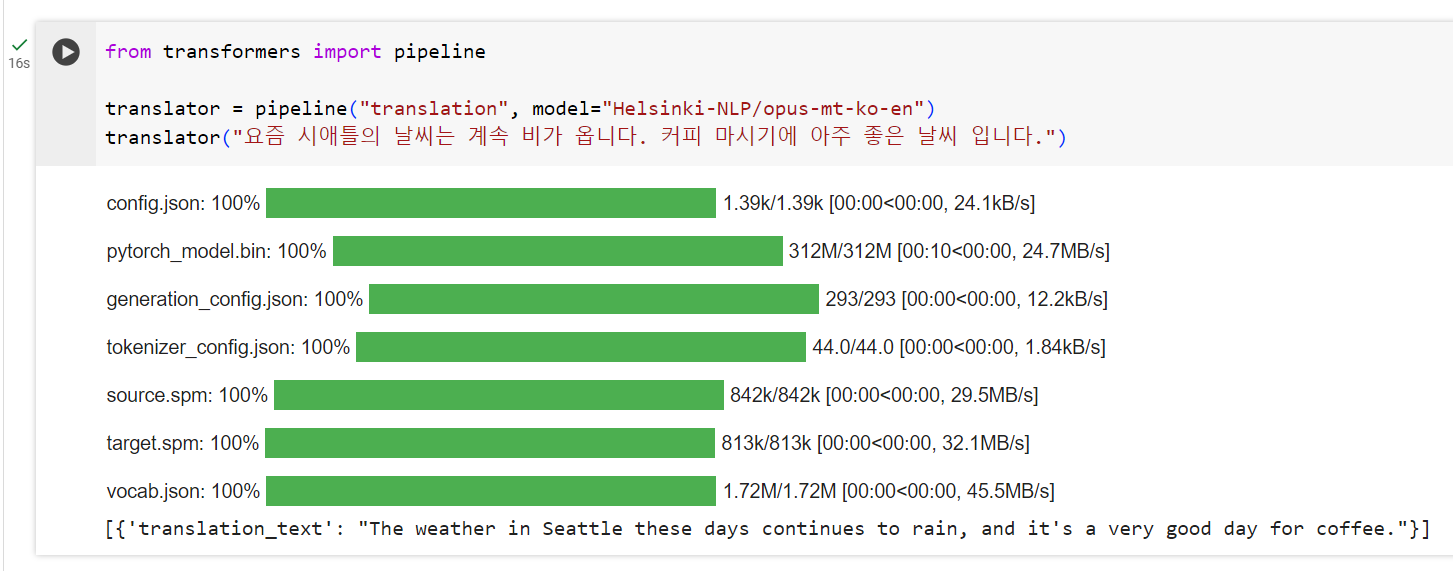
한국어를 프랑스어로 번역할 경우
한국어를 영어로 번역할 경우.
Like with text generation and summarization, you can specify amax_lengthor amin_lengthfor the result.
텍스트 생성 및 요약과 마찬가지로 결과에 대해 max_length 또는 min_length를 지정할 수 있습니다.
✏️Try it out!Search for translation models in other languages and try to translate the previous sentence into a few different languages.
✏️ 한번 사용해 보세요! 다른 언어의 번역 모델을 검색하고 이전 문장을 몇 가지 다른 언어로 번역해 보세요.
The pipelines shown so far are mostly for demonstrative purposes. They were programmed for specific tasks and cannot perform variations of them. In the next chapter, you’ll learn what’s inside apipeline()function and how to customize its behavior.
지금까지 표시된 파이프라인은 대부분 시연 목적으로 사용되었습니다. 특정 작업을 위해 프로그래밍되었으며 다양한 작업을 수행할 수 없습니다. 다음 장에서는 파이프라인() 함수 내부의 내용과 해당 동작을 사용자 정의하는 방법을 배우게 됩니다.
Before jumping into Transformer models, let’s do a quick overview of what natural language processing is and why we care about it.
Transformer 모델을 살펴보기 전에 자연어 처리가 무엇인지, 그리고 우리가 그것에 관심을 갖는 이유에 대해 간략하게 살펴보겠습니다.
What is NLP?
NLP is a field of linguistics and machine learning focused on understanding everything related to human language. The aim of NLP tasks is not only to understand single words individually, but to be able to understand the context of those words.
NLP는 인간 언어와 관련된 모든 것을 이해하는 데 초점을 맞춘 언어학 및 기계 학습 분야입니다. NLP 작업의 목표는 단일 단어를 개별적으로 이해하는 것뿐만 아니라 해당 단어의 맥락을 이해하는 것입니다.
The following is a list of common NLP tasks, with some examples of each:
다음은 일반적인 NLP 작업 목록과 각 작업의 몇 가지 예입니다.
Classifying whole sentences: Getting the sentiment of a review, detecting if an email is spam, determining if a sentence is grammatically correct or whether two sentences are logically related or not
전체 문장 분류: 리뷰의 감정 파악, 이메일 스팸 여부 감지, 문장이 문법적으로 올바른지 또는 두 문장이 논리적으로 관련되어 있는지 확인
Classifying each word in a sentence: Identifying the grammatical components of a sentence (noun, verb, adjective), or the named entities (person, location, organization)
문장의 각 단어 분류: 문장의 문법적 구성 요소(명사, 동사, 형용사) 또는 명명된 개체(사람, 위치, 조직) 식별
Generating text content: Completing a prompt with auto-generated text, filling in the blanks in a text with masked words
텍스트 콘텐츠 생성: 자동 생성된 텍스트로 프롬프트 완성, 마스크된 단어로 텍스트의 공백 채우기
Extracting an answer from a text: Given a question and a context, extracting the answer to the question based on the information provided in the context
텍스트에서 답변 추출: 질문과 컨텍스트가 주어지면, 컨텍스트에 제공된 정보를 기반으로 질문에 대한 답변을 추출합니다.
Generating a new sentence from an input text: Translating a text into another language, summarizing a text
입력 텍스트에서 새 문장 생성: 텍스트를 다른 언어로 번역, 텍스트 요약
NLP isn’t limited to written text though. It also tackles complex challenges in speech recognition and computer vision, such as generating a transcript of an audio sample or a description of an image.
NLP는 서면 텍스트에만 국한되지 않습니다. 또한 오디오 샘플의 대본이나 이미지 설명 생성과 같은 음성 인식 및 컴퓨터 비전의 복잡한 문제를 해결합니다.
Why is it challenging? 왜 이것이 어려운가?
Computers don’t process information in the same way as humans. For example, when we read the sentence “I am hungry,” we can easily understand its meaning. Similarly, given two sentences such as “I am hungry” and “I am sad,” we’re able to easily determine how similar they are. For machine learning (ML) models, such tasks are more difficult. The text needs to be processed in a way that enables the model to learn from it. And because language is complex, we need to think carefully about how this processing must be done. There has been a lot of research done on how to represent text, and we will look at some methods in the next chapter.
컴퓨터는 인간과 같은 방식으로 정보를 처리하지 않습니다. 예를 들어, 우리는 “나는 배고프다”라는 문장을 읽으면 그 의미를 쉽게 이해할 수 있습니다. 마찬가지로, “나는 배고프다”와 “나는 슬프다”라는 두 문장이 주어지면 우리는 그 두 문장이 얼마나 비슷한지 쉽게 판단할 수 있습니다. 기계 학습(ML) 모델의 경우 이러한 작업은 더 어렵습니다. 텍스트는 모델이 학습할 수 있는 방식으로 처리되어야 합니다. 그리고 언어는 복잡하기 때문에 이 처리가 어떻게 이루어져야 하는지 신중하게 생각해야 합니다. 텍스트를 표현하는 방법에 대해 많은 연구가 진행되어 왔으며 다음 장에서 몇 가지 방법을 살펴보겠습니다.
이 과정에서는 Hugging Face 생태계의 라이브러리( 🤗 Transformers, 🤗 Datasets, 🤗 Tokenizers 및 🤗 Accelerate)와 Hugging Face Hub를 사용하여 자연어 처리(NLP)에 대해 설명합니다. 완전 무료이며 광고도 없습니다.
What to expect?
Here is a brief overview of the course:
강좌에 대한 간략한 개요는 다음과 같습니다.
Chapters 1 to 4 provide an introduction to the main concepts of the 🤗 Transformers library. By the end of this part of the course, you will be familiar with how Transformer models work and will know how to use a model from theHugging Face Hub, fine-tune it on a dataset, and share your results on the Hub!
1장부터 4장까지는 🤗 Transformers 라이브러리의 주요 개념을 소개합니다. 과정의 이 부분이 끝나면 Transformer 모델의 작동 방식에 익숙해지고 Hugging Face Hub의 모델을 사용하는 방법, 데이터세트에서 이를 미세 조정하고 허브에서 결과를 공유하는 방법을 알게 됩니다!
Chapters 5 to 8 teach the basics of 🤗 Datasets and 🤗 Tokenizers before diving into classic NLP tasks. By the end of this part, you will be able to tackle the most common NLP problems by yourself.
5~8장에서는 고전적인 NLP 작업을 시작하기 전에 🤗 데이터세트 및 🤗 토크나이저의 기본 사항을 가르칩니다. 이 부분이 끝나면 가장 일반적인 NLP 문제를 스스로 해결할 수 있게 됩니다.
Chapters 9 to 12 go beyond NLP, and explore how Transformer models can be used to tackle tasks in speech processing and computer vision. Along the way, you’ll learn how to build and share demos of your models, and optimize them for production environments. By the end of this part, you will be ready to apply 🤗 Transformers to (almost) any machine learning problem!
9~12장에서는 NLP를 넘어 음성 처리 및 컴퓨터 비전 작업을 처리하는 데 Transformer 모델을 사용할 수 있는 방법을 살펴봅니다. 그 과정에서 모델의 데모를 구축 및 공유하고 생산 환경에 맞게 최적화하는 방법을 배우게 됩니다. 이 부분이 끝나면 🤗 Transformers를 (거의) 모든 기계 학습 문제에 적용할 수 있습니다!
After you’ve completed this course, we recommend checking out DeepLearning.AI’sNatural Language Processing Specialization, which covers a wide range of traditional NLP models like naive Bayes and LSTMs that are well worth knowing about!
이 과정을 마친 후에는 Naive Bayes 및 LSTM과 같이 알아 둘 가치가 있는 광범위한 기존 NLP 모델을 다루는 DeepLearning.AI의 자연어 처리 전문 분야를 확인하는 것이 좋습니다!
Who are we?
About the authors: 저자 소개
Abubakar Abidcompleted his PhD at Stanford in applied machine learning. During his PhD, he foundedGradio, an open-source Python library that has been used to build over 600,000 machine learning demos. Gradio was acquired by Hugging Face, which is where Abubakar now serves as a machine learning team lead.
Abubakar Abid는 스탠포드에서 응용 기계 학습 분야의 박사 학위를 취득했습니다. 박사 과정 동안 그는 600,000개 이상의 기계 학습 데모를 구축하는 데 사용된 오픈 소스 Python 라이브러리인 Gradio를 설립했습니다. Gradio는 현재 Abubakar가 기계 학습 팀 리더로 일하고 있는 Hugging Face에 인수되었습니다.
Matthew Carriganis a Machine Learning Engineer at Hugging Face. He lives in Dublin, Ireland and previously worked as an ML engineer at Parse.ly and before that as a post-doctoral researcher at Trinity College Dublin. He does not believe we’re going to get to AGI by scaling existing architectures, but has high hopes for robot immortality regardless.
Matthew Carrigan은 Hugging Face의 머신러닝 엔지니어입니다. 그는 아일랜드 더블린에 거주하며 이전에는 Parse.ly에서 ML 엔지니어로 근무했고 그 전에는 Trinity College Dublin에서 박사후 연구원으로 근무했습니다. 그는 기존 아키텍처를 확장하는 것으로는 AGI에 도달할 것이라고 믿지 않지만 그럼에도 불구하고 로봇 불멸에 대한 높은 희망을 가지고 있습니다.
Lysandre Debutis a Machine Learning Engineer at Hugging Face and has been working on the 🤗 Transformers library since the very early development stages. His aim is to make NLP accessible for everyone by developing tools with a very simple API.
Lysandre Debut는 Hugging Face의 기계 학습 엔지니어이며 초기 개발 단계부터 🤗 Transformers 라이브러리 작업을 해왔습니다. 그의 목표는 매우 간단한 API로 도구를 개발하여 모든 사람이 NLP에 액세스할 수 있도록 하는 것입니다.
Sylvain Guggeris a Research Engineer at Hugging Face and one of the core maintainers of the 🤗 Transformers library. Previously he was a Research Scientist at fast.ai, and he co-wroteDeep Learning for Coders with fastai and PyTorchwith Jeremy Howard. The main focus of his research is on making deep learning more accessible, by designing and improving techniques that allow models to train fast on limited resources.
Sylvain Gugger는 Hugging Face의 연구 엔지니어이자 🤗 Transformers 라이브러리의 핵심 관리자 중 한 명입니다. 이전에 그는 fast.ai의 연구 과학자였으며, fastai와 함께 Coders를 위한 Deep Learning, Jeremy Howard와 함께 PyTorch를 공동 집필했습니다. 그의 연구의 주요 초점은 모델이 제한된 리소스에서 빠르게 훈련할 수 있는 기술을 설계하고 개선하여 딥 러닝의 접근성을 높이는 것입니다.
Dawood Khanis a Machine Learning Engineer at Hugging Face. He’s from NYC and graduated from New York University studying Computer Science. After working as an iOS Engineer for a few years, Dawood quit to start Gradio with his fellow co-founders. Gradio was eventually acquired by Hugging Face.
Dawood Khan은 Hugging Face의 머신러닝 엔지니어입니다. 그는 뉴욕 출신이고 뉴욕 대학교에서 컴퓨터 공학을 전공했습니다. 몇 년 동안 iOS 엔지니어로 일한 후 Dawood는 동료 공동 창립자들과 함께 Gradio를 시작하기 위해 회사를 그만뒀습니다. Gradio는 결국 Hugging Face에 인수되었습니다.
Merve Noyanis a developer advocate at Hugging Face, working on developing tools and building content around them to democratize machine learning for everyone.
Merve Noyan은 Hugging Face의 개발자 옹호자로서 모든 사람을 위한 기계 학습을 민주화하기 위해 도구를 개발하고 관련 콘텐츠를 구축하는 작업을 하고 있습니다.
Lucile Saulnieris a machine learning engineer at Hugging Face, developing and supporting the use of open source tools. She is also actively involved in many research projects in the field of Natural Language Processing such as collaborative training and BigScience.
Lucile Saulnier는 Hugging Face의 머신 러닝 엔지니어로, 오픈 소스 도구 사용을 개발하고 지원합니다. 그녀는 또한 협업 훈련, BigScience 등 자연어 처리 분야의 많은 연구 프로젝트에 적극적으로 참여하고 있습니다.
Lewis Tunstallis a machine learning engineer at Hugging Face, focused on developing open-source tools and making them accessible to the wider community. He is also a co-author of the O’Reilly bookNatural Language Processing with Transformers.
Lewis Tunstall은 Hugging Face의 기계 학습 엔지니어로, 오픈 소스 도구를 개발하고 이를 더 넓은 커뮤니티에 액세스할 수 있도록 하는 데 중점을 두고 있습니다. 그는 또한 O'Reilly의 책인 Transformers를 사용한 자연어 처리의 공동 저자이기도 합니다.
Leandro von Werrais a machine learning engineer in the open-source team at Hugging Face and also a co-author of the O’Reilly bookNatural Language Processing with Transformers. He has several years of industry experience bringing NLP projects to production by working across the whole machine learning stack..
Leandro von Werra는 Hugging Face 오픈 소스 팀의 머신 러닝 엔지니어이자 O'Reilly의 Natural Language Process with Transformers 책의 공동 저자이기도 합니다. 그는 기계 학습 스택 전반에 걸쳐 NLP 프로젝트를 프로덕션으로 가져오는 수년간의 업계 경험을 보유하고 있습니다.
FAQ
Here are some answers to frequently asked questions:
자주 묻는 질문(FAQ)에 대한 답변은 다음과 같습니다.
Does taking this course lead to a certification?Currently we do not have any certification for this course. However, we are working on a certification program for the Hugging Face ecosystem — stay tuned!
이 강좌를 수강하면 인증을 받을 수 있나요? 현재 이 과정에 대한 인증이 없습니다. 그러나 우리는 Hugging Face 생태계에 대한 인증 프로그램을 개발 중입니다. 계속 지켜봐 주시기 바랍니다!
How much time should I spend on this course?Each chapter in this course is designed to be completed in 1 week, with approximately 6-8 hours of work per week. However, you can take as much time as you need to complete the course.
이 강좌에 얼마나 많은 시간을 투자해야 합니까? 이 과정의 각 장은 주당 약 6~8시간씩 1주일 내에 완료하도록 설계되었습니다. 그러나 과정을 완료하는 데 필요한 만큼의 시간을 투자할 수 있습니다.
Where can I ask a question if I have one?If you have a question about any section of the course, just click on the ”Ask a question” banner at the top of the page to be automatically redirected to the right section of theHugging Face forums:
질문이 있으면 어디로 문의해야 하나요? 코스의 특정 섹션에 대해 질문이 있는 경우 페이지 상단의 "질문하기" 배너를 클릭하면 자동으로 Hugging Face 포럼의 해당 섹션으로 리디렉션됩니다.
Note that a list ofproject ideasis also available on the forums if you wish to practice more once you have completed the course.
과정을 마친 후 더 연습하고 싶다면 포럼에서 프로젝트 아이디어 목록을 확인할 수도 있습니다.
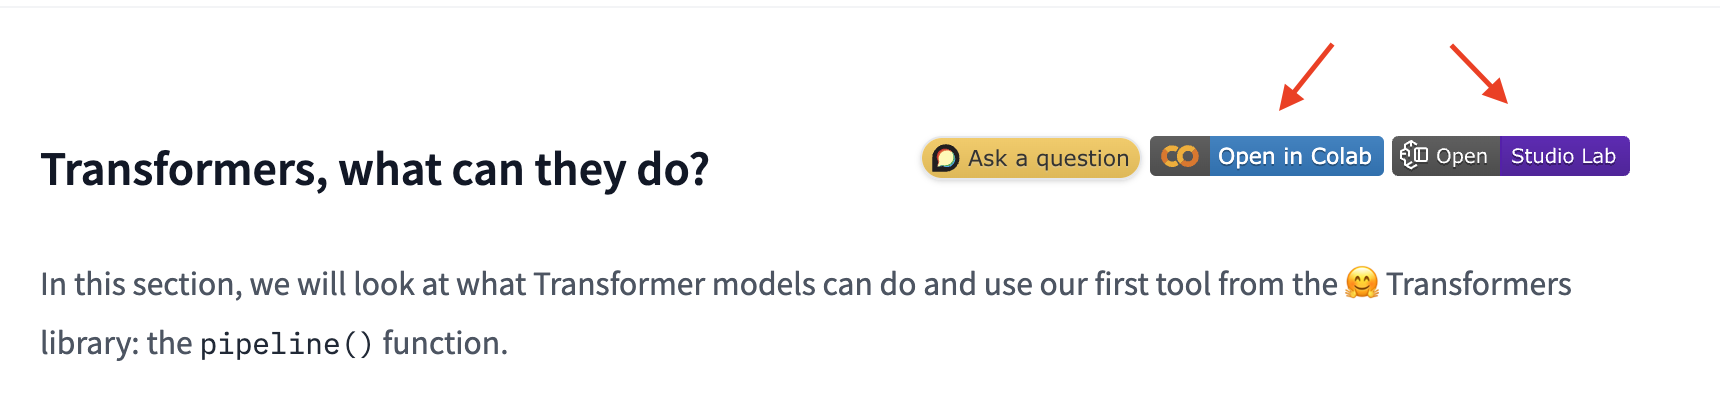
Where can I get the code for the course?For each section, click on the banner at the top of the page to run the code in either Google Colab or Amazon SageMaker Studio Lab:
강의 코드는 어디서 받을 수 있나요? 각 섹션에 대해 페이지 상단의 배너를 클릭하여 Google Colab 또는 Amazon SageMaker Studio Lab에서 코드를 실행하세요.
The Jupyter notebooks containing all the code from the course are hosted on thehuggingface/notebooksrepo. If you wish to generate them locally, check out the instructions in thecourserepo on GitHub.
강좌의 모든 코드가 포함된 Jupyter Notebook은 Huggingface/Notebooks 저장소에서 호스팅됩니다. 로컬에서 생성하려면 GitHub의 코스 저장소에 있는 지침을 확인하세요.
How can I contribute to the course?There are many ways to contribute to the course! If you find a typo or a bug, please open an issue on thecourserepo. If you would like to help translate the course into your native language, check out the instructionshere.
강좌에 어떻게 기여할 수 있나요? 강좌에 참여하는 방법에는 여러 가지가 있습니다! 오타나 버그를 발견한 경우 코스 저장소에서 문제를 열어주세요. 강좌를 모국어로 번역하는 데 도움을 주고 싶다면 여기에서 지침을 확인하세요.
What were the choices made for each translation?Each translation has a glossary andTRANSLATING.txtfile that details the choices that were made for machine learning jargon etc. You can find an example for Germanhere.
각 번역에 대해 어떤 선택이 이루어졌나요? 각 번역에는 기계 학습 전문 용어 등에 대한 선택 사항을 자세히 설명하는 용어집과 TRANSLATING.txt 파일이 있습니다. 여기에서 독일어에 대한 예를 찾을 수 있습니다.
Can I reuse this course?Of course! The course is released under the permissiveApache 2 license. This means that you must give appropriate credit, provide a link to the license, and indicate if changes were made. You may do so in any reasonable manner, but not in any way that suggests the licensor endorses you or your use. If you would like to cite the course, please use the following BibTeX:
이 강좌를 재사용할 수 있나요? 물론! 이 과정은 허용되는 Apache 2 라이센스에 따라 공개됩니다. 이는 적절한 출처를 표시하고 라이선스에 대한 링크를 제공하고 변경 사항이 있는지 표시해야 함을 의미합니다. 귀하는 합리적인 방식으로 그렇게 할 수 있지만, 라이센스 제공자가 귀하 또는 귀하의 사용을 보증하는 방식으로 그렇게 할 수는 없습니다. 강좌를 인용하려면 다음 BibTeX를 사용하세요.
@misc{huggingfacecourse,
  author = {Hugging Face},
  title = {The Hugging Face Course, 2022},
  howpublished = "\url{https://huggingface.co/course}",
  year = {2022},
  note = "[Online; accessed <today>]"
}
Let's Go
Are you ready to roll? In this chapter, you will learn:
굴릴 준비가 되셨나요? 이 장에서는 다음 내용을 학습합니다.
How to use thepipeline()function to solve NLP tasks such as text generation and classification
파이프라인() 함수를 사용하여 텍스트 생성 및 분류와 같은 NLP 작업을 해결하는 방법
About the Transformer architecture
Transformer 아키텍처 정보
How to distinguish between encoder, decoder, and encoder-decoder architectures and use cases
Welcome to the Hugging Face course! This introduction will guide you through setting up a working environment. If you’re just starting the course, we recommend you first take a look atChapter 1, then come back and set up your environment so you can try the code yourself.
Hugging Face 코스에 오신 것을 환영합니다! 이 소개에서는 작업 환경을 설정하는 과정을 안내합니다. 과정을 막 시작하는 경우 먼저 1장을 살펴보고 다시 돌아와서 코드를 직접 사용해 볼 수 있도록 환경을 설정하는 것이 좋습니다.
All the libraries that we’ll be using in this course are available as Python packages, so here we’ll show you how to set up a Python environment and install the specific libraries you’ll need.
이 과정에서 사용할 모든 라이브러리는 Python 패키지로 제공되므로 여기서는 Python 환경을 설정하고 필요한 특정 라이브러리를 설치하는 방법을 보여 드리겠습니다.
We’ll cover two ways of setting up your working environment, using a Colab notebook or a Python virtual environment. Feel free to choose the one that resonates with you the most. For beginners, we strongly recommend that you get started by using a Colab notebook.
Colab 노트북이나 Python 가상 환경을 사용하여 작업 환경을 설정하는 두 가지 방법을 다루겠습니다. 당신에게 가장 공감되는 것을 자유롭게 선택하십시오. 초보자의 경우 Colab 노트북을 사용하여 시작하는 것이 좋습니다.
Note that we will not be covering the Windows system. If you’re running on Windows, we recommend following along using a Colab notebook. If you’re using a Linux distribution or macOS, you can use either approach described here.
Windows 시스템은 다루지 않습니다. Windows에서 실행하는 경우 Colab 노트북을 사용하여 따라하는 것이 좋습니다. Linux 배포판이나 macOS를 사용하는 경우 여기에 설명된 접근 방식 중 하나를 사용할 수 있습니다.
Most of the course relies on you having a Hugging Face account. We recommend creating one now:create an account.
대부분의 과정은 Hugging Face 계정이 있어야 합니다. 지금 계정을 만드는 것이 좋습니다. 계정을 만드세요.
Using a Google Colab notebook
Using a Colab notebook is the simplest possible setup; boot up a notebook in your browser and get straight to coding!
Colab 노트북을 사용하는 것이 가장 간단한 설정입니다. 브라우저에서 노트북을 부팅하고 바로 코딩을 시작해 보세요!
If you’re not familiar with Colab, we recommend you start by following theintroduction. Colab allows you to use some accelerating hardware, like GPUs or TPUs, and it is free for smaller workloads.
Colab에 익숙하지 않다면 소개부터 시작하는 것이 좋습니다. Colab을 사용하면 GPU 또는 TPU와 같은 일부 가속 하드웨어를 사용할 수 있으며 소규모 워크로드에는 무료로 제공됩니다.
Once you’re comfortable moving around in Colab, create a new notebook and get started with the setup:
Colab에서 편안하게 이동하고 나면 새 노트북을 만들고 설정을 시작하세요.
The next step is to install the libraries that we’ll be using in this course. We’ll usepipfor the installation, which is the package manager for Python. In notebooks, you can run system commands by preceding them with the!character, so you can install the 🤗 Transformers library as follows:
다음 단계는 이 과정에서 사용할 라이브러리를 설치하는 것입니다. Python의 패키지 관리자인 pip를 설치에 사용하겠습니다. 노트북에서는 앞에 !를 붙여 시스템 명령을 실행할 수 있습니다. 캐릭터이므로 다음과 같이 🤗 Transformers 라이브러리를 설치할 수 있습니다.
!pip install transformers
You can make sure the package was correctly installed by importing it within your Python runtime:
Python 런타임 내에서 패키지를 가져와 패키지가 올바르게 설치되었는지 확인할 수 있습니다.
import transformers
This installs a very light version of 🤗 Transformers. In particular, no specific machine learning frameworks (like PyTorch or TensorFlow) are installed. Since we’ll be using a lot of different features of the library, we recommend installing the development version, which comes with all the required dependencies for pretty much any imaginable use case:
이것은 🤗 Transformers의 매우 가벼운 버전을 설치합니다. 특히, 특정 기계 학습 프레임워크(예: PyTorch 또는 TensorFlow)가 설치되지 않습니다. 우리는 라이브러리의 다양한 기능을 사용할 것이므로 상상할 수 있는 거의 모든 사용 사례에 필요한 모든 종속성이 포함된 개발 버전을 설치하는 것이 좋습니다.
!pip install transformers[sentencepiece]
This will take a bit of time, but then you’ll be ready to go for the rest of the course!
약간의 시간이 걸리겠지만, 그러면 나머지 과정을 진행할 준비가 된 것입니다!
Using a Python virtual environment
If you prefer to use a Python virtual environment, the first step is to install Python on your system. We recommend followingthis guideto get started.
Python 가상 환경을 사용하려는 경우 첫 번째 단계는 시스템에 Python을 설치하는 것입니다. 시작하려면 이 가이드를 따르는 것이 좋습니다.
Once you have Python installed, you should be able to run Python commands in your terminal. You can start by running the following command to ensure that it is correctly installed before proceeding to the next steps:python --version. This should print out the Python version now available on your system.
Python을 설치하고 나면 터미널에서 Python 명령을 실행할 수 있습니다. 다음 단계를 진행하기 전에 python --version 명령을 실행하여 올바르게 설치되었는지 확인할 수 있습니다. 그러면 현재 시스템에서 사용할 수 있는 Python 버전이 인쇄됩니다.
When running a Python command in your terminal, such aspython --version, you should think of the program running your command as the “main” Python on your system. We recommend keeping this main installation free of any packages, and using it to create separate environments for each application you work on — this way, each application can have its own dependencies and packages, and you won’t need to worry about potential compatibility issues with other applications.
python --version과 같은 Python 명령을 터미널에서 실행할 때 명령을 실행하는 프로그램을 시스템의 "기본" Python으로 생각해야 합니다. 이 기본 설치에 패키지를 사용하지 않고 이를 사용하여 작업하는 각 애플리케이션에 대해 별도의 환경을 만드는 것이 좋습니다. 이렇게 하면 각 애플리케이션이 자체 종속성과 패키지를 가질 수 있습니다.다른 응용 프로그램과의 잠재적인 호환성 문제에 대해 걱정할 필요가 없습니다.
In Python this is done withvirtual environments, which are self-contained directory trees that each contain a Python installation with a particular Python version alongside all the packages the application needs. Creating such a virtual environment can be done with a number of different tools, but we’ll use the official Python package for that purpose, which is calledvenv.
Python에서는 애플리케이션에 필요한 모든 패키지와 함께 특정 Python 버전이 포함된 Python 설치가 포함된 독립형 디렉터리 트리인 가상 환경을 통해 이 작업이 수행됩니다. 이러한 가상 환경을 만드는 것은 다양한 도구를 사용하여 수행할 수 있지만 우리는 해당 목적을 위해 venv라고 하는 공식 Python 패키지를 사용하겠습니다.
First, create the directory you’d like your application to live in — for example, you might want to make a new directory calledtransformers-courseat the root of your home directory:
먼저, 애플리케이션을 보관할 디렉터리를 만듭니다. 예를 들어 홈 디렉터리의 루트에 Transformers-course라는 새 디렉터리를 만들 수 있습니다.
mkdir ~/transformers-course
cd ~/transformers-course
From inside this directory, create a virtual environment using the Pythonvenvmodule:
이 디렉터리 내에서 Python venv 모듈을 사용하여 가상 환경을 만듭니다.
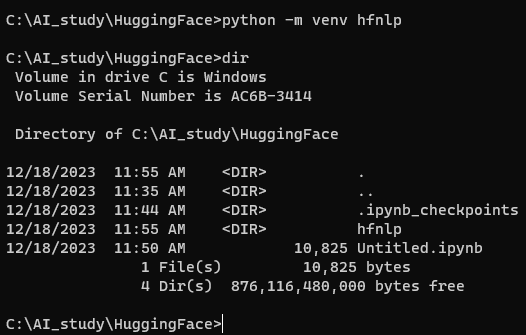
python -m venv .env
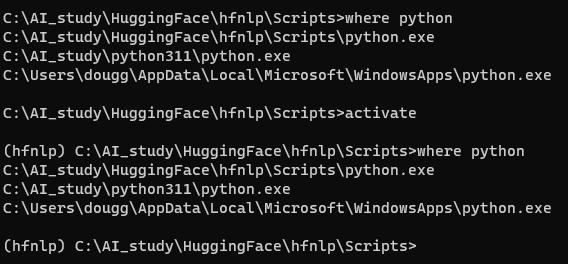
나는 윈도우 환경에서 실행하고 있으며 가상 환경 이름은 hfnlp라고 하겠음.
You should now have a directory called.envin your otherwise empty folder:
이제 빈 폴더에 .env라는 디렉터리가 있어야 합니다.
ls -a
. .. .env
내 윈도우 로컬 환경에서는 아래와 같이 dir로 디렉토리 내용을 볼 수 있음. hfnlp 폴더가 생성 돼 있음.
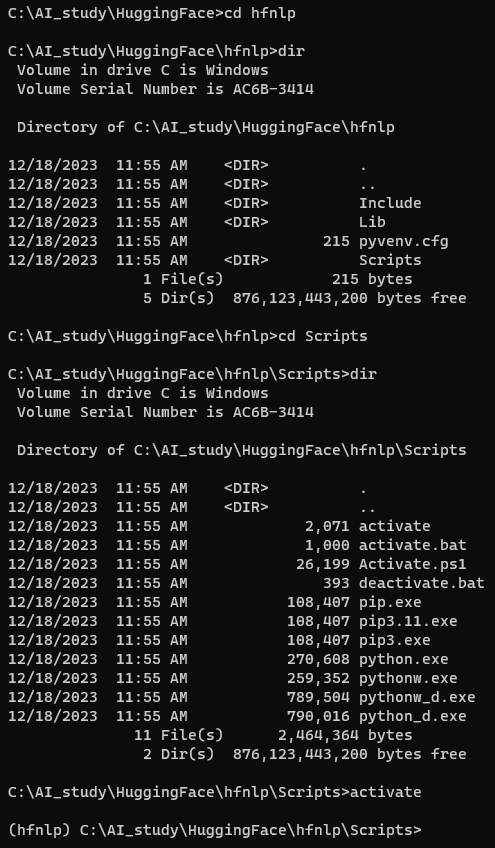
You can jump in and out of your virtual environment with theactivateanddeactivatescripts:
활성화 및 비활성화 스크립트를 사용하여 가상 환경에 들어가고 나올 수 있습니다.
# Activate the virtual environment
source .env/bin/activate

# Deactivate the virtual environment
source .env/bin/deactivate
윈도우에서는 Scripts라는 폴더에 있는 activate를 실행하면 됨
이 가상환경에서 나오려면 deactivate 하면 됨.
You can make sure that the environment is activated by running thewhich pythoncommand: if it points to the virtual environment, then you have successfully activated it!
which python 명령을 실행하여 환경이 활성화되었는지 확인할 수 있습니다. 가상 환경을 가리키면 성공적으로 활성화된 것입니다!
which python
/home/<user>/transformers-course/.env/bin/python
윈도우 환경에서는 비슷한 명령어로 where python이 있음.
Installing dependencies
As in the previous section on using Google Colab instances, you’ll now need to install the packages required to continue. Again, you can install the development version of 🤗 Transformers using thepippackage manager:
Google Colab 인스턴스 사용에 대한 이전 섹션과 마찬가지로 이제 계속하려면 필요한 패키지를 설치해야 합니다. 이번에도 pip 패키지 관리자를 사용하여 🤗 Transformers의 개발 버전을 설치할 수 있습니다.