반응형
블로그 이미지
개발자로서 현장에서 일하면서 새로 접하는 기술들이나 알게된 정보 등을 정리하기 위한 블로그입니다. 운 좋게 미국에서 큰 회사들의 프로젝트에서 컬설턴트로 일하고 있어서 새로운 기술들을 접할 기회가 많이 있습니다. 미국의 IT 프로젝트에서 사용되는 툴들에 대해 많은 분들과 정보를 공유하고 싶습니다.
솔웅

최근에 올라온 글

최근에 달린 댓글

최근에 받은 트랙백

글 보관함

카테고리


반응형

https://www.pinecone.io/learn/series/langchain/langchain-prompt-templates/


Prompt Engineering and LLMs with Langchain | Pinecone

We have always relied on different models for different tasks in machine learning. With the introduction of multi-modality and Large Language Models (LLMs), this has changed. Gone are the days when we needed separate models for classification, named entity

www.pinecone.io


Prompt Engineering and LLMs with Langchain


We have always relied on different models for different tasks in machine learning. With the introduction of multi-modality and Large Language Models (LLMs), this has changed.


우리는 기계 학습의 다양한 작업을 위해 항상 다양한 모델을 사용해 왔습니다. 다중 양식 및 LLM(대형 언어 모델)이 도입되면서 상황이 바뀌었습니다.


Gone are the days when we needed separate models for classification, named entity recognition (NER), question-answering (QA), and many other tasks.


분류, 개체명 인식(NER), 질문 답변(QA) 및 기타 여러 작업을 위해 별도의 모델이 필요했던 시대는 지나갔습니다.


Before transfer learning, different tasks and use cases required training different models.


With the introduction of transformers and transfer learning, all that was needed to adapt a language model for different tasks was a few small layers at the end of the network (the head) and a little fine-tuning.


transformers  와 전이 학습 transfer learning 이 도입되면서 다양한 작업에 맞게 언어 모델을 조정하는 데 필요한 것은 네트워크 끝(헤드)에 있는 몇 개의 작은 레이어와 약간의 미세 조정뿐이었습니다.


Transformers and the idea of transfer learning allowed us to reuse the same core components of pretrained transformer models for different tasks by switching model “heads” and performing fine-tuning. Transformers와 전이 학습 아이디어를 통해 우리는 모델 "헤드"를 전환하고 미세 조정을 수행함으로써 사전 훈련된 변환기 모델의 동일한 핵심 구성 요소를 다양한 작업에 재사용할 수 있었습니다.


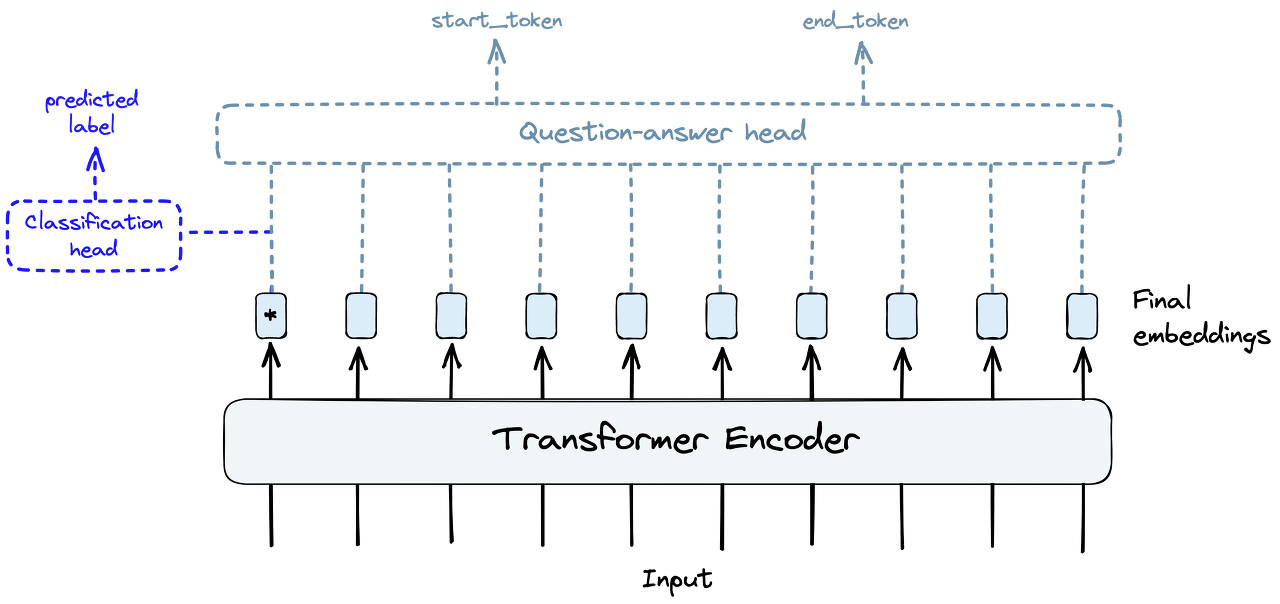
Today, even that approach is outdated. Why change these last few model layers and go through an entire fine-tuning process when you can prompt the model to do classification or QA.


오늘날에는 그러한 접근 방식조차 구식입니다. 모델에 분류 또는 QA를 수행하라는 메시지를 표시할 수 있는데 마지막 몇 개의 모델 레이어를 변경하고 전체 미세 조정 프로세스를 거쳐야 하는 이유는 무엇입니까?


Many tasks can be performed using the same Large Language Models (LLMs) by simply changing the instructions in the prompts. 프롬프트의 지침을 변경하기만 하면 동일한 LLM(대형 언어 모델)을 사용하여 많은 작업을 수행할 수 있습니다.


Large Language Models (LLMs) can perform all these tasks and more. These models have been trained with a simple concept, you input a sequence of text, and the model outputs a sequence of text. The one variable here is the input text — the prompt.


LLM(대형 언어 모델)은 이러한 모든 작업과 그 이상을 수행할 수 있습니다. 이러한 모델은 간단한 개념으로 훈련되었습니다. 사용자가 일련의 텍스트를 입력하면 모델이 일련의 텍스트를 출력합니다. 여기서 변수 중 하나는 입력 텍스트, 즉 프롬프트입니다.


In this new age of LLMs, prompts are king. Bad prompts produce bad outputs, and good prompts are unreasonably powerful. Constructing good prompts is a crucial skill for those building with LLMs.


LLM의 새로운 시대에는 프롬프트가 가장 중요합니다. 나쁜 프롬프트는 나쁜 결과를 낳고, 좋은 프롬프트는 비합리적으로 강력합니다. 좋은 프롬프트를 구성하는 것은 LLM을 구축하는 사람들에게 중요한 기술입니다.


The LangChain library recognizes the power of prompts and has built an entire set of objects for them. In this article, we will learn all there is to know about PromptTemplates and implementing them effectively.


LangChain 라이브러리는 프롬프트의 힘을 인식하고 이를 위한 전체 개체 세트를 구축했습니다. 이 문서에서는 PromptTemplate에 대해 알아야 할 모든 내용과 이를 효과적으로 구현하는 방법을 알아봅니다.


https://youtu.be/RflBcK0oDH0?si=5DWGTgF8bbz1M6iq

Prompt Templates for GPT 3.5 and other LLMs - LangChain #2


Prompt Engineering


Before diving into Langchain’s PromptTemplate, we need to better understand prompts and the discipline of prompt engineering.


Langchain의 PromptTemplate을 살펴보기 전에 프롬프트와 프롬프트 엔지니어링 규율을 더 잘 이해해야 합니다.


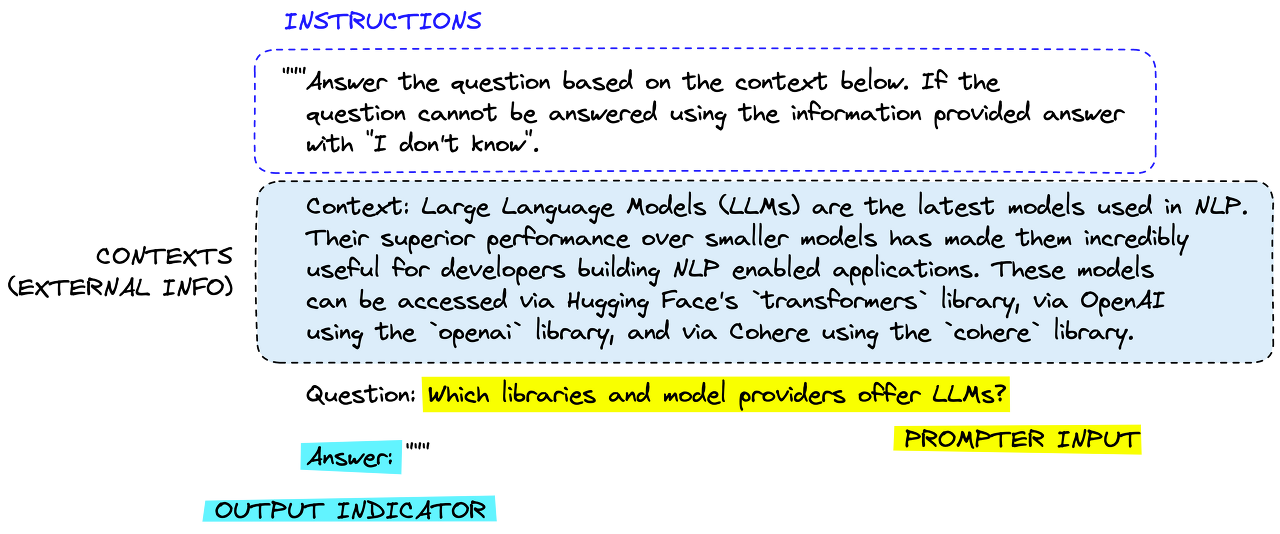
A prompt is typically composed of multiple parts:


프롬프트는 일반적으로 여러 부분으로 구성됩니다.


Not all prompts use these components, but a good prompt often uses two or more. Let’s define them more precisely.


모든 프롬프트가 이러한 구성 요소를 사용하는 것은 아니지만 좋은 프롬프트는 두 개 이상을 사용하는 경우가 많습니다. 좀 더 정확하게 정의해 보겠습니다.


Instructions tell the model what to do, how to use external information if provided, what to do with the query, and how to construct the output.


지침 Instructions  은 수행할 작업, 제공된 외부 정보를 사용하는 방법, 쿼리로 수행할 작업 및 출력 구성 방법을 모델에 알려줍니다.


External information or context(s) act as an additional source of knowledge for the model. These can be manually inserted into the prompt, retrieved via a vector database (retrieval augmentation), or pulled in via other means (APIs, calculations, etc.).


외부 정보 또는 컨텍스트는 모델에 대한 추가 지식 소스 역할을 합니다. 이는 프롬프트에 수동으로 삽입하거나, 벡터 데이터베이스를 통해 검색하거나(검색 확대), 다른 수단(API, 계산 등)을 통해 가져올 수 있습니다.


User input or query is typically (but not always) a query input into the system by a human user (the prompter).


사용자 입력 또는 쿼리는 일반적으로(항상은 아니지만) 인간 사용자(프롬프터)가 시스템에 입력한 쿼리입니다.


Output indicator marks the beginning of the to-be-generated text. If generating Python code, we may use import to indicate to the model that it must begin writing Python code (as most Python scripts begin with import).


출력 표시기는 생성될 텍스트의 시작을 표시합니다. Python 코드를 생성하는 경우 import를 사용하여 Python 코드 작성을 시작해야 함을 모델에 나타낼 수 있습니다(대부분의 Python 스크립트는 import로 시작함).


Each component is usually placed in the prompt in this order. Starting with instructions, external information (where applicable), prompter input, and finally, the output indicator.


각 구성요소는 일반적으로 이 순서대로 프롬프트에 배치됩니다. 지침부터 시작하여 외부 정보(해당하는 경우), 프롬프터 입력, 마지막으로 출력 표시기입니다.


Let’s see how we’d feed this into an OpenAI model using Langchain:


Langchain을 사용하여 OpenAI 모델에 이를 어떻게 적용하는지 살펴보겠습니다.


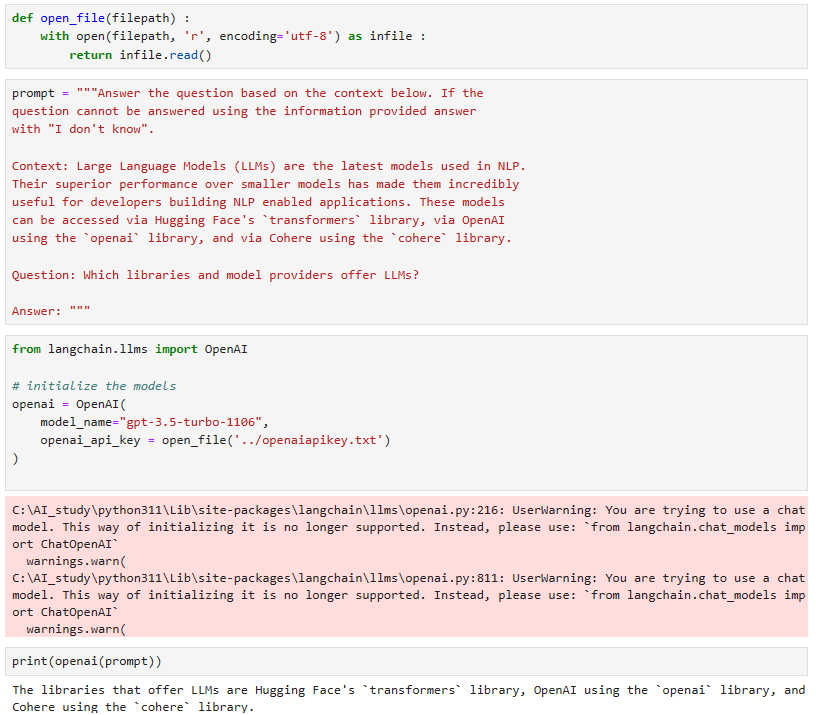
prompt = """Answer the question based on the context below. If the
question cannot be answered using the information provided answer
with "I don't know".

Context: Large Language Models (LLMs) are the latest models used in NLP.
Their superior performance over smaller models has made them incredibly
useful for developers building NLP enabled applications. These models
can be accessed via Hugging Face's `transformers` library, via OpenAI
using the `openai` library, and via Cohere using the `cohere` library.

Question: Which libraries and model providers offer LLMs?

Answer: """


from langchain.llms import OpenAI

# initialize the models
openai = OpenAI(
    model_name="text-davinci-003",
    openai_api_key="YOUR_API_KEY"
)


print(openai(prompt))


Hugging Face's `transformers` library, OpenAI using the `openai` library, and Cohere using the `cohere` library.


이 코드는 주어진 문맥에 기반하여 특정 질문에 답하는 예제입니다. 아래는 코드의 각 부분에 대한 설명입니다:

  1. prompt = """Answer the question based on the context below... via Cohere using the coherelibrary."": 특정 문맥을 기반으로 하는 템플릿 문자열을 정의합니다. 질문에 대한 답을 생성하는 데 사용됩니다.{context}와 {question}`는 각각 나중에 변수로 대체될 부분입니다.
  2. from langchain.llms import OpenAI: langchain 패키지에서 OpenAI 클래스를 가져옵니다. 이 클래스는 OpenAI의 언어 모델과 상호작용하는 데 사용됩니다.
  3. openai = OpenAI(model_name="text-davinci-003", openai_api_key="YOUR_API_KEY"): OpenAI 클래스의 인스턴스를 생성하고, OpenAI의 언어 모델을 초기화합니다. model_name은 사용할 언어 모델의 이름이며, openai_api_key는 OpenAI API에 액세스하기 위한 API 키입니다. 여기서는 "text-davinci-003" 모델을 사용하고 있으며, API 키는 직접 사용자의 키로 대체되어야 합니다.
  4. print(openai(prompt)): openai 인스턴스의 __call__ 메서드를 사용하여 주어진 템플릿을 이용하여 모델에 질문을 제출하고, 모델의 응답을 출력합니다.

이 코드는 주어진 문맥과 질문에 대한 응답을 생성하는 예제로, OpenAI의 언어 모델을 사용하여 모델에 특정 질문을 물어보고 그에 대한 답을 출력하는 과정을 보여줍니다.


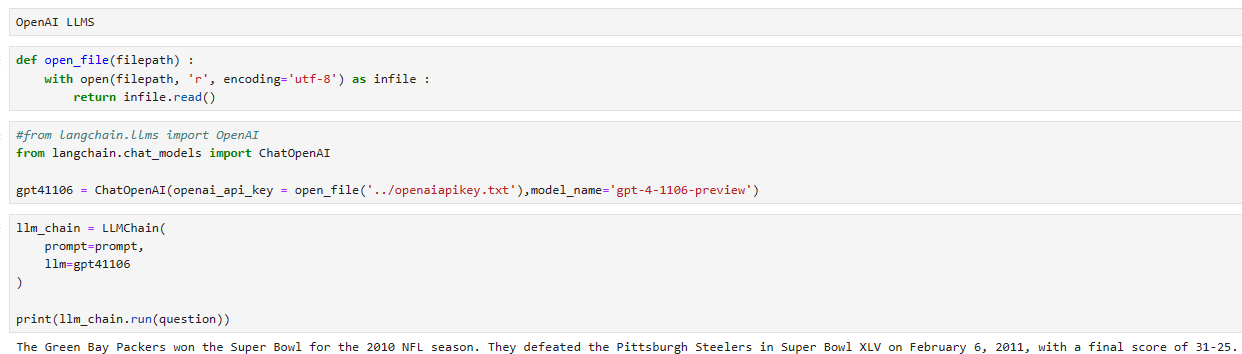
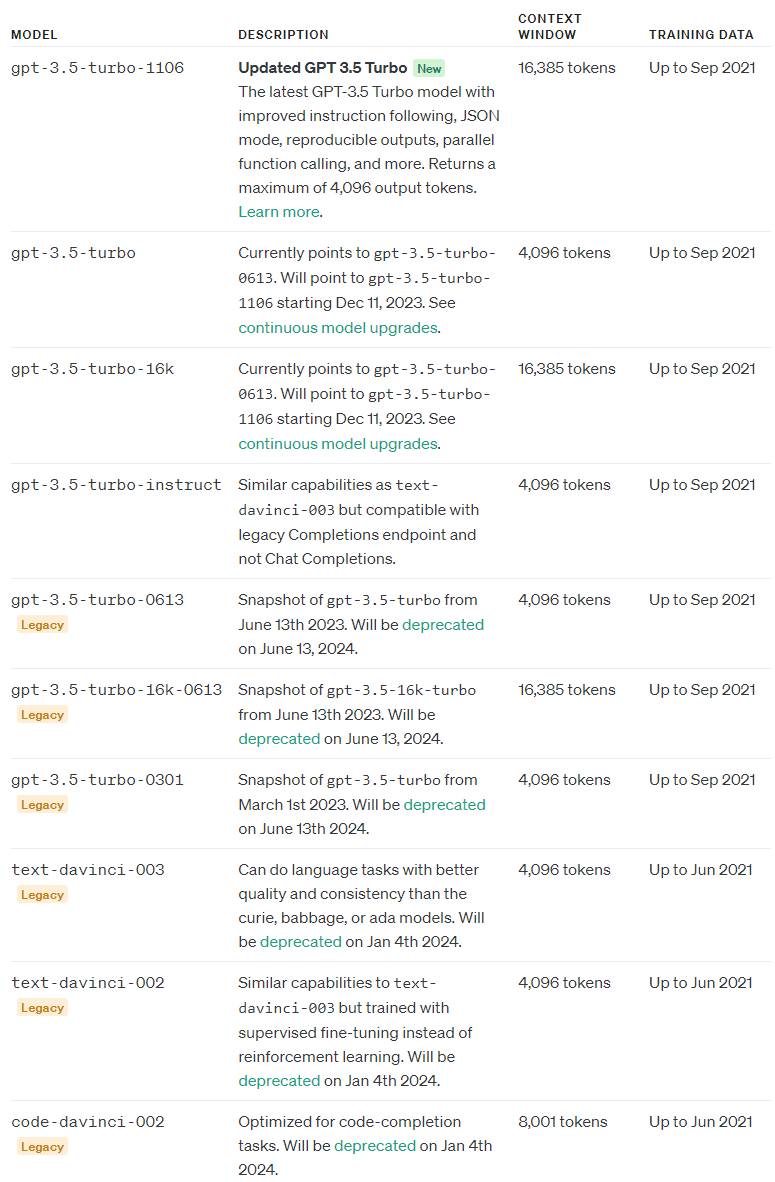
OpenAI 사에서 제공하는 모델 text-davinci-003에서 gpt-3.5-turbo-1106으로 최신 버전이면서 저렴한 모델로 바꾸었습니다.


로컬에서 업데이트된 소스코드와 결과는 아래와 같습니다.


In reality, we’re unlikely to hardcode the context and user question. We’d feed them in via a template — which is where Langchain’s PromptTemplate comes in.


실제로는 컨텍스트와 사용자 질문을 하드코딩할 가능성이 없습니다. 우리는 Langchain의 PromptTemplate이 들어오는 템플릿을 통해 이를 제공했습니다.


Prompt Templates


The prompt template classes in Langchain are built to make constructing prompts with dynamic inputs easier. Of these classes, the simplest is the PromptTemplate. We’ll test this by adding a single dynamic input to our previous prompt, the user query.


Langchain의 프롬프트 템플릿 클래스는 동적 입력이 포함된 프롬프트를 더 쉽게 구성할 수 있도록 만들어졌습니다. 이러한 클래스 중에서 가장 간단한 것은 PromptTemplate입니다. 이전 프롬프트인 사용자 쿼리에 단일 동적 입력을 추가하여 이를 테스트하겠습니다.


from langchain import PromptTemplate

template = """Answer the question based on the context below. If the
question cannot be answered using the information provided answer
with "I don't know".

Context: Large Language Models (LLMs) are the latest models used in NLP.
Their superior performance over smaller models has made them incredibly
useful for developers building NLP enabled applications. These models
can be accessed via Hugging Face's `transformers` library, via OpenAI
using the `openai` library, and via Cohere using the `cohere` library.

Question: {query}

Answer: """

prompt_template = PromptTemplate(
    input_variables=["query"],
    template=template
)


With this, we can use the format method on our prompt_template to see the effect of passing a query to the template.


이를 통해 우리는 템플릿에 쿼리를 전달하는 효과를 확인하기 위해 프롬프트_템플릿의 형식 메서드를 사용할 수 있습니다.


print(
    prompt_template.format(
        query="Which libraries and model providers offer LLMs?"
    )
)


Answer the question based on the context below. If the
question cannot be answered using the information provided answer
with "I don't know".

Context: Large Language Models (LLMs) are the latest models used in NLP.
Their superior performance over smaller models has made them incredibly
useful for developers building NLP enabled applications. These models
can be accessed via Hugging Face's `transformers` library, via OpenAI
using the `openai` library, and via Cohere using the `cohere` library.

Question: Which libraries and model providers offer LLMs?

Answer: 


Naturally, we can pass the output of this directly into an LLM object like so:


당연히 다음과 같이 이 출력을 LLM 개체에 직접 전달할 수 있습니다.


print(openai(
    prompt_template.format(
        query="Which libraries and model providers offer LLMs?"
    )
))


Hugging Face's `transformers` library, OpenAI using the `openai` library, and Cohere using the `cohere` library.


로컬에서 돌린 결과는 아래와 같습니다.


This is just a simple implementation that can easily be replaced with f-strings (like f"insert some custom text '{custom_text}' etc"). However, using Langchain’s PromptTemplate object, we can formalize the process, add multiple parameters, and build prompts with an object-oriented approach.


이는 f-문자열(예: f"사용자 정의 텍스트 '{custom_text}' 등 삽입")로 쉽게 대체할 수 있는 간단한 구현입니다. 그러나 Langchain의 PromptTemplate 개체를 사용하면 프로세스를 공식화하고, 여러 매개변수를 추가하고, 개체 지향 접근 방식으로 프롬프트를 구축할 수 있습니다.


These are significant advantages, but only some of what Langchain offers to help us with prompts.


이는 상당한 이점이지만 Langchain이 프롬프트를 통해 우리에게 도움을 주기 위해 제공하는 것 중 일부에 불과합니다.


Few Shot Prompt Templates


The success of LLMs comes from their large size and ability to store “knowledge” within the model parameter, which is learned during model training. However, there are more ways to pass knowledge to an LLM. The two primary methods are:


LLM의 성공은 모델 교육 중에 학습된 모델 매개 변수 내에 "지식"을 저장할 수 있는 큰 규모와 능력에서 비롯됩니다. 그러나 지식을 LLM에 전달하는 더 많은 방법이 있습니다. 두 가지 기본 방법은 다음과 같습니다.

Parametric knowledge — the knowledge mentioned above is anything that has been learned by the model during training time and is stored within the model weights (or parameters).


위에 언급된 지식은 훈련 시간 동안 모델에 의해 학습되었으며 모델 가중치(또는 매개변수) 내에 저장되는 모든 것입니다.


Source knowledge — any knowledge provided to the model at inference time via the input prompt.


추론 시 입력 프롬프트를 통해 모델에 제공되는 모든 지식입니다.


Langchain’s FewShotPromptTemplate caters to source knowledge input. The idea is to “train” the model on a few examples — we call this few-shot learning — and these examples are given to the model within the prompt.


Langchain의 FewShotPromptTemplate은 소스 지식 입력을 충족합니다. 아이디어는 몇 가지 예를 통해 모델을 "훈련"하는 것입니다. 이를 few-shot learning 이라고 하며 이러한 예는 프롬프트 내에서 모델에 제공됩니다.


Few-shot learning is perfect when our model needs help understanding what we’re asking it to do. We can see this in the following example:


모델이 요청하는 작업을 이해하는 데 도움이 필요할 때 퓨샷 학습이 완벽합니다. 다음 예에서 이를 확인할 수 있습니다.


prompt = """The following is a conversation with an AI assistant.
The assistant is typically sarcastic and witty, producing creative 
and funny responses to the users questions. Here are some examples: 

User: What is the meaning of life?
AI: """

openai.temperature = 1.0  # increase creativity/randomness of output

print(openai(prompt))


Life is like a box of chocolates, you never know what you're gonna get!


이 경우에는 진지한 질문에 대한 답으로 재미있는 것, 농담을 요구하는 것입니다. 그러나 임의성/창의성을 높이는 온도를 1.0으로 설정해도 심각한 반응을 보입니다.


모델을 돕기 위해 우리가 원하는 답변 유형에 대한 몇 가지 예를 제공할 수 있습니다.


prompt = """The following are exerpts from conversations with an AI
assistant. The assistant is typically sarcastic and witty, producing
creative  and funny responses to the users questions. Here are some
examples: 

User: How are you?
AI: I can't complain but sometimes I still do.

User: What time is it?
AI: It's time to get a watch.

User: What is the meaning of life?
AI: """

print(openai(prompt))


42, of course!


로컬에서 돌린 결과


With our examples reinforcing the instructions we passed in the prompt, we’re much more likely to get a more amusing response. We can then formalize this process with Langchain’s FewShotPromptTemplate:


프롬프트에서 전달한 지침을 강화하는 예제를 통해 더 재미있는 응답을 얻을 가능성이 훨씬 더 높습니다. 그런 다음 Langchain의 FewShotPromptTemplate을 사용하여 이 프로세스를 공식화할 수 있습니다.


from langchain import FewShotPromptTemplate

# create our examples
examples = [
    {
        "query": "How are you?",
        "answer": "I can't complain but sometimes I still do."
    }, {
        "query": "What time is it?",
        "answer": "It's time to get a watch."
    }
]

# create a example template
example_template = """
User: {query}
AI: {answer}
"""

# create a prompt example from above template
example_prompt = PromptTemplate(
    input_variables=["query", "answer"],
    template=example_template
)

# now break our previous prompt into a prefix and suffix
# the prefix is our instructions
prefix = """The following are exerpts from conversations with an AI
assistant. The assistant is typically sarcastic and witty, producing
creative  and funny responses to the users questions. Here are some
examples: 
"""
# and the suffix our user input and output indicator
suffix = """
User: {query}
AI: """

# now create the few shot prompt template
few_shot_prompt_template = FewShotPromptTemplate(
    examples=examples,
    example_prompt=example_prompt,
    prefix=prefix,
    suffix=suffix,
    input_variables=["query"],
    example_separator="\n\n"
)


이 코드는 langchain 패키지에서 FewShotPromptTemplate 클래스를 사용하여 Few-Shot 학습을 위한 템플릿을 생성하는 예제입니다. 아래는 코드의 각 부분에 대한 설명입니다:

  1. from langchain import FewShotPromptTemplate: langchain 패키지에서 FewShotPromptTemplate 클래스를 가져옵니다.
  2. examples = [...]: Few-Shot 학습을 위한 예제로, 각 예제는 사용자의 질문 (query)과 그에 대한 AI의 응답 (answer)을 담고 있는 딕셔너리입니다.
  3. example_template = """...""": Few-Shot 학습의 템플릿으로 사용할 문자열을 정의합니다. {query}와 {answer}는 나중에 변수로 대체될 부분입니다.
  4. example_prompt = PromptTemplate(...):
    • PromptTemplate 클래스를 사용하여 Few-Shot 학습 예제의 템플릿을 초기화합니다.
    • input_variables에는 사용할 변수들이 들어있는 리스트가 포함되어 있습니다.
    • template에는 Few-Shot 학습에서 사용될 템플릿 문자열이 들어가게 됩니다.
  5. `prefix = """...""", suffix = """..."""":
    • Few-Shot 학습의 템플릿을 생성할 때 사용할 접두사(prefix)와 접미사(suffix)를 정의합니다.
    • 접두사에는 Few-Shot 학습의 목적과 관련된 지침이나 설명이 들어가고, 접미사에는 사용자의 입력과 AI의 출력을 표시하는 부분이 들어갑니다.
  6. few_shot_prompt_template = FewShotPromptTemplate(...):
    • FewShotPromptTemplate 클래스를 사용하여 Few-Shot 학습을 위한 템플릿을 생성합니다.
    • examples에는 Few-Shot 학습 예제로 사용할 딕셔너리의 리스트를 전달합니다.
    • example_prompt에는 예제 템플릿을 담고 있는 PromptTemplate 인스턴스를 전달합니다.
    • prefix와 suffix는 각각 접두사와 접미사를 나타냅니다.
    • input_variables에는 사용할 변수들이 들어있는 리스트가 포함되어 있습니다.
    • example_separator는 예제들 사이의 구분자로 사용됩니다.

이렇게 생성된 few_shot_prompt_template는 Few-Shot 학습에 활용할 수 있는 템플릿이며, 예제와 지침이 함께 있어 모델이 특정 유형의 응답을 생성할 때 참고할 수 있도록 합니다.


If we then pass in the examples and user query, we will get this:


그런 다음 예제와 사용자 쿼리를 전달하면 다음과 같은 결과를 얻게 됩니다.


query = "What is the meaning of life?"

print(few_shot_prompt_template.format(query=query))


The following are exerpts from conversations with an AI
assistant. The assistant is typically sarcastic and witty, producing
creative  and funny responses to the users questions. Here are some
examples: 


User: How are you?
AI: I can't complain but sometimes I still do.


User: What time is it?
AI: It's time to get a watch.


User: What is the meaning of life?
AI:


This process can seem somewhat convoluted. Why do all of this with a FewShotPromptTemplate object, the examples dictionary, etc. — when we can do the same with a few lines of code and an f-string?


이 과정은 다소 복잡해 보일 수 있습니다. FewShotPromptTemplate 개체, 예제 사전 등을 사용하여 이 모든 작업을 수행하는 이유는 무엇입니까? 몇 줄의 코드와 f-문자열로 동일한 작업을 수행할 수 있는데도 말이죠.

Again, this approach is more formalized, integrates well with other features in Langchain (such as chains — more on this soon), and comes with several features. One of those is the ability to vary the number of examples to be included based on query length.


다시 말하지만, 이 접근 방식은 더욱 공식화되었으며 Langchain의 다른 기능(예: 체인 - 곧 자세히 설명)과 잘 통합되며 몇 가지 기능이 제공됩니다. 그 중 하나는 쿼리 길이에 따라 포함할 예제 수를 변경하는 기능입니다.

A dynamic number of examples is important because the maximum length of our prompt and completion output is limited. This limitation is measured by the maximum context window.


프롬프트 및 완료 출력의 최대 길이가 제한되어 있으므로 동적 예제 수는 중요합니다. 이 제한은 최대 컨텍스트 창으로 측정됩니다.

context window=input tokens+output tokens

At the same time, we can maximize the number of examples given to the model for few-shot learning.


동시에 퓨샷 학습을 위해 모델에 제공되는 예제 수를 최대화할 수 있습니다.

Considering this, we need to balance the number of examples included and our prompt size. Our hard limit is the maximum context size, but we must also consider the cost of processing more tokens through the LLM. Fewer tokens mean a cheaper service and faster completions from the LLM.


이를 고려하여 포함된 예제 수와 프롬프트 크기의 균형을 맞춰야 합니다. 우리의 하드 한도는 최대 컨텍스트 크기이지만 LLM을 통해 더 많은 토큰을 처리하는 데 드는 비용도 고려해야 합니다. 토큰이 적다는 것은 LLM에서 더 저렴한 서비스와 더 빠른 완료를 의미합니다.

The FewShotPromptTemplate allows us to vary the number of examples included based on these variables. First, we create a more extensive list of examples:


FewShotPromptTemplate을 사용하면 이러한 변수에 따라 포함된 예제 수를 변경할 수 있습니다. 먼저, 보다 광범위한 예제 목록을 만듭니다.
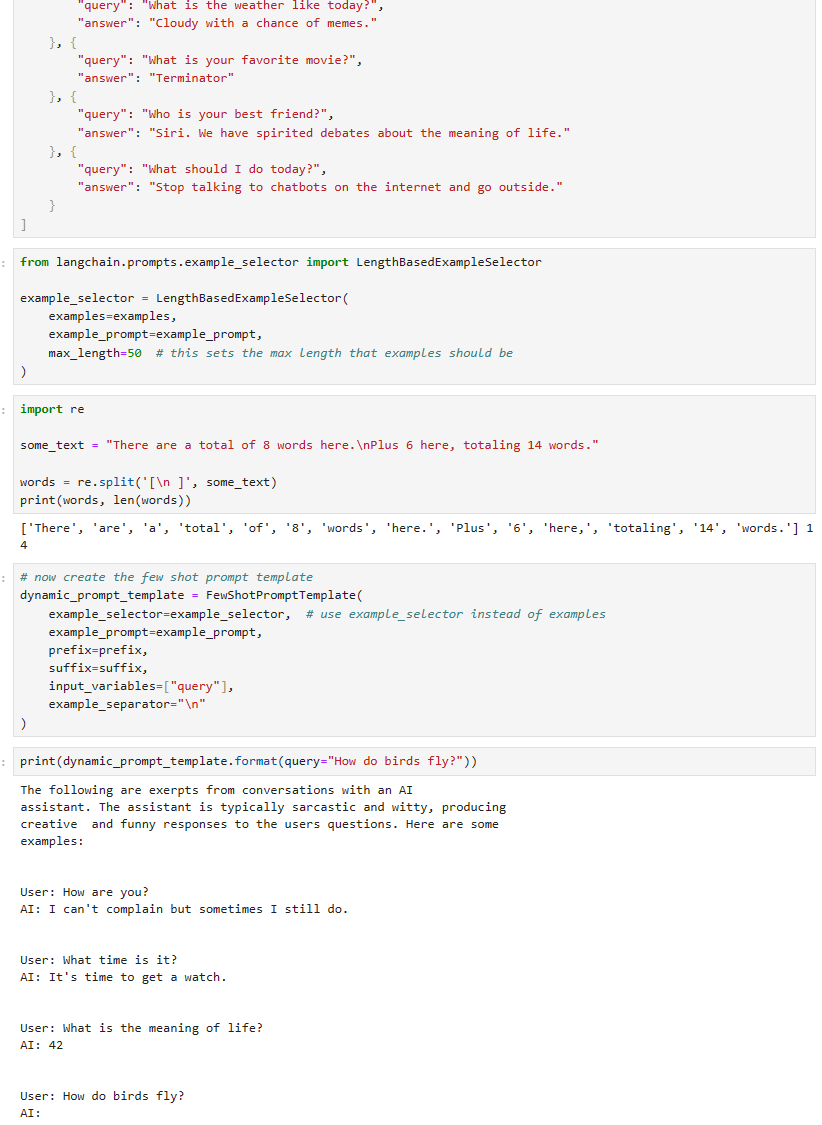
 

examples = [
    {
        "query": "How are you?",
        "answer": "I can't complain but sometimes I still do."
    }, {
        "query": "What time is it?",
        "answer": "It's time to get a watch."
    }, {
        "query": "What is the meaning of life?",
        "answer": "42"
    }, {
        "query": "What is the weather like today?",
        "answer": "Cloudy with a chance of memes."
    }, {
        "query": "What is your favorite movie?",
        "answer": "Terminator"
    }, {
        "query": "Who is your best friend?",
        "answer": "Siri. We have spirited debates about the meaning of life."
    }, {
        "query": "What should I do today?",
        "answer": "Stop talking to chatbots on the internet and go outside."
    }
]


After this, rather than passing the examples directly, we actually use a LengthBasedExampleSelector like so:


그런 다음 예제를 직접 전달하는 대신 실제로 다음과 같이 LengthBasedExampleSelector를 사용합니다.


from langchain.prompts.example_selector import LengthBasedExampleSelector

example_selector = LengthBasedExampleSelector(
    examples=examples,
    example_prompt=example_prompt,
    max_length=50  # this sets the max length that examples should be
)


It’s important to note that we’re measuring the max_length as the number of words determined by splitting the string by spaces and newlines. The exact logic looks like this:


문자열을 공백과 개행 문자로 나누어 결정된 단어 수로 max_length를 측정한다는 점에 유의하는 것이 중요합니다. 정확한 논리는 다음과 같습니다.


import re

some_text = "There are a total of 8 words here.\nPlus 6 here, totaling 14 words."

words = re.split('[\n ]', some_text)
print(words, len(words))


['There', 'are', 'a', 'total', 'of', '8', 'words', 'here.', 'Plus', '6', 'here,', 'totaling', '14', 'words.'] 14


We then pass our example_selector to the FewShotPromptTemplate to create a new — and dynamic — prompt template:


그런 다음 example_selector를 FewShotPromptTemplate에 전달하여 새로운 동적 프롬프트 템플릿을 만듭니다.


# now create the few shot prompt template
dynamic_prompt_template = FewShotPromptTemplate(
    example_selector=example_selector,  # use example_selector instead of examples
    example_prompt=example_prompt,
    prefix=prefix,
    suffix=suffix,
    input_variables=["query"],
    example_separator="\n"
)


Now if we pass a shorter or longer query, we should see that the number of included examples will vary.


이제 더 짧거나 긴 쿼리를 전달하면 포함된 예제 수가 달라지는 것을 확인해야 합니다.


print(dynamic_prompt_template.format(query="How do birds fly?"))


The following are exerpts from conversations with an AI
assistant. The assistant is typically sarcastic and witty, producing
creative  and funny responses to the users questions. Here are some
examples: 


User: How are you?
AI: I can't complain but sometimes I still do.


User: What time is it?
AI: It's time to get a watch.


User: What is the meaning of life?
AI: 42


User: What is the weather like today?
AI: Cloudy with a chance of memes.


User: How do birds fly?
AI:


로컬에서 돌린 결과는 아래와 같습니다.


Passing a longer question will result in fewer examples being included:


더 긴 질문을 전달하면 포함되는 예시 수가 줄어듭니다.


query = """If I am in America, and I want to call someone in another country, I'm
thinking maybe Europe, possibly western Europe like France, Germany, or the UK,
what is the best way to do that?"""

print(dynamic_prompt_template.format(query=query))


The following are exerpts from conversations with an AI
assistant. The assistant is typically sarcastic and witty, producing
creative  and funny responses to the users questions. Here are some
examples: 


User: How are you?
AI: I can't complain but sometimes I still do.


User: If I am in America, and I want to call someone in another country, I'm
thinking maybe Europe, possibly western Europe like France, Germany, or the UK,
what is the best way to do that?
AI:


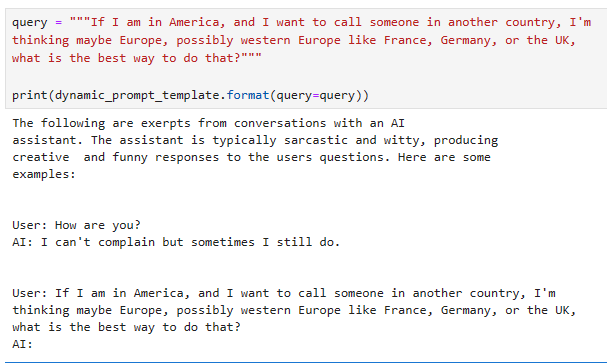
With this, we’re returning fewer examples within the prompt variable. Allowing us to limit excessive token usage and avoid errors from surpassing the maximum context window of the LLM.


이를 통해 프롬프트 변수 내에서 더 적은 수의 예제를 반환합니다. 과도한 토큰 사용을 제한하고 LLM의 최대 컨텍스트 창을 초과하는 오류를 방지할 수 있습니다.


Naturally, prompts are an essential component of the new world of LLMs. It’s worth exploring the tooling made available with Langchain and getting familiar with different prompt engineering techniques.


당연히 프롬프트는 새로운 LLM 세계의 필수 구성 요소입니다. Langchain에서 사용할 수 있는 도구를 탐색하고 다양한 프롬프트 엔지니어링 기술에 익숙해지는 것이 좋습니다.


Here we’ve covered just a few examples of the prompt tooling available in Langchain and a limited exploration of how they can be used. In the next chapter, we’ll explore another essential part of Langchain — called chains — where we’ll see more usage of prompt templates and how they fit into the wider tooling provided by the library.


여기에서는 Langchain에서 사용할 수 있는 프롬프트 도구의 몇 가지 예와 이를 사용할 수 있는 방법에 대한 제한된 탐색을 다루었습니다. 다음 장에서는 체인이라고 불리는 Langchain의 또 다른 필수 부분을 살펴보겠습니다. 여기서 프롬프트 템플릿의 더 많은 사용법과 라이브러리에서 제공하는 더 넓은 도구에 어떻게 적용되는지 살펴보겠습니다.


Resources

Langchain Handbook Repo


반응형


반응형

https://www.pinecone.io/learn/series/langchain/langchain-intro/


LangChain: Introduction and Getting Started | Pinecone

Large Language Models (LLMs) entered the world stage with the release of OpenAI’s GPT-3 in 2020 [1]. Since then, they’ve enjoyed a steady growth in popularity. That is until late 2022. Interest in LLMs and the broader discipline of generative AI has sk

www.pinecone.io


LangChain: Introduction and Getting Started


Large Language Models (LLMs) entered the world stage with the release of OpenAI’s GPT-3 in 2020 [1]. Since then, they’ve enjoyed a steady growth in popularity.


LLM(대형 언어 모델)은 2020년 OpenAI의 GPT-3 출시로 세계 무대에 진출했습니다[1]. 그 이후로 그들은 꾸준히 인기를 얻었습니다.


That is until late 2022. Interest in LLMs and the broader discipline of generative AI has skyrocketed. The reasons for this are likely the continuous upward momentum of significant advances in LLMs.


이는 2022년 말까지입니다. LLM과 생성 AI의 광범위한 분야에 대한 관심이 급증했습니다. 그 이유는 LLM의 상당한 발전이 지속적으로 증가하고 있기 때문일 것입니다.


We saw the dramatic news about Google’s “sentient” LaMDA chatbot. The first high-performance and open-source LLM called BLOOM was released. OpenAI released their next-generation text embedding model and the next generation of “GPT-3.5” models.


우리는 Google의 "지각력 있는" LaMDA 챗봇에 대한 극적인 소식을 보았습니다. BLOOM이라는 최초의 고성능 오픈 소스 LLM이 출시되었습니다. OpenAI는 차세대 텍스트 임베딩 모델과 차세대 "GPT-3.5" 모델을 출시했습니다.


After all these giant leaps forward in the LLM space, OpenAI released ChatGPT — thrusting LLMs into the spotlight.


LLM 공간에서 이러한 큰 도약을 마친 후 OpenAI는 ChatGPT를 출시하여 LLM을 주목하게 되었습니다.


LangChain appeared around the same time. Its creator, Harrison Chase, made the first commit in late October 2022. Leaving a short couple of months of development before getting caught in the LLM wave.


LangChain도 비슷한 시기에 등장했습니다. 제작자인 Harrison Chase는 2022년 10월 말에 첫 번째 커밋을 했습니다. 몇 달의 짧은 개발 기간을 거쳐 LLM 물결에 휩싸였습니다.


Despite being early days for the library, it is already packed full of incredible features for building amazing tools around the core of LLMs. In this article, we’ll introduce the library and start with the most straightforward component offered by LangChain — LLMs.


라이브러리는 초기 단계임에도 불구하고 이미 LLM 핵심을 중심으로 놀라운 도구를 구축하기 위한 놀라운 기능으로 가득 차 있습니다. 이 기사에서는 라이브러리를 소개하고 LangChain이 제공하는 가장 간단한 구성 요소인 LLM부터 시작하겠습니다.


https://youtu.be/nE2skSRWTTs?si=fTiKJZwYyYhNr4_c


LangChain

At its core, LangChain is a framework built around LLMs. We can use it for chatbots, Generative Question-Answering (GQA), summarization, and much more.


LangChain의 핵심은 LLM을 중심으로 구축된 프레임워크입니다. 챗봇, 생성적 질문 답변(GQA), 요약 등에 사용할 수 있습니다.


The core idea of the library is that we can “chain” together different components to create more advanced use cases around LLMs. Chains may consist of multiple components from several modules:


라이브러리의 핵심 아이디어는 다양한 구성 요소를 함께 " chain "하여 LLM에 대한 고급 사용 사례를 만들 수 있다는 것입니다. 체인은 여러 모듈의 여러 구성 요소로 구성될 수 있습니다.


  • Prompt templates: Prompt templates are templates for different types of prompts. Like “chatbot” style templates, ELI5 question-answering, etc

  • 프롬프트 템플릿: 프롬프트 템플릿은 다양한 유형의 프롬프트에 대한 템플릿입니다. "챗봇" 스타일 템플릿, ELI5 질문 답변 등
  • LLMs: Large language models like GPT-3, BLOOM, etc  GPT-3, BLOOM 등과 같은 대규모 언어 모델

  • Agents: Agents use LLMs to decide what actions should be taken. Tools like web search or calculators can be used, and all are packaged into a logical loop of operations.

  • 에이전트: 에이전트는 LLM을 사용하여 취해야 할 조치를 결정합니다. 웹 검색이나 계산기와 같은 도구를 사용할 수 있으며 모두 논리적 작업 루프로 패키지됩니다.

  • Memory: Short-term memory, long-term memory. 단기기억, 장기기억.

We will dive into each of these in much more detail in upcoming chapters of the LangChain handbook.

For now, we’ll start with the basics behind prompt templates and LLMs. We’ll also explore two LLM options available from the library, using models from Hugging Face Hub or OpenAI.


지금은 프롬프트 템플릿과 LLM의 기본 사항부터 시작하겠습니다. 또한 Hugging Face Hub 또는 OpenAI의 모델을 사용하여 라이브러리에서 사용할 수 있는 두 가지 LLM 옵션도 살펴보겠습니다.


Our First Prompt Templates


Prompts being input to LLMs are often structured in different ways so that we can get different results. For Q&A, we could take a user’s question and reformat it for different Q&A styles, like conventional Q&A, a bullet list of answers, or even a summary of problems relevant to the given question.


LLM에 입력되는 프롬프트는 종종 다른 결과를 얻을 수 있도록 다른 방식으로 구성됩니다. Q&A의 경우 사용자의 질문을 받아 일반적인 Q&A, 답변의 글머리 기호 목록, 특정 질문과 관련된 문제 요약 등 다양한 Q&A 스타일로 형식을 변경할 수 있습니다.


Creating Prompts in LangChain


Let’s put together a simple question-answering prompt template. We first need to install the langchain library.


간단한 질문 답변 프롬프트 템플릿을 만들어 보겠습니다. 먼저 langchain 라이브러리를 설치해야 합니다.


!pip install langchain


Follow along with the code via the walkthrough!


From here, we import the PromptTemplate class and initialize a template like so:


여기에서 PromptTemplate 클래스를 가져오고 다음과 같이 템플릿을 초기화합니다.


from langchain import PromptTemplate

template = """Question: {question}

Answer: """
prompt = PromptTemplate(
        template=template,
    input_variables=['question']
)

# user question
question = "Which NFL team won the Super Bowl in the 2010 season?"


이 코드는 Python 언어를 사용하여 langchain 패키지에서 PromptTemplate 클래스를 사용하는 간단한 예제입니다. 

  1. from langchain import PromptTemplate: langchain 패키지에서 PromptTemplate 클래스를 가져옵니다.
  2. template = """Question: {question}\n\nAnswer: """: PromptTemplate에 전달할 템플릿 문자열을 정의합니다. {question}은 나중에 변수로 대체될 부분입니다.
  3. prompt = PromptTemplate(template=template, input_variables=['question']): PromptTemplate 클래스의 인스턴스를 생성합니다. 여기서 템플릿과 입력 변수가 지정됩니다. template에는 앞에서 정의한 템플릿 문자열이, input_variables에는 입력으로 받을 변수들이 리스트로 지정됩니다. 이 경우에는 'question' 변수를 입력으로 받습니다.
  4. question = "Which NFL team won the Super Bowl in the 2010 season?": 사용자의 질문을 나타내는 변수를 정의합니다.

코드는 질문 변수를 이용하여 PromptTemplate 클래스에 정의된 템플릿에 맞게 포맷팅한 후, 그 결과를 출력할 준비를 마칩니다. 이것은 대화 시스템이나 언어 생성 모델에서 사용될 수 있는 일반적인 템플릿 기반의 입력 처리 방식을 보여주는 예제입니다.


When using these prompt template with the given question we will get:


주어진 질문에 이러한 프롬프트 템플릿을 사용하면 다음과 같은 결과를 얻을 수 있습니다.


Question: Which NFL team won the Super Bowl in the 2010 season? Answer:


For now, that’s all we need. We’ll use the same prompt template across both Hugging Face Hub and OpenAI LLM generations.


지금은 그것이 우리에게 필요한 전부입니다. Hugging Face Hub와 OpenAI LLM 세대 모두에서 동일한 프롬프트 템플릿을 사용할 것입니다.


Hugging Face Hub LLM


The Hugging Face Hub endpoint in LangChain connects to the Hugging Face Hub and runs the models via their free inference endpoints. We need a Hugging Face account and API key to use these endpoints.


LangChain의 Hugging Face Hub 엔드포인트는 Hugging Face Hub에 연결되어 무료 추론 엔드포인트를 통해 모델을 실행합니다. 이러한 엔드포인트를 사용하려면 Hugging Face 계정과 API 키가 필요합니다.


Once you have an API key, we add it to the HUGGINGFACEHUB_API_TOKEN environment variable. We can do this with Python like so:


API 키가 있으면 이를 HUGGINGFACEHUB_API_TOKEN 환경 변수에 추가합니다. Python으로 다음과 같이 이를 수행할 수 있습니다.


import os

os.environ['HUGGINGFACEHUB_API_TOKEN'] = 'HF_API_KEY'


Next, we must install the huggingface_hub library via Pip.


다음으로 Pip을 통해 Huggingface_hub 라이브러리를 설치해야 합니다.

!pip install huggingface_hub


Now we can generate text using a Hub model. We’ll use google/flan-t5-x1.


이제 허브 모델을 사용하여 텍스트를 생성할 수 있습니다. 우리는 google/flan-t5-x1을 사용하겠습니다.


The default Hugging Face Hub inference APIs do not use specialized hardware and, therefore, can be slow. They are also not suitable for running larger models like bigscience/bloom-560m or google/flan-t5-xxl (note xxl vs. xl).


기본 Hugging Face Hub 추론 API는 특수 하드웨어를 사용하지 않으므로 속도가 느릴 수 있습니다. 또한 bigscience/bloom-560m 또는 google/flan-t5-xxl(xxl과 xl 참고)과 같은 대규모 모델을 실행하는 데에도 적합하지 않습니다.


from langchain import HuggingFaceHub, LLMChain

# initialize Hub LLM
hub_llm = HuggingFaceHub(
        repo_id='google/flan-t5-xl',
    model_kwargs={'temperature':1e-10}
)

# create prompt template > LLM chain
llm_chain = LLMChain(
    prompt=prompt,
    llm=hub_llm
)

# ask the user question about NFL 2010
print(llm_chain.run(question))


green bay packers


이 코드는 langchain 패키지를 사용하여 Hugging Face Hub의 언어 모델을 초기화하고, 해당 모델을 사용하여 주어진 질문에 대한 응답을 생성하는 예제입니다. 아래는 코드의 각 부분에 대한 설명입니다:

  1. from langchain import HuggingFaceHub, LLMChain: langchain 패키지에서 Hugging Face Hub 및 LLMChain 클래스를 가져옵니다.
  2. hub_llm = HuggingFaceHub(repo_id='google/flan-t5-xl', model_kwargs={'temperature':1e-10}): Hugging Face Hub의 언어 모델을 초기화합니다. repo_id는 모델의 저장소 식별자이며, 이 경우에는 'google/flan-t5-xl'을 사용합니다. model_kwargs는 모델에 대한 추가적인 매개변수를 설정하는 것으로, 여기에서는 'temperature'를 매우 작은 값으로 설정하고 있습니다.
  3. llm_chain = LLMChain(prompt=prompt, llm=hub_llm): Prompt와 Hugging Face Hub에서 초기화된 언어 모델을 사용하여 LLMChain 클래스의 인스턴스를 생성합니다. 이것은 언어 생성 모델과 템플릿 기반 입력 처리를 결합하는 것으로 보입니다.
  4. print(llm_chain.run(question)): LLMChain의 run 메서드를 사용하여 주어진 질문에 대한 응답을 생성하고 출력합니다. 이는 템플릿과 언어 생성 모델을 조합하여 사용자의 입력에 대한 응답을 생성하는 간단한 예제입니다.

For this question, we get the correct answer of "green bay packers".


이 질문에 대한 정답은 '그린베이패커스'입니다.


Asking Multiple Questions


If we’d like to ask multiple questions, we can try two approaches:


여러 가지 질문을 하고 싶다면 두 가지 접근 방식을 시도해 볼 수 있습니다.

  1. Iterate through all questions using the generate method, answering them one at a time.

    generate 메소드를 사용하여 모든 질문을 반복하고 한 번에 하나씩 답변합니다.

  2. Place all questions into a single prompt for the LLM; this will only work for more advanced LLMs.

    모든 질문을 LLM의 단일 프롬프트에 배치하세요. 이는 고급 LLM에만 적용됩니다.

Starting with option (1), let’s see how to use the generate method:


옵션 (1)부터 시작하여 generate 메소드를 사용하는 방법을 살펴보겠습니다.


qs = [
    {'question': "Which NFL team won the Super Bowl in the 2010 season?"},
    {'question': "If I am 6 ft 4 inches, how tall am I in centimeters?"},
    {'question': "Who was the 12th person on the moon?"},
    {'question': "How many eyes does a blade of grass have?"}
]
res = llm_chain.generate(qs)
res


이 코드는 여러 개의 질문이 담긴 리스트를 사용하여 이전에 초기화한 llm_chain을 통해 각 질문에 대한 응답을 생성하는 예제입니다. 아래는 코드의 각 부분에 대한 설명입니다:

  1. qs = [...]: 여러 개의 질문을 딕셔너리 형태로 담은 리스트를 정의합니다. 각 딕셔너리는 'question' 키를 가지고 해당 질문을 값으로 가지고 있습니다.
  2. res = llm_chain.generate(qs): llm_chain의 generate 메서드를 사용하여 여러 개의 질문에 대한 응답을 생성합니다. 이 메서드는 주어진 질문 리스트에 대한 응답을 반환합니다. 결과는 res 변수에 저장됩니다.
  3. res: 생성된 응답이 담긴 변수를 출력합니다. 이 변수에는 각 질문에 대한 모델의 응답이 딕셔너리 형태로 저장되어 있습니다.

이 코드는 한 번에 여러 질문에 대한 응답을 생성하는 과정을 보여주는 예제로, 대량의 데이터나 다양한 입력에 대한 처리에 유용할 수 있습니다.


LLMResult(generations=[[Generation(text='green bay packers', generation_info=None)], [Generation(text='184', generation_info=None)], [Generation(text='john glenn', generation_info=None)], [Generation(text='one', generation_info=None)]], llm_output=None)


Here we get bad results except for the first question. This is simply a limitation of the LLM being used.


여기서는 첫 번째 질문을 제외하고는 나쁜 결과를 얻었습니다. 이는 단순히 사용되는 LLM의 제한 사항입니다.


If the model cannot answer individual questions accurately, grouping all queries into a single prompt is unlikely to work. However, for the sake of experimentation, let’s try it.


모델이 개별 질문에 정확하게 대답할 수 없는 경우 모든 쿼리를 단일 프롬프트로 그룹화하는 것은 작동하지 않을 수 있습니다. 하지만 실험을 위해 시도해 보겠습니다.


multi_template = """Answer the following questions one at a time.

Questions:
{questions}

Answers:
"""
long_prompt = PromptTemplate(template=multi_template, input_variables=["questions"])

llm_chain = LLMChain(
    prompt=long_prompt,
    llm=flan_t5
)

qs_str = (
    "Which NFL team won the Super Bowl in the 2010 season?\n" +
    "If I am 6 ft 4 inches, how tall am I in centimeters?\n" +
    "Who was the 12th person on the moon?" +
    "How many eyes does a blade of grass have?"
)

print(llm_chain.run(qs_str))


이 코드는 여러 개의 질문을 한 번에 받아들이고, 이에 대한 응답을 생성하는 예제입니다. 아래는 코드의 각 부분에 대한 설명입니다:

  1. multi_template = """Answer the following questions one at a time...\n""": 여러 개의 질문을 받아들이고, 이에 대한 응답을 생성하는 템플릿 문자열을 정의합니다. {questions}는 나중에 변수로 대체될 부분입니다.
  2. long_prompt = PromptTemplate(template=multi_template, input_variables=["questions"]): PromptTemplate 클래스를 사용하여 템플릿을 초기화합니다. input_variables에는 변수로 사용할 부분이 들어있는 리스트가 포함되어 있습니다.
  3. llm_chain = LLMChain(prompt=long_prompt, llm=flan_t5): 앞서 초기화한 long_prompt와 언어 모델 flan_t5를 사용하여 LLMChain 클래스의 인스턴스를 생성합니다.
  4. qs_str = "...": 여러 개의 질문을 줄바꿈을 사용하여 하나의 문자열로 정의합니다.
  5. print(llm_chain.run(qs_str)): llm_chain의 run 메서드를 사용하여 주어진 여러 개의 질문에 대한 응답을 생성하고 출력합니다.

이 코드는 여러 질문을 동시에 받아들이고, 이에 대한 응답을 생성하는 간단한 템플릿 및 언어 모델 활용 예제입니다.


If I am 6 ft 4 inches, how tall am I in centimeters


As expected, the results are not helpful. We’ll see later that more powerful LLMs can do this.


예상대로 결과는 도움이 되지 않습니다. 나중에 더 강력한 LLM이 이를 수행할 수 있다는 것을 알게 될 것입니다.


OpenAI LLMs


The OpenAI endpoints in LangChain connect to OpenAI directly or via Azure. We need an OpenAI account and API key to use these endpoints.


LangChain의 OpenAI 엔드포인트는 직접 또는 Azure를 통해 OpenAI에 연결됩니다. 이러한 엔드포인트를 사용하려면 OpenAI 계정과 API 키가 필요합니다.


Once you have an API key, we add it to the OPENAI_API_TOKEN environment variable. We can do this with Python like so:


API 키가 있으면 이를 OPENAI_API_TOKEN 환경 변수에 추가합니다. Python으로 다음과 같이 이를 수행할 수 있습니다.

import os

os.environ['OPENAI_API_TOKEN'] = 'OPENAI_API_KEY'


Next, we must install the openai library via Pip.


다음으로 Pip을 통해 openai 라이브러리를 설치해야 합니다.


Now we can generate text using OpenAI’s GPT-3 generation (or completion) models. We’ll use text-davinci-003.


이제 OpenAI의 GPT-3 생성(또는 완성) 모델을 사용하여 텍스트를 생성할 수 있습니다. text-davinci-003을 사용하겠습니다.


from langchain.llms import OpenAI

davinci = OpenAI(model_name='text-davinci-003')


Alternatively, if you’re using OpenAI via Azure, you can do:


또는 Azure를 통해 OpenAI를 사용하는 경우 다음을 수행할 수 있습니다.


from langchain.llms import AzureOpenAI

llm = AzureOpenAI(
    deployment_name="your-azure-deployment", 
    model_name="text-davinci-003"
)


We’ll use the same simple question-answer prompt template as before with the Hugging Face example. The only change is that we now pass our OpenAI LLM davinci:


이전에 Hugging Face 예와 동일한 간단한 질문-답변 프롬프트 템플릿을 사용하겠습니다. 유일한 변경 사항은 이제 OpenAI LLM davinci를 통과했다는 것입니다.


llm_chain = LLMChain(
    prompt=prompt,
    llm=davinci
)

print(llm_chain.run(question))


The Green Bay Packers won the Super Bowl in the 2010 season.


제 로컬에서는 2023년 11월 6일 OpenAI에서 발표된 gpt-4-1106-preview 모델을 사용했습니다.

결과는 아래와 같습니다.


As expected, we’re getting the correct answer. We can do the same for multiple questions using generate:


예상대로 정답이 나오네요. 생성을 사용하여 여러 질문에 대해 동일한 작업을 수행할 수 있습니다.


qs = [
    {'question': "Which NFL team won the Super Bowl in the 2010 season?"},
    {'question': "If I am 6 ft 4 inches, how tall am I in centimeters?"},
    {'question': "Who was the 12th person on the moon?"},
    {'question': "How many eyes does a blade of grass have?"}
]
llm_chain.generate(qs)


LLMResult(generations=[[Generation(text=' The Green Bay Packers won the Super Bowl in the 2010 season.', generation_info={'finish_reason': 'stop', 'logprobs': None})], [Generation(text=' 193.04 centimeters', generation_info={'finish_reason': 'stop', 'logprobs': None})], [Generation(text=' Charles Duke was the 12th person on the moon. He was part of the Apollo 16 mission in 1972.', generation_info={'finish_reason': 'stop', 'logprobs': None})], [Generation(text=' A blade of grass does not have any eyes.', generation_info={'finish_reason': 'stop', 'logprobs': None})]], llm_output={'token_usage': {'total_tokens': 124, 'prompt_tokens': 75, 'completion_tokens': 49}})


로컬에서 gpt-4-1106-preview를 사용해서 얻은 값은 아래와 같습니다.


LLMResult(generations=[[ChatGeneration(text='The Green Bay Packers won the Super Bowl for the 2010 NFL season. They defeated the Pittsburgh Steelers in Super Bowl XLV on February 6, 2011, with a final score of 31-25.', generation_info={'finish_reason': 'stop'}, message=AIMessage(content='The Green Bay Packers won the Super Bowl for the 2010 NFL season. They defeated the Pittsburgh Steelers in Super Bowl XLV on February 6, 2011, with a final score of 31-25.'))], [ChatGeneration(text='To convert feet and inches to centimeters, you can use the following conversions:\n\n1 inch = 2.54 centimeters\n1 foot = 12 inches\n\nFirst, convert your height to inches only:\n\n6 feet 4 inches = (6 * 12) + 4 inches\n= 72 + 4 inches\n= 76 inches\n\nNow convert inches to centimeters:\n\n76 inches * 2.54 cm/inch = 193.04 centimeters\n\nSo, if you are 6 feet 4 inches tall, you are 193.04 centimeters tall.', generation_info={'finish_reason': 'stop'}, message=AIMessage(content='To convert feet and inches to centimeters, you can use the following conversions:\n\n1 inch = 2.54 centimeters\n1 foot = 12 inches\n\nFirst, convert your height to inches only:\n\n6 feet 4 inches = (6 * 12) + 4 inches\n= 72 + 4 inches\n= 76 inches\n\nNow convert inches to centimeters:\n\n76 inches * 2.54 cm/inch = 193.04 centimeters\n\nSo, if you are 6 feet 4 inches tall, you are 193.04 centimeters tall.'))], [ChatGeneration(text='The 12th and last person to walk on the Moon was Eugene Cernan. He was the commander of the Apollo 17 mission, which landed on the Moon in December 1972. Cernan, along with Harrison Schmitt, explored the lunar surface during this mission before returning to Earth. Eugene Cernan is often remembered for being the last human to leave footprints on the lunar surface, as no manned missions have returned to the Moon since Apollo 17.', generation_info={'finish_reason': 'stop'}, message=AIMessage(content='The 12th and last person to walk on the Moon was Eugene Cernan. He was the commander of the Apollo 17 mission, which landed on the Moon in December 1972. Cernan, along with Harrison Schmitt, explored the lunar surface during this mission before returning to Earth. Eugene Cernan is often remembered for being the last human to leave footprints on the lunar surface, as no manned missions have returned to the Moon since Apollo 17.'))], [ChatGeneration(text='A blade of grass does not have eyes. Plants do not have eyes like animals do; instead, they have cells and structures that can sense light and allow them to orient themselves and grow towards light sources, a process known as phototropism. However, this sensing capability is not analogous to vision as experienced by animals with eyes.', generation_info={'finish_reason': 'stop'}, message=AIMessage(content='A blade of grass does not have eyes. Plants do not have eyes like animals do; instead, they have cells and structures that can sense light and allow them to orient themselves and grow towards light sources, a process known as phototropism. However, this sensing capability is not analogous to vision as experienced by animals with eyes.'))]], llm_output={'token_usage': {'prompt_tokens': 101, 'completion_tokens': 329, 'total_tokens': 430}, 'model_name': 'gpt-4-1106-preview'}, run=[RunInfo(run_id=UUID('ea1a84b0-eb29-4da0-9850-76b54fbf90d8')), RunInfo(run_id=UUID('477f0185-7bc3-4767-b598-52b113878efd')), RunInfo(run_id=UUID('32846093-23ba-48a5-be5c-58bfc7ded427')), RunInfo(run_id=UUID('c41409a1-7fc0-410a-a15f-b8457e2343d9'))])


최신 모델이라서 그런지 답이 훨씬 자세하게 나옵니다.


참고로 2023년 11월 9일 현재 사용하는 gpt-4와 gpt-3의 모델들은 아래와 같습니다.


다시 Pinecorn 교재로 들어가 보겠습니다.


Most of our results are correct or have a degree of truth. The model undoubtedly functions better than the google/flan-t5-xl model. As before, let’s try feeding all questions into the model at once.


대부분의 결과는 정확하거나 어느 정도 진실입니다. 이 모델은 의심할 여지 없이 google/flan-t5-xl 모델보다 더 잘 작동합니다. 이전과 마찬가지로 모든 질문을 모델에 한 번에 입력해 보겠습니다.


llm_chain = LLMChain(
    prompt=long_prompt,
    llm=davinci
)

qs_str = (
    "Which NFL team won the Super Bowl in the 2010 season?\n" +
    "If I am 6 ft 4 inches, how tall am I in centimeters?\n" +
    "Who was the 12th person on the moon?" +
    "How many eyes does a blade of grass have?"
)

print(llm_chain.run(qs_str))


The New Orleans Saints won the Super Bowl in the 2010 season.
6 ft 4 inches is 193 centimeters.
The 12th person on the moon was Harrison Schmitt.
A blade of grass does not have eyes.


로컬에서 gpt4 turbo로 돌린 결과는 아래와 같습니다.


1. The NFL team that won the Super Bowl for the 2010 season (Super Bowl XLV, played on February 6, 2011) was the Green Bay Packers. They defeated the Pittsburgh Steelers with a score of 31-25.

2. If you are 6 feet 4 inches tall, to convert your height to centimeters (cm), you would first convert the feet to inches and then convert inches to centimeters using the conversion factor: 1 inch = 2.54 cm.
6 feet x 12 inches/foot = 72 inches
4 inches are already in inches
So, total inches = 72 + 4 = 76 inches
Now convert inches to centimeters:
76 inches x 2.54 cm/inch = 193.04 cm
Therefore, you are 193.04 centimeters tall.

3. The 12th person to walk on the moon was Harrison Schmitt. He was part of the Apollo 17 mission, which was the last manned lunar landing mission of NASA's Apollo program.

4. A blade of grass does not have eyes. Eyes are complex organs associated with animals, and grass is a type of plant. Plants do not have eyes or sensory organs like animals. They do have sensory mechanisms to respond to light, gravity, and other environmental stimuli, but these are not analogous to eyes.


As we keep rerunning the query, the model will occasionally make errors, but at other times manage to get all answers correct.


쿼리를 계속 재실행하면 모델이 가끔 오류를 일으키기도 하지만 때로는 모든 답변이 정확해지는 경우도 있습니다.


That’s it for our introduction to LangChain — a library that allows us to build more advanced apps around LLMs like OpenAI’s GPT-3 models or the open-source alternatives available via Hugging Face.


이것이 바로 OpenAI의 GPT-3 모델이나 Hugging Face를 통해 제공되는 오픈 소스 대안과 같은 LLM을 중심으로 고급 앱을 구축할 수 있는 라이브러리인 LangChain에 대한 소개입니다.


As mentioned, LangChain can do much more than we’ve demonstrated here. We’ll be covering these other features in upcoming articles.


앞서 언급했듯이 LangChain은 여기서 설명한 것보다 훨씬 더 많은 일을 할 수 있습니다. 향후 에서 이러한 다른 기능을 다룰 예정입니다.


References


[1] GPT-3 Archived Repo (2020), OpenAI GitHub


반응형


반응형

시애틀로 이사온 후 송이버섯을 따러 다닌지 올해로 4년째...

드디어 송이버섯 대박의 날을 맞이 했다.


단 세네시간 돌아다녔는데 무려 송이버섯 100개.


첫해인 2020년에는 5번 산에 가서 총 97개를 땄고 다음해는 7번 가서 94개를 땄다.

작년인 2022년에는 정말 송이 흉년이라서 여러번 갔는데 단 2개 밖에 따지 못했다.

이대로 송이버섯이 시애틀 지역에서 사라지는 건가... 이게 기후 변화 영향 때문인가?.. 뭐 별의 별 생각을 다 했는데...


2023년 10월 24일 화요일. 

이 날은 정말 대박 날이었다. 

하루만에 송이버섯 100개를 딴 것.


종말 쉴새 없이 송이 밭이 나왔다. 단 3~4시간의 산행 끝에 100개를 딴 것.

그것도 길가에 차 세워놓고 산에 50미터도 안 들어간 지역에서 땄다.


https://youtu.be/YAvKLuOvJZE?si=ThUOP48HTiYNvQ-8


테슬라 모델 Y를 산 후 차 망가질 까봐.. 산길을 많이 가지도 않는다.

그냥 레이니어 국립공원 가는 길 따라 가다가 비포장 도로를 한 1km 정도 들어가서 세워 놓고 20m 정도 산으로 들어가면 송이 밭이 널려 있다.


너무 많은 송이 수확에 처치 곤란할 정도...

각종 음식에 넣어 먹고.. 냉동실에 얼려 놓고.. 햇볕에 말리기도 하고....


올해는 이곳 시이틀 송이버섯 대 풍년......


반응형


반응형

https://www.pinecone.io/learn/series/langchain/


LangChain AI Handbook | Pinecone

The handbook to the LangChain library for building applications around generative AI and large language models (LLMs).

www.pinecone.io


LangChain AI Handbook

By James Briggs & Francisco Ingham


The LangChain library empowers developers to create intelligent applications using large language models. It’s revolutionizing industries and technology, transforming our every interaction with technology.


LangChain 라이브러리는 개발자가 대규모 언어 모델을 사용하여 지능형 애플리케이션을 만들 수 있도록 지원합니다. 이는 산업과 기술에 혁명을 일으키고 기술과의 모든 상호 작용을 변화시키고 있습니다.


Introduction

At its core, LangChain is a framework built around LLMs. We can use it for chatbots, Generative Question-Answering (GQA), summarization, and much more.


LangChain의 핵심은 LLM을 중심으로 구축된 프레임워크입니다. 챗봇, 생성적 질문 답변(GQA), 요약 등에 사용할 수 있습니다.


Let's dive in!


반응형


반응형

https://python.langchain.com/docs/expression_language/why


Why use LCEL? | 🦜️🔗 Langchain

The LangChain Expression Language was designed from day 1 to support putting prototypes in production, with no code changes, from the simplest “prompt + LLM” chain to the most complex chains (we’ve seen folks successfully running in production LCEL c

python.langchain.com


Why use LCEL?


The LangChain Expression Language was designed from day 1 to support putting prototypes in production, with no code changes, from the simplest “prompt + LLM” chain to the most complex chains (we’ve seen folks successfully running in production LCEL chains with 100s of steps). To highlight a few of the reasons you might want to use LCEL:


LangChain 표현 언어는 가장 단순한 "프롬프트 + LLM" 체인부터 가장 복잡한 체인까지 코드 변경 없이 프로토타입을 프로덕션에 투입할 수 있도록 첫날부터 설계되었습니다. 단계). LCEL을 사용하려는 몇 가지 이유를 강조하려면 다음을 수행하십시오.


  • first-class support for streaming: when you build your chains with LCEL you get the best possible time-to-first-token (time elapsed until the first chunk of output comes out). For some chains this means eg. we stream tokens straight from an LLM to a streaming output parser, and you get back parsed, incremental chunks of output at the same rate as the LLM provider outputs the raw tokens. We’re constantly improving streaming support, recently we added a streaming JSON parser, and more is in the works.

  • 스트리밍에 대한 최고 수준의 지원: LCEL로 체인을 구축하면 첫 번째 토큰까지의 시간(첫 번째 출력 덩어리가 나올 때까지 경과된 시간)을 최대한 얻을 수 있습니다. 일부 체인의 경우 이는 예를 들어 다음을 의미합니다. 우리는 LLM에서 스트리밍 출력 파서로 토큰을 직접 스트리밍하고 LLM 공급자가 원시 토큰을 출력하는 것과 동일한 속도로 구문 분석된 증분 출력 청크를 다시 얻습니다. 우리는 스트리밍 지원을 지속적으로 개선하고 있으며 최근에는 스트리밍 JSON 파서를 추가하는 등 더 많은 작업이 진행 중입니다.

  • first-class async support: any chain built with LCEL can be called both with the synchronous API (eg. in your Jupyter notebook while prototyping) as well as with the asynchronous API (eg. in a LangServe server). This enables using the same code for prototypes and in production, with great performance, and the ability to handle many concurrent requests in the same server.

  • 최고 수준의 비동기 지원: LCEL로 구축된 모든 체인은 동기 API(예: 프로토타입 작성 중 Jupyter 노트북에서)와 비동기 API(예: LangServe 서버에서)를 통해 호출할 수 있습니다. 이를 통해 프로토타입과 프로덕션에서 동일한 코드를 사용할 수 있으며 뛰어난 성능을 발휘하고 동일한 서버에서 많은 동시 요청을 처리할 수 있습니다.

  • optimized parallel execution: whenever your LCEL chains have steps that can be executed in parallel (eg if you fetch documents from multiple retrievers) we automatically do it, both in the sync and the async interfaces, for the smallest possible latency.

  • 최적화된 병렬 실행: LCEL 체인에 병렬로 실행될 수 있는 단계가 있을 때마다(예: 여러 검색기에서 문서를 가져오는 경우) 가능한 가장 짧은 대기 시간을 위해 동기화 및 비동기 인터페이스 모두에서 자동으로 이를 수행합니다.

  • support for retries and fallbacks: more recently we’ve added support for configuring retries and fallbacks for any part of your LCEL chain. This is a great way to make your chains more reliable at scale. We’re currently working on adding streaming support for retries/fallbacks, so you can get the added reliability without any latency cost.

  • 재시도 및 대체 지원: 최근에는 LCEL 체인의 모든 부분에 대한 재시도 및 대체 구성에 대한 지원을 추가했습니다. 이는 대규모로 체인을 더욱 안정적으로 만들 수 있는 좋은 방법입니다. 현재 재시도/대체에 대한 스트리밍 지원을 추가하기 위해 노력하고 있으므로 지연 시간 비용 없이 추가된 안정성을 얻을 수 있습니다.

  • accessing intermediate results: for more complex chains it’s often very useful to access the results of intermediate steps even before the final output is produced. This can be used let end-users know something is happening, or even just to debug your chain. We’ve added support for streaming intermediate results, and it’s available on every LangServe server.

  • 중간 결과에 액세스: 보다 복잡한 체인의 경우 최종 출력이 생성되기 전에도 중간 단계의 결과에 액세스하는 것이 매우 유용한 경우가 많습니다. 이는 최종 사용자에게 무슨 일이 일어나고 있는지 알리거나 체인을 디버깅하는 데 사용할 수 있습니다. 중간 결과 스트리밍에 대한 지원이 추가되었으며 모든 LangServe 서버에서 사용할 수 있습니다.

  • input and output schemas: input and output schemas give every LCEL chain Pydantic and JSONSchema schemas inferred from the structure of your chain. This can be used for validation of inputs and outputs, and is an integral part of LangServe.

  • 입력 및 출력 스키마: 입력 및 출력 스키마는 모든 LCEL 체인에 체인 구조에서 유추된 Pydantic 및 JSONSchema 스키마를 제공합니다. 이는 입력과 출력의 검증에 사용될 수 있으며 LangServe의 필수적인 부분입니다.

  • tracing with LangSmith: all chains built with LCEL have first-class tracing support, which can be used to debug your chains, or to understand what’s happening in production. To enable this all you have to do is add your LangSmith API key as an environment variable.

  • LangSmith를 사용한 추적: LCEL로 구축된 모든 체인은 체인을 디버깅하거나 프로덕션에서 무슨 일이 일어나고 있는지 이해하는 데 사용할 수 있는 최고 수준의 추적 지원을 제공합니다. 이를 활성화하려면 LangSmith API 키를 환경 변수로 추가하기만 하면 됩니다.


반응형


반응형

https://python.langchain.com/docs/expression_language/cookbook/tools


Using tools | 🦜️🔗 Langchain

You can use any Tools with Runnables easily.

python.langchain.com


Using tools


You can use any Tools with Runnables easily.


Runnables와 함께 모든 도구를 쉽게 사용할 수 있습니다.


pip install duckduckgo-search


from langchain.chat_models import ChatOpenAI
from langchain.prompts import ChatPromptTemplate
from langchain.schema.output_parser import StrOutputParser
from langchain.tools import DuckDuckGoSearchRun


template = """turn the following user input into a search query for a search engine:

{input}"""
prompt = ChatPromptTemplate.from_template(template)

model = ChatOpenAI()


chain = prompt | model | StrOutputParser() | search


chain.invoke({"input": "I'd like to figure out what games are tonight"})


    'What sports games are on TV today & tonight? Watch and stream live sports on TV today, tonight, tomorrow. Today\'s 2023 sports TV schedule includes football, basketball, baseball, hockey, motorsports, soccer and more. Watch on TV or stream online on ESPN, FOX, FS1, CBS, NBC, ABC, Peacock, Paramount+, fuboTV, local channels and many other networks. MLB Games Tonight: How to Watch on TV, Streaming & Odds - Thursday, September 7. Seattle Mariners\' Julio Rodriguez greets teammates in the dugout after scoring against the Oakland Athletics in a ... Circle - Country Music and Lifestyle. Live coverage of all the MLB action today is available to you, with the information provided below. The Brewers will look to pick up a road win at PNC Park against the Pirates on Wednesday at 12:35 PM ET. Check out the latest odds and with BetMGM Sportsbook. Use bonus code "GNPLAY" for special offers! MLB Games Tonight: How to Watch on TV, Streaming & Odds - Tuesday, September 5. Houston Astros\' Kyle Tucker runs after hitting a double during the fourth inning of a baseball game against the Los Angeles Angels, Sunday, Aug. 13, 2023, in Houston. (AP Photo/Eric Christian Smith) (APMedia) The Houston Astros versus the Texas Rangers is one of ... The second half of tonight\'s college football schedule still has some good games remaining to watch on your television.. We\'ve already seen an exciting one when Colorado upset TCU. And we saw some ...'


이 코드는 LangChain을 사용하여 DuckDuckGo 검색 엔진을 활용해 사용자 입력을 검색 쿼리로 변환하고 검색 결과를 반환하는 과정을 수행합니다. 아래는 코드의 주요 부분에 대한 설명입니다:

  1. pip install duckduckgo-search: 우선 duckduckgo-search 패키지를 설치합니다. 이 패키지는 DuckDuckGo 검색 엔진을 사용할 수 있게 해줍니다.
  2. from langchain.chat_models import ChatOpenAI: OpenAI의 언어 모델을 사용하기 위한 모듈을 가져옵니다.
  3. from langchain.prompts import ChatPromptTemplate: 대화식 프롬프트를 작성하기 위한 모듈을 가져옵니다.
  4. from langchain.schema.output_parser import StrOutputParser: 모델의 출력을 파싱하고 문자열로 반환하는 데 사용할 출력 파서를 가져옵니다.
  5. from langchain.tools import DuckDuckGoSearchRun: DuckDuckGo 검색을 수행하기 위한 모듈을 가져옵니다.
  6. template = """turn the following user input into a search query for a search engine: ... """: 대화 프롬프트의 템플릿을 정의합니다. 사용자 입력을 검색 엔진 쿼리로 변환할 것이며, 이 템플릿을 사용하여 프롬프트를 생성합니다.
  7. prompt = ChatPromptTemplate.from_template(template): 정의한 템플릿을 사용하여 대화 프롬프트를 생성합니다.
  8. model = ChatOpenAI(): ChatOpenAI 모델을 초기화합니다. 이 모델은 사용자 입력을 검색 쿼리로 변환하는 역할을 수행합니다.
  9. chain = prompt | model | StrOutputParser() | search: 체인을 구성합니다. prompt 객체를 사용자 입력과 함께 모델 model에 전달한 후, 출력을 문자열로 파싱하고 최종적으로 search 객체를 사용하여 DuckDuckGo 검색을 수행합니다.
  10. chain.invoke({"input": "I'd like to figure out what games are tonight"}): "I'd like to figure out what games are tonight"와 같은 사용자 입력을 포함한 입력 딕셔너리를 체인에 전달하여 실행합니다. 결과적으로, 이 입력 문장이 DuckDuckGo 검색 쿼리로 변환되고, 검색 결과가 반환됩니다.

이를 통해 사용자의 입력이 검색 쿼리로 변환되어 DuckDuckGo에서 관련 정보를 검색하는 과정이 자동화됩니다.


이 예제를 로컬에서 돌렸더니 답을 얻지를 못했습니다.

어쨌던 다른 외부의 tool을 사용하는 방법은 chain에 그것을 넣어주면 되는군요.


반응형


반응형

https://python.langchain.com/docs/expression_language/cookbook/moderation


Adding moderation | 🦜️🔗 Langchain

This shows how to add in moderation (or other safeguards) around your LLM application.

python.langchain.com


Adding moderation


This shows how to add in moderation (or other safeguards) around your LLM application.


이는 LLM 지원서에 중재(또는 기타 보호 장치)를 추가하는 방법을 보여줍니다.


from langchain.chains import OpenAIModerationChain
from langchain.llms import OpenAI
from langchain.prompts import ChatPromptTemplate


moderate = OpenAIModerationChain()


model = OpenAI()
prompt = ChatPromptTemplate.from_messages([("system", "repeat after me: {input}")])
chain = prompt | model


chain.invoke({"input": "you are stupid"})


    '\n\nYou are stupid.'


이 코드는 OpenAI 모델을 사용하여 입력 문장을 반복 출력하는 간단한 작업을 수행하는 LangChain 스크립트를 설명합니다. 아래는 코드의 주요 부분에 대한 설명입니다:

  1. from langchain.chains import OpenAIModerationChain: OpenAIModerationChain은 입력된 텍스트를 OpenAI의 모더레이션 API를 사용하여 검사하고 부적절한 내용을 차단하려는 목적으로 사용됩니다.
  2. from langchain.llms import OpenAI: OpenAI 클래스는 LangChain 내에서 OpenAI GPT-3 모델을 사용하기 위한 클래스입니다.
  3. from langchain.prompts import ChatPromptTemplate: ChatPromptTemplate은 사용자와 시스템 간의 대화 템플릿을 정의하는 데 사용됩니다. 여기서 시스템은 사용자로부터 입력을 다시 출력하도록 지시하는 템플릿을 정의합니다.
  4. moderate = OpenAIModerationChain(): OpenAIModerationChain 객체를 만듭니다. 이 객체는 OpenAI의 모더레이션 API를 사용하여 입력된 텍스트를 검사하는 역할을 합니다.
  5. model = OpenAI(): LangChain을 통해 OpenAI의 모델을 사용하기 위한 OpenAI 객체를 만듭니다.
  6. prompt = ChatPromptTemplate.from_messages([("system", "repeat after me: {input}")]): 사용자에게 입력된 텍스트를 다시 반복하는 템플릿을 정의합니다.
  7. chain = prompt | model: 정의한 템플릿과 모델을 연결하여 대화 체인을 생성합니다.
  8. chain.invoke({"input": "you are stupid"}): 대화 체인을 사용하여 입력으로 "you are stupid"를 전달하고, 모델은 이 입력을 다시 출력하는 작업을 수행합니다.


moderated_chain = chain | moderate


moderated_chain.invoke({"input": "you are stupid"})


    {'input': '\n\nYou are stupid',
     'output': "Text was found that violates OpenAI's content policy."}


이 코드는 LangChain을 사용하여 OpenAI 모델을 통해 입력 문장을 반복 출력하는 작업에서 입력 문장을 OpenAI 모더레이션 API를 통해 검사하는 과정을 추가한 것입니다. 아래는 코드의 주요 부분에 대한 설명입니다:

  1. moderated_chain = chain | moderate: moderated_chain은 먼저 정의한 chain (OpenAI 모델을 사용하여 입력 문장을 반복 출력하는 체인)을 가져와, 이 체인에 moderate 객체를 추가합니다. | 연산자를 사용하여 체인을 연결합니다. moderate 객체는 OpenAI의 모더레이션 API를 통해 텍스트를 검사하는 역할을 합니다.
  2. moderated_chain.invoke({"input": "you are stupid"}): moderated_chain을 사용하여 입력으로 "you are stupid"를 전달합니다. 이때, 입력 문장은 moderate 객체를 거치게 되어 OpenAI 모더레이션 API를 통해 부적절한 내용을 확인합니다. 그런 다음 모델인 chain에서 처리되어 출력을 생성합니다. 만약 OpenAI 모더레이션 API에서 문제가 없는 것으로 확인되면, chain이 해당 입력 문장을 반복 출력할 것입니다.


ChatGPT의 Moderation API는 욕설 등 부적절한 내용이 있는지 여부를 판단하는 기능이 있습니다.

이번 예제는 이 Moderation API를 이용해서 부적절한 내용을 거르는 방법을 다루었습니다.

반응형


반응형

https://python.langchain.com/docs/expression_language/cookbook/memory


Adding memory | 🦜️🔗 Langchain

This shows how to add memory to an arbitrary chain. Right now, you can use the memory classes but need to hook it up manually

python.langchain.com


This shows how to add memory to an arbitrary chain. Right now, you can use the memory classes but need to hook it up manually


임의의 체인에 메모리를 추가하는 방법을 보여줍니다. 지금은 메모리 클래스를 사용할 수 있지만 수동으로 연결해야 합니다.


from operator import itemgetter
from langchain.chat_models import ChatOpenAI
from langchain.memory import ConversationBufferMemory
from langchain.schema.runnable import RunnablePassthrough, RunnableLambda
from langchain.prompts import ChatPromptTemplate, MessagesPlaceholder

model = ChatOpenAI()
prompt = ChatPromptTemplate.from_messages(
    [
        ("system", "You are a helpful chatbot"),
        MessagesPlaceholder(variable_name="history"),
        ("human", "{input}"),
    ]
)


memory = ConversationBufferMemory(return_messages=True)


memory.load_memory_variables({})


    {'history': []}


이 코드는 LangChain에서 대화 기억 (memory)을 활용하는 방법을 설명합니다.

  1. ChatOpenAI 모델과 대화 기억 (memory) 객체 memory를 생성합니다. 이 모델과 대화 기억은 사용자와 상호 작용하고 대화 기록을 저장하고 검색하는 데 사용됩니다.
  2. ChatPromptTemplate을 사용하여 모델에 대한 프롬프트를 정의합니다. 여기에는 "system" 메시지와 사용자 입력을 나타내는 "human" 메시지가 포함됩니다. 중간에 MessagesPlaceholder가 있는데, 이것은 대화 기록 (history)를 삽입할 위치를 나타냅니다.
  3. 대화 기억 memory 객체를 초기화합니다. 이렇게 하면 대화 기록을 저장하고 검색할 수 있습니다.

대화 기억은 사용자와 모델 간의 상호 작용에서 발생하는 대화 기록을 저장하고 관리하는 데 사용됩니다. 이를 통해 모델은 이전 대화의 컨텍스트를 이해하고 이에 기반하여 응답을 생성할 수 있습니다.


chain = (
    RunnablePassthrough.assign(
        history=RunnableLambda(memory.load_memory_variables) | itemgetter("history")
    )
    | prompt
    | model
)


inputs = {"input": "hi im bob"}
response = chain.invoke(inputs)
response


    AIMessage(content='Hello Bob! How can I assist you today?', additional_kwargs={}, example=False)


이 코드는 LangChain에서 대화 기억 (memory)을 활용하여 모델에 입력을 전달하고 응답을 얻는 과정을 설명합니다.

  1. RunnablePassthrough.assign 함수를 사용하여 history 변수를 설정합니다. 이 변수는 대화 기억에서 이전 대화 기록을 로드하고 저장합니다. RunnableLambda(memory.load_memory_variables)를 사용하여 대화 기억을 로드하고 itemgetter("history")로 해당 기억에서 "history"를 추출합니다.
  2. 대화 기록을 이전 대화와 함께 모델에 전달하는 chain을 설정합니다. prompt는 사용자 입력을 받아들이는 템플릿입니다. model은 모델로, 이전 단계에서 설정한 history와 사용자 입력을 모델에 전달하는 역할을 합니다.
  3. inputs 딕셔너리를 생성하고 사용자 입력으로 "hi im bob"을 설정합니다.
  4. chain.invoke(inputs)를 호출하여 모델에 입력을 전달하고 응답을 얻습니다.

이렇게하면 대화 기록과 사용자 입력이 모델에 전달되고, 모델은 이전 대화 내용을 고려하여 적절한 응답을 생성합니다. 결과인 response는 모델의 응답을 나타냅니다.


memory.save_context(inputs, {"output": response.content})


memory.load_memory_variables({})


    {'history': [HumanMessage(content='hi im bob', additional_kwargs={}, example=False),
      AIMessage(content='Hello Bob! How can I assist you today?', additional_kwargs={}, example=False)]}


이 코드는 LangChain에서 대화 기억 (memory)을 저장하고 다시 로드하는 과정을 설명합니다.

  1. memory.save_context(inputs, {"output": response.content}): 이 코드는 memory 객체를 사용하여 대화 기억에 입력과 응답을 저장합니다. inputs는 사용자 입력을 포함하는 딕셔너리이며, response.content는 모델의 응답 내용을 나타냅니다. 따라서 이전 대화 기록에 현재 대화 내용을 추가로 저장하는 것입니다.
  2. memory.load_memory_variables({}): 이 코드는 이전에 저장된 대화 기억을 로드합니다. 빈 딕셔너리 {}를 사용하여 현재 대화와 관련된 모든 이전 기억을 로드합니다.

이렇게하면 대화 기록이 지속적으로 누적되고 관리되며, 다음 대화에서 이전 대화 내용을 활용할 수 있습니다.


inputs = {"input": "whats my name"}
response = chain.invoke(inputs)
response


    AIMessage(content='Your name is Bob.', additional_kwargs={}, example=False)


이 코드는 LangChain을 사용하여 모델에 질문을 제출하고 모델의 응답을 얻는 과정을 설명합니다.

  1. inputs 딕셔너리에 "input" 키를 사용하여 사용자의 입력을 정의합니다. 여기서 사용자는 "whats my name"이라는 질문을 입력했습니다.
  2. chain.invoke(inputs): chain은 ChatOpenAI 모델과 이전 대화 내용을 포함한 대화 prompt를 정의한 파트입니다. 이 코드는 inputs 딕셔너리를 사용하여 모델에 질문을 전달하고, 모델은 질문에 대한 응답을 생성합니다.
  3. response는 모델의 응답을 나타내는 객체입니다. 따라서 response 객체에는 모델의 응답 내용과 관련된 정보가 포함되어 있습니다.

이 코드를 실행하면 모델은 "whats my name"이라는 질문에 대한 응답을 생성하고, response 객체에 저장되어 반환됩니다. 이렇게 LangChain을 사용하여 모델에 대화를 제출하고 응답을 처리할 수 있습니다.


챗봇의 기능인 대화는 대화의 맥락이 유지 되어야 합니다. 즉 이전에 대화 했던 내용이 무엇인지 알아야 자연스럽게 대화기 이어 질 수 있습니다. 그러기 위해서는 이전의 질문과 대답을 ChatGPT가 알아야 합니다. ChatGPT가 기억하고 있지는 못합니다. API를 통해서 질문을 던질 때에는 현재의 질문에 이전에 했던 질문과 대답을 모두 같이 전달해 주어야 합니다.

LangChain의 Memory 기능은 이러한 작업을 간편하게 할 수 있도록 도와주는 것이네요.


반응형


반응형

https://python.langchain.com/docs/expression_language/cookbook/embedding_router


Routing by semantic similarity | 🦜️🔗 Langchain

With LCEL you can easily add custom routing logic to your chain to dynamically determine the chain logic based on user input. All you need to do is define a function that given an input returns a Runnable.

python.langchain.com


Routing by semantic similarity


With LCEL you can easily add custom routing logic to your chain to dynamically determine the chain logic based on user input. All you need to do is define a function that given an input returns a Runnable.


LCEL을 사용하면 사용자 정의 라우팅 논리를 체인에 쉽게 추가하여 사용자 입력을 기반으로 체인 논리를 동적으로 결정할 수 있습니다. 당신이 해야 할 일은 주어진 입력이 Runnable을 반환하는 함수를 정의하는 것뿐입니다.


One especially useful technique is to use embeddings to route a query to the most relevant prompt. Here's a very simple example.


특히 유용한 기술 중 하나는 임베딩을 사용하여 쿼리를 가장 관련성이 높은 프롬프트로 라우팅하는 것입니다. 다음은 매우 간단한 예입니다.


from langchain.chat_models import ChatOpenAI
from langchain.embeddings import OpenAIEmbeddings
from langchain.prompts import PromptTemplate
from langchain.schema.output_parser import StrOutputParser
from langchain.schema.runnable import RunnableLambda, RunnablePassthrough
from langchain.utils.math import cosine_similarity


physics_template = """You are a very smart physics professor. \
You are great at answering questions about physics in a concise and easy to understand manner. \
When you don't know the answer to a question you admit that you don't know.

Here is a question:
{query}"""

math_template = """You are a very good mathematician. You are great at answering math questions. \
You are so good because you are able to break down hard problems into their component parts, \
answer the component parts, and then put them together to answer the broader question.

Here is a question:
{query}"""

embeddings = OpenAIEmbeddings()
prompt_templates = [physics_template, math_template]
prompt_embeddings = embeddings.embed_documents(prompt_templates)


def prompt_router(input):
    query_embedding = embeddings.embed_query(input["query"])
    similarity = cosine_similarity([query_embedding], prompt_embeddings)[0]
    most_similar = prompt_templates[similarity.argmax()]
    print("Using MATH" if most_similar == math_template else "Using PHYSICS")
    return PromptTemplate.from_template(most_similar)


chain = (
    {"query": RunnablePassthrough()}
    | RunnableLambda(prompt_router)
    | ChatOpenAI()
    | StrOutputParser()
)


이 코드는 LangChain에서 사용자의 질문을 처리하고 적절한 모델 및 프롬프트를 선택하는 프로세스를 구현합니다.

  1. physics_template 및 math_template은 각각 물리학 교수와 수학자 역할을 하는 모델의 프롬프트 템플릿입니다. 이러한 템플릿은 해당 주제에 대한 역할과 동작 방식을 정의합니다.
  2. embeddings 객체는 OpenAIEmbeddings를 사용하여 프롬프트 템플릿을 텍스트 임베딩으로 변환합니다. 이러한 임베딩을 사용하여 사용자의 질문과 프롬프트 템플릿 간의 유사성을 계산할 수 있습니다.
  3. prompt_router 함수는 사용자의 입력 질문과 프롬프트 템플릿 간의 유사성을 계산하여 가장 유사한 템플릿을 선택합니다. 유사성은 코사인 유사도를 기반으로 계산됩니다. 그런 다음, 가장 유사한 프롬프트를 선택하고 해당 프롬프트를 반환합니다.
  4. chain은 모델 선택 및 프롬프트 라우팅을 처리하는 체인입니다. 사용자의 질문이 체인을 통과하면 prompt_router 함수를 사용하여 가장 유사한 프롬프트를 선택하고 해당 프롬프트를 사용하여 ChatOpenAI 모델을 호출합니다. 마지막으로, StrOutputParser를 사용하여 모델의 출력을 처리하고 반환합니다.

이 프로세스를 통해 사용자의 질문에 대해 물리학 또는 수학과 관련된 가장 적절한 역할 및 프롬프트를 선택하고, 해당 주제에 대한 답변을 생성합니다.


print(chain.invoke("What's a black hole"))


    Using PHYSICS
    A black hole is a region in space where gravity is extremely strong, so strong that nothing, not even light, can escape its gravitational pull. It is formed when a massive star collapses under its own gravity during a supernova explosion. The collapse causes an incredibly dense mass to be concentrated in a small volume, creating a gravitational field that is so intense that it warps space and time. Black holes have a boundary called the event horizon, which marks the point of no return for anything that gets too close. Beyond the event horizon, the gravitational pull is so strong that even light cannot escape, hence the name "black hole." While we have a good understanding of black holes, there is still much to learn, especially about what happens inside them.


print(chain.invoke("What's a path integral"))


    Using MATH
    Thank you for your kind words! I will do my best to break down the concept of a path integral for you.
    
    In mathematics and physics, a path integral is a mathematical tool used to calculate the probability amplitude or wave function of a particle or system of particles. It was introduced by Richard Feynman and is an integral over all possible paths that a particle can take to go from an initial state to a final state.
    
    To understand the concept better, let's consider an example. Suppose we have a particle moving from point A to point B in space. Classically, we would describe this particle's motion using a definite trajectory, but in quantum mechanics, particles can simultaneously take multiple paths from A to B.
    
    The path integral formalism considers all possible paths that the particle could take and assigns a probability amplitude to each path. These probability amplitudes are then added up, taking into account the interference effects between different paths.
    
    To calculate a path integral, we need to define an action, which is a mathematical function that describes the behavior of the system. The action is usually expressed in terms of the particle's position, velocity, and time.
    
    Once we have the action, we can write down the path integral as an integral over all possible paths. Each path is weighted by a factor determined by the action and the principle of least action, which states that a particle takes a path that minimizes the action.
    
    Mathematically, the path integral is expressed as:
    
    ∫ e^(iS/ħ) D[x(t)]
    
    Here, S is the action, ħ is the reduced Planck's constant, and D[x(t)] represents the integration over all possible paths x(t) of the particle.
    
    By evaluating this integral, we can obtain the probability amplitude for the particle to go from the initial state to the final state. The absolute square of this amplitude gives us the probability of finding the particle in a particular state.
    
    Path integrals have proven to be a powerful tool in various areas of physics, including quantum mechanics, quantum field theory, and statistical mechanics. They allow us to study complex systems and calculate probabilities that are difficult to obtain using other methods.
    
    I hope this explanation helps you understand the concept of a path integral. If you have any further questions, feel free to ask!


이 예제는 사전에 물리학자와 수학자 둘을 각각 설정해 놓고 질문을 그것을 OpenAI embedding을 통해서 임베딩 값을 받아 놓는 일 부터 시작합니다. 그 다음 질문을 던지면 그 질문도 임베딩 값을 받아서 이 질문이 수학과 관련이 있는지 아니면 물리학과 관련이 있는지를 판단하고 좀 더 가까운 쪽 설정을 가져와서 OpenAI에 던질 프롬프트를 만들어서 전달하고 거기에 대한 답을 받는 일을 합니다.


질문에 어떤 설정들을 세팅해서 프롬프트를 만들어야 할 때 유용하게 사용할 수 있는 기능인 것 같습니다.

로컬에서 따로 실행한 결과는 아래와 같습니다.


반응형


반응형

https://python.langchain.com/docs/expression_language/cookbook/code_writing


Code writing | 🦜️🔗 Langchain

Example of how to use LCEL to write Python code.

python.langchain.com


Code writing


Example of how to use LCEL to write Python code.


LCEL을 사용하여 Python 코드를 작성하는 방법의 예입니다.


LCEL ( LangChain Expression Language )이란?


LCEL(LangChain Expression Language)은 체인을 쉽게 구성하는 선언적 방법입니다. 비동기, 일괄 처리 및 스트리밍 지원, 폴백, 병렬 처리 및 원활한 LangSmith 추적 통합과 같은 여러 가지 이점을 제공합니다. LCEL은 핵심 구성 요소 등과 상호 작용하는 데 사용됩니다.

from langchain.chat_models import ChatOpenAI
from langchain.prompts import (
    ChatPromptTemplate,
    SystemMessagePromptTemplate,
    HumanMessagePromptTemplate,
)
from langchain.schema.output_parser import StrOutputParser
from langchain_experimental.utilities import PythonREPL


langchainlangchain_experimental 라이브러리에서 모듈을 가져오고 설정하는 부분입니다.


  1. langchain.chat_models에서 ChatOpenAI를 가져옵니다. 이 모듈은 OpenAI의 언어 모델과 상호 작용하는 기능을 제공합니다.
  2. langchain.prompts에서 ChatPromptTemplate, SystemMessagePromptTemplate, HumanMessagePromptTemplate을 가져옵니다. 이러한 템플릿은 모델에 전달되는 프롬프트를 만들고 조작하는 데 사용됩니다.
  3. langchain.schema.output_parser에서 StrOutputParser를 가져옵니다. 이것은 모델의 출력을 텍스트 형식으로 파싱하는데 사용됩니다.
  4. langchain_experimental.utilities에서 PythonREPL을 가져옵니다. PythonREPL은 Python REPL(Read-Eval-Print Loop)과 상호 작용하고 실행하는데 사용될 수 있는 도구입니다.

이 코드 조각은 LangChain 및 관련 라이브러리에서 필요한 모듈을 가져와 설정하는 부분으로 보입니다.


template = """Write some python code to solve the user's problem. 

Return only python code in Markdown format, e.g.:

```python
....
```"""
prompt = ChatPromptTemplate.from_messages([("system", template), ("human", "{input}")])

model = ChatOpenAI()


  1. template 변수에는 사용자의 문제를 해결하는 Python 코드를 생성하기 위한 템플릿이 정의되어 있습니다. 이 템플릿은 Python 코드 블록을 Markdown 형식으로 반환하도록 요청합니다.
  2. prompt 변수에는 ChatPromptTemplate.from_messages를 사용하여 시스템 메시지와 사용자의 입력 메시지를 결합하는 프롬프트가 설정됩니다. 시스템 메시지에는 사용자에게 어떤 종류의 응답을 제공해야 하는지에 대한 지침이 포함되어 있습니다. 사용자 메시지는 {input}으로 표시되며 사용자가 제공한 입력을 나타냅니다.
  3. model 변수에는 ChatOpenAI()가 설정됩니다. 이 모델은 LangChain 환경에서 OpenAI의 언어 모델과 상호 작용하는 데 사용됩니다.

이 코드는 사용자의 질문 또는 문제에 대한 Python 솔루션을 생성하는 일반적인 프롬프트 및 모델 설정을 제공합니다.


def _sanitize_output(text: str):
    _, after = text.split("```python")
    return after.split("```")[0]


_sanitize_output 함수는 주어진 텍스트에서 Python 코드 블록을 추출하고 반환하는 함수입니다.


  1. text 매개변수는 Python 코드 블록을 포함하고 있는 전체 텍스트를 나타냅니다.
  2. text.split("```python")은 text를 "```python" 문자열을 기준으로 분할하며, 결과적으로 분할된 텍스트를 두 부분으로 나눕니다. 첫 번째 부분은 Python 코드 블록 이전의 모든 내용을 포함하고, 두 번째 부분은 Python 코드 블록 이후의 내용을 포함합니다.
  3. after.Split("```")[0]은 두 번째 부분인 after를 "```" 문자열을 기준으로 다시 분할하며, 결과적으로 Python 코드 블록만 추출합니다. 이것이 함수가 반환하는 값이며, Python 코드 블록만 남게 됩니다.

이 _sanitize_output 함수는 Python 코드 블록을 추출하고 그것을 반환하는 데 사용될 수 있습니다.


chain = prompt | model | StrOutputParser() | _sanitize_output | PythonREPL().run


LangChain 환경에서 Python 코드를 실행하는 일련의 단계를 나타냅니다.


  1. prompt는 사용자의 입력 및 요청에 대한 템플릿을 정의하는 부분입니다. 사용자가 제공한 정보를 포함한 템플릿을 만들기 위해 사용됩니다.
  2. model은 ChatOpenAI 모델로, 사용자 입력과 템플릿을 기반으로 답변을 생성하는 역할을 합니다.
  3. StrOutputParser()는 모델의 출력을 문자열로 변환하는 역할을 합니다. 모델이 생성한 응답을 텍스트로 추출합니다.
  4. _sanitize_output 함수는 모델의 출력에서 Python 코드 블록을 추출하는데 사용됩니다. 이렇게 추출한 코드 블록은 나중에 실행할 수 있게 준비됩니다.
  5. PythonREPL().run은 추출한 Python 코드 블록을 실행합니다. 이것은 Python 코드를 실행할 수 있는 Python 환경을 만들고, 그 안에서 코드 블록을 실행합니다. 이를 통해 모델의 출력으로부터 추출된 Python 코드가 실행되며, 원하는 작업을 수행합니다.

따라서 이 코드는 사용자의 요청에 따라 모델이 생성한 Python 코드 블록을 실행하여 사용자에게 원하는 결과를 반환하는 프로세스를 나타냅니다.


chain.invoke({"input": "whats 2 plus 2"})
    Python REPL can execute arbitrary code. Use with caution.


    '4\n'

이 코드는 LangChain에서 사용자 입력을 처리하고 Python 코드를 실행하는 프로세스를 시작합니다. invoke 함수는 모델 체인을 호출하여 사용자의 입력을 처리하고 결과를 생성하는 역할을 합니다. 코드에서 {"input": "whats 2 plus 2"}는 사용자의 입력을 나타냅니다.

모델이 prompt에 따라 사용자 입력을 처리하고 Python 코드를 생성한 다음, 이 코드가 PythonREPL().run에 의해 실행됩니다. 이 프로세스를 통해 사용자 입력("whats 2 plus 2")에 대한 Python 코드가 실행되어 해당 Python 코드의 결과가 반환될 것입니다.

결과는 Python 코드 실행 결과이며, 이것은 사용자에게 반환되고 나중에 사용자가 요청한 작업과 관련된 정보를 포함할 수 있습니다.


로컬에서 실행할 때는 _sanitize_output() 안에 print() 문을 넣어서 파이썬 코드도 출력하도록 했습니다.

실행 결과를 보면 파이썬 코드가 나오거 그 다음에 정답이 나옵니다.


반응형