개발자로서 현장에서 일하면서 새로 접하는 기술들이나 알게된 정보 등을 정리하기 위한 블로그입니다. 운 좋게 미국에서 큰 회사들의 프로젝트에서 컬설턴트로 일하고 있어서 새로운 기술들을 접할 기회가 많이 있습니다. 미국의 IT 프로젝트에서 사용되는 툴들에 대해 많은 분들과 정보를 공유하고 싶습니다.
There are many possible points of failure in an LLM application, whether that be issues with LLM API's, poor model outputs, issues with other integrations, etc. Fallbacks help you gracefully handle and isolate these issues.
LLM API 문제, 잘못된 모델 출력, 기타 통합 문제 등 LLM 애플리케이션에는 실패할 수 있는 지점이 많이 있습니다. 폴백은 이러한 문제를 적절하게 처리하고 격리하는 데 도움이 됩니다.
Crucially, fallbacks can be applied not only on the LLM level but on the whole runnable level.
결정적으로 폴백은 LLM 수준뿐만 아니라 전체 실행 가능 수준에 적용될 수 있습니다.
Handling LLM API Errors
This is maybe the most common use case for fallbacks. A request to an LLM API can fail for a variety of reasons - the API could be down, you could have hit rate limits, any number of things. Therefore, using fallbacks can help protect against these types of things.
이는 아마도 폴백의 가장 일반적인 사용 사례일 것입니다. LLM API에 대한 요청은 다양한 이유로 실패할 수 있습니다. API가 다운되거나 속도 제한에 도달하는 등 여러 가지 이유로 실패할 수 있습니다. 따라서 fallbacks를 사용하면 이러한 유형의 문제로부터 보호하는 데 도움이 될 수 있습니다.
IMPORTANT: By default, a lot of the LLM wrappers catch errors and retry. You will most likely want to turn those off when working with fallbacks. Otherwise the first wrapper will keep on retrying and not failing.
중요: 기본적으로 많은 LLM wrappers 가 오류를 포착하고 다시 시도합니다. 폴백 작업을 할 때는 이 기능을 끄고 싶을 가능성이 높습니다. 그렇지 않으면 첫 번째 래퍼가 계속 재시도하고 실패하지 않습니다.
from langchain.chat_models import ChatOpenAI, ChatAnthropic
First, let's mock out what happens if we hit a RateLimitError from OpenAI
먼저 OpenAI에서 RateLimitError가 발생하면 어떤 일이 발생하는지 모의해 보겠습니다.
from unittest.mock import patch
from openai.error import RateLimitError
# Note that we set max_retries = 0 to avoid retrying on RateLimits, etc
openai_llm = ChatOpenAI(max_retries=0)
anthropic_llm = ChatAnthropic()
llm = openai_llm.with_fallbacks([anthropic_llm])
# Let's use just the OpenAI LLm first, to show that we run into an error
with patch('openai.ChatCompletion.create', side_effect=RateLimitError()):
    try:
         print(openai_llm.invoke("Why did the chicken cross the road?"))
    except:
        print("Hit error")
이 코드는 ChatOpenAI와 ChatAnthropic 대화 모델을 설정하고, RateLimitError가 발생하도록 모의 실험을 수행하는 예시를 제공합니다.
필수 모듈 및 클래스 가져오기:
langchain.chat_models 모듈에서 ChatOpenAI 및 ChatAnthropic 클래스를 가져옵니다. 이 클래스들은 대화 모델을 설정하고 사용하는 데 도움을 줍니다.
unittest.mock 모듈에서 patch 클래스를 가져옵니다. 이 클래스를 사용하여 함수 호출을 모의로 변경합니다.
openai.error 모듈에서 RateLimitError 클래스를 가져옵니다. 이 클래스는 OpenAI API 요청 제한(Rate Limit) 오류를 나타냅니다.
대화 모델 설정:
ChatOpenAI(max_retries=0)는 "ChatOpenAI" 대화 모델을 설정하며, max_retries를 0으로 설정하여 요청 제한(Rate Limit) 오류 시 재시도(retry)를 피합니다.
ChatAnthropic()는 "ChatAnthropic" 대화 모델을 설정합니다.
openai_llm.with_fallbacks([anthropic_llm])는 "openai_llm" 대화 모델을 설정하며, "ChatAnthropic" 대화 모델을 대체 옵션으로 사용합니다.
RateLimitError 모의 실험:
with patch('openai.ChatCompletion.create', side_effect=RateLimitError()):는 openai.ChatCompletion.create 함수 호출을 모의로 변경하여 RateLimitError를 발생하도록 설정합니다.
try: 블록은 RateLimitError가 발생할 가능성이 있는 코드를 포함합니다.
openai_llm.invoke("Why did the chicken cross the road?")는 "openai_llm" 대화 모델을 사용하여 질문을 호출합니다.
except: 블록은 RateLimitError가 발생한 경우 실행되며, "Hit error"를 출력합니다.
이 코드는 RateLimitError를 처리하는 방법을 모의 실험을 통해 보여줍니다. RateLimitError는 OpenAI API의 요청 제한을 초과한 경우 발생하는 오류입니다.
Hit error
# Now let's try with fallbacks to Anthropic
with patch('openai.ChatCompletion.create', side_effect=RateLimitError()):
    try:
         print(llm.invoke("Why did the chicken cross the road?"))
    except:
        print("Hit error")
이 코드는 ChatOpenAI와 ChatAnthropic 대화 모델을 설정하고, RateLimitError가 발생하도록 모의 실험을 수행합니다. 이번에는 "llm" 대화 모델이 대체 옵션으로 "ChatAnthropic" 대화 모델을 사용하여 실험합니다.
RateLimitError 모의 실험:
with patch('openai.ChatCompletion.create', side_effect=RateLimitError()):는 openai.ChatCompletion.create 함수 호출을 모의로 변경하여 RateLimitError를 발생하도록 설정합니다.
try: 블록은 RateLimitError가 발생할 가능성이 있는 코드를 포함합니다.
llm.invoke("Why did the chicken cross the road?")는 "llm" 대화 모델을 사용하여 질문을 호출합니다.
except: 블록은 RateLimitError가 발생한 경우 실행되며, "Hit error"를 출력합니다.
이 코드는 "llm" 대화 모델이 RateLimitError가 발생하는 상황에서 "ChatAnthropic" 대화 모델로 대체되어 정상적으로 처리하는 방법을 모의 실험을 통해 보여줍니다. RateLimitError가 발생하면 "ChatAnthropic" 대화 모델이 대신 사용되어 오류를 처리합니다.
content=' I don\'t actually know why the chicken crossed the road, but here are some possible humorous answers:\n\n- To get to the other side!\n\n- It was too chicken to just stand there. \n\n- It wanted a change of scenery.\n\n- It wanted to show the possum it could be done.\n\n- It was on its way to a poultry farmers\' convention.\n\nThe joke plays on the double meaning of "the other side" - literally crossing the road to the other side, or the "other side" meaning the afterlife. So it\'s an anti-joke, with a silly or unexpected pun as the answer.' additional_kwargs={} example=False
We can use our "LLM with Fallbacks" as we would a normal LLM.
일반 LLM처럼 "폴백이 포함된 LLM"을 사용할 수 있습니다.
from langchain.prompts import ChatPromptTemplate

prompt = ChatPromptTemplate.from_messages(
    [
        ("system", "You're a nice assistant who always includes a compliment in your response"),
        ("human", "Why did the {animal} cross the road"),
    ]
)
chain = prompt | llm
with patch('openai.ChatCompletion.create', side_effect=RateLimitError()):
    try:
         print(chain.invoke({"animal": "kangaroo"}))
    except:
        print("Hit error")
이 코드는 ChatPromptTemplate을 사용하여 대화 템플릿을 설정하고, RateLimitError가 발생하도록 모의 실험을 수행합니다. 이 템플릿은 사용자와 시스템 간의 대화에서 "compliment"를 항상 포함하는 섬사적인(Assistant) 응답을 생성하는 목적으로 설계되었습니다.
ChatPromptTemplate 설정:
ChatPromptTemplate.from_messages()를 사용하여 대화 템플릿을 생성합니다.
템플릿에는 시스템과 사용자 간의 대화 메시지가 정의되어 있습니다.
시스템 메시지는 "You're a nice assistant who always includes a compliment in your response"로 설정되어 있으며, Assistant가 항상 칭찬을 포함하는 좋은 Assistant임을 나타냅니다.
사용자 메시지는 "Why did the {animal} cross the road"로 설정되어 있으며, "{animal}" 부분은 나중에 사용자가 지정할 수 있는 변수로 사용됩니다.
대화 체인 설정:
chain = prompt | llm는 설정한 대화 템플릿과 "llm" 대화 모델을 연결하여 실행 체인을 설정합니다.
RateLimitError 모의 실험:
with patch('openai.ChatCompletion.create', side_effect=RateLimitError()):는 openai.ChatCompletion.create 함수 호출을 모의로 변경하여 RateLimitError를 발생하도록 설정합니다.
try: 블록은 RateLimitError가 발생할 가능성이 있는 코드를 포함합니다.
chain.invoke({"animal": "kangaroo"})는 "chain" 대화 체인을 사용하여 "{animal}" 변수를 "kangaroo"로 설정하여 질문을 호출합니다.
except: 블록은 RateLimitError가 발생한 경우 실행되며, "Hit error"를 출력합니다.
이 코드는 섬사적인(Assistant) 대화 템플릿과 "llm" 대화 모델을 사용하여 RateLimitError가 발생하는 상황에서 어떻게 오류를 처리하는지를 모의 실험을 통해 보여줍니다. RateLimitError가 발생하면 오류를 처리하는 방법을 확인할 수 있습니다.
content=" I don't actually know why the kangaroo crossed the road, but I'm happy to take a guess! Maybe the kangaroo was trying to get to the other side to find some tasty grass to eat. Or maybe it was trying to get away from a predator or other danger. Kangaroos do need to cross roads and other open areas sometimes as part of their normal activities. Whatever the reason, I'm sure the kangaroo looked both ways before hopping across!" additional_kwargs={} example=False
Specifying errors to handle
We can also specify the errors to handle if we want to be more specific about when the fallback is invoked:
fallback이 호출되는 시기에 대해 더 구체적으로 알고 싶다면 처리할 오류를 지정할 수도 있습니다.
이 코드는 설정한 ChatOpenAI 및 ChatAnthropic 대화 모델을 사용하여 RateLimitError가 발생하도록 모의 실험을 수행하고, 이 때 특정 예외(KeyboardInterrupt)를 처리하는 방법을 보여줍니다.
RateLimitError 모의 실험:
with patch('openai.ChatCompletion.create', side_effect=RateLimitError()):는 openai.ChatCompletion.create 함수 호출을 모의로 변경하여 RateLimitError를 발생하도록 설정합니다.
try: 블록은 RateLimitError가 발생할 가능성이 있는 코드를 포함합니다.
chain.invoke({"animal": "kangaroo"})는 "chain" 대화 체인을 사용하여 "{animal}" 변수를 "kangaroo"로 설정하여 질문을 호출합니다.
except: 블록은 RateLimitError가 발생한 경우 실행되며, "Hit error"를 출력합니다.
대화 모델 및 RateLimitError 처리:
openai_llm.with_fallbacks([anthropic_llm], exceptions_to_handle=(KeyboardInterrupt,))는 "openai_llm" 대화 모델에 대체 옵션으로 "anthropic_llm" 대화 모델을 추가하며, RateLimitError 외에도 KeyboardInterrupt 예외를 처리하기 위해 exceptions_to_handle를 설정합니다.
이렇게 설정한 "llm" 대화 모델을 사용하여 대화 체인을 생성합니다.
이 코드는 RateLimitError가 발생하거나 KeyboardInterrupt 예외가 발생하는 경우, 대체 옵션으로 "anthropic_llm" 대화 모델로 전환하여 오류를 처리하는 방법을 보여줍니다. KeyboardInterrupt 예외는 사용자가 프로그램을 중지할 때 발생하는 예외이며, 이러한 예외가 발생하는 경우 대체 모델로 전환하여 안전하게 처리할 수 있습니다.
Hit error
Fallbacks for Sequences
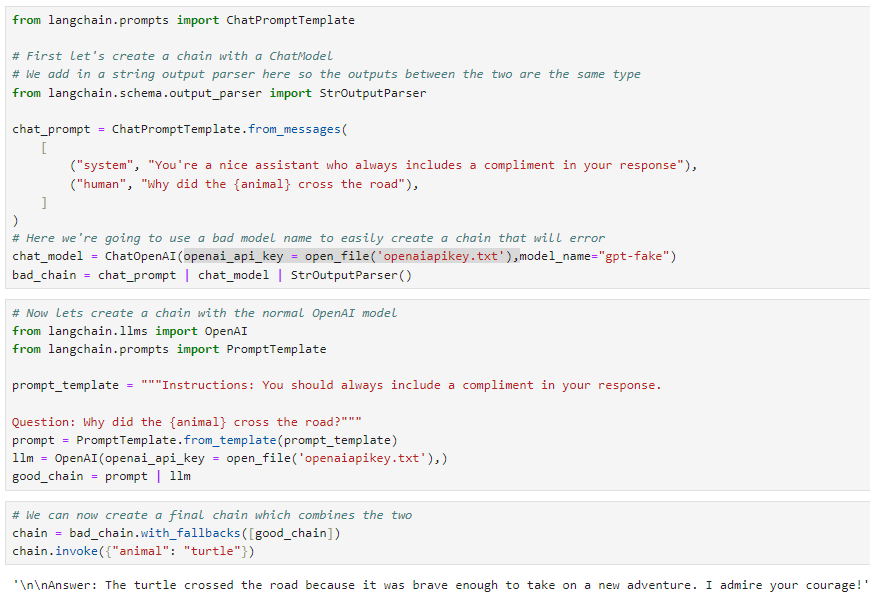
We can also create fallbacks for sequences, that are sequences themselves. Here we do that with two different models: ChatOpenAI and then normal OpenAI (which does not use a chat model). Because OpenAI is NOT a chat model, you likely want a different prompt.
시퀀스 자체인 시퀀스에 대한 대체를 만들 수도 있습니다. 여기서는 ChatOpenAI와 일반 OpenAI(채팅 모델을 사용하지 않음)라는 두 가지 모델을 사용하여 이를 수행합니다. OpenAI는 채팅 모델이 아니기 때문에 다른 프롬프트를 원할 가능성이 높습니다.
# First let's create a chain with a ChatModel
# We add in a string output parser here so the outputs between the two are the same type
from langchain.schema.output_parser import StrOutputParser

chat_prompt = ChatPromptTemplate.from_messages(
    [
        ("system", "You're a nice assistant who always includes a compliment in your response"),
        ("human", "Why did the {animal} cross the road"),
    ]
)
# Here we're going to use a bad model name to easily create a chain that will error
chat_model = ChatOpenAI(model_name="gpt-fake")
bad_chain = chat_prompt | chat_model | StrOutputParser()
# Now lets create a chain with the normal OpenAI model
from langchain.llms import OpenAI
from langchain.prompts import PromptTemplate

prompt_template = """Instructions: You should always include a compliment in your response.

Question: Why did the {animal} cross the road?"""
prompt = PromptTemplate.from_template(prompt_template)
llm = OpenAI()
good_chain = prompt | llm
# We can now create a final chain which combines the two
chain = bad_chain.with_fallbacks([good_chain])
chain.invoke({"animal": "turtle"})
이 코드는 먼저 ChatModel과 String Output Parser를 사용하여 대화 체인을 생성하고, 그런 다음 정상적인 OpenAI 모델과 연결하여 오류 처리를 수행하는 방법을 보여줍니다.
첫 번째 대화 체인 생성:
ChatPromptTemplate.from_messages()를 사용하여 대화 템플릿을 생성합니다. 이 템플릿은 시스템이 항상 칭찬을 포함하도록 지시하고 사용자로부터 "{animal}" 변수를 받는 대화를 설정합니다.
ChatOpenAI(model_name="gpt-fake")는 "gpt-fake"와 같은 잘못된 모델 이름을 사용하여 오류가 발생하는 "bad_chain" 대화 모델을 설정합니다.
chat_prompt | chat_model | StrOutputParser()는 "chat_prompt" 템플릿과 "chat_model" 대화 모델을 연결하고, 출력 형식을 일치시키기 위해 String Output Parser를 추가합니다.
정상적인 대화 체인 생성:
PromptTemplate.from_template(prompt_template)를 사용하여 대화 템플릿을 생성합니다. 이 템플릿은 Assistant가 항상 칭찬을 포함해야 함을 지시하고 "{animal}" 변수를 받는 대화를 설정합니다.
OpenAI()를 사용하여 정상적인 "llm" 대화 모델을 설정합니다.
prompt | llm는 "prompt" 템플릿과 "llm" 대화 모델을 연결하여 정상적인 대화 체인인 "good_chain"을 설정합니다.
대체 옵션을 포함하는 최종 대화 체인 생성:
bad_chain.with_fallbacks([good_chain])는 "bad_chain" 대화 체인을 "good_chain" 대화 체인으로 대체 옵션을 추가하여 최종 대화 체인 "chain"을 생성합니다.
대화 체인 호출:
chain.invoke({"animal": "turtle"})는 "chain" 대화 체인을 사용하여 "{animal}" 변수를 "turtle"로 설정하여 질문을 호출합니다.
이 코드는 대화 체인에서 모델 오류 처리 및 대체 모델 사용의 예시를 제공합니다. "bad_chain"에서 오류가 발생하면 "good_chain"으로 대체하여 정상적으로 처리됩니다.
Oftentimes you may want to experiment with, or even expose to the end user, multiple different ways of doing things. In order to make this experience as easy as possible, we have defined two methods.
종종 작업을 수행하는 여러 가지 다른 방법을 실험하거나 최종 사용자에게 노출시키고 싶을 수도 있습니다. 이 경험을 가능한 한 쉽게 만들기 위해 두 가지 방법을 정의했습니다.
First, aconfigurable_fieldsmethod. This lets you configure particular fields of a runnable.
첫째, configurable_fields 메소드입니다. 이를 통해 실행 가능 항목의 특정 필드를 구성할 수 있습니다.
Second, aconfigurable_alternativesmethod. With this method, you can list out alternatives for any particular runnable that can be set during runtime.
둘째, configurable_alternatives 방법입니다. 이 방법을 사용하면 런타임 중에 설정할 수 있는 특정 실행 가능 항목에 대한 대안을 나열할 수 있습니다.
With LLMs we can configure things like temperature
LLM을 사용하면 온도와 같은 항목을 구성할 수 있습니다.
from langchain.chat_models import ChatOpenAI
from langchain.prompts import PromptTemplate

model = ChatOpenAI(temperature=0).configurable_fields(
    temperature=ConfigurableField(
        id="llm_temperature",
        name="LLM Temperature",
        description="The temperature of the LLM",
    )
)
이 코드는 "langchain" 라이브러리를 사용하여 LLM (Language Model)에 대한 설정을 구성하고 온라인으로 제어할 수 있는 옵션을 추가하는 예시를 제공합니다.
모듈 및 클래스 가져오기:
langchain.chat_models 모듈에서 ChatOpenAI 클래스를 가져옵니다. 이 클래스는 OpenAI의 대화 모델을 사용하기 위한 도구를 제공합니다.
langchain.prompts 모듈에서 PromptTemplate 클래스를 가져옵니다. 이 클래스는 템플릿을 만들기 위한 도구를 제공합니다.
모델 설정:
"model" 변수에는 "ChatOpenAI(temperature=0)"를 사용하여 대화 모델을 생성합니다. "temperature=0"은 모델의 출력을 보다 결정적으로 만듭니다.
.configurable_fields()를 사용하여 모델에 구성 가능한 필드를 추가하고 설정합니다. 이러한 필드는 모델의 동작을 온라인으로 변경할 수 있는 옵션을 제공합니다.
구성 가능한 필드로 "temperature"을 추가합니다.
id="llm_temperature": 필드의 고유 식별자로 "llm_temperature"를 설정합니다.
name="LLM Temperature": 필드의 이름으로 "LLM Temperature"를 설정합니다.
description="The temperature of the LLM": 필드의 설명으로 "The temperature of the LLM"을 설정합니다.
이 코드는 "Langchain" 라이브러리를 사용하여 대화 모델의 설정을 구성 가능한 필드를 통해 정의하고, 이를 온라인으로 변경할 수 있는 옵션으로 제공하는 예시를 나타냅니다. "temperature"은 모델의 동작을 조절하는 중요한 매개변수 중 하나입니다.
model.invoke("pick a random number")
이 코드는 "model"을 사용하여 "pick a random number"라는 메시지를 모델에 전달하여 실행하는 부분을 설명하고 있습니다.
"model.invoke("pick a random number")":
이 부분은 "model"을 사용하여 "pick a random number"라는 메시지를 모델에 전달하여 실행하는 부분입니다.
모델은 이 메시지를 처리하고 결과를 생성합니다.
이 코드는 모델을 사용하여 특정 메시지를 모델에 전달하고, 모델이 해당 메시지를 처리한 후에 결과를 얻는 방법을 보여줍니다. "pick a random number" 메시지에 대한 모델의 응답은 다양할 수 있으며, 해당 메시지에 따라 모델이 적절한 응답을 생성할 것입니다.
AIMessage(content='7')
model.with_config(configurable={"llm_temperature": .9}).invoke("pick a random number")
이 코드는 모델 설정을 변경하고, 변경된 설정을 사용하여 "pick a random number" 메시지를 모델에 전달하여 실행하는 부분을 설명하고 있습니다.
configurable={"llm_temperature": .9}는 "llm_temperature"라는 설정 옵션을 변경하며, 온라인에서 모델의 온도(temperature)를 0.9로 설정합니다.
.invoke("pick a random number"):
이 부분은 변경된 설정을 가진 모델을 사용하여 "pick a random number"라는 메시지를 모델에 전달하여 실행하는 부분입니다.
모델은 이 메시지를 변경된 설정에 따라 처리하고 결과를 생성합니다.
이 코드는 모델의 설정을 변경하여 모델이 다른 동작을 하도록 만들고, 변경된 설정을 사용하여 "pick a random number" 메시지를 모델에 전달하여 실행하는 방법을 보여줍니다. 변경된 설정은 모델의 동작을 조절하며, 이 경우에는 온도(temperature)를 조정하는 예시입니다.
AIMessage(content='34')
We can also do this when its used as part of a chain
체인의 일부로 사용될 때도 이 작업을 수행할 수 있습니다.
prompt = PromptTemplate.from_template("Pick a random number above {x}")
chain = prompt | model
이 코드는 대화 체인을 설정하고 사용자에게 특정 명령을 전달하기 위한 템플릿을 생성하는 예제를 보여줍니다.
PromptTemplate.from_template("Pick a random number above {x}"):
이 부분은 "PromptTemplate.from_template()"을 사용하여 대화 템플릿을 생성합니다. 이 템플릿은 사용자에게 "Pick a random number above {x}"라는 명령을 전달하고, "{x}" 부분은 나중에 사용자가 지정할 수 있는 매개변수 또는 변수를 나타냅니다.
chain = prompt | model:
이 부분은 "chain"이라는 실행 체인을 설정합니다. 이 체인은 "prompt" (대화 템플릿)과 모델을 연결합니다.
사용자에게 명령을 전달하기 위한 템플릿은 "prompt"로 지정되며, 모델은 이 템플릿에 따라 작동합니다.
이 코드는 사용자에게 "Pick a random number above {x}"라는 명령을 전달하기 위한 템플릿을 생성하고, 이 명령을 모델과 연결하여 모델이 해당 명령을 처리하고 응답을 생성할 수 있도록 하는 예시를 보여줍니다. 이때, "{x}" 부분은 나중에 사용자가 지정할 수 있는 값입니다.
ChatPromptValue(messages=[HumanMessage(content="You are an assistant for question-answering tasks. Use the following pieces of retrieved context to answer the question. If you don't know the answer, just say that you don't know. Use three sentences maximum and keep the answer concise.\nQuestion: foo \nContext: bar \nAnswer:")])
ChatPromptValue(messages=[HumanMessage(content="[INST]<<SYS>> You are an assistant for question-answering tasks. Use the following pieces of retrieved context to answer the question. If you don't know the answer, just say that you don't know. Use three sentences maximum and keep the answer concise.<</SYS>> \nQuestion: foo \nContext: bar \nAnswer: [/INST]")])
이 코드는 HubRunnable을 사용하여 Hub에서 가져온 리포지토리 커밋(commit)을 설정하고, 설정된 커밋을 기반으로 특정 질문과 컨텍스트를 처리하고 실행하는 예시를 나타냅니다.
HubRunnable 및 설정:
HubRunnable("rlm/rag-prompt")는 "HubRunnable"을 생성하고, 이 HubRunnable은 "rlm/rag-prompt" 리포지토리에서 컨텐츠를 가져오도록 구성되어 있습니다.
.configurable_fields()를 사용하여 설정 가능한 필드를 추가하고 설정합니다. 이 경우 "owner_repo_commit"이라는 설정 옵션을 추가하며, "hub_commit"이라는 식별자와 설명이 포함되어 있습니다.
첫 번째 실행:
prompt.invoke({"question": "foo", "context": "bar"})는 "prompt"를 사용하여 "question"과 "context" 값을 갖는 JSON 객체를 HubRunnable에 전달하고 실행합니다.
설정 변경 및 두 번째 실행:
prompt.with_config(configurable={"hub_commit": "rlm/rag-prompt-llama"})는 "hub_commit" 설정 값을 "rlm/rag-prompt-llama"로 변경하는 부분입니다.
.invoke({"question": "foo", "context": "bar"})는 변경된 설정을 가진 "prompt"를 사용하여 두 번째 실행을 수행합니다.
이 코드는 HubRunnable을 사용하여 특정 Hub 리포지토리에서 커밋을 설정하고, 설정된 커밋을 기반으로 특정 질문과 컨텍스트를 처리하고 실행하는 예시를 제공합니다. 설정을 변경함으로써 다른 커밋에서 실행을 수행할 수 있습니다.
from langchain.chat_models import ChatOpenAI, ChatAnthropic
from langchain.schema.runnable import ConfigurableField
from langchain.prompts import PromptTemplate
llm = ChatAnthropic(temperature=0).configurable_alternatives(
    # This gives this field an id
    # When configuring the end runnable, we can then use this id to configure this field
    ConfigurableField(id="llm"),
    # This sets a default_key.
    # If we specify this key, the default LLM (ChatAnthropic initialized above) will be used
    default_key="anthropic",
    # This adds a new option, with name `openai` that is equal to `ChatOpenAI()`
    openai=ChatOpenAI(),
    # This adds a new option, with name `gpt4` that is equal to `ChatOpenAI(model="gpt-4")`
    gpt4=ChatOpenAI(model="gpt-4"),
    # You can add more configuration options here
)
prompt = PromptTemplate.from_template("Tell me a joke about {topic}")
chain = prompt | llm
# By default it will call Anthropic
chain.invoke({"topic": "bears"})
AIMessage(content=" Here's a silly joke about bears:\n\nWhat do you call a bear with no teeth?\nA gummy bear!")
# We can use `.with_config(configurable={"llm": "openai"})` to specify an llm to use
chain.with_config(configurable={"llm": "openai"}).invoke({"topic": "bears"})
AIMessage(content="Sure, here's a bear joke for you:\n\nWhy don't bears wear shoes?\n\nBecause they already have bear feet!")
# If we use the `default_key` then it uses the default
chain.with_config(configurable={"llm": "anthropic"}).invoke({"topic": "bears"})
AIMessage(content=" Here's a silly joke about bears:\n\nWhat do you call a bear with no teeth?\nA gummy bear!")
이 코드는 ChatAnthropic 및 다른 대화 모델(ChatOpenAI 및 모델 구성)을 사용하여 설정 가능한 대화 모델 체인을 설정하고, 설정을 변경하여 특정 대화 모델을 사용하여 특정 주제에 관한 농담을 생성하는 예시를 제공합니다.
모듈 및 클래스 가져오기:
langchain.chat_models 모듈에서 ChatOpenAI 및 ChatAnthropic 클래스를 가져옵니다. 이 클래스들은 대화 모델을 설정하고 사용하는 데 도움을 줍니다.
langchain.schema.runnable 모듈에서 ConfigurableField 클래스를 가져옵니다. 이 클래스는 설정 가능한 필드를 정의하는 데 사용됩니다.
langchain.prompts 모듈에서 PromptTemplate 클래스를 가져옵니다. 이 클래스는 대화 템플릿을 생성하는 데 사용됩니다.
대화 모델 및 설정 가능한 대화 모델 체인 설정:
ChatAnthropic(temperature=0)는 "ChatAnthropic" 대화 모델을 설정합니다. 이 모델은 온도(temperature)를 0으로 설정합니다.
.configurable_alternatives()를 사용하여 설정 가능한 대화 모델 옵션을 정의합니다.
"ConfigurableField"를 사용하여 "llm"이라는 설정 옵션을 추가하고 식별자를 지정합니다.
"default_key"를 사용하여 기본 LLM(ChatAnthropic 초기화)을 설정합니다.
다른 대화 모델 옵션을 추가합니다. "openai" 및 "gpt4"라는 이름의 옵션을 추가하고, 각각 "ChatOpenAI()" 및 "ChatOpenAI(model="gpt-4")"와 연결합니다.
이외에 필요한 설정 옵션을 추가할 수 있습니다.
대화 체인 설정:
"PromptTemplate.from_template()"를 사용하여 대화 템플릿을 생성합니다. 이 템플릿은 "{topic}" 부분을 나중에 사용자가 지정할 수 있는 변수로 사용하며, "Tell me a joke about {topic}"라는 메시지를 생성합니다.
chain = prompt | llm는 템플릿과 설정 가능한 대화 모델을 연결하여 실행 체인을 설정합니다.
대화 모델 및 설정 변경 및 실행:
"chain.invoke({"topic": "bears"})"는 설정 가능한 대화 모델 체인을 사용하여 주제가 "bears"인 농담을 생성합니다.
"chain.with_config(configurable={"llm": "openai"})"는 "llm" 설정 옵션을 "openai"로 변경하여 "ChatOpenAI" 대화 모델을 사용하여 동일한 주제에 관한 농담을 생성합니다.
"chain.with_config(configurable={"llm": "anthropic"})"는 "llm" 설정 옵션을 "anthropic" (기본 설정)으로 변경하여 "ChatAnthropic" 대화 모델을 사용하여 동일한 주제에 관한 농담을 생성합니다.
이 코드는 다양한 대화 모델 옵션을 설정하고 설정을 변경하여 다른 모델을 사용하여 특정 주제에 관한 농담을 생성하는 방법을 나타냅니다.
With Prompts
We can do a similar thing, but alternate between prompts
비슷한 작업을 수행할 수 있지만 프롬프트를 번갈아 가며 수행할 수 있습니다.
llm = ChatAnthropic(temperature=0)
prompt = PromptTemplate.from_template("Tell me a joke about {topic}").configurable_alternatives(
    # This gives this field an id
    # When configuring the end runnable, we can then use this id to configure this field
    ConfigurableField(id="prompt"),
    # This sets a default_key.
    # If we specify this key, the default LLM (ChatAnthropic initialized above) will be used
    default_key="joke",
    # This adds a new option, with name `poem`
    poem=PromptTemplate.from_template("Write a short poem about {topic}"),
    # You can add more configuration options here
)
chain = prompt | llm
# By default it will write a joke
chain.invoke({"topic": "bears"})
AIMessage(content=" Here's a silly joke about bears:\n\nWhat do you call a bear with no teeth?\nA gummy bear!")
# We can configure it write a poem
chain.with_config(configurable={"prompt": "poem"}).invoke({"topic": "bears"})
AIMessage(content=' Here is a short poem about bears:\n\nThe bears awaken from their sleep\nAnd lumber out into the deep\nForests filled with trees so tall\nForaging for food before nightfall \nTheir furry coats and claws so sharp\nSniffing for berries and fish to nab\nLumbering about without a care\nThe mighty grizzly and black bear\nProud creatures, wild and free\nRuling their domain majestically\nWandering the woods they call their own\nBefore returning to their dens alone')
이 코드는 ChatAnthropic 대화 모델을 사용하여 설정 가능한 대화 템플릿 체인을 설정하고, 설정을 변경하여 농담 또는 시를 작성하는 예시를 제공합니다.
대화 모델 및 설정 가능한 대화 템플릿 설정:
ChatAnthropic(temperature=0)는 "ChatAnthropic" 대화 모델을 설정합니다. 이 모델은 온도(temperature)를 0으로 설정합니다.
PromptTemplate.from_template("Tell me a joke about {topic}")는 대화 템플릿을 생성하고, "{topic}" 부분은 나중에 사용자가 지정할 수 있는 변수로 사용됩니다.
.configurable_alternatives()를 사용하여 설정 가능한 대화 템플릿 옵션을 정의합니다.
"ConfigurableField"를 사용하여 "prompt"이라는 설정 옵션을 추가하고 식별자를 지정합니다.
"default_key"를 사용하여 기본 설정을 "joke"로 설정합니다. 이는 초기에 농담을 작성할 것을 의미합니다.
다른 대화 템플릿 옵션을 추가할 수 있습니다. "poem"이라는 이름의 옵션을 추가하고, 시를 작성하는 템플릿을 연결합니다.
대화 체인 설정:
chain = prompt | llm는 템플릿과 설정 가능한 대화 모델을 연결하여 실행 체인을 설정합니다.
농담 또는 시 작성:
"chain.invoke({"topic": "bears"})"는 설정 가능한 대화 템플릿 체인을 사용하여 주제가 "bears"인 농담을 생성합니다.
"chain.with_config(configurable={"prompt": "poem"})"는 "prompt" 설정 옵션을 "poem"으로 변경하여 동일한 주제에 대한 시를 생성합니다.
이 코드는 설정 가능한 대화 템플릿과 대화 모델을 사용하여 사용자가 설정을 변경함으로써 농담 또는 시를 작성하는 방법을 나타냅니다. "joke" 및 "poem" 설정을 변경하여 원하는 유형의 대화를 생성할 수 있습니다.
With Prompts and LLMs
We can also have multiple things configurable! Here's an example doing that with both prompts and LLMs.
여러 가지를 구성할 수도 있습니다! 프롬프트와 LLM을 모두 사용하여 이를 수행하는 예는 다음과 같습니다.
llm = ChatAnthropic(temperature=0).configurable_alternatives(
    # This gives this field an id
    # When configuring the end runnable, we can then use this id to configure this field
    ConfigurableField(id="llm"),
    # This sets a default_key.
    # If we specify this key, the default LLM (ChatAnthropic initialized above) will be used
    default_key="anthropic",
    # This adds a new option, with name `openai` that is equal to `ChatOpenAI()`
    openai=ChatOpenAI(),
    # This adds a new option, with name `gpt4` that is equal to `ChatOpenAI(model="gpt-4")`
    gpt4=ChatOpenAI(model="gpt-4"),
    # You can add more configuration options here
)
prompt = PromptTemplate.from_template("Tell me a joke about {topic}").configurable_alternatives(
    # This gives this field an id
    # When configuring the end runnable, we can then use this id to configure this field
    ConfigurableField(id="prompt"),
    # This sets a default_key.
    # If we specify this key, the default LLM (ChatAnthropic initialized above) will be used
    default_key="joke",
    # This adds a new option, with name `poem`
    poem=PromptTemplate.from_template("Write a short poem about {topic}"),
    # You can add more configuration options here
)
chain = prompt | llm
# We can configure it write a poem with OpenAI
chain.with_config(configurable={"prompt": "poem", "llm": "openai"}).invoke({"topic": "bears"})
AIMessage(content="In the forest, where tall trees sway,\nA creature roams, both fierce and gray.\nWith mighty paws and piercing eyes,\nThe bear, a symbol of strength, defies.\n\nThrough snow-kissed mountains, it does roam,\nA guardian of its woodland home.\nWith fur so thick, a shield of might,\nIt braves the coldest winter night.\n\nA gentle giant, yet wild and free,\nThe bear commands respect, you see.\nWith every step, it leaves a trace,\nOf untamed power and ancient grace.\n\nFrom honeyed feast to salmon's leap,\nIt takes its place, in nature's keep.\nA symbol of untamed delight,\nThe bear, a wonder, day and night.\n\nSo let us honor this noble beast,\nIn forests where its soul finds peace.\nFor in its presence, we come to know,\nThe untamed spirit that in us also flows.")
# We can always just configure only one if we want
chain.with_config(configurable={"llm": "openai"}).invoke({"topic": "bears"})
AIMessage(content="Sure, here's a bear joke for you:\n\nWhy don't bears wear shoes?\n\nBecause they have bear feet!")
이 코드는 ChatAnthropic 및 ChatOpenAI 대화 모델을 설정 가능한 대화 모델 체인으로 결합하고, 설정을 변경하여 다양한 대화 모델 및 대화 템플릿 옵션을 사용할 수 있는 예시를 제공합니다.
Saving configurations
We can also easily save configured chains as their own objects
Sometimes we want to invoke a Runnable within a Runnable sequence with constant arguments that are not part of the output of the preceding Runnable in the sequence, and which are not part of the user input. We can useRunnable.bind()to easily pass these arguments in.
때때로 우리는 시퀀스의 이전 Runnable 출력의 일부가 아니고 사용자 입력의 일부도 아닌 상수 인수를 사용하여 Runnable 시퀀스 내에서 Runnable을 호출하려고 합니다. Runnable.bind()를 사용하여 이러한 인수를 쉽게 전달할 수 있습니다.
Suppose we have a simple prompt + model sequence:
간단한 프롬프트 + 모델 시퀀스가 있다고 가정해 보겠습니다.
from langchain.chat_models import ChatOpenAI
from langchain.prompts import ChatPromptTemplate
from langchain.schema import StrOutputParser
from langchain.schema.runnable import RunnablePassthrough
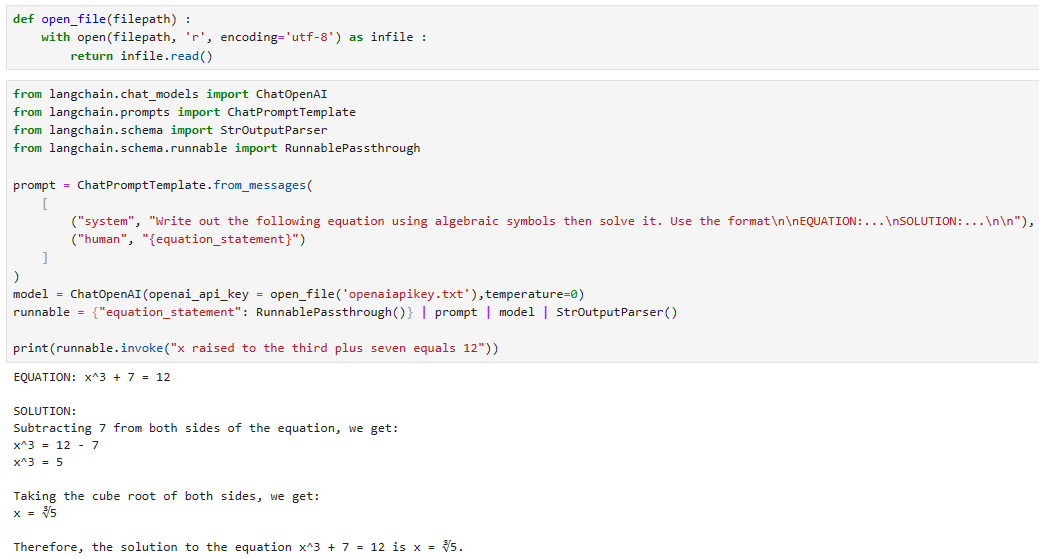
prompt = ChatPromptTemplate.from_messages(
[
("system", "Write out the following equation using algebraic symbols then solve it. Use the format\n\nEQUATION:...\nSOLUTION:...\n\n"),
("human", "{equation_statement}")
]
)
model = ChatOpenAI(temperature=0)
runnable = {"equation_statement": RunnablePassthrough()} | prompt | model | StrOutputParser()
print(runnable.invoke("x raised to the third plus seven equals 12"))
이 코드는 "langchain" 라이브러리를 사용하여 주어진 방정식을 해결하기 위한 대화 모델을 설정하고 실행하는 예시를 보여줍니다.
모듈 및 클래스 가져오기:
langchain.chat_models 모듈에서 ChatOpenAI 클래스를 가져옵니다. 이 클래스는 OpenAI의 대화 모델을 사용하기 위한 도구를 제공합니다.
langchain.prompts 모듈에서 ChatPromptTemplate 클래스를 가져옵니다. 이 클래스는 대화 형식의 템플릿을 만들기 위한 도구를 제공합니다.
langchain.schema 모듈에서 StrOutputParser 클래스를 가져옵니다. 이 클래스는 출력을 파싱하기 위한 도구를 제공합니다.
langchain.schema.runnable 모듈에서 RunnablePassthrough 클래스를 가져옵니다. 이 클래스는 실행 가능한 객체를 나타내는 클래스입니다.
대화 템플릿 설정:
"prompt" 변수에는 "ChatPromptTemplate.from_messages()"를 사용하여 대화 템플릿을 생성합니다. 이 템플릿은 시스템 메시지와 사용자 메시지를 포함합니다. 사용자는 방정식을 입력하고 시스템은 방정식과 그 해를 출력할 것을 요청합니다.
모델 및 실행 가능한 체인 설정:
"model" 변수에는 "ChatOpenAI(temperature=0)"를 사용하여 대화 모델을 생성합니다. "temperature=0"은 모델의 출력을 보다 결정적으로 만듭니다.
"runnable" 변수에는 실행 가능한 체인을 설정합니다. 이 체인은 다음과 같이 구성됩니다:
"equation_statement" 변수를 "RunnablePassthrough()"와 조합하여 방정식 문장을 처리합니다.
"prompt" 템플릿을 추가합니다.
대화 모델(model)을 추가합니다.
출력 파서(StrOutputParser)를 추가합니다.
실행 및 결과 출력:
"runnable.invoke("x raised to the third plus seven equals 12")"를 사용하여 주어진 방정식을 실행합니다.
결과를 출력합니다.
이 코드는 주어진 방정식을 해결하기 위한 대화 모델을 설정하고 실행하여 결과를 출력하는 예시를 나타냅니다.
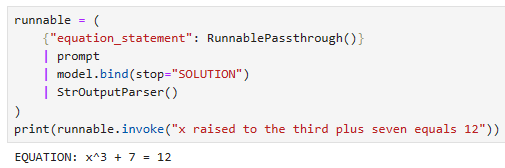
and want to call the model with certainstopwords:
특정 중지 단어로 모델을 호출하고 싶습니다.
runnable = (
    {"equation_statement": RunnablePassthrough()}
    | prompt
    | model.bind(stop="SOLUTION")
    | StrOutputParser()
)
print(runnable.invoke("x raised to the third plus seven equals 12"))
이 코드는 방정식을 처리하고 해결하기 위한 실행 체인을 설정하고, 주어진 방정식을 실행하여 결과를 출력하는 예시를 보여줍니다.
실행 체인 설정:
"runnable" 변수에는 실행 체인을 설정합니다.
이 체인은 다음과 같이 구성됩니다:
{"equation_statement": RunnablePassthrough()}: "equation_statement" 변수를 "RunnablePassthrough()"와 조합하여 방정식 문장을 처리합니다. 이 부분은 사용자가 입력한 방정식 문장을 체인으로 전달합니다.
"prompt": 이전 설명에서 정의된 "prompt" 템플릿을 추가합니다. 이 템플릿은 시스템 메시지와 사용자 메시지를 포함하며 방정식을 입력하는 역할을 합니다.
"model.bind(stop="SOLUTION")": 모델(model)에 "SOLUTION"이라는 종료 토큰을 지정하여, 모델이 "SOLUTION"이라는 토큰을 만날 때까지 출력을 생성하도록 설정합니다.
"StrOutputParser()": 출력 파서(StrOutputParser())를 추가합니다. 이 파서는 모델 출력을 파싱하고 처리합니다.
실행 및 결과 출력:
"runnable.invoke("x raised to the third plus seven equals 12")"를 사용하여 주어진 방정식을 실행합니다.
실행 결과를 출력합니다.
이 코드는 주어진 방정식을 처리하고 해결하기 위한 실행 체인을 설정하고, 결과를 출력하는 예시를 나타냅니다. 결과는 방정식의 해결책을 포함합니다.
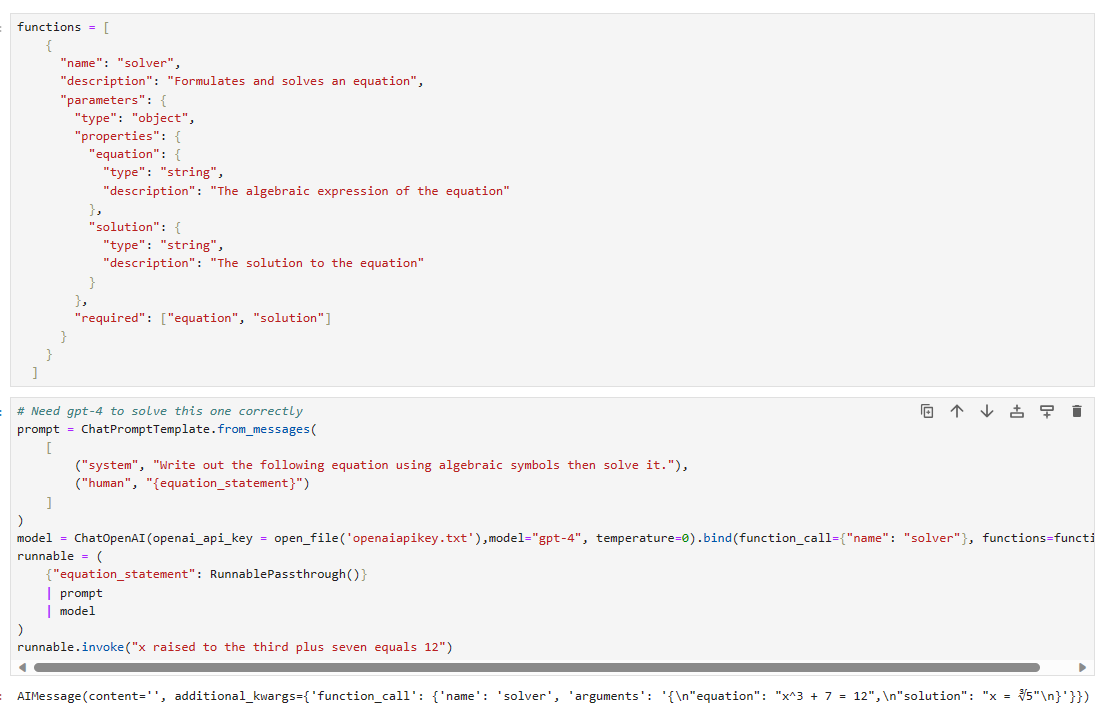
Attaching OpenAI functions
One particularly useful application of binding is to attach OpenAI functions to a compatible OpenAI model:
바인딩의 특히 유용한 응용 프로그램 중 하나는 OpenAI 기능을 호환되는 OpenAI 모델에 연결하는 것입니다.
functions = [
    {
      "name": "solver",
      "description": "Formulates and solves an equation",
      "parameters": {
        "type": "object",
        "properties": {
          "equation": {
            "type": "string",
            "description": "The algebraic expression of the equation"
          },
          "solution": {
            "type": "string",
            "description": "The solution to the equation"
          }
        },
        "required": ["equation", "solution"]
      }
    }
  ]
이 코드는 "functions"라는 변수에 대한 목록을 설정하며, 이 목록은 함수에 대한 정보를 포함합니다. 이 함수 정보는 JSON 형식으로 표현되며, 주어진 함수에 대한 이름, 설명, 그리고 함수의 매개변수에 대한 정보를 제공합니다.
functions 변수는 함수 정보를 담고 있는 리스트입니다.
name: 함수의 이름을 나타냅니다. 이 경우, 함수의 이름은 "solver"입니다.
description: 함수의 설명을 나타냅니다. 이 경우, "solver" 함수는 "방정식을 구성하고 풉니다"라는 설명을 갖습니다.
parameters: 함수의 매개변수에 대한 정보를 나타냅니다.
type: 매개변수의 형식을 지정합니다. 이 경우, "object"로 설정되어 있으므로, 객체 형태의 매개변수를 가집니다.
properties: 객체 형태의 매개변수에 포함된 속성들을 정의합니다.
"equation": 방정식의 대수적 표현에 대한 정보를 정의합니다. 이 매개변수는 문자열 형식을 갖고 있으며, "description"은 "방정식의 대수적 표현"입니다.
"solution": 방정식의 해결책에 대한 정보를 정의합니다. 이 매개변수 역시 문자열 형식을 갖고 있으며, "description"은 "방정식의 해결책"입니다.
required: 필수적으로 제공되어야 하는 매개변수를 정의합니다. "equation"과 "solution"은 반드시 제공되어야 하는 매개변수입니다.
이 코드는 "solver"라는 함수에 대한 정보를 정의하고, 해당 함수가 어떤 매개변수를 필요로 하며 어떤 역할을 하는지 설명합니다. 이러한 정보는 API 또는 서비스의 사용자에게 함수의 사용 방법을 설명하는 데 사용될 수 있습니다.
# Need gpt-4 to solve this one correctly
prompt = ChatPromptTemplate.from_messages(
    [
        ("system", "Write out the following equation using algebraic symbols then solve it."),
        ("human", "{equation_statement}")
    ]
)
model = ChatOpenAI(model="gpt-4", temperature=0).bind(function_call={"name": "solver"}, functions=functions)
runnable = (
    {"equation_statement": RunnablePassthrough()}
    | prompt
    | model
)
runnable.invoke("x raised to the third plus seven equals 12")
이 코드는 GPT-4 모델을 사용하여 방정식을 구성하고 풀기 위한 프로세스를 설정하고 실행하는 예시를 제공합니다.
실행 체인 설정:
"prompt" 변수에는 "ChatPromptTemplate.from_messages()"를 사용하여 대화 템플릿을 생성합니다. 이 템플릿은 시스템 메시지와 사용자 메시지를 포함합니다. 시스템 메시지에서는 사용자에게 방정식을 구성하고 풀어달라는 지시가 포함되어 있고, 사용자는 "equation_statement" 변수를 사용하여 방정식을 제공합니다.
모델 및 함수 설정:
"model" 변수에는 "ChatOpenAI(model="gpt-4", temperature=0)"를 사용하여 GPT-4 모델을 생성합니다. "temperature=0"은 모델의 출력을 보다 결정적으로 만듭니다.
"model.bind(function_call={"name": "solver"}, functions=functions)"를 사용하여 모델에 함수 호출을 바인딩합니다. "function_call"은 호출할 함수의 이름을 지정하고, "functions"는 함수의 정의를 포함하는 목록입니다. 이 경우, "solver" 함수가 호출될 것입니다.
실행 가능한 체인 설정:
"runnable" 변수에는 실행 가능한 체인을 설정합니다.
이 체인은 다음과 같이 구성됩니다:
{"equation_statement": RunnablePassthrough()}: "equation_statement" 변수를 "RunnablePassthrough()"와 조합하여 방정식 문장을 처리합니다.
"prompt" 템플릿을 추가합니다.
GPT-4 모델(model)을 추가합니다.
실행 및 결과 출력:
"runnable.invoke("x raised to the third plus seven equals 12")"를 사용하여 주어진 방정식을 실행합니다. 이 방정식은 "x raised to the third plus seven equals 12"로 주어집니다.
이 코드는 GPT-4 모델을 사용하여 방정식을 구성하고 풀기 위한 프로세스를 설정하고, 결과를 출력하는 예시를 나타냅니다. GPT-4 모델은 더 복잡한 방정식을 다루기 위해 사용됩니다.
In an effort to make it as easy as possible to create custom chains, we've implemented a"Runnable"protocol that most components implement. This is a standard interface with a few different methods, which makes it easy to define custom chains as well as making it possible to invoke them in a standard way. The standard interface exposed includes:
사용자 정의 체인을 최대한 쉽게 생성하기 위한 노력의 일환으로 우리는 대부분의 구성 요소가 구현하는 "실행 가능" 프로토콜을 구현했습니다. 이는 몇 가지 다른 메소드가 포함된 표준 인터페이스로, 사용자 정의 체인을 쉽게 정의할 수 있을 뿐만 아니라 표준 방식으로 호출할 수도 있습니다. 노출된 표준 인터페이스에는 다음이 포함됩니다.
stream: stream back chunks of the response 응답의 청크를 다시 스트리밍합니다.
invoke: call the chain on an input 입력에서 체인을 호출합니다.
batch: call the chain on a list of inputs 입력 목록에서 체인을 호출합니다.
These also have corresponding async methods: 여기에는 해당하는 비동기 메서드도 있습니다.
astream: stream back chunks of the response async 응답 비동기 청크를 다시 스트리밍합니다.
ainvoke: call the chain on an input async 입력 비동기에서 체인 호출
abatch: call the chain on a list of inputs async 비동기 입력 목록에서 체인을 호출합니다.
astream_log: stream back intermediate steps as they happen, in addition to the final response 최종 응답 외에도 중간 단계가 발생하면 다시 스트리밍합니다.
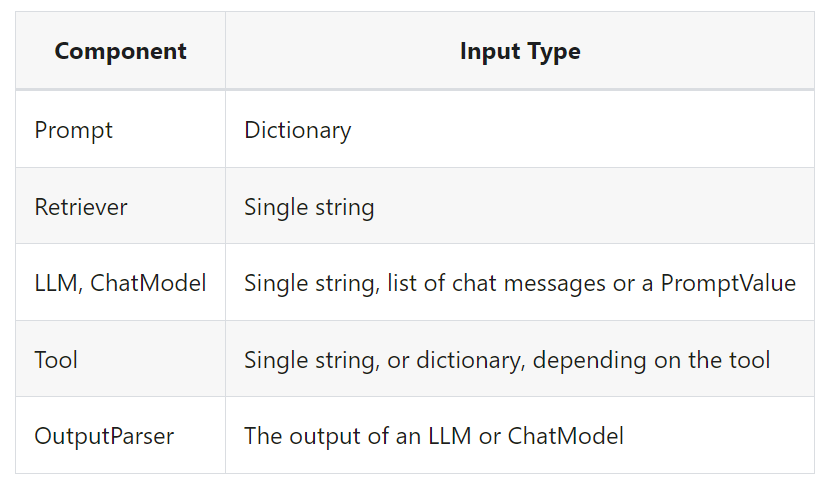
The type of the input varies by component:
입력 유형은 구성 요소에 따라 다릅니다.
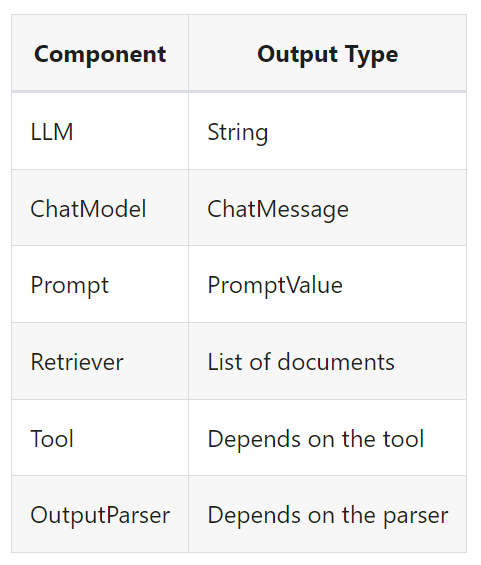
The output type also varies by component:
출력 유형도 구성요소에 따라 다릅니다.
All runnables expose properties to inspect the input and output types:
모든 실행 가능 항목은 입력 및 출력 유형을 검사하기 위한 속성을 노출합니다.
input_schema: an input Pydantic model auto-generated from the structure of the Runnable
input_schema: Runnable의 구조에서 자동 생성된 입력 Pydantic 모델
output_schema: an output Pydantic model auto-generated from the structure of the Runnable
output_schema: Runnable의 구조에서 자동 생성된 출력 Pydantic 모델
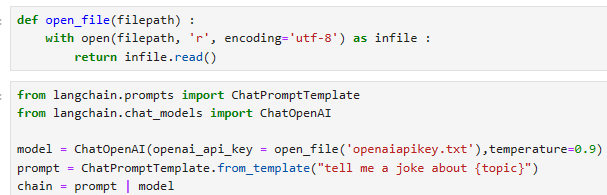
Let's take a look at these methods! To do so, we'll create a super simple PromptTemplate + ChatModel chain.
이러한 방법들을 살펴보겠습니다! 이를 위해 매우 간단한 PromptTemplate + ChatModel 체인을 생성하겠습니다.
from langchain.prompts import ChatPromptTemplate
from langchain.chat_models import ChatOpenAI

model = ChatOpenAI()
prompt = ChatPromptTemplate.from_template("tell me a joke about {topic}")
chain = prompt | model
이 코드는 "langchain" 라이브러리를 사용하여 OpenAI의 언어 모델을 활용하는 예시를 제공합니다.
ChatPromptTemplate 클래스는 대화 생성에 사용되는 템플릿을 만들고 활용하는 데 도움을 주는 클래스입니다.
from langchain.chat_models import ChatOpenAI:
"langchain" 라이브러리에서 ChatOpenAI 클래스를 가져오는 명령입니다.
ChatOpenAI 클래스는 OpenAI의 언어 모델을 활용하는 데 사용되는 클래스입니다.
model = ChatOpenAI(openai_api_key = open_file('openaiapikey.txt'), temperature=0.9):
ChatOpenAI 클래스의 인스턴스를 생성합니다.
openai_api_key 매개변수에 OpenAI API 키를 파일로부터 읽어온 값을 전달합니다.
temperature 매개변수는 모델의 창의성을 조절하는 요소로, 0.9로 설정되어 있으며 높을수록 더 다양한 출력이 생성됩니다.
prompt = ChatPromptTemplate.from_template("tell me a joke about {topic}"):
ChatPromptTemplate 클래스의 from_template 메서드를 사용하여 템플릿을 생성합니다.
템플릿 문자열 "tell me a joke about {topic}"은 {topic} 부분이 나중에 대체될 변수를 나타냅니다.
chain = prompt | model:
prompt와 model을 결합하여 대화 체인을 생성합니다.
이러한 체인을 사용하면 템플릿을 모델과 함께 사용하여 모델에게 대화 형식으로 질문을 하고 응답을 받을 수 있습니다.
이 코드는 주어진 주제에 대한 재미있는 농담을 생성하기 위해 OpenAI 모델을 사용하는 예시를 나타내고 있습니다. 모델은 주어진 API 키 및 설정과 함께 템플릿을 사용하여 대화를 생성하고 대화의 연장으로 대화를 계속할 수 있습니다.
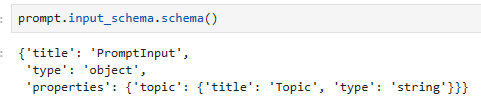
Input Schema
A description of the inputs accepted by a Runnable. This is a Pydantic model dynamically generated from the structure of any Runnable. You can call.schema()on it to obtain a JSONSchema representation.
Runnable이 허용하는 입력에 대한 설명입니다. 이는 Runnable의 구조에서 동적으로 생성된 Pydantic 모델입니다. .schema()를 호출하여 JSONSchema 표현을 얻을 수 있습니다.
# The input schema of the chain is the input schema of its first part, the prompt.
chain.input_schema.schema()
이 코드는 "chain"이라는 객체의 입력 스키마(input schema)를 설명하고 있습니다. "chain"은 여러 부분으로 구성된 대화 체인이며, 이 코드는 체인의 입력 스키마를 확인하는 부분에 대한 설명입니다.
# 체인의 입력 스키마는 체인의 첫 번째 부분인 prompt의 입력 스키마와 동일합니다.
chain.input_schema.schema()
"chain"은 여러 부분으로 이루어진 대화 체인을 나타내는 객체입니다. 이 대화 체인은 대화를 구성하고 관리하는 데 사용됩니다.
chain.input_schema.schema()은 체인의 입력 스키마를 확인하는 코드입니다. 입력 스키마는 데이터나 정보의 구조와 형식을 정의하는데 사용됩니다.
주석(#)은 코드에 설명을 추가하는 데 사용되며, 이 경우에는 주석으로 코드의 목적을 설명하고 있습니다.
이 코드에서 "chain"의 입력 스키마는 "prompt"라는 첫 번째 부분의 입력 스키마와 동일하다고 설명하고 있습니다. 즉, 체인의 입력 스키마는 체인의 첫 번째 부분인 "prompt"에서 정의한 입력 스키마와 일치합니다.
입력 스키마의 역할은 데이터의 형식, 구조, 및 유효성 검사에 관련됩니다. 이 코드는 입력 스키마를 확인하는 용도로 사용되며, 체인의 구조와 입력 데이터에 대한 정보를 얻을 수 있습니다.
이 코드는 체인의 입력 스키마를 확인하고 첫 번째 부분 "prompt"의 입력 스키마와 일치한다는 점을 강조하는 목적으로 사용됩니다.
prompt.input_schema.schema()
model.input_schema.schema()
return 값
{'title': 'ChatOpenAIInput',
 'anyOf': [{'type': 'string'},
  {'$ref': '#/definitions/StringPromptValue'},
  {'$ref': '#/definitions/ChatPromptValueConcrete'},
  {'type': 'array',
   'items': {'anyOf': [{'$ref': '#/definitions/AIMessage'},
     {'$ref': '#/definitions/HumanMessage'},
     {'$ref': '#/definitions/ChatMessage'},
     {'$ref': '#/definitions/SystemMessage'},
     {'$ref': '#/definitions/FunctionMessage'}]}}],
 'definitions': {'StringPromptValue': {'title': 'StringPromptValue',
   'description': 'String prompt value.',
   'type': 'object',
   'properties': {'text': {'title': 'Text', 'type': 'string'},
    'type': {'title': 'Type',
     'default': 'StringPromptValue',
     'enum': ['StringPromptValue'],
     'type': 'string'}},
   'required': ['text']},
  'AIMessage': {'title': 'AIMessage',
   'description': 'A Message from an AI.',
   'type': 'object',
   'properties': {'content': {'title': 'Content', 'type': 'string'},
    'additional_kwargs': {'title': 'Additional Kwargs', 'type': 'object'},
    'type': {'title': 'Type',
     'default': 'ai',
     'enum': ['ai'],
     'type': 'string'},
    'example': {'title': 'Example', 'default': False, 'type': 'boolean'}},
   'required': ['content']},
  'HumanMessage': {'title': 'HumanMessage',
   'description': 'A Message from a human.',
   'type': 'object',
   'properties': {'content': {'title': 'Content', 'type': 'string'},
    'additional_kwargs': {'title': 'Additional Kwargs', 'type': 'object'},
    'type': {'title': 'Type',
     'default': 'human',
     'enum': ['human'],
     'type': 'string'},
    'example': {'title': 'Example', 'default': False, 'type': 'boolean'}},
   'required': ['content']},
  'ChatMessage': {'title': 'ChatMessage',
   'description': 'A Message that can be assigned an arbitrary speaker (i.e. role).',
   'type': 'object',
   'properties': {'content': {'title': 'Content', 'type': 'string'},
    'additional_kwargs': {'title': 'Additional Kwargs', 'type': 'object'},
    'type': {'title': 'Type',
     'default': 'chat',
     'enum': ['chat'],
     'type': 'string'},
    'role': {'title': 'Role', 'type': 'string'}},
   'required': ['content', 'role']},
  'SystemMessage': {'title': 'SystemMessage',
   'description': 'A Message for priming AI behavior, usually passed in as the first of a sequence\nof input messages.',
   'type': 'object',
   'properties': {'content': {'title': 'Content', 'type': 'string'},
    'additional_kwargs': {'title': 'Additional Kwargs', 'type': 'object'},
    'type': {'title': 'Type',
     'default': 'system',
     'enum': ['system'],
     'type': 'string'}},
   'required': ['content']},
  'FunctionMessage': {'title': 'FunctionMessage',
   'description': 'A Message for passing the result of executing a function back to a model.',
   'type': 'object',
   'properties': {'content': {'title': 'Content', 'type': 'string'},
    'additional_kwargs': {'title': 'Additional Kwargs', 'type': 'object'},
    'type': {'title': 'Type',
     'default': 'function',
     'enum': ['function'],
     'type': 'string'},
    'name': {'title': 'Name', 'type': 'string'}},
   'required': ['content', 'name']},
  'ChatPromptValueConcrete': {'title': 'ChatPromptValueConcrete',
   'description': 'Chat prompt value which explicitly lists out the message types it accepts.\nFor use in external schemas.',
   'type': 'object',
   'properties': {'messages': {'title': 'Messages',
     'type': 'array',
     'items': {'anyOf': [{'$ref': '#/definitions/AIMessage'},
       {'$ref': '#/definitions/HumanMessage'},
       {'$ref': '#/definitions/ChatMessage'},
       {'$ref': '#/definitions/SystemMessage'},
       {'$ref': '#/definitions/FunctionMessage'}]}},
    'type': {'title': 'Type',
     'default': 'ChatPromptValueConcrete',
     'enum': ['ChatPromptValueConcrete'],
     'type': 'string'}},
   'required': ['messages']}}}
Output Schema
A description of the outputs produced by a Runnable. This is a Pydantic model dynamically generated from the structure of any Runnable. You can call.schema()on it to obtain a JSONSchema representation.
Runnable이 생성한 출력에 대한 설명입니다. 이는 Runnable의 구조에서 동적으로 생성된 Pydantic 모델입니다. .schema()를 호출하여 JSONSchema 표현을 얻을 수 있습니다.
# The output schema of the chain is the output schema of its last part, in this case a ChatModel, which outputs a ChatMessage
chain.output_schema.schema()
이 코드는 "chain" 객체의 출력 스키마를 설명하고 있습니다. "chain"은 여러 부분으로 구성된 대화 체인이며, 이 코드는 체인의 출력 스키마를 확인하는 부분에 대한 설명입니다.
# 체인의 출력 스키마는 마지막 부분인 ChatModel의 출력 스키마와 동일합니다. 이 경우에는 ChatMessage가 출력됩니다.
chain.output_schema.schema()
"chain"은 여러 부분으로 이루어진 대화 체인을 나타내는 객체입니다. 이 대화 체인은 대화의 구조와 출력을 관리하는 데 사용됩니다.
chain.output_schema.schema()은 체인의 출력 스키마를 확인하는 코드입니다. 출력 스키마는 데이터나 정보의 구조와 형식을 정의하는데 사용됩니다.
주석(#)은 코드에 설명을 추가하는 데 사용되며, 이 경우에는 주석으로 코드의 목적을 설명하고 있습니다.
이 코드에서 "chain"의 출력 스키마는 이 체인의 마지막 부분인 "ChatModel"에서 정의한 출력 스키마와 일치한다고 설명하고 있습니다. 마지막 부분인 "ChatModel"이 "ChatMessage"를 출력하므로, 체인의 출력 스키마도 "ChatMessage"와 일치합니다.
출력 스키마의 역할은 데이터의 형식, 구조, 및 유효성 검사에 관련됩니다. 이 코드는 출력 스키마를 확인하는 용도로 사용되며, 체인의 구조와 출력 데이터에 대한 정보를 얻을 수 있습니다.
이 코드는 체인의 출력 스키마를 확인하고 마지막 부분 "ChatModel"의 출력 스키마와 일치한다는 점을 강조하는 목적으로 사용됩니다.
return 값
{'title': 'ChatOpenAIOutput',
 'anyOf': [{'$ref': '#/definitions/AIMessage'},
  {'$ref': '#/definitions/HumanMessage'},
  {'$ref': '#/definitions/ChatMessage'},
  {'$ref': '#/definitions/SystemMessage'},
  {'$ref': '#/definitions/FunctionMessage'}],
 'definitions': {'AIMessage': {'title': 'AIMessage',
   'description': 'A Message from an AI.',
   'type': 'object',
   'properties': {'content': {'title': 'Content', 'type': 'string'},
    'additional_kwargs': {'title': 'Additional Kwargs', 'type': 'object'},
    'type': {'title': 'Type',
     'default': 'ai',
     'enum': ['ai'],
     'type': 'string'},
    'example': {'title': 'Example', 'default': False, 'type': 'boolean'}},
   'required': ['content']},
  'HumanMessage': {'title': 'HumanMessage',
   'description': 'A Message from a human.',
   'type': 'object',
   'properties': {'content': {'title': 'Content', 'type': 'string'},
    'additional_kwargs': {'title': 'Additional Kwargs', 'type': 'object'},
    'type': {'title': 'Type',
     'default': 'human',
     'enum': ['human'],
     'type': 'string'},
    'example': {'title': 'Example', 'default': False, 'type': 'boolean'}},
   'required': ['content']},
  'ChatMessage': {'title': 'ChatMessage',
   'description': 'A Message that can be assigned an arbitrary speaker (i.e. role).',
   'type': 'object',
   'properties': {'content': {'title': 'Content', 'type': 'string'},
    'additional_kwargs': {'title': 'Additional Kwargs', 'type': 'object'},
    'type': {'title': 'Type',
     'default': 'chat',
     'enum': ['chat'],
     'type': 'string'},
    'role': {'title': 'Role', 'type': 'string'}},
   'required': ['content', 'role']},
  'SystemMessage': {'title': 'SystemMessage',
   'description': 'A Message for priming AI behavior, usually passed in as the first of a sequence\nof input messages.',
   'type': 'object',
   'properties': {'content': {'title': 'Content', 'type': 'string'},
    'additional_kwargs': {'title': 'Additional Kwargs', 'type': 'object'},
    'type': {'title': 'Type',
     'default': 'system',
     'enum': ['system'],
     'type': 'string'}},
   'required': ['content']},
  'FunctionMessage': {'title': 'FunctionMessage',
   'description': 'A Message for passing the result of executing a function back to a model.',
   'type': 'object',
   'properties': {'content': {'title': 'Content', 'type': 'string'},
    'additional_kwargs': {'title': 'Additional Kwargs', 'type': 'object'},
    'type': {'title': 'Type',
     'default': 'function',
     'enum': ['function'],
     'type': 'string'},
    'name': {'title': 'Name', 'type': 'string'}},
   'required': ['content', 'name']}}}
Stream
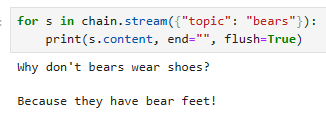
for s in chain.stream({"topic": "bears"}):
    print(s.content, end="", flush=True)
이 코드는 "chain" 객체를 사용하여 대화를 생성하고 출력하는 부분을 설명하고 있습니다.
for s in chain.stream({"topic": "bears"})::
이 부분은 "chain" 객체를 사용하여 대화를 생성하는 반복문입니다.
"chain.stream({"topic": "bears"})"은 주어진 입력 매개변수인 {"topic": "bears"}를 사용하여 대화를 시작하고 그 결과를 반복적으로 처리합니다.
print(s.content, end="", flush=True):
"s"는 반복문에서 가져온 대화의 한 부분을 나타냅니다.
"s.content"는 대화의 내용을 나타내며, 이 부분은 출력됩니다.
"end=""`"는 "print" 함수가 줄 바꿈 문자를 출력하지 않도록 합니다. 따라서 출력이 연이어 나타납니다.
"flush=True"는 출력을 즉시 표시하도록 하는 옵션으로, 출력이 즉시 화면에 나타납니다.
이 코드는 "chain"을 사용하여 주제가 "bears"인 대화를 생성하고 해당 대화를 반복적으로 처리하여 출력합니다. 출력은 줄 바꿈 없이 연이어 표시되며, flush=True 옵션을 사용하여 즉시 표시됩니다.
Invoke
chain.invoke({"topic": "bears"})
이 코드는 "chain" 객체를 사용하여 대화를 생성하고 실행하는 부분을 설명하고 있습니다.
chain.invoke({"topic": "bears"}):
이 부분은 "chain" 객체를 사용하여 대화를 생성하고 실행하는 명령입니다.
{"topic": "bears"}는 입력 매개변수로 주어진 딕셔너리를 나타냅니다. 여기서 "topic"은 대화 주제를 설정하는데 사용되는 키이며, "bears"는 주제로 설정됩니다.
이 코드는 "chain"을 사용하여 주제가 "bears"인 대화를 생성하고 실행합니다. 이로써 대화 모델은 "bears" 주제에 관한 대화를 생성하고 결과를 반환합니다.
{"topic": "bears"}와 {"topic": "cats"}는 입력 매개변수로 주어진 딕셔너리의 목록을 나타냅니다. 각 딕셔너리에는 "topic" 키와 대화 주제를 설정하는 값이 포함되어 있습니다.
이 코드는 "chain"을 사용하여 "bears" 주제와 "cats" 주제에 관한 여러 대화를 생성하고 처리합니다. 이로써 대화 모델은 주어진 주제에 따라 대화를 생성하고 결과를 반환합니다.
Async Stream
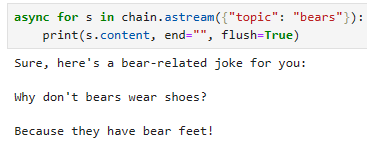
async for s in chain.astream({"topic": "bears"}):
    print(s.content, end="", flush=True)
이 코드는 비동기로 "chain" 객체를 사용하여 대화를 생성하고 출력하는 부분을 설명하고 있습니다.
async for s in chain.astream({"topic": "bears"})::
이 부분은 비동기 반복문으로, "chain" 객체를 사용하여 대화를 생성하고 결과를 처리합니다.
chain.astream({"topic": "bears"})은 주어진 입력 매개변수인 {"topic": "bears"}를 사용하여 대화를 시작하고 비동기 스트림을 통해 결과를 받아옵니다.
print(s.content, end="", flush=True):
"s"는 스트림에서 가져온 대화의 한 부분을 나타냅니다.
"s.content"는 대화의 내용을 나타내며, 이 부분은 출력됩니다.
"end=""`"는 "print" 함수가 줄 바꿈 문자를 출력하지 않도록 합니다. 따라서 출력이 연이어 나타납니다.
"flush=True"는 출력을 즉시 표시하도록 하는 옵션으로, 출력이 즉시 화면에 나타납니다.
이 코드는 "chain"을 사용하여 주제가 "bears"인 대화를 생성하고 비동기 스트림을 통해 결과를 받아오며, 결과를 출력합니다. 출력은 줄 바꿈 없이 연이어 표시되며, flush=True 옵션을 사용하여 즉시 표시됩니다.
Async Invoke
await chain.ainvoke({"topic": "bears"})
이 코드는 "chain" 객체를 사용하여 대화를 생성하고 실행하는 비동기 방식을 설명하고 있습니다.
await chain.ainvoke({"topic": "bears"}):
이 부분은 "chain" 객체를 사용하여 비동기로 대화를 생성하고 실행하는 명령입니다.
{"topic": "bears"}는 입력 매개변수로 주어진 딕셔너리를 나타냅니다. 여기서 "topic"은 대화 주제를 설정하는데 사용되는 키이며, "bears"는 주제로 설정됩니다.
이 코드는 "chain"을 사용하여 "bears" 주제에 관한 대화를 생성하고 실행합니다. await 키워드는 비동기 작업이 완료될 때까지 대기하도록 하며, 대화의 실행이 완료되면 결과를 반환합니다.
Async Batch
await chain.abatch([{"topic": "bears"}])
이 코드는 "chain" 객체를 사용하여 대화를 생성하고 실행하는 비동기 일괄 처리 방법을 설명하고 있습니다.
await chain.abatch([{"topic": "bears"}]):
이 부분은 "chain" 객체를 사용하여 비동기로 대화를 생성하고 실행하는 명령입니다.
{"topic": "bears"}는 입력 매개변수로 주어진 딕셔너리의 목록을 나타냅니다. 각 딕셔너리에는 "topic" 키와 대화 주제를 설정하는 값이 포함되어 있습니다.
이 코드는 "chain"을 사용하여 "bears" 주제에 관한 대화를 생성하고 실행합니다. await 키워드는 비동기 작업이 완료될 때까지 대기하도록 하며, 대화의 실행이 완료되면 결과를 반환합니다.
Async Stream Intermediate Steps
All runnables also have a method.astream_log()which is used to stream (as they happen) all or part of the intermediate steps of your chain/sequence.
모든 runnables는 체인/시퀀스의 중간 단계 전체 또는 일부를 스트리밍하는 데 사용되는 .astream_log() 메서드도 있습니다.
This is useful to show progress to the user, to use intermediate results, or to debug your chain.
이는 사용자에게 진행 상황을 표시하거나, 중간 결과를 사용하거나, 체인을 디버깅하는 데 유용합니다.
You can stream all steps (default) or include/exclude steps by name, tags or metadata.
모든 단계를 스트리밍(기본값)하거나 이름, 태그 또는 메타데이터별로 단계를 포함/제외할 수 있습니다.
This method yieldsJSONPatchops that when applied in the same order as received build up the RunState.
이 메서드는 수신된 순서와 동일한 순서로 적용될 때 RunState를 구축하는 JSONPatch 작업을 생성합니다.
class LogEntry(TypedDict):
    id: str
    """ID of the sub-run."""
    name: str
    """Name of the object being run."""
    type: str
    """Type of the object being run, eg. prompt, chain, llm, etc."""
    tags: List[str]
    """List of tags for the run."""
    metadata: Dict[str, Any]
    """Key-value pairs of metadata for the run."""
    start_time: str
    """ISO-8601 timestamp of when the run started."""

    streamed_output_str: List[str]
    """List of LLM tokens streamed by this run, if applicable."""
    final_output: Optional[Any]
    """Final output of this run.
    Only available after the run has finished successfully."""
    end_time: Optional[str]
    """ISO-8601 timestamp of when the run ended.
    Only available after the run has finished."""


class RunState(TypedDict):
    id: str
    """ID of the run."""
    streamed_output: List[Any]
    """List of output chunks streamed by Runnable.stream()"""
    final_output: Optional[Any]
    """Final output of the run, usually the result of aggregating (`+`) streamed_output.
    Only available after the run has finished successfully."""

    logs: Dict[str, LogEntry]
    """Map of run names to sub-runs. If filters were supplied, this list will
    contain only the runs that matched the filters."""
위의 코드는 Python 3.8 이상에서 사용 가능한 TypedDict를 사용하여 두 개의 타입 딕셔너리(LogEntry 및 RunState)를 정의하고 있습니다. 이 타입 딕셔너리는 특정 키와 그에 상응하는 데이터 형식을 명시적으로 정의함으로써 딕셔너리의 구조를 제한하고 코드의 가독성과 안정성을 향상시킵니다.
LogEntry 타입 딕셔너리:
id: str: 서브런의 ID를 나타내는 문자열.
name: str: 실행 중인 객체의 이름을 나타내는 문자열.
type: str: 실행 중인 객체의 유형(예: 프롬프트, 체인, llm 등)을 나타내는 문자열.
tags: List[str]: 실행에 대한 태그 목록을 나타내는 문자열 리스트.
metadata: Dict[str, Any]: 실행에 대한 메타데이터를 나타내는 키-값 쌍의 딕셔너리.
start_time: str: 실행이 시작된 ISO-8601 타임스탬프를 나타내는 문자열.
streamed_output_str: List[str]: 이 실행에 의해 스트리밍된 LLM 토큰의 목록(적용 가능한 경우).
final_output: Optional[Any]: 이 실행의 최종 출력. 실행이 성공적으로 완료된 후에만 사용 가능한 옵셔널 타입 데이터.
end_time: Optional[str]: 실행이 종료된 ISO-8601 타임스탬프. 실행이 성공적으로 완료된 후에만 사용 가능한 옵셔널 타입 데이터.
RunState 타입 딕셔너리:
id: str: 실행의 ID를 나타내는 문자열.
streamed_output: List[Any]: Runnable.stream()에 의해 스트리밍된 출력 청크 목록을 나타내는 리스트.
final_output: Optional[Any]: 실행의 최종 출력. 일반적으로 streamed_output을 집계한 결과입니다. 실행이 성공적으로 완료된 후에만 사용 가능한 옵셔널 타입 데이터.
logs: Dict[str, LogEntry]: 실행의 이름과 서브런(로그 엔트리) 간의 매핑. 필터가 제공된 경우 해당 필터와 일치하는 실행만 포함합니다.
이러한 타입 딕셔너리는 데이터 구조와 형식을 명확히 정의하며, 이러한 정보를 사용하는 코드에서 유용한 형식 검증과 가독성을 제공합니다.
Streaming JSONPatch chunks
This is useful eg. to stream theJSONPatchin an HTTP server, and then apply the ops on the client to rebuild the run state there. SeeLangServefor tooling to make it easier to build a webserver from any Runnable.
이는 유용합니다. HTTP 서버에서 JSONPatch를 스트리밍한 다음 클라이언트에 작업을 적용하여 실행 상태를 다시 빌드합니다. Runnable에서 웹 서버를 더 쉽게 구축할 수 있는 도구는 LangServe를 참조하세요.
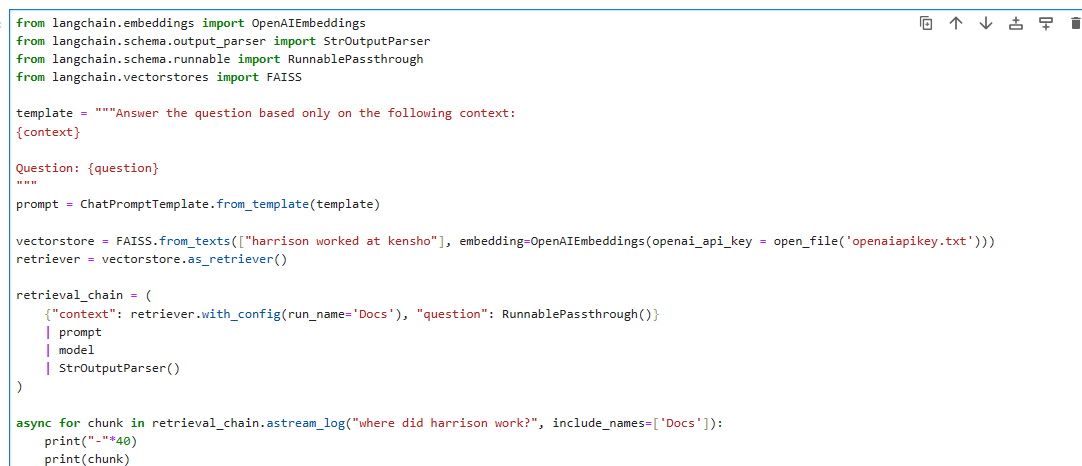
from langchain.embeddings import OpenAIEmbeddings
from langchain.schema.output_parser import StrOutputParser
from langchain.schema.runnable import RunnablePassthrough
from langchain.vectorstores import FAISS
template = """Answer the question based only on the following context:
{context}
Question: {question}
"""
prompt = ChatPromptTemplate.from_template(template)
vectorstore = FAISS.from_texts(["harrison worked at kensho"], embedding=OpenAIEmbeddings())
retriever = vectorstore.as_retriever()
retrieval_chain = (
{"context": retriever.with_config(run_name='Docs'), "question": RunnablePassthrough()}
| prompt
| model
| StrOutputParser()
)
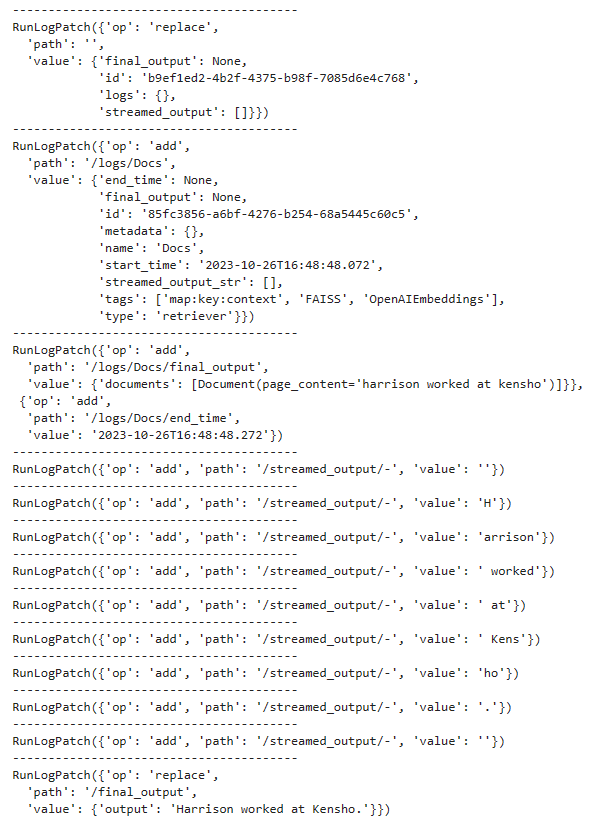
async for chunk in retrieval_chain.astream_log("where did harrison work?", include_names=['Docs']):
print("-"*40)
print(chunk)
이 코드는 "langchain" 라이브러리를 사용하여 OpenAI 모델을 활용하여 질문 응답 시스템을 구축하는 예시를 제공합니다.
모듈 및 클래스 가져오기:
langchain.embeddings 모듈에서 OpenAIEmbeddings 클래스를 가져옵니다. 이 클래스는 OpenAI의 임베딩을 사용하기 위한 도구를 제공합니다.
langchain.schema.output_parser 모듈에서 StrOutputParser 클래스를 가져옵니다. 이 클래스는 출력을 파싱하는 데 사용됩니다.
langchain.schema.runnable 모듈에서 RunnablePassthrough 클래스를 가져옵니다. 이 클래스는 실행 가능한 객체를 나타내는 클래스입니다.
langchain.vectorstores 모듈에서 FAISS 클래스를 가져옵니다. 이 클래스는 FAISS 벡터 저장소를 만들고 관리하는 도구를 제공합니다.
템플릿 정의:
"template" 변수에는 질문에 대한 컨텍스트와 질문 자체를 템플릿으로 정의합니다.
질문 응답 시스템 구성:
"prompt" 변수에는 "ChatPromptTemplate.from_template(template)"을 사용하여 템플릿을 기반으로한 대화 템플릿을 생성합니다.
"vectorstore" 변수에는 "FAISS.from_texts"를 사용하여 벡터 저장소를 생성합니다. 이 벡터 저장소는 "harrison worked at kensho"와 같은 텍스트로 초기화되며, OpenAI 임베딩을 사용하여 벡터를 생성합니다.
"retriever" 변수에는 "vectorstore.as_retriever()"를 사용하여 정보 검색(retrieval)을 위한 객체를 생성합니다.
실행 체인 설정:
"retrieval_chain" 변수에는 실행 체인을 설정합니다. 이 체인은 다음과 같이 구성됩니다:
"context"와 "question" 매개변수를 사용하여 "retriever.with_config(run_name='Docs')"와 "RunnablePassthrough()"를 결합합니다.
"prompt" 템플릿을 추가합니다.
모델(model)을 추가합니다.
출력 파서(StrOutputParser)를 추가합니다.
결과 검색 및 출력:
비동기 반복문(async for)을 사용하여 질문을 실행하고 결과를 검색합니다.
retrieval_chain.astream_log("where did harrison work?", include_names=['Docs'])를 사용하여 "where did harrison work?"라는 질문을 실행하고, 실행 결과를 가져옵니다.
실행 결과를 출력합니다.
이 코드는 OpenAI 모델을 사용하여 컨텍스트와 질문을 기반으로 질문 응답 시스템을 구현하고, 결과를 출력하는 과정을 나타냅니다.
나는 OpenAI key를 외부 파일에서 읽어 오도록 아래와 같이 코딩 했음
return 값
Streaming the incremental RunState
You can simply passdiff=Falseto get incremental values ofRunState. You get more verbose output with more repetitive parts.
간단히 diff=False를 전달하여 RunState의 증분 값을 얻을 수 있습니다. 반복되는 부분이 많아지면 더 자세한 출력을 얻을 수 있습니다.
async for chunk in retrieval_chain.astream_log("where did harrison work?", include_names=['Docs'], diff=False):
    print("-"*70)
    print(chunk)
이 코드는 질문 응답 시스템을 통해 질문을 실행하고 결과를 비동기적으로 가져오는 부분을 설명하고 있습니다.
async for chunk in retrieval_chain.astream_log("where did harrison work?", include_names=['Docs'], diff=False)::
이 부분은 비동기 반복문으로, "retrieval_chain" 객체를 사용하여 질문을 실행하고 결과를 비동기적으로 처리합니다.
retrieval_chain.astream_log("where did harrison work?", include_names=['Docs'], diff=False)는 "where did harrison work?"라는 질문을 실행하고 결과를 가져오는 코드입니다.
include_names=['Docs']는 결과에 대한 필터로, "Docs"라는 이름을 가진 실행에 대한 결과만 포함합니다.
diff=False는 결과를 비교(diff)하지 않도록 설정합니다.
print("-"*70):
이 부분은 구분선을 출력합니다. 출력 결과를 시각적으로 구분하기 위해 사용됩니다.
print(chunk):
"chunk"는 질문 실행의 결과를 나타냅니다.
이 부분은 실행 결과를 출력합니다.
이 코드는 "retrieval_chain"을 사용하여 "where did harrison work?"라는 질문을 실행하고 결과를 가져오며, 결과를 출력합니다. 결과는 "Docs"라는 이름을 가진 실행에 대한 것만 포함되며, diff를 비활성화하고 결과를 출력합니다.
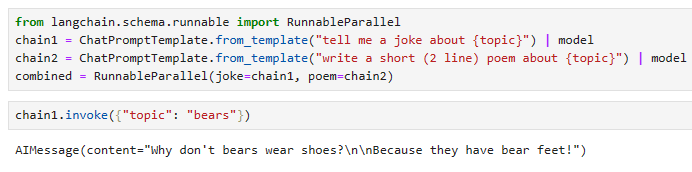
Let's take a look at how LangChain Expression Language supports parallel requests. For example, when using aRunnableParallel(often written as a dictionary) it executes each element in parallel.
LangChain Expression Language가 어떻게 병렬 요청을 지원하는지 살펴보겠습니다. 예를 들어 RunnableParallel(종종 사전으로 작성됨)을 사용하면 각 요소가 병렬로 실행됩니다.
from langchain.schema.runnable import RunnableParallel
chain1 = ChatPromptTemplate.from_template("tell me a joke about {topic}") | model
chain2 = ChatPromptTemplate.from_template("write a short (2 line) poem about {topic}") | model
combined = RunnableParallel(joke=chain1, poem=chain2)
chain1.invoke({"topic": "bears"})
이 코드는 "langchain" 라이브러리를 사용하여 두 개의 병렬 실행 체인을 생성하고, 이 두 체인을 조합하여 단일 실행 객체를 만들고, 그 중 하나인 "chain1"을 사용하여 특정 주제에 대한 실행을 시작하는 예시를 보여줍니다
모듈 및 클래스 가져오기:
langchain.schema.runnable 모듈에서 RunnableParallel 클래스를 가져옵니다. 이 클래스는 병렬 실행을 관리하고 조합하는 데 사용됩니다.
실행 체인 생성:
"chain1"은 "ChatPromptTemplate.from_template("tell me a joke about {topic}") | model"를 사용하여 생성됩니다. 이 체인은 주어진 주제에 관한 농담을 생성하기 위해 대화 템플릿과 모델을 조합합니다.
"chain2"는 "ChatPromptTemplate.from_template("write a short (2 line) poem about {topic}") | model"를 사용하여 생성됩니다. 이 체인은 주어진 주제에 관한 짧은 시를 생성하기 위해 대화 템플릿과 모델을 조합합니다.
병렬 실행 조합:
"combined"는 "RunnableParallel(joke=chain1, poem=chain2)"를 사용하여 생성됩니다. 이 객체는 "joke" 및 "poem"이라는 이름으로 "chain1"과 "chain2"를 조합한 것입니다. 이를 통해 "joke" 및 "poem" 실행을 병렬로 시작하고 결과를 처리할 수 있습니다.
실행 시작:
"chain1.invoke({"topic": "bears"})"을 사용하여 "chain1"을 실행합니다. 이 부분은 "bears" 주제에 관한 농담을 생성하는 실행을 시작합니다.
이 코드는 두 개의 병렬 실행 체인을 생성하고 실행하기 위한 방법을 보여주며, "chain1"을 사용하여 "bears" 주제에 관한 실행을 시작합니다.
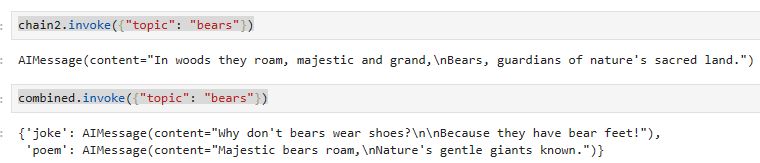
chain2.invoke({"topic": "bears"})
combined.invoke({"topic": "bears"})
이 코드는 "chain2"와 "combined" 두 실행 체인을 사용하여 "bears" 주제에 관한 실행을 시작하는 부분을 설명하고 있습니다.
"chain2.invoke({"topic": "bears"})":
이 부분은 "chain2"를 사용하여 "bears" 주제에 관한 실행을 시작합니다. "chain2"는 주어진 주제에 관한 짧은 시를 생성하기 위한 실행을 나타냅니다.
"combined.invoke({"topic": "bears"})":
이 부분은 "combined"를 사용하여 "bears" 주제에 관한 실행을 시작합니다. "combined"는 "joke" 및 "poem"이라는 이름으로 두 개의 실행 체인을 병렬로 조합한 것입니다.
이 코드는 "chain2"와 "combined" 두 실행 체인을 사용하여 "bears" 주제에 관한 실행을 시작하며, 각 실행은 주어진 주제에 따라 농담 또는 시를 생성하는 목적을 갖고 있습니다.
Parallelism on batches
Parallelism can be combined with other runnables. Let's try to use parallelism with batches.
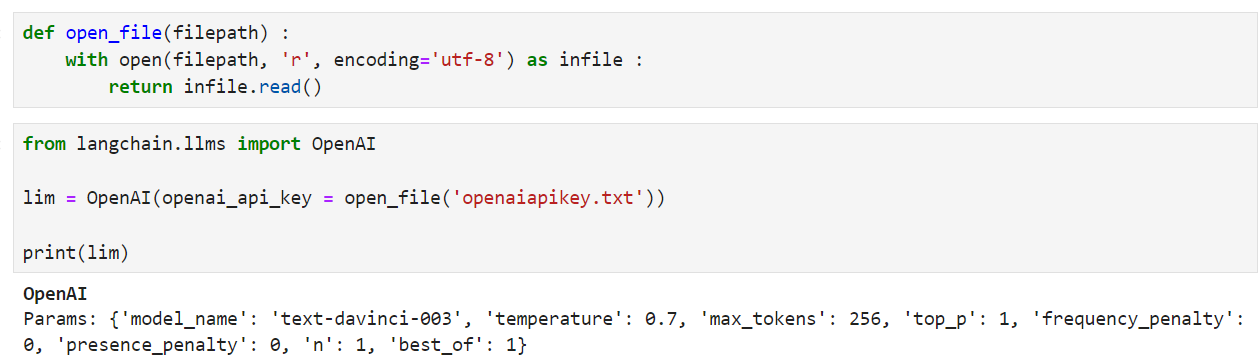
나는 openai api key 세팅을 아래와 같이 별도의 txt 파일에 두고 이를 불러와서 씀.
LangChain에 OpenAI key를 세팅하고 OpenAI에게 질문을 해서 답변을 받는 가장 간단한 코딩.
langchain.llms에 있는 OpenAI 모듈을 사용해서 api key를 세팅한 후 질문을 보내면 답변을 받을 수 있음.
위 코드는 파스타를 좋아하는 사람이 휴가때 가기 좋은 곳 5곳을 질문했고 그에 대한 답을 얻었음.
(변수 lim에 openAI 세팅이 되 있음. 원래는 llm 인데 lim 으로 오타가 난 것임. 참고 바람)
위 코드는 langchain의 PromptTemplate으로 프롬프트를 관리하는 간단한 예제이다.
위 예제에서는 질문 안에 있는 음식(food)을 변수로 처리해서 별도로 값을 입력 받아서 prompt를 완성할 수 있게 하는 소스코드임.
질문을 던질 때 food에 dessert를 넣어서 디저트를 좋아하는 사람이 갈만한 휴가 장소 5곳을 물었고 그에 대한 답을 OpenAI로 부터 받았음.
위 코드는 langchain.chains 의 LLMChain 을 사용해서 OpenAI에 질문을 던지는 방법을 보여 준다.
소스코드가 하는 일은 위와 같다.
이번에는 food에 fruit을 넣어서 질문을 했고 위와는 다른 답변을 얻어 냈다.
다음은 Agents 에 대해 살펴 본다.
google-search-results 모듈을 인스톨 한다.
필요한 모듈을 import 한다.
그리고 llm 변수에 OpenAI 모델을 load 한다.
참고로 open_file() 함수는 위에 세팅해 두었던 것인데 이 부분을 따로 사용하려면 아래 함수를 넣는다.
def open_file(filepath) :
    with open(filepath, 'r', encoding='utf-8') as infile :
        return infile.read()
그 다음 필요한 툴을 로드한다.
# Load in some tools to use

# os.environ["SERPAPI_API_KEY"] = "..."

tools = load_tools(["serpapi", "llm-math"], llm=llm)
이 모듈을 실행하려면 SerpAPI 계정이 있어야 한다. 이 서비스는 유료인 것 같음.
# Finally, let's initialize an agent with:
# 1. The tools
# 2. The language model
# 3. The type of agent we want to use.

agent = initialize_agent(tools, llm, agent="zero-shot-react-description", verbose=True)
이제 agent를 초기화 한다.
initialize_agent() 메소드를 사용하고 파라미터로 tools와 llm 그리고 agent 를 전달한다.
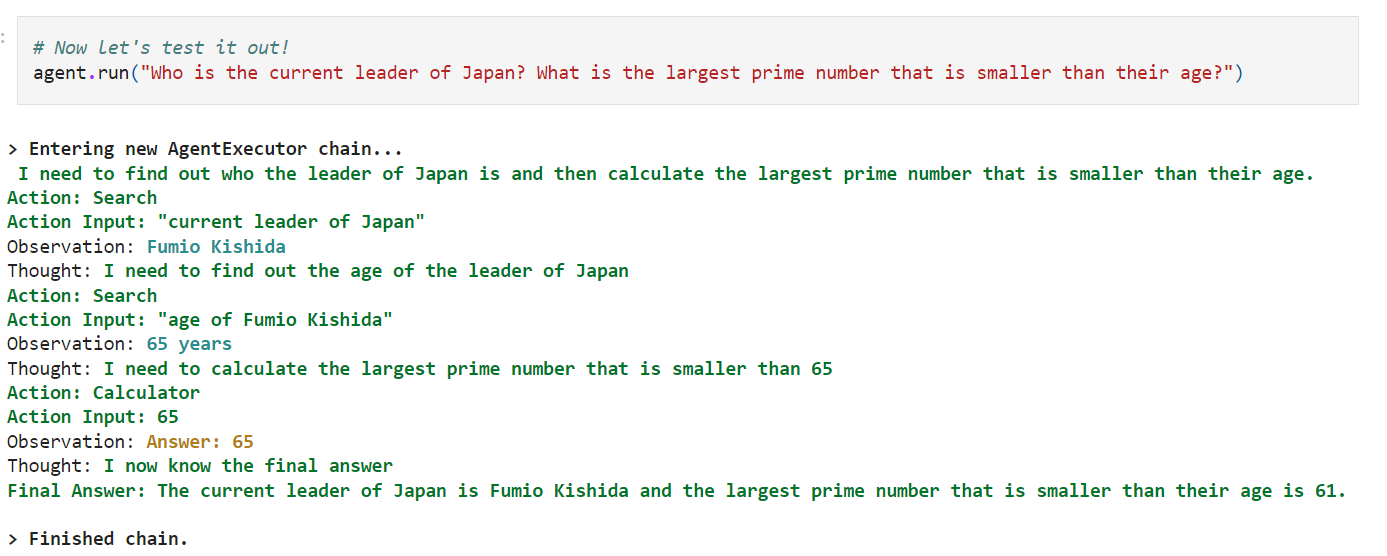
# Now let's test it out!
agent.run("Who is the current leader of Japan? What is the largest prime number that is smaller than their age?")
이제 이 agent를 run 하면 된다. 이때 원하는 prompt를 전달한다.
prompt에는 두가지 질문이 있다. 일본의 현재 리더는 누구인가? 그리고 나이보다 작은 가장 큰 소수는 무엇입니까? 이다.
위 유투브 클립에서는 아래와 같은 답변을 얻어 냈다.
위 질문에 답변을 하기 위해 이 agent 는 여러 일을 하게 된다.
처음에 자기가 할 일을 얘기한다. 이 agent 가 할 일은 일본의 수상이 누구인지 찾고 그 수상의 나이를 찾아서 그 나이보다 작은 가장 큰 소수를 찾는 일을 하는 것이다.
처음 질문에 대한 답변은 Fumio Kishida이다.
그 다음 이 수상의 나이를 찾아야 한다. age of Fumio Kishida. 나이는 65세이다.
그리고 나서 65보다 작은 가장 큰 소수를 찾는 거다.
65가 소수이기 때문에 답은 65 이다.
그리고 나서 final answer를 내 놓는다.
이 작업은 chain을 통해 이루어 진다.
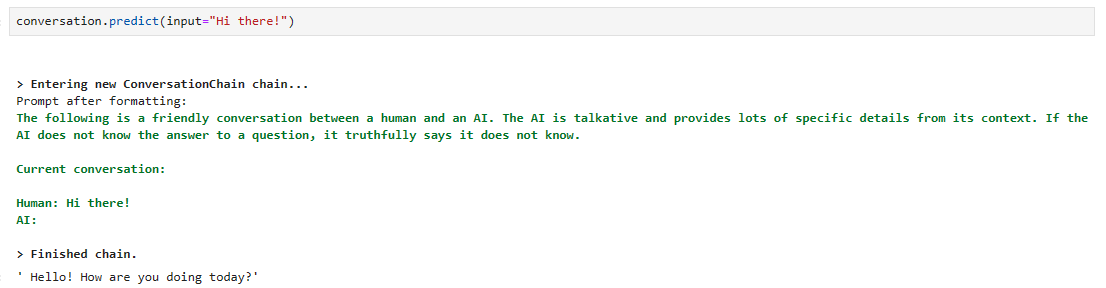
다음은 Memory에 대해서 알아본다.
우선 ConversationChain 모듈을 import해야 한다.
그 다음 OpenAI를 세팅하고 나서 ConversationChain을 초기화 한다.
그 다음 predict() 메소드를 사용해서 실행한다. 결과는 다음과 같다.
conversation.predict(input="Hi there!")
Hi there라는 프롬프트를 보냈더니 자기가 알아서 prompt를 포맷해서 전달합니다.
prompt 앞에 이 시스템 조건을 붙입니다.
The following is a friendly conversation between a human and an AI. The AI is talkative and provides lots of specific details from its context. If the AI does not know the answer to a question, it truthfully says it does not know.
다음은 인간과 AI의 친근한 대화이다. AI는 말이 많고 상황에 맞는 구체적인 세부 정보를 많이 제공합니다. AI가 질문에 대한 답을 모른다면, 사실은 모른다고 말합니다.
그 다음 전달한 prompt 'hi there!를 붙입니다.
그럼 답변으로 Hello! How are you doing today? 를 받았습니다.
conversation.predict(input="I'm doing well! Just having a conversation with an AI.")
그 다음 이어서 질문을 합니다.
그러면 이전 prompt에다가 현재의 prompt를 추가해서 보냅니다.
이렇게 함으로서 대화가 맥락이 끊기지 않고 계속 이어질 수 있도록 합니다.
맥락이 끊어지지 않도록 하기 위해서 이전 prompt를 계속 memory 하게 됩니다.
이 일을 하는게 ConversationChain입니다.
conversation.predict(input="what is an alternative phrase for the first thing I said to you?")
그 다음. 내가 너한테 맨 먼저 한 말이 뭐지? 라고 물어봅니다.
맨 먼저 한 말은 Hi there! 였고 OpenAI는 잘 대답합니다.
대화들을 계속 기억하고 있다는 이야기 입니다.
그 다음에는 그 내가 맨 처음 한 얘기는 어떤 의미인지에 대해 질문합니다.
conversation.predict(input="what is an alternative phrase for the first thing I said to you?")
OpenAI 는 Hi there!는 그냥 인사말이었다고 답변을 하네요.
뭔가 대화가 되어 가는 느낌 입니다.
이상 Greg Kamradt 가 운영하는 채널에 있는 LangChain 101: Quickstart Guide를 살펴 봤습니다.
LangChain Expression Language or LCEL is a declarative way to easily compose chains together. There are several benefits to writing chains in this manner (as opposed to writing normal code):
LangChain 표현 언어(LCEL)는 체인을 쉽게 구성하는 선언적 방법입니다. 이러한 방식으로 체인을 작성하면 다음과 같은 여러 이점이 있습니다(일반 코드 작성과 반대).
Async, Batch, and Streaming SupportAny chain constructed this way will automatically have full sync, async, batch, and streaming support. This makes it easy to prototype a chain in a Jupyter notebook using the sync interface, and then expose it as an async streaming interface.
비동기, 배치 및 스트리밍 지원 이러한 방식으로 구성된 모든 체인은 자동으로 전체 동기화, 비동기, 배치 및 스트리밍을 지원합니다. 이를 통해 동기화 인터페이스를 사용하여 Jupyter 노트북에서 체인의 프로토타입을 쉽게 만든 다음 이를 비동기 스트리밍 인터페이스로 노출할 수 있습니다.
FallbacksThe non-determinism of LLMs makes it important to be able to handle errors gracefully. With LCEL you can easily attach fallbacks to any chain.
폴백 LLM의 비결정성으로 인해 오류를 적절하게 처리하는 것이 중요합니다. LCEL을 사용하면 모든 체인에 폴백을 쉽게 연결할 수 있습니다.
ParallelismSince LLM applications involve (sometimes long) API calls, it often becomes important to run things in parallel. With LCEL syntax, any components that can be run in parallel automatically are.
병렬성 LLM 응용 프로그램에는 (때때로 긴) API 호출이 포함되므로 작업을 병렬로 실행하는 것이 중요해지는 경우가 많습니다. LCEL 구문을 사용하면 병렬로 실행될 수 있는 모든 구성 요소가 자동으로 실행됩니다.
Seamless LangSmith Tracing IntegrationAs your chains get more and more complex, it becomes increasingly important to understand what exactly is happening at every step. With LCEL,allsteps are automatically logged toLangSmithfor maximal observability and debuggability.
원활한 LangSmith 추적 통합 체인이 점점 더 복잡해짐에 따라 모든 단계에서 정확히 무슨 일이 일어나고 있는지 이해하는 것이 점점 더 중요해지고 있습니다. LCEL을 사용하면 관찰 가능성과 디버그 가능성을 극대화하기 위해 모든 단계가 자동으로 LangSmith에 기록됩니다.
Using LangChain will usually require integrations with one or more model providers, data stores, APIs, etc. For this example, we'll use OpenAI's model APIs.
LangChain을 사용하려면 일반적으로 하나 이상의 모델 공급자, 데이터 저장소, API 등과의 통합이 필요합니다. 이 예에서는 OpenAI의 모델 API를 사용합니다.
First we'll need to install their Python package:
먼저 Python 패키지를 설치해야 합니다.
pip install openai
Accessing the API requires an API key, which you can get by creating an account and headinghere. Once we have a key we'll want to set it as an environment variable by running:
API에 액세스하려면 API 키가 필요합니다. API 키는 계정을 생성하고 여기에서 얻을 수 있습니다. 키가 있으면 다음을 실행하여 이를 환경 변수로 설정하려고 합니다.
export OPENAI_API_KEY="..."
If you'd prefer not to set an environment variable you can pass the key in directly via theopenai_api_keynamed parameter when initiating the OpenAI LLM class:
환경 변수를 설정하지 않으려는 경우 OpenAI LLM 클래스를 시작할 때 openai_api_key라는 매개변수를 통해 직접 키를 전달할 수 있습니다.
from langchain.llms import OpenAI

llm = OpenAI(openai_api_key="...")
나는 아래 방법 이용함.
Building an application
Now we can start building our language model application. LangChain provides many modules that can be used to build language model applications. Modules can be used as stand-alones in simple applications and they can be combined for more complex use cases.
이제 언어 모델 애플리케이션 구축을 시작할 수 있습니다. LangChain은 언어 모델 애플리케이션을 구축하는 데 사용할 수 있는 많은 모듈을 제공합니다. 모듈은 간단한 애플리케이션에서 독립 실행형으로 사용할 수 있으며 더 복잡한 사용 사례에서는 결합할 수 있습니다.
The most common and most important chain that LangChain helps create contains three things:
LangChain이 생성하는 데 도움이 되는 가장 일반적이고 가장 중요한 체인에는 다음 세 가지가 포함됩니다.
LLM: The language model is the core reasoning engine here. In order to work with LangChain, you need to understand the different types of language models and how to work with them.
LLM: 언어 모델은 여기서 핵심 추론 엔진입니다. LangChain을 사용하려면 다양한 유형의 언어 모델과 이를 사용하는 방법을 이해해야 합니다.
Prompt Templates: This provides instructions to the language model. This controls what the language model outputs, so understanding how to construct prompts and different prompting strategies is crucial.
프롬프트 템플릿: 언어 모델에 대한 지침을 제공합니다. 이는 언어 모델의 출력을 제어하므로 프롬프트와 다양한 프롬프트 전략을 구성하는 방법을 이해하는 것이 중요합니다.
Output Parsers: These translate the raw response from the LLM to a more workable format, making it easy to use the output downstream.
출력 파서: LLM의 원시 응답을 보다 실행 가능한 형식으로 변환하여 출력 다운스트림을 쉽게 사용할 수 있도록 합니다.
In this getting started guide we will cover those three components by themselves, and then go over how to combine all of them. Understanding these concepts will set you up well for being able to use and customize LangChain applications. Most LangChain applications allow you to configure the LLM and/or the prompt used, so knowing how to take advantage of this will be a big enabler.
이 시작 가이드에서는 이 세 가지 구성 요소를 단독으로 다룬 다음 이 모든 구성 요소를 결합하는 방법을 살펴보겠습니다. 이러한 개념을 이해하면 LangChain 애플리케이션을 사용하고 사용자 정의하는 데 도움이 됩니다. 대부분의 LangChain 애플리케이션에서는 LLM 및/또는 사용되는 프롬프트를 구성할 수 있으므로 이를 활용하는 방법을 아는 것이 큰 도움이 될 것입니다.
LLMs
There are two types of language models, which in LangChain are called:
LangChain에는 두 가지 유형의 언어 모델이 있습니다.
LLMs: this is a language model which takes a string as input and returns a string
LLM: 문자열을 입력으로 받아 문자열을 반환하는 언어 모델입니다.
ChatModels: this is a language model which takes a list of messages as input and returns a message
ChatModels: 메시지 목록을 입력으로 받아 메시지를 반환하는 언어 모델입니다.
The input/output for LLMs is simple and easy to understand - a string. But what about ChatModels? The input there is a list ofChatMessages, and the output is a singleChatMessage. AChatMessagehas two required components:
LLM의 입력/출력은 간단하고 이해하기 쉽습니다. 즉, 문자열입니다. 하지만 ChatModel은 어떻습니까? 입력에는 ChatMessage 목록이 있고 출력은 단일 ChatMessage입니다. ChatMessage에는 두 가지 필수 구성 요소가 있습니다.
content: This is the content of the message 메시지의 내용입니다..
role: This is the role of the entity from which theChatMessageis coming from. ChatMessage가 나오는 엔터티의 역할입니다.
LangChain provides several objects to easily distinguish between different roles:
LangChain은 서로 다른 역할을 쉽게 구별할 수 있는 여러 개체를 제공합니다.
HumanMessage: AChatMessagecoming from a human/user.
AIMessage: AChatMessagecoming from an AI/assistant.
SystemMessage: AChatMessagecoming from the system.
FunctionMessage: AChatMessagecoming from a function call.
If none of those roles sound right, there is also aChatMessageclass where you can specify the role manually. For more information on how to use these different messages most effectively, see our prompting guide.
이러한 역할 중 어느 것도 적절하지 않은 경우 역할을 수동으로 지정할 수 있는 ChatMessage 클래스도 있습니다. 이러한 다양한 메시지를 가장 효과적으로 사용하는 방법에 대한 자세한 내용은 메시지 안내 가이드를 참조하세요.
LangChain provides a standard interface for both, but it's useful to understand this difference in order to construct prompts for a given language model. The standard interface that LangChain provides has two methods:
LangChain은 두 가지 모두에 대한 표준 인터페이스를 제공하지만 주어진 언어 모델에 대한 프롬프트를 구성하려면 이러한 차이점을 이해하는 것이 유용합니다. LangChain이 제공하는 표준 인터페이스에는 두 가지 방법이 있습니다.
predict: Takes in a string, returns a string 문자열을 받아 문자열을 반환합니다.
predict_messages: Takes in a list of messages, returns a message. 메시지 목록을 가져와 메시지를 반환합니다.
Let's see how to work with these different types of models and these different types of inputs. First, let's import an LLM and a ChatModel.
이러한 다양한 유형의 모델과 다양한 유형의 입력을 사용하여 작업하는 방법을 살펴보겠습니다. 먼저 LLM과 ChatModel을 가져오겠습니다.
from langchain.llms import OpenAI
from langchain.chat_models import ChatOpenAI
llm = OpenAI()
chat_model = ChatOpenAI()
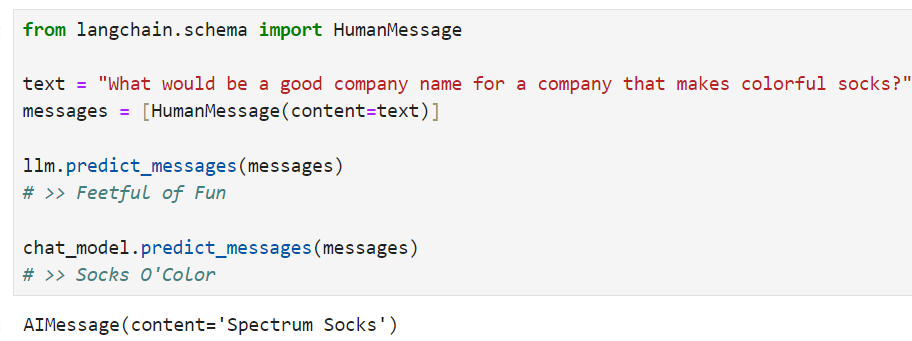
llm.predict("hi!")
>>> "Hi"
chat_model.predict("hi!")
>>> "Hi"
Note) 아래와 같은 에러메시지가 나오면 Langchain을 최신 버전으로 업그레이드 합니다.
pip install langchain --upgrade
TheOpenAIandChatOpenAIobjects are basically just configuration objects. You can initialize them with parameters liketemperatureand others, and pass them around.
OpenAI 및 ChatOpenAI 개체는 기본적으로 구성 개체입니다. temperature 및 기타 매개변수로 초기화하고 전달할 수 있습니다.
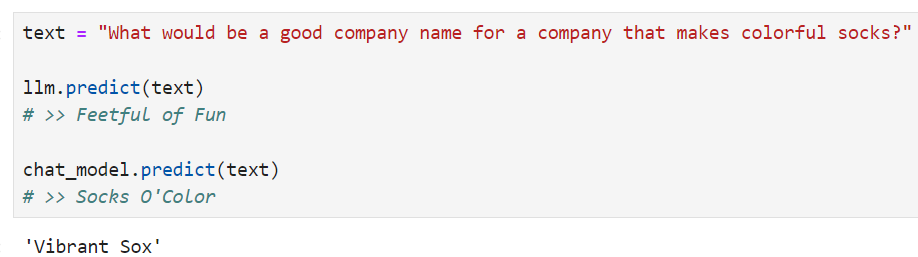
Next, let's use thepredictmethod to run over a string input.
다음으로 예측 메서드를 사용하여 문자열 입력을 실행해 보겠습니다.
text = "What would be a good company name for a company that makes colorful socks?"

llm.predict(text)
# >> Feetful of Fun

chat_model.predict(text)
# >> Socks O'Color
Finally, let's use thepredict_messagesmethod to run over a list of messages.
마지막으로 Predict_messages 메서드를 사용하여 메시지 목록을 살펴보겠습니다.
from langchain.schema import HumanMessage

text = "What would be a good company name for a company that makes colorful socks?"
messages = [HumanMessage(content=text)]

llm.predict_messages(messages)
# >> Feetful of Fun

chat_model.predict_messages(messages)
# >> Socks O'Color
For both these methods, you can also pass in parameters as keyword arguments. For example, you could pass intemperature=0to adjust the temperature that is used from what the object was configured with. Whatever values are passed in during run time will always override what the object was configured with.
두 가지 방법 모두 매개변수를 키워드 인수로 전달할 수도 있습니다. 예를 들어, 온도=0을 전달하여 객체 구성에 사용되는 온도를 조정할 수 있습니다. 런타임 중에 전달되는 값은 항상 개체 구성을 재정의합니다.
Prompt templates
Most LLM applications do not pass user input directly into an LLM. Usually they will add the user input to a larger piece of text, called a prompt template, that provides additional context on the specific task at hand.
대부분의 LLM 응용 프로그램은 사용자 입력을 LLM에 직접 전달하지 않습니다. 일반적으로 그들은 현재 특정 작업에 대한 추가 컨텍스트를 제공하는 프롬프트 템플릿이라는 더 큰 텍스트에 사용자 입력을 추가합니다.
In the previous example, the text we passed to the model contained instructions to generate a company name. For our application, it'd be great if the user only had to provide the description of a company/product, without having to worry about giving the model instructions.
이전 예에서 모델에 전달한 텍스트에는 회사 이름을 생성하는 지침이 포함되어 있습니다. 우리 애플리케이션의 경우 사용자가 모델 지침을 제공하는 것에 대해 걱정할 필요 없이 회사/제품에 대한 설명만 제공하면 좋을 것입니다.
PromptTemplates help with exactly this! They bundle up all the logic for going from user input into a fully formatted prompt. This can start off very simple - for example, a prompt to produce the above string would just be:
PromptTemplate이 바로 이 작업에 도움이 됩니다! 사용자 입력을 완전히 형식화된 프롬프트로 전환하기 위한 모든 논리를 묶습니다. 이는 매우 간단하게 시작할 수 있습니다. 예를 들어 위 문자열을 생성하라는 프롬프트는 다음과 같습니다.
from langchain.prompts import PromptTemplate

prompt = PromptTemplate.from_template("What is a good name for a company that makes {product}?")
prompt.format(product="colorful socks")
What is a good name for a company that makes colorful socks?
However, the advantages of using these over raw string formatting are several. You can "partial" out variables - e.g. you can format only some of the variables at a time. You can compose them together, easily combining different templates into a single prompt. For explanations of these functionalities, see thesection on promptsfor more detail.
그러나 원시 문자열 형식화에 비해 이를 사용하면 여러 가지 장점이 있습니다. 변수를 "부분적으로" 출력할 수 있습니다. 한 번에 일부 변수만 형식화할 수 있습니다. 다양한 템플릿을 하나의 프롬프트로 쉽게 결합하여 함께 구성할 수 있습니다. 이러한 기능에 대한 설명은 프롬프트 섹션을 참조하세요.
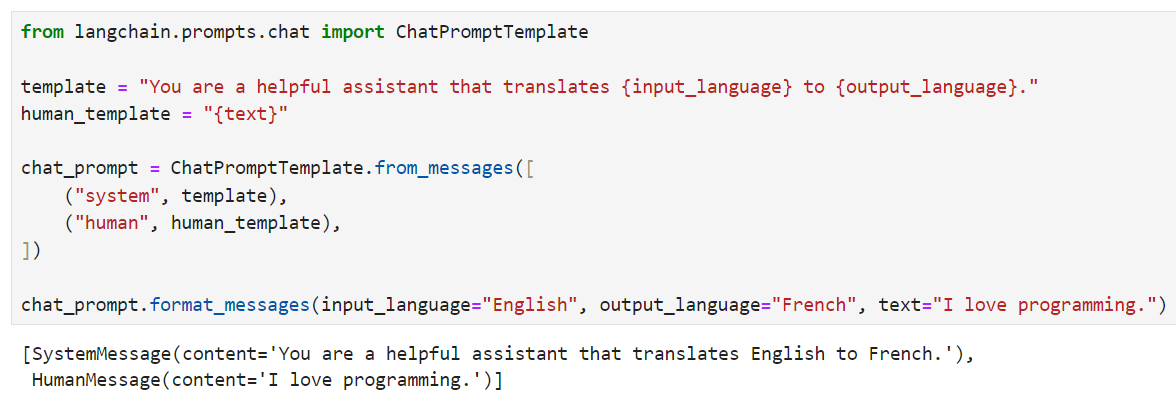
PromptTemplates can also be used to produce a list of messages. In this case, the prompt not only contains information about the content, but also each message (its role, its position in the list, etc) Here, what happens most often is a ChatPromptTemplate is a list of ChatMessageTemplates. Each ChatMessageTemplate contains instructions for how to format that ChatMessage - its role, and then also its content. Let's take a look at this below:
PromptTemplate을 사용하여 메시지 목록을 생성할 수도 있습니다. 이 경우 프롬프트에는 콘텐츠에 대한 정보뿐만 아니라 각 메시지(해당 역할, 목록에서의 위치 등)도 포함됩니다. 여기서 가장 자주 발생하는 것은 ChatPromptTemplate이 ChatMessageTemplate의 목록이라는 것입니다. 각 ChatMessageTemplate에는 해당 ChatMessage(해당 역할 및 콘텐츠)의 형식을 지정하는 방법에 대한 지침이 포함되어 있습니다. 아래에서 이에 대해 살펴보겠습니다.
from langchain.prompts.chat import ChatPromptTemplate

template = "You are a helpful assistant that translates {input_language} to {output_language}."
human_template = "{text}"

chat_prompt = ChatPromptTemplate.from_messages([
    ("system", template),
    ("human", human_template),
])

chat_prompt.format_messages(input_language="English", output_language="French", text="I love programming.")
[
    SystemMessage(content="You are a helpful assistant that translates English to French.", additional_kwargs={}),
    HumanMessage(content="I love programming.")
]
Output parsers
OutputParsers convert the raw output of an LLM into a format that can be used downstream. There are few main type of OutputParsers, including:
OutputParser는 LLM의 원시 출력을 다운스트림에서 사용할 수 있는 형식으로 변환합니다. 다음을 포함하여 몇 가지 주요 유형의 OutputParser가 있습니다.
Convert text from LLM -> structured information (e.g. JSON)
LLM에서 텍스트 변환 -> 구조화된 정보(예: JSON)
Convert a ChatMessage into just a string
ChatMessage를 문자열로 변환
Convert the extra information returned from a call besides the message (like OpenAI function invocation) into a string.
메시지(예: OpenAI 함수 호출) 외에 호출에서 반환된 추가 정보를 문자열로 변환합니다.
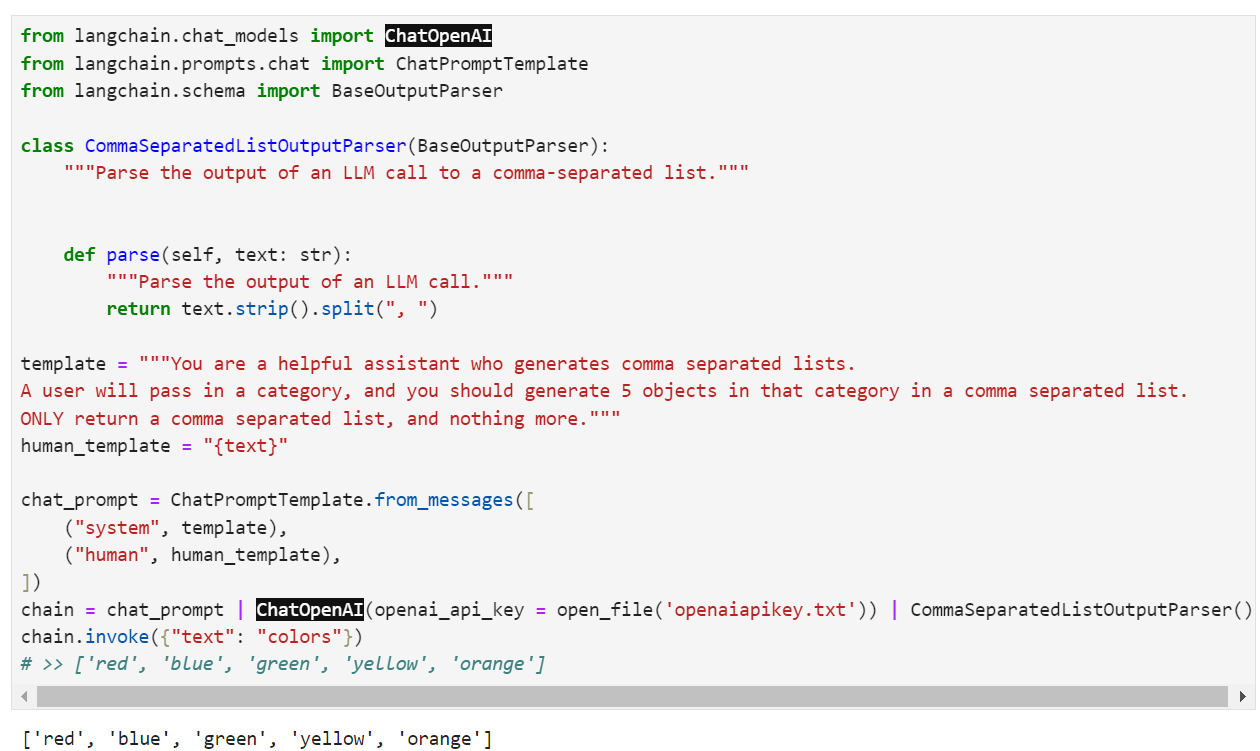
In this getting started guide, we will write our own output parser - one that converts a comma separated list into a list.
이 시작 가이드에서는 쉼표로 구분된 목록을 목록으로 변환하는 자체 출력 구문 분석기를 작성합니다.
from langchain.schema import BaseOutputParser

class CommaSeparatedListOutputParser(BaseOutputParser):
    """Parse the output of an LLM call to a comma-separated list."""


    def parse(self, text: str):
        """Parse the output of an LLM call."""
        return text.strip().split(", ")

CommaSeparatedListOutputParser().parse("hi, bye")
# >> ['hi', 'bye']
PromptTemplate + LLM + OutputParser
We can now combine all these into one chain. This chain will take input variables, pass those to a prompt template to create a prompt, pass the prompt to a language model, and then pass the output through an (optional) output parser. This is a convenient way to bundle up a modular piece of logic. Let's see it in action!
이제 이 모든 것을 하나의 체인으로 결합할 수 있습니다. 이 체인은 입력 변수를 가져와 프롬프트 템플릿에 전달하여 프롬프트를 생성하고, 프롬프트를 언어 모델에 전달한 다음 (선택 사항) 출력 구문 분석기를 통해 출력을 전달합니다. 이는 모듈식 로직 조각을 묶는 편리한 방법입니다. 실제로 확인해 봅시다!
from langchain.chat_models import ChatOpenAI
from langchain.prompts.chat import ChatPromptTemplate
from langchain.schema import BaseOutputParser

class CommaSeparatedListOutputParser(BaseOutputParser):
    """Parse the output of an LLM call to a comma-separated list."""


    def parse(self, text: str):
        """Parse the output of an LLM call."""
        return text.strip().split(", ")

template = """You are a helpful assistant who generates comma separated lists.
A user will pass in a category, and you should generate 5 objects in that category in a comma separated list.
ONLY return a comma separated list, and nothing more."""
human_template = "{text}"

chat_prompt = ChatPromptTemplate.from_messages([
    ("system", template),
    ("human", human_template),
])
chain = chat_prompt | ChatOpenAI() | CommaSeparatedListOutputParser()
chain.invoke({"text": "colors"})
# >> ['red', 'blue', 'green', 'yellow', 'orange']
Note that we are using the|syntax to join these components together. This|syntax is called the LangChain Expression Language. To learn more about this syntax, read the documentationhere.
우리는 | 이러한 구성 요소를 함께 결합하는 구문입니다. 이 | 구문을 LangChain 표현 언어라고 합니다. 이 구문에 대해 자세히 알아보려면 여기에서 설명서를 읽어보세요.
This is it! We've now gone over how to create the core building block of LangChain applications. There is a lot more nuance in all these components (LLMs, prompts, output parsers) and a lot more different components to learn about as well. To continue on your journey:
여기까지 입니다! 이제 우리는 LangChain 애플리케이션의 핵심 빌딩 블록을 생성하는 방법을 살펴보았습니다. 이러한 모든 구성 요소(LLM, 프롬프트, 출력 구문 분석기)에는 훨씬 더 많은 미묘한 차이가 있으며, 배워야 할 구성 요소도 훨씬 더 많습니다. 여행을 계속하려면:
This will install the bare minimum requirements of LangChain. A lot of the value of LangChain comes when integrating it with various model providers, datastores, etc. By default, the dependencies needed to do that are NOT installed. However, there are two other ways to install LangChain that do bring in those dependencies.
LangChain의 최소 요구 사항을 설치하겠습니다. LangChain의 많은 가치는 LangChain을 다양한 모델 공급자, 데이터 저장소 등과 통합할 때 발생합니다. 기본적으로 이를 수행하는 데 필요한 종속성은 설치되지 않습니다. 그러나 이러한 종속성을 가져오는 LangChain을 설치하는 다른 두 가지 방법이 있습니다.
To install modules needed for the common LLM providers, run:
일반 LLM 공급자에 필요한 모듈을 설치하려면 다음을 실행하세요.
pip install langchain[llms]
To install all modules needed for all integrations, run:
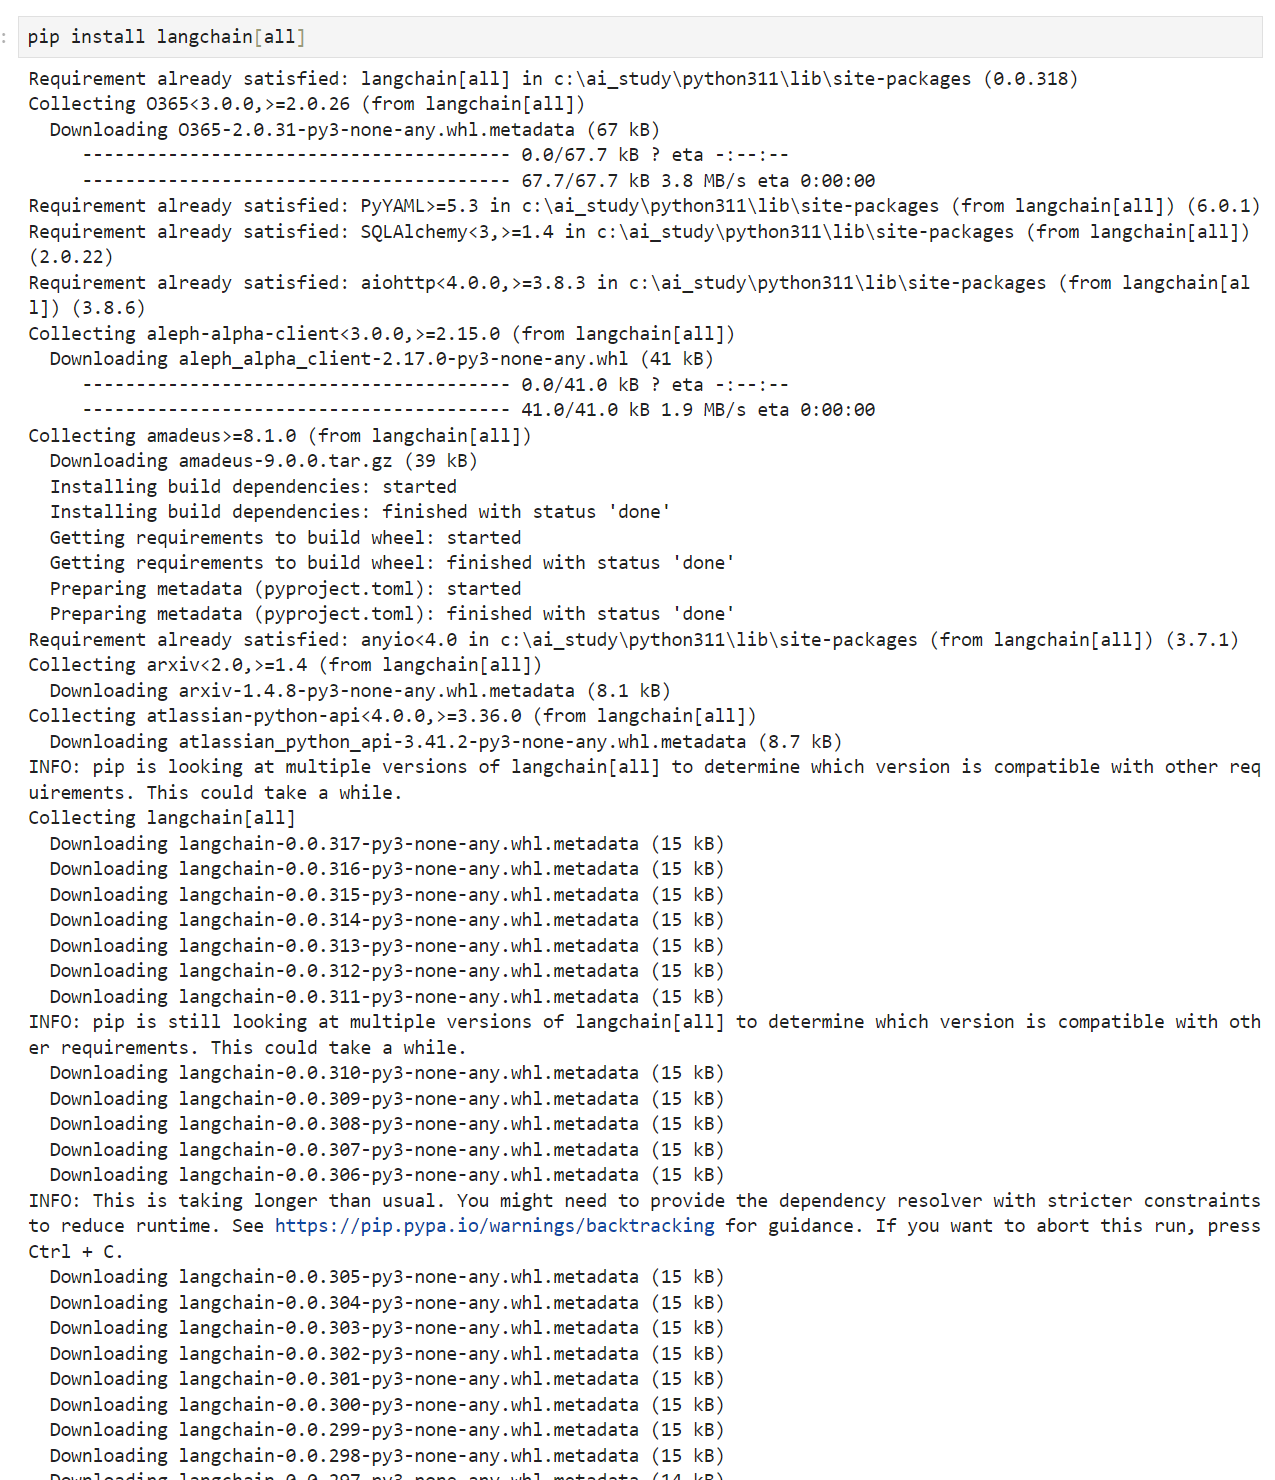
모든 통합에 필요한 모든 모듈을 설치하려면 다음을 실행하세요.
pip install langchain[all]
Note that if you are usingzsh, you'll need to quote square brackets when passing them as an argument to a command, for example:
zsh를 사용하는 경우 명령에 대한 인수로 전달할 때 대괄호를 인용해야 합니다. 예를 들면 다음과 같습니다.
pip install 'langchain[all]'
If you want to install from source, you can do so by cloning the repo and be sure that the directory isPATH/TO/REPO/langchain/libs/langchainrunning:
소스에서 설치하려면 repo를 복제하여 설치할 수 있으며 디렉터리가 PATH/TO/REPO/langchain/libs/langchain이 실행 중인지 확인하세요.
LangChainis a framework for developing applications powered by language models. It enables applications that:
LangChain은 언어 모델을 기반으로 하는 애플리케이션을 개발하기 위한 프레임워크입니다. 이는 다음과 같은 애플리케이션을 가능하게 합니다.
Are context-aware: connect a language model to sources of context (prompt instructions, few shot examples, content to ground its response in, etc.)
상황 인식: 언어 모델을 상황 소스( prompt instructions, few shot examples, content to ground its response in, etc. )에 연결합니다.
Reason: rely on a language model to reason (about how to answer based on provided context, what actions to take, etc.)
이유: 추론하기 위해 언어 모델에 의존합니다(제공된 맥락에 따라 대답하는 방법, 취해야 할 조치 등에 대해).
The main value props of LangChain are:
LangChain의 주요 가치 제안은 다음과 같습니다:
Components: abstractions for working with language models, along with a collection of implementations for each abstraction. Components are modular and easy-to-use, whether you are using the rest of the LangChain framework or not
구성요소: 각 추상화에 대한 구현 모음과 함께 언어 모델 작업을 위한 추상화입니다. LangChain 프레임워크의 나머지 부분을 사용하는지 여부에 관계없이 구성 요소는 모듈식이며 사용하기 쉽습니다.
Off-the-shelf chains: a structured assembly of components for accomplishing specific higher-level tasks
기성품 체인: 특정 상위 수준 작업을 수행하기 위한 구성 요소의 구조화된 어셈블리
Off-the-shelf chains make it easy to get started. For complex applications, components make it easy to customize existing chains and build new ones.
기성품 체인을 사용하면 쉽게 시작할 수 있습니다. 복잡한 애플리케이션의 경우 구성요소를 사용하면 기존 체인을 쉽게 맞춤화하고 새 체인을 구축할 수 있습니다.
LangChain is part of a rich ecosystem of tools that integrate with our framework and build on top of it. Check out our growing list ofintegrationsanddependent repos.
LangChain은 우리의 프레임워크와 통합되고 그 위에 구축되는 풍부한 도구 생태계의 일부입니다. 점점 늘어나는 통합 및 종속 저장소 목록을 확인하세요.
Our community is full of prolific developers, creative builders, and fantastic teachers. Check outYouTube tutorialsfor great tutorials from folks in the community, andGalleryfor a list of awesome LangChain projects, compiled by the folks atKyroLabs.
우리 커뮤니티는 활발한 개발자, 창의적인 개발자, 환상적인 교사로 가득 차 있습니다. YouTube 튜토리얼에서 커뮤니티 사람들의 훌륭한 튜토리얼을 확인하고 갤러리에서 KyroLabs 사람들이 편집한 멋진 LangChain 프로젝트 목록을 확인하세요.
While we cannot possibly introduce every single PyTorch function and class (and the information might become outdated quickly), theAPI documentationand additionaltutorialsand examples provide such documentation. This section provides some guidance for how to explore the PyTorch API.
PyTorch의 모든 기능과 클래스를 모두 소개할 수는 없지만(정보가 빨리 구식이 될 수 있음) API 문서와 추가 튜토리얼 및 예제에서 이러한 문서를 제공합니다. 이 섹션에서는 PyTorch API를 탐색하는 방법에 대한 몇 가지 지침을 제공합니다.
import torch
2.7.1.Functions and Classes in a Module
To know which functions and classes can be called in a module, we invoke thedirfunction. For instance, we can query all properties in the module for generating random numbers:
모듈에서 어떤 함수와 클래스를 호출할 수 있는지 알기 위해 dir 함수를 호출합니다. 예를 들어 난수 생성을 위해 모듈의 모든 속성을 쿼리할 수 있습니다.
print(dir(torch.distributions))
주어진 코드는 PyTorch에서 확률 분포와 관련된 클래스와 함수를 탐색하기 위해 사용되는 코드입니다. 코드는 PyTorch의 torch 라이브러리를 사용하며, torch.Distributions 모듈 아래에 있는 클래스와 함수를 나열합니다. 아래는 코드의 설명입니다:
import torch: PyTorch 라이브러리를 임포트합니다. PyTorch는 딥 러닝 및 확률적 모델링을 위한 라이브러리로 널리 사용됩니다.
print(dir(torch.Distributions)): torch.Distributions 모듈 아래에 있는 클래스와 함수를 나열하고 출력합니다. 이 명령은 해당 모듈에 포함된 모든 객체 및 함수의 이름을 보여줍니다. 이를 통해 PyTorch에서 제공하는 확률 분포와 관련된 클래스와 함수의 리스트를 확인할 수 있습니다.
PyTorch의 torch.Distributions 모듈에는 다양한 확률 분포를 다루는 클래스와 함수가 포함되어 있으며, 이러한 분포를 사용하여 확률적 모델링을 수행할 수 있습니다. 이 코드를 실행하면 해당 모듈의 내용을 확인할 수 있으며, 확률 분포와 관련된 작업을 수행할 때 유용한 클래스와 함수를 찾을 수 있습니다.
Generally, we can ignore functions that start and end with__(special objects in Python) or functions that start with a single_(usually internal functions). Based on the remaining function or attribute names, we might hazard a guess that this module offers various methods for generating random numbers, including sampling from the uniform distribution (uniform), normal distribution (normal), and multinomial distribution (multinomial).
일반적으로 __(파이썬의 특수 객체)로 시작하고 끝나는 함수나 단일 _(일반적으로 내부 함수)로 시작하는 함수를 무시할 수 있습니다. 나머지 함수 또는 속성 이름을 기반으로 이 모듈이 균일 분포(균일), 정규 분포(정규) 및 다항 분포(다항)로부터의 샘플링을 포함하여 난수를 생성하는 다양한 방법을 제공한다고 추측할 수 있습니다.
2.7.2.Specific Functions and Classes
For specific instructions on how to use a given function or class, we can invoke thehelpfunction. As an example, let’s explore the usage instructions for tensors’onesfunction.
주어진 함수나 클래스를 사용하는 방법에 대한 구체적인 지침을 보려면 도움말 함수를 호출할 수 있습니다. 예를 들어, 텐서의 함수에 대한 사용 지침을 살펴보겠습니다.
help(torch.ones)
주어진 코드는 PyTorch에서 torch.Ones 함수에 대한 도움말 문서를 출력하는 코드입니다. help() 함수는 파이썬 내장 함수로, 주어진 객체나 함수에 대한 도움말 문서를 출력합니다. 아래는 코드의 설명입니다:
help(torch.Ones): 이 코드는 PyTorch의 torch.Ones 함수에 대한 도움말을 요청합니다. torch.Ones 함수는 텐서를 생성하며, 모든 요소가 1인 텐서를 생성합니다. 이 함수의 도움말 문서에는 함수의 사용법, 매개변수, 반환값 등에 대한 정보가 포함되어 있을 것입니다.
도움말 문서는 함수나 클래스의 사용법을 이해하고 해당 함수 또는 클래스를 효과적으로 활용하기 위해 유용한 정보를 제공합니다. PyTorch와 같은 라이브러리의 도움말 문서를 읽어보면 함수나 클래스의 매개변수와 반환값에 대한 이해를 높일 수 있으며, 코드를 개발하고 디버그하는 데 도움이 됩니다.
Help on built-in function ones in module torch:

ones(...)
    ones(*size, *, out=None, dtype=None, layout=torch.strided, device=None, requires_grad=False) -> Tensor

    Returns a tensor filled with the scalar value `1`, with the shape defined
    by the variable argument :attr:`size`.

    Args:
        size (int...): a sequence of integers defining the shape of the output tensor.
            Can be a variable number of arguments or a collection like a list or tuple.

    Keyword arguments:
        out (Tensor, optional): the output tensor.
        dtype (:class:`torch.dtype`, optional): the desired data type of returned tensor.
            Default: if ``None``, uses a global default (see :func:`torch.set_default_tensor_type`).
        layout (:class:`torch.layout`, optional): the desired layout of returned Tensor.
            Default: ``torch.strided``.
        device (:class:`torch.device`, optional): the desired device of returned tensor.
            Default: if ``None``, uses the current device for the default tensor type
            (see :func:`torch.set_default_tensor_type`). :attr:`device` will be the CPU
            for CPU tensor types and the current CUDA device for CUDA tensor types.
        requires_grad (bool, optional): If autograd should record operations on the
            returned tensor. Default: ``False``.

    Example::

        >>> torch.ones(2, 3)
        tensor([[ 1.,  1.,  1.],
                [ 1.,  1.,  1.]])

        >>> torch.ones(5)
        tensor([ 1.,  1.,  1.,  1.,  1.])
From the documentation, we can see that theonesfunction creates a new tensor with the specified shape and sets all the elements to the value of 1. Whenever possible, you should run a quick test to confirm your interpretation:
문서에서 ones 함수가 지정된 모양을 가진 새 텐서를 생성하고 모든 요소를 1의 값으로 설정하는 것을 볼 수 있습니다. 가능할 때마다 빠른 테스트를 실행하여 해석을 확인해야 합니다.
torch.ones(4)
주어진 코드는 PyTorch에서 torch.Ones(4)를 사용하여 모든 요소가 1로 초기화된 1차원 텐서를 생성하는 코드입니다. 아래는 코드의 설명입니다:
torch.Ones(4): 이 코드는 PyTorch에서 torch.Ones 함수를 호출하여 4개의 요소로 구성된 1차원 텐서를 생성합니다. torch.Ones 함수는 모든 요소가 1로 초기화된 텐서를 생성하는 함수입니다. 따라서 이 코드는 길이가 4이고 모든 요소가 1로 초기화된 1차원 텐서를 생성합니다.
이렇게 생성된 텐서는 PyTorch를 사용하여 다양한 수치 연산을 수행하는 데 사용할 수 있으며, 데이터 처리 및 머신 러닝 작업에서 유용하게 활용될 수 있습니다.
tensor([1., 1., 1., 1.])
In the Jupyter notebook, we can use?to display the document in another window. For example,list?will create content that is almost identical tohelp(list), displaying it in a new browser window. In addition, if we use two question marks, such aslist??, the Python code implementing the function will also be displayed.
Jupyter 노트북에서는? 문서를 다른 창에 표시하려면 예를 들어 목록? help(list)와 거의 동일한 콘텐츠를 생성하여 새 브라우저 창에 표시합니다. 또한 list??와 같은 물음표 두 개를 사용하면 해당 함수를 구현하는 Python 코드도 표시됩니다.
The official documentation provides plenty of descriptions and examples that are beyond this book. We emphasize important use cases that will get you started quickly with practical problems, rather than completeness of coverage. We also encourage you to study the source code of the libraries to see examples of high-quality implementations of production code. By doing this you will become a better engineer in addition to becoming a better scientist.
공식 문서는 이 책보다 더 많은 설명과 예제를 제공합니다. 우리는 적용 범위의 완전성보다는 실제 문제를 빠르게 시작할 수 있는 중요한 사용 사례를 강조합니다. 또한 프로덕션 코드의 고품질 구현 예를 보려면 라이브러리의 소스 코드를 연구하는 것이 좋습니다. 이렇게 함으로써 당신은 더 나은 과학자가 될 뿐만 아니라 더 나은 엔지니어가 될 것입니다.