반응형
블로그 이미지
개발자로서 현장에서 일하면서 새로 접하는 기술들이나 알게된 정보 등을 정리하기 위한 블로그입니다. 운 좋게 미국에서 큰 회사들의 프로젝트에서 컬설턴트로 일하고 있어서 새로운 기술들을 접할 기회가 많이 있습니다. 미국의 IT 프로젝트에서 사용되는 툴들에 대해 많은 분들과 정보를 공유하고 싶습니다.
솔웅

최근에 올라온 글

최근에 달린 댓글

최근에 받은 트랙백

글 보관함

카테고리


반응형

오늘 살펴 볼 쿡북 예제는 Embedding long input 입니다.


https://github.com/openai/openai-cookbook/blob/main/examples/Embedding_long_inputs.ipynb


GitHub - openai/openai-cookbook: Examples and guides for using the OpenAI API

Examples and guides for using the OpenAI API. Contribute to openai/openai-cookbook development by creating an account on GitHub.

github.com


Open AI 에서는 각 모델별로 입력값 길이의 한계가 있습니다. 입력값의 크기는 토큰을 기준으로 정해 집니다.


토큰 관련 설명은 아래 페이지를 참고하세요.


https://github.com/openai/openai-cookbook/blob/2f5e350bbe66a418184899b0e12f182dbb46a156/examples/How_to_count_tokens_with_tiktoken.ipynb


GitHub - openai/openai-cookbook: Examples and guides for using the OpenAI API

Examples and guides for using the OpenAI API. Contribute to openai/openai-cookbook development by creating an account on GitHub.

github.com

오늘 예제는 이 모델의 최대 context 길이보다 더 긴 텍스트는 어떻게 처리를 해야 하는지를 보여 줍니다.


1. Model context length
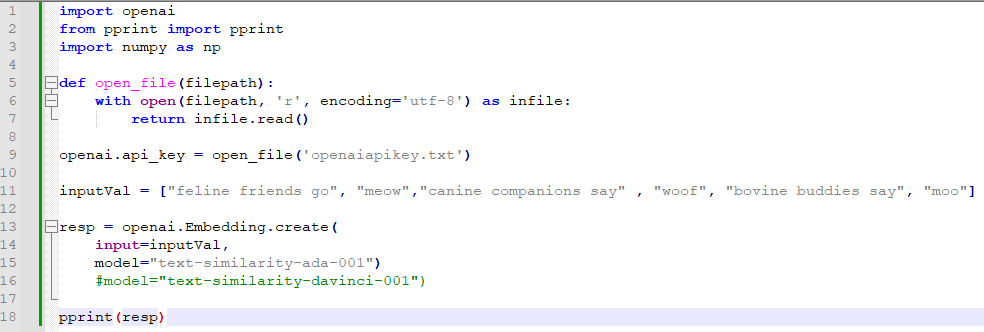
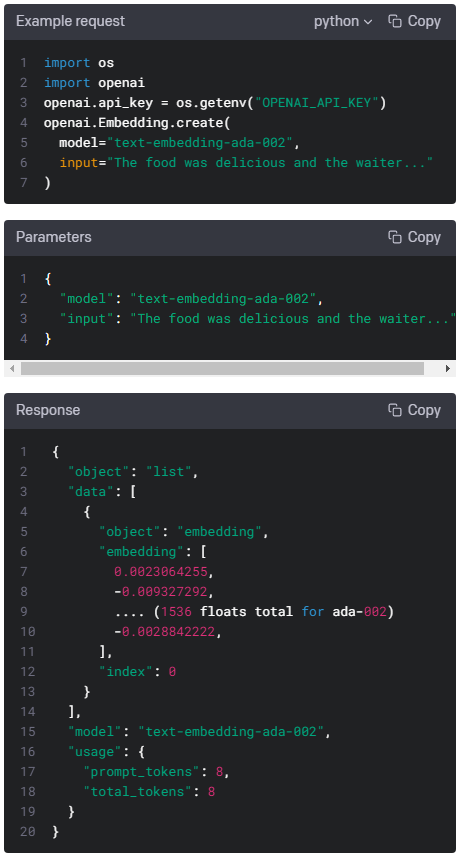
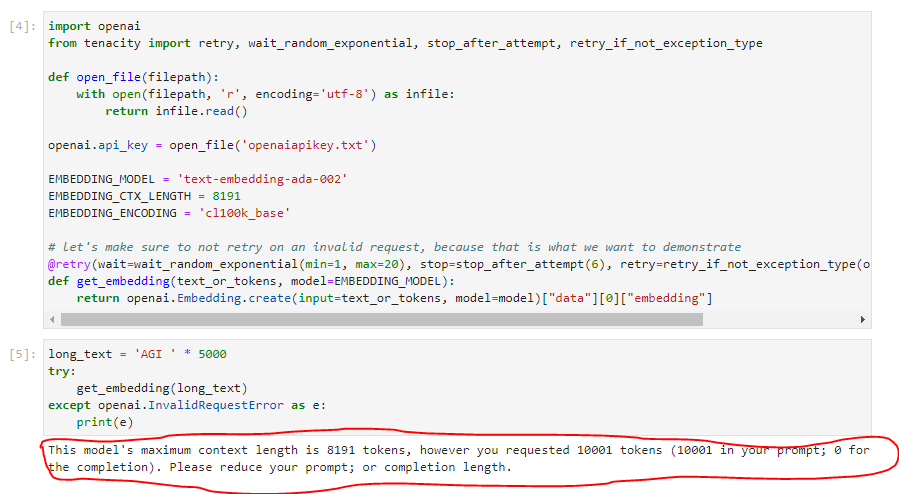
import openai
from tenacity import retry, wait_random_exponential, stop_after_attempt, retry_if_not_exception_type


EMBEDDING_MODEL = 'text-embedding-ada-002'
EMBEDDING_CTX_LENGTH = 8191
EMBEDDING_ENCODING = 'cl100k_base'

# let's make sure to not retry on an invalid request, because that is what we want to demonstrate
@retry(wait=wait_random_exponential(min=1, max=20), stop=stop_after_attempt(6), retry=retry_if_not_exception_type(openai.InvalidRequestError))
def get_embedding(text_or_tokens, model=EMBEDDING_MODEL):
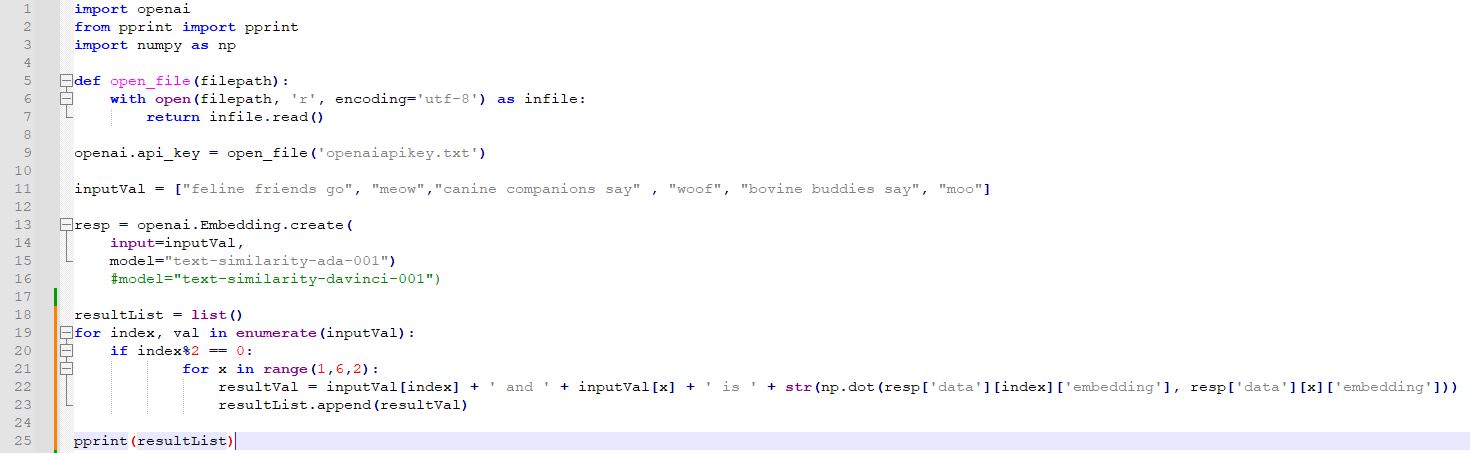
    return openai.Embedding.create(input=text_or_tokens, model=model)["data"][0]["embedding"]

가장 먼저 openai를 import 하고 그 다음에 tenacity 모듈을 import 합니다.

tenacity는 런타임 중 오류가 발생해서 종료가 될 때 이 종료하는 것을 막고 다시 retry 하고자 할 때 사용하는 파이썬 모듈입니다.

이 모듈 중에서 retry, wait_random_exponential, Stop_after_attempt, retry_if_not_exception_type 만 import 합니다.

(이렇게 하면 @tenacity.retry 라고 하지 않고 간단하게 @retry 형식으로 사용할 수 있습니다.)


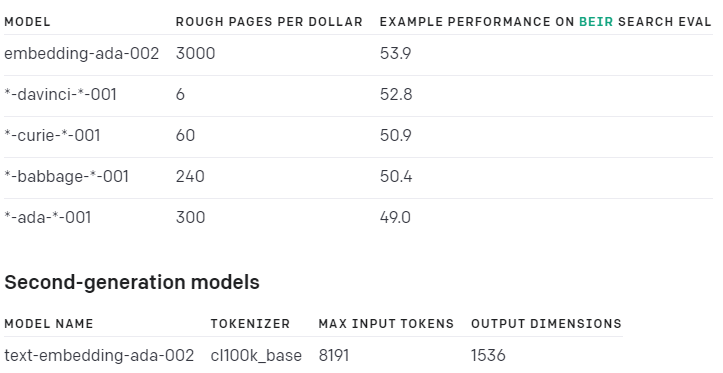
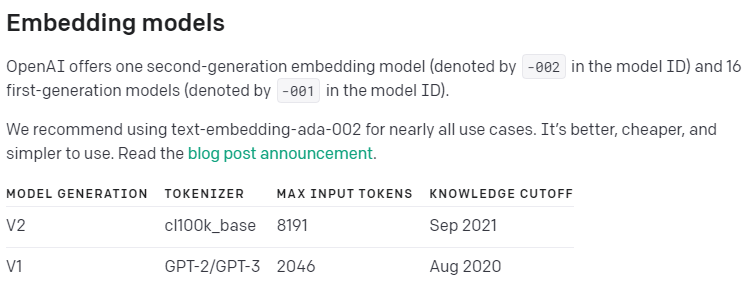
그 다음은 openai 모델을 설정하고 context length 를 8191 로 지정하고 encoding은 cl100k_base 로 합니다.

cl100k_base 는 tokenizer로 Max Input Token은 8191 로 정해져 있습니다. 2021년 9월에 발표 됐습니다.


자세한 내용은 OpenAI Guide의 Embeddings Overview 페이지를 참조하세요.

https://platform.openai.com/docs/guides/embeddings/what-are-embeddings


OpenAI API

An API for accessing new AI models developed by OpenAI

platform.openai.com

그 다음 은 @retry 구문이 나옵니다. retry 사이에 기다리는 시간은 1~20초이고 6번 까지 시도하고 exception type이 InvalidRequestError 가 아닌 경우만 retry를 시도합니다. InvalidRequest인 경우는 Retry를 해도 아무 소용 없으니까요.


그 다음은 get_embedding() 함수를 만들었습니다.


입력 파라미터로는 text_or_tokens와 모델 이름을 받습니다.

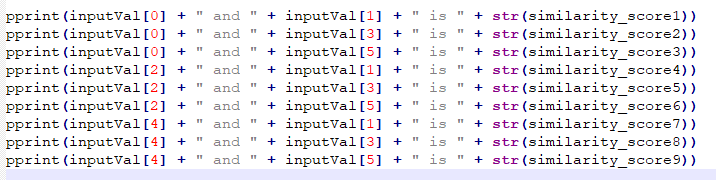
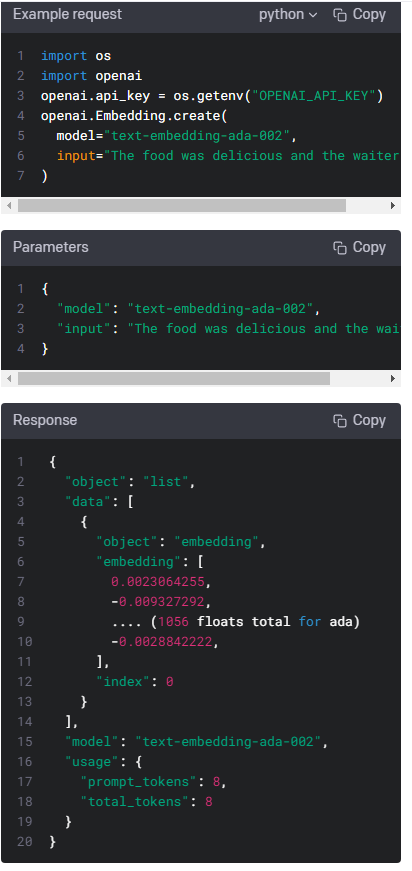
그리고 이 입력값에 대한 embedding 값을 전달받은 모델을 사용해서 openai.Embedding.create() api로 부터 받고 그 값을 return 합니다.


여기까지는 아직 아무 일을 한 것이 없습니다.


long_text = 'AGI ' * 5000
try:
    get_embedding(long_text)
except openai.InvalidRequestError as e:
    print(e)

여기서는 long_text를 설정해 주는데 AGI 라는 글자를 5천번 반복한 값을 long_text에 넣습니다.


그리고 get_embedding()을 호출하면서 이 long_text를 전달합니다.

이 때 이 호출 부분을 try로 감싸면서 openai의 InvalidRequestError 인 경우 이 에러 메세지를 프린트 하도록 합니다.


이렇게 하면 이 InvalidRequestError 메세지가 출력 됩니다.

이렇게 openai의 모델이 가지고 있는 Max Input Tokens를 넘어가는 입력 텍스트를 사용해야 할 경우 어떻게 할 수 있는지 아래 예제에서 설명합니다.


첫번째 방법은 입력 텍스트를 허용되는 최대 길이로 자르거나 두분째 방법은 입력 텍스트를 chunk하고 이 chunk들을 개별적으로 포함하는 방법 입니다.


여기서 한가지 염두에 둘 것은 api 사용 가격 입니다.


text-embedding-ada-002 모델은 토큰 1 천개 당 가격이 0.0004불 입니다. 즉 0.04 센트이죠.

그럼 위에서 생성한 5000 개의 AGI 인 long_text는 몇개의 토큰이 있는지 보겠습니다.


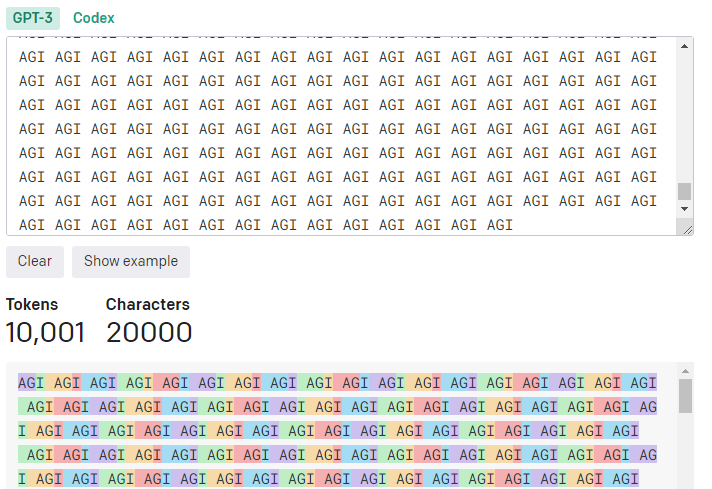
이 long_text 입력값은 총 1만 1개의 토큰을 가지고 있습니다.

0.0004 X (10001 / 1000)을 하면 0.004 불이 나옵니다. 


이 모델의 maximum 입력 값으로 요청을 해도 1센트도 안 나오네요.


참고로 저 위에 토큰 수를 계산하는 것은 아래 페이지에 가시면 볼 수 있습니다.

https://platform.openai.com/tokenizer


OpenAI API

An API for accessing new AI models developed by OpenAI

platform.openai.com

1. Truncating the input text

위에서 말한 첫번째 해결책 입니다. 모델에서 허용하는 최대 입력값 크기만큼 잘면 되죠.

여기서 크기는 토큰으로 정해지기 때문에 먼저 입력값이 몇개의 토큰으로 이루어져 있는지 알아봐야 합니다.

Tokenizer 페이지에서 그 작업을 했었죠. 10001 이었습니다. 그리고 위에서 사용한 모델은 8191 개의 토큰이 입력 허용 최대값이구요.


아래 방법이 이렇게 입력값을 토큰화 해서 자르는 부분입니다.

import tiktoken

def truncate_text_tokens(text, encoding_name=EMBEDDING_ENCODING, max_tokens=EMBEDDING_CTX_LENGTH):
    """Truncate a string to have `max_tokens` according to the given encoding."""
    encoding = tiktoken.get_encoding(encoding_name)
    return encoding.encode(text)[:max_tokens]

openai의 모듈중 하나인 tiktoken 모듈을 import 합니다.

https://github.com/openai/tiktoken


GitHub - openai/tiktoken

Contribute to openai/tiktoken development by creating an account on GitHub.

github.com


그리고 truncate_text_tokens() 함수를 만들었고 입력 파라미터는 text, encoding_name, 그리고 max_tokens을 받습니다.

이 함수는 주어진 인코딩으로 max_tokens를 갖도록 문자열을 자르는 일을 합니다.

일단 encoding을 정해 줍니다. tiktoken.get_encoding() 함수를 사용하고 인코딩 이름은 위에서 정한 값을 사용합니다.

EMBEDDING_ENCODING = 'cl100k_base'


참고로 tiktoken에서는 OpenAI 모델에서 사용하는 아래 3가지 인코딩을 지원한다고 하네요.

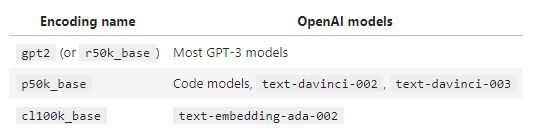
https://github.com/openai/openai-cookbook/blob/main/examples/How_to_count_tokens_with_tiktoken.ipynb


GitHub - openai/openai-cookbook: Examples and guides for using the OpenAI API

Examples and guides for using the OpenAI API. Contribute to openai/openai-cookbook development by creating an account on GitHub.

github.com


그 다음 부분이 이 인코딩을 기준으로 max_tokens 만큼 truncate 해서 return 해 주는 부분 입니다.

return encoding.encode(text)[:max_tokens]


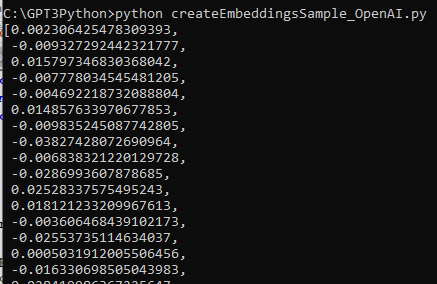
이렇게 해서 받은 값을 출력해 보았습니다.


AGI의 반복이라서 그런지 똑같은 숫자들만 반복 되네요.

Truncate은 뒷부분을 잘라내는 겁니다.

maximum limit 까지만 남기고 나머지는 잘라내는 거죠.


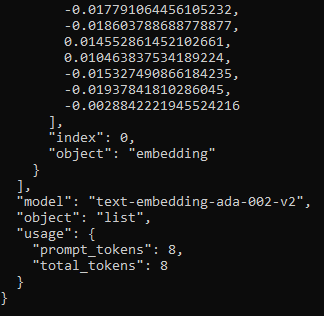
예제 처럼 이 truncated 값을 get_embedding 에 보내는 length를 출력해 보았습니다.


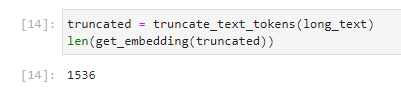
1536 이 나왔습니다. 임베딩 숫자의 차원이죠. len() 을 하지 않고 그대로 출력을 했다면 1536개의 정수를 가진 리스트가 출력 됐을 겁니다.


get_embedding() 함수가 에러 없이 작동 했다는 이야기네요.


여기까지가 입력값을 truncate 해서 제한량을 넘는 입력값을 처리하는 방법을 살펴 보았습니다.

초과 되는 부분을 잘라 내 버리는 거라서... 이게 과연 정확한 결과를 얻을 수 있을 지 의심되네요.

tiktoken의 encode()[:max_tokens] 를 사용해서 truncate 한 다음에 openai api로 request를 하면 됩니다.


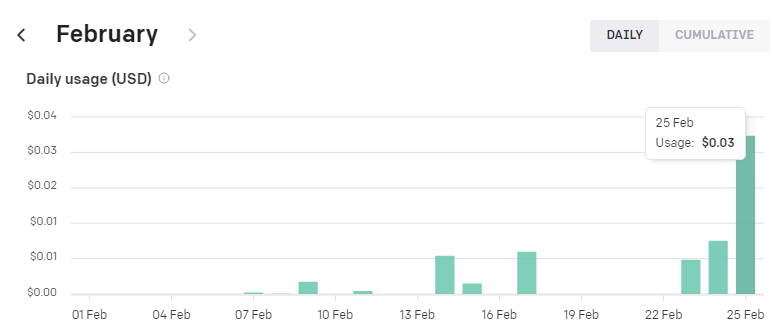
여기까지 하고 과금된 액수를 확인 했습니다.


거의 과금이 안 됐네요.

맨 마지막 막대 그래프인데 1센트도 청구가 안 됐습니다.

그 전의 가장 긴 막대 그래프가 어제 (2/24) 에 사용했던 건데 0.01달러 (1센트) 청구 된 거거든요.


2. Chunking the input text

Truncate은 작동을 하게는 할 수 있지만 잠재적으로 중요성이 있을 수도 있는 부분을 잘라내 버리는 것은 뭔가 단점이라고 할 수 있을 것 같습니다.

Truncate 이외에 할 수 있는 방법은 Chunk (뭉태기)로 나누는 겁니다.

큰 입력값을 여러 뭉태기로 나누고 그것들을 개별적으로 request해서 response를 받는 것이다.

그렇지 않으면 이 Chunk embedding들을 평균화 해서 request한 다음 response 할 수 있습니다.


이 예제에서는 큰 입력값을 chunk로 나누어 주는 모듈을 사용할 겁니다.

이 모듈은 아래 페이지에서 보실 수 있습니다.

https://docs.python.org/3/library/itertools.html#itertools-recipes


itertools — Functions creating iterators for efficient looping

This module implements a number of iterator building blocks inspired by constructs from APL, Haskell, and SML. Each has been recast in a form suitable for Python. The module standardizes a core set...

docs.python.org


방법은 아래와 같이 시작합니다.

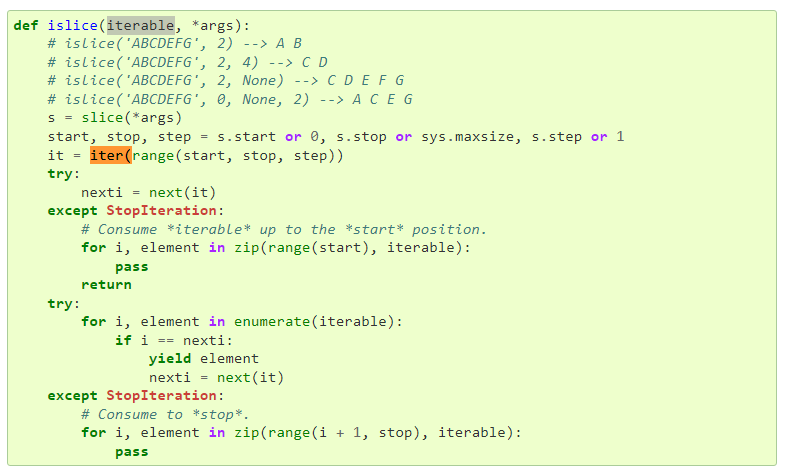
from itertools import islice

def batched(iterable, n):
    """Batch data into tuples of length n. The last batch may be shorter."""
    # batched('ABCDEFG', 3) --> ABC DEF G
    if n < 1:
        raise ValueError('n must be at least one')
    it = iter(iterable)
    while (batch := tuple(islice(it, n))):
        yield batch

우선 itertools 의 islice 함수를 import 합니다.

그리고 batched() 함수를 만들고 입력값으로는 iterable과 n을 받습니다.


그 다음 입력 받은 데이터를 길이가 n인 tuple로 batch 처리 합니다. 마지막 batch는 길이가 n 보다 작을 수 있습니다.


만약 길이 n이 1보다 작으면 에러를 발생 시킵니다.


raise는 에러를 발생시키는 파이썬 명령어 입니다. 

이것을 사용하면 정해진 에러를 발생하고 프로그램을 멈춥니다.


https://www.w3schools.com/python/ref_keyword_raise.asp


Python raise Keyword

W3Schools offers free online tutorials, references and exercises in all the major languages of the web. Covering popular subjects like HTML, CSS, JavaScript, Python, SQL, Java, and many, many more.

www.w3schools.com

에러의 종류는 아래 페이지에서 보실 수 있습니다.


https://docs.python.org/3/library/exceptions.html#ValueError


Built-in Exceptions

In Python, all exceptions must be instances of a class that derives from BaseException. In a try statement with an except clause that mentions a particular class, that clause also handles any excep...

docs.python.org

입력값이 1보다 작지 않으면 입력받은 iterable을 iter() 로 처리합니다.

iter()은 iterator 객체를 생성하는 파이썬 함수 입니다.

https://www.w3schools.com/python/ref_func_iter.asp


Python iter() Function

W3Schools offers free online tutorials, references and exercises in all the major languages of the web. Covering popular subjects like HTML, CSS, JavaScript, Python, SQL, Java, and many, many more.

www.w3schools.com

그 다음은 while문을 돌립니다.

islice() 는 아래와 같이 작동 합니다.

islice(it,n) 은 입력받은 it 값을 n 만큼씩 자르는 겁니다. 이 값을 tuple 형식으로 담습니다.

tuple은 아래 설명을 참조하세요. (여러 개의 아이템을 하나의 변수에 담을 때 tuple을 사용할 수 있습니다.)


https://www.w3schools.com/python/python_tuples.asp


Python Tuples

W3Schools offers free online tutorials, references and exercises in all the major languages of the web. Covering popular subjects like HTML, CSS, JavaScript, Python, SQL, Java, and many, many more.

www.w3schools.com

그리고 while문 안에 있는 := 는 2019년 10월에 새로 나온 파이썬 신택스로 좀 더 큰 expression의 일 부분으로 value를 변수에 할당하는 일을 합니다. 그리고 return까지 합니다.  별명은 바다코끼리 연산자 입니다.


https://docs.python.org/3/whatsnew/3.8.html


What’s New In Python 3.8

Editor, Raymond Hettinger,. This article explains the new features in Python 3.8, compared to 3.7. Python 3.8 was released on October 14, 2019. For full details, see the changelog. Summary – Releas...

docs.python.org

간단히 말해서 할당과 반환을 동시에 하는 연산자 입니다.

https://bio-info.tistory.com/120


[Python] 유용한 새로운 연산자! 바다코끼리 연산자 := (walrus operator)

Python 3.8부터 바다코끼리 연산자 (:=)가 도입되었습니다. 저도 최근에 알게 된, 매우 생소한 연산자입니다. 간단히 말해, 할당과 반환을 동시에 하는 연산자입니다. 개념과 목적, 예시를 알아보겠

bio-info.tistory.com

다음으로 나오는 yield 키워드는 결과 값을 return 하는 키워드 입니다.

yield는 generator를 반환합니다.

자세한 사항은 아래 글을 참조하세요.

https://www.daleseo.com/python-yield/


파이썬의 yield 키워드와 제너레이터(generator)

Engineering Blog by Dale Seo

www.daleseo.com

https://realpython.com/introduction-to-python-generators/


How to Use Generators and yield in Python – Real Python

In this step-by-step tutorial, you'll learn about generators and yielding in Python. You'll create generator functions and generator expressions using multiple Python yield statements. You'll also learn how to build data pipelines that take advantage of th

realpython.com

그래서 맨 마지막에 yield batch의 의미는 입력받은 context인 it를 입력받은 정수 n 의 크기만큼 나눈 결과 값인 batch를 반환하라는 겁니다.


즉 큰 데이터를 특정 크기 만큼의 뭉태기로 나눈 값이죠.


이제 이 값을 토큰으로 인코딩 한 다음 chunk로 나누는 일을 할 겁니다.


def chunked_tokens(text, encoding_name, chunk_length):
    encoding = tiktoken.get_encoding(encoding_name)
    tokens = encoding.encode(text)
    chunks_iterator = batched(tokens, chunk_length)
    yield from chunks_iterator

이 일을 하는 함수 이름은 chunked_tokens() 이고 입력값은 3가지를 받습니다.


get_encoding() 으로 encoding을 정하고

encode()를 사용해서 tokens를 할당 합니다. (이부분은 위에서도 다룬 부분 입니다.)

그 다음에 위에 만들었던 batched() 함수를 사용해서 여러 뭉태기로 나눈 값을 받아서 chunks_iterator에 할당합니다.

그리고 이 chunks_iterator를 yield를 사용해서 반환합니다.


이제 마지막 마무리 작업을 하는 함수를 만들겠습니다.


import numpy as np


def len_safe_get_embedding(text, model=EMBEDDING_MODEL, max_tokens=EMBEDDING_CTX_LENGTH, encoding_name=EMBEDDING_ENCODING, average=True):
    chunk_embeddings = []
    chunk_lens = []
    for chunk in chunked_tokens(text, encoding_name=encoding_name, chunk_length=max_tokens):
        chunk_embeddings.append(get_embedding(chunk, model=model))
        chunk_lens.append(len(chunk))

    if average:
        chunk_embeddings = np.average(chunk_embeddings, axis=0, weights=chunk_lens)
        chunk_embeddings = chunk_embeddings / np.linalg.norm(chunk_embeddings)  # normalizes length to 1
        chunk_embeddings = chunk_embeddings.tolist()
    return chunk_embeddings

numpy 모듈을 import 합니다.


그리고 len_safe_get_embedding() 이라는 함수를 만듭니다. 

입력값은 text와 모델, max_tokens,와 인코딩 이름 입니다.

위에서 만든 함수들에서 다 사용되는 값들입니다.

첫번째로 한 일은 chunk_embeddings와 chunk_lens라는 리스트를 초기화 합니다. 

(참고로 파이썬에서 [] 는 배열-리스트-이고 () 는 튜플이고 {} 는 딕셔너리 입니다.)

https://gostart.tistory.com/58


[Python] Python 에서 (), [], {} 의 용도

Python 에서 [], (), {} 용도 배열[Array] 튜플(Tuple) 딕셔너리{Dictionary} 선언 arr = [] tup = () dic = {} 초기화 arr = [1, 2, 3, 4] tup = (1, 2, 3, 4) dic = {"january":1, "February": 2, "March":3 } 불러오기 arr[0] tup[0] dic["March"]

gostart.tistory.com

그 다음 for 루프에서는 위에 만들었던 chunked_tokens() 함수에서 return 받은 배열 수 만큼 루프를 돕니다.

그 배열(리스트)의 각 아이템별로 chunk_embeddings.append()를 해서 위에서 초기화 했던 chunk_embeddings 배열에 하나 하나 넣습니다. 

그 넣는 값들이 get_embedding() 해서 openai api인 openai.Embedding.create()에서 얻은 각 아이템별 임베딩 값입니다.


이제 chunk_embeddings에는 openai로부터 받은 임베딩 값이 있습니다.

그리고 chunk_lens 배열에도 각 chunk의 length들을 배열로 넣구요.


그 다음 for 문이 끝나면 if 문이 나옵니다.

if average: 는 위에 average= true라고 정의 돼 있으므로 무조건 실행 됩니다.


if 문 안을 보면 처음에 위에서 받은 chunk_embeddings 배열의 즉 각 아이템별 임베딩 값의 average 값을 구합니다.

다른 파라미터인 axis와 weights는 아래 글을 보세요.

https://numpy.org/doc/stable/reference/generated/numpy.average.html


numpy.average — NumPy v1.24 Manual

Return the average along the specified axis. When returned is True, return a tuple with the average as the first element and the sum of the weights as the second element. sum_of_weights is of the same type as retval. The result dtype follows a genereal pat

numpy.org


이렇게 평균 낸 값을 normalize 합니다. 

https://numpy.org/doc/stable/reference/generated/numpy.linalg.norm.html


numpy.linalg.norm — NumPy v1.24 Manual

[1] G. H. Golub and C. F. Van Loan, Matrix Computations, Baltimore, MD, Johns Hopkins University Press, 1985, pg. 15

numpy.org

그리고 마지막으로 이 chunk_embeddings 값을 리스트 형식으로 convert 해준 후 return 합니다.


여러개 뭉테기로 나눠서 받은 임베딩 값을 평균 내서 하나로 만들고 또 normalize 하고 이것을 리스트로 만드는 것 까지 했습니다.


average_embedding_vector = len_safe_get_embedding(long_text, average=True)
chunks_embedding_vectors = len_safe_get_embedding(long_text, average=False)

print(average_embedding_vector)
print(chunks_embedding_vektor)


자 이제 위에서 만든 long_text에 대한 임베딩 값을 chunk로 나누는 방법으로 받습니다.

average_embedding_vector는 average를 True로 해서 그 평균 값을 받습니다.

그리고 chunk_embedding_vectors는 average를 하지 않은 값을 보여 줍니다.


average_embedding_vector는 아래와 같습니다.


1536개의 정수가 있는 임베딩 값입니다.


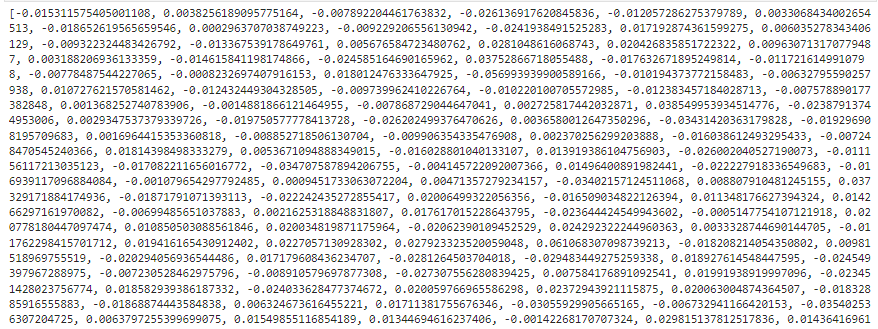
그 다음 average를 하지 않은 chunks_embedding_vectors입니다.


똑 같은 것 같지만 이것은 평균을 내기 전의 값이기 때문에 여러개의 임베딩 값이 있습니다.

Notepad ++ 에서 , 의 숫자를 한번 검색해 봤습니다.


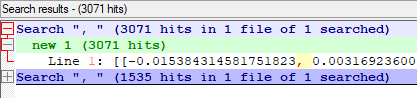
average 는 1535 개여서 총 숫자가 1536 인 1개의 임베딩 값임을 알 수 있고

두번째 average를 하지 않은 것은 콤마 숫자가 3071개여서 여기서는 2개의 chunk 가 있었다는 것을 알 수 있습니다.


예제에서 처럼 length를 출력 해 봤습니다.


방금전 살펴 본 대로 설명이 나오네요.

average=True인 경우는 한개의 1536 dimension (차원) 인 임베딩이 결과 값이고

average=False인 경우는 2개의 임베딩 벡터가 있고 그것은 chunk가 2개였기 때문이라고 되어 있습니다.


Summary 


오늘 배운 내용은 입력값이 각 모델이 허용하는 입력값 크기보다 클 경우 사용할 수 있는 방법을 알아 봤습니다.

첫번째로는 허용하는 값만큼만 취하고 나머지는 truncate 해 버리는 방법입니다.

두번째는 허용하는 크기 만큼의 chunk로 나눠서 각 chunk 별로 embedding 값을 따로 받는 것입니다.

그리고 이 각각의 임베딩 값들을 numpy 의 average() 함수를 이용해서 평균을 낼 수 있습니다.


오늘은 입력값의 토큰 갯수가 많은 관계로 과금이 조금 많이 됐습니다. 3센트 (50원)


반응형


반응형

이번에는 Openai cookbook 을 통해 얻은 정보를 가지고 embedding에 대한 예제 소스를 만들어 보도록 하겠습니다.

openai cookbook은 openai에서 제공하는 예제들이 있는 페이지 입니다.


https://github.com/openai/openai-cookbook


GitHub - openai/openai-cookbook: Examples and guides for using the OpenAI API

Examples and guides for using the OpenAI API. Contribute to openai/openai-cookbook development by creating an account on GitHub.

github.com


이 중에 Embeddings 부분으로 가게 되면 총 8개의 링크가 있습니다.


이 중 가장 처음에 있는 text comparison examples 로 갑니다.


그러면 Text comparison examples 가 나오게 되는데 오늘 다룰 부분은 예제로 곧바로 가지 않고 이 페이지에서 소개 된 블로그 중 한 곳의 내용을 가지고 소스 코드를 만들 계획입니다.


2022년 1월 블로그로 갑니다.


이곳에는 openai에서 embedding 기능을 선보이면서 설명한 내용이 있습니다.


이 내용도 읽어 보시면 Embedding을 이해하는데 아주 도움이 많이 됩니다.


이 페이지에서 핵심 내용은 아래 그림입니다.


이것은 각 아이템별로 embedding 값을 가지고 그 위치를 좌표에 표시한 것입니다.


feline (고양이류) friends say 에서 가장 가까운 것은 meow (야옹) 입니다.

canine (개과) companions say 에 가장 가까운 것은 woof (멍멍) 이구요.

bovine (소과) buddies say 에 가장 가까운 것은 moo (음메) 입니다.


미식축구의 쿼터백은 이들과는 아주 멀리 떨어져 있죠.


이렇게 Embedding 값은 여러 아이템들의 유사성을 비교할 수 있도록 해 줍니다.


이 표 아래에 보시면 아래 소스 코드가 나옵니다.


여기서 PRINT RESPONSE를 클릭하면 아래 처럼 보입니다.


아주 간단한 request와 response 인데요.

이 간단한 요청과 응답에 대해서는 바로 전 글에서 자세히 설명 했습니다.


https://coronasdk.tistory.com/1260


Open AI API - GPT 3 - Embedding API 예제 살펴 보기

오늘은 Open AI API 에서 제공하는 기본 Embedding 예제 소스 코드를 살펴 보겠습니다. 아래 글을 보시면 해당 API 페이지의 내용을 보실 수 있습니다. https://coronasdk.tistory.com/1237 Embeddings - openai.Embedding.c

coronasdk.tistory.com


오늘은 이것을 어떻게 의미있게 사용할 지에 대해 알아보겠습니다.


저는 위에 제시된 3개의 동물과 3개의 울음소리가 서로 얼마나 유사성이 있는지 알고 싶었습니다.


그래서 첫번째로 한 일은 request에 위의 6가지 (각 동물들과 그 울음소리) 정보를 모두 보내는 일을 했습니다.

우선 각 요소별 embedding 값을 받아야지 서로 비교할 수 있으니까요.


9번째 줄 까지는 계속 사용했던 부분이니까 설명은 생략하겠습니다.


우선 inputVal 이라는 변수에 이 6개의 아이템을 배열로 담았습니다.


그리고 openai.Embedding.create() 에 이를 input 값으로 보냈습니다.

여기서의 목적은 유사성을 알아보는 것이라서 모델은 text-similarity-ada-001을 사용했습니다. 

davinci 보다 성능은 떨어지지만 저렴한 ada 모델을 썼습니다.


일단 이 값을 pprint를 이용해서 출력 해 봤습니다.


어마어마하게 긴 response를 받았습니다.


입력값이 6개 이므로 index는 0~5로 총 6개의 embedding 값을 받았습니다.

토큰은 총 19개 이군요.


일단 입력한 6개 아이템들에 대한 임베딩값을 받았으니 그 값들을 비교해서 유사성을 추출해 내면 됩니다.

이전 글에서 살펴 봤듯이 하나의 입력 아이템 당 1536개의 부동 소숫점 배열을 응답으로 받았습니다.

이것을 그냥 비교하기는 불가능 합니다.


여기에서 파이썬에 있는 numpy 모듈의 dot() 메소드를 사용해야 합니다.


우선 그 방법을 알아보기 위해서 두개의 입력값에 대한 임베딩 값을 비교해 보겠습니다.


방법은 간단합니다. 

우선 첫번째 입력값과 두번째 입력값을 각각 변수에 담습니다.

첫번째 입력값은 feline friends go 이고 두번째 입력값은 meow 이었죠.


이 두 임베딩 값을 dot() 메소드에 파라미터 값으로 전달합니다.

여기서 return 받은 값은 similarity_score1 에 저장이 됩니다.


그리고 이 값을 출력해 보겠습니다.


위와 같은 값이 나왔습니다.

이제 사람이 좀 알아 볼 수 있는 값이 나왔네요.

두 아이템간의 유사성은 0.8432 ...... 입니다.


이제 방법을 찾았으니 모든 6개 입력값들을 짝을 지어서 유사성을 알아 보겠습니다.

동물과 울음소리가 각각 3개씩 이니까 총 9본을 비교해 보면 되겠네요.


일단 무식하지만 이 작업을 하나 하나씩 아래와 같이 스크립팅을 해 봤습니다.


이 코드의 결과는 아래와 같습니다.


이제 거의 다 왔습니다.


이제 두가지 작업만 더 하죠.


우선  고객이 알기 쉽도록 표시해 줍시다.


이런식으로 두개의 입력값에 대한 유사성은 이렇다라고 문장으로 보여 주려고 하는데요.

이렇게 하면 아래 에러가 뜹니다.


입력값은 string 이고 유사성에 대한 값은 numpy.float64 이기 때문입니다. 

다 string 타입으로 통일 시켜야 겠습니다.

방법은 간단합니다. numpy.float64 를 srt() 로 감싸 주면 됩니다.


출력값은 아래와 같습니다.


이제 고객의 요구조건에 딱 맞는 결과물을 제공할 수 있게 되었습니다.


고양이과의 울음소리는 meow 가 가장 유사성이 있네요.

개과도 meow로 나오는데 아마 ada 모델이 성능이 조금 떨어져서 그럴 겁니다.

ada 모델은 woof 보다 meow 가 개 울음소리에 더 가깝다고 보는 것 같습니다.

davinci 모델을 사용하면 답변이 제대로 나올 겁니다.

소과의 울음소리는 moo 가 가장 유사성이 있네요.


결과물의 퀄리티는 좀 떨어집니다. 이럴 경우 돈을 더 써서 davinci 모델을 사용해서 고객에게 전달을 해야지 제대로 판매를 할 수 있겠네요.


지금은 API 기능을 배우는 중이라 결과물에 대한 퀄리티는 크게 신경 쓰지 않겠습니다.


근데 결과값은 제대로 나왔지만 프로그래머로서 코드가 마음에 안 듭니다.


이 긴 부분은 패턴이 있기 때문에 충분히 refactoring을 할 수 있습니다.


for 루프를 이용해서 아래와 같이 만들어 보았습니다.


inputVal의 아이템 숫자 (6) 만큼 루프를 돌리면서 일을 할 겁니다.

2로 나누어 지면 즉 0,2,4번째 아이템일 경우 그 다음 일을 합니다.

즉 고양이, 개, 소 인 부분에서 3가지 울음 소리와 비교하려고 이렇게 한 겁니다.


두번째 for 루프는 울음 소리를 x에 담기 위해서 만들었습니다.

range(1,6,2) 의 의미는 1서부터 시작해서 6까지 2단계씩 뛰면서 x에 그 값을 담아라 입니다.

즉 첫번째 루프에서는 1이 그 다음은 2단계 뛴 3이 그리고 마지막엔 5가 담깁니다.


여기서 index 값에는 동물들이 있는 위치값이 그리고 x에는 울음소리가 있는 위치값이 담깁니다.


이걸 가지고 그 밑에 줄에서 이용을 합니다.


resultVal = inputVal[index] + ' and ' + inputVal[x] + ' is ' + str(np.dot(resp['data'][index]['embedding'], resp['data'][x]['embedding']))

그리고 이 값을 resultList 에 append 합니다.


이렇게 하면 위에 26줄에 걸쳐서 했던 일을 10줄도 안되게 줄일 수 있습니다.


답변도 위에서와 같이 나옵니다.


아마 22번째 줄을 좀 더 가시성이 있도록 바꾸고 싶으신 분들도 많을 겁니다.

저도 좀 그런데... 오늘은 그냥 여기까지 하겠습니다.


이렇게 해서 Openai API 중에서 Embedding 기능을 유의미하게 사용하는 방법을 살펴 봤습니다.


완성된 소스 코드는 아래와 같습니다.


import openai
from pprint import pprint
import numpy as np

def open_file(filepath):
    with open(filepath, 'r', encoding='utf-8') as infile:
        return infile.read()

openai.api_key = open_file('openaiapikey.txt')

inputVal = ["feline friends go", "meow","canine companions say" , "woof", "bovine buddies say", "moo"]

resp = openai.Embedding.create(
    input=inputVal,
    model="text-similarity-ada-001")
    #model="text-similarity-davinci-001")
    
resultList = list()
for index, val in enumerate(inputVal):
    if index%2 == 0:
            for x in range(1,6,2):
                resultVal = inputVal[index] + ' and ' + inputVal[x] + ' is ' + str(np.dot(resp['data'][index]['embedding'], resp['data'][x]['embedding']))
                resultList.append(resultVal)
    
pprint(resultList)


P.S. 


2022년 12월에 발표된 새 모델인 text-embedding-ada-002 를 사용하면 더 빠르고 정확하면서 비용이 더 저렴한 것 같습니다.


import openai
from pprint import pprint
import numpy as np

def open_file(filepath):
    with open(filepath, 'r', encoding='utf-8') as infile:
        return infile.read()

openai.api_key = open_file('openaiapikey.txt')

inputVal = ["feline friends go", "meow","canine companions say" , "woof", "bovine buddies say", "moo"]

resp = openai.Embedding.create(
    input=inputVal,
    model="text-embedding-ada-002")
    #model="text-similarity-ada-001")
    #model="text-similarity-davinci-001")
    
resultList = list()
for index, val in enumerate(inputVal):
    if index%2 == 0:
            for x in range(1,6,2):
                resultVal = inputVal[index] + ' and ' + inputVal[x] + ' is ' + str(np.dot(resp['data'][index]['embedding'], resp['data'][x]['embedding']))
                resultList.append(resultVal)
    
pprint(resultList)


위 코드를 사용하면 아래와 같은 결과를 얻게 됩니다.


고양이는 meow 이고 개는 woof 그리고 소는 moo 가 가장 유사성이 높다고 나오네요.


제대로 원하는 답을 얻은 것 같습니다. 저렴한 모델을 사용하면서요.


이 새 모델에 대한 설명은 2022년 12월에 올라온 openai 블로그 글에 자세히 나와 있습니다.

https://openai.com/blog/new-and-improved-embedding-model/


New and Improved Embedding Model

We are excited to announce a new embedding model which is significantly more capable, cost effective, and simpler to use. The new model, text-embedding-ada-002, replaces five separate models for text search, text similarity, and code search, and outperform

openai.com


반응형


반응형

오늘은 Open AI API 에서 제공하는 기본 Embedding 예제 소스 코드를 살펴 보겠습니다.


아래 글을 보시면 해당 API 페이지의 내용을 보실 수 있습니다.


https://coronasdk.tistory.com/1237


Embeddings - openai.Embedding.create()

https://beta.openai.com/docs/api-reference/embeddings Embeddings Get a vector representation of a given input that can be easily consumed by machine learning models and algorithms. 기계 학습 모델 및 알고리즘에서 쉽게 사용할 수 있는 주

coronasdk.tistory.com

이 예제 코드를 실행하기 위해서 약간 고친 저의 코드는 아래와 같습니다.


print를 좀 이쁘게 하기 위해서 pprint를 import 했고 api key를 전달하는 부분을 파일에서 읽어서 전달하도록 바꾸었습니다.

openai.Embedding.create() 부분은 예제와 똑 같습니다


이것을 실행하면 이렇게 나옵니다.


시작하는 부분은 이렇습니다.

입력 값은 "The food was delicious and the waiter..." 입니다. 

이에 대한 응답은 JSON 형식으로 response를 받게 되고 data 밑에 embedding 이라는 항목이 있고 그 안데 배열 형식으로 수 많은 숫자들이 있습니다. 모든 숫자는 0 이하의 부동 소숫점이고 양수와 음수들이 번갈아 가며 있습니다.

소숫점 아래 숫자들은 18자리 입니다.

이 부동 소숫점 들이 몇개나 있는지 알아봤습니다.

총 1536개가 있었습니다.


이것만 가지고는 무슨 의미인지 전혀 알 수 없습니다.


이 embeddings 기능을 사용하려면 이 response를 조금 가공 해야 합니다.

의미를 알 수 있도록 가공하는 방법에 대해서는 다음 글에서 자세하게 다룰 예정입니다.


오늘은 간단한 방법만 알아 보겠습니다.


일단 response 부분을 더 보겠습니다.


response의 맨 아랫부분을 보면 이렇습니다.


부동 소숫점 배열이 있는 embedding 부분이 끝나면 index 가 있습니다.

현재 값은 0 입니다.

이것은 우리가 request를 할 때 한가지만 전달해서 그렇습니다.


request의 input 부분에 여러개를 전달하면 각각에 대한 embedding 값을 반환하고 index는 0,1,2,3 이렇게 증가하면서 몇번째 request에 대한 임베딩 값인지 알 수 있게 해 줍니다.


그 다음 object는 embedding 이라는 것을 말해 줍니다.


그 다음은 모델 정보가 나옵니다. 우리는 request에서 text-embedding-ada-002를 사용했습니다.

응답에 나온 것을 보니까 정확하게는 text-embedding-ada-002-v2 모델을 사용했네요.


밑줄엔 object 아이템이 있고 이것은 list 를 사용했다고 알려 주는 것 같습니다.


그 밑에 usage 부분에는 사용된 토큰 값이 표시 됩니다.

이 토큰의 양에 따라서 사용료가 부과가 되니까 이것도 중요한 정보 입니다.


우리가 사용한 토큰은 총 8개 입니다.


토큰에 대해 알고 싶으시면 아래 글에 간단히 설명 돼 있습니다.


https://coronasdk.tistory.com/1257


GPT-3 API로 초간단 Chatbot 만들기

오늘은 Python 과 ChatGPT API로 간단한 챗봇을 만들어 보겠습니다. import os import openai def open_file(filepath): with open(filepath, 'r', encoding='utf-8') as infile: return infile.read() openai.api_key = open_file('openaiapikey.txt') wh

coronasdk.tistory.com


일단 여기서 핵심 정보는 embedding 부분입니다.


이것을 다루려면 이 부분만 따로 추려서 다루어야 합니다.


response 중에 embedding 만을 따로 추리는 방법은 아래와 같습니다.


embeddings = response['data'][0]['embedding']


당연히 이 부분을 출력하면 embedding 값들만 나오겠죠.


이 embedding은 대개 유사성을 측정하는데 사용합니다.

그렇기 때문에 두개 이상의 대상에 대해 유사성을 측정하게 되는데요.


이 경우 이 값들을 유의미하게 사용하기 위해서 numpy의 dot() 이라는 메소드를 사용합니다.

이 dot() 메소드는 두개의 input array가 1차원인 벡터들인 경우 사용합니다.


다음 글에서는 이 embedding 을 가지고 유의미하게 사용하는 예제를 만들고 분석해 보겠습니다.

반응형

OpenAI API : GPT-3 : Embeddings Sample Code

2023. 2. 9. 00:36 | Posted by 솔웅


반응형

OpenAI 에서 제공하는 서비스에는 아래처럼 5가지로 분류할 수 있습니다.

Text completion

Code completion

Image generation

Fine-tuning

Embeddings


이 중 챗봇은 맨 처음의 Text completion 서비스를 사용했습니다.

오늘은 이 중 Embeddings에 대해 알아 보겠습니다.

좀 어려운 부분입니다.


OpenAI의 Embeddings 의 개념에 대해 알아보려면 여기를 참조하세요.

https://coronasdk.tistory.com/1222


Guides - Embeddings

https://beta.openai.com/docs/guides/embeddings/what-are-embeddings OpenAI API An API for accessing new AI models developed by OpenAI beta.openai.com Embeddings What are embeddings? OpenAI’s text embeddings measure the relatedness of text strings. Embeddi

coronasdk.tistory.com

Embeddings관련 openai API를 알아보려면 여기를 참조하세요.

https://coronasdk.tistory.com/1237


Embeddings - openai.Embedding.create()

https://beta.openai.com/docs/api-reference/embeddings Embeddings Get a vector representation of a given input that can be easily consumed by machine learning models and algorithms. 기계 학습 모델 및 알고리즘에서 쉽게 사용할 수 있는 주

coronasdk.tistory.com

그리고 이 Tensorflow.org의 자료도 참고하시면 더 깊게 이해하는데 좋습니다. (한글로도 제공됩니다.)

https://www.tensorflow.org/text/guide/word_embeddings


단어 임베딩  |  Text  |  TensorFlow

이 페이지는 Cloud Translation API를 통해 번역되었습니다. Switch to English 단어 임베딩 컬렉션을 사용해 정리하기 내 환경설정을 기준으로 콘텐츠를 저장하고 분류하세요. 이 자습서에는 단어 임베딩

www.tensorflow.org


Embeddings는 OpenAI 의 GPT-3 가 사용자로부터 받은 파라미터가 다양한 보기에 얼마나 유사성이 있는지를 반환해 주는 서비스 입니다.

반환값은 여러개의 유사성들이 되죠. 이는 벡터 Vector 입니다.

벡터란 1 dimensional matrix를 말합니다.

embedding = vector with semantic meaning (어떤 의미가 있는 vector)


예를 들어 아래와 같은 벡터가 있습니다.

[X, Y]


여기에 의미를 부여해 보겠습니다.

 X는 social power 이고 값은 max 1.0 - min -1.0 입니다.

Y는 gender이고 max 1.0 - min -1.0 입니다. 1.0 은 완전 남성이고 -1.0은 완전 여성입니다.


그러면 값이 [1.0 , 1.0]  은 황제를 나타낼 수 있겠죠. 사회적 최강자이고 남성성도 만빵인 황제요.

황제가 [1.0 , 0.5] 일 수도 있죠. 사회적 최 강자 이지만 약간 덜 남성적인 성격일 수도 있으니까요.


[-1.0, 0]인 값은 사회적 파워가 없는 사람, 자유가 박탈된 사람이 되겠죠. 감옥에 있는 사람이 되겠죠. 그리고 성별은 중성인 무엇인가가 될 것입니다.

이렇듯 제공된 벡터를 가지고 그 사람이 제공된 조건에서 어디쯤에 속할지를 가늠하는 것이 Embedding의 역할 입니다.


여기서는 2개의 dimension을 사용했습니다. 참고로 OpenAI의 모델별 output dimensions는 아래와 같습니다. 


이제 기본적인 개념 정리는 여기까지 하고 OpenAI API에서 이 Embedding 기능을 사용하는 간단한 파이썬 예제를 보겠습니다.


우선 2번째 줄의 numpy는 python의 기본 수학 모듈입니다.  배열을 다룰 때 많이 사용됩니다. 

자세한 사항은 아래 웹사이트를 참조하세요.

https://numpy.org/


NumPy

Powerful N-dimensional arrays Fast and versatile, the NumPy vectorization, indexing, and broadcasting concepts are the de-facto standards of array computing today. Numerical computing tools NumPy offers comprehensive mathematical functions, random number g

numpy.org


https://ko.wikipedia.org/wiki/NumPy


NumPy - 위키백과, 우리 모두의 백과사전

위키백과, 우리 모두의 백과사전. NumPy("넘파이"라 읽는다)는 행렬이나 일반적으로 대규모 다차원 배열을 쉽게 처리할 수 있도록 지원하는 파이썬의 라이브러리이다. NumPy는 데이터 구조 외에도

ko.wikipedia.org


import numpy as np 는 numpy를 사용하기 위해 import 하는 것이고 이 numpy를 np 라는 이름으로 사용하겠다는 것입니다.

pprint는 pritty print의 약자로 이쁘게 프린트 해 주는 python의 메소드 입니다.


그 다음의 open_file() 함수는 반복되서 나오는 거라서 설명을 생략하겠습니다.


gpt3_embedding() 함수가 openAI의 API를 사용하기 위해 만든 함수입니다.

엔진은 text-embedding-ada-002를 사용했습니다.


2022년 12월 15일에 발표된 자료에 따르면 이 모델이 성능도 좋으며 가장 저렴한 모델이라고 소개 돼 있습니다.


https://openai.com/blog/new-and-improved-embedding-model/


New and Improved Embedding Model

We are excited to announce a new embedding model which is significantly more capable, cost effective, and simpler to use. The new model, text-embedding-ada-002, replaces five separate models for text search, text similarity, and code search, and outperform

openai.com


이 함수에서 가장 중요한 부분은 openai.Embedding.create() 입니다.

OpenAI의 embedding 기능을 사용하기 위한 API 를 호출하는 겁니다.

파라미터로는 input 과 engine 이 있습니다.

여기서 engine은 model로 사용해도 됩니다. model이 아마 최근에 바뀐 파라미터 이름인 것 같습니다.


이 함수는 content를 받아서 ASCII 형식으로 인코딩 한 값을 다시 디코드해서 content에 담습니다.

(이 부분은 따로 하지 않아도 작동 됩니다.)


이 전달받은 content를 openai.Embedding.create() 을 사용해서 OpenAI에 사용할 모델 이름과 함께 보내고 거기서 받은 값을 response 변수에 담습니다.


받은 응답 (JSON 형식) 중에 data 배열의 첫번째 항목에서 embedding  부분을 vector에 담다서 이를 리턴합니다.


그 다음 함수는 similarity인데요.

이는 두 개의 파라미터 (벡터 형식)를 받아서 numpy의 dot 메소드를 사용해서 처리한 다음에 그 값을 반환하는 겁니다.


이 메소드는 벡터의 각 element들을 곱한 값들을 더한 값을 반환합니다.


파이썬의 이 dot 메소드는 여기에서 보시면 됩니다.

https://numpy.org/doc/stable/reference/generated/numpy.dot.html


numpy.dot — NumPy v1.24 Manual

Output argument. This must have the exact kind that would be returned if it was not used. In particular, it must have the right type, must be C-contiguous, and its dtype must be the dtype that would be returned for dot(a,b). This is a performance feature.

numpy.org

그 다음 22번째 줄에서는 openai에 openaiapikey.txt 파일에 저장돼 있는 key 값을 전달하고 있습니다.

이 key 값이 valid 하면 openai api를 사용할 수 있는 권한을 가지게 됩니다.


그 다음 함수는 match_class() 함수 입니다.

이 함수는 vector와 classes라는 두 개의 파라미터를 받습니다.


아래에 보시면 알겠지만 classes 는 35번째 줄에 있는 categories 값입니다.

위에 설명했지만 openai 의 각 모델들은 수 많은 dimention을 가지고 있습니다. 

이렇게 카테고리를 설정해 주지 않으면 아주 많은 리턴값이 나오게 됩니다.

그래서 이 함수를 만든건데요. 

우선 반환값은 list() 로 할 겁니다.

그 다음 classes (categories) 에 있는 값들을 하나 하나 for loop를 돌면서 처리 합니다.

두 벡터값을 similarity() 함수로 보내서 np.dot 값을 받아 오는 것이죠.

그 반환된 값은 score에 저장이 되고 그 값은 아래 info 변수에서 활용 됩니다.

info에는 각 카테고리별로 similarity에서 받아온 score를 넣습니다.

그 값들을 전부 results에 넣게 되고 이 값을 반환하게 됩니다.


이제 함수에 대한 설명은 다 됐고 실제 이것이 어떻게 실행이 되는지 보겠습니다.


34번째 if 문은 여러번 설명한 파이썬 문법입니다. 이 파이썬 파일이 실행 됐을 경우 아래 내용들이 처리 됩니다.

다른 파이썬 파일에서 import 되면 아래 내용이 처리되지않을 겁니다.


categories = ['plant', 'reptile', 'mammal', 'fish', 'bird', 'pet', 'wild animal']


카테고리는 이렇게 7개를 정했습니다. 사용자가 입력한 값이 이 중 어느것에 가장 가까운지 알아 볼 겁니다.

여기에는 다른 값들을 추가해도 됩니다.

예를 들어 food 나 brand 뭐 이런것을 추가해도 될 겁니다. 


그 다음은 classes라는 list()를 생성했습니다.


그리고 나서 for 루프가 나오는데요. 이 for 루프는 categories에 있는 인수들 만큼 루프를 돌립니다.

첫번째로 gpt3_embedding(c) 에 각 인수를 전달해서 그 값을 vector에 담습니다.

그 다음 info 에서는 이를 category 별로 그 vector 값이 담기게 합니다.

그리고 아까 만들었든 classes라는 리스트에 이 값을 담습니다.


이러면 categories의 각 인수들 마다 gpt 3 에서 받은 벡터값이 있게 됩니다.


이 벡터값을 이제 사용하게 됩니다.


43번째 줄을 보면 while 무한 루프를 만들었습니다.

사용자로부터 계속 입력값을 받기 위함이죠.


44번째 줄은 파이썬의 input() 메소드를 사용해서 사용자로부터 입력 받은 값을 a 라는 변수에 넣는 겁니다.


이 사용자가 입력한 값의 벡터값을 gpt3-embedding() 함수를 통해서 받습니다.


이러면 우리는 입력한 값의 벡터값과 아까 설정해 두었던 categories에 있는 각 인수들의 벡터값을 갖고 있습니다.


그러면 이제 입력한 값이 categories의 각 인수들과 얼마나 유사한지 알 수 있습니다.


47번째 줄에서는 match_class() 함수로 이 두 값을 보내서 각 카테고리별로 유사성 점수가 어떤지 정리한 값을 받습니다.

그 값은 result에 담기게 되고 pprint()를 이용해서 그 값을 이쁘게 출력을 하게 됩니다.


이걸 실행해 봤습니다.


첫번째로 frog 개구리는 새일 가능성이 가장 높고 그 다음은 물고기일 가능성이 높다고 나오네요. 

그 다음 파충류일 가능성이 세번째로 높습니다.

양서류라는 보기가 없어서 그럴까요?


그 다음 sockeye는 연어의 종류인데요. 결과는 물고기일 확률이 제일 높게 나옵니다. 그 다음은 새, 그리고 음식 뭐 이런 순으로 나가네요.


그 다음은 개구리를 대문자 F를 사용해서 입력했습니다.

그러면 파충류일 가능성이 제일 높다고 나오네요.


다음 호랑이는 야생동물일 가능성이 가장 높게 나오고 그 다음은 포유류와 유사성이 높다고 나옵니다.


국수를 입력했을 때는 역시 음식이 가장 유사하고 그 다음은 물고기, 식물 뭐 이런 순으로 나옵니다.


구찌를 입력했을 때는 브랜드와 가장 유사하고 그 다음은 음식, 그 다음은 새 이렇게 나옵니다.


아까 개구리가 약간 이상하게 나와서... 보기에 양서류 (amphibians)를 추가 했습니다.


그 결과는 Frog 일 경우 양서류와 가장 유사하고 그 다음이 파충류로 나옵니다.


frog 일 경우에는 새일 가능성이 가장 높고 그 다음이 물고기 - 파충류 - 양서류 이런 순서네요.


일단 답은 100% 만족스럽지 않지만 Openai GPT 3 의 Embedding 기능에 대해서 어느 정도 감이 잡혔습니다.


참고로 이 임베딩은 아래와 같은 경우에 사용될 수 있습니다.


  • Search (where results are ranked by relevance to a query string)
  • Clustering (where text strings are grouped by similarity)
  • Recommendations (where items with related text strings are recommended)
  • Anomaly detection (where outliers with little relatedness are identified)
  • Diversity measurement (where similarity distributions are analyzed)
  • Classification (where text strings are classified by their most similar label)

전체 소스 코드는 아래에 있습니다.


import openai
import numpy as np  # standard math module for python
from pprint import pprint


def open_file(filepath):
    with open(filepath, 'r', encoding='utf-8') as infile:
        return infile.read()


def gpt3_embedding(content, model='text-embedding-ada-002'):
    content = content.encode(encoding='ASCII',errors='ignore').decode()
    response = openai.Embedding.create(input=content,model=model)
    vector = response['data'][0]['embedding']  # this is a normal list
    return vector


def similarity(v1, v2):  # return dot product of two vectors
    return np.dot(v1, v2)


openai.api_key = open_file('openaiapikey.txt')


def match_class(vector, classes):
    results = list()
    for c in classes:
        score = similarity(vector, c['vector'])
        info = {'category': c['category'], 'score': score}
        results.append(info)
    return results


if __name__ == '__main__':
    categories = ['plant', 'reptile', 'mammal', 'fish', 'bird', 'pet', 'wild animal', 'food', 'brand',  'amphibians']
    classes = list()
    for c in categories:
        vector = gpt3_embedding(c)
        info = {'category': c, 'vector': vector}
        classes.append(info)
    #print(classes)
    #exit(0)
    while True:
        a = input('Enter a lifeform here: ')
        vector = gpt3_embedding(a)
        #print(a, vector)
        result = match_class(vector, classes)
        pprint(result)

반응형

Embeddings - openai.Embedding.create()

2023. 1. 17. 01:11 | Posted by 솔웅


반응형

https://beta.openai.com/docs/api-reference/embeddings


Embeddings

Get a vector representation of a given input that can be easily consumed by machine learning models and algorithms.

기계 학습 모델 및 알고리즘에서 쉽게 사용할 수 있는 주어진 입력의 벡터 표현을 가져옵니다.


Related guide: Embeddings


Create embeddings

POST https://api.openai.com/v1/embeddings

Creates an embedding vector representing the input text.

입력 텍스트를 표현하는 embedding 벡터를 만듭니다.


Request body

model
string
Required

ID of the model to use. You can use the List models API to see all of your available models, or see our Model overview for descriptions of them.

사용할 모델의 ID입니다. 모델 목록 API를 사용하여 사용 가능한 모든 모델을 보거나 모델 개요에서 설명을 볼 수 있습니다.


input
string or array
Required

Input text to get embeddings for, encoded as a string or array of tokens. To get embeddings for multiple inputs in a single request, pass an array of strings or array of token arrays. Each input must not exceed 8192 tokens in length.

문자열 또는 토큰 배열로 인코딩된 임베딩을 가져올 입력 텍스트입니다. 단일 요청에서 여러 입력에 대한 임베딩을 가져오려면 문자열 배열 또는 토큰 배열 배열을 전달합니다. 각 입력은 길이가 8192 토큰을 초과할 수 없습니다.


user
string
Optional

A unique identifier representing your end-user, which can help OpenAI to monitor and detect abuse. Learn more.

OpenAI가 남용을 모니터링하고 탐지하는 데 도움이 될 수 있는 최종 사용자를 나타내는 고유 식별자입니다. 더 알아보기.


반응형

Guides - Embeddings

2023. 1. 10. 08:36 | Posted by 솔웅


반응형

https://beta.openai.com/docs/guides/embeddings/what-are-embeddings


OpenAI API

An API for accessing new AI models developed by OpenAI

beta.openai.com


Embeddings

What are embeddings?

OpenAI’s text embeddings measure the relatedness of text strings. Embeddings are most commonly used for:

  • Search (where results are ranked by relevance to a query string)
  • Clustering (where text strings are grouped by similarity)
  • Recommendations (where items with related text strings are recommended)
  • Anomaly detection (where outliers with little relatedness are identified)
  • Diversity measurement (where similarity distributions are analyzed)
  • Classification (where text strings are classified by their most similar label)


OpenAI의 텍스트 임베딩은 텍스트 문자열의 관련성을 측정합니다. 임베딩은 다음 용도로 가장 일반적으로 사용됩니다.
* 검색(쿼리 문자열과의 관련성에 따라 결과 순위가 매겨짐)
* 클러스터링(텍스트 문자열이 유사성에 따라 그룹화됨)
* 권장 사항(관련 텍스트 문자열이 있는 항목이 권장되는 경우)
* 이상 감지(관련성이 거의 없는 이상값이 식별되는 경우)
* 다양성 측정(유사성 분포가 분석되는 경우)
* 분류(여기서 텍스트 문자열은 가장 유사한 레이블로 분류됨)


An embedding is a vector (list) of floating point numbers. The distance between two vectors measures their relatedness. Small distances suggest high relatedness and large distances suggest low relatedness.

Visit our pricing page to learn about Embeddings pricing. Requests are billed based on the number of tokens in the input sent.


임베딩은 부동 소수점 숫자의 벡터(목록)입니다. 두 벡터 사이의 거리는 관련성을 측정합니다. 작은 거리는 높은 관련성을 나타내고 먼 거리는 낮은 관련성을 나타냅니다.
임베딩 가격에 대해 알아보려면 가격 페이지를 방문하세요. 요청은 전송된 입력의 토큰 수에 따라 요금이 청구됩니다.


To see embeddings in action, check out our code samples

  • Classification
  • Topic clustering
  • Search
  • Recommendations
Browse Samples‍


How to get embeddings

To get an embedding, send your text string to the embeddings API endpoint along with a choice of embedding model ID (e.g., text-embedding-ada-002). The response will contain an embedding, which you can extract, save, and use.


임베딩을 받으려면 임베딩 모델 ID(예: text-embedding-ada-002) 선택과 함께 텍스트 문자열을 임베딩 API 엔드포인트로 보냅니다. 응답에는 추출, 저장 및 사용할 수 있는 임베딩이 포함됩니다.


Example requests:


response = openai.Embedding.create(
    input="Your text string goes here",
    model="text-embedding-ada-002"
)
embeddings = response['data'][0]['embedding']


Example response:


{
  "data": [
    {
      "embedding": [
        -0.006929283495992422,
        -0.005336422007530928,
        ...
        -4.547132266452536e-05,
        -0.024047505110502243
      ],
      "index": 0,
      "object": "embedding"
    }
  ],
  "model": "text-embedding-ada-002",
  "object": "list",
  "usage": {
    "prompt_tokens": 5,
    "total_tokens": 5
  }
}


See more Python code examples in the OpenAI Cookbook.

When using OpenAI embeddings, please keep in mind their limitations and risks.


Embedding models

OpenAI offers one second-generation embedding model (denoted with -002 in the model ID) and sixteen first-generation models (denoted with -001 in the model ID).

We recommend using text-embedding-ada-002 for nearly all use cases. It’s better, cheaper, and simpler to use. Read the blog post announcement.


OpenAI는 1개의 2세대 임베딩 모델(모델 ID에 -002로 표시됨)과 16개의 1세대 모델(모델 ID에 -001로 표시됨)을 제공합니다.
거의 모든 사용 사례에 대해 text-embedding-ada-002를 사용하는 것이 좋습니다. 더 좋고, 더 저렴하고, 더 간단하게 사용할 수 있습니다. 블로그 게시물 공지사항을 읽어보세요.


MODEL GENERATION.  TOKENIZER.                                           MAX INPUT TOKENS.  KNOWLEDGE CUTOFF

V2 cl100k_base 8191 Sep 2021
V1 GPT-2/GPT-3 2046 Aug 2020


Usage is priced per input token, at a rate of $0.0004 per 1000 tokens, or about ~3,000 pages per US dollar (assuming ~800 tokens per page):


사용량은 입력 토큰당 1,000개 토큰당 $0.0004 또는 미국 달러당 약 3,000페이지(페이지당 800개 토큰으로 가정)의 비율로 가격이 책정됩니다.


First-generation models (not recommended)
 
1 세대 모델 (권장 하지 않음)
 

All first-generation models (those ending in -001) use the GPT-3 tokenizer and have a max input of 2046 tokens.

모든 1세대 모델(-001로 끝나는 모델)은 GPT-3 토크나이저를 사용하며 최대 입력값은 2046개입니다.


First-generation embeddings are generated by five different model families tuned for three different tasks: text search, text similarity and code search. The search models come in pairs: one for short queries and one for long documents. Each family includes up to four models on a spectrum of quality and speed:


1세대 임베딩은 텍스트 검색, 텍스트 유사성 및 코드 검색의 세 가지 작업에 맞게 조정된 다섯 가지 모델군에 의해 생성됩니다. 검색 모델은 쌍으로 제공됩니다. 하나는 짧은 쿼리용이고 다른 하나는 긴 문서용입니다. 각 제품군에는 다양한 품질과 속도에 대해 최대 4개의 모델이 포함됩니다.


MODEL                                                                                                  OUTPUT DIMENSIONS
Ada 1024
Babbage 2048
Curie 4096
Davinci 12288


Davinci is the most capable, but is slower and more expensive than the other models. Ada is the least capable, but is significantly faster and cheaper.


Davinci는 가장 유능하지만 다른 모델보다 느리고 비쌉니다. Ada는 성능이 가장 낮지만 훨씬 빠르고 저렴합니다.


Similarity embeddings

Similarity models are best at capturing semantic similarity between pieces of text.

유사성 모델은 텍스트 조각 간의 의미론적 유사성을 포착하는 데 가장 적합합니다.


USE CASES                                                                                                            AVAILABLE MODELS
Clustering, regression, anomaly detection, visualization text-similarity-ada-001
text-similarity-babbage-001
text-similarity-curie-001
text-similarity-davinci-001


Text search embeddings


Text search models help measure which long documents are most relevant to a short search query. Two models are used: one for embedding the search query and one for embedding the documents to be ranked. The document embeddings closest to the query embedding should be the most relevant.


텍스트 검색 모델은 짧은 검색 쿼리와 가장 관련성이 높은 긴 문서를 측정하는 데 도움이 됩니다. 두 가지 모델이 사용됩니다. 하나는 검색 쿼리를 포함하기 위한 것이고 다른 하나는 순위를 매길 문서를 포함하기 위한 것입니다. 쿼리 임베딩에 가장 가까운 문서 임베딩이 가장 관련성이 높아야 합니다.


USE CASES                                                                                               AVAILABLE MODELS
Search, context relevance, information retrieval text-search-ada-doc-001
text-search-ada-query-001
text-search-babbage-doc-001
text-search-babbage-query-001
text-search-curie-doc-001
text-search-curie-query-001
text-search-davinci-doc-001
text-search-davinci-query-001


Code search embeddings

Similarly to search embeddings, there are two types: one for embedding natural language search queries and one for embedding code snippets to be retrieved.

검색 임베딩과 유사하게 두 가지 유형이 있습니다. 하나는 자연어 검색 쿼리를 포함하는 것이고 다른 하나는 검색할 코드 스니펫을 포함하는 것입니다.


USE CASES                                                                           AVAILABLE MODELS
Code search and relevance code-search-ada-code-001
code-search-ada-text-001
code-search-babbage-code-001
code-search-babbage-text-001
 

With the -001 text embeddings (not -002, and not code embeddings), we suggest replacing newlines (\n) in your input with a single space, as we have seen worse results when newlines are present.

-001 텍스트 임베딩(-002 및 코드 임베딩이 아님)을 사용하는 경우 입력의 줄 바꿈(\n)을 단일 공백으로 바꾸는 것이 좋습니다. 줄 바꿈이 있을 때 더 나쁜 결과가 나타났기 때문입니다.


Collapse‍


Use cases

Here we show some representative use cases. We will use the Amazon fine-food reviews dataset for the following examples.

여기서는 몇 가지 대표적인 사용 사례를 보여줍니다. 다음 예제에서는 Amazon 고급 식품 리뷰 데이터 세트를 사용합니다.


Obtaining the embeddings

The dataset contains a total of 568,454 food reviews Amazon users left up to October 2012. We will use a subset of 1,000 most recent reviews for illustration purposes. The reviews are in English and tend to be positive or negative. Each review has a ProductId, UserId, Score, review title (Summary) and review body (Text). For example:

데이터 세트에는 2012년 10월까지 Amazon 사용자가 남긴 총 568,454개의 음식 리뷰가 포함되어 있습니다. 설명을 위해 가장 최근 리뷰 1,000개의 하위 집합을 사용합니다. 리뷰는 영어로 되어 있으며 긍정적이거나 부정적인 경향이 있습니다. 각 리뷰에는 ProductId, UserId, 점수, 리뷰 제목(요약) 및 리뷰 본문(텍스트)이 있습니다. 예를 들어:


We will combine the review summary and review text into a single combined text. The model will encode this combined text and output a single vector embedding.

리뷰 요약과 리뷰 텍스트를 하나의 결합된 텍스트로 결합합니다. 모델은 이 결합된 텍스트를 인코딩하고 단일 벡터 임베딩을 출력합니다.


Obtain_dataset.ipynb
 
def get_embedding(text, model="text-embedding-ada-002"):
   text = text.replace("\n", " ")
   return openai.Embedding.create(input = [text], model=model)['data'][0]['embedding']
 
df['ada_embedding'] = df.combined.apply(lambda x: get_embedding(x, model='text-embedding-ada-002'))
df.to_csv('output/embedded_1k_reviews.csv', index=False)
 

To load the data from a saved file, you can run the following:

저장된 파일로부터 데이터를 로드 하려면 아래를 실행하면 됩니다.


import pandas as pd
 
df = pd.read_csv('output/embedded_1k_reviews.csv')
df['ada_embedding'] = df.ada_embedding.apply(eval).apply(np.array)


Data visualization in 2D
 
Visualizing_embeddings_in_2D.ipynb

The size of the embeddings varies with the complexity of the underlying model. In order to visualize this high dimensional data we use the t-SNE algorithm to transform the data into two dimensions.

임베딩의 크기는 기본 모델의 복잡성에 따라 다릅니다. 이 고차원 데이터를 시각화하기 위해 t-SNE 알고리즘을 사용하여 데이터를 2차원으로 변환합니다.


We colour the individual reviews based on the star rating which the reviewer has given:

리뷰어가 부여한 별점에 따라 개별 리뷰에 색상을 지정합니다.

  • 1-star: red
  • 2-star: dark orange
  • 3-star: gold
  • 4-star: turquoise
  • 5-star: dark green

The visualization seems to have produced roughly 3 clusters, one of which has mostly negative reviews.

시각화는 대략 3개의 클러스터를 생성한 것으로 보이며 그 중 하나는 대부분 부정적인 리뷰를 가지고 있습니다.


import pandas as pd
from sklearn.manifold import TSNE
import matplotlib.pyplot as plt
import matplotlib
 
df = pd.read_csv('output/embedded_1k_reviews.csv')
matrix = df.ada_embedding.apply(eval).to_list()
 
# Create a t-SNE model and transform the data
tsne = TSNE(n_components=2, perplexity=15, random_state=42, init='random', learning_rate=200)
vis_dims = tsne.fit_transform(matrix)
 
colors = ["red", "darkorange", "gold", "turquiose", "darkgreen"]
x = [x for x,y in vis_dims]
y = [y for x,y in vis_dims]
color_indices = df.Score.values - 1
 
colormap = matplotlib.colors.ListedColormap(colors)
plt.scatter(x, y, c=color_indices, cmap=colormap, alpha=0.3)
plt.title("Amazon ratings visualized in language using t-SNE")


Embedding as a text feature encoder for ML algorithms
 
Regression_using_embeddings.ipynb

An embedding can be used as a general free-text feature encoder within a machine learning model. Incorporating embeddings will improve the performance of any machine learning model, if some of the relevant inputs are free text. An embedding can also be used as a categorical feature encoder within a ML model. This adds most value if the names of categorical variables are meaningful and numerous, such as job titles. Similarity embeddings generally perform better than search embeddings for this task.

임베딩은 기계 학습 모델 내에서 일반 자유 텍스트 기능 인코더로 사용할 수 있습니다. 임베딩을 통합하면 관련 입력 중 일부가 자유 텍스트인 경우 기계 학습 모델의 성능이 향상됩니다. 포함은 ML 모델 내에서 범주형 기능 인코더로 사용할 수도 있습니다. 이것은 범주형 변수의 이름이 직위와 같이 의미 있고 많은 경우 가장 큰 가치를 추가합니다. 유사성 임베딩은 일반적으로 이 작업에서 검색 임베딩보다 성능이 좋습니다.


We observed that generally the embedding representation is very rich and information dense. For example, reducing the dimensionality of the inputs using SVD or PCA, even by 10%, generally results in worse downstream performance on specific tasks.


우리는 일반적으로 임베딩 표현이 매우 풍부하고 정보 밀도가 높다는 것을 관찰했습니다. 예를 들어 SVD 또는 PCA를 사용하여 입력의 차원을 10%까지 줄이면 일반적으로 특정 작업에서 다운스트림 성능이 저하됩니다.


This code splits the data into a training set and a testing set, which will be used by the following two use cases, namely regression and classification.


이 코드는 데이터를 학습 세트와 테스트 세트로 분할하며, 회귀 및 분류라는 두 가지 사용 사례에서 사용됩니다.

from sklearn.model_selection import train_test_split
 
X_train, X_test, y_train, y_test = train_test_split(
    list(df.ada_embedding.values),
    df.Score,
    test_size = 0.2,
    random_state=42
)


Regression using the embedding features

Embeddings present an elegant way of predicting a numerical value. In this example we predict the reviewer’s star rating, based on the text of their review. Because the semantic information contained within embeddings is high, the prediction is decent even with very few reviews.

임베딩은 숫자 값을 예측하는 우아한 방법을 제공합니다. 이 예에서는 리뷰 텍스트를 기반으로 리뷰어의 별점을 예측합니다. 임베딩에 포함된 의미론적 정보가 높기 때문에 리뷰가 거의 없어도 예측이 괜찮습니다.


We assume the score is a continuous variable between 1 and 5, and allow the algorithm to predict any floating point value. The ML algorithm minimizes the distance of the predicted value to the true score, and achieves a mean absolute error of 0.39, which means that on average the prediction is off by less than half a star.


우리는 점수가 1과 5 사이의 연속 변수라고 가정하고 알고리즘이 부동 소수점 값을 예측할 수 있도록 합니다. ML 알고리즘은 예측 값과 실제 점수의 거리를 최소화하고 평균 절대 오차 0.39를 달성합니다.

 
from sklearn.ensemble import RandomForestRegressor
 
rfr = RandomForestRegressor(n_estimators=100)
rfr.fit(X_train, y_train)
preds = rfr.predict(X_test)


Classification using the embedding features
 
Classification_using_embeddings.ipynb

This time, instead of having the algorithm predict a value anywhere between 1 and 5, we will attempt to classify the exact number of stars for a review into 5 buckets, ranging from 1 to 5 stars.

이번에는 알고리즘이 1에서 5 사이의 값을 예측하는 대신 검토를 위한 정확한 별 수를 1에서 5개 범위의 5개 버킷으로 분류하려고 합니다.


After the training, the model learns to predict 1 and 5-star reviews much better than the more nuanced reviews (2-4 stars), likely due to more extreme sentiment expression.


학습 후 모델은 보다 극단적인 감정 표현으로 인해 미묘한 차이가 있는 리뷰(2~4개)보다 별 1개 및 5개 리뷰를 훨씬 더 잘 예측하는 방법을 학습합니다.


from sklearn.ensemble import RandomForestClassifier
from sklearn.metrics import classification_report, accuracy_score
 
clf = RandomForestClassifier(n_estimators=100)
clf.fit(X_train, y_train)
preds = clf.predict(X_test)
 
 
Zero-shot classification
 
Zero-shot_classification_with_embeddings.ipynb

We can use embeddings for zero shot classification without any labeled training data. For each class, we embed the class name or a short description of the class. To classify some new text in a zero-shot manner, we compare its embedding to all class embeddings and predict the class with the highest similarity.

라벨이 지정된 학습 데이터 없이 제로샷 분류에 임베딩을 사용할 수 있습니다. 각 클래스에 대해 클래스 이름 또는 클래스에 대한 간단한 설명을 포함합니다. 새로운 텍스트를 제로 샷 방식으로 분류하기 위해 임베딩을 모든 클래스 임베딩과 비교하고 유사도가 가장 높은 클래스를 예측합니다.


from openai.embeddings_utils import cosine_similarity, get_embedding
 
df= df[df.Score!=3]
df['sentiment'] = df.Score.replace({1:'negative', 2:'negative', 4:'positive', 5:'positive'})
 
labels = ['negative', 'positive']
label_embeddings = [get_embedding(label, model=model) for label in labels]
 
def label_score(review_embedding, label_embeddings):
   return cosine_similarity(review_embedding, label_embeddings[1]) - cosine_similarity(review_embedding, label_embeddings[0])
 
prediction = 'positive' if label_score('Sample Review', label_embeddings) > 0 else 'negative'


Obtaining user and product embeddings for cold-start recommendation
 
User_and_product_embeddings.ipynb

We can obtain a user embedding by averaging over all of their reviews. Similarly, we can obtain a product embedding by averaging over all the reviews about that product. In order to showcase the usefulness of this approach we use a subset of 50k reviews to cover more reviews per user and per product.

모든 리뷰를 평균하여 임베딩하는 사용자를 얻을 수 있습니다. 마찬가지로 해당 제품에 대한 모든 리뷰를 평균화하여 제품 포함을 얻을 수 있습니다. 이 접근 방식의 유용성을 보여주기 위해 50,000개 리뷰의 하위 집합을 사용하여 사용자 및 제품당 더 많은 리뷰를 다루었습니다.


We evaluate the usefulness of these embeddings on a separate test set, where we plot similarity of the user and product embedding as a function of the rating. Interestingly, based on this approach, even before the user receives the product we can predict better than random whether they would like the product.

우리는 별도의 테스트 세트에서 이러한 임베딩의 유용성을 평가합니다. 여기서 사용자와 제품 임베딩의 유사성을 등급의 함수로 표시합니다. 흥미롭게도 이 접근 방식을 기반으로 사용자가 제품을 받기 전에도 사용자가 제품을 좋아할지 무작위보다 더 잘 예측할 수 있습니다.

 
user_embeddings = df.groupby('UserId').ada_embedding.apply(np.mean)
prod_embeddings = df.groupby('ProductId').ada_embedding.apply(np.mean)


Clustering
 
Clustering.ipynb

Clustering is one way of making sense of a large volume of textual data. Embeddings are useful for this task, as they provide semantically meaningful vector representations of each text. Thus, in an unsupervised way, clustering will uncover hidden groupings in our dataset.

클러스터링은 대량의 텍스트 데이터를 이해하는 한 가지 방법입니다. 임베딩은 각 텍스트의 의미론적으로 의미 있는 벡터 표현을 제공하므로 이 작업에 유용합니다. 따라서 감독되지 않은 방식으로 클러스터링은 데이터 세트에서 숨겨진 그룹을 발견합니다.


In this example, we discover four distinct clusters: one focusing on dog food, one on negative reviews, and two on positive reviews.

이 예에서 우리는 4개의 뚜렷한 클러스터를 발견합니다. 하나는 개 사료에 초점을 맞추고, 하나는 부정적인 리뷰에 초점을 맞추고, 다른 하나는 긍정적인 리뷰에 초점을 맞춥니다.


import numpy as np
from sklearn.cluster import KMeans
 
matrix = np.vstack(df.ada_embedding.values)
n_clusters = 4
 
kmeans = KMeans(n_clusters = n_clusters, init='k-means++', random_state=42)
kmeans.fit(matrix)
df['Cluster'] = kmeans.labels_


Text search using embeddings
 
Semantic_text_search_using_embeddings.ipynb

To retrieve the most relevant documents we use the cosine similarity between the embedding vectors of the query and each document, and return the highest scored documents.

가장 관련성이 높은 문서를 검색하기 위해 쿼리와 각 문서의 임베딩 벡터 간의 코사인 유사성을 사용하고 점수가 가장 높은 문서를 반환합니다.


from openai.embeddings_utils import get_embedding, cosine_similarity
 
def search_reviews(df, product_description, n=3, pprint=True):
   embedding = get_embedding(product_description, model='text-embedding-ada-002')
   df['similarities'] = df.ada_embedding.apply(lambda x: cosine_similarity(x, embedding))
   res = df.sort_values('similarities', ascending=False).head(n)
   return res
 
res = search_reviews(df, 'delicious beans', n=3)


Code search using embeddings
 
Code_search.ipynb

Code search works similarly to embedding-based text search. We provide a method to extract Python functions from all the Python files in a given repository. Each function is then indexed by the text-embedding-ada-002 model.

코드 검색은 임베딩 기반 텍스트 검색과 유사하게 작동합니다. 주어진 리포지토리의 모든 Python 파일에서 Python 함수를 추출하는 방법을 제공합니다. 그런 다음 각 함수는 text-embedding-ada-002 모델에 의해 인덱싱됩니다.


To perform a code search, we embed the query in natural language using the same model. Then we calculate cosine similarity between the resulting query embedding and each of the function embeddings. The highest cosine similarity results are most relevant.


코드 검색을 수행하기 위해 동일한 모델을 사용하여 자연어로 쿼리를 포함합니다. 그런 다음 결과 쿼리 임베딩과 각 함수 임베딩 간의 코사인 유사성을 계산합니다. 가장 높은 코사인 유사성 결과가 가장 적합합니다.


from openai.embeddings_utils import get_embedding, cosine_similarity
 
df['code_embedding'] = df['code'].apply(lambda x: get_embedding(x, model='text-embedding-ada-002'))
 
def search_functions(df, code_query, n=3, pprint=True, n_lines=7):
   embedding = get_embedding(code_query, model='text-embedding-ada-002')
   df['similarities'] = df.code_embedding.apply(lambda x: cosine_similarity(x, embedding))
 
   res = df.sort_values('similarities', ascending=False).head(n)
   return res
res = search_functions(df, 'Completions API tests', n=3)


Recommendations using embeddings
 
Recommendation_using_embeddings.ipynb

Because shorter distances between embedding vectors represent greater similarity, embeddings can be useful for recommendation.

임베딩 벡터 사이의 거리가 짧을수록 유사성이 더 높기 때문에 임베딩은 추천에 유용할 수 있습니다.


Below, we illustrate a basic recommender. It takes in a list of strings and one 'source' string, computes their embeddings, and then returns a ranking of the strings, ranked from most similar to least similar. As a concrete example, the linked notebook below applies a version of this function to the AG news dataset (sampled down to 2,000 news article descriptions) to return the top 5 most similar articles to any given source article.

아래에서는 기본 추천자를 설명합니다. 문자열 목록과 하나의 '소스' 문자열을 가져와 임베딩을 계산한 다음 가장 유사한 항목부터 가장 유사한 항목 순으로 순위가 매겨진 문자열 순위를 반환합니다. 구체적인 예로서, 아래 링크된 노트북은 이 기능의 버전을 AG 뉴스 데이터 세트(2,000개의 뉴스 기사 설명으로 샘플링됨)에 적용하여 주어진 소스 기사와 가장 유사한 상위 5개 기사를 반환합니다.

def recommendations_from_strings(
   strings: List[str],
   index_of_source_string: int,
   model="text-embedding-ada-002",
) -> List[int]:
   """Return nearest neighbors of a given string."""

   # get embeddings for all strings
   embeddings = [embedding_from_string(string, model=model) for string in strings]
   
   # get the embedding of the source string
   query_embedding = embeddings[index_of_source_string]
   
   # get distances between the source embedding and other embeddings (function from embeddings_utils.py)
   distances = distances_from_embeddings(query_embedding, embeddings, distance_metric="cosine")
   
   # get indices of nearest neighbors (function from embeddings_utils.py)
   indices_of_nearest_neighbors = indices_of_nearest_neighbors_from_distances(distances)
   return indices_of_nearest_neighbors


Limitations & risks

Our embedding models may be unreliable or pose social risks in certain cases, and may cause harm in the absence of mitigations.

당사의 임베딩 모델은 신뢰할 수 없거나 경우에 따라 사회적 위험을 초래할 수 있으며 완화 조치가 없을 경우 해를 끼칠 수 있습니다.


Social bias

Limitation: The models encode social biases, e.g. via stereotypes or negative sentiment towards certain groups.

We found evidence of bias in our models via running the SEAT (May et al, 2019) and the Winogender (Rudinger et al, 2018) benchmarks. Together, these benchmarks consist of 7 tests that measure whether models contain implicit biases when applied to gendered names, regional names, and some stereotypes.

우리는 SEAT(May et al, 2019) 및 Winogender(Rudinger et al, 2018) 벤치마크를 실행하여 모델에서 편향의 증거를 발견했습니다. 이 벤치마크는 성별 이름, 지역 이름 및 일부 고정관념에 적용될 때 모델에 암시적 편향이 포함되어 있는지 여부를 측정하는 7가지 테스트로 구성됩니다.


For example, we found that our models more strongly associate (a) European American names with positive sentiment, when compared to African American names, and (b) negative stereotypes with black women.


예를 들어, 우리 모델은 (a) 아프리카계 미국인 이름과 비교할 때 긍정적인 정서가 있는 유럽계 미국인 이름 및 (b) 흑인 여성에 대한 부정적인 고정관념과 더 강하게 연관되어 있음을 발견했습니다.


These benchmarks are limited in several ways: (a) they may not generalize to your particular use case, and (b) they only test for a very small slice of possible social bias.


이러한 벤치마크는 다음과 같은 몇 가지 방식으로 제한됩니다. (a) 특정 사용 사례에 대해 일반화할 수 없으며 (b) 가능한 사회적 편향의 아주 작은 조각에 대해서만 테스트합니다.


These tests are preliminary, and we recommend running tests for your specific use cases. These results should be taken as evidence of the existence of the phenomenon, not a definitive characterization of it for your use case. Please see our usage policies for more details and guidance.


이러한 테스트는 예비 테스트이며 특정 사용 사례에 대한 테스트를 실행하는 것이 좋습니다. 이러한 결과는 사용 사례에 대한 결정적인 특성이 아니라 현상의 존재에 대한 증거로 간주되어야 합니다. 자세한 내용과 지침은 당사의 사용 정책을 참조하십시오.


Please reach out to embeddings@openai.com if you have any questions; we are happy to advise on this.


질문이 있는 경우 embeddings@openai.com으로 문의하십시오. 우리는 이에 대해 기꺼이 조언합니다.


English only

Limitation: Models are most reliable for mainstream English that is typically found on the Internet. Our models may perform poorly on regional or group dialects.


Researchers have found (Blodgett & O’Connor, 2017) that common NLP systems don’t perform as well on African American English as they do on mainstream American English. Our models may similarly perform poorly on dialects or uses of English that are not well represented on the Internet.


연구자들은 (Blodgett & O'Connor, 2017) 일반적인 NLP 시스템이 주류 미국 영어에서처럼 아프리카계 미국인 영어에서 잘 수행되지 않는다는 사실을 발견했습니다. 우리의 모델은 인터넷에서 잘 표현되지 않는 방언이나 영어 사용에 대해 제대로 작동하지 않을 수 있습니다.


Blindness to recent events

Limitation: Models lack knowledge of events that occurred after August 2020.

Our models are trained on datasets that contain some information about real world events up until 8/2020. If you rely on the models representing recent events, then they may not perform well.

우리 모델은 2020년 8월까지 실제 이벤트에 대한 일부 정보가 포함된 데이터 세트에서 학습됩니다. 최근 이벤트를 나타내는 모델에 의존하는 경우 성능이 좋지 않을 수 있습니다.


Frequently asked questions

How can I tell how many tokens a string will have before I embed it?

For second-generation embedding models, as of Dec 2022, there is not yet a way to count tokens locally. The only way to get total token counts is to submit an API request.

2세대 임베딩 모델의 경우 2022년 12월 현재 로컬에서 토큰을 계산하는 방법이 아직 없습니다. 총 토큰 수를 얻는 유일한 방법은 API 요청을 제출하는 것입니다.


  • If the request succeeds, you can extract the number of tokens from the response: response[“usage”][“total_tokens”]
  • If the request fails for having too many tokens, you can extract the number of tokens from the error message: e.g., This model's maximum context length is 8191 tokens, however you requested 10000 tokens (10000 in your prompt; 0 for the completion). Please reduce your prompt; or completion length.

* 요청이 성공하면 응답에서 토큰 수를 추출할 수 있습니다. response[“usage”][“total_tokens”]
* 토큰이 너무 많아 요청이 실패하는 경우 오류 메시지에서 토큰 수를 추출할 수 있습니다. 예: 이 모델의 최대 컨텍스트 길이는 8191 토큰이지만 10000 토큰을 요청했습니다(프롬프트에서 10000, 완료를 위해 0). 프롬프트를 줄이십시오. 또는 완료 길이.


For first-generation embedding models, which are based on GPT-2/GPT-3 tokenization, you can count tokens in a few ways:

GPT-2/GPT-3 토큰화를 기반으로 하는 1세대 임베딩 모델의 경우 몇 가지 방법으로 토큰을 계산할 수 있습니다.

* 일회성 확인의 경우 OpenAI 토크나이저 페이지가 편리합니다.
* Python에서 transformers.GPT2TokenizerFast(GPT-2 토크나이저는 GPT-3과 동일함)
* JavaScript에서 gpt-3-encoder

Python example:


from transformers import GPT2TokenizerFast

def num_tokens_from_string(string: str, tokenizer) -> int:
    return len(tokenizer.encode(string))

string = "your text here"
tokenizer = GPT2TokenizerFast.from_pretrained("gpt2")

num_tokens_from_string(string, tokenizer)


How can I retrieve K nearest embedding vectors quickly?

For searching over many vectors quickly, we recommend using a vector database.

많은 벡터를 빠르게 검색하려면 벡터 데이터베이스를 사용하는 것이 좋습니다.


Vector database options include:

  • Pinecone, a fully managed vector database
  • Weaviate, an open-source vector search engine
  • Faiss, a vector search algorithm by Facebook
  •  

Which distance function should I use?

We recommend cosine similarity. The choice of distance function typically doesn’t matter much.

코사인 유사성을 권장합니다. 거리 함수의 선택은 일반적으로 그다지 중요하지 않습니다.


OpenAI embeddings are normalized to length 1, which means that:

  • Cosine similarity can be computed slightly faster using just a dot product
  • Cosine similarity and Euclidean distance will result in the identical rankings

OpenAI 임베딩은 길이 1로 정규화되며 이는 다음을 의미합니다.

* 코사인 유사도는 내적만 사용하여 약간 더 빠르게 계산할 수 있습니다.
* 코사인 유사성과 유클리드 거리는 동일한 순위가 됩니다.

반응형

'Open AI > GUIDES' 카테고리의 다른 글

Guide - Rate limits  (0) 2023.03.05
Guide - Speech to text  (0) 2023.03.05
Guide - Chat completion (ChatGPT API)  (0) 2023.03.05
Guides - Production Best Practices  (0) 2023.01.10
Guides - Safety best practices  (0) 2023.01.10
Guides - Moderation  (0) 2023.01.10
Guides - Fine tuning  (0) 2023.01.10
Guide - Image generation  (0) 2023.01.09
Guide - Code completion  (0) 2023.01.09
Guide - Text completion  (0) 2023.01.09
이전 1 다음